Questo contenuto non è disponibile nella lingua selezionata.
Chapter 38. Implementing a Component
Abstract
This chapter provides a general overview of the approaches can be used to implement a Apache Camel component.
38.1. Component Architecture
38.1.1. Factory Patterns for a Component
Overview
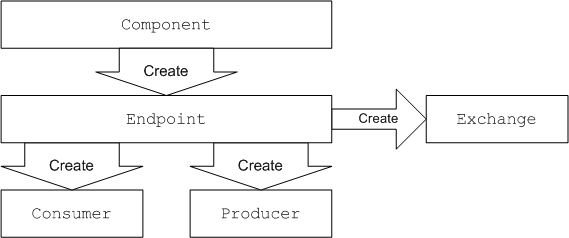
An Apache Camel component consists of a set of classes that are related to each other through a factory pattern. The primary entry point to a component is the Component object itself (an instance of org.apache.camel.Component type). You can use the Component object as a factory to create Endpoint objects, which in turn act as factories for creating Consumer, Producer, and Exchange objects. These relationships are summarized in Figure 38.1, “Component Factory Patterns”
Figure 38.1. Component Factory Patterns
Component
A component implementation is an endpoint factory. The main task of a component implementor is to implement the Component.createEndpoint() method, which is responsible for creating new endpoints on demand.
Each kind of component must be associated with a component prefix that appears in an endpoint URI. For example, the file component is usually associated with the file prefix, which can be used in an endpoint URI like file://tmp/messages/input. When you install a new component in Apache Camel, you must define the association between a particular component prefix and the name of the class that implements the component.
Endpoint
Each endpoint instance encapsulates a particular endpoint URI. Every time Apache Camel encounters a new endpoint URI, it creates a new endpoint instance. An endpoint object is also a factory for creating consumer endpoints and producer endpoints.
Endpoints must implement the org.apache.camel.Endpoint interface. The Endpoint interface defines the following factory methods:
-
createConsumer()andcreatePollingConsumer()— Creates a consumer endpoint, which represents the source endpoint at the beginning of a route. -
createProducer()— Creates a producer endpoint, which represents the target endpoint at the end of a route. -
createExchange()— Creates an exchange object, which encapsulates the messages passed up and down the route.
Consumer
Consumer endpoints consume requests. They always appear at the start of a route and they encapsulate the code responsible for receiving incoming requests and dispatching outgoing replies. From a service-oriented perspective a consumer represents a service.
Consumers must implement the org.apache.camel.Consumer interface. There are a number of different patterns you can follow when implementing a consumer. These patterns are described in Section 38.1.3, “Consumer Patterns and Threading”.
Producer
Producer endpoints produce requests. They always appears at the end of a route and they encapsulate the code responsible for dispatching outgoing requests and receiving incoming replies. From a service-oriented perspective a producer represents a service consumer.
Producers must implement the org.apache.camel.Producer interface. You can optionally implement the producer to support an asynchronous style of processing. See Section 38.1.4, “Asynchronous Processing” for details.
Exchange
Exchange objects encapsulate a related set of messages. For example, one kind of message exchange is a synchronous invocation, which consists of a request message and its related reply.
Exchanges must implement the org.apache.camel.Exchange interface. The default implementation, DefaultExchange, is sufficient for many component implementations. However, if you want to associated extra data with the exchanges or have the exchanges preform additional processing, it can be useful to customize the exchange implementation.
Message
There are two different message slots in an Exchange object:
- In message — holds the current message.
- Out message — temporarily holds a reply message.
All of the message types are represented by the same Java object, org.apache.camel.Message. It is not always necessary to customize the message implementation — the default implementation, DefaultMessage, is usually adequate.
38.1.2. Using a Component in a Route
Overview
A Apache Camel route is essentially a pipeline of processors, of org.apache.camel.Processor type. Messages are encapsulated in an exchange object, E, which gets passed from node to node by invoking the process() method. The architecture of the processor pipeline is illustrated in Figure 38.2, “Consumer and Producer Instances in a Route”.
Figure 38.2. Consumer and Producer Instances in a Route
Source endpoint
At the start of the route, you have the source endpoint, which is represented by an org.apache.camel.Consumer object. The source endpoint is responsible for accepting incoming request messages and dispatching replies. When constructing the route, Apache Camel creates the appropriate Consumer type based on the component prefix from the endpoint URI, as described in Section 38.1.1, “Factory Patterns for a Component”.
Processors
Each intermediate node in the pipeline is represented by a processor object (implementing the org.apache.camel.Processor interface). You can insert either standard processors (for example, filter, throttler, or delayer) or insert your own custom processor implementations.
Target endpoint
At the end of the route is the target endpoint, which is represented by an org.apache.camel.Producer object. Because it comes at the end of a processor pipeline, the producer is also a processor object (implementing the org.apache.camel.Processor interface). The target endpoint is responsible for sending outgoing request messages and receiving incoming replies. When constructing the route, Apache Camel creates the appropriate Producer type based on the component prefix from the endpoint URI.
38.1.3. Consumer Patterns and Threading
Overview
The pattern used to implement the consumer determines the threading model used in processing the incoming exchanges. Consumers can be implemented using one of the following patterns:
- Event-driven pattern — The consumer is driven by an external thread.
- Scheduled poll pattern — The consumer is driven by a dedicated thread pool.
- Polling pattern — The threading model is left undefined.
Event-driven pattern
In the event-driven pattern, the processing of an incoming request is initiated when another part of the application (typically a third-party library) calls a method implemented by the consumer. A good example of an event-driven consumer is the Apache Camel JMX component, where events are initiated by the JMX library. The JMX library calls the handleNotification() method to initiate request processing — see Example 41.4, “JMXConsumer Implementation” for details.
Figure 38.3, “Event-Driven Consumer” shows an outline of the event-driven consumer pattern. In this example, it is assumed that processing is triggered by a call to the notify() method.
Figure 38.3. Event-Driven Consumer
The event-driven consumer processes incoming requests as follows:
The consumer must implement a method to receive the incoming event (in Figure 38.3, “Event-Driven Consumer” this is represented by the
notify()method). The thread that callsnotify()is normally a separate part of the application, so the consumer’s threading policy is externally driven.For example, in the case of the JMX consumer implementation, the consumer implements the
NotificationListener.handleNotification()method to receive notifications from JMX. The threads that drive the consumer processing are created within the JMX layer.-
In the body of the
notify()method, the consumer first converts the incoming event into an exchange object,E, and then callsprocess()on the next processor in the route, passing the exchange object as its argument.
Scheduled poll pattern
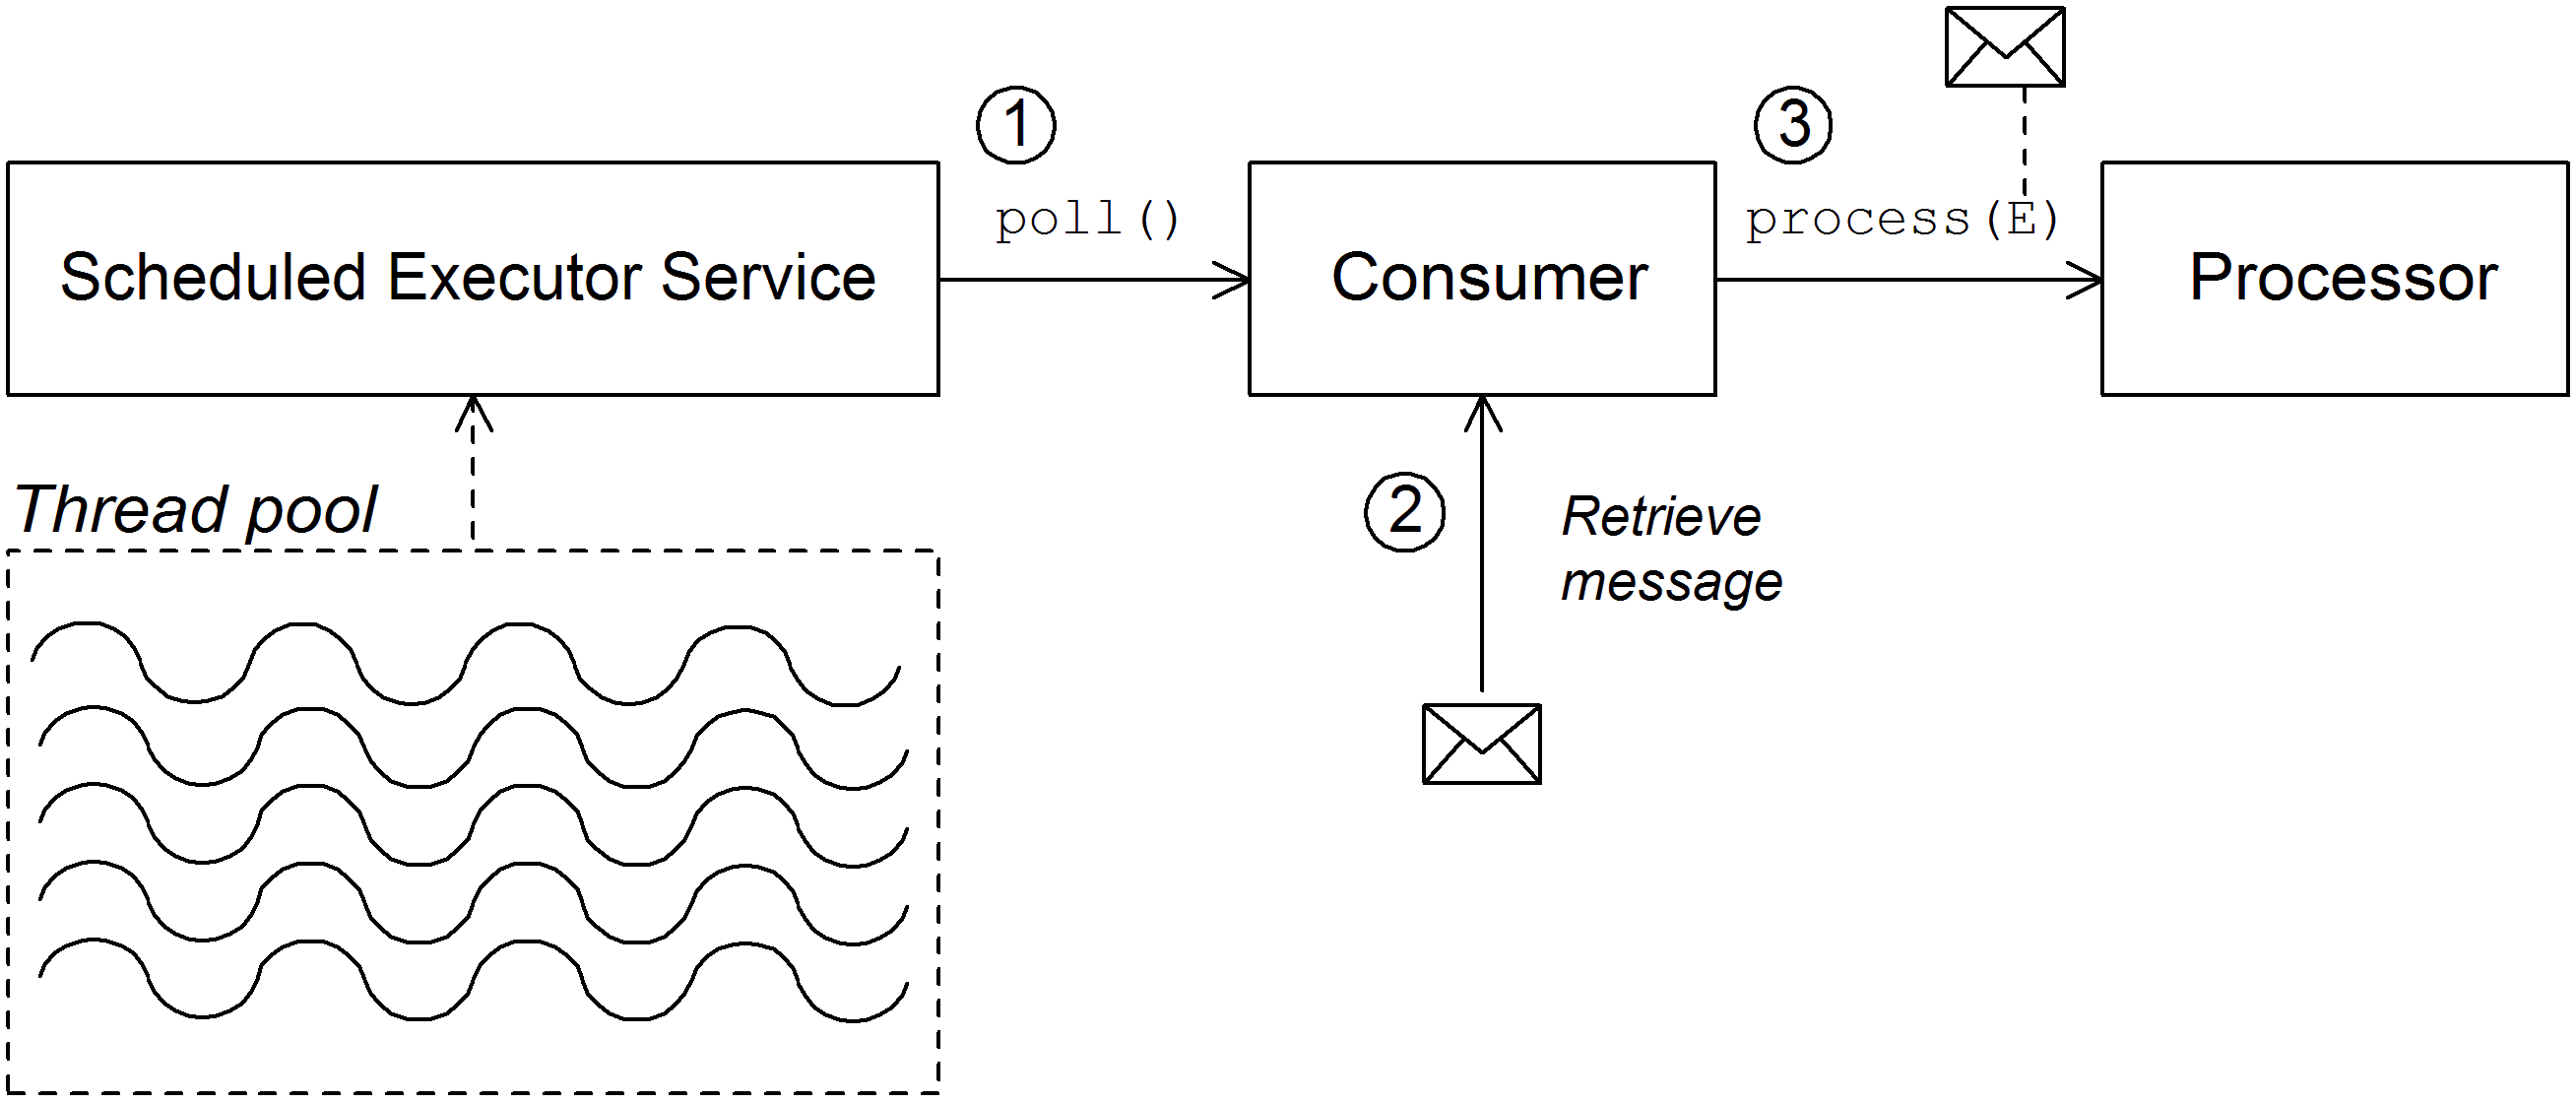
In the scheduled poll pattern, the consumer retrieves incoming requests by checking at regular time intervals whether or not a request has arrived. Checking for requests is scheduled automatically by a built-in timer class, the scheduled executor service, which is a standard pattern provided by the java.util.concurrent library. The scheduled executor service executes a particular task at timed intervals and it also manages a pool of threads, which are used to run the task instances.
Figure 38.4, “Scheduled Poll Consumer” shows an outline of the scheduled poll consumer pattern.
Figure 38.4. Scheduled Poll Consumer
The scheduled poll consumer processes incoming requests as follows:
-
The scheduled executor service has a pool of threads at its disposal, that can be used to initiate consumer processing. After each scheduled time interval has elapsed, the scheduled executor service attempts to grab a free thread from its pool (there are five threads in the pool by default). If a free thread is available, it uses that thread to call the
poll()method on the consumer. -
The consumer’s
poll()method is intended to trigger processing of an incoming request. In the body of thepoll()method, the consumer attempts to retrieve an incoming message. If no request is available, thepoll()method returns immediately. -
If a request message is available, the consumer inserts it into an exchange object and then calls
process()on the next processor in the route, passing the exchange object as its argument.
Polling pattern
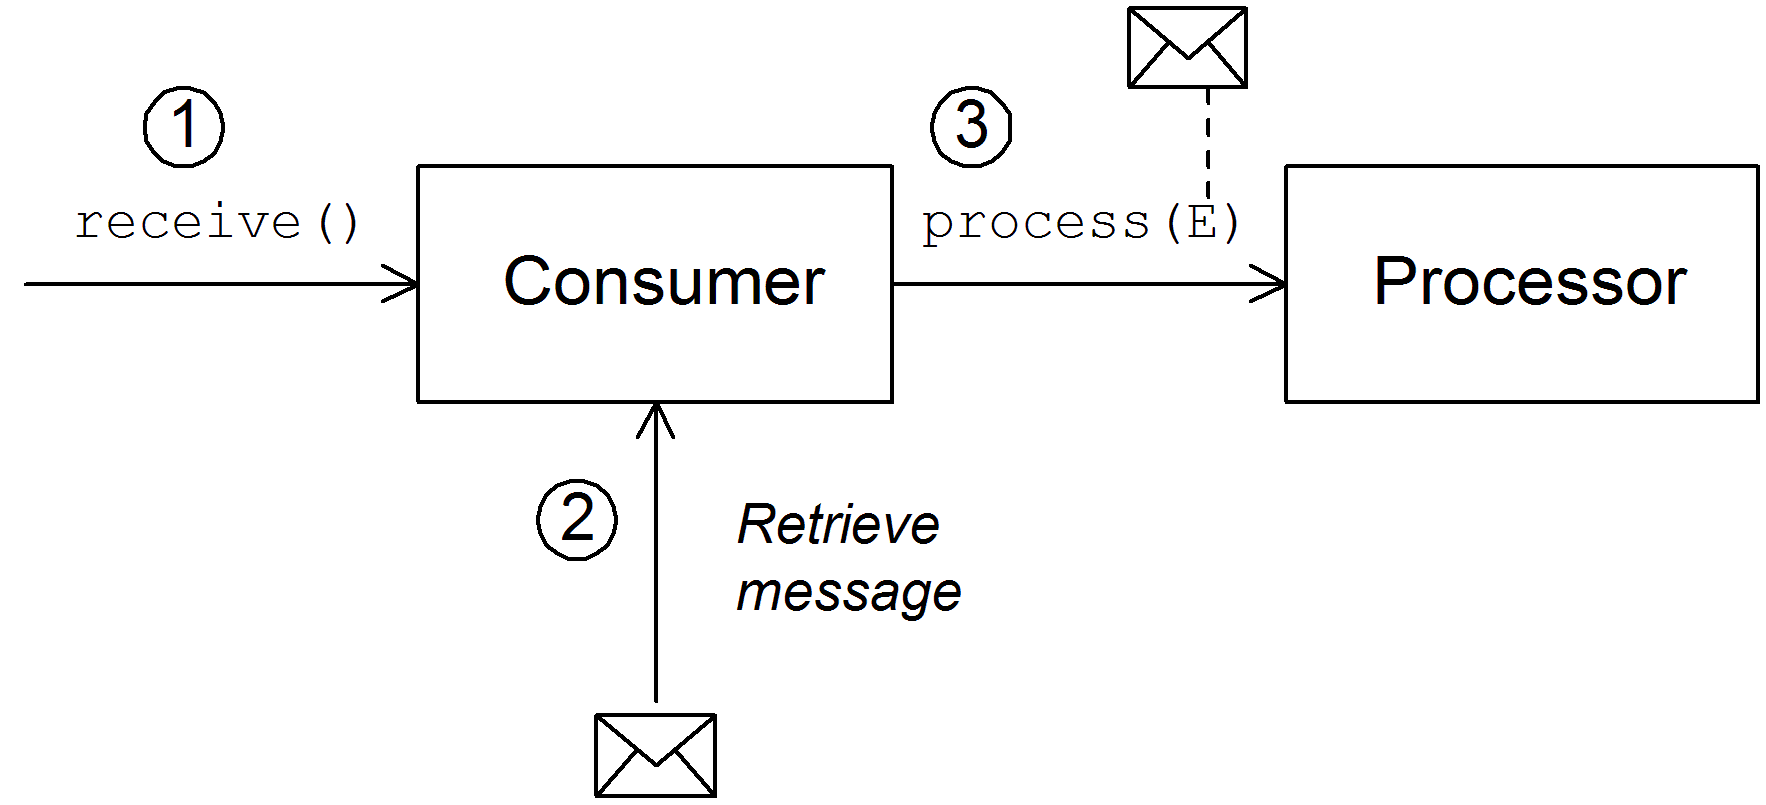
In the polling pattern, processing of an incoming request is initiated when a third-party calls one of the consumer’s polling methods:
-
receive() -
receiveNoWait() -
receive(long timeout)
It is up to the component implementation to define the precise mechanism for initiating calls on the polling methods. This mechanism is not specified in the polling pattern.
Figure 38.5, “Polling Consumer” shows an outline of the polling consumer pattern.
Figure 38.5. Polling Consumer
The polling consumer processes incoming requests as follows:
- Processing of an incoming request is initiated whenever one of the consumer’s polling methods is called. The mechanism for calling these polling methods is defined by the component implementation.
In the body of the
receive()method, the consumer attempts to retrieve an incoming request message. If no message is currently available, the behavior depends on which receive method was called.-
receiveNoWait()returns immediately -
receive(long timeout)waits for the specified timeout interval[2] before returning -
receive()waits until a message is received
-
-
If a request message is available, the consumer inserts it into an exchange object and then calls
process()on the next processor in the route, passing the exchange object as its argument.
38.1.4. Asynchronous Processing
Overview
Producer endpoints normally follow a synchronous pattern when processing an exchange. When the preceding processor in a pipeline calls process() on a producer, the process() method blocks until a reply is received. In this case, the processor’s thread remains blocked until the producer has completed the cycle of sending the request and receiving the reply.
Sometimes, however, you might prefer to decouple the preceding processor from the producer, so that the processor’s thread is released immediately and the process() call does not block. In this case, you should implement the producer using an asynchronous pattern, which gives the preceding processor the option of invoking a non-blocking version of the process() method.
To give you an overview of the different implementation options, this section describes both the synchronous and the asynchronous patterns for implementing a producer endpoint.
Synchronous producer
Figure 38.6, “Synchronous Producer” shows an outline of a synchronous producer, where the preceding processor blocks until the producer has finished processing the exchange.
Figure 38.6. Synchronous Producer
The synchronous producer processes an exchange as follows:
-
The preceding processor in the pipeline calls the synchronous
process()method on the producer to initiate synchronous processing. The synchronousprocess()method takes a single exchange argument. -
In the body of the
process()method, the producer sends the request (In message) to the endpoint. -
If required by the exchange pattern, the producer waits for the reply (Out message) to arrive from the endpoint. This step can cause the
process()method to block indefinitely. However, if the exchange pattern does not mandate a reply, theprocess()method can return immediately after sending the request. -
When the
process()method returns, the exchange object contains the reply from the synchronous call (an Out message message).
Asynchronous producer
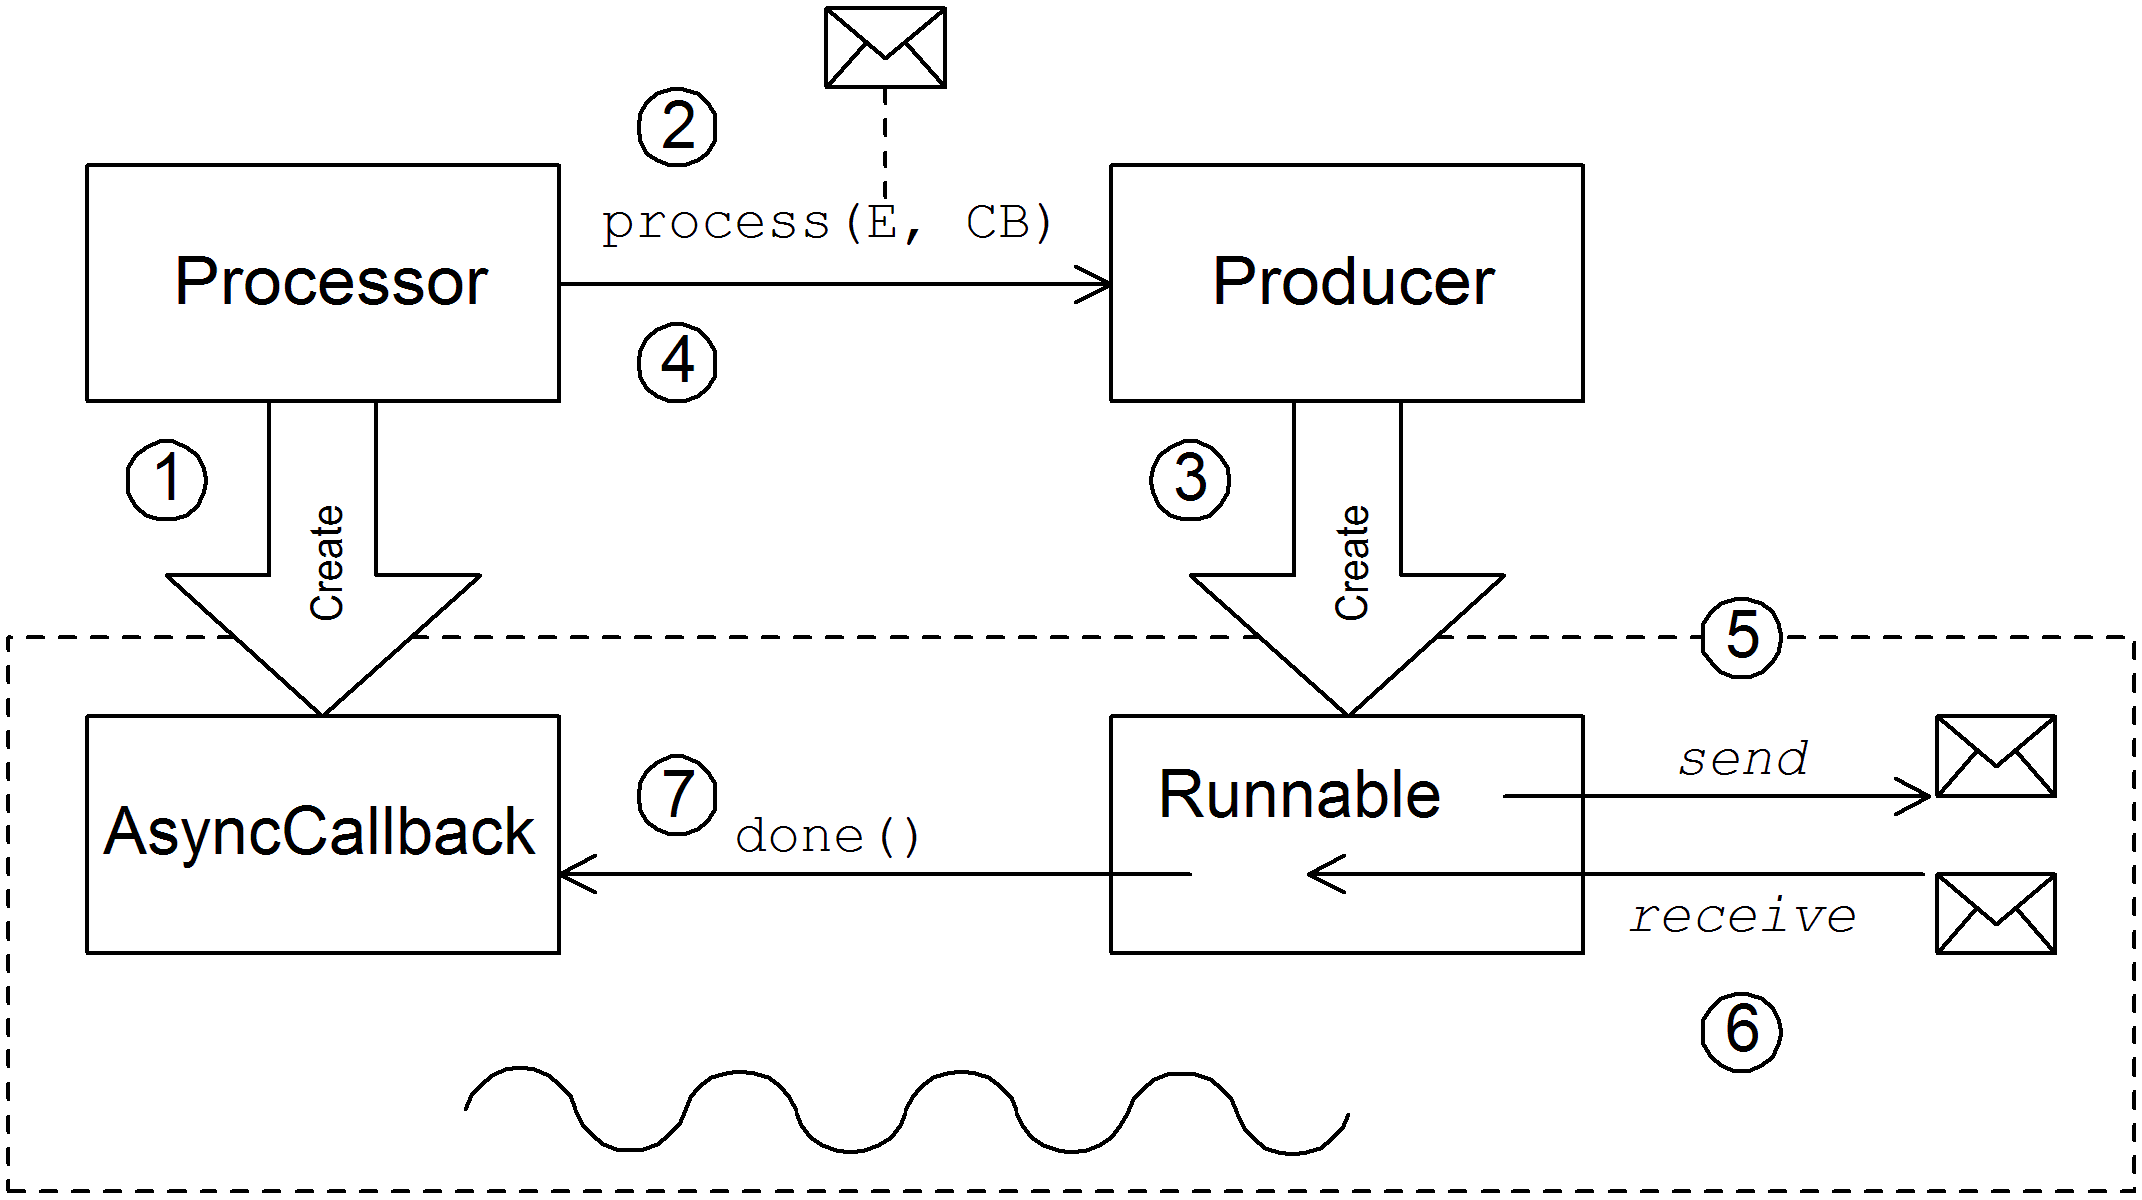
Figure 38.7, “Asynchronous Producer” shows an outline of an asynchronous producer, where the producer processes the exchange in a sub-thread, and the preceding processor is not blocked for any significant length of time.
Figure 38.7. Asynchronous Producer
The asynchronous producer processes an exchange as follows:
-
Before the processor can call the asynchronous
process()method, it must create an asynchronous callback object, which is responsible for processing the exchange on the return portion of the route. For the asynchronous callback, the processor must implement a class that inherits from the AsyncCallback interface. The processor calls the asynchronous
process()method on the producer to initiate asynchronous processing. The asynchronousprocess()method takes two arguments:- an exchange object
- a synchronous callback object
-
In the body of the
process()method, the producer creates aRunnableobject that encapsulates the processing code. The producer then delegates the execution of thisRunnableobject to a sub-thread. -
The asynchronous
process()method returns, thereby freeing up the processor’s thread. The exchange processing continues in a separate sub-thread. -
The
Runnableobject sends the In message to the endpoint. -
If required by the exchange pattern, the
Runnableobject waits for the reply (Out or Fault message) to arrive from the endpoint. TheRunnableobject remains blocked until the reply is received. -
After the reply arrives, the
Runnableobject inserts the reply (Out message) into the exchange object and then callsdone()on the asynchronous callback object. The asynchronous callback is then responsible for processing the reply message (executed in the sub-thread).
38.2. How to Implement a Component
Overview
This section gives a brief overview of the steps required to implement a custom Apache Camel component.
Which interfaces do you need to implement?
When implementing a component, it is usually necessary to implement the following Java interfaces:
- org.apache.camel.Component
- org.apache.camel.Endpoint
- org.apache.camel.Consumer
- org.apache.camel.Producer
In addition, it can also be necessary to implement the following Java interfaces:
- org.apache.camel.Exchange
- org.apache.camel.Message
Implementation steps
You typically implement a custom component as follows:
Implement the Component interface — A component object acts as an endpoint factory. You extend the
DefaultComponentclass and implement thecreateEndpoint()method.Implement the Endpoint interface — An endpoint represents a resource identified by a specific URI. The approach taken when implementing an endpoint depends on whether the consumers follow an event-driven pattern, a scheduled poll pattern, or a polling pattern. For an event-driven pattern, implement the endpoint by extending the
DefaultEndpointclass and implementing the following methods:-
createProducer() createConsumer()For a scheduled poll pattern, implement the endpoint by extending the
ScheduledPollEndpointclass and implementing the following methods:-
createProducer() createConsumer()For a polling pattern, implement the endpoint by extending the
DefaultPollingEndpointclass and implementing the following methods:-
createProducer() createPollConsumer()
-
Implement the Consumer interface — There are several different approaches you can take to implementing a consumer, depending on which pattern you need to implement (event-driven, scheduled poll, or polling). The consumer implementation is also crucially important for determining the threading model used for processing a message exchange.
Implement the Producer interface — To implement a producer, you extend the
DefaultProducerclass and implement theprocess()method.Optionally implement the Exchange or the Message interface — The default implementations of Exchange and Message can be used directly, but occasionally, you might find it necessary to customize these types.
See Chapter 43, Exchange Interface and Chapter 44, Message Interface.
Installing and configuring the component
You can install a custom component in one of the following ways:
-
Add the component directly to the CamelContext — The
CamelContext.addComponent()method adds a component programatically. -
Add the component using Spring configuration — The standard Spring
beanelement creates a component instance. The bean’sidattribute implicitly defines the component prefix. For details, see Section 38.3.2, “Configuring a Component”. - Configure Apache Camel to auto-discover the component — Auto-discovery, ensures that Apache Camel automatically loads the component on demand. For details, see Section 38.3.1, “Setting Up Auto-Discovery”.
38.3. Auto-Discovery and Configuration
38.3.1. Setting Up Auto-Discovery
Overview
Auto-discovery is a mechanism that enables you to dynamically add components to your Apache Camel application. The component URI prefix is used as a key to load components on demand. For example, if Apache Camel encounters the endpoint URI, activemq://MyQName, and the ActiveMQ endpoint is not yet loaded, Apache Camel searches for the component identified by the activemq prefix and dynamically loads the component.
Availability of component classes
Before configuring auto-discovery, you must ensure that your custom component classes are accessible from your current classpath. Typically, you bundle the custom component classes into a JAR file, and add the JAR file to your classpath.
Configuring auto-discovery
To enable auto-discovery of your component, create a Java properties file named after the component prefix, component-prefix, and store that file in the following location:
/META-INF/services/org/apache/camel/component/component-prefix
/META-INF/services/org/apache/camel/component/component-prefixThe component-prefix properties file must contain the following property setting:
class=component-class-name
class=component-class-nameWhere component-class-name is the fully-qualified name of your custom component class. You can also define additional system property settings in this file.
Example
For example, you can enable auto-discovery for the Apache Camel FTP component by creating the following Java properties file:
/META-INF/services/org/apache/camel/component/ftp
/META-INF/services/org/apache/camel/component/ftpWhich contains the following Java property setting:
class=org.apache.camel.component.file.remote.RemoteFileComponent
class=org.apache.camel.component.file.remote.RemoteFileComponent
The Java properties file for the FTP component is already defined in the JAR file, camel-ftp-Version.jar.
38.3.2. Configuring a Component
Overview
You can add a component by configuring it in the Apache Camel Spring configuration file, META-INF/spring/camel-context.xml. To find the component, the component’s URI prefix is matched against the ID attribute of a bean element in the Spring configuration. If the component prefix matches a bean element ID, Apache Camel instantiates the referenced class and injects the properties specified in the Spring configuration.
This mechanism has priority over auto-discovery. If the CamelContext finds a Spring bean with the requisite ID, it will not attempt to find the component using auto-discovery.
Define bean properties on your component class
If there are any properties that you want to inject into your component class, define them as bean properties. For example:
The getProperty() method and the setProperty() method access the value of property.
Configure the component in Spring
To configure a component in Spring, edit the configuration file, META-INF/spring/camel-context.xml, as shown in Example 38.1, “Configuring a Component in Spring”.
Example 38.1. Configuring a Component in Spring
The bean element with ID component-prefix configures the component-class-name component. You can inject properties into the component instance using property elements. For example, the property element in the preceding example would inject the value, propertyValue, into the property property by calling setProperty() on the component.
Examples
Example 38.2, “JMS Component Spring Configuration” shows an example of how to configure the Apache Camel’s JMS component by defining a bean element with ID equal to jms. These settings are added to the Spring configuration file, camel-context.xml.
Example 38.2. JMS Component Spring Configuration
- 1
- The
CamelContextautomatically instantiates anyRouteBuilderclasses that it finds in the specified Java package, org.apache.camel.example.spring. - 2
- The bean element with ID,
jms, configures the JMS component. The bean ID corresponds to the component’s URI prefix. For example, if a route specifies an endpoint with the URI, jms://MyQName, Apache Camel automatically loads the JMS component using the settings from thejmsbean element. - 3
- JMS is just a wrapper for a messaging service. You must specify the concrete implementation of the messaging system by setting the
connectionFactoryproperty on theJmsComponentclass. - 4
- In this example, the concrete implementation of the JMS messaging service is Apache ActiveMQ. The
brokerURLproperty initializes a connection to an ActiveMQ broker instance, where the message broker is embedded in the local Java virtual machine (JVM). If a broker is not already present in the JVM, ActiveMQ will instantiate it with the optionsbroker.persistent=false(the broker does not persist messages) andbroker.useJmx=false(the broker does not open a JMX port).


