第2章 チュートリアル
次のチュートリアルでは、JPDL で基本的な プロセス構造 を使用する方法を説明します。このチュートリアルでは、アプリケーションプログラミングインターフェイスを介してランタイム実行を管理する方法も示します。
このチュートリアルの例は、
src/java.examples サブディレクトリーにある JBPM ダウンロードパッケージにあります。
注記
この時点でプロジェクトを作成することを推奨します。そうすることで、各例を自由に試したり、バリエーションを作成したりできます。
まず、JBPM をダウンロードしてインストールします。
jBPM には、例に示されている XML を作成するためのグラフィカルデザイナーツールが含まれています。グラフィカルデザイナーのダウンロード手順は、「ダウンロード可能なリソースの概要」セクションを参照してください。このチュートリアルを完了するためにグラフィカルデザイナーツールは必要ありません。
2.1. "Hello World" の例
リンクのコピーリンクがクリップボードにコピーされました!
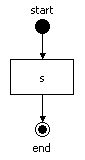
プロセス定義 は、ノードと遷移で構成される 有向グラフ です。
Hello World プロセス定義には、以下のノードが 3 つあります。(デザイナーツールl を使用せずにこの単純なプロセスを調べて、その仕組みを学習することをお勧めします。) 次の図は、Hello World プロセスをグラフィカルに表現したものです。
図2.1 Hello World プロセスの図
public void testHelloWorldProcess() {
  // This method shows a process definition and one execution
  // of the process definition.  The process definition has
  // 3 nodes: an unnamed start-state, a state 's' and an
  // end-state named 'end'.
  // The next line parses a piece of xml text into a
  // ProcessDefinition.  A ProcessDefinition is the formal
  // description of a process represented as a java object.
  ProcessDefinition processDefinition = ProcessDefinition.parseXmlString(
      "<process-definition>" +
      "  <start-state>" +
      "    <transition to='s' />" +
      "  </start-state>" +
      "  <state name='s'>" +
      "    <transition to='end' />" +
      "  </state>" +
      "  <end-state name='end' />" +
      "</process-definition>"
  );

    // The next line creates one execution of the process definition.
    // After construction, the process execution has one main path
    // of execution (=the root token) that is positioned in the
    // start-state.
    ProcessInstance processInstance =
      new ProcessInstance(processDefinition);

    // After construction, the process execution has one main path
    // of execution (=the root token).
    Token token = processInstance.getRootToken();

    // Also after construction, the main path of execution is positioned
    // in the start-state of the process definition.
    assertSame(processDefinition.getStartState(), token.getNode());

    // Let's start the process execution, leaving the start-state
    // over its default transition.
    token.signal();
    // The signal method will block until the process execution
    // enters a wait state.

    // The process execution will have entered the first wait state
    // in state 's'. So the main path of execution is now
    // positioned in state 's'
    assertSame(processDefinition.getNode("s"), token.getNode());

    // Let's send another signal.  This will resume execution by
    // leaving the state 's' over its default transition.
    token.signal();
    // Now the signal method returned because the process instance
    // has arrived in the end-state.

    assertSame(processDefinition.getNode("end"), token.getNode());
}
2.2. データベースの例
リンクのコピーリンクがクリップボードにコピーされました!
jBPM の基本的な機能の 1 つに、データベースプロセスが
待機状態 の間、データベースプロセスの実行を永続化する機能があります。次の例は、この機能を示しており、jBPM データベースにプロセスインスタンスを保存しています。
これは、ユーザーコードのさまざまな部分に対して個別の
メソッド を作成することによって機能します。たとえば、Web アプリケーション内のユーザーコードの一部がプロセスを起動し、データベース内で実行を "永続化" します。その後、メッセージ駆動型 Bean がそのプロセスインスタンスをロードし、その実行を再開します。
ここでは、ユーザーコードのさまざまな部分に対して個別の
メソッド が作成されます。たとえば、Web アプリケーションのコードがプロセスを起動し、データベース内で実行を "永続化" します。その後、メッセージ駆動型 Bean プロセスインスタンスをロードし、その実行を再開します。
注記
jBPM の永続性に関する詳細は、4章 永続性 を参照してください。
public class HelloWorldDbTest extends TestCase {

  static JbpmConfiguration jbpmConfiguration = null;

  static {
    // An example configuration file such as this can be found in
    // 'src/config.files'.  Typically the configuration information
    // is in the resource file 'jbpm.cfg.xml', but here we pass in
    // the configuration information as an XML string.

    // First we create a JbpmConfiguration statically.  One
    // JbpmConfiguration can be used for all threads in the system,
    // that is why we can safely make it static.

    jbpmConfiguration = JbpmConfiguration.parseXmlString(
      "<jbpm-configuration>" +

      // A jbpm-context mechanism separates the jbpm core
      // engine from the services that jbpm uses from
      // the environment.

      "<jbpm-context>"+
      "<service name='persistence' "+
      " factory='org.jbpm.persistence.db.DbPersistenceServiceFactory' />" +
      "</jbpm-context>"+

      // Also all the resource files that are used by jbpm are
      // referenced from the jbpm.cfg.xml

      "<string name='resource.hibernate.cfg.xml' " +
      "  value='hibernate.cfg.xml' />" +
      "<string name='resource.business.calendar' " +
      "  value='org/jbpm/calendar/jbpm.business.calendar.properties' />" +
      "<string name='resource.default.modules' " +
      "  value='org/jbpm/graph/def/jbpm.default.modules.properties' />" +
      "<string name='resource.converter' " +
      "  value='org/jbpm/db/hibernate/jbpm.converter.properties' />" +
      "<string name='resource.action.types' " +
      "  value='org/jbpm/graph/action/action.types.xml' />" +
      "<string name='resource.node.types' " +
      "  value='org/jbpm/graph/node/node.types.xml' />" +
      "<string name='resource.varmapping' " +
      "  value='org/jbpm/context/exe/jbpm.varmapping.xml' />" +
      "</jbpm-configuration>"
    );
  }

  public void setUp() {
    jbpmConfiguration.createSchema();
  }

  public void tearDown() {
    jbpmConfiguration.dropSchema();
  }

  public void testSimplePersistence() {
    // Between the 3 method calls below, all data is passed via the
    // database.  Here, in this unit test, these 3 methods are executed
    // right after each other because we want to test a complete process
    // scenario.  But in reality, these methods represent different
    // requests to a server.

    // Since we start with a clean, empty in-memory database, we have to
    // deploy the process first.  In reality, this is done once by the
    // process developer.
    deployProcessDefinition();

    // Suppose we want to start a process instance (=process execution)
    // when a user submits a form in a web application...
    processInstanceIsCreatedWhenUserSubmitsWebappForm();

    // Then, later, upon the arrival of an asynchronous message the
    // execution must continue.
    theProcessInstanceContinuesWhenAnAsyncMessageIsReceived();
  }

  public void deployProcessDefinition() {
    // This test shows a process definition and one execution
    // of the process definition.  The process definition has
    // 3 nodes: an unnamed start-state, a state 's' and an
    // end-state named 'end'.
    ProcessDefinition processDefinition =
        ProcessDefinition.parseXmlString(
      "<process-definition name='hello world'>" +
      "  <start-state name='start'>" +
      "    <transition to='s' />" +
      "  </start-state>" +
      "  <state name='s'>" +
      "    <transition to='end' />" +
      "  </state>" +
      "  <end-state name='end' />" +
      "</process-definition>"
    );

    //Lookup the pojo persistence context-builder that is configured above
    JbpmContext jbpmContext = jbpmConfiguration.createJbpmContext();
    try {
      // Deploy the process definition in the database
      jbpmContext.deployProcessDefinition(processDefinition);

    } finally {
      // Tear down the pojo persistence context.
      // This includes flush the SQL for inserting the process definition
      // to the database.
      jbpmContext.close();
    }
  }

  public void processInstanceIsCreatedWhenUserSubmitsWebappForm() {
    // The code in this method could be inside a struts-action
    // or a JSF managed bean.

    //Lookup the pojo persistence context-builder that is configured above
    JbpmContext jbpmContext = jbpmConfiguration.createJbpmContext();
    try {

      GraphSession graphSession = jbpmContext.getGraphSession();

      ProcessDefinition processDefinition =
          graphSession.findLatestProcessDefinition("hello world");

      //With the processDefinition that we retrieved from the database, we
      //can create an execution of the process definition just like in the
      //hello world example (which was without persistence).
      ProcessInstance processInstance =
          new ProcessInstance(processDefinition);

      Token token = processInstance.getRootToken();
      assertEquals("start", token.getNode().getName());
      // Let's start the process execution
      token.signal();
      // Now the process is in the state 's'.
      assertEquals("s", token.getNode().getName());

      // Now the processInstance is saved in the database.  So the
      // current state of the execution of the process is stored in the
      // database.
      jbpmContext.save(processInstance);
      // The method below will get the process instance back out
      // of the database and resume execution by providing another
      // external signal.

    } finally {
      // Tear down the pojo persistence context.
      jbpmContext.close();
    }
  }

  public void theProcessInstanceContinuesWhenAnAsyncMessageIsReceived() {
  //The code in this method could be the content of a message driven bean.

    // Lookup the pojo persistence context-builder that is configured above
    JbpmContext jbpmContext = jbpmConfiguration.createJbpmContext();
    try {

      GraphSession graphSession = jbpmContext.getGraphSession();
      // First, we need to get the process instance back out of the
      // database.  There are several options to know what process
      // instance we are dealing  with here.  The easiest in this simple
      // test case is just to look for the full list of process instances.
      // That should give us only one result.  So let's look up the
      // process definition.

      ProcessDefinition processDefinition =
          graphSession.findLatestProcessDefinition("hello world");

      //Now search for all process instances of this process definition.
      List processInstances =
          graphSession.findProcessInstances(processDefinition.getId());

      // Because we know that in the context of this unit test, there is
      // only one execution.  In real life, the processInstanceId can be
      // extracted from the content of the message that arrived or from
      // the user making a choice.
      ProcessInstance processInstance =
          (ProcessInstance) processInstances.get(0);

      // Now we can continue the execution.  Note that the processInstance
      // delegates signals to the main path of execution (=the root token).
      processInstance.signal();

      // After this signal, we know the process execution should have
      // arrived in the end-state.
      assertTrue(processInstance.hasEnded());

      // Now we can update the state of the execution in the database
      jbpmContext.save(processInstance);

    } finally {
      // Tear down the pojo persistence context.
      jbpmContext.close();
    }
  }
}
2.3. コンテキストの例: プロセス変数
リンクのコピーリンクがクリップボードにコピーされました!
プロセスが実行されている間、コンテキスト情報は プロセス変数 に保持されます。これらは、変数名を値にマップするという点で
java.util.Map クラスに似ており、後者は Java オブジェクトに相当します。(プロセス変数は、プロセスインスタンスの一部として "永続化" されます。)
注記
次の例を単純にするために、変数を操作するために必要なアプリケーションプログラミングインターフェイスのみを示します (永続性機能はありません)。
注記
変数の詳細は、7章 コンテキスト を参照してください。
// This example also starts from the hello world process.
// This time even without modification.
ProcessDefinition processDefinition = ProcessDefinition.parseXmlString(
  "<process-definition>" +
  "  <start-state>" +
  "    <transition to='s' />" +
  "  </start-state>" +
  "  <state name='s'>" +
  "    <transition to='end' />" +
  "  </state>" +
  "  <end-state name='end' />" +
  "</process-definition>"
);

ProcessInstance processInstance =
  new ProcessInstance(processDefinition);

// Fetch the context instance from the process instance
// for working with the process variables.
ContextInstance contextInstance =
  processInstance.getContextInstance();

// Before the process has left the start-state,
// we are going to set some process variables in the
// context of the process instance.
contextInstance.setVariable("amount", new Integer(500));
contextInstance.setVariable("reason", "i met my deadline");

// From now on, these variables are associated with the
// process instance.  The process variables are now accessible
// by user code via the API shown here, but also in the actions
// and node implementations.  The process variables are also
// stored into the database as a part of the process instance.

processInstance.signal();

// The variables are accessible via the contextInstance.

assertEquals(new Integer(500),
             contextInstance.getVariable("amount"));
assertEquals("i met my deadline",
             contextInstance.getVariable("reason"));
2.4. タスク割り当ての例
リンクのコピーリンクがクリップボードにコピーされました!
次の例は、ユーザーにタスクを割り当てる方法を示しています。jBPM ワークフローエンジンと組織モデルが分離しているため、式言語が常に限定されており、アクターの計算には使用できません。代わりに、
AssignmentHandler の実装を指定し、それを使用してタスクのアクターの計算を含めます。
public void testTaskAssignment() {
  // The process shown below is based on the hello world process.
  // The state node is replaced by a task-node.  The task-node
  // is a node in JPDL that represents a wait state and generates
  // task(s) to be completed before the process can continue to
  // execute.
  ProcessDefinition processDefinition = ProcessDefinition.parseXmlString(
    "<process-definition name='the baby process'>" +
    "  <start-state>" +
    "    <transition name='baby cries' to='t' />" +
    "  </start-state>" +
    "  <task-node name='t'>" +
    "    <task name='change nappy'>" +
    "      <assignment" +
    "       class='org.jbpm.tutorial.taskmgmt.NappyAssignmentHandler' />" +
    "    </task>" +
    "    <transition to='end' />" +
    "  </task-node>" +
    "  <end-state name='end' />" +
    "</process-definition>"
  );

  // Create an execution of the process definition.
  ProcessInstance processInstance =
      new ProcessInstance(processDefinition);
  Token token = processInstance.getRootToken();

  // Let's start the process execution, leaving the start-state
  // over its default transition.
  token.signal();
  // The signal method will block until the process execution
  // enters a wait state.   In this case, that is the task-node.
  assertSame(processDefinition.getNode("t"), token.getNode());

  // When execution arrived in the task-node, a task 'change nappy'
  // was created and the NappyAssignmentHandler was called to determine
  // to whom the task should be assigned.  The NappyAssignmentHandler
  // returned 'papa'.

  // In a real environment, the tasks would be fetched from the
  // database with the methods in the org.jbpm.db.TaskMgmtSession.
  // Since we don't want to include the persistence complexity in
  // this example, we just take the first task-instance of this
  // process instance (we know there is only one in this test
  // scenario).
  TaskInstance taskInstance = (TaskInstance)
      processInstance
        .getTaskMgmtInstance()
        .getTaskInstances()
        .iterator().next();

  // Now, we check if the taskInstance was actually assigned to 'papa'.
  assertEquals("papa", taskInstance.getActorId() );

  // Now we suppose that 'papa' has done his duties and mark the task
  // as done.
  taskInstance.end();
  // Since this was the last (only) task to do, the completion of this
  // task triggered the continuation of the process instance execution.

  assertSame(processDefinition.getNode("end"), token.getNode());
}
2.5. カスタムアクションの例
リンクのコピーリンクがクリップボードにコピーされました!
アクション は、カスタム Java コードを jBPM プロセスにバインドするためのメカニズムです。アクションは独自のノードに関連付けることができます (これらがプロセスのグラフィカル表現に関連している場合)。 または、アクションをイベントに "配置" することもできます (たとえば、遷移を取得するとき、またはノードに進入または退出するときなど)。 アクションがイベントに配置されている場合、アクションはグラフィカル表現の一部として扱われません (ただし、ランタイムプロセスの実行中にイベントが "発生" すると、アクションは引き続き実行されます)。
最初に、次の例で使用されているアクションハンドラー
MyActionHandler の実装をご覧ください。それ自体は特に驚くようなものではありません。ブール型変数 isExecuted を true に設定しているだけです。この変数は静的であるため、アクションハンドラー内から (およびアクション自体から) アクセスして、その値を確認することができます。
注記
"アクション" の詳細は、「アクション」 を参照してください。
// MyActionHandler represents a class that could execute
// some user code during the execution of a jBPM process.
public class MyActionHandler implements ActionHandler {

  // Before each test (in the setUp), the isExecuted member
  // will be set to false.
  public static boolean isExecuted = false;

  // The action will set the isExecuted to true so the
  // unit test will be able to show when the action
  // is being executed.
  public void execute(ExecutionContext executionContext) {
    isExecuted = true;
  }
}
重要
各テストの前に、静的フィールド
MyActionHandler.isExecuted をfalse に設定してください。
  // Each test will start with setting the static isExecuted
  // member of MyActionHandler to false.
  public void setUp() {
    MyActionHandler.isExecuted = false;
  }
最初の例は、遷移に対するアクションを示しています。
public void testTransitionAction() {
    // The next process is a variant of the hello world process.
    // We have added an action on the transition from state 's'
    // to the end-state.  The purpose of this test is to show
    // how easy it is to integrate Java code in a jBPM process.
    ProcessDefinition processDefinition = ProcessDefinition.parseXmlString(
      "<process-definition>" +
      "  <start-state>" +
      "    <transition to='s' />" +
      "  </start-state>" +
      "  <state name='s'>" +
      "    <transition to='end'>" +
      "      <action class='org.jbpm.tutorial.action.MyActionHandler' />" +
      "    </transition>" +
      "  </state>" +
      "  <end-state name='end' />" +
      "</process-definition>"
    );

    // Let's start a new execution for the process definition.
    ProcessInstance processInstance =
      new ProcessInstance(processDefinition);

    // The next signal will cause the execution to leave the start
    // state and enter the state 's'
    processInstance.signal();

    // Here we show that MyActionHandler was not yet executed.
    assertFalse(MyActionHandler.isExecuted);
    // ... and that the main path of execution is positioned in
    // the state 's'
    assertSame(processDefinition.getNode("s"),
               processInstance.getRootToken().getNode());

    // The next signal will trigger the execution of the root
    // token.  The token will take the transition with the
    // action and the action will be executed during the
    // call to the signal method.
    processInstance.signal();

    // Here we can see that MyActionHandler was executed during
    // the call to the signal method.
    assertTrue(MyActionHandler.isExecuted);
  }
次の例は、
enter-node イベントと leave-node イベントの両方に同じアクションが配置されていることを示しています。ノードには複数のイベントタイプがあることに注意してください。これは、イベントが 1 つしかない 遷移 とは対照的です。したがって、ノードにアクションを配置するときは、常にイベント要素に配置してください。
ProcessDefinition processDefinition = ProcessDefinition.parseXmlString(
  "<process-definition>" +
  "  <start-state>" +
  "    <transition to='s' />" +
  "  </start-state>" +
  "  <state name='s'>" +
  "    <event type='node-enter'>" +
  "      <action class='org.jbpm.tutorial.action.MyActionHandler' />" +
  "    </event>" +
  "    <event type='node-leave'>" +
  "      <action class='org.jbpm.tutorial.action.MyActionHandler' />" +
  "    </event>" +
  "    <transition to='end'/>" +
  "  </state>" +
  "  <end-state name='end' />" +
  "</process-definition>"
);

ProcessInstance processInstance =
  new ProcessInstance(processDefinition);

assertFalse(MyActionHandler.isExecuted);
// The next signal will cause the execution to leave the start
// state and enter the state 's'.  So the state 's' is entered
// and hence the action is executed.
processInstance.signal();
assertTrue(MyActionHandler.isExecuted);

// Let's reset the MyActionHandler.isExecuted
MyActionHandler.isExecuted = false;

// The next signal will trigger execution to leave the
// state 's'.  So the action will be executed again.
processInstance.signal();
// Voila.
assertTrue(MyActionHandler.isExecuted);