이 콘텐츠는 선택한 언어로 제공되지 않습니다.
Chapter 5. Requesting, enrolling and managing certificates
Certificates are requested and used by end users. Although certificate enrollment and renewal are operations that are not limited to administrators, understanding the enrollment and renewal processes can make it easier for administrators to manage and create appropriate certificate profiles, as described in Section 3.2, “Setting up certificate profiles”, and to use fitting authentication methods (described in Chapter 11, Authentication for enrolling certificates) for each certificate type.
This chapter discusses requesting, receiving, and renewing certificates for use outside Certificate System. For information on requesting and renewing Certificate System subsystem certificates, see Chapter 18, Managing subsystem certificates.
5.1. About enrolling and renewing certificates
Enrollment is the process for requesting and receiving a certificate. The mechanics for the enrollment process are slightly different depending on the type of certificate, the method for generating its key pair, and the method for generating and approving the certificate itself. Whatever the specific method, certificate enrollment, at a high level, has the same basic steps:
- A certificate request (CSR) is generated.
- The certificate request is submitted to the CA.
- The request is verified by authenticating the entity which requested it and by confirming that the request meets the certificate profile rules which were used to submit it.
- The request is approved.
- The requesting party retrieves the new certificate.
When the certificate reaches the end of its validity period, it can be renewed.
5.2. Creating certificate signing requests
Traditionally, the following methods are used to generate Certificate requests (CSRs):
- Generating CSRs using command line utilities
- Generating CSRs inside a supporting browser
- Generating CSRs inside an application, such as the installer of a server
Some of these methods support direct submission of the CSRs, while some do not.
Starting from Red Hat Certificate System 9.7, Server-Side key generation has been supported to overcome the inconvenience brought on by the removal of the key generation support inside newer versions of browsers, such as Firefox v69 and up, as well as Chrome. For this reason, in this section, we will not discuss browser support for key generation.
CSRs generated from an application generally take the form of PKCS#10. Provided that they are generated correctly, they should be supported by RHCS.
The following subsections go over the following methods supported by Red Hat Certificate System:
- Command-line utilities
- Server-Side Key Generation
5.2.1. Generating CSRs using command-line utilities
Red Hat Certificate System supports using the following utilities to create CSRs:
-
certutil: Supports creating PKCS #10 requests. -
PKCS10Client: Supports creating PKCS #10 requests. -
CRMFPopClient: Supports creating CRMF requests. -
pki client-cert-request: Supports both PKCS#10 and CRMF requests.
The following sections provide some examples on how to use these utilities with the feature-rich enrollment profile framework.
5.2.1.1. Creating a CSR using certutil
This section describes examples on how to use the certutil utility to create a CSR.
For further details about using certutil, see:
-
The
certutil(1)man page -
The output of the
certutil --helpcommand
5.2.1.1.1. Using certutil to create a CSR with EC keys
The following procedure demonstrates how to use the certutil utility to create an Elliptic Curve (EC) key pair and CSR:
Change to the certificate database directory of the user or entity for which the certificate is being requested, for example:
$ cd /user_or_entity_database_directory/Create the binary CSR and store it in the
/user_or_entity_database_directory/request.csrfile:$ certutil -d . -R -k ec -q nistp256 -s "CN=subject_name" -o /user_or_entity_database_directory/request-bin.csrEnter the required NSS database password when prompted.
For further details about the parameters, see the
certutil(1)man page.Convert the created binary format CSR to PEM format:
$ BtoA /user_or_entity_database_directory/request-bin.csr /user_or_entity_database_directory/request.csrOptionally, verify that the CSR file is correct:
$ cat /user_or_entity_database_directory/request.csr

		MIICbTCCAVUCAQAwKDEQMA4GA1UEChMHRXhhbXBsZTEUMBIGA1UEAxMLZXhhbXBs
		...
This is a PKCS#10 PEM certificate request.
- For the next steps, see Section 5.5.2, “The CMC enrollment process”, but skip the step about creating the certificate request.
5.2.1.1.2. Using certutil to create a CSR with user-defined extensions
The following procedure demonstrates how to create a CSR with user-defined extensions using the certutil utility.
Note that the enrollment requests are constrained by the enrollment profiles defined by the CA. See Example B.3, “Multiple user supplied extensions in CSR”.
Change to the certificate database directory of the user or entity for which the certificate is being requested, for example:
$ cd /user_or_entity_database_directory/Create the CSR with user-defined Key Usage extension as well as user-defined Extended Key Usage extension and store it in the
/user_or_entity_database_directory/request.csrfile:$ certutil -d . -R -k rsa -g 1024 -s "CN=subject_name" --keyUsage keyEncipherment,dataEncipherment,critical --extKeyUsage timeStamp,msTrustListSign,critical -a -o /user_or_entity_database_directory/request.csrEnter the required NSS database password when prompted.
For further details about the parameters, see the
certutil(1)man page.Optionally, verify that the CSR file is correct:
$ cat /user_or_entity_database_directory/request.csr
		Certificate request generated by Netscape certutil
		Phone: (not specified)

		Common Name: user 4-2-1-2
		Email: (not specified)
		Organization: (not specified)
		State: (not specified)
		Country: (not specified)
This is a PKCS#10 PEM certificate request.
For the next steps, see Section 5.5.2, “The CMC enrollment process”, but skip the step about creating the certificate request.
Remove the header information from the CSR.
5.2.1.2. Creating a CSR using PKCS10Client
This section describes examples how to use the PKCS10Client utility to create a CSR.
For further details about using PKCS10Client, see:
-
The
PKCS10Client(1)man page -
The output of the
PKCS10Client --helpcommand
5.2.1.2.1. Using PKCS10Client to create a CSR
The following procedure explains how to use the PKCS10Client utility to create an Elliptic Curve (EC) key pair and CSR:
Change to the certificate database directory of the user or entity for which the certificate is being requested, for example:
$ cd /user_or_entity_database_directory/Create the CSR and store it in the
/user_or_entity_database_directory/example.csrfile:$ PKCS10Client -d . -p NSS_password -a ec -c nistp256 -o /user_or_entity_database_directory/example.csr -n "CN=subject_name"For further details about the parameters, see the
PKCS10Client(1)man page.Optionally, verify that the CSR is correct:
$ cat /user_or_entity_database_directory/example.csr
		-----BEGIN CERTIFICATE REQUEST-----
		MIICzzCCAbcCAQAwgYkx
		...
		-----END CERTIFICATE REQUEST-----
5.2.1.2.2. Using PKCS10Client to create a CSR for SharedSecret-based CMC
The following procedure explains how to use the PKCS10Client utility to create an RSA key pair and CSR for SharedSecret-based CMC. Use it only with the CMC Shared Secret authentication method which is, by default, handled by the caFullCMCSharedTokenCert and caECFullCMCSharedTokenCert profiles.
Change to the certificate database directory of the user or entity for which the certificate is being requested, for example:
$ cd /user_or_entity_database_directory/Create the CSR and store it in the
/user_or_entity_database_directory/example.csrfile:$ PKCS10Client -d . -p NSS_password -o /user_or_entity_database_directory/example.csr -y true -n "CN=subject_name"For further details about the parameters, see the
PKCS10Client(1)man page.Optionally, verify that the CSR is correct:
$ cat /user_or_entity_database_directory/example.csr
		-----BEGIN CERTIFICATE REQUEST-----
		MIICzzCCAbcCAQAwgYkx
		...
		-----END CERTIFICATE REQUEST-----
5.2.1.3. Creating a CSR using CRMFPopClient
Certificate Request Message Format (CRMF) is a CSR format accepted in CMC that allows key archival information to be securely embedded in the request.
This section describes examples how to use the CRMFPopClient utility to create a CSR.
For further details about using CRMFPopClient, see the CRMFPopClient(1) man page.
5.2.1.3.1. Using CRMFPopClient to Create a CSR with Key Archival
The following procedure explains how to use the CRMFPopClient utility to create an RSA key pair and a CSR with the key archival option:
Change to the certificate database directory of the user or entity for which the certificate is being requested, for example:
$ cd /user_or_entity_database_directory/Retrieve the KRA transport certificate:
$ pki ca-cert-find --name "DRM Transport Certificate"
		---------------
		1 entries found
		---------------
			Serial Number: 0x7
			Subject DN: CN=DRM Transport Certificate,O=EXAMPLE
			Status: VALID
			Type: X.509 version 3
			Key A    lgorithm: PKCS #1 RSA with 2048-bit key
			Not Valid Before: Thu Oct 22 18:26:11 CEST 2015
			Not Valid After: Wed Oct 11 18:26:11 CEST 2017
			Issued On: Thu Oct 22 18:26:11 CEST 2015
			Issued By: caadmin
		----------------------------
		Number of entries returned 1
Export the KRA transport certificate:
$ pki ca-cert-show 0x7 --output kra.transportCreate the CSR and store it in the
/user_or_entity_database_directory/example.csrfile:$ CRMFPopClient -d /home/example-user/certs_db -p password -n "CN=user_name" -q POP_SUCCESS -b kra.transport -w "AES KeyWrap/Wrapped" -v -o ~/user_name.req -oaepTo create an Elliptic Curve (EC) key pair and CSR, pass the -a ec -t false options to the command.
For further details about the parameters, see the
CRMFPopClient(1)man page.NoteUse
-oaepif the server is configured for it. Use AES KeyWrap/WrapWrapped if a modern HSM prefers it over AES/CBC/PKCS5Padding.Optionally, verify that the CSR is correct:
$ cat /user_or_entity_database_directory/example.csr
		-----BEGIN CERTIFICATE REQUEST-----
		MIICzzCCAbcCAQAwgYkx
		...
		-----END CERTIFICATE REQUEST-----
5.2.1.3.2. Using CRMFPopClient to create a CSR for SharedSecret-based CMC
The following procedure explains how to use the CRMFPopClient utility to create an RSA key pair and CSR for SharedSecret-based CMC. Use it only with the CMC Shared Secret authentication method which is, by default, handled by the caFullCMCSharedTokenCert and caECFullCMCSharedTokenCert profiles.
Change to the certificate database directory of the user or entity for which the certificate is being requested, for example:
$ cd /user_or_entity_database_directory/Retrieve the KRA transport certificate:
$ pki ca-cert-find --name "DRM Transport Certificate"
		---------------
		1 entries found
		---------------
			Serial Number: 0x7
			Subject DN: CN=DRM Transport Certificate,O=EXAMPLE
			Status: VALID
			Type: X.509 version 3
			Key A    lgorithm: PKCS #1 RSA with 2048-bit key
			Not Valid Before: Thu Oct 22 18:26:11 CEST 2015
			Not Valid After: Wed Oct 11 18:26:11 CEST 2017
			Issued On: Thu Oct 22 18:26:11 CEST 2015
			Issued By: caadmin
		----------------------------
		Number of entries returned 1
Export the KRA transport certificate:
$ pki ca-cert-show 0x7 --output kra.transportCreate the CSR and store it in the
/user_or_entity_database_directory/example.csrfile:$ CRMFPopClient -d . -p password -n "cn=subject_name" -q POP_SUCCESS -b kra.transport -w "AES/CBC/PKCS5Padding" -y -v -o /user_or_entity_database_directory/example.csrTo create an EC key pair and CSR, pass the -a ec -t false options to the command.
For further details about the parameters, see the output of the
CRMFPopClient --helpcommand.Optionally, verify that the CSR is correct:
$ cat /user_or_entity_database_directory/example.csr
		-----BEGIN CERTIFICATE REQUEST-----
		MIICzzCCAbcCAQAwgYkx
		...
		-----END CERTIFICATE REQUEST-----
5.2.1.4. Creating a CSR using client-cert-request in the PKI CLI
The pki`command-line tool can also be used with the `client-cert-request command to generate a CSR. However, unlike the previously discussed tools, CSR generated with pki are submitted directly to the CA. Both PKCS#10 or CRMF requests can be generated.
- Example on generating a PKCS#10 request:
pki -d user token db directory -P https -p 8443 -h host.test.com -c user token db passwd client-cert-request "uid=test2" --length 4096 --type pkcs10- Example on generating a CRMF request:
pki -d user token db directory -P https -p 8443 -h host.test.com -c user token db passwd client-cert-request "uid=test2" --length 4096 --type crmfA request id will be returned upon success.
Once a request is submitted, an agent could approve it by using the pki ca-cert-request-approve command.
For example:
pki -d agent token db directory -P https -p 8443 -h host.test.com -c agent token db passwd -n <CA agent cert nickname> ca-cert-request-approve request id
For more information, see the man page by running the pki client-cert-request --help command.
5.2.2. Generating CSRs using Server-Side Key Generation
Many newer versions of browsers, including Firefox v69 and up, as well as Chrome, have removed the functionality to generate PKI keys and the support for CRMF for key archival. On RHEL, CLIs such as CRMFPopClient (see CRMFPopClient --help) or pki (see pki client-cert-request --help) could be used as a workaround.
Server-Side Keygen enrollment has been around for a long time since the introduction of Token Key Management System (TMS), where keys could be generated on a KRA instead of locally on smart cards. Red Hat Certificate System now adopts a similar mechanism to resolve the browser keygen deficiency issue. Keys are generated on the server (specifically, on the KRA) and then transferred securely back to the client in PKCS#12.
It is highly recommended to employ the Server-Side Keygen mechanism only for encryption certificates.
5.2.2.1. Functionality highlights
- Certificate request keys are generated on the KRA (Note: a KRA must be installed to work with the CA)
-
The profile default plugin,
serverKeygenUserKeyDefaultImpl, provides selection to enable or disable key archival (i.e. the enableArchival parameter) - Support for both RSA and EC keys
- Support for both manual (agent) approval and automatic approval (e.g. directory password-based)
5.2.2.2. Enrolling a certificate using Server-Side keygen
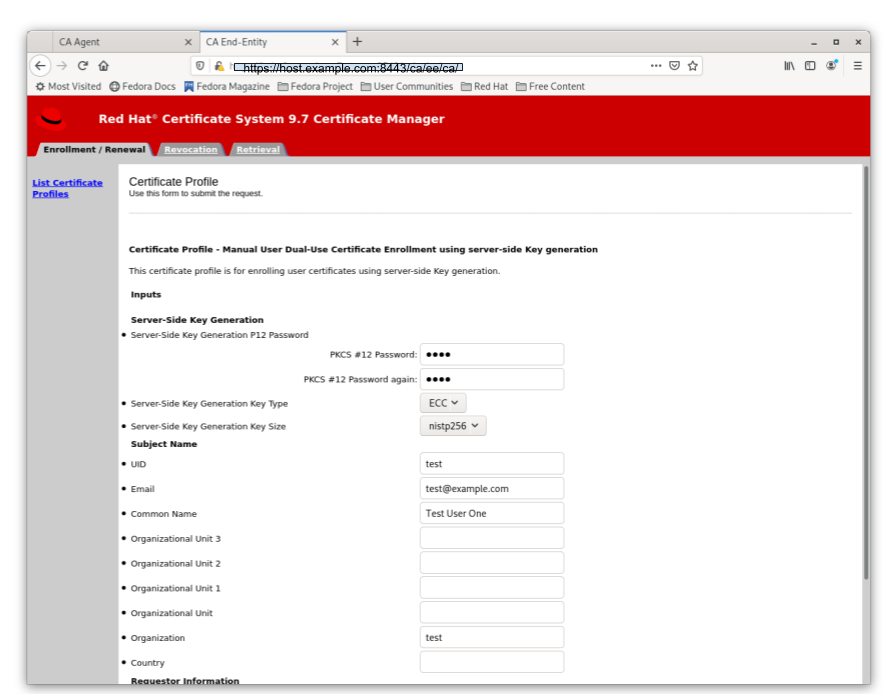
The default Server-Side Keygen enrollment profile can be found on the EE page, under the List Certificate Profiles tab:
Manual User dual-use certificate enrollment using Server-Side key generation
Figure 5.1. Server-Side Keygen Enrollment that requires agent manual approval
Directory-authenticated user dual-use certificate enrollment using Server-Side key generation
Figure 5.2. Server-Side keygen enrollment that will be automatically approved upon successful LDAP uid/pwd authentication
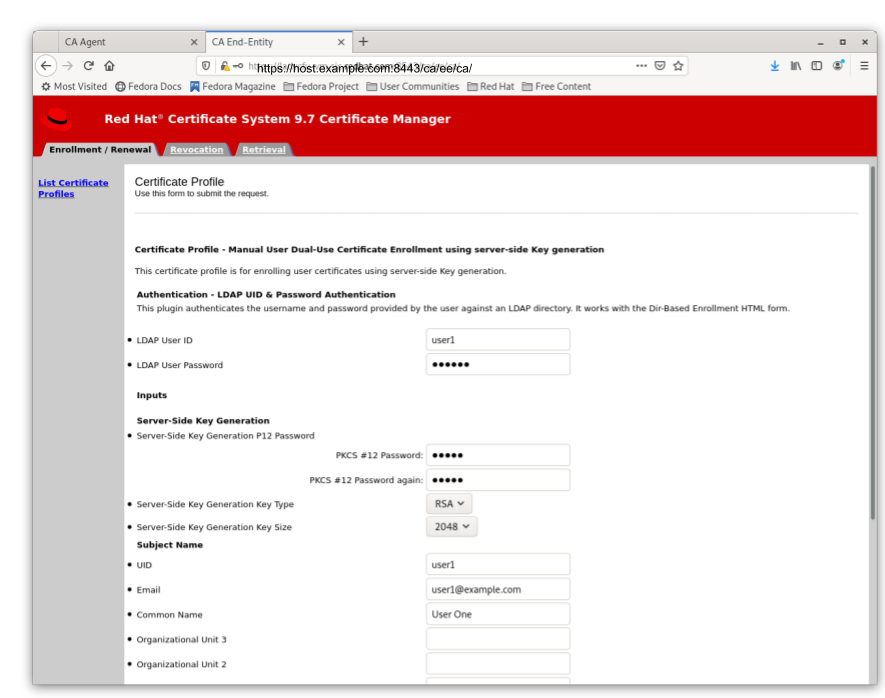
Regardless of how the request is approved, the Server-Side Keygen Enrollment mechanism requires the End Entity user to enter a password for the PKCS#12 package which will contain the issued certificate as well as the encrypted private key generated by the server once issued.
Users should not share their passwords with anyone. Not even the CA or KRA agents.
When the enrollment request is approved, the PKCS#12 package will be generated and,
- In case of manual approval, the PKCS#12 file will be returned to the CA agent that approves the request; the agent is then expected to forward the PKCS#12 file to the user.
- In case of automatic approval, the PKCS#12 file will be returned to the user who submitted the request
Figure 5.3. Enrollment manually approved by an agent
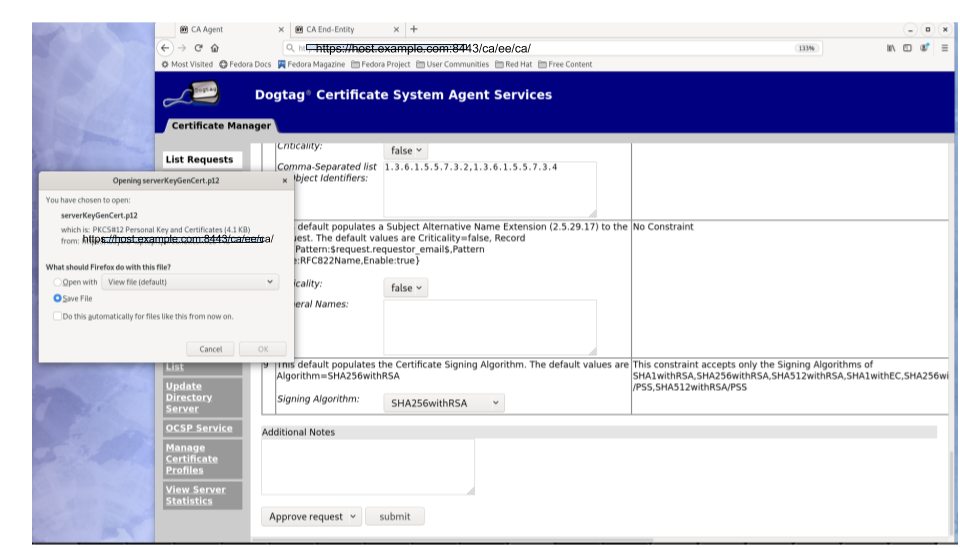
Once the PKCS#12 file is received, the user could use a CLI such as pkcs12util to import this file into their own user internal cert/key database for each application. E.g. the Firefox nss database of the user.
5.2.2.3. Key recovery
If the enableArchival parameter is set to true in the certificate enrollment profile, then the private keys are archived at the time of Server-Side Keygen enrollment. The archived private keys could then be recovered by the authorized KRA agents.
5.2.2.4. Additional information
5.2.2.4.1. KRA request records
Due to the nature of this mechanism, in case the enableArchival parameter is set to true in the profile, there are two KRA requests records per Server-Side keygen request:
One for the request type asymkeyGenRequest
This request type cannot be filtered using List Requests on the KRA agent page; you can select Show All Requests to see them listed.
- One for the request type recovery
5.2.2.4.2. Audit records
Some audit records could be observed if enabled:
- CA
- SERVER_SIDE_KEYGEN_ENROLL_KEYGEN_REQUEST
- SERVER_SIDE_KEYGEN_ENROLL_KEY_RETRIEVAL_REQUEST
- KRA
- SERVER_SIDE_KEYGEN_ENROLL_KEYGEN_REQUEST_PROCESSED
- SERVER_SIDE_KEYGEN_ENROLL_KEY_RETRIEVAL_REQUEST_PROCESSED (not yet implemented)
5.3. Requesting and receiving certificates
As explained in Section 5.1, “About enrolling and renewing certificates”, once CSRs are generated, they need to be submitted to the CA for issuance. Some of the methods discussed in Section 5.2, “Creating certificate signing requests” submit CSRs to the CA directly, while some would require submission of the CSRs in a separate step, which could either be carried out by the user or pre-signed by an agent.
In this section, we are going to discuss the separate submission steps supported by the RHCS CA.
5.3.1. Requesting and receiving a certificate through the End-Entities page
At the CA End Entity portal (i.e. https://host.domain:_port#_/ca/ee/ca), end entities can use the HTML enrollment forms presented at each applicable enrollment profile under the Enrollment/Renewal tab to submit their certificate requests (CSRs, see Section 5.2, “Creating certificate signing requests” for how to generate CSRs).
This section assumes that you have the CSR in Base64 encoded format, including the marker lines -----BEGIN NEW CERTIFICATE REQUEST----- and -----END NEW CERTIFICATE REQUEST----- .
Many of the default enrollment profiles provide a Certificate Request text box where one could paste in the Base64 encoded CSR, along with a Certificate Request Type selection drop down list.
In the certificate enrollment form, enter the required information.
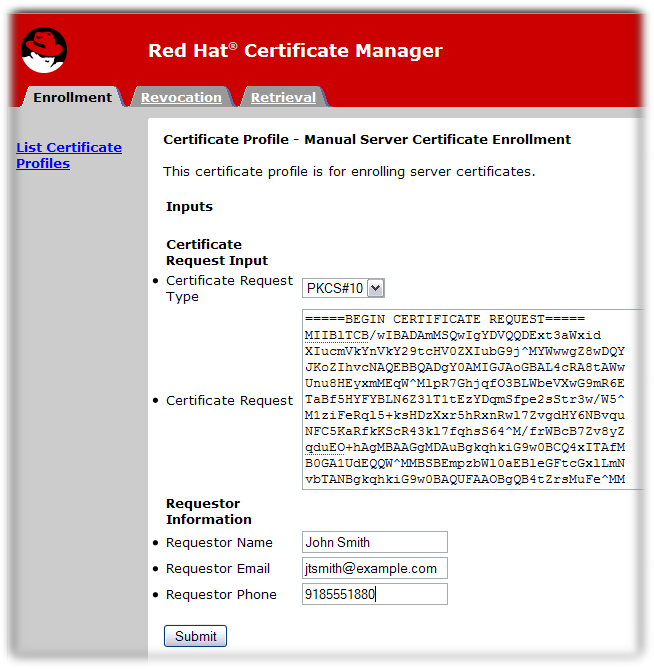
The standard requirements are as follows:
-
Certificate Request Type. This is either PKCS#10 or CRMF. Certificate requests created through the subsystem administrative console are PKCS #10; those created through the
certutiltool and other utilities are usually PKCS #10. -
Certificate Request. Paste the base-64 encoded blob, including the
-----BEGIN NEW CERTIFICATE REQUEST-----and-----END NEW CERTIFICATE REQUEST-----marker lines. - Requester Name. This is the common name of the person requesting the certificate.
-
Requester Email. This is the email address of the requester. The agent or CA system will use this address to contact the requester when the certificate is issued. For example,
jdoe@someCompany.com. - Requester Phone. This is the contact phone number of the requester.
The submitted request is queued for agent approval. An agent needs to process and approve the certificate request.
Some enrollment profiles may allow automatic approval such as by using the LDAP uid/pwd authentication method offered by Red Hat Certificate System. Enrollments through those profiles would not require manual agent approval in the next section. See Chapter 11, Authentication for enrolling certificates for supported approval methods.
In case of manual approval, once the certificate is approved and generated, you can retrieve the certificate.
Open the Certificate Manager end-entities page, for example:
https://server.example.com:8443/ca/ee/ca- Click the Retrieval tab.
- Fill in the request ID number that was created when the certificate request was submitted, and click .
The next page shows the status of the certificate request. If the status is
complete, then there is a link to the certificate. Click the Issued certificate link.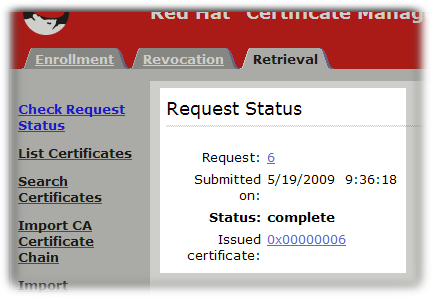
The new certificate information is shown in pretty-print format, in base-64 encoded format, and in PKCS #7 format.

The following actions can be taken through this page:
- To install this certificate on a server or other application, scroll down to the Installing This Certificate in a Server section, which contains the base-64 encoded certificate.
-
Copy the base-64 encoded certificate, including the
-----BEGIN CERTIFICATE-----and-----END CERTIFICATE-----marker lines, to a text file. Save the text file, and use it to store a copy of the certificate in the security module of the entity where the private key resides. See Section 16.3.2.1, “Creating users”.
5.4. Renewing certificates
This section discusses how to renew certificates. For more information on how to set up certificate renewal, see Section 3.4, “Configuring profiles to enable renewal”.
Renewing a certificate consists in regenerating the certificate with the same properties to be used for the same purpose as the original certificate. In general, there are two types of renewals:
Same key Renewal takes the original key, profile, and request of the certificate and recreates a new certificate with a new validity period and expiration date using the identical key. This can be done by either of the following methods:
- resubmitting the original certificate request (CSR) through the original profile, or
- regenerating a CSR with the original keys by using supporting tools such as certutil
- Re-keying a certificate requires regeneration of a certificate request with the same information, so that a new key pair is generated. The CSR is then submitted through the original profile.
5.4.1. Same Keys Renewal
5.4.1.1. Reusing CSR
There are three approval methods for same key renewal at the end entity portal.
- Agent-approved method requires submitting the serial number of the certificate to be renewed; This method would require a CA agent’s approval.
- Directory-based renewal requires submitting the serial number of the certificate to be renewed, and the CA draws the information from its current certificate directory entry. The certificate is automatically approved if the ldap uid/pwd is authenticated successfully.
- Certificate-based renewal uses the certificate in the browser database to authenticate and have the same certificate re-issued.
5.4.1.1.1. Agent-Approved or Directory-Based Renewals
Sometimes, a certificate renewal request has to be manually approved, either by a CA agent or by providing login information for the user directory.
Open the end-entities services page for the CA which issued the certificate (or its clone).
https://server.example.com:8443/ca/ee/ca- Click the name of the renewal form to use.
Enter the serial number of the certificate to renew. This can be in decimal or hexadecimal form.
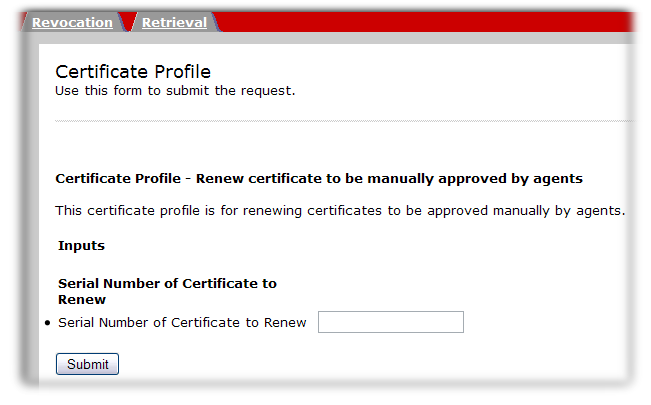
- Click the renew button.
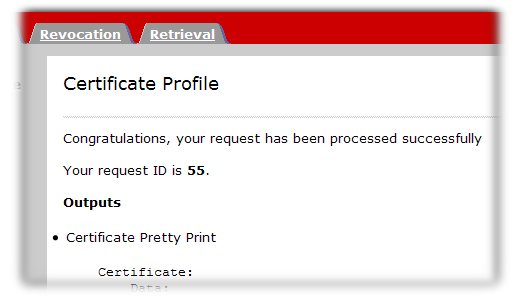
The request is submitted. For directory-based renewals, the renewed certificate is automatically returned. Otherwise, the renewal request will be approved by an agent.
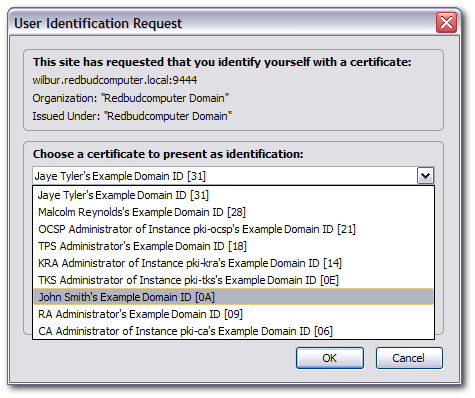
5.4.1.1.2. Certificate-Based Renewal
Some user certificates are stored directly in your browser, so some renewal forms will simply check your browser certificate database for a certificate to renew. If a certificate can be renewed, then the CA automatically approved and reissued it.
If the certificate which is being renewed has already expired, then it probably cannot be used for certificate-based renewal. The browser client may disallow any SSL client authentication with an expired certificate.
In that case, the certificate must be renewed using one of the other renewal methods.
Open the end-entities services page for the CA which issued the certificate (or its clone).
https://server.example.com:8443/ca/ee/ca- Click the name of the renewal form to use.
- There is no input field, so click the button.
When prompted, select the certificate to renew.
The request is submitted and the renewed certificate is automatically returned.
5.4.1.2. Renewal by generating CSR with same keys
Sometimes, the original CSR might not be available. The certutil tool allows one to regenerate a CSR with the same keys, provided that the key pair is in the NSS database. This can be achieved by doing the following:
Find the corresponding key id in the NSS db:
Certutil -d <nssdb dir> -KGenerate a CSR using a specific key:
Certutil -d <nssdb dir> -R -k <key id> -s <subject DN> -o <CSR output file>
Alternatively, instead of keyid, if a key is associated with a certificate in the NSS db, nickname could be used:
Generate a CSR using an existing nickname:
Certutil -d <nssdb dir> -R -k <nickname> -s <subject DN> -o <CSR output file>
5.4.2. Renewal by Re-keying Certificates
Since renewal by re-keying is basically generating a new CSR with the same info as the old certificate, just follow any one of the methods described in Section 5.2, “Creating certificate signing requests”. Be mindful to enter the same information as the old certificate.
5.5. Submitting certificate requests using CMC
This section describes the procedure to enroll a certificate using Certificate Management over CMS (CMC).
For general information about configuration and the workflow of enrolling certificates using CMC, see:
- The Configuration for CMC section in the Red Hat Certificate System Planning, Installation, and Deployment Guide.
- The Enrolling with CMC section in the Red Hat Certificate System Planning, Installation, and Deployment Guide.
-
CMCRequest(1)man page -
CMCResponse(1)man page
CMC enrollment is possible in various ways to meet the requirements for different scenarios. Section 5.5.2, “The CMC enrollment process” supplements the Enrolling with CMC section in the Red Hat Certificate System Planning, Installation, and Deployment Guide with more details. Additionally, the Section 5.5.3, “Practical CMC enrollment scenarios” section enables administrators to decide which mechanisms should be used in which scenario.
5.5.1. Using CMC enrollment
CMC enrollment allows an enrollment client to use a CMCAuth plug-in for authentication, by which the certificate request is pre-signed with an agent certificate. The Certificate Manager automatically issues certificates when a valid request signed with the agent certificate is received.
CMC enrollments are enabled by default. It should not be necessary to enable the CMC enrollment authentication plug-ins or profiles unless the configuration has been changed.
The CMCAuth authentication plug-in also provides CMC revocation for the client. CMC revocation allows the client to have the certificate request signed by the agent certificate, and then send such a request to the Certificate Manager. The Certificate Manager automatically revokes certificates when a valid request signed with the agent certificate is received. CMC revocation can be created with the CMCRevoke command line tool. For more information about CMCRevoke, see Section 7.2, “Performing a CMC revocation”.
A CMC request can be submitted through browser end-entities forms or using a tool such as HttpClient to post the request to the appropriate profile. The CMCRequest tool generates a signed certificate request which can then be submitted using the HttpClient tool or the browser end-entities forms to enroll and receive the certificate automatically and immediately.
The CMCRequest tool has a simple command syntax, with all the configuration given in the .cfg input file:
CMCRequest /path/to/file.cfg
A single CMC enrollment can also be created using the CMCEnroll tool, with the following syntax:
CMCEnroll -d /agent's/certificate/directory -h password -n cert_nickname -r certrequest.file -p certDB_passwd [-c "comment"]
These tools are described in more detail in the CMCEnroll(1) man page.
Surround values that include spaces in quotation marks.
5.5.1.1. Testing CMCEnroll
-
Create a certificate request using the
certutiltool. - Copy the PKCS #10 ASCII output to a text file.
Run the CMCEnroll utility.
For example, if the input file called
request34.txt, the agent certificate is stored in the browser databases, the certificate common name of the agent certificate isCertificateManagerAgentsCert, and the password for the certificate database issecret, the command is as follows:CMCEnroll -d ~jsmith/.mozilla/firefox/1234.jsmith -n "CertificateManagerAgentsCert" -r /export/requests/request34.txt -p secretThe output of this command is stored in a file with the same filename with
.outappended to the filename.Submit the signed certificate through the end-entities page.
Open the end-entities page.
https://server.example.com:8443/ca/ee/ca- Select the CMC enrollment form from the list of certificate profiles.
- Paste the content of the output file into the Certificate Request text area of this form.
-
Remove
-----BEGIN NEW CERTIFICATE REQUEST-----and----END NEW CERTIFICATE REQUEST-----from the pasted content. - Fill in the contact information, and submit the form.
- The certificate is immediately processed and returned.
- Use the agent page to search for the new certificate.
5.5.2. The CMC enrollment process
Use the following general procedure to request and issue a certificate using CMC:
Create a Certificate Signing Request (CSR) in one of the following formats:
- PKCS #10 format
- Certificate Request Message Format (CRMF) format
For details about creating CSRs in these formats, see Section 5.2, “Creating certificate signing requests”.
Import the admin certificate into the client NSS database. For example:
Execute the command below to extract the admin client certificate from the
.p12file:$ openssl pkcs12 -in /root/.dogtag/instance/ca_admin_cert.p12 -clcerts -nodes -nokeys -out /root/.dogtag/instance/ca_admin_cert.crtValidate and import the admin client certificate according to guidance in Managing Certificate/Key Crypto Token section in the Red Hat Certificate System Planning, Installation, and Deployment Guide:
$ PKICertImport -d . -n "CA Admin - Client Certificate" -t ",," -a -i /root/.dogtag/instance/ca_admin_cert.crt -u CImportantMake sure all intermediate certificates and the root CA certificate have been imported before importing the CA Admin client certificate.
Import the private keys associated with the certificates.
$ pki -c password pkcs12-import --pkcs12-file /root/.dogtag/instance/ca_admin_cert.p12 --pkcs12-password-file /root/.dogtag/instance/ca/pkcs12_password.conf
Create a configuration file for a CMC request, such as
/home/user_name/cmc-request.cfg, with the following content:# NSS database directory where CA agent certificate is stored dbdir=/home/user_name/.dogtag/nssdb/ # NSS database password password=password # Token name (default is internal) tokenname=internal # Nickname for signing certificate nickname=subsystem_admin # Request format: pkcs10 or crmf format=pkcs10 # Total number of PKCS10/CRMF requests numRequests=1 # Path to the PKCS10/CRMF request # The content must be in Base-64 encoded format. # Multiple files are supported. They must be separated by space. input=/home/user_name/file.csr # Path for the CMC request output=/home/user_name/cmc-request.binFor further details, see the
CMCRequest(1)man page.Create the CMC request:
$ CMCRequest /home/user_name/cmc-request.cfgIf the command succeeds, the
CMCRequestutility stored the CMC request in the file specified in theoutputparameter in the request configuration file.Create a configuration file for
HttpClient, such as/home/user_name/cmc-submit.cfg, to use in a later step to submit the CMC request to the CA. Add the following content to the created file:# PKI server host name host=server.example.com # PKI server port number port=8443 # Use secure connection secure=true # Use client authentication clientmode=true # NSS database directory where the CA agent certificate is stored. dbdir=/home/user_name/.dogtag/nssdb/ # NSS database password password=password # Token name (default: internal) tokenname=internal # Nickname of signing certificate nickname=subsystem_admin # Path for the CMC request input=/home/user_name/cmc-request.bin # Path for the CMC response output=/home/user_name/cmc-response.binImportantThe nickname of the certificate specified in the
nicknameparameter must match the one previously used for the CMC request.Depending on what type of certificate you request, add the following parameter to the configuration file created in the previous step:
servlet=/ca/ee/ca/profileSubmitCMCFull?profileId=profile_nameFor example, for a CA signing certificate:
servlet=/ca/ee/ca/profileSubmitCMCFull?profileId=caCMCcaCertImportantWhen an agent submits the CMC request in the next step, the profile specified in this parameter must use the
CMCAuthauthentication plug-in. Whereas in user-initiated enrollments, the profile must use theCMCUserSignedAuthplug-in. For further details, see the Section 11.3, “CMC authentication plug-ins”.Submit the CMC request to the CA:
$ HttpClient /home/user_name/cmc-submit.cfgTo convert the CMC response to a PKCS #7 certificate chain, pass the CMC response file to the
-iparameter of theCMCResponseutility. For example:$ CMCResponse -i /home/user_name/cmc-response.bin -o /home/user_name/cert_chain.crt
5.5.3. Practical CMC enrollment scenarios
This section describes frequent practical usage scenarios and their workflows to enable CA administrators to decide which CMC method to use in which situation.
For a general process of enrolling a certificate using CMC, see Section 5.5.2, “The CMC enrollment process”.
5.5.3.1. Obtaining system and server certificates
If a service, such as LDAP or a web server, requires a TLS server certificate, the administrator of this server creates a CSR based on the documentation of the service and sends it to the CA’s agent for approval. Use the procedure described in Section 5.5.2, “The CMC enrollment process” for this process. Additionally, consider the following requirements:
- Enrollment Profiles
-
The agent must either use one of the existing CMC profiles listed in Section 11.3, “CMC authentication plug-ins”, or, alternatively, create a custom profile that uses the
CMCAuthauthentication mechanism. - CMC Signing Certificate
For system certificates, the CA agent must generate and sign the CMC request. For this, set the
nicknameparameter in theCMCRequestconfiguration file to the nickname of the CA agent.NoteThe CA agent must have access to its own private key.
HttpClientTLS client nickname-
Use the same certificate for signing in the
CMCRequestutility’s configuration file as for TLS client authentication in the configuration file forHttpClient. HttpClientservletparameterThe
servletin the configuration file passed to theHttpClientutility refers to the CMC servlet and the enrollment profile which handles the request.Depending on what type of certificate you request, add one of the following entries to the configuration file created in the previous step:
For a CA signing certificate:
servlet=/ca/ee/ca/profileSubmitCMCFull?profileId=caCMCcaCertFor a KRA transport certificate:
servlet=/ca/ee/ca/profileSubmitCMCFull?profileId=caCMCkraTransportCertFor an OCSP signing certificate:
servlet=/ca/ee/ca/profileSubmitCMCFull?profileId=caCMCocspCertFor an audit signing certificate:
servlet=/ca/ee/ca/profileSubmitCMCFull?profileId=caCMCauditSigningCertFor a subsystem certificate:
For RSA certificates:
servlet=/ca/ee/ca/profileSubmitCMCFull?profileId=caCMCsubsystemCertFor ECC certificates:
servlet=/ca/ee/ca/profileSubmitCMCFull?profileId=caCMCECCsubsystemCert
For a TLS server certificate:
For RSA certificates:
servlet=/ca/ee/ca/profileSubmitCMCFull?profileId=caCMCserverCertFor ECC certificates:
servlet=/ca/ee/ca/profileSubmitCMCFull?profileId=caCMCECCserverCert
For an admin certificate:
servlet=/ca/ee/ca/profileSubmitCMCFull?profileId=caFullCMCUserCert
Further details:
- When an agent pre-signs a CSR, the Proof of Identification is considered established because the agent examines the CSR for identification. No additional CMC-specific identification proof is required.
- PKCS #10 files already provide Proof of Possession information and no additional Proof of Possession (POP) is required.
-
In agent pre-approved requests, the
PopLinkWittnessV2feature must be disabled because the identification is checked by the agent.
5.5.3.2. Obtaining the first signing certificate for a user
There are two ways to approve a user’s first signing certificate:
- An agent signs the CMC request. See Section 5.5.3.2.1, “Signing a CMC Request with an agent certificate”.
- Certificate enrollment is authenticated by using a Shared Secret. See Section 5.5.3.2.2, “Authenticating for certificate enrollment using a shared secret”.
5.5.3.2.1. Signing a CMC Request with an agent certificate
The process for signing a CMC request with an agent certificate is the same as for system and server certificates described in Section 5.5.3.1, “Obtaining system and server certificates”. The only difference is that the user creates the CSR and sends it to a CA agent for approval.
5.5.3.3. Obtaining an Encryption-only Certificate for a User
This section describes the workflow for obtaining an encryption-only certificate which is signed with an existing user signing certificate:
If a user owns multiple certificates for different usages, where one is signing, the user must obtain the signing certificate first. Once the user owns a signing certificate, it can be used for Proof Of Origin without requiring to set up and rely on the CMC Shared Secret mechanism.
For details about obtaining a user’s first signing certificate, see Section 5.5.3.2, “Obtaining the first signing certificate for a user”.
As a user:
- Use the cryptographic token stored in a Network Security Services (NSS) database or on a smart card that contains the user’s signing certificate and keys.
Generate the CSR in PKCS #10 or the CRMF format.
NoteUse the CRMF format, if key archival is required.
Generate the CMC request.
Since this is an encryption-only certificate, the private key is not able to sign. Therefore, Proof Of Possession (POP) is not included. For this reason, the enrollment requires two steps: If the initial request is successful, results in a CMC status with the
EncryptedPOPcontrol. The user then uses the response and generates a CMC request that contains theDecryptedPOPcontrol and submits it in the second step.For the first step, in addition to the default parameters, the user must set the following parameters in the configuration file passed to the
CMCRequestutility:-
identification.enable -
witness.sharedSecret -
identityProofV2.enable -
identityProofV2.hashAlg -
identityProofV2.macAlg -
popLinkWitnessV2.enableif required by the CA -
popLinkWitnessV2.keyGenAlgif required by the CA -
popLinkWitnessV2.macAlgif required by the CA request.privKeyIdFor details, see the
CMCRequest(1)man page.The response contains:
- A CMC encrypted POP control
-
The
CMCStatusInfoV2control with thePOP requirederror - The request ID
-
For the second step, in addition to the default parameters, the user must set the following parameters in the configuration file passed to the
CMCRequestutility:-
decryptedPop.enable -
encryptedPopResponseFile -
decryptedPopRequestFile -
request.privKeyId -
oaep=true
-
For details, see the
CMCRequest(1)man page.
5.5.3.3.1. Example on Obtaining an Encryption-only certificate with Key Archival
To perform an enrollment with key archival, generate a CMC request that contains the user’s encrypted private key in the CRMF request. The following procedure assumes that the user already owns a signing certificate. The nickname of this signing certificate is set in the configuration files in the procedure.
The following procedure describes the two-trip issuance used with encryption-only keys, which cannot be used for signing. If you use a key which can sign certificates, pass the -q POP_SUCCESS option instead of -q POP_NONE to the CRMFPopClient utility for a single-trip issuance.
For instructions about using CRMFPoPClient with POP_SUCCESS, see Section 5.2.1.3.1, “Using CRMFPopClient to Create a CSR with Key Archival” and Section 5.2.1.3.2, “Using CRMFPopClient to create a CSR for SharedSecret-based CMC”.
Search for the KRA transport certificate. For example:
$ pki cert-find --name KRA_transport_certificate_subject_CNUse the serial number of the KRA transport certificate, which you retrieved in the previous step, to store the certificate in a file. For example, to store the certificate with the 12345 serial number in the
/home/user_name/kra.certfile:$ pki cert-show 12345 --output /home/user_name/kra.certUse the
CRMFPopClientutility to:Create a CSR with key archival:
Change to the certificate database directory of the user or entity for which the certificate is being requested, for example:
$ cd /home/user_name/Use the
CRMFPopClientutility to create a CRMF request, where the RSA private key is wrapped by the KRA transport certificate. For example, to store the request in the/home/user_name/crmf.reqfile:$ CRMFPopClient -d . -p token_password -n "cn=subject_name" -q POP_NONE -b kra.transport -w "AES KeyWrap/Wrapped" -v -o crmf.req -oaepNote the ID of the private key displayed by the command. The ID is required in a later step as value in the
request.privKeyIdparameter in the configuration file for the second trip.NoteUse
-oaepif the server is configured for it. Use AES KeyWrap/WrapWrapped if a modern HSM prefers it over AES/CBC/PKCS5Padding.
Create a configuration file for the
CRMRequestutility, such as/home/user_name/cmc.cfgwith the following content:#numRequests: Total number of PKCS10 requests or CRMF requests. numRequests=1 #input: full path for the PKCS10 request or CRMF request, #the content must be in Base-64 encoded format input=/home/user_name/crmf.req #output: full path for the CMC request in binary format output=/home/user_name/cmc.req #tokenname: name of token where agent signing cert can be found #(default is internal) tokenname=internal #nickname: nickname for user certificate which will be used #to sign the CMC full request. nickname=signing_certificate #dbdir: directory for cert9.db, key4.db and pkcs11.txt dbdir=/home/user_name/.dogtag/nssdb/ #password: password for cert9.db which stores the agent certificate password=password #format: request format, either pkcs10 or crmf format=crmfCreate the CMC request:
$ CMCRequest /home/user_name/cmc.cfgIf the command succeeds, the
CMCRequestutility stored the CMC request in the file specified in theoutputparameter in the request configuration file.Create a configuration file for
HttpClient, such as/home/user_name/cmc-submit.cfg, to use in a later step to submit the CMC request to the CA. Add the following content to the created file:#host: host name for the http server host=server.example.com #port: port number port=8443 #secure: true for secure connection, false for nonsecure connection secure=true #input: full path for the enrollment request, the content must be in #binary format input=/home/user_name/cmc.req #output: full path for the response in binary format output=/home/user_name/cmc-response_round_1.bin #tokenname: name of token where TLS client authentication cert can be found #(default is internal) #This parameter will be ignored if secure=false tokenname=internal #dbdir: directory for cert9.db, key4.db and pkcs11.txt #This parameter will be ignored if secure=false dbdir=/home/user_name/.dogtag/nssdb/ #clientmode: true for client authentication, false for no client authentication #This parameter will be ignored if secure=false clientmode=true #password: password for cert9.db #This parameter will be ignored if secure=false and clientauth=false password=password #nickname: nickname for client certificate #This parameter will be ignored if clientmode=false nickname=signing_certificate #servlet: servlet name servlet=/ca/ee/ca/profileSubmitUserSignedCMCFull?profileId=caFullCMCUserSignedCertSubmit the CMC request to the CA:
$ HttpClient /home/user_name/cmc-submit.cfgIf the command succeeds, the
HTTPClientutility stored the CMC response in the file specified in theoutputparameter in the configuration file.Verify the response by passing the response file to the
CMCResponseutility. For example:$ CMCResponse -d /home/user_name/.dogtag/nssdb/ -i /home/user_name/cmc-response_round_1.binIf the first trip was successful,
CMCResponsedisplays output similar to the following:Certificates: Certificate: Data: Version: v3 Serial Number: 0x1 Signature Algorithm: SHA256withRSA - 1.2.840.113549.1.1.11 Issuer: CN=CA Signing Certificate,OU=pki-tomcat,O=unknown00262DFC6A5E Security Domain Validity: Not Before: Wednesday, May 17, 2017 6:06:50 PM PDT America/Los_Angeles Not After: Sunday, May 17, 2037 6:06:50 PM PDT America/Los_Angeles Subject: CN=CA Signing Certificate,OU=pki-tomcat,O=unknown00262DFC6A5E Security Domain ... Number of controls is 3 Control #0: CMC encrypted POP OID: {1 3 6 1 5 5 7 7 9} encryptedPOP decoded Control #1: CMCStatusInfoV2 OID: {1 3 6 1 5 5 7 7 25} BodyList: 1 OtherInfo type: FAIL failInfo=POP required Control #2: CMC ResponseInfo requestID: 15For the second trip, create a configuration file for
DecryptedPOP, such as/home/user_name/cmc_DecryptedPOP.cfg, which you use in a later step. Add the following content to the created file:#numRequests: Total number of PKCS10 requests or CRMF requests. numRequests=1 #input: full path for the PKCS10 request or CRMF request, #the content must be in Base-64 encoded format #this field is actually unused in 2nd trip input=/home/user_name/crmf.req #output: full path for the CMC request in binary format #this field is actually unused in 2nd trip output=/home/user_name/cmc2.req #tokenname: name of token where agent signing cert can be found #(default is internal) tokenname=internal #nickname: nickname for agent certificate which will be used #to sign the CMC full request. nickname=signing_certificate #dbdir: directory for cert9.db, key4.db and pkcs11.txt dbdir=/home/user_name/.dogtag/nssdb/ #password: password for cert9.db which stores the agent #certificate password=password #format: request format, either pkcs10 or crmf format=crmf oaep=true decryptedPop.enable=true encryptedPopResponseFile=/home/user_name/cmc-response_round_1.bin request.privKeyId=-25aa0a8aad395ebac7e6a19c364f0dcb5350cfef decryptedPopRequestFile=/home/user_name/cmc.DecryptedPOP.reqCreate the
DecryptPOPCMC request:$ CMCRequest /home/user_name/cmc.DecryptedPOP.cfgIf the command succeeds, the
CMCRequestutility stored the CMC request in the file specified in thedecryptedPopRequestFileparameter in the request configuration file.Create a configuration file for
HttpClient, such as/home/user_name/decrypted_POP_cmc-submit.cfg, to use in a later step to submit theDecryptedPOPCMC request to the CA. Add the following content to the created file:#host: host name for the http server host=server.example.com #port: port number port=8443 #secure: true for secure connection, false for nonsecure connection secure=true #input: full path for the enrollment request, the content must be in binary format input=/home/user_name/cmc.DecryptedPOP.req #output: full path for the response in binary format output=/home/user_name/cmc-response_round_2.bin #tokenname: name of token where TLS client authentication cert can be found (default is internal) #This parameter will be ignored if secure=false tokenname=internal #dbdir: directory for cert9.db, key4.db and pkcs11.txt #This parameter will be ignored if secure=false dbdir=/home/user_name/.dogtag/nssdb/ #clientmode: true for client authentication, false for no client authentication #This parameter will be ignored if secure=false clientmode=true #password: password for cert9.db #This parameter will be ignored if secure=false and clientauth=false password=password #nickname: nickname for client certificate #This parameter will be ignored if clientmode=false nickname=singing_certificate #servlet: servlet name servlet=/ca/ee/ca/profileSubmitUserSignedCMCFull?profileId=caFullCMCUserCertSubmit the
DecryptedPOPCMC request to the CA:$ HttpClient /home/user_name/decrypted_POP_cmc-submit.cfgIf the command succeeds, the
HTTPClientutility stored the CMC response in the file specified in theoutputparameter in the configuration file.To convert the CMC response to a PKCS #7 certificate chain, pass the CMC response file to the
-iparameter of theCMCResponseutility. For example:$ CMCResponse -i /home/user_name/cmc-response_round_2.bin -o /home/user_name/certs.p7Alternatively, to display the individual certificates in PEM format, pass the -v to the utility.
If the second trip was successful,
CMCResponsedisplays output similar to the following:Certificates: Certificate: Data: Version: v3 Serial Number: 0x2D Signature Algorithm: SHA256withRSA - 1.2.840.113549.1.1.11 Issuer: CN=CA Signing Certificate,OU=pki-tomcat,O=unknown00262DFC6A5E Security Domain Validity: Not Before: Thursday, June 15, 2017 3:43:45 PM PDT America/Los_Angeles Not After: Tuesday, December 12, 2017 3:43:45 PM PST America/Los_Angeles Subject: CN=user_name,UID=example,OU=keyArchivalExample ... Number of controls is 1 Control #0: CMCStatusInfo OID: {1 3 6 1 5 5 7 7 1} BodyList: 1 Status: SUCCESS
5.6. Performing bulk issuance
In certain situations, an administrator may need to submit and generate a large number of certificates simultaneously. A combination of tools supplied with Certificate System can be used to post a file containing certificate requests to the CA. This example procedure uses the PKCS10Client command to generate the requests and the sslget command to send the requests to the CA.
Multiple variables are needed to identify the CA (host, port) and the items used for authentication (the agent certificate and certificate database and password). For example, to export these variables:
export d=/var/tmp/testDir
export p=password
export f=/var/tmp/server.csr.txt
export nick="PKI Administrator for example.test"
export cahost=1.2.3.4
export caport=8443
# cat << EOF > ${d}/pwd.txt password EOFCreate a NSS database for an agent with SSL client certificate for automatic certificate issuance:
# pki -d ${d}-c ${p} client-initImport the admin PKCS#12 file from a prior CA installation:
# pk12util -i ~/ca_admin_cert.p12 -d ${d}Export the CA certificate:
# pki-server cert-export ca_signing -i subca1 --cert-file ${d}/myca.crtImport the certificate:
# pki -d ${d} -n "${nick}" -C ${d}/pwd.txt client-cert-import myCA --ca-cert ${d}/myca.crtVerify the admin certificate trust chain:
# certutil -O -d ${d}/ -n "PKI Administrator for example.test"

"myCA" [CN=CA Signing Certificate,OU=subca1,O=Sub CA1 Example Test]
  "PKI Administrator for example.test" [CN=PKI Administrator,E=caadmin@example.test,OU=subca1,O=Sub CA1 Example Test]
Create individual CSR files with header and footer:
time for i in {1..10}; do /usr/bin/PKCS10Client -d ${d} -p ${p} -o ${f}.${i} -n "cn=testms${i}.example.test"; doneSubmit these CSR files sequentially to the CA:
tail -f /var/log/pki/subca1/ca/transactions &
time for i in {1..10}; do pki -U https://${cahost}:${caport}/ca -d ${d} -n "${nick}" -C ${d}/pwd.txt ca-cert-request-submit --profile caAgentServerCert --csr-file ${f}.${i} ; done
5.6.1. Enrolling a certificate on a Cisco router
Simple Certificate Enrollment Protocol (SCEP), designed by Cisco, is a way for a router to communicate a certificate issuing authority, such as a CA, to enroll certificates for the router.
Normally, a router installer enters the CA’s URL and a challenge password (also called a one-time PIN) into the router and issues a command to initiate the enrollment. The router then communicates with the CA over SCEP to generate, request, and retrieve the certificate. The router can also check the status of a pending request using SCEP.
5.6.2. Enabling SCEP enrollments
For security reasons, SCEP enrollments are disabled by default in the CA. To allow routers to be enrolled, SCEP enrollments must be manually enabled for the CA.
Stop the CA server, so that you can edit the configuration files.
# pki-server stop instance_nameOpen the CA’s
CS.cfgfile.# vim /var/lib/pki/ instance_name/ca/conf/CS.cfgSet the
ca.scep.enableto true. If the parameter is not present, then add a line with the parameter.ca.scep.enable=trueRestart the CA server.
pki-server start instance_name
5.6.3. Configuring security settings for SCEP
Several different parameters allow administrators to set specific security requirements for SCEP connections, such as not using the same certificate for enrollment authentication and regular certificate enrollments, or setting allowed encryption algorithms to prevent downgrading the connection strength. These parameters are listed in the following table.
| Parameter | Description |
|---|---|
| ca.scep.encryptionAlgorithm | Sets the default or preferred encryption algorithm. |
| ca.scep.allowedEncryptionAlgorithms | Sets a comma-separated list of allowed encryption algorithms. |
| ca.scep.hashAlgorithm | Sets the default or preferred hash algorithm. |
| ca.scep.allowedHashAlgorithms | Sets a comma-separated list of allowed hash algorithms. |
| ca.scep.nickname | Gives the nickname of the certificate to use for SCEP communication. The default is to use the CA’s key pair and certificate unless this parameter is set. |
| ca.scep.nonceSizeLimit | Sets the maximum nonce size, in bytes, allowed for SCEP requests. The default is 16 bytes. |
To set security settings for connections for SCEP enrollments:
Stop the CA server, so that you can edit the configuration files.
# pki-server stop instance_nameOpen the CA’s
CS.cfgfile.# vim /var/lib/pki/ instance_name/ca/conf/CS.cfgSet the desired security parameters, as listed in the above table. If the parameter is not already present, then add it to the
CS.cfgfile.ca.scep.encryptionAlgorithm=DES3 ca.scep.allowedEncryptionAlgorithms=DES3 ca.scep.hashAlgorithm=SHA1 ca.scep.allowedHashAlgorithms=SHA1,SHA256,SHA512 ca.scep.nickname=Server-Cert ca.scep.nonceSizeLimit=20Restart the CA server.
pki-server start instance_name
5.6.4. Configuring a router for SCEP enrollment
Not all versions of router IOS have the relevant crypto features. Make sure that the firmware image has the Certification Authority Interoperability feature. Certificate System SCEP support was tested on a Cisco 2611 router running IOS C2600 Software (C2600-JK9S-M), version 12.2(40), RELEASE SOFTWARE (fc1).
Before enrolling SCEP certificates on the router, make sure that the router is appropriately configured:
- The router must be configured with an IP address, DNS server, and routing information.
- The router’s date/time must be correct.
- The router’s hostname and dnsname must be configured.
See the router documentation for instructions on configuring the router hardware.
5.6.5. Generating the SCEP Certificate for a router
The following procedure details how to generate the SCEP certificate for a router.
- Pick a random PIN.
Add the PIN and the router’s ID to the
flatfile.txtfile so that the router can authenticate directly against the CA. For example:# vim /var/lib/pki/ instance_name/ca/conf/flatfile.txt UID:172.16.24.238 PWD:Uojs93wkfd0ISBe sure to insert an empty line after the
PWDline.The router’s IP address can be an IPv4 address or an IPv6 address.
Using flat file authentication is described in Section 11.2.4, “Configuring Flat File Authentication”.
Log into the router’s console. For this example, the router’s name is
scep:scep>Enable privileged commands.
scep> enableEnter configuration mode.
scep# conf tImport the CA certificate for every CA in the certificate chain, starting with the root. For example, the following command sequence imports two CA certificates in the chain into the router:
scep(config)# crypto ca trusted-root1
scep(ca-root)# root CEP http://server.example.com:8080/ca/cgi-bin/pkiclient.exe
scep(ca-root)# crl optional
scep(ca-root)# exit
scep(config)# cry ca authenticate 1
scep(config)# crypto ca trusted-root0
scep(ca-root)# root CEP http://server.example.com:8080/ca/cgi-bin/pkiclient.exe
scep(ca-root)# crl optional
scep(ca-root)# exit
scep(config)# cry ca authenticate 0
Set up a CA identity, and enter the URL to access the SCEP enrollment profile. For example, for the CA:
scep(config)# crypto ca identity CA
scep(ca-identity)# enrollment url http://server.example.com:8080/ca/cgi-bin
scep(ca-identity)# crl optional
Get the CA’s certificate.
scep(config)# crypto ca authenticate CA
Certificate has the following attributes:
Fingerprint: 145E3825 31998BA7 F001EA9A B4001F57
% Do you accept this certificate? [yes/no]: yes
Generate RSA key pair.
scep(config)# crypto key generate rsa
The name for the keys will be: scep.server.example.com
Choose the size of the key modulus in the range of 360 to 2048 for your
General Purpose Keys. Choosing a key modulus greater than 512 may take
a few minutes.

How many bits in the modulus [512]:
Generating RSA keys ...
[OK]
Lastly, generate the certificate on the router.
scep(config)# crypto ca enroll CA
%
% Start certificate enrollment ..
% Create a challenge password. You will need to verbally provide this
password to the CA Administrator in order to revoke your certificate.
For security reasons your password will not be saved in the configuration.
Please make a note of it.

Password: secret
Re-enter password: secret

% The subject name in the certificate will be: scep.server.example.com
% Include the router serial number in the subject name? [yes/no]: yes
% The serial number in the certificate will be: 57DE391C
% Include an IP address in the subject name? [yes/no]: yes
% Interface: Ethernet0/0
% Request certificate from CA? [yes/no]: yes
% Certificate request sent to Certificate Authority
% The certificate request fingerprint will be displayed.
% The 'show crypto ca certificate' command will also show the fingerprint.

% Fingerprint:D89DB555 E64CC2F7 123725B4 3DBDF263

Jan 12 13:41:17.348: %CRYPTO-6-CERTRET: Certificate received from Certificate
Close configuration mode.
scep(config)# exitTo make sure that the router was properly enrolled, list all of the certificates stored on the router.
scep# show crypto ca certificates
Certificate
 Status: Available
 Certificate Serial Number: 0C
 Key Usage: General Purpose
 Issuer:
	CN = Certificate Authority
	 O = Sfbay Red hat Domain 20070111d12
 Subject Name Contains:
	Name: scep.server.example.com
	IP Address: 10.14.1.94
	Serial Number: 57DE391C
 Validity Date:
	start date: 21:42:40 UTC Jan 12 2007
	end date: 21:49:50 UTC Dec 31 2008
 Associated Identity: CA

CA Certificate
 Status: Available
 Certificate Serial Number: 01
 Key Usage: Signature
 Issuer:
	CN = Certificate Authority
	 O = Sfbay Red hat Domain 20070111d12
 Subject:
	CN = Certificate Authority
	 O = Sfbay Red hat Domain 20070111d12
 Validity Date:
	start date: 21:49:50 UTC Jan 11 2007
	end date: 21:49:50 UTC Dec 31 2008
 Associated Identity: CA
5.6.6. Working with Subordinate CAs
Before a router can authenticate to a CA, every CA certificate in the CA’s certificate chain must be imported into the router, starting with the root. For example, the following command sequence imports two CA certificates in the chain into the router:
scep(config)# crypto ca trusted-root1
scep(ca-root)# root CEP http://server.example.com:8080/ca/cgi-bin/pkiclient.exe
scep(ca-root)# crl optional
scep(ca-root)# exit
scep(config)# cry ca authenticate 1
scep(config)# crypto ca trusted-root0
scep(ca-root)# root CEP http://server.example.com:8080/ca/cgi-bin/pkiclient.exe
scep(ca-root)# crl optional
scep(ca-root)# exit
scep(config)# cry ca authenticate 0
If the CA certificates do not have the CRL distribution point extension set, turn off the CRL requirement by setting it to optional:
scep(ca-root)# crl optionalAfter that, set up the CA identity as described in Section 5.6.5, “Generating the SCEP Certificate for a router”.
5.6.7. Re-enrolling a router
Before a router can be re-enrolled with new certificates, the existing configuration has to be removed.
Remove (zeroize) the existing keys.
scep(config)# crypto key zeroize rsa
% Keys to be removed are named scep.server.example.com.
Do you really want to remove these keys? [yes/no]: yes
Remove the CA identity.
scep(config)# no crypto ca identity CA
% Removing an identity will destroy all certificates received from
the related Certificate Authority.

Are you sure you want to do this? [yes/no]: yes
% Be sure to ask the CA administrator to revoke your certificates.

No enrollment sessions are currently active.
5.6.8. Enabling debugging
The router provides additional debugging during SCEP operations by enabling the debug statements.
 scep# debug crypto pki callbacks
 Crypto PKI callbacks debugging is on

 scep# debug crypto pki messages
 Crypto PKI Msg debugging is on

 scep# debug crypto pki transactions
 Crypto PKI Trans debugging is on

 scep#debug crypto verbose
 verbose debug output debugging is on
5.6.9. Issuing ECC certificates with SCEP
By default, an ECC CA does not support SCEP out of box. However, it is possible to work around it by using a designated RSA certificate to handle each of the following two areas:
- encryption/decryption cert - designate an RSA cert having encryption/decryption capability; (scepRSAcert in the following example)
- signature cert - get an RSA cert to use on the client side for signing purpose instead of self-signed; (signingCert cert in the following example)
For example, with scepRSAcert cert being the encrypt/decrypt cert, and signingCert being the signing cert:
sscep enroll -c ca.crt -e scepRSAcert.crt -k local.key -r local.csr -K sign.key -O sign.crt -E 3des -S sha256 -l cert.crt -u 'http://example.example.com:8080/ca/cgi-bin/pkiclient.exe'5.7. Using Certificate Transparency
Certificate System provides a basic version of Certificate Transparency (CT) V1 support (rfc 6962). It has the capability of issuing certificates with embedded Signed Certificate Time stamps (SCTs) from any trusted log where each deployment site choses to have its root CA cert included. You can also configure the system to support multiple CT logs. A minimum of one trusted CT log is required for this feature to work.
It is the responsibility of the deployment site to establish its trust relationship with a trusted CT log server.
For more information on how to configure Certificate Transparency, see the Configuring Certificate Transparency section in the Red Hat Certificate System Planning, Installation, and Deployment Guide.
5.7.1. Testing Certificate Transparency
As example on how to test a CT setup, the following procedure describes an actual test against Google CT test logs. A more comprehensive test procedure would involve setting up a TLS server and test for the inclusion of its certs from its specified CT logs. However, the following serves as a quick test that checks for inclusion of the SCT extension once a certificate has been issued.
The test procedure consists in generating and submitting a Certificate Signing Request (CSR), in order to verify its SCT extension using openssl. The test configuration in the CS.cfg file is as follows:
ca.certTransparency.mode=enabled
ca.certTransparency.log.1.enable=true
ca.certTransparency.log.1.pubKey=MFkwEwYHKoZIzj0CAQYIKoZIzj0DAQcDQgAEw8i8S7qiGEs9NXv0ZJFh6uuOm<snip>
ca.certTransparency.log.1.url=http://ct.googleapis.com:80/testtube/
ca.certTransparency.log.1.version=1
ca.certTransparency.log.2.enable=true
ca.certTransparency.log.2.pubKey=MFkwEwYHKoZIzj0CAQYIKoZIzj0DAQcDQgAEKATl2B3SAbxyzGOfNRB+AytNTG<snip>
ca.certTransparency.log.2.url=http://ct.googleapis.com:80/logs/crucible/
ca.certTransparency.log.2.version=1
ca.certTransparency.log.3.enable=false
ca.certTransparency.log.3.pubKey=MFkwEwYHKoZIzj0CAQYIKoZIzj0DAQcDQgAEiKfWtuoWCPMEzSKySjMjXpo38W<snip>
ca.certTransparency.log.3.url=http://ct.googleapis.com:80/logs/solera2020/
ca.certTransparency.log.3.version=1
ca.certTransparency.log.num=3
First, generate a CSR, e.g:
# PKCS10Client -d . -p passwd -l 2048 -n "cn=user.test.domain.com,OU=user-TEST,O=TestDomain" -o pkcs10-TLS.reqNext, submit the CSR to an enrollment profile depending on the CT mode defined by the
ca.certTransparency.modeparameter inCS.cfg:- if the parameter is set to enabled, use any enrollment profile
- if the parameter is set to perProfile, use one of the CT profiles: e.g. caServerCertWithSCT
-
Copy the issued b64 cert into a file, e.g.
.ct1.pem. Convert the pem to binary:
# AtoB ct1.pem ct1.binDisplay the DER certificate content:
# openssl x509 -noout -text -inform der -in ct1.binObserve that the SCT extension is present, e.g:
								CT Precertificate SCTs:
								 Signed Certificate Timestamp:
										 Version   : v1 (0x0)
										 Log ID    : B0:CC:83:E5:A5:F9:7D:6B:AF:7C:09:CC:28:49:04:87:
																 2A:C7:E8:8B:13:2C:63:50:B7:C6:FD:26:E1:6C:6C:77
										 Timestamp : Jun 11 23:07:14.146 2020 GMT
										 Extensions: none
										 Signature : ecdsa-with-SHA256
																 30:44:02:20:6E:E7:DC:D6:6B:A6:43:E3:BB:8E:1D:28:
																 63:C6:6B:03:43:4E:7A:90:0F:D6:2B:E8:ED:55:1D:5F:
																 86:0C:5A:CE:02:20:53:EB:75:FA:75:54:9C:9F:D3:7A:
																 D4:E7:C6:6C:9B:33:2A:75:D8:AB:DE:7D:B9:FA:2B:19:
																 56:22:BB:EF:19:AD
								 Signed Certificate Timestamp:
										 Version   : v1 (0x0)
										 Log ID    : C3:BF:03:A7:E1:CA:88:41:C6:07:BA:E3:FF:42:70:FC:
																 A5:EC:45:B1:86:EB:BE:4E:2C:F3:FC:77:86:30:F5:F6
										 Timestamp : Jun 11 23:07:14.516 2020 GMT
										 Extensions: none
										 Signature : ecdsa-with-SHA256
																 30:44:02:20:4A:C9:4D:EF:64:02:A7:69:FF:34:4E:41:
																 F4:87:E1:6D:67:B9:07:14:E6:01:47:C2:0A:72:88:7A:
																 A9:C3:9C:90:02:20:31:26:15:75:60:1E:E2:C0:A3:C2:
																 ED:CF:22:A0:3B:A4:10:86:D1:C1:A3:7F:68:CC:1A:DD:
																 6A:5E:10:B2:F1:8F
Alternatively, verify the SCT by running an asn1 dump:
# openssl asn1parse -i -inform der -in ct1.binand observe the hex dump, e.g:
  740:d=4  hl=4 l= 258 cons:     SEQUENCE
		744:d=5  hl=2 l=  10 prim:      OBJECT            :CT Precertificate SCTs
		756:d=5  hl=3 l= 243 prim:      OCTET STRING      [HEX DUMP]:0481F000EE007500B0CC83E5A5F97D6B<snip>