이 콘텐츠는 선택한 언어로 제공되지 않습니다.
Chapter 5. Installing OpenShift Serverless
5.1. Installing OpenShift Serverless
This guide walks cluster administrators through installing the OpenShift Serverless Operator to an OpenShift Container Platform cluster.
OpenShift Serverless is supported for installation in a restricted network environment. For more information, see Using Operator Lifecycle Manager on restricted networks.
5.1.1. Cluster sizing requirements
To run OpenShift Serverless, the OpenShift Container Platform cluster must be sized correctly. The minimum requirement to use OpenShift Serverless is a cluster with 10 CPUs and 40GB memory.
The total size requirements to run OpenShift Serverless are dependent on the applications deployed. By default, each pod requests ~400m of CPU, so the minimum requirements are based on this value.
In the size requirement provided, an application can scale up to 10 replicas. Lowering the actual CPU request of applications can increase the number of possible replicas.
You can use the MachineSet API to manually scale your cluster up to the desired size. The minimum requirements usually mean that you must scale up one of the default MachineSets by two additional machines.
For more information on using the MachineSet API, see the documentation on Creating MachineSets.
For more information on scaling a MachineSet manually, see the documentation on manually scaling MachineSets.
The requirements provided relate only to the pool of worker machines of the OpenShift Container Platform cluster. Master nodes are not used for general scheduling and are omitted from the requirements.
The following limitations apply to all OpenShift Serverless deployments:
- Maximum number of Knative services: 1000
- Maximum number of Knative revisions: 1000
5.1.1.1. Additional requirements for advanced use-cases
For more advanced use-cases such as logging or metering on OpenShift Container Platform, you must deploy more resources. Recommended requirements for such use-cases are 24 CPUs and 96GB of memory.
If you have high availability (HA) enabled on your cluster, this requires between 0.5 - 1.5 cores and between 200MB - 2GB of memory for each replica of the Knative Serving control plane. HA is enabled for some Knative Serving components by default. You can disable HA by following the documentation on Configuring high availability replicas on OpenShift Serverless.
Before upgrading to the latest Serverless release, you must remove the community Knative Eventing operator if you have previously installed it. Having the Knative Eventing operator installed will prevent you from being able to install the latest Technology Preview version of Knative Eventing using the OpenShift Serverless Operator.
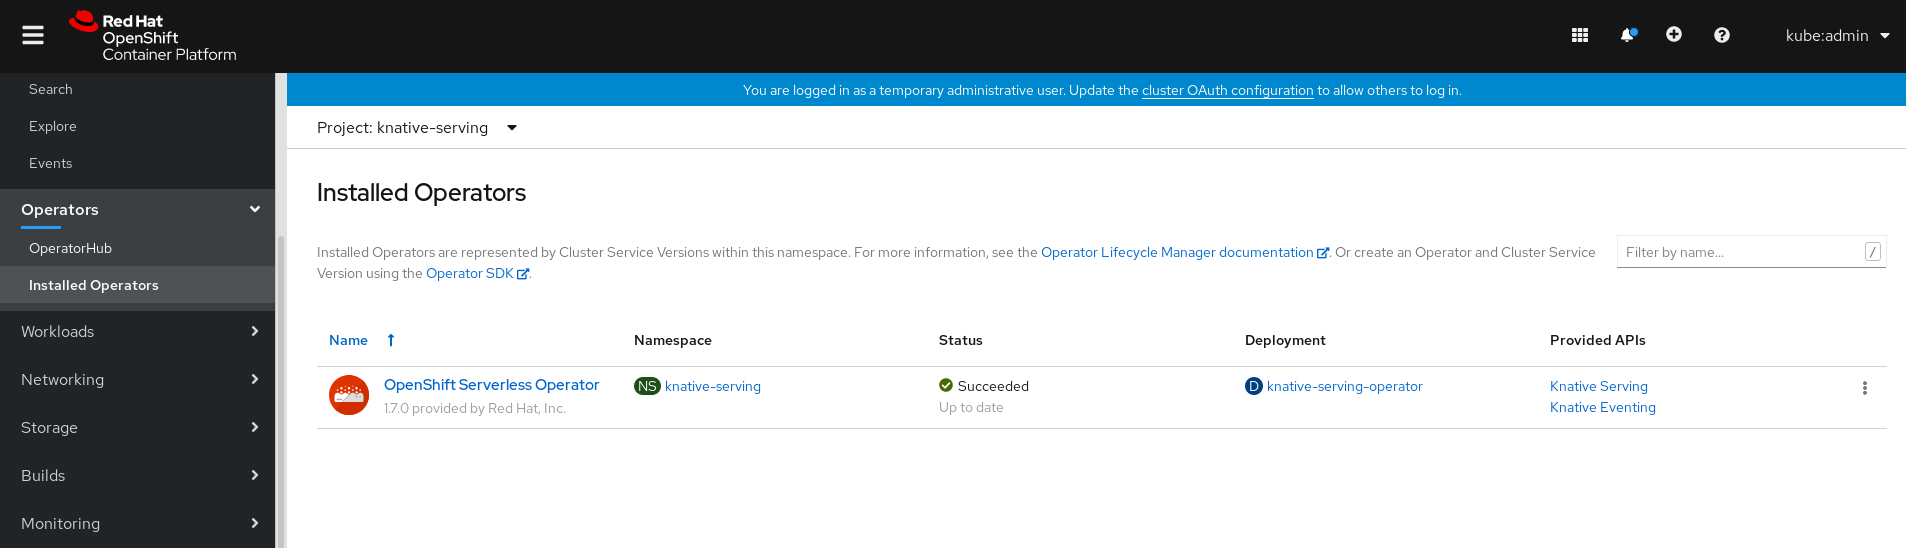
5.1.2. Installing the OpenShift Serverless Operator
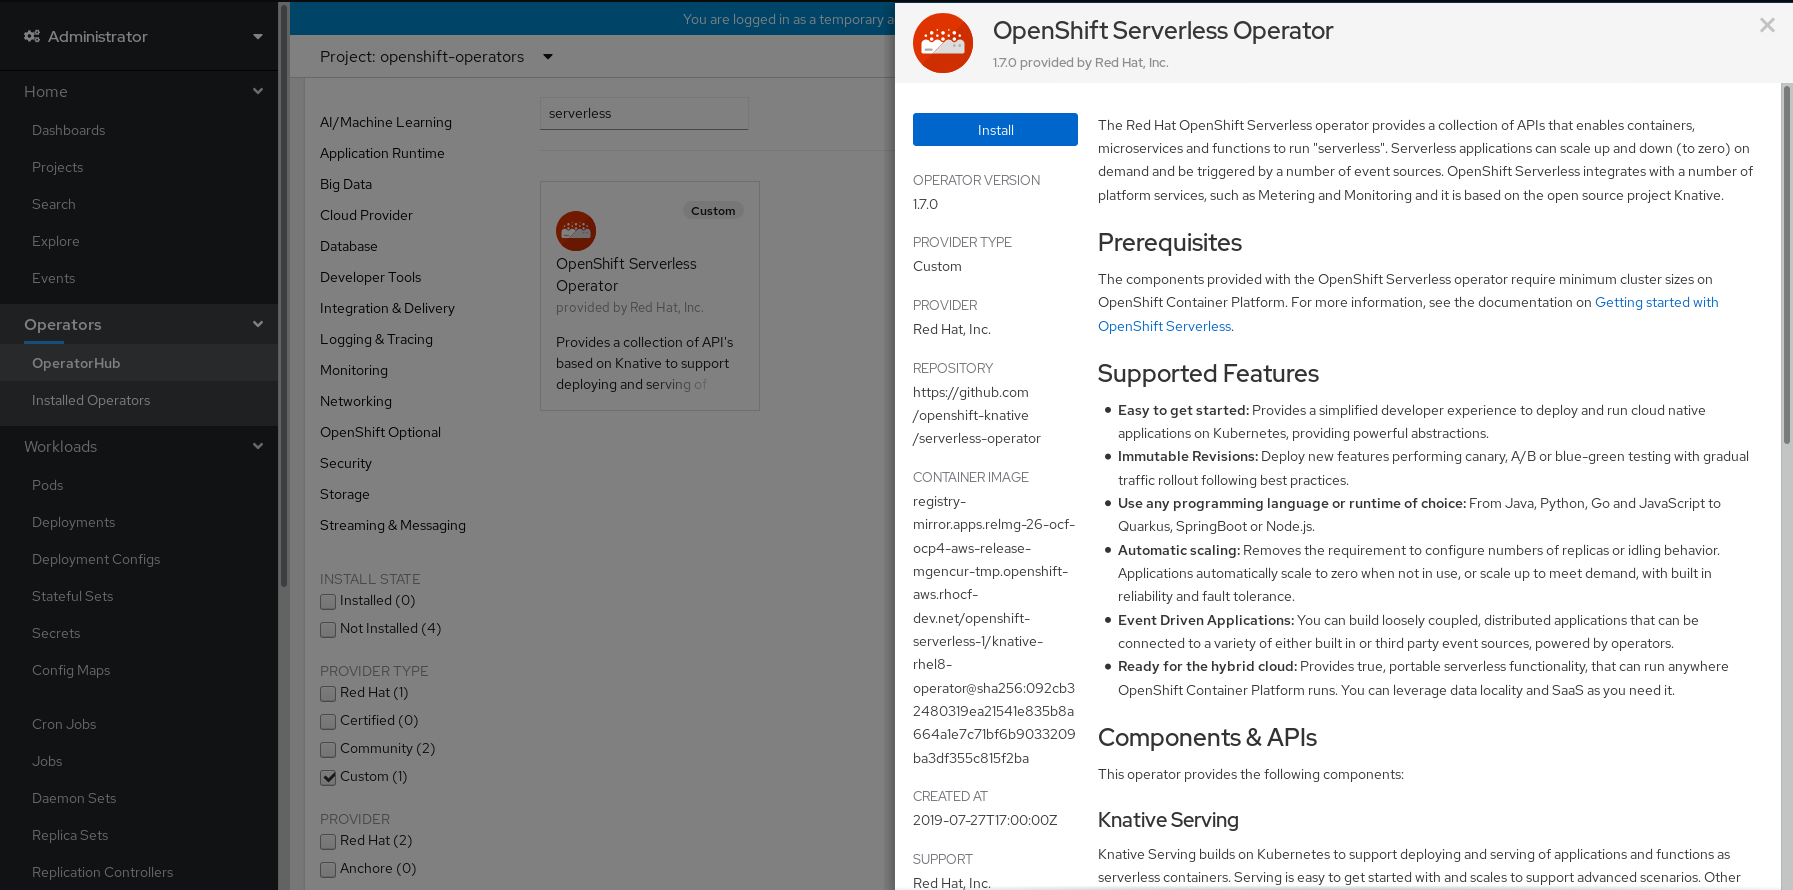
This procedure describes how to install and subscribe to the OpenShift Serverless Operator from the OperatorHub using the OpenShift Container Platform web console.
Procedure
-
In the OpenShift Container Platform web console, navigate to the Operators
OperatorHub page. Scroll, or type they keyword Serverless into the Filter by keyword box to find the OpenShift Serverless Operator.

Review the information about the Operator and click Install.
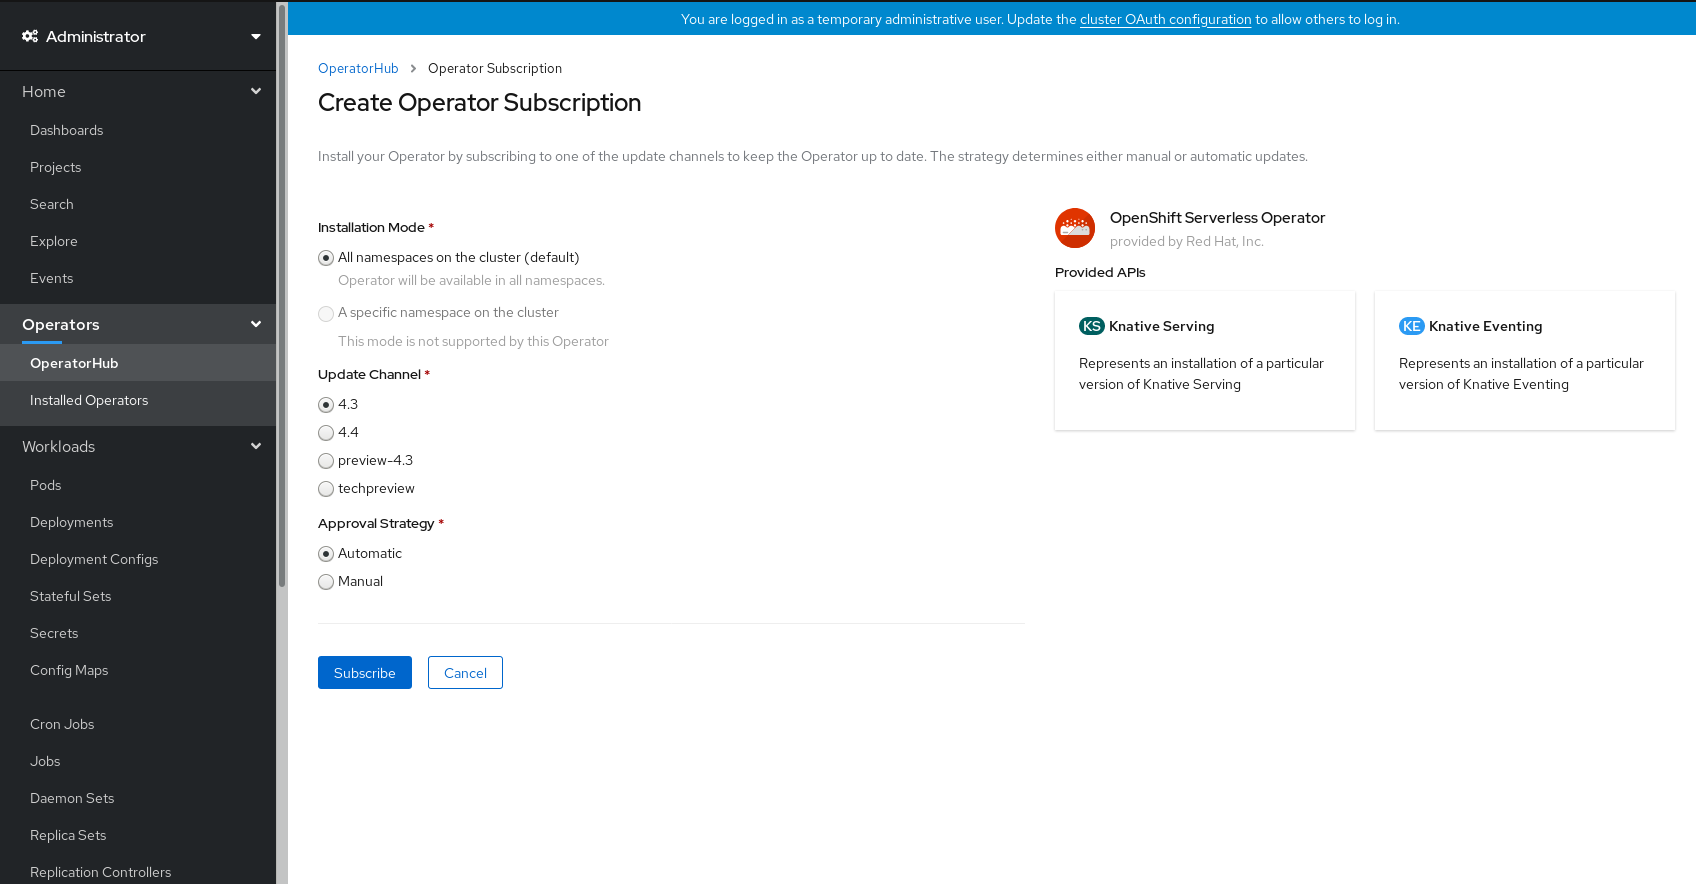
On the Create Operator Subscription page:
-
The Installation Mode is All namespaces on the cluster (default). This mode installs the Operator in the default
openshift-operatorsnamespace to watch and be made available to all namespaces in the cluster. -
The Installed Namespace will be
openshift-operators. - Select 4.3 as the Update Channel.
- Select Automatic or Manual approval strategy.
-
The Installation Mode is All namespaces on the cluster (default). This mode installs the Operator in the default
- Click Subscribe to make the Operator available to the selected namespaces on this OpenShift Container Platform cluster.
From the Catalog
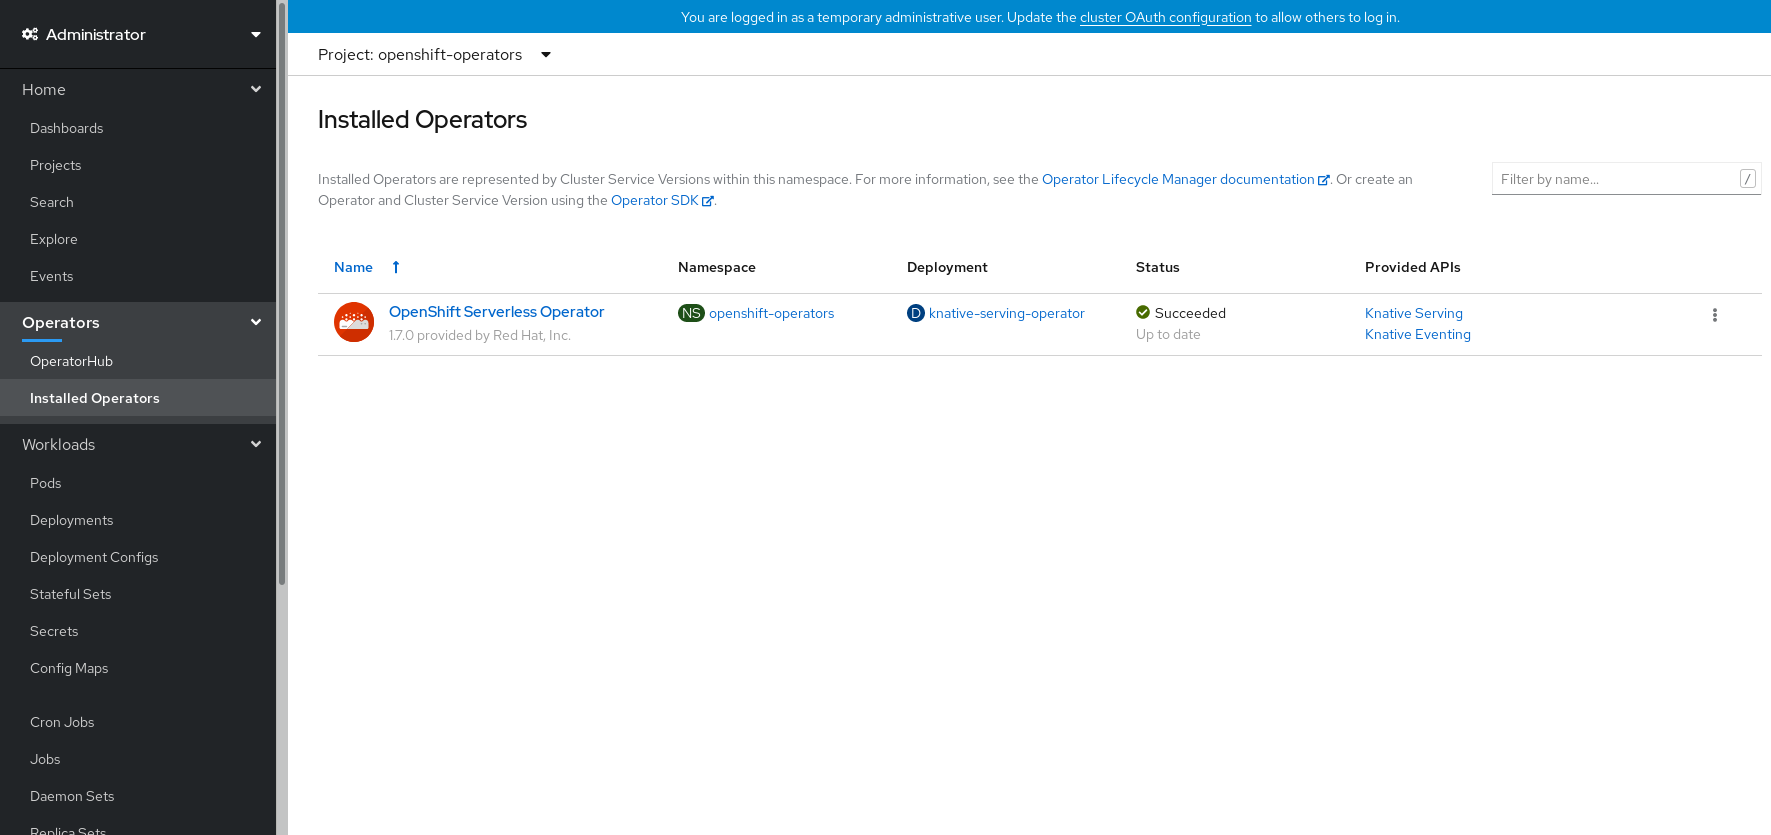
Operator Management page, you can monitor the OpenShift Serverless Operator subscription’s installation and upgrade progress. - If you selected a Manual approval strategy, the subscription’s upgrade status will remain Upgrading until you review and approve its install plan. After approving on the Install Plan page, the subscription upgrade status moves to Up to date.
- If you selected an Automatic approval strategy, the upgrade status should resolve to Up to date without intervention.
Verification steps
After the Subscription’s upgrade status is Up to date, select Catalog
If it does not:
-
Switch to the Catalog
Operator Management page and inspect the Operator Subscriptions and Install Plans tabs for any failure or errors under Status. -
Check the logs in any pods in the
openshift-operatorsproject on the WorkloadsPods page that are reporting issues to troubleshoot further.
Additional resources
- For more information on installing Operators, see the OpenShift Container Platform documentation on Adding Operators to a cluster.
5.1.3. Next steps
- After the OpenShift Serverless Operator is installed, you can install the Knative Serving component. See the documentation on Installing Knative Serving.
- After the OpenShift Serverless Operator is installed, you can install the Knative Eventing component. See the documentation on Installing Knative Eventing.
5.2. Installing Knative Serving
After you install the OpenShift Serverless Operator, you can install Knative Serving by following the procedures described in this guide.
This guide provides information about installing Knative Serving using the default settings. However, you can configure more advanced settings in the KnativeServing custom resource definition.
For more information about configuration options for the KnativeServing custom resource definition, see Advanced installation configuration options.
5.2.1. Creating the knative-serving namespace
When you create the knative-serving namespace, a knative-serving project will also be created.
You must complete this procedure before installing Knative Serving.
If the KnativeServing object created during Knative Serving’s installation is not created in the knative-serving namespace, it will be ignored.
Prerequisites
- An OpenShift Container Platform account with cluster administrator access
- Installed OpenShift Serverless Operator
5.2.1.1. Creating the knative-serving namespace using the web console
Procedure
In the OpenShift Container Platform web console, navigate to Administration
Namespaces. 
Enter
knative-servingas the Name for the project. The other fields are optional.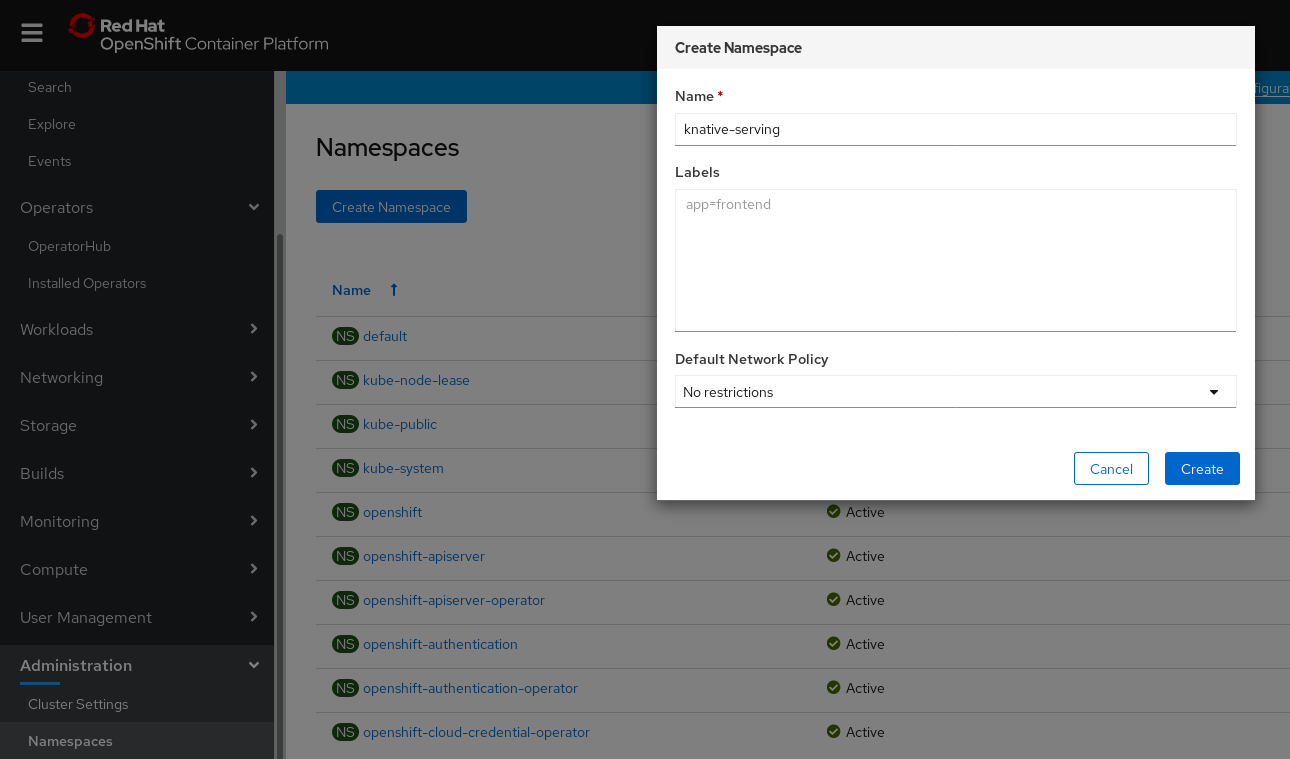
- Click Create.
5.2.1.2. Creating the knative-serving namespace using the CLI
Procedure
Create the
knative-servingnamespace:$ oc create namespace knative-serving
5.2.2. Prerequisites
- An OpenShift Container Platform account with cluster administrator access.
- Installed OpenShift Serverless Operator.
-
Created the
knative-servingnamespace.
5.2.3. Installing Knative Serving using the web console
Procedure
-
In the Administrator perspective of the OpenShift Container Platform web console, navigate to Operators
Installed Operators. - Check that the Project dropdown at the top of the page is set to Project: knative-serving.
Click Knative Serving in the list of Provided APIs for the OpenShift Serverless Operator to go to the Knative Serving tab.
Click the Create Knative Serving button.
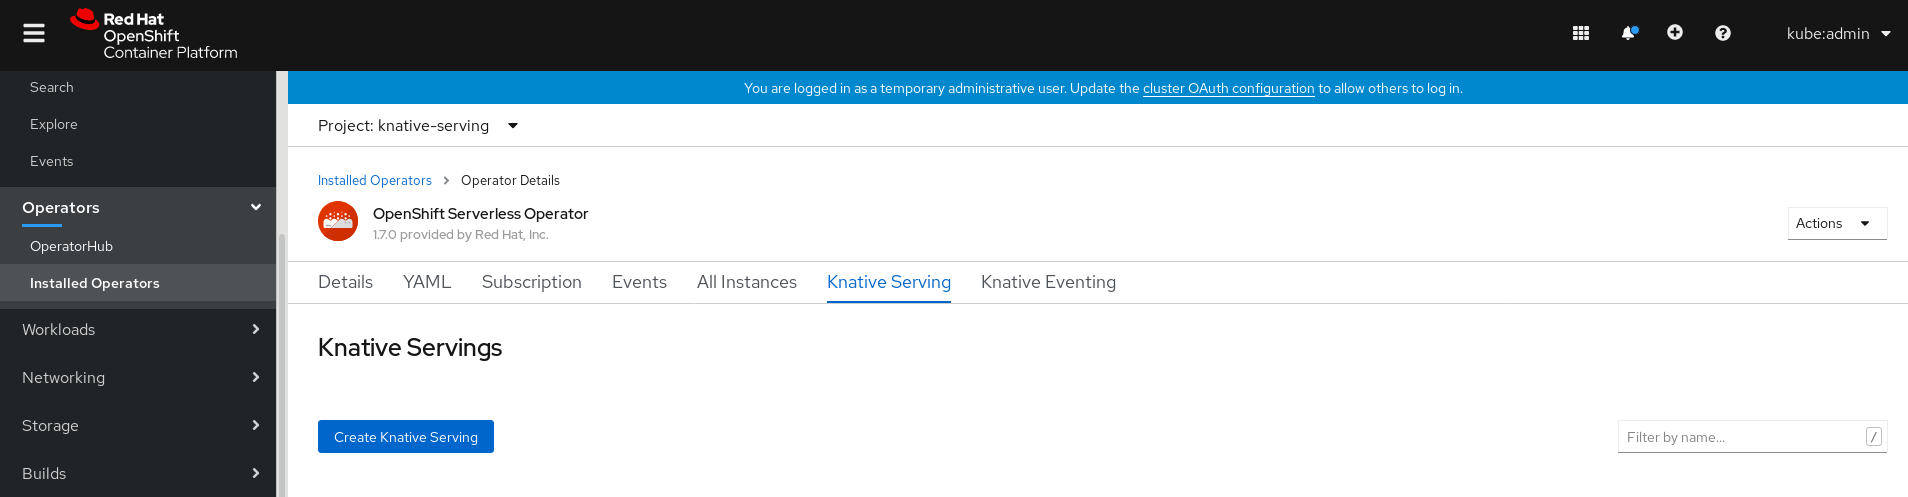
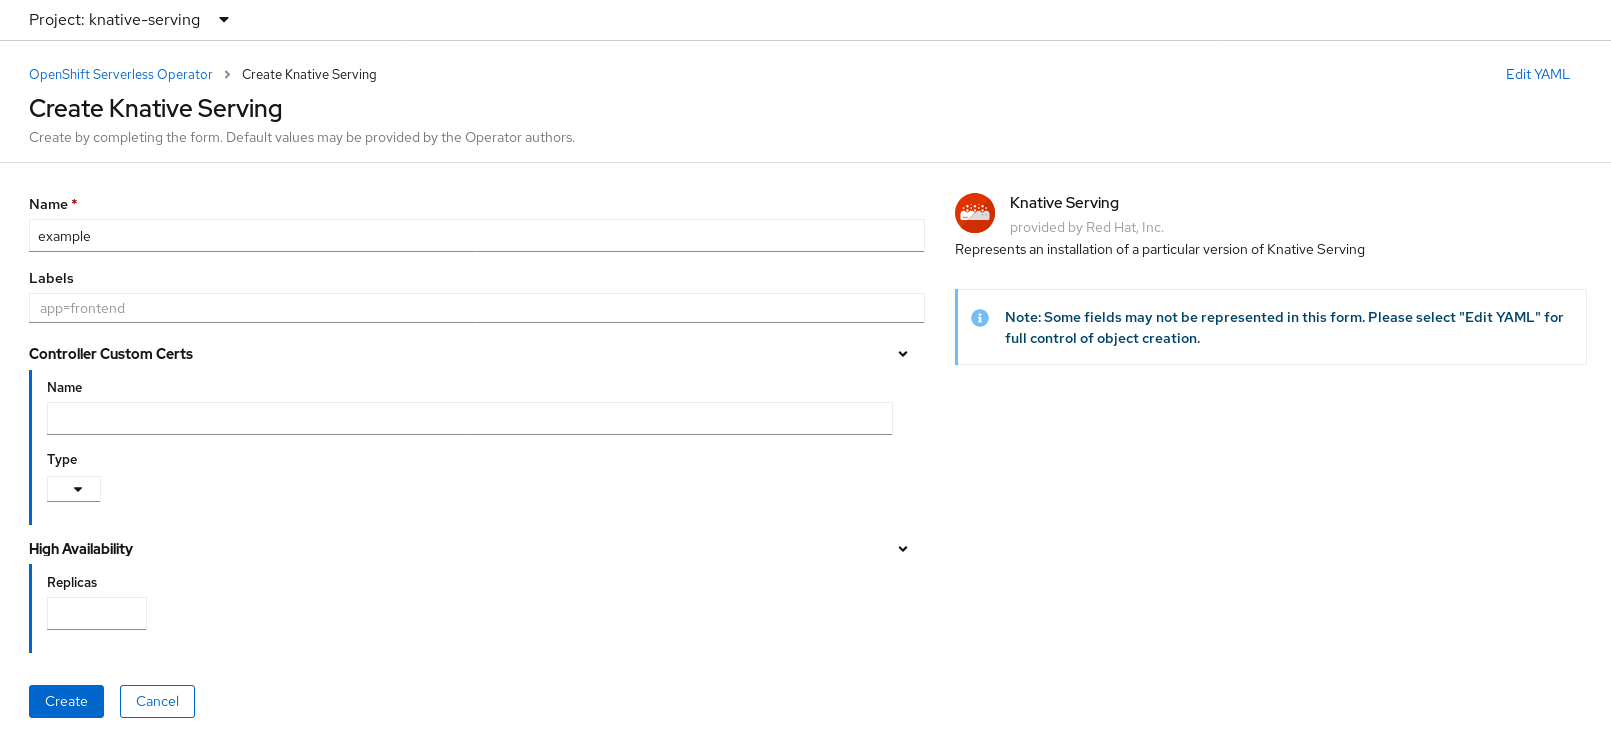
In the Create Knative Serving page, you can install Knative Serving using the default settings by clicking Create.
You can also modify settings for the Knative Serving installation by editing the
KnativeServingobject using either the form provided, or by editing the YAML.-
Using the form is recommended for simpler configurations that do not require full control of
KnativeServingobject creation. Editing the YAML is recommended for more complex configurations that require full control of
KnativeServingobject creation. You can access the YAML by clicking the edit YAML link in the top right of the Create Knative Serving page.After you complete the form, or have finished modifying the YAML, click Create.
NoteFor more information about configuration options for the KnativeServing custom resource definition, see the documentation on Advanced installation configuration options.

-
Using the form is recommended for simpler configurations that do not require full control of
After you have installed Knative Serving, the
KnativeServingobject is created, and you will be automically directed to the Knative Serving tab.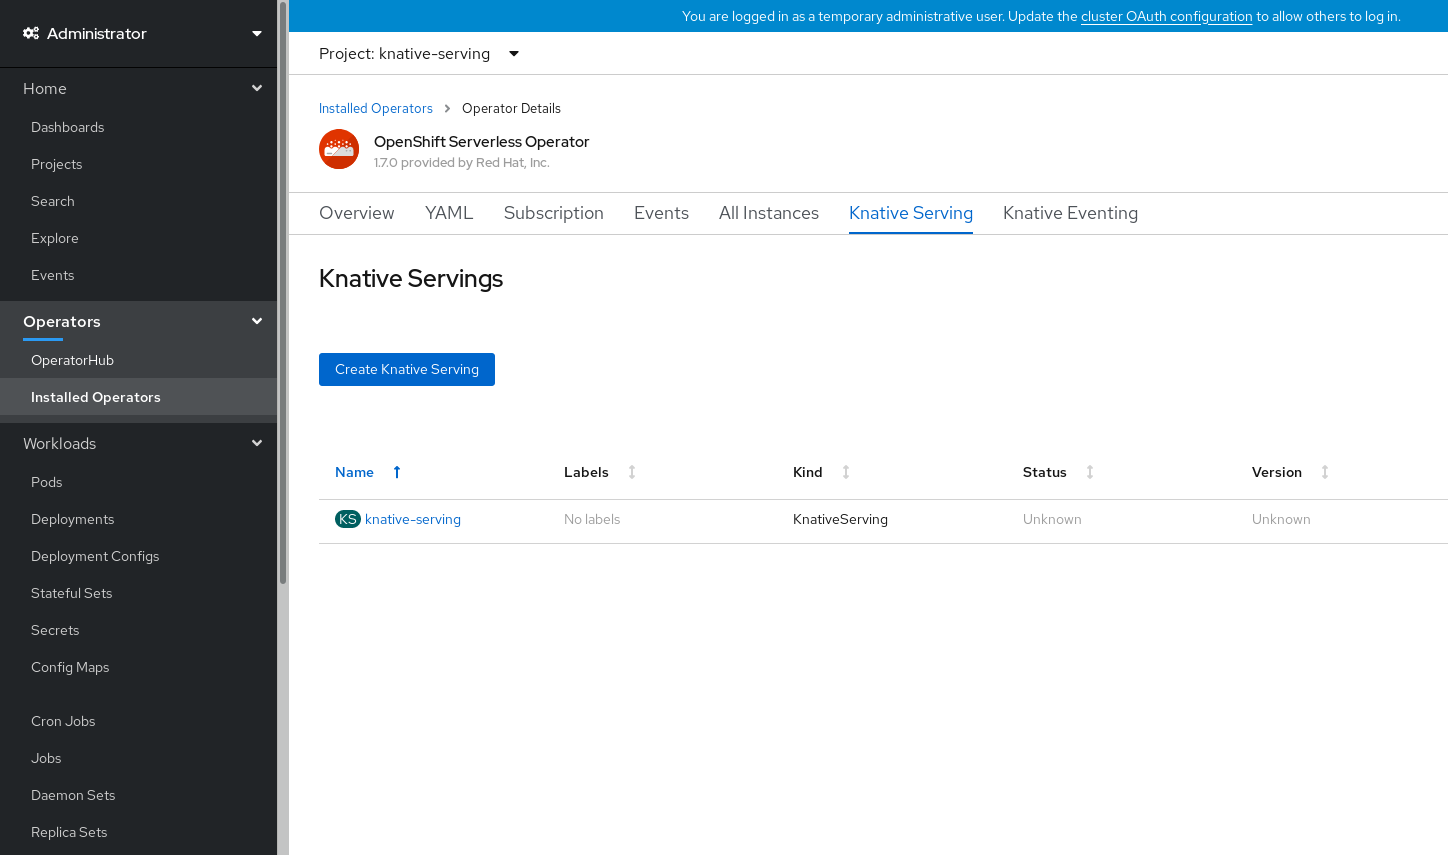
You will see
knative-servingin the list of resources.
Verification steps
-
Click on
knative-servingin the Knative Serving tab. You will be automatically directed to the Knative Serving Overview page.
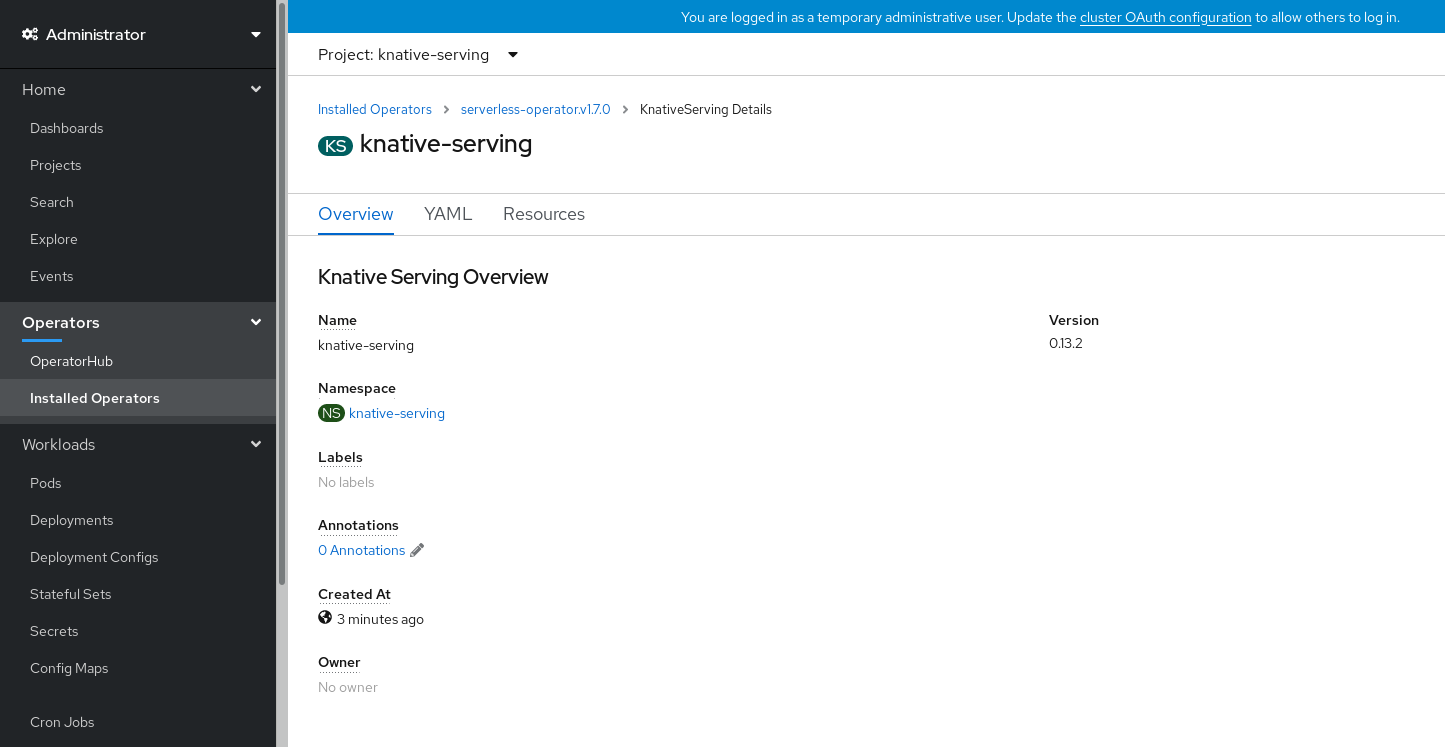
- Scroll down to look at the list of Conditions.
You should see a list of conditions with a status of True, as shown in the example image.
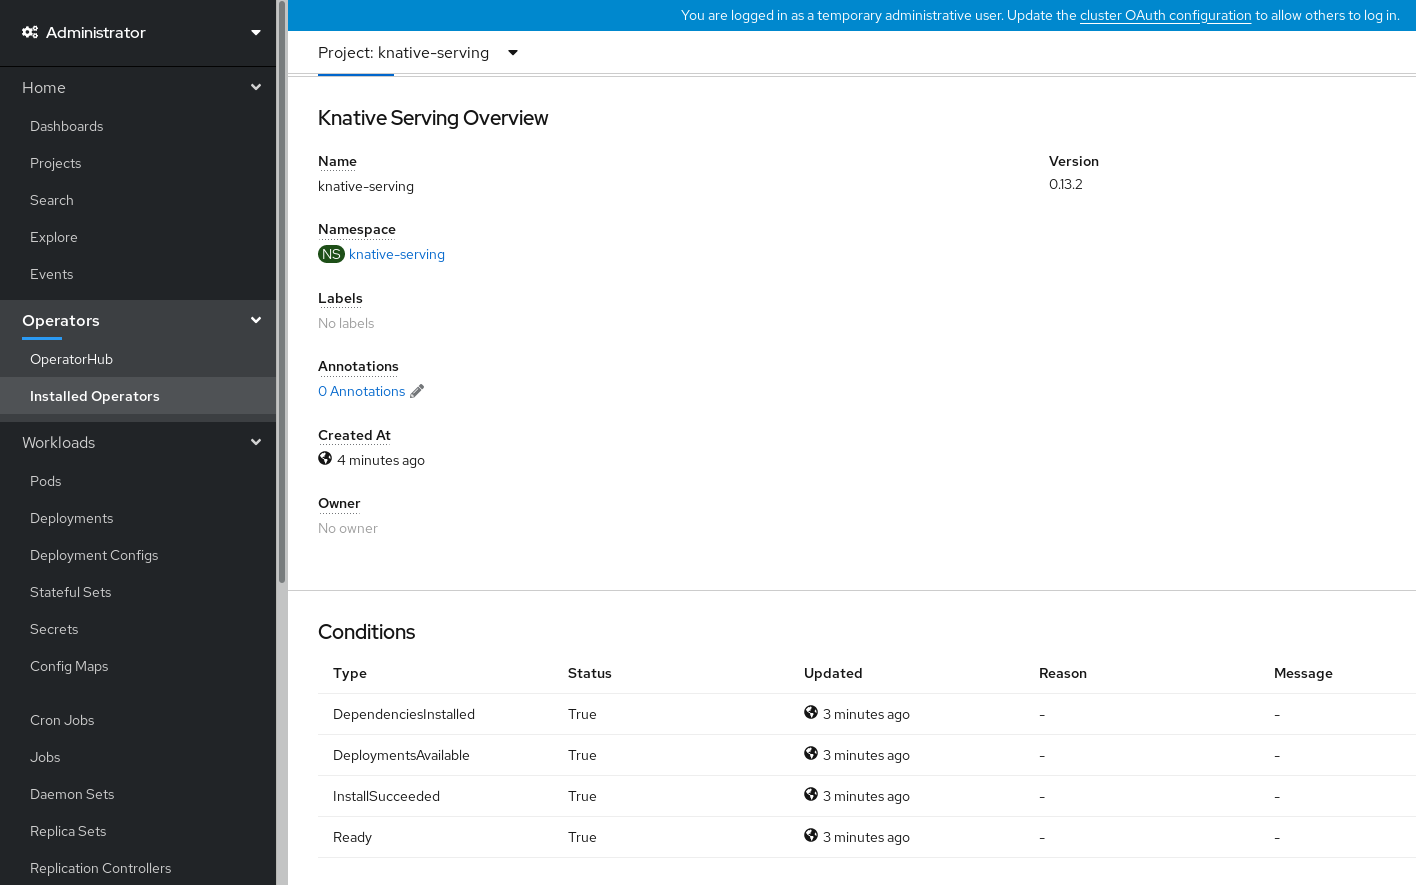 Note
NoteIt may take a few seconds for the Knative Serving resources to be created. You can check their status in the Resources tab.
- If the conditions have a status of Unknown or False, wait a few moments and then check again after you have confirmed that the resources have been created.
5.2.4. Installing Knative Serving using YAML
Procedure
-
Create a file named
serving.yaml. Copy the following sample YAML into
serving.yaml:apiVersion: operator.knative.dev/v1alpha1 kind: KnativeServing metadata: name: knative-serving namespace: knative-servingApply the
serving.yamlfile:$ oc apply -f serving.yaml
Verification steps
Verify that the installation is complete:
$ oc get knativeserving.operator.knative.dev/knative-serving -n knative-serving --template='{{range .status.conditions}}{{printf "%s=%s\n" .type .status}}{{end}}'Example output
DependenciesInstalled=True DeploymentsAvailable=True InstallSucceeded=True Ready=TrueNoteIt may take a few seconds for the Knative Serving resources to be created.
-
If the conditions have a status of
UnknownorFalse, wait a few moments and then check again after you have confirmed that the resources have been created. Check that the Knative Serving resources have been created by entering:
$ oc get pods -n knative-servingExample output
NAME READY STATUS RESTARTS AGE activator-5c596cf8d6-5l86c 1/1 Running 0 9m37s activator-5c596cf8d6-gkn5k 1/1 Running 0 9m22s autoscaler-5854f586f6-gj597 1/1 Running 0 9m36s autoscaler-hpa-78665569b8-qmlmn 1/1 Running 0 9m26s autoscaler-hpa-78665569b8-tqwvw 1/1 Running 0 9m26s controller-7fd5655f49-9gxz5 1/1 Running 0 9m32s controller-7fd5655f49-pncv5 1/1 Running 0 9m14s kn-cli-downloads-8c65d4cbf-mt4t7 1/1 Running 0 9m42s webhook-5c7d878c7c-n267j 1/1 Running 0 9m35s
5.2.5. Next steps
- For cloud events functionality on OpenShift Serverless, you can install the Knative Eventing component. See the documentation on Installing Knative Eventing.
-
Install the Knative CLI to use
kncommands with Knative Serving. For example,kn servicecommands. See the documentation on Installing the Knative CLI (kn).
5.3. Installing Knative Eventing
After you install the OpenShift Serverless Operator, you can install Knative Eventing by following the procedures described in this guide.
Knative Eventing is a Technology Preview feature only. Technology Preview features are not supported with Red Hat production service level agreements (SLAs) and might not be functionally complete. Red Hat does not recommend using them in production. These features provide early access to upcoming product features, enabling customers to test functionality and provide feedback during the development process.
For more information about the support scope of Red Hat Technology Preview features, see https://access.redhat.com/support/offerings/techpreview/.
This guide provides information about installing Knative Eventing using the default settings.
5.3.1. Creating the knative-eventing namespace
When you create the knative-eventing namespace, a knative-eventing project will also be created.
You must complete this procedure before installing Knative Eventing.
If the KnativeEventing object created during Knative Eventing’s installation is not created in the knative-eventing namespace, it will be ignored.
Prerequisites
- An OpenShift Container Platform account with cluster administrator access
- Installed OpenShift Serverless Operator
5.3.1.1. Creating the knative-eventing namespace using the web console
Procedure
-
In the OpenShift Container Platform web console, navigate to Administration
Namespaces. Click Create Namespace.
Enter
knative-eventingas the Name for the project. The other fields are optional.
- Click Create.
5.3.1.2. Creating the knative-eventing namespace using the CLI
Procedure
Create the
knative-eventingnamespace:$ oc create namespace knative-eventing
5.3.2. Prerequisites
- An OpenShift Container Platform account with cluster administrator access
- Installed OpenShift Serverless Operator
-
Created the
knative-eventingnamespace
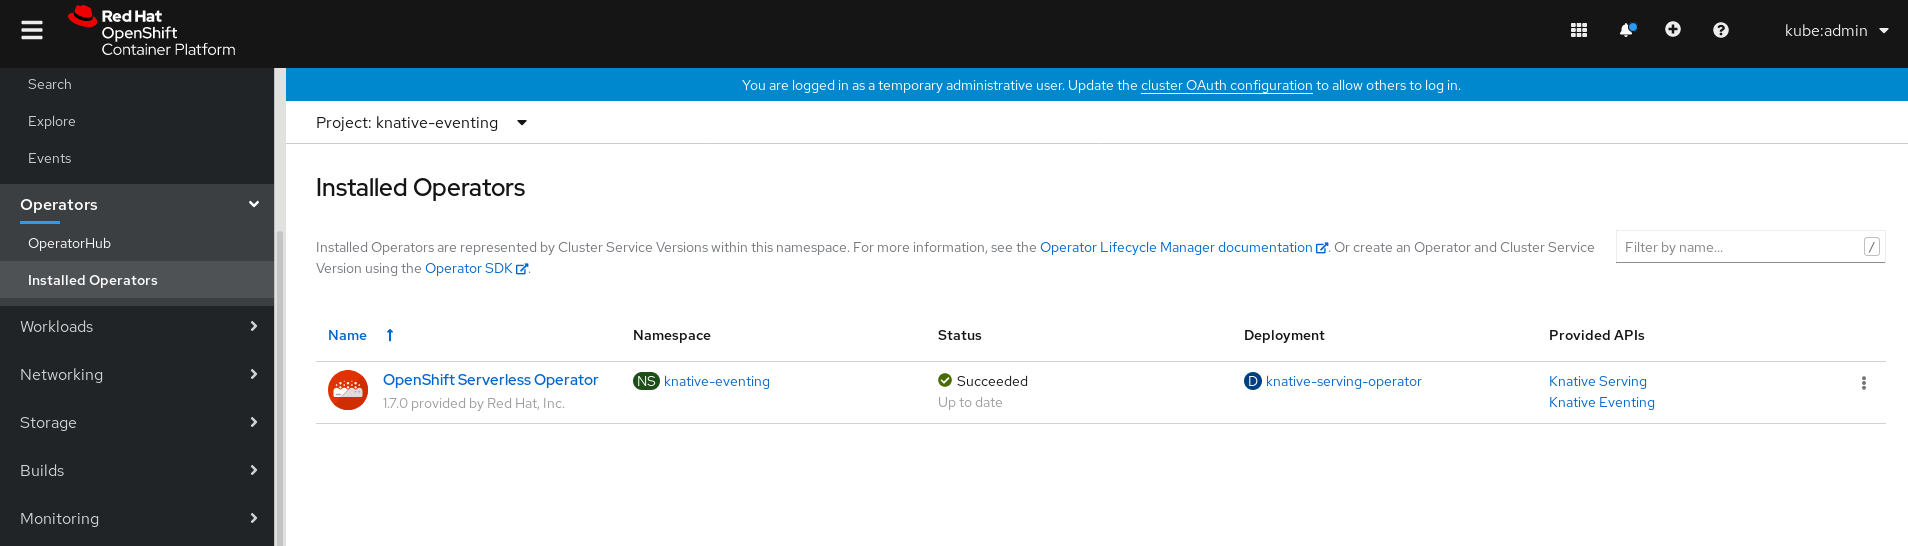
5.3.3. Installing Knative Eventing using the web console
Procedure
-
In the Administrator perspective of the OpenShift Container Platform web console, navigate to Operators
Installed Operators. - Check that the Project dropdown at the top of the page is set to Project: knative-eventing.
Click Knative Eventing in the list of Provided APIs for the OpenShift Serverless Operator to go to the Knative Eventing tab.
Click the Create Knative Eventing button.
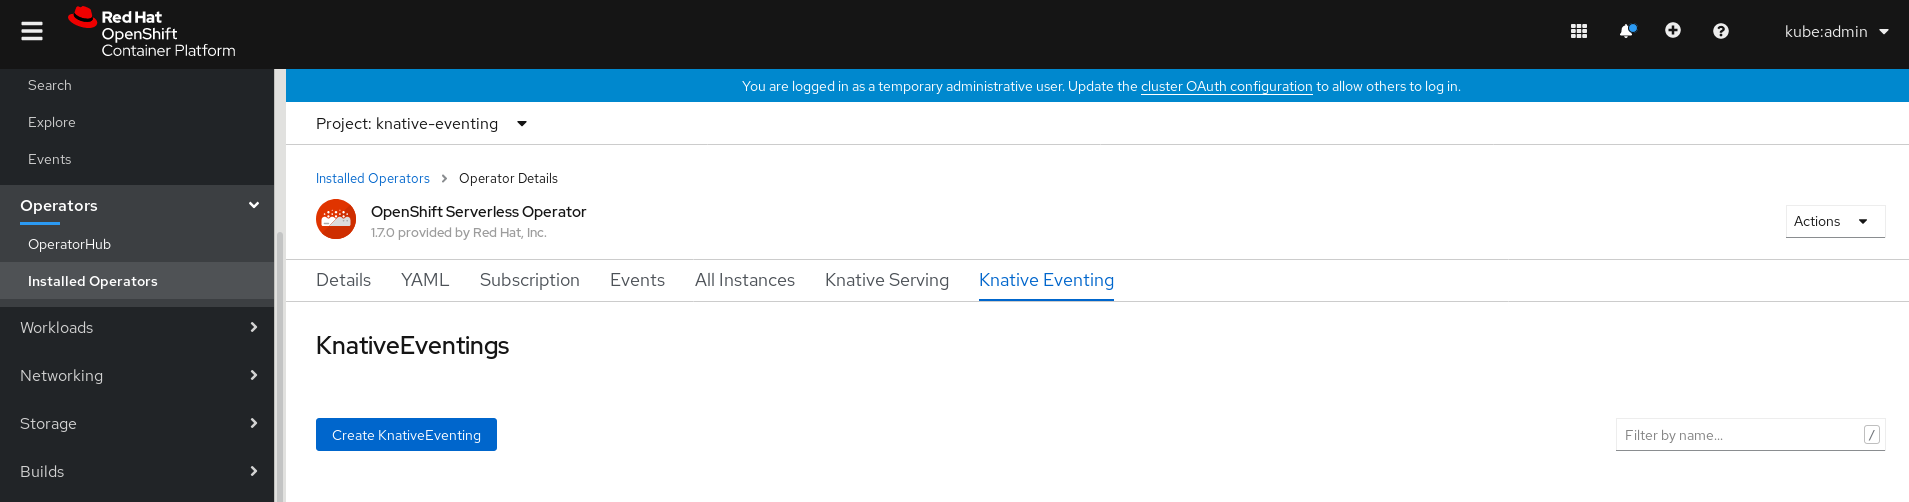
In the Create Knative Eventing page, you can choose to configure the
KnativeEventingobject by using either the default form provided, or by editing the YAML.Using the form is recommended for simpler configurations that do not require full control of
KnativeEventingobject creation.Optional. If you are configuring the
KnativeEventingobject using the form, make any changes that you want to implement for your Knative Eventing deployment.
Click Create.
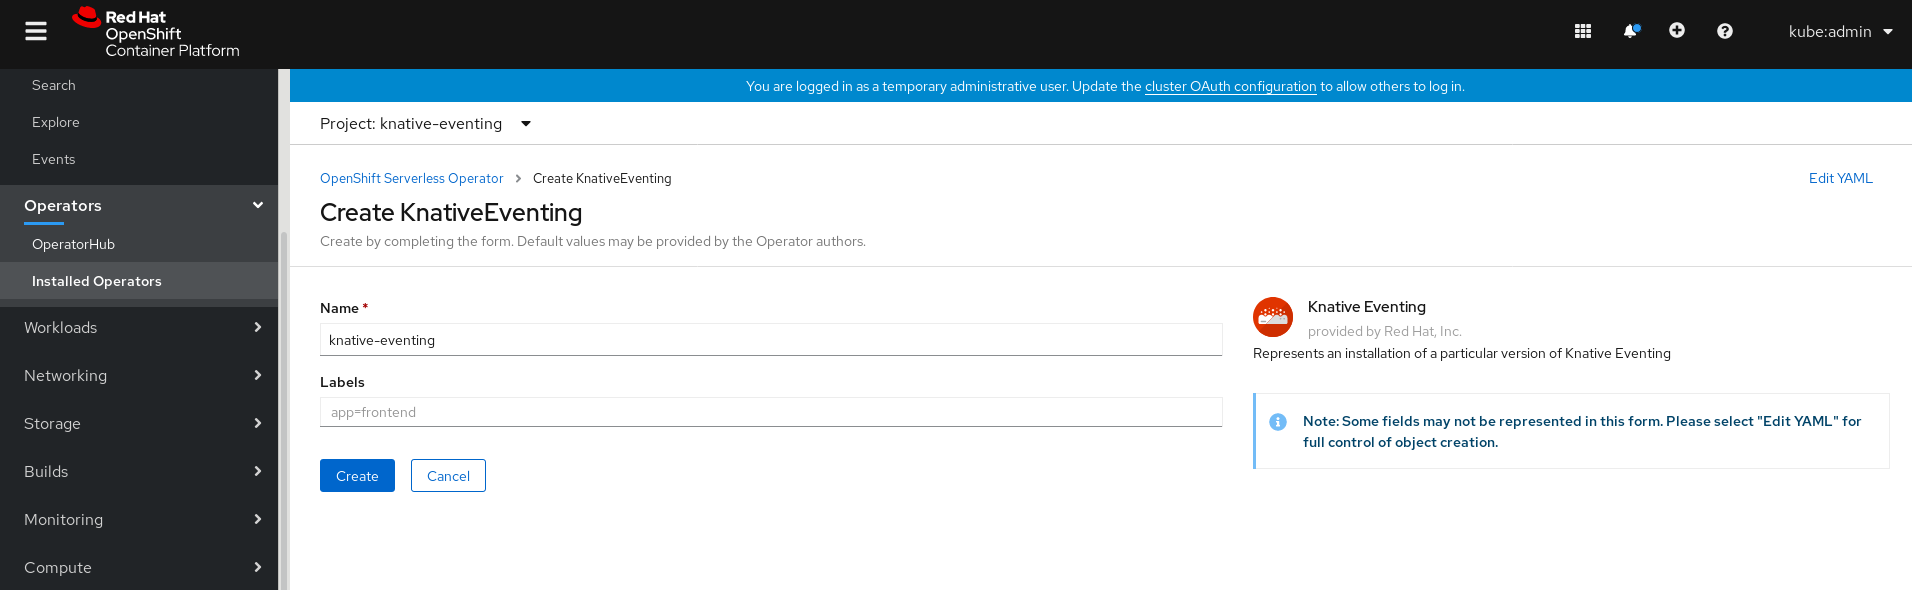
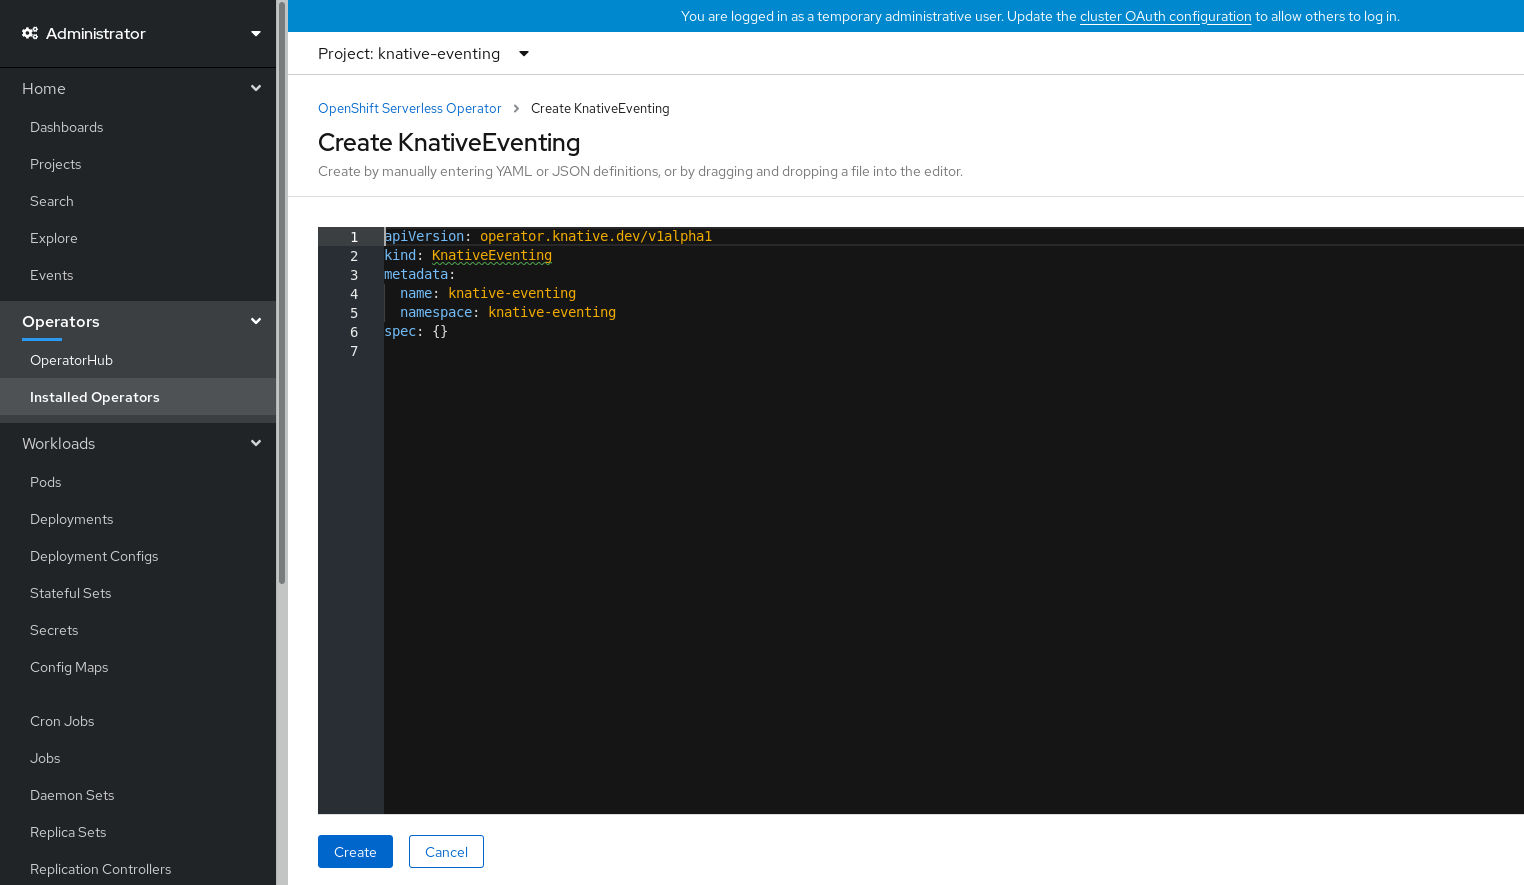
Editing the YAML is recommended for more complex configurations that require full control of
KnativeEventingobject creation. You can access the YAML by clicking the edit YAML link in the top right of the Create Knative Eventing page.Optional. If you are configuring the
KnativeEventingobject by editing the YAML, make any changes to the YAML that you want to implement for your Knative Eventing deployment.
Click Create.
After you have installed Knative Eventing, the
KnativeEventingobject is created, and you will be automically directed to the Knative Eventing tab.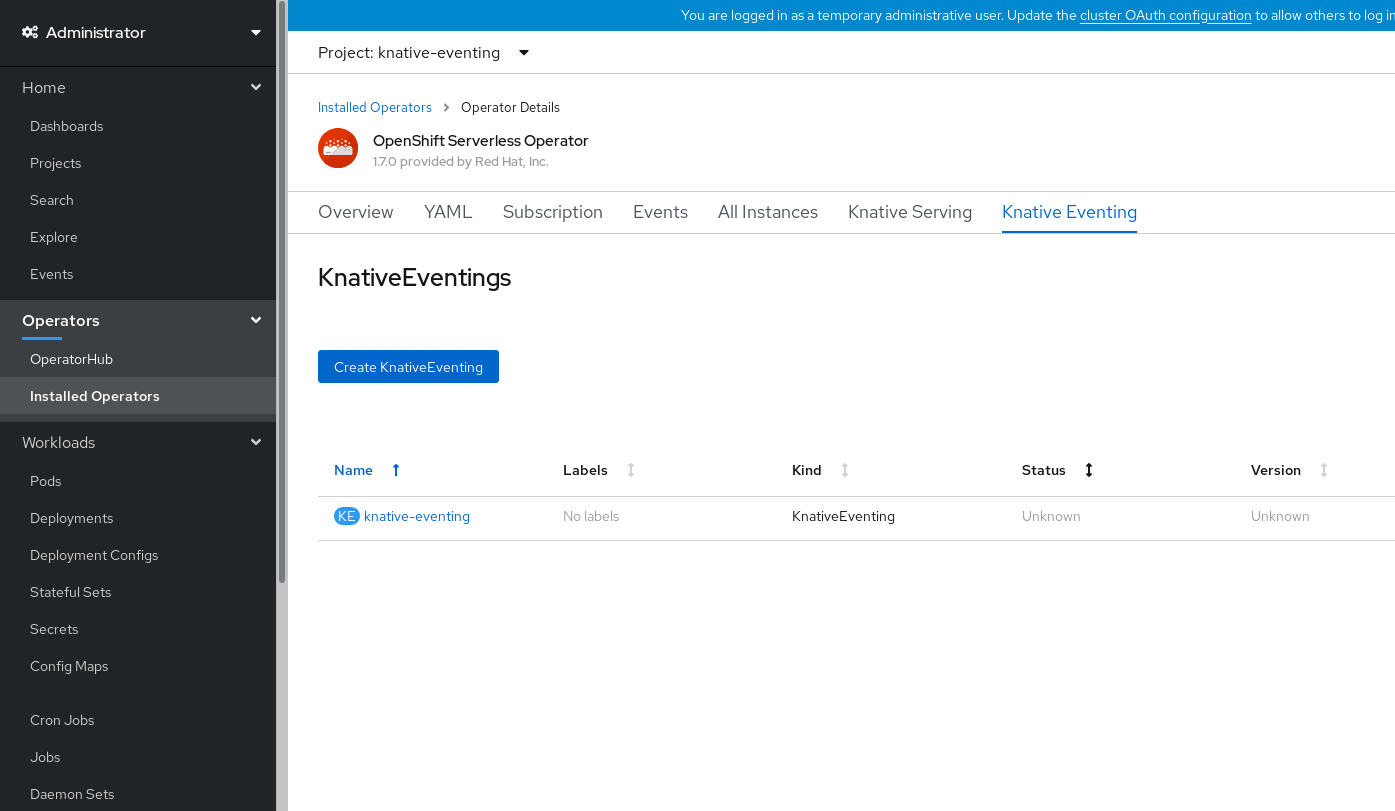
You will see
knative-eventingin the list of resources.
Verification steps
-
Click on
knative-eventingin the Knative Eventing tab. You will be automatically directed to the Knative Eventing Overview page.
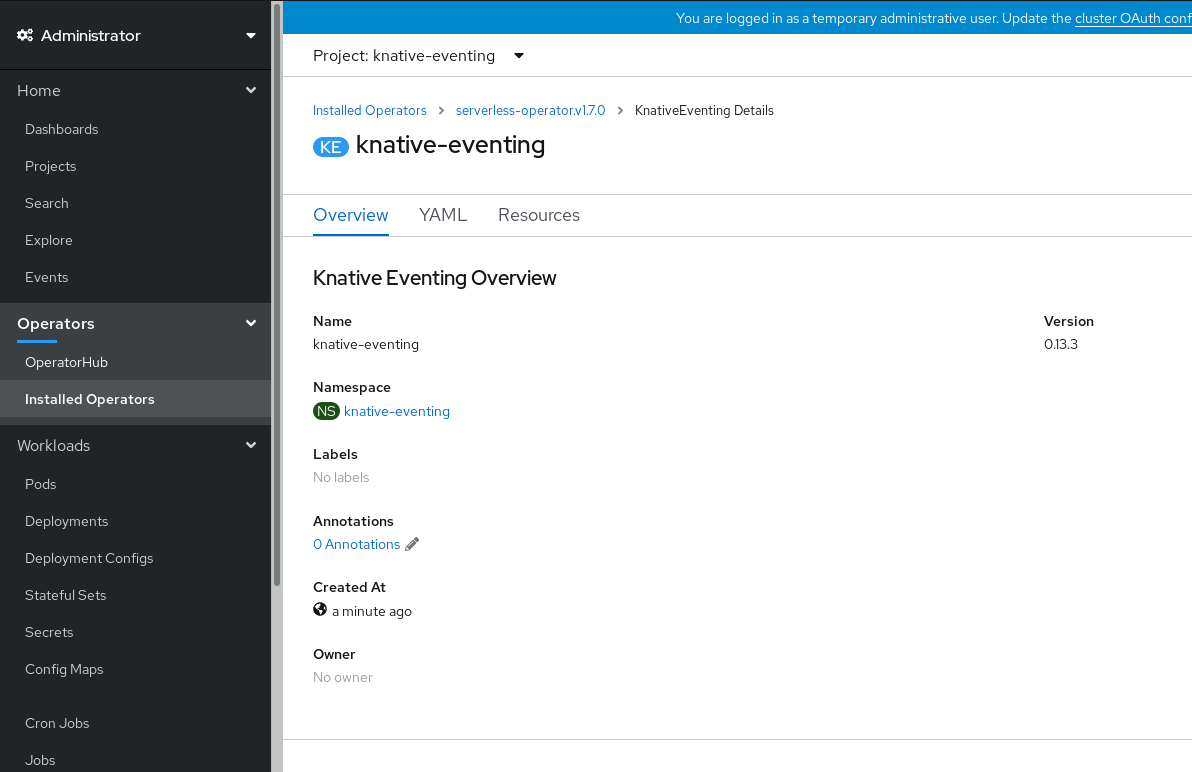
- Scroll down to look at the list of Conditions.
You should see a list of conditions with a status of True, as shown in the example image.
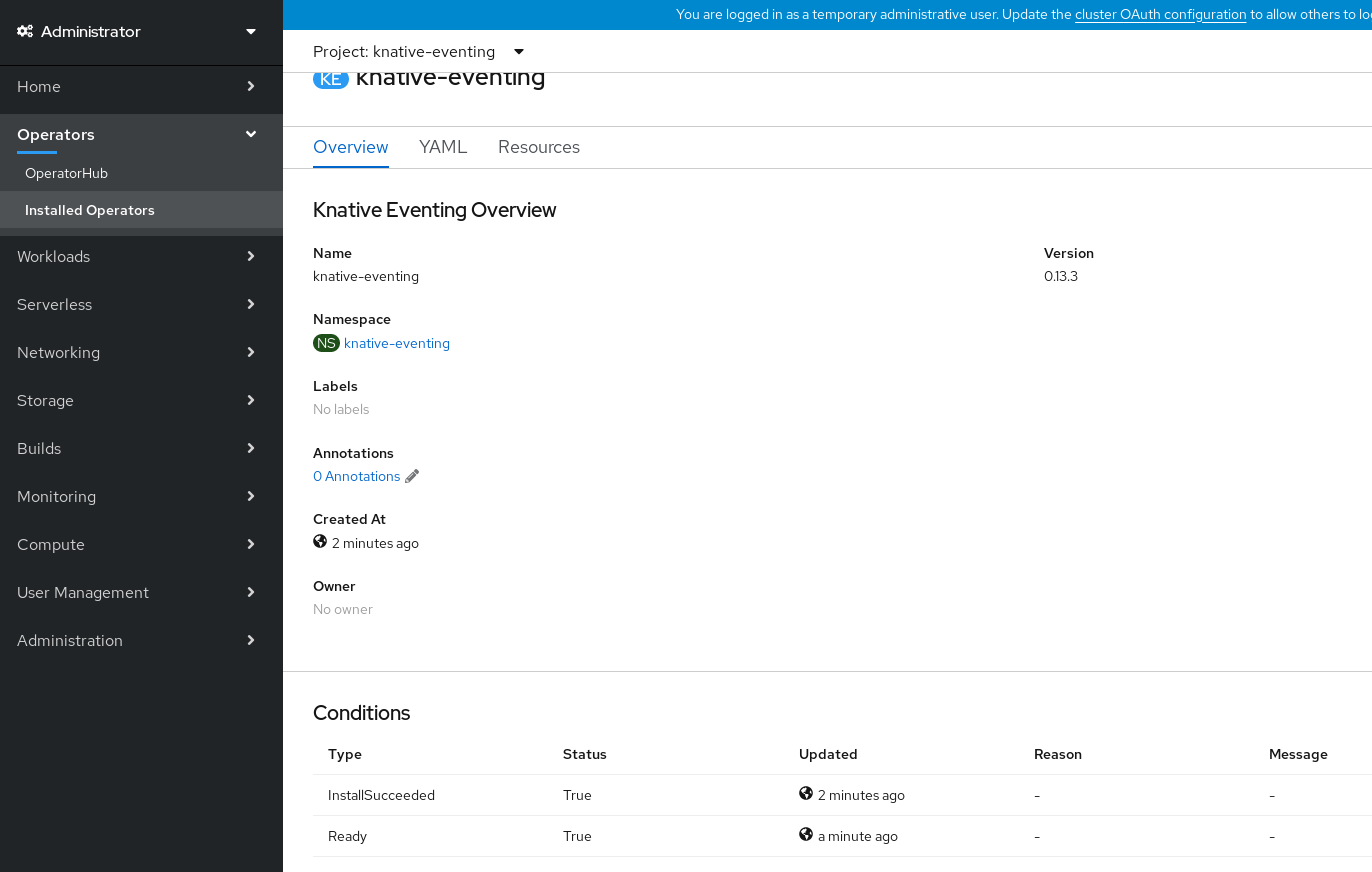 Note
NoteIt may take a few seconds for the Knative Eventing resources to be created. You can check their status in the Resources tab.
- If the conditions have a status of Unknown or False, wait a few moments and then check again after you have confirmed that the resources have been created.
5.3.4. Installing Knative Eventing using YAML
Procedure
-
Create a file named
eventing.yaml. Copy the following sample YAML into
eventing.yaml:apiVersion: operator.knative.dev/v1alpha1 kind: KnativeEventing metadata: name: knative-eventing namespace: knative-eventing- Optional. Make any changes to the YAML that you want to implement for your Knative Eventing deployment.
Apply the
eventing.yamlfile by entering:$ oc apply -f eventing.yaml
Verification steps
Verify that the installation is complete:
$ oc get knativeeventing.operator.knative.dev/knative-eventing \ -n knative-eventing \ --template='{{range .status.conditions}}{{printf "%s=%s\n" .type .status}}{{end}}'Example output
InstallSucceeded=True Ready=TrueNoteIt may take a few seconds for the Knative Eventing resources to be created.
-
If the conditions have a status of
UnknownorFalse, wait a few moments and then check again after you have confirmed that the resources have been created. Check that the Knative Eventing resources have been created:
$ oc get pods -n knative-eventingExample output
NAME READY STATUS RESTARTS AGE broker-controller-58765d9d49-g9zp6 1/1 Running 0 7m21s eventing-controller-65fdd66b54-jw7bh 1/1 Running 0 7m31s eventing-webhook-57fd74b5bd-kvhlz 1/1 Running 0 7m31s imc-controller-5b75d458fc-ptvm2 1/1 Running 0 7m19s imc-dispatcher-64f6d5fccb-kkc4c 1/1 Running 0 7m18s
5.3.5. Next steps
- For services and serving functionality on OpenShift Serverless, you can install the Knative Serving component. See the documentation on Installing Knative Serving.
-
Install the Knative CLI to use
kncommands with Knative Eventing. For example,kn sourcecommands. See the documentation on Installing the Knative CLI (kn).
5.4. Advanced installation configuration options
This guide provides information for cluster administrators about advanced installation configuration options for OpenShift Serverless components.
5.4.1. Knative Serving supported installation configuration options
This guide provides information for cluster administrators about advanced installation configuration options for Knative Serving.
Do not modify any YAML contained inside the config field. Some of the configuration values in this field are injected by the OpenShift Serverless Operator, and modifying them will cause your deployment to become unsupported.
5.4.1.1. Controller Custom Certs
If your registry uses a self-signed certificate, you must enable tag-to-digest resolution by creating a ConfigMap or Secret. The OpenShift Serverless Operator then automatically configures Knative Serving controller access to the registry.
To enable tag-to-digest resolution, the Knative Serving controller requires access to the container registry.
The ConfigMap or Secret must reside in the same namespace as the Knative Serving CustomResourceDefinition (CRD).
The following example triggers the OpenShift Serverless Operator to:
- Create and mount a volume containing the certificate in the controller.
- Set the required environment variable properly.
Example YAML
apiVersion: operator.knative.dev/v1alpha1
kind: KnativeServing
metadata:
    name: knative-serving
    namespace: knative-serving
spec:
controller-custom-certs:
name: certs
type: ConfigMap
The following example uses a certificate in a ConfigMap named certs in the knative-serving namespace.
The supported types are ConfigMap and Secret.
If no controller custom cert is specified, this defaults to the config-service-ca ConfigMap.
Example default YAML
spec:
  controller-custom-certs:
    name: config-service-ca
    type: ConfigMap
5.4.1.2. High availability
High availability (HA) defaults to 2 replicas per controller if no number of replicas is specified.
You can set this to 1 to disable HA, or add more replicas by setting a higher integer.
Example YAML
spec:
  high-availability:
    replicas: 2
5.4.2. Additional resources
- For more information about configuring high availability, see High availability on OpenShift Serverless.
5.5. Upgrading OpenShift Serverless
If you have previously installed a Technology Preview version of OpenShift Serverless, follow the instructions in this guide to upgrade to the latest version.
Before upgrading to the latest Serverless release, you must remove the community Knative Eventing operator if you have previously installed it. Having the Knative Eventing operator installed will prevent you from being able to install the latest Technology Preview version of Knative Eventing.
5.5.1. Updating Knative services URL formats
When upgrading from older versions of OpenShift Serverless to 1.7.0, support for HTTPS requires a change to the format of routes. Knative services created on OpenShift Serverless 1.6.0 or older versions are no longer reachable at the old format URLs. You must retrieve the new URL for each service after upgrading OpenShift Serverless.
For more information on retrieving Knative services URLs, see Verifying your serverless application deployment.
5.5.2. Upgrading the Subscription Channel
To upgrade to the latest version of OpenShift Serverless on OpenShift Container Platform 4.3, you must update the channel to 4.3.
If you are upgrading from OpenShift Serverless version 1.5.0, or earlier, to version 1.7.0, you must complete the following steps:
-
Upgrade to OpenShift Serverless version 1.5.0, by selecting the
techpreviewchannel. -
After you have upgraded to 1.5.0, upgrade to 1.6.0 by selecting the
preview-4.3channel. -
Finally, after you have upgraded to 1.6.0, upgrade to the latest version by selecting the
4.3channel.
After each channel change, wait for the pods in the knative-serving namespace to get upgraded before changing the channel again.
Prerequisites
You have installed a previous version of OpenShift Serverless Operator, and have selected Automatic updates during the installation process.
NoteIf you have selected Manual updates, you will need to complete additional steps after updating the channel as described in this guide. The Subscription’s upgrade status will remain Upgrading until you review and approve its Install Plan. Information about the Install Plan can be found in the OpenShift Container Platform Operators documentation.
- You have logged in to the OpenShift Container Platform web console.
Procedure
-
Select the
openshift-operatorsnamespace in the OpenShift Container Platform web console. -
Navigate to the Operators
Installed Operators page. - Select the OpenShift Serverless Operator Operator.
-
Click Subscription
Channel. -
In the Change Subscription Update Channel window, select
4.3, and then click Save. -
Wait until all pods have been upgraded in the
knative-servingnamespace and the KnativeServing custom resource reports the latest Knative Serving version.
Verification steps
To verify that the upgrade has been successful, you can check the status of pods in the knative-serving namespace, and the version of the KnativeServing CR.
Check the status of the pods:
$ oc get knativeserving.operator.knative.dev knative-serving -n knative-serving -o=jsonpath='{.status.conditions[?(@.type=="Ready")].status}'The previous command should return a status of
True.Check the version of the KnativeServing CR:
$ oc get knativeserving.operator.knative.dev knative-serving -n knative-serving -o=jsonpath='{.status.version}'This command should return the latest version of Knative Serving. You can check the latest version in the OpenShift Serverless Operator release notes.
5.6. Removing OpenShift Serverless
This guide provides details of how to remove the OpenShift Serverless Operator and other OpenShift Serverless components.
Before you can remove the OpenShift Serverless Operator, you must remove Knative Serving and Knative Eventing.
5.6.1. Uninstalling Knative Serving
To uninstall Knative Serving, you must remove its custom resource and delete the knative-serving namespace.
Procedure
Delete the
knative-servingcustom resource:$ oc delete knativeservings.operator.knative.dev knative-serving -n knative-servingAfter the command has completed and all pods have been removed from the
knative-servingnamespace, delete the namespace:$ oc delete namespace knative-serving
5.6.2. Uninstalling Knative Eventing
To uninstall Knative Eventing, you must remove its custom resource and delete the knative-eventing namespace.
Procedure
Delete the
knative-eventingcustom resource:$ oc delete knativeeventings.operator.knative.dev knative-eventing -n knative-eventingAfter the command has completed and all pods have been removed from the
knative-eventingnamespace, delete the namespace:$ oc delete namespace knative-eventing
5.6.3. Removing the OpenShift Serverless Operator
You can remove the OpenShift Serverless Operator from the host cluster by following the documentation on deleting Operators from a cluster.
5.6.4. Deleting OpenShift Serverless CRDs
After uninstalling the OpenShift Serverless, the Operator and API CRDs remain on the cluster. You can use the following procedure to remove the remaining CRDs.
Removing the Operator and API CRDs also removes all resources that were defined using them, including Knative services.
5.6.5. Prerequisites
- You uninstalled Knative Serving and removed the OpenShift Serverless Operator.
Procedure
To delete the remaining OpenShift Serverless CRDs, enter the following command:
$ oc get crd -oname | grep 'knative.dev' | xargs oc delete
5.7. Installing the Knative CLI (kn)
kn does not have its own login mechanism. To log in to the cluster, you must install the oc CLI and use oc login.
Installation options for the oc CLI will vary depending on your operating system.
For more information on installing the oc CLI for your operating system and logging in with oc, see the CLI getting started documentation.
5.7.1. Installing the kn CLI using the OpenShift Container Platform web console
Once the OpenShift Serverless Operator is installed, you will see a link to download the kn CLI for Linux, macOS and Windows from the Command Line Tools page in the OpenShift Container Platform web console.
You can access the Command Line Tools page by clicking the
 icon in the top right corner of the web console and selecting Command Line Tools in the drop down menu.
Procedure
-
Download the
knCLI from the Command Line Tools page. Unpack the archive:
$ tar -xf <file>-
Move the
knbinary to a directory on your PATH. Check your path:
$ echo $PATHNoteIf you do not use RHEL or Fedora, ensure that libc is installed in a directory on your library path. If libc is not available, you might see the following error when you run CLI commands:
$ kn: No such file or directory
5.7.2. Installing the kn CLI for Linux using an RPM
For Red Hat Enterprise Linux (RHEL), you can install kn as an RPM if you have an active OpenShift Container Platform subscription on your Red Hat account.
Procedure
Enter the command:
# subscription-manager registerEnter the command:
# subscription-manager refreshEnter the command:
# subscription-manager attach --pool=<pool_id>1 - 1
- Pool ID for an active OpenShift Container Platform subscription
Enter the command:
# subscription-manager repos --enable="openshift-serverless-1-for-rhel-8-x86_64-rpms"Enter the command:
# yum install openshift-serverless-clients
5.7.3. Installing the kn CLI for Linux
For Linux distributions, you can download the CLI directly as a tar.gz archive.
Procedure
- Download the CLI.
Unpack the archive:
$ tar -xf <file>-
Move the
knbinary to a directory on your PATH. Check your path:
$ echo $PATHNoteIf you do not use RHEL or Fedora, ensure that libc is installed in a directory on your library path. If libc is not available, you might see the following error when you run CLI commands:
$ kn: No such file or directory
5.7.4. Installing the kn CLI for macOS
kn for macOS is provided as a tar.gz archive.
Procedure
- Download the CLI.
- Unpack and unzip the archive.
-
Move the
knbinary to a directory on your PATH. Check your path:
$ echo $PATH
5.7.5. Installing the kn CLI for Windows
The CLI for Windows is provided as a zip archive.
Procedure
- Download the CLI.
- Unzip the archive with a ZIP program.
-
Move the
knbinary to a directory on your PATH. To check your PATH, open the Command Prompt and enter:
C:\> path