이 콘텐츠는 선택한 언어로 제공되지 않습니다.
5.3. Virtual Disks
5.3.1. Adding a New Virtual Disk
링크 복사링크가 클립보드에 복사되었습니다!
You can add multiple virtual disks to a virtual machine.
Image is the default type of disk. You can also add a Direct LUN disk or a Cinder (OpenStack Volume) disk. Image disk creation is managed entirely by the Manager. Direct LUN disks require externally prepared targets that already exist. Cinder disks require access to an instance of OpenStack Volume that has been added to the Red Hat Enterprise Virtualization environment using the External Providers window; see Adding an OpenStack Volume (Cinder) Instance for Storage Management for more information. Existing disks are either floating disks or shareable disks attached to virtual machines.
Procedure 5.6. Adding Disks to Virtual Machines
- Click the Virtual Machines tab and select a virtual machine.
- Click the Disks tab in the details pane.
- Click .
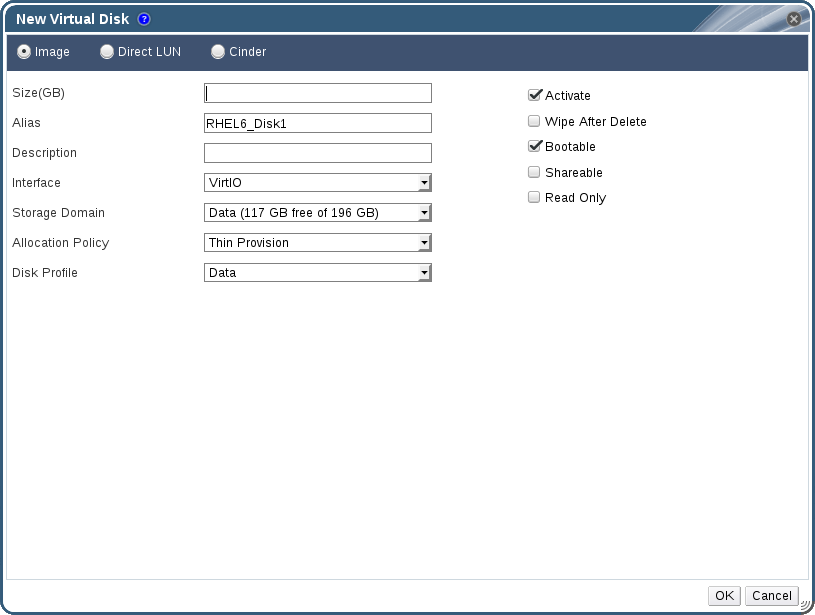
Figure 5.2. The New Virtual Disk Window
- Use the appropriate radio buttons to switch between Image, Direct LUN, or Cinder. Virtual disks added in the User Portal can only be Image disks. Direct LUN and Cinder disks can be added in the Administration Portal.
- Enter a Size(GB), Alias, and Description for the new disk.
- Use the drop-down lists and check boxes to configure the disk. See Section A.3, “Explanation of Settings in the New Virtual Disk and Edit Virtual Disk Windows” for more details on the fields for all disk types.
- Click .
The new disk appears in the details pane after a short time.
5.3.2. Attaching an Existing Disk to a Virtual Machine
링크 복사링크가 클립보드에 복사되었습니다!
Floating disks are disks that are not associated with any virtual machine.
Floating disks can minimize the amount of time required to set up virtual machines. Designating a floating disk as storage for a virtual machine makes it unnecessary to wait for disk preallocation at the time of a virtual machine's creation.
Floating disks can be attached to a single virtual machine, or to multiple virtual machines if the disk is shareable.
Once a floating disk is attached to a virtual machine, the virtual machine can access it.
Procedure 5.7. Attaching Virtual Disks to Virtual Machines
- Click the Virtual Machines tab and select a virtual machine.
- Click the Disks tab in the details pane.
- Click .

Figure 5.3. The Attach Virtual Disks Window
- Select one or more virtual disks from the list of available disks.
- Click .
Note
No Quota resources are consumed by attaching virtual disks to, or detaching virtual disks from, virtual machines.
5.3.3. Extending the Available Size of a Virtual Disk
링크 복사링크가 클립보드에 복사되었습니다!
You can extend the available size of a virtual disk while the virtual disk is attached to a virtual machine. Resizing a virtual disk does not resize the underlying partitions or file systems on that virtual disk. Use the
fdisk utility to resize the partitions and file systems as required. See How to Resize a Partition using fdisk for more information.
Procedure 5.8. Extending the Available Size of Virtual Disks
- Click the Virtual Machines tab and select a virtual machine.
- Click the Disks tab in the details pane and select the disk to edit.
- Click .
- Enter a value in the
Extend size by(GB)field. - Click .
The target disk's status becomes
locked for a short time, during which the drive is resized. When the resizing of the drive is complete, the status of the drive becomes OK.
5.3.4. Hot Plugging a Virtual Disk
링크 복사링크가 클립보드에 복사되었습니다!
You can hot plug virtual machine disks. Hot plugging means enabling or disabling devices while a virtual machine is running.
Note
The guest operating system must support hot plugging virtual disks.
Procedure 5.9. Hot Plugging Virtual Disks
- Click the Virtual Machines tab and select a virtual machine.
- Click the Disks tab in the details pane and select the virtual disk to hot plug.
- Click to enable the disk, or click to disable the disk.
- Click .
5.3.5. Removing a Virtual Disk from a Virtual Machine
링크 복사링크가 클립보드에 복사되었습니다!
Procedure 5.10. Removing Virtual Disks From Virtual Machines
- Click the Virtual Machines tab and select a virtual machine.
- Click the Disks tab in the details pane and select the virtual disk to remove.
- Click .
- Click .
- Click .
- Optionally, select the Remove Permanently check box to completely remove the virtual disk from the environment. If you do not select this option - for example, because the disk is a shared disk - the virtual disk will remain in the Disks resource tab.
- Click .
If the disk was created as block storage, for example iSCSI, and the Wipe After Delete check box was selected when creating the disk, you can view the log file on the Red Hat Enterprise Virtualization host to confirm that the data has been wiped after permanently removing the disk. See Settings to Wipe Virtual Disks After Deletion in the Administration Guide.