Este conteúdo não está disponível no idioma selecionado.
Storage
Configuring and managing storage in OpenShift Container Platform
Abstract
Chapter 1. OpenShift Container Platform storage overview
OpenShift Container Platform supports multiple types of storage, both for on-premise and cloud providers. You can manage container storage for persistent and non-persistent data in an OpenShift Container Platform cluster.
1.1. Glossary of common terms for OpenShift Container Platform storage
This glossary defines common terms that are used in the storage content.
- Access modes
Volume access modes describe volume capabilities. You can use access modes to match persistent volume claim (PVC) and persistent volume (PV). The following are the examples of access modes:
- ReadWriteOnce (RWO)
- ReadOnlyMany (ROX)
- ReadWriteMany (RWX)
- ReadWriteOncePod (RWOP)
- Cinder
- The Block Storage service for Red Hat OpenStack Platform (RHOSP) which manages the administration, security, and scheduling of all volumes.
- Config map
-
A config map provides a way to inject configuration data into pods. You can reference the data stored in a config map in a volume of type
ConfigMap. Applications running in a pod can use this data. - Container Storage Interface (CSI)
- An API specification for the management of container storage across different container orchestration (CO) systems.
- Dynamic Provisioning
- The framework allows you to create storage volumes on-demand, eliminating the need for cluster administrators to pre-provision persistent storage.
- Ephemeral storage
- Pods and containers can require temporary or transient local storage for their operation. The lifetime of this ephemeral storage does not extend beyond the life of the individual pod, and this ephemeral storage cannot be shared across pods.
- Fiber channel
- A networking technology that is used to transfer data among data centers, computer servers, switches and storage.
- FlexVolume
- FlexVolume is an out-of-tree plugin interface that uses an exec-based model to interface with storage drivers. You must install the FlexVolume driver binaries in a pre-defined volume plugin path on each node and in some cases the control plane nodes.
- fsGroup
- The fsGroup defines a file system group ID of a pod.
- iSCSI
- Internet Small Computer Systems Interface (iSCSI) is an Internet Protocol-based storage networking standard for linking data storage facilities. An iSCSI volume allows an existing iSCSI (SCSI over IP) volume to be mounted into your Pod.
- hostPath
- A hostPath volume in an OpenShift Container Platform cluster mounts a file or directory from the host node’s filesystem into your pod.
- KMS key
- The Key Management Service (KMS) helps you achieve the required level of encryption of your data across different services. you can use the KMS key to encrypt, decrypt, and re-encrypt data.
- Local volumes
- A local volume represents a mounted local storage device such as a disk, partition or directory.
- NFS
- A Network File System (NFS) that allows remote hosts to mount file systems over a network and interact with those file systems as though they are mounted locally. This enables system administrators to consolidate resources onto centralized servers on the network.
- OpenShift Data Foundation
- A provider of agnostic persistent storage for OpenShift Container Platform supporting file, block, and object storage, either in-house or in hybrid clouds
- Persistent storage
- Pods and containers can require permanent storage for their operation. OpenShift Container Platform uses the Kubernetes persistent volume (PV) framework to allow cluster administrators to provision persistent storage for a cluster. Developers can use PVC to request PV resources without having specific knowledge of the underlying storage infrastructure.
- Persistent volumes (PV)
- OpenShift Container Platform uses the Kubernetes persistent volume (PV) framework to allow cluster administrators to provision persistent storage for a cluster. Developers can use PVC to request PV resources without having specific knowledge of the underlying storage infrastructure.
- Persistent volume claims (PVCs)
- You can use a PVC to mount a PersistentVolume into a Pod. You can access the storage without knowing the details of the cloud environment.
- Pod
- One or more containers with shared resources, such as volume and IP addresses, running in your OpenShift Container Platform cluster. A pod is the smallest compute unit defined, deployed, and managed.
- Reclaim policy
-
A policy that tells the cluster what to do with the volume after it is released. A volume’s reclaim policy can be
Retain,Recycle, orDelete. - Role-based access control (RBAC)
- Role-based access control (RBAC) is a method of regulating access to computer or network resources based on the roles of individual users within your organization.
- Stateless applications
- A stateless application is an application program that does not save client data generated in one session for use in the next session with that client.
- Stateful applications
-
A stateful application is an application program that saves data to persistent disk storage. A server, client, and applications can use a persistent disk storage. You can use the
Statefulsetobject in OpenShift Container Platform to manage the deployment and scaling of a set of Pods, and provides guarantee about the ordering and uniqueness of these Pods. - Static provisioning
- A cluster administrator creates a number of PVs. PVs contain the details of storage. PVs exist in the Kubernetes API and are available for consumption.
- Storage
- OpenShift Container Platform supports many types of storage, both for on-premise and cloud providers. You can manage container storage for persistent and non-persistent data in an OpenShift Container Platform cluster.
- Storage class
- A storage class provides a way for administrators to describe the classes of storage they offer. Different classes might map to quality of service levels, backup policies, arbitrary policies determined by the cluster administrators.
- VMware vSphere’s Virtual Machine Disk (VMDK) volumes
- Virtual Machine Disk (VMDK) is a file format that describes containers for virtual hard disk drives that is used in virtual machines.
1.2. Storage types
OpenShift Container Platform storage is broadly classified into two categories, namely ephemeral storage and persistent storage.
1.2.1. Ephemeral storage
Pods and containers are ephemeral or transient in nature and designed for stateless applications. Ephemeral storage allows administrators and developers to better manage the local storage for some of their operations. For more information about ephemeral storage overview, types, and management, see Understanding ephemeral storage.
1.2.2. Persistent storage
Stateful applications deployed in containers require persistent storage. OpenShift Container Platform uses a pre-provisioned storage framework called persistent volumes (PV) to allow cluster administrators to provision persistent storage. The data inside these volumes can exist beyond the lifecycle of an individual pod. Developers can use persistent volume claims (PVCs) to request storage requirements. For more information about persistent storage overview, configuration, and lifecycle, see Understanding persistent storage.
1.3. Container Storage Interface (CSI)
CSI is an API specification for the management of container storage across different container orchestration (CO) systems. You can manage the storage volumes within the container native environments, without having specific knowledge of the underlying storage infrastructure. With the CSI, storage works uniformly across different container orchestration systems, regardless of the storage vendors you are using. For more information about CSI, see Using Container Storage Interface (CSI).
1.4. Dynamic Provisioning
Dynamic Provisioning allows you to create storage volumes on-demand, eliminating the need for cluster administrators to pre-provision storage. For more information about dynamic provisioning, see Dynamic provisioning.
Chapter 2. Understanding ephemeral storage
2.1. Overview
In addition to persistent storage, pods and containers can require ephemeral or transient local storage for their operation. The lifetime of this ephemeral storage does not extend beyond the life of the individual pod, and this ephemeral storage cannot be shared across pods.
Pods use ephemeral local storage for scratch space, caching, and logs. Issues related to the lack of local storage accounting and isolation include the following:
- Pods cannot detect how much local storage is available to them.
- Pods cannot request guaranteed local storage.
- Local storage is a best-effort resource.
- Pods can be evicted due to other pods filling the local storage, after which new pods are not admitted until sufficient storage is reclaimed.
Unlike persistent volumes, ephemeral storage is unstructured and the space is shared between all pods running on a node, in addition to other uses by the system, the container runtime, and OpenShift Container Platform. The ephemeral storage framework allows pods to specify their transient local storage needs. It also allows OpenShift Container Platform to schedule pods where appropriate, and to protect the node against excessive use of local storage.
While the ephemeral storage framework allows administrators and developers to better manage local storage, I/O throughput and latency are not directly effected.
2.2. Types of ephemeral storage
Ephemeral local storage is always made available in the primary partition. There are two basic ways of creating the primary partition: root and runtime.
2.2.1. Root
This partition holds the kubelet root directory, /var/lib/kubelet/ by default, and /var/log/ directory. This partition can be shared between user pods, the OS, and Kubernetes system daemons. This partition can be consumed by pods through EmptyDir volumes, container logs, image layers, and container-writable layers. Kubelet manages shared access and isolation of this partition. This partition is ephemeral, and applications cannot expect any performance SLAs, such as disk IOPS, from this partition.
2.2.2. Runtime
This is an optional partition that runtimes can use for overlay file systems. OpenShift Container Platform attempts to identify and provide shared access along with isolation to this partition. Container image layers and writable layers are stored here. If the runtime partition exists, the root partition does not hold any image layer or other writable storage.
2.3. Ephemeral storage management
Cluster administrators can manage ephemeral storage within a project by setting quotas that define the limit ranges and number of requests for ephemeral storage across all pods in a non-terminal state. Developers can also set requests and limits on this compute resource at the pod and container level.
You can manage local ephemeral storage by specifying requests and limits. Each container in a pod can specify the following:
-
spec.containers[].resources.limits.ephemeral-storage -
spec.containers[].resources.requests.ephemeral-storage
2.3.1. Ephemeral storage limits and requests units
Limits and requests for ephemeral storage are measured in byte quantities. You can express storage as a plain integer or as a fixed-point number using one of these suffixes: E, P, T, G, M, k. You can also use the power-of-two equivalents: Ei, Pi, Ti, Gi, Mi, Ki.
For example, the following quantities all represent approximately the same value: 128974848, 129e6, 129M, and 123Mi.
The suffixes for each byte quantity are case-sensitive. Be sure to use the correct case. Use the case-sensitive "M", such as used in "400M" to set the request at 400 megabytes. Use the case-sensitive "400Mi" to request 400 mebibytes. If you specify "400m" of ephemeral storage, the storage requests is only 0.4 bytes.
2.3.2. Ephemeral storage requests and limits example
The following example configuration file shows a pod with two containers:
- Each container requests 2GiB of local ephemeral storage.
- Each container has a limit of 4GiB of local ephemeral storage.
At the pod level, kubelet works out an overall pod storage limit by adding up the limits of all the containers in that pod.
-
In this case, the total storage usage at the pod level is the sum of the disk usage from all containers plus the pod’s
emptyDirvolumes. - Therefore, the pod has a request of 4GiB of local ephemeral storage, and a limit of 8GiB of local ephemeral storage.
-
In this case, the total storage usage at the pod level is the sum of the disk usage from all containers plus the pod’s
Example ephemeral storage configuration with quotas and limits
apiVersion: v1
kind: Pod
metadata:
name: frontend
spec:
containers:
- name: app
image: images.my-company.example/app:v4
resources:
requests:
ephemeral-storage: "2Gi"
limits:
ephemeral-storage: "4Gi"
volumeMounts:
- name: ephemeral
mountPath: "/tmp"
- name: log-aggregator
image: images.my-company.example/log-aggregator:v6
resources:
requests:
ephemeral-storage: "2Gi"
limits:
ephemeral-storage: "4Gi"
volumeMounts:
- name: ephemeral
mountPath: "/tmp"
volumes:
- name: ephemeral
emptyDir: {}2.3.3. Ephemeral storage configuration effects pod scheduling and eviction
The settings in the pod spec affect both how the scheduler makes a decision about scheduling pods and when kubelet evicts pods.
- First, the scheduler ensures that the sum of the resource requests of the scheduled containers is less than the capacity of the node. In this case, the pod can be assigned to a node only if the node’s available ephemeral storage (allocatable resource) is more than 4GiB.
- Second, at the container level, because the first container sets a resource limit, kubelet eviction manager measures the disk usage of this container and evicts the pod if the storage usage of the container exceeds its limit (4GiB). The kubelet eviction manager also marks the pod for eviction if the total usage exceeds the overall pod storage limit (8GiB).
For information about defining quotas for projects, see Quota setting per project.
2.4. Monitoring ephemeral storage
You can use /bin/df as a tool to monitor ephemeral storage usage on the volume where ephemeral container data is located, which is /var/lib/kubelet and /var/lib/containers. The available space for only /var/lib/kubelet is shown when you use the df command if /var/lib/containers is placed on a separate disk by the cluster administrator.
Procedure
To show the human-readable values of used and available space in
/var/lib, enter the following command:$ df -h /var/libThe output shows the ephemeral storage usage in
/var/lib:Example output
Filesystem Size Used Avail Use% Mounted on /dev/disk/by-partuuid/4cd1448a-01 69G 32G 34G 49% /
Chapter 3. Understanding persistent storage
3.1. Persistent storage overview
Managing storage is a distinct problem from managing compute resources. OpenShift Container Platform uses the Kubernetes persistent volume (PV) framework to allow cluster administrators to provision persistent storage for a cluster. Developers can use persistent volume claims (PVCs) to request PV resources without having specific knowledge of the underlying storage infrastructure.
PVCs are specific to a project, and are created and used by developers as a means to use a PV. PV resources on their own are not scoped to any single project; they can be shared across the entire OpenShift Container Platform cluster and claimed from any project. After a PV is bound to a PVC, that PV can not then be bound to additional PVCs. This has the effect of scoping a bound PV to a single namespace, that of the binding project.
PVs are defined by a PersistentVolume API object, which represents a piece of existing storage in the cluster that was either statically provisioned by the cluster administrator or dynamically provisioned using a StorageClass object. It is a resource in the cluster just like a node is a cluster resource.
PVs are volume plugins like Volumes but have a lifecycle that is independent of any individual pod that uses the PV. PV objects capture the details of the implementation of the storage, be that NFS, iSCSI, or a cloud-provider-specific storage system.
High availability of storage in the infrastructure is left to the underlying storage provider.
PVCs are defined by a PersistentVolumeClaim API object, which represents a request for storage by a developer. It is similar to a pod in that pods consume node resources and PVCs consume PV resources. For example, pods can request specific levels of resources, such as CPU and memory, while PVCs can request specific storage capacity and access modes. For example, they can be mounted once read-write or many times read-only.
3.2. Lifecycle of a volume and claim
PVs are resources in the cluster. PVCs are requests for those resources and also act as claim checks to the resource. The interaction between PVs and PVCs have the following lifecycle.
3.2.1. Provision storage
In response to requests from a developer defined in a PVC, a cluster administrator configures one or more dynamic provisioners that provision storage and a matching PV.
Alternatively, a cluster administrator can create a number of PVs in advance that carry the details of the real storage that is available for use. PVs exist in the API and are available for use.
3.2.2. Bind claims
When you create a PVC, you request a specific amount of storage, specify the required access mode, and create a storage class to describe and classify the storage. The control loop in the master watches for new PVCs and binds the new PVC to an appropriate PV. If an appropriate PV does not exist, a provisioner for the storage class creates one.
The size of all PVs might exceed your PVC size. This is especially true with manually provisioned PVs. To minimize the excess, OpenShift Container Platform binds to the smallest PV that matches all other criteria.
Claims remain unbound indefinitely if a matching volume does not exist or can not be created with any available provisioner servicing a storage class. Claims are bound as matching volumes become available. For example, a cluster with many manually provisioned 50Gi volumes would not match a PVC requesting 100Gi. The PVC can be bound when a 100Gi PV is added to the cluster.
3.2.3. Use pods and claimed PVs
Pods use claims as volumes. The cluster inspects the claim to find the bound volume and mounts that volume for a pod. For those volumes that support multiple access modes, you must specify which mode applies when you use the claim as a volume in a pod.
Once you have a claim and that claim is bound, the bound PV belongs to you for as long as you need it. You can schedule pods and access claimed PVs by including persistentVolumeClaim in the pod’s volumes block.
If you attach persistent volumes that have high file counts to pods, those pods can fail or can take a long time to start. For more information, see When using Persistent Volumes with high file counts in OpenShift, why do pods fail to start or take an excessive amount of time to achieve "Ready" state?.
3.2.4. Storage Object in Use Protection
The Storage Object in Use Protection feature ensures that PVCs in active use by a pod and PVs that are bound to PVCs are not removed from the system, as this can result in data loss.
Storage Object in Use Protection is enabled by default.
A PVC is in active use by a pod when a Pod object exists that uses the PVC.
If a user deletes a PVC that is in active use by a pod, the PVC is not removed immediately. PVC removal is postponed until the PVC is no longer actively used by any pods. Also, if a cluster admin deletes a PV that is bound to a PVC, the PV is not removed immediately. PV removal is postponed until the PV is no longer bound to a PVC.
3.2.5. Release a persistent volume
When you are finished with a volume, you can delete the PVC object from the API, which allows reclamation of the resource. The volume is considered released when the claim is deleted, but it is not yet available for another claim. The previous claimant’s data remains on the volume and must be handled according to policy.
3.2.6. Reclaim policy for persistent volumes
The reclaim policy of a persistent volume tells the cluster what to do with the volume after it is released. A volume’s reclaim policy can be Retain, Recycle, or Delete.
-
Retainreclaim policy allows manual reclamation of the resource for those volume plugins that support it. -
Recyclereclaim policy recycles the volume back into the pool of unbound persistent volumes once it is released from its claim.
The Recycle reclaim policy is deprecated in OpenShift Container Platform 4. Dynamic provisioning is recommended for equivalent and better functionality.
-
Deletereclaim policy deletes both thePersistentVolumeobject from OpenShift Container Platform and the associated storage asset in external infrastructure, such as Amazon Elastic Block Store (Amazon EBS) or VMware vSphere.
Dynamically provisioned volumes are always deleted.
3.2.7. Reclaiming a persistent volume manually
When a persistent volume claim (PVC) is deleted, the persistent volume (PV) still exists and is considered "released". However, the PV is not yet available for another claim because the data of the previous claimant remains on the volume.
Procedure
To manually reclaim the PV as a cluster administrator:
Delete the PV by running the following command:
$ oc delete pv <pv_name>The associated storage asset in the external infrastructure, such as an AWS EBS, GCE PD, Azure Disk, or Cinder volume, still exists after the PV is deleted.
- Clean up the data on the associated storage asset.
- Delete the associated storage asset. Alternately, to reuse the same storage asset, create a new PV with the storage asset definition.
The reclaimed PV is now available for use by another PVC.
3.2.8. Changing the reclaim policy of a persistent volume
You can change the reclaim policy of a persistent volume.
Procedure
List the persistent volumes in your cluster:
$ oc get pvExample output
NAME CAPACITY ACCESSMODES RECLAIMPOLICY STATUS CLAIM STORAGECLASS REASON AGE pvc-b6efd8da-b7b5-11e6-9d58-0ed433a7dd94 4Gi RWO Delete Bound default/claim1 manual 10s pvc-b95650f8-b7b5-11e6-9d58-0ed433a7dd94 4Gi RWO Delete Bound default/claim2 manual 6s pvc-bb3ca71d-b7b5-11e6-9d58-0ed433a7dd94 4Gi RWO Delete Bound default/claim3 manual 3sChoose one of your persistent volumes and change its reclaim policy:
$ oc patch pv <your-pv-name> -p '{"spec":{"persistentVolumeReclaimPolicy":"Retain"}}'Verify that your chosen persistent volume has the right policy:
$ oc get pvExample output
NAME CAPACITY ACCESSMODES RECLAIMPOLICY STATUS CLAIM STORAGECLASS REASON AGE pvc-b6efd8da-b7b5-11e6-9d58-0ed433a7dd94 4Gi RWO Delete Bound default/claim1 manual 10s pvc-b95650f8-b7b5-11e6-9d58-0ed433a7dd94 4Gi RWO Delete Bound default/claim2 manual 6s pvc-bb3ca71d-b7b5-11e6-9d58-0ed433a7dd94 4Gi RWO Retain Bound default/claim3 manual 3sIn the preceding output, the volume bound to claim
default/claim3now has aRetainreclaim policy. The volume will not be automatically deleted when a user deletes claimdefault/claim3.
3.3. Persistent volumes
Each PV contains a spec and status, which is the specification and status of the volume, for example:
PersistentVolume object definition example
apiVersion: v1
kind: PersistentVolume
metadata:
name: pv0001
spec:
capacity:
storage: 5Gi
accessModes:
- ReadWriteOnce
persistentVolumeReclaimPolicy: Retain
...
status:
...3.3.1. Types of PVs
OpenShift Container Platform supports the following persistent volume plugins:
- AliCloud Disk
- AWS Elastic Block Store (EBS)
- AWS Elastic File Store (EFS)
- Azure Disk
- Azure File
- Cinder
- Fibre Channel
- GCP Persistent Disk
- GCP Filestore
- IBM Power Virtual Server Block
- IBM® VPC Block
- HostPath
- iSCSI
- Local volume
- LVM Storage
- NFS
- OpenStack Manila
- Red Hat OpenShift Data Foundation
- VMware vSphere
3.3.2. Capacity
Generally, a persistent volume (PV) has a specific storage capacity. This is set by using the capacity attribute of the PV.
Currently, storage capacity is the only resource that can be set or requested. Future attributes may include IOPS, throughput, and so on.
3.3.3. Access modes
A persistent volume can be mounted on a host in any way supported by the resource provider. Providers have different capabilities and each PV’s access modes are set to the specific modes supported by that particular volume. For example, NFS can support multiple read-write clients, but a specific NFS PV might be exported on the server as read-only. Each PV gets its own set of access modes describing that specific PV’s capabilities.
Claims are matched to volumes with similar access modes. The only two matching criteria are access modes and size. A claim’s access modes represent a request. Therefore, you might be granted more, but never less. For example, if a claim requests RWO, but the only volume available is an NFS PV (RWO+ROX+RWX), the claim would then match NFS because it supports RWO.
Direct matches are always attempted first. The volume’s modes must match or contain more modes than you requested. The size must be greater than or equal to what is expected. If two types of volumes, such as NFS and iSCSI, have the same set of access modes, either of them can match a claim with those modes. There is no ordering between types of volumes and no way to choose one type over another.
All volumes with the same modes are grouped, and then sorted by size, smallest to largest. The binder gets the group with matching modes and iterates over each, in size order, until one size matches.
Volume access modes describe volume capabilities. They are not enforced constraints. The storage provider is responsible for runtime errors resulting from invalid use of the resource. Errors in the provider show up at runtime as mount errors.
For example, NFS offers ReadWriteOnce access mode. If you want to use the volume’s ROX capability, mark the claims as ReadOnlyMany.
iSCSI and Fibre Channel volumes do not currently have any fencing mechanisms. You must ensure the volumes are only used by one node at a time. In certain situations, such as draining a node, the volumes can be used simultaneously by two nodes. Before draining the node, delete the pods that use the volumes.
The following table lists the access modes:
| Access Mode | CLI abbreviation | Description |
|---|---|---|
| ReadWriteOnce |
| The volume can be mounted as read-write by a single node. |
| ReadWriteOncePod [1] |
| The volume can be mounted as read-write by a single pod on a single node. |
| ReadOnlyMany |
| The volume can be mounted as read-only by many nodes. |
| ReadWriteMany |
| The volume can be mounted as read-write by many nodes. |
- ReadWriteOncePod access mode for persistent volumes is a Technology Preview feature.
ReadWriteOncePod access mode for persistent volumes is a Technology Preview feature only. Technology Preview features are not supported with Red Hat production service level agreements (SLAs) and might not be functionally complete. Red Hat does not recommend using them in production. These features provide early access to upcoming product features, enabling customers to test functionality and provide feedback during the development process.
For more information about the support scope of Red Hat Technology Preview features, see Technology Preview Features Support Scope.
| Volume plugin | ReadWriteOnce [1] | ReadWriteOncePod [2] | ReadOnlyMany | ReadWriteMany |
|---|---|---|---|---|
| AliCloud Disk |
✅ |
✅ |
- |
- |
| AWS EBS [3] |
✅ |
✅ |
- |
- |
| AWS EFS |
✅ |
✅ |
✅ |
✅ |
| Azure File |
✅ |
✅ |
✅ |
✅ |
| Azure Disk |
✅ |
✅ |
- |
- |
| Cinder |
✅ |
✅ |
- |
- |
| Fibre Channel |
✅ |
✅ |
✅ |
✅ [4] |
| GCP Persistent Disk |
✅ |
✅ |
- |
- |
| GCP Filestore |
✅ |
✅ |
✅ |
✅ |
| HostPath |
✅ |
✅ |
- |
- |
| IBM Power Virtual Server Disk |
✅ |
✅ |
✅ |
✅ |
| IBM® VPC Disk |
✅ |
✅ |
- |
- |
| iSCSI |
✅ |
✅ |
✅ |
✅ [4] |
| Local volume |
✅ |
✅ |
- |
- |
| LVM Storage |
✅ |
✅ |
- |
- |
| NFS |
✅ |
✅ |
✅ |
✅ |
| OpenStack Manila |
- |
✅ |
- |
✅ |
| Red Hat OpenShift Data Foundation |
✅ |
✅ |
- |
✅ |
| VMware vSphere |
✅ |
✅ |
- |
✅ [5] |
- ReadWriteOnce (RWO) volumes cannot be mounted on multiple nodes. If a node fails, the system does not allow the attached RWO volume to be mounted on a new node because it is already assigned to the failed node. If you encounter a multi-attach error message as a result, force delete the pod on a shutdown or crashed node to avoid data loss in critical workloads, such as when dynamic persistent volumes are attached.
- ReadWriteOncePod is a Technology Preview feature.
- Use a recreate deployment strategy for pods that rely on AWS EBS.
- Only raw block volumes support the ReadWriteMany (RWX) access mode for Fibre Channel and iSCSI. For more information, see "Block volume support".
- If the underlying vSphere environment supports the vSAN file service, then the vSphere Container Storage Interface (CSI) Driver Operator installed by OpenShift Container Platform supports provisioning of ReadWriteMany (RWX) volumes. If you do not have vSAN file service configured, and you request RWX, the volume fails to get created and an error is logged. For more information, see "Using Container Storage Interface" → "VMware vSphere CSI Driver Operator".
3.3.4. Phase
Volumes can be found in one of the following phases:
| Phase | Description |
|---|---|
| Available | A free resource not yet bound to a claim. |
| Bound | The volume is bound to a claim. |
| Released | The claim was deleted, but the resource is not yet reclaimed by the cluster. |
| Failed | The volume has failed its automatic reclamation. |
You can view the name of the PVC that is bound to the PV by running the following command:
$ oc get pv <pv_claim>3.3.4.1. Mount options
You can specify mount options while mounting a PV by using the attribute mountOptions.
For example:
Mount options example
apiVersion: v1
kind: PersistentVolume
metadata:
name: pv0001
spec:
capacity:
storage: 1Gi
accessModes:
- ReadWriteOnce
mountOptions:
- nfsvers=4.1
nfs:
path: /tmp
server: 172.17.0.2
persistentVolumeReclaimPolicy: Retain
claimRef:
name: claim1
namespace: default- 1
- Specified mount options are used while mounting the PV to the disk.
The following PV types support mount options:
- AWS Elastic Block Store (EBS)
- Azure Disk
- Azure File
- Cinder
- GCE Persistent Disk
- iSCSI
- Local volume
- NFS
- Red Hat OpenShift Data Foundation (Ceph RBD only)
- VMware vSphere
Fibre Channel and HostPath PVs do not support mount options.
change
@@ -1,115 +0,0 @@
// Module included in the following assemblies:
//
// * storage/understanding-persistent-storage.adoc
//* microshift_storage/understanding-persistent-storage-microshift.adoc3.3.5. Persistent volume claims
Each PersistentVolumeClaim object contains spec and status fields, which are the specification and status of the persistent volume claim (PVC), for example:
PersistentVolumeClaim object definition example
kind: PersistentVolumeClaim
apiVersion: v1
metadata:
name: myclaim
spec:
accessModes:
- ReadWriteOnce
resources:
requests:
storage: 8Gi
storageClassName: gold
status:
...3.3.6. Storage classes
Claims can optionally request a specific storage class by specifying the storage class’s name in the storageClassName attribute. Only PVs of the requested class, ones with the same storageClassName as the PVC, can be bound to the PVC. The cluster administrator can configure dynamic provisioners to service one or more storage classes. The cluster administrator can create a PV on-demand that matches the specifications in the PVC.
The Cluster Storage Operator might install a default storage class depending on the platform in use. This storage class is owned and controlled by the Operator. It cannot be deleted or modified beyond defining annotations and labels. If different behavior is desired, you must define a custom storage class.
The cluster administrator can also set a default storage class for all PVCs. When a default storage class is configured, the PVC must explicitly ask for StorageClass or storageClassName annotations set to "" to be bound to a PV without a storage class.
If more than one storage class is marked as default, a PVC can only be created if the storageClassName is explicitly specified. Therefore, only one storage class should be set as the default.
3.3.7. Access modes
Claims use the same conventions as volumes when requesting storage with specific access modes.
3.3.8. Resources
Claims, such as pods, can request specific quantities of a resource. In this case, the request is for storage. The same resource model applies to volumes and claims.
3.3.9. Claims as volumes
Pods access storage by using the claim as a volume. Claims must exist in the same namespace as the pod using the claim. The cluster finds the claim in the pod’s namespace and uses it to get the PersistentVolume backing the claim. The volume is mounted to the host and into the pod, for example:
Mount volume to the host and into the pod example
kind: Pod
apiVersion: v1
metadata:
name: mypod
spec:
containers:
- name: myfrontend
image: dockerfile/nginx
volumeMounts:
- mountPath: "/var/www/html"
name: mypd
volumes:
- name: mypd
persistentVolumeClaim:
claimName: myclaim - 1
- Path to mount the volume inside the pod.
- 2
- Name of the volume to mount. Do not mount to the container root,
/, or any path that is the same in the host and the container. This can corrupt your host system if the container is sufficiently privileged, such as the host/dev/ptsfiles. It is safe to mount the host by using/host. - 3
- Name of the PVC, that exists in the same namespace, to use.
3.4. Block volume support
OpenShift Container Platform can statically provision raw block volumes. These volumes do not have a file system, and can provide performance benefits for applications that either write to the disk directly or implement their own storage service.
Raw block volumes are provisioned by specifying volumeMode: Block in the PV and PVC specification.
Pods using raw block volumes must be configured to allow privileged containers.
The following table displays which volume plugins support block volumes.
| Volume Plugin | Manually provisioned | Dynamically provisioned | Fully supported |
|---|---|---|---|
| Amazon Elastic Block Store (Amazon EBS) | ✅ | ✅ | ✅ |
| Amazon Elastic File Storage (Amazon EFS) | |||
| AliCloud Disk | ✅ | ✅ | ✅ |
| Azure Disk | ✅ | ✅ | ✅ |
| Azure File | |||
| Cinder | ✅ | ✅ | ✅ |
| Fibre Channel | ✅ | ✅ | |
| GCP | ✅ | ✅ | ✅ |
| HostPath | |||
| IBM VPC Disk | ✅ | ✅ | ✅ |
| iSCSI | ✅ | ✅ | |
| Local volume | ✅ | ✅ | |
| LVM Storage | ✅ | ✅ | ✅ |
| NFS | |||
| Red Hat OpenShift Data Foundation | ✅ | ✅ | ✅ |
| VMware vSphere | ✅ | ✅ | ✅ |
Using any of the block volumes that can be provisioned manually, but are not provided as fully supported, is a Technology Preview feature only. Technology Preview features are not supported with Red Hat production service level agreements (SLAs) and might not be functionally complete. Red Hat does not recommend using them in production. These features provide early access to upcoming product features, enabling customers to test functionality and provide feedback during the development process.
For more information about the support scope of Red Hat Technology Preview features, see Technology Preview Features Support Scope.
3.4.1. Block volume examples
PV example
apiVersion: v1
kind: PersistentVolume
metadata:
name: block-pv
spec:
capacity:
storage: 10Gi
accessModes:
- ReadWriteOnce
volumeMode: Block
persistentVolumeReclaimPolicy: Retain
fc:
targetWWNs: ["50060e801049cfd1"]
lun: 0
readOnly: false- 1
volumeModemust be set toBlockto indicate that this PV is a raw block volume.
PVC example
apiVersion: v1
kind: PersistentVolumeClaim
metadata:
name: block-pvc
spec:
accessModes:
- ReadWriteOnce
volumeMode: Block
resources:
requests:
storage: 10Gi- 1
volumeModemust be set toBlockto indicate that a raw block PVC is requested.
Pod specification example
apiVersion: v1
kind: Pod
metadata:
name: pod-with-block-volume
spec:
containers:
- name: fc-container
image: fedora:26
command: ["/bin/sh", "-c"]
args: [ "tail -f /dev/null" ]
volumeDevices:
- name: data
devicePath: /dev/xvda
volumes:
- name: data
persistentVolumeClaim:
claimName: block-pvc - 1
volumeDevices, instead ofvolumeMounts, is used for block devices. OnlyPersistentVolumeClaimsources can be used with raw block volumes.- 2
devicePath, instead ofmountPath, represents the path to the physical device where the raw block is mapped to the system.- 3
- The volume source must be of type
persistentVolumeClaimand must match the name of the PVC as expected.
| Value | Default |
|---|---|
| Filesystem | Yes |
| Block | No |
PV volumeMode | PVC volumeMode | Binding result |
|---|---|---|
| Filesystem | Filesystem | Bind |
| Unspecified | Unspecified | Bind |
| Filesystem | Unspecified | Bind |
| Unspecified | Filesystem | Bind |
| Block | Block | Bind |
| Unspecified | Block | No Bind |
| Block | Unspecified | No Bind |
| Filesystem | Block | No Bind |
| Block | Filesystem | No Bind |
Unspecified values result in the default value of Filesystem.
3.5. Using fsGroup to reduce pod timeouts
If a storage volume contains many files (~1,000,000 or greater), you may experience pod timeouts.
This can occur because, by default, OpenShift Container Platform recursively changes ownership and permissions for the contents of each volume to match the fsGroup specified in a pod’s securityContext when that volume is mounted. For large volumes, checking and changing ownership and permissions can be time consuming, slowing pod startup. You can use the fsGroupChangePolicy field inside a securityContext to control the way that OpenShift Container Platform checks and manages ownership and permissions for a volume.
fsGroupChangePolicy defines behavior for changing ownership and permission of the volume before being exposed inside a pod. This field only applies to volume types that support fsGroup-controlled ownership and permissions. This field has two possible values:
-
OnRootMismatch: Only change permissions and ownership if permission and ownership of root directory does not match with expected permissions of the volume. This can help shorten the time it takes to change ownership and permission of a volume to reduce pod timeouts. -
Always: Always change permission and ownership of the volume when a volume is mounted.
fsGroupChangePolicy example
securityContext:
runAsUser: 1000
runAsGroup: 3000
fsGroup: 2000
fsGroupChangePolicy: "OnRootMismatch"
...- 1
OnRootMismatchspecifies skipping recursive permission change, thus helping to avoid pod timeout problems.
The fsGroupChangePolicyfield has no effect on ephemeral volume types, such as secret, configMap, and emptydir.
Chapter 4. Configuring persistent storage
4.1. Persistent storage using AWS Elastic Block Store
OpenShift Container Platform supports Amazon Elastic Block Store (EBS) volumes. You can provision your OpenShift Container Platform cluster with persistent storage by using Amazon EC2.
The Kubernetes persistent volume framework allows administrators to provision a cluster with persistent storage and gives users a way to request those resources without having any knowledge of the underlying infrastructure. You can dynamically provision Amazon EBS volumes. Persistent volumes are not bound to a single project or namespace; they can be shared across the OpenShift Container Platform cluster. Persistent volume claims are specific to a project or namespace and can be requested by users. You can define a KMS key to encrypt container-persistent volumes on AWS. By default, newly created clusters using OpenShift Container Platform version 4.10 and later use gp3 storage and the AWS EBS CSI driver.
High-availability of storage in the infrastructure is left to the underlying storage provider.
OpenShift Container Platform 4.12 and later provides automatic migration for the AWS Block in-tree volume plugin to its equivalent CSI driver.
CSI automatic migration should be seamless. Migration does not change how you use all existing API objects, such as persistent volumes, persistent volume claims, and storage classes. For more information about migration, see CSI automatic migration.
4.1.1. Creating the EBS storage class
Storage classes are used to differentiate and delineate storage levels and usages. By defining a storage class, users can obtain dynamically provisioned persistent volumes.
4.1.2. Creating the persistent volume claim
Prerequisites
Storage must exist in the underlying infrastructure before it can be mounted as a volume in OpenShift Container Platform.
Procedure
- In the OpenShift Container Platform console, click Storage → Persistent Volume Claims.
- In the persistent volume claims overview, click Create Persistent Volume Claim.
Define the desired options on the page that appears.
- Select the previously-created storage class from the drop-down menu.
- Enter a unique name for the storage claim.
- Select the access mode. This selection determines the read and write access for the storage claim.
- Define the size of the storage claim.
- Click Create to create the persistent volume claim and generate a persistent volume.
4.1.3. Volume format
Before OpenShift Container Platform mounts the volume and passes it to a container, it checks that the volume contains a file system as specified by the fsType arameter in the persistent volume definition. If the device is not formatted with the file system, all data from the device is erased and the device is automatically formatted with the given file system.
This verification enables you to use unformatted AWS volumes as persistent volumes, because OpenShift Container Platform formats them before the first use.
4.1.4. Maximum number of EBS volumes on a node
By default, OpenShift Container Platform supports a maximum of 39 EBS volumes attached to one node. This limit is consistent with the AWS volume limits. The volume limit depends on the instance type.
As a cluster administrator, you must use either in-tree or Container Storage Interface (CSI) volumes and their respective storage classes, but never both volume types at the same time. The maximum attached EBS volume number is counted separately for in-tree and CSI volumes, which means you could have up to 39 EBS volumes of each type.
For information about accessing additional storage options, such as volume snapshots, that are not possible with in-tree volume plug-ins, see AWS Elastic Block Store CSI Driver Operator.
4.1.5. Encrypting container persistent volumes on AWS with a KMS key
Defining a KMS key to encrypt container-persistent volumes on AWS is useful when you have explicit compliance and security guidelines when deploying to AWS.
Prerequisites
- Underlying infrastructure must contain storage.
- You must create a customer KMS key on AWS.
Procedure
Create a storage class:
$ cat << EOF | oc create -f - apiVersion: storage.k8s.io/v1 kind: StorageClass metadata: name: <storage-class-name>1 parameters: fsType: ext42 encrypted: "true" kmsKeyId: keyvalue3 provisioner: ebs.csi.aws.com reclaimPolicy: Delete volumeBindingMode: WaitForFirstConsumer EOF- 1
- Specifies the name of the storage class.
- 2
- File system that is created on provisioned volumes.
- 3
- Specifies the full Amazon Resource Name (ARN) of the key to use when encrypting the container-persistent volume. If you do not provide any key, but the
encryptedfield is set totrue, then the default KMS key is used. See Finding the key ID and key ARN on AWS in the AWS documentation.
Create a persistent volume claim (PVC) with the storage class specifying the KMS key:
$ cat << EOF | oc create -f - apiVersion: v1 kind: PersistentVolumeClaim metadata: name: mypvc spec: accessModes: - ReadWriteOnce volumeMode: Filesystem storageClassName: <storage-class-name> resources: requests: storage: 1Gi EOFCreate workload containers to consume the PVC:
$ cat << EOF | oc create -f - kind: Pod metadata: name: mypod spec: containers: - name: httpd image: quay.io/centos7/httpd-24-centos7 ports: - containerPort: 80 volumeMounts: - mountPath: /mnt/storage name: data volumes: - name: data persistentVolumeClaim: claimName: mypvc EOF
4.2. Persistent storage using Azure
OpenShift Container Platform supports Microsoft Azure Disk volumes. You can provision your OpenShift Container Platform cluster with persistent storage using Azure. Some familiarity with Kubernetes and Azure is assumed. The Kubernetes persistent volume framework allows administrators to provision a cluster with persistent storage and gives users a way to request those resources without having any knowledge of the underlying infrastructure. Azure Disk volumes can be provisioned dynamically. Persistent volumes are not bound to a single project or namespace; they can be shared across the OpenShift Container Platform cluster. Persistent volume claims are specific to a project or namespace and can be requested by users.
OpenShift Container Platform 4.11 and later provides automatic migration for the Azure Disk in-tree volume plugin to its equivalent CSI driver.
CSI automatic migration should be seamless. Migration does not change how you use all existing API objects, such as persistent volumes, persistent volume claims, and storage classes. For more information about migration, see CSI automatic migration.
High availability of storage in the infrastructure is left to the underlying storage provider.
4.2.1. Creating the Azure storage class
Storage classes are used to differentiate and delineate storage levels and usages. By defining a storage class, users can obtain dynamically provisioned persistent volumes.
Procedure
- In the OpenShift Container Platform console, click Storage → Storage Classes.
- In the storage class overview, click Create Storage Class.
Define the desired options on the page that appears.
- Enter a name to reference the storage class.
- Enter an optional description.
- Select the reclaim policy.
Select
kubernetes.io/azure-diskfrom the drop down list.-
Enter the storage account type. This corresponds to your Azure storage account SKU tier. Valid options are
Premium_LRS,Standard_LRS,StandardSSD_LRS, andUltraSSD_LRS. Enter the kind of account. Valid options are
shared,dedicated,andmanaged.ImportantRed Hat only supports the use of
kind: Managedin the storage class.With
SharedandDedicated, Azure creates unmanaged disks, while OpenShift Container Platform creates a managed disk for machine OS (root) disks. But because Azure Disk does not allow the use of both managed and unmanaged disks on a node, unmanaged disks created withSharedorDedicatedcannot be attached to OpenShift Container Platform nodes.
-
Enter the storage account type. This corresponds to your Azure storage account SKU tier. Valid options are
- Enter additional parameters for the storage class as desired.
- Click Create to create the storage class.
4.2.2. Creating the persistent volume claim
Prerequisites
Storage must exist in the underlying infrastructure before it can be mounted as a volume in OpenShift Container Platform.
Procedure
- In the OpenShift Container Platform console, click Storage → Persistent Volume Claims.
- In the persistent volume claims overview, click Create Persistent Volume Claim.
Define the desired options on the page that appears.
- Select the previously-created storage class from the drop-down menu.
- Enter a unique name for the storage claim.
- Select the access mode. This selection determines the read and write access for the storage claim.
- Define the size of the storage claim.
- Click Create to create the persistent volume claim and generate a persistent volume.
4.2.3. Volume format
Before OpenShift Container Platform mounts the volume and passes it to a container, it checks that it contains a file system as specified by the fsType parameter in the persistent volume definition. If the device is not formatted with the file system, all data from the device is erased and the device is automatically formatted with the given file system.
This allows using unformatted Azure volumes as persistent volumes, because OpenShift Container Platform formats them before the first use.
4.2.4. Machine sets that deploy machines with ultra disks using PVCs
You can create a machine set running on Azure that deploys machines with ultra disks. Ultra disks are high-performance storage that are intended for use with the most demanding data workloads.
Both the in-tree plugin and CSI driver support using PVCs to enable ultra disks. You can also deploy machines with ultra disks as data disks without creating a PVC.
4.2.4.1. Creating machines with ultra disks by using machine sets
You can deploy machines with ultra disks on Azure by editing your machine set YAML file.
Prerequisites
- Have an existing Microsoft Azure cluster.
Procedure
Copy an existing Azure
MachineSetcustom resource (CR) and edit it by running the following command:$ oc edit machineset <machine_set_name>where
<machine_set_name>is the machine set that you want to provision machines with ultra disks.Add the following lines in the positions indicated:
apiVersion: machine.openshift.io/v1beta1 kind: MachineSet spec: template: spec: metadata: labels: disk: ultrassd1 providerSpec: value: ultraSSDCapability: Enabled2 Create a machine set using the updated configuration by running the following command:
$ oc create -f <machine_set_name>.yamlCreate a storage class that contains the following YAML definition:
apiVersion: storage.k8s.io/v1 kind: StorageClass metadata: name: ultra-disk-sc1 parameters: cachingMode: None diskIopsReadWrite: "2000"2 diskMbpsReadWrite: "320"3 kind: managed skuname: UltraSSD_LRS provisioner: disk.csi.azure.com4 reclaimPolicy: Delete volumeBindingMode: WaitForFirstConsumer5 - 1
- Specify the name of the storage class. This procedure uses
ultra-disk-scfor this value. - 2
- Specify the number of IOPS for the storage class.
- 3
- Specify the throughput in MBps for the storage class.
- 4
- For Azure Kubernetes Service (AKS) version 1.21 or later, use
disk.csi.azure.com. For earlier versions of AKS, usekubernetes.io/azure-disk. - 5
- Optional: Specify this parameter to wait for the creation of the pod that will use the disk.
Create a persistent volume claim (PVC) to reference the
ultra-disk-scstorage class that contains the following YAML definition:apiVersion: v1 kind: PersistentVolumeClaim metadata: name: ultra-disk1 spec: accessModes: - ReadWriteOnce storageClassName: ultra-disk-sc2 resources: requests: storage: 4Gi3 Create a pod that contains the following YAML definition:
apiVersion: v1 kind: Pod metadata: name: nginx-ultra spec: nodeSelector: disk: ultrassd1 containers: - name: nginx-ultra image: alpine:latest command: - "sleep" - "infinity" volumeMounts: - mountPath: "/mnt/azure" name: volume volumes: - name: volume persistentVolumeClaim: claimName: ultra-disk2
Verification
Validate that the machines are created by running the following command:
$ oc get machinesThe machines should be in the
Runningstate.For a machine that is running and has a node attached, validate the partition by running the following command:
$ oc debug node/<node_name> -- chroot /host lsblkIn this command,
oc debug node/<node_name>starts a debugging shell on the node<node_name>and passes a command with--. The passed commandchroot /hostprovides access to the underlying host OS binaries, andlsblkshows the block devices that are attached to the host OS machine.
Next steps
To use an ultra disk from within a pod, create a workload that uses the mount point. Create a YAML file similar to the following example:
apiVersion: v1 kind: Pod metadata: name: ssd-benchmark1 spec: containers: - name: ssd-benchmark1 image: nginx ports: - containerPort: 80 name: "http-server" volumeMounts: - name: lun0p1 mountPath: "/tmp" volumes: - name: lun0p1 hostPath: path: /var/lib/lun0p1 type: DirectoryOrCreate nodeSelector: disktype: ultrassd
4.2.4.2. Troubleshooting resources for machine sets that enable ultra disks
Use the information in this section to understand and recover from issues you might encounter.
4.2.4.2.1. Unable to mount a persistent volume claim backed by an ultra disk
If there is an issue mounting a persistent volume claim backed by an ultra disk, the pod becomes stuck in the ContainerCreating state and an alert is triggered.
For example, if the additionalCapabilities.ultraSSDEnabled parameter is not set on the machine that backs the node that hosts the pod, the following error message appears:
StorageAccountType UltraSSD_LRS can be used only when additionalCapabilities.ultraSSDEnabled is set.To resolve this issue, describe the pod by running the following command:
$ oc -n <stuck_pod_namespace> describe pod <stuck_pod_name>
4.3. Persistent storage using Azure File
OpenShift Container Platform supports Microsoft Azure File volumes. You can provision your OpenShift Container Platform cluster with persistent storage using Azure. Some familiarity with Kubernetes and Azure is assumed.
The Kubernetes persistent volume framework allows administrators to provision a cluster with persistent storage and gives users a way to request those resources without having any knowledge of the underlying infrastructure. You can provision Azure File volumes dynamically.
Persistent volumes are not bound to a single project or namespace, and you can share them across the OpenShift Container Platform cluster. Persistent volume claims are specific to a project or namespace, and can be requested by users for use in applications.
High availability of storage in the infrastructure is left to the underlying storage provider.
Azure File volumes use Server Message Block.
OpenShift Container Platform 4.13 and later provides automatic migration for the Azure File in-tree volume plugin to its equivalent CSI driver.
CSI automatic migration should be seamless. Migration does not change how you use all existing API objects, such as persistent volumes, persistent volume claims, and storage classes. For more information about migration, see CSI automatic migration.
Additional resources
4.3.1. Create the Azure File share persistent volume claim
To create the persistent volume claim, you must first define a Secret object that contains the Azure account and key. This secret is used in the PersistentVolume definition, and will be referenced by the persistent volume claim for use in applications.
Prerequisites
- An Azure File share exists.
- The credentials to access this share, specifically the storage account and key, are available.
Procedure
Create a
Secretobject that contains the Azure File credentials:$ oc create secret generic <secret-name> --from-literal=azurestorageaccountname=<storage-account> \1 --from-literal=azurestorageaccountkey=<storage-account-key>2 Create a
PersistentVolumeobject that references theSecretobject you created:apiVersion: "v1" kind: "PersistentVolume" metadata: name: "pv0001"1 spec: capacity: storage: "5Gi"2 accessModes: - "ReadWriteOnce" storageClassName: azure-file-sc azureFile: secretName: <secret-name>3 shareName: share-14 readOnly: falseCreate a
PersistentVolumeClaimobject that maps to the persistent volume you created:apiVersion: "v1" kind: "PersistentVolumeClaim" metadata: name: "claim1"1 spec: accessModes: - "ReadWriteOnce" resources: requests: storage: "5Gi"2 storageClassName: azure-file-sc3 volumeName: "pv0001"4 - 1
- The name of the persistent volume claim.
- 2
- The size of this persistent volume claim.
- 3
- The name of the storage class that is used to provision the persistent volume. Specify the storage class used in the
PersistentVolumedefinition. - 4
- The name of the existing
PersistentVolumeobject that references the Azure File share.
4.3.2. Mount the Azure File share in a pod
After the persistent volume claim has been created, it can be used inside by an application. The following example demonstrates mounting this share inside of a pod.
Prerequisites
- A persistent volume claim exists that is mapped to the underlying Azure File share.
Procedure
Create a pod that mounts the existing persistent volume claim:
apiVersion: v1 kind: Pod metadata: name: pod-name1 spec: containers: ... volumeMounts: - mountPath: "/data"2 name: azure-file-share volumes: - name: azure-file-share persistentVolumeClaim: claimName: claim13 - 1
- The name of the pod.
- 2
- The path to mount the Azure File share inside the pod. Do not mount to the container root,
/, or any path that is the same in the host and the container. This can corrupt your host system if the container is sufficiently privileged, such as the host/dev/ptsfiles. It is safe to mount the host by using/host. - 3
- The name of the
PersistentVolumeClaimobject that has been previously created.
4.4. Persistent storage using Cinder
OpenShift Container Platform supports OpenStack Cinder. Some familiarity with Kubernetes and OpenStack is assumed.
Cinder volumes can be provisioned dynamically. Persistent volumes are not bound to a single project or namespace; they can be shared across the OpenShift Container Platform cluster. Persistent volume claims are specific to a project or namespace and can be requested by users.
OpenShift Container Platform 4.11 and later provides automatic migration for the Cinder in-tree volume plugin to its equivalent CSI driver.
CSI automatic migration should be seamless. Migration does not change how you use all existing API objects, such as persistent volumes, persistent volume claims, and storage classes. For more information about migration, see CSI automatic migration.
4.4.1. Manual provisioning with Cinder
Storage must exist in the underlying infrastructure before it can be mounted as a volume in OpenShift Container Platform.
Prerequisites
- OpenShift Container Platform configured for Red Hat OpenStack Platform (RHOSP)
- Cinder volume ID
4.4.1.1. Creating the persistent volume
You must define your persistent volume (PV) in an object definition before creating it in OpenShift Container Platform:
Procedure
Save your object definition to a file.
cinder-persistentvolume.yaml
apiVersion: "v1" kind: "PersistentVolume" metadata: name: "pv0001"1 spec: capacity: storage: "5Gi"2 accessModes: - "ReadWriteOnce" cinder:3 fsType: "ext3"4 volumeID: "f37a03aa-6212-4c62-a805-9ce139fab180"5 - 1
- The name of the volume that is used by persistent volume claims or pods.
- 2
- The amount of storage allocated to this volume.
- 3
- Indicates
cinderfor Red Hat OpenStack Platform (RHOSP) Cinder volumes. - 4
- The file system that is created when the volume is mounted for the first time.
- 5
- The Cinder volume to use.
ImportantDo not change the
fstypeparameter value after the volume is formatted and provisioned. Changing this value can result in data loss and pod failure.Create the object definition file you saved in the previous step.
$ oc create -f cinder-persistentvolume.yaml
4.4.1.2. Persistent volume formatting
You can use unformatted Cinder volumes as PVs because OpenShift Container Platform formats them before the first use.
Before OpenShift Container Platform mounts the volume and passes it to a container, the system checks that it contains a file system as specified by the fsType parameter in the PV definition. If the device is not formatted with the file system, all data from the device is erased and the device is automatically formatted with the given file system.
4.4.1.3. Cinder volume security
If you use Cinder PVs in your application, configure security for their deployment configurations.
Prerequisites
-
An SCC must be created that uses the appropriate
fsGroupstrategy.
Procedure
Create a service account and add it to the SCC:
$ oc create serviceaccount <service_account>$ oc adm policy add-scc-to-user <new_scc> -z <service_account> -n <project>In your application’s deployment configuration, provide the service account name and
securityContext:apiVersion: v1 kind: ReplicationController metadata: name: frontend-1 spec: replicas: 11 selector:2 name: frontend template:3 metadata: labels:4 name: frontend5 spec: containers: - image: openshift/hello-openshift name: helloworld ports: - containerPort: 8080 protocol: TCP restartPolicy: Always serviceAccountName: <service_account>6 securityContext: fsGroup: 77777 - 1
- The number of copies of the pod to run.
- 2
- The label selector of the pod to run.
- 3
- A template for the pod that the controller creates.
- 4
- The labels on the pod. They must include labels from the label selector.
- 5
- The maximum name length after expanding any parameters is 63 characters.
- 6
- Specifies the service account you created.
- 7
- Specifies an
fsGroupfor the pods.
4.5. Persistent storage using Fibre Channel
OpenShift Container Platform supports Fibre Channel, allowing you to provision your OpenShift Container Platform cluster with persistent storage using Fibre channel volumes. Some familiarity with Kubernetes and Fibre Channel is assumed.
Persistent storage using Fibre Channel is not supported on ARM architecture based infrastructures.
The Kubernetes persistent volume framework allows administrators to provision a cluster with persistent storage and gives users a way to request those resources without having any knowledge of the underlying infrastructure. Persistent volumes are not bound to a single project or namespace; they can be shared across the OpenShift Container Platform cluster. Persistent volume claims are specific to a project or namespace and can be requested by users.
High availability of storage in the infrastructure is left to the underlying storage provider.
4.5.1. Provisioning
To provision Fibre Channel volumes using the PersistentVolume API the following must be available:
-
The
targetWWNs(array of Fibre Channel target’s World Wide Names). - A valid LUN number.
- The filesystem type.
A persistent volume and a LUN have a one-to-one mapping between them.
Prerequisites
- Fibre Channel LUNs must exist in the underlying infrastructure.
PersistentVolume object definition
apiVersion: v1
kind: PersistentVolume
metadata:
name: pv0001
spec:
capacity:
storage: 1Gi
accessModes:
- ReadWriteOnce
fc:
wwids: [3600508b400105e210000900000490000]
targetWWNs: ['500a0981891b8dc5', '500a0981991b8dc5']
lun: 2
fsType: ext4- 1
- World wide identifiers (WWIDs). Either FC
wwidsor a combination of FCtargetWWNsandlunmust be set, but not both simultaneously. The FC WWID identifier is recommended over the WWNs target because it is guaranteed to be unique for every storage device, and independent of the path that is used to access the device. The WWID identifier can be obtained by issuing a SCSI Inquiry to retrieve the Device Identification Vital Product Data (page 0x83) or Unit Serial Number (page 0x80). FC WWIDs are identified as/dev/disk/by-id/to reference the data on the disk, even if the path to the device changes and even when accessing the device from different systems. - 2 3
- Fibre Channel WWNs are identified as
/dev/disk/by-path/pci-<IDENTIFIER>-fc-0x<WWN>-lun-<LUN#>, but you do not need to provide any part of the path leading up to theWWN, including the0x, and anything after, including the-(hyphen).
Changing the value of the fstype parameter after the volume has been formatted and provisioned can result in data loss and pod failure.
4.5.1.1. Enforcing disk quotas
Use LUN partitions to enforce disk quotas and size constraints. Each LUN is mapped to a single persistent volume, and unique names must be used for persistent volumes.
Enforcing quotas in this way allows the end user to request persistent storage by a specific amount, such as 10Gi, and be matched with a corresponding volume of equal or greater capacity.
4.5.1.2. Fibre Channel volume security
Users request storage with a persistent volume claim. This claim only lives in the user’s namespace, and can only be referenced by a pod within that same namespace. Any attempt to access a persistent volume across a namespace causes the pod to fail.
Each Fibre Channel LUN must be accessible by all nodes in the cluster.
4.6. Persistent storage using FlexVolume
FlexVolume is a deprecated feature. Deprecated functionality is still included in OpenShift Container Platform and continues to be supported; however, it will be removed in a future release of this product and is not recommended for new deployments.
Out-of-tree Container Storage Interface (CSI) driver is the recommended way to write volume drivers in OpenShift Container Platform. Maintainers of FlexVolume drivers should implement a CSI driver and move users of FlexVolume to CSI. Users of FlexVolume should move their workloads to CSI driver.
For the most recent list of major functionality that has been deprecated or removed within OpenShift Container Platform, refer to the Deprecated and removed features section of the OpenShift Container Platform release notes.
OpenShift Container Platform supports FlexVolume, an out-of-tree plugin that uses an executable model to interface with drivers.
To use storage from a back-end that does not have a built-in plugin, you can extend OpenShift Container Platform through FlexVolume drivers and provide persistent storage to applications.
Pods interact with FlexVolume drivers through the flexvolume in-tree plugin.
4.6.1. About FlexVolume drivers
A FlexVolume driver is an executable file that resides in a well-defined directory on all nodes in the cluster. OpenShift Container Platform calls the FlexVolume driver whenever it needs to mount or unmount a volume represented by a PersistentVolume object with flexVolume as the source.
Attach and detach operations are not supported in OpenShift Container Platform for FlexVolume.
4.6.2. FlexVolume driver example
The first command-line argument of the FlexVolume driver is always an operation name. Other parameters are specific to each operation. Most of the operations take a JavaScript Object Notation (JSON) string as a parameter. This parameter is a complete JSON string, and not the name of a file with the JSON data.
The FlexVolume driver contains:
-
All
flexVolume.options. -
Some options from
flexVolumeprefixed bykubernetes.io/, such asfsTypeandreadwrite. -
The content of the referenced secret, if specified, prefixed by
kubernetes.io/secret/.
FlexVolume driver JSON input example
{
"fooServer": "192.168.0.1:1234",
"fooVolumeName": "bar",
"kubernetes.io/fsType": "ext4",
"kubernetes.io/readwrite": "ro",
"kubernetes.io/secret/<key name>": "<key value>",
"kubernetes.io/secret/<another key name>": "<another key value>",
}OpenShift Container Platform expects JSON data on standard output of the driver. When not specified, the output describes the result of the operation.
FlexVolume driver default output example
{
"status": "<Success/Failure/Not supported>",
"message": "<Reason for success/failure>"
}
Exit code of the driver should be 0 for success and 1 for error.
Operations should be idempotent, which means that the mounting of an already mounted volume should result in a successful operation.
4.6.3. Installing FlexVolume drivers
FlexVolume drivers that are used to extend OpenShift Container Platform are executed only on the node. To implement FlexVolumes, a list of operations to call and the installation path are all that is required.
Prerequisites
FlexVolume drivers must implement these operations:
initInitializes the driver. It is called during initialization of all nodes.
- Arguments: none
- Executed on: node
- Expected output: default JSON
mountMounts a volume to directory. This can include anything that is necessary to mount the volume, including finding the device and then mounting the device.
-
Arguments:
<mount-dir><json> - Executed on: node
- Expected output: default JSON
-
Arguments:
unmountUnmounts a volume from a directory. This can include anything that is necessary to clean up the volume after unmounting.
-
Arguments:
<mount-dir> - Executed on: node
- Expected output: default JSON
-
Arguments:
mountdevice- Mounts a volume’s device to a directory where individual pods can then bind mount.
This call-out does not pass "secrets" specified in the FlexVolume spec. If your driver requires secrets, do not implement this call-out.
-
Arguments:
<mount-dir><json> - Executed on: node
Expected output: default JSON
unmountdevice- Unmounts a volume’s device from a directory.
-
Arguments:
<mount-dir> - Executed on: node
Expected output: default JSON
-
All other operations should return JSON with
{"status": "Not supported"}and exit code1.
-
All other operations should return JSON with
Procedure
To install the FlexVolume driver:
- Ensure that the executable file exists on all nodes in the cluster.
-
Place the executable file at the volume plugin path:
/etc/kubernetes/kubelet-plugins/volume/exec/<vendor>~<driver>/<driver>.
For example, to install the FlexVolume driver for the storage foo, place the executable file at: /etc/kubernetes/kubelet-plugins/volume/exec/openshift.com~foo/foo.
4.6.4. Consuming storage using FlexVolume drivers
Each PersistentVolume object in OpenShift Container Platform represents one storage asset in the storage back-end, such as a volume.
Procedure
-
Use the
PersistentVolumeobject to reference the installed storage.
Persistent volume object definition using FlexVolume drivers example
apiVersion: v1
kind: PersistentVolume
metadata:
name: pv0001
spec:
capacity:
storage: 1Gi
accessModes:
- ReadWriteOnce
flexVolume:
driver: openshift.com/foo
fsType: "ext4"
secretRef: foo-secret
readOnly: true
options:
fooServer: 192.168.0.1:1234
fooVolumeName: bar- 1
- The name of the volume. This is how it is identified through persistent volume claims or from pods. This name can be different from the name of the volume on back-end storage.
- 2
- The amount of storage allocated to this volume.
- 3
- The name of the driver. This field is mandatory.
- 4
- The file system that is present on the volume. This field is optional.
- 5
- The reference to a secret. Keys and values from this secret are provided to the FlexVolume driver on invocation. This field is optional.
- 6
- The read-only flag. This field is optional.
- 7
- The additional options for the FlexVolume driver. In addition to the flags specified by the user in the
optionsfield, the following flags are also passed to the executable:"fsType":"<FS type>", "readwrite":"<rw>", "secret/key1":"<secret1>" ... "secret/keyN":"<secretN>"
Secrets are passed only to mount or unmount call-outs.
4.7. Persistent storage using GCE Persistent Disk
OpenShift Container Platform supports GCE Persistent Disk volumes (gcePD). You can provision your OpenShift Container Platform cluster with persistent storage using GCE. Some familiarity with Kubernetes and GCE is assumed.
The Kubernetes persistent volume framework allows administrators to provision a cluster with persistent storage and gives users a way to request those resources without having any knowledge of the underlying infrastructure.
GCE Persistent Disk volumes can be provisioned dynamically.
Persistent volumes are not bound to a single project or namespace; they can be shared across the OpenShift Container Platform cluster. Persistent volume claims are specific to a project or namespace and can be requested by users.
OpenShift Container Platform 4.12 and later provides automatic migration for the GCE Persist Disk in-tree volume plugin to its equivalent CSI driver.
CSI automatic migration should be seamless. Migration does not change how you use all existing API objects, such as persistent volumes, persistent volume claims, and storage classes.
For more information about migration, see CSI automatic migration.
High availability of storage in the infrastructure is left to the underlying storage provider.
4.7.1. Creating the GCE storage class
Storage classes are used to differentiate and delineate storage levels and usages. By defining a storage class, users can obtain dynamically provisioned persistent volumes.
4.7.2. Creating the persistent volume claim
Prerequisites
Storage must exist in the underlying infrastructure before it can be mounted as a volume in OpenShift Container Platform.
Procedure
- In the OpenShift Container Platform console, click Storage → Persistent Volume Claims.
- In the persistent volume claims overview, click Create Persistent Volume Claim.
Define the desired options on the page that appears.
- Select the previously-created storage class from the drop-down menu.
- Enter a unique name for the storage claim.
- Select the access mode. This selection determines the read and write access for the storage claim.
- Define the size of the storage claim.
- Click Create to create the persistent volume claim and generate a persistent volume.
4.7.3. Volume format
Before OpenShift Container Platform mounts the volume and passes it to a container, it checks that the volume contains a file system as specified by the fsType arameter in the persistent volume definition. If the device is not formatted with the file system, all data from the device is erased and the device is automatically formatted with the given file system.
This verification enables you to use unformatted GCE volumes as persistent volumes, because OpenShift Container Platform formats them before the first use.
4.8. Persistent storage using iSCSI
You can provision your OpenShift Container Platform cluster with persistent storage using iSCSI. Some familiarity with Kubernetes and iSCSI is assumed.
The Kubernetes persistent volume framework allows administrators to provision a cluster with persistent storage and gives users a way to request those resources without having any knowledge of the underlying infrastructure.
High-availability of storage in the infrastructure is left to the underlying storage provider.
When you use iSCSI on Amazon Web Services, you must update the default security policy to include TCP traffic between nodes on the iSCSI ports. By default, they are ports 860 and 3260.
Users must ensure that the iSCSI initiator is already configured on all OpenShift Container Platform nodes by installing the iscsi-initiator-utils package and configuring their initiator name in /etc/iscsi/initiatorname.iscsi. The iscsi-initiator-utils package is already installed on deployments that use Red Hat Enterprise Linux CoreOS (RHCOS).
For more information, see Managing Storage Devices.
4.8.1. Provisioning
You can verify that the storage exists in the underlying infrastructure before mounting it as a volume in OpenShift Container Platform. All that is required for the iSCSI is the iSCSI target portal, a valid iSCSI Qualified Name (IQN), a valid LUN number, the filesystem type, and the PersistentVolume API.
Procedure
-
Verify that the storage exists in the underlying infrastructure before mounting it as a volume in OpenShift Container Platform by creating the following .
PersistentVolumeobject definition:
PersistentVolume object definition
apiVersion: v1
kind: PersistentVolume
metadata:
name: iscsi-pv
spec:
capacity:
storage: 1Gi
accessModes:
- ReadWriteOnce
iscsi:
targetPortal: 10.16.154.81:3260
iqn: iqn.2014-12.example.server:storage.target00
lun: 0
fsType: 'ext4'4.8.2. Enforce disk quotas
Use LUN partitions to enforce disk quotas and size constraints. Each LUN is one persistent volume. Kubernetes enforces unique names for persistent volumes.
Enforcing quotas in this way allows the user to request persistent storage by a specific amount (for example, 10Gi) and be matched with a corresponding volume of equal or greater capacity.
4.8.3. iSCSI volume security
Users request storage with a PersistentVolumeClaim object. This claim only lives in the user’s namespace and can only be referenced by a pod within that same namespace. Any attempt to access a persistent volume claim across a namespace causes the pod to fail.
Each iSCSI LUN must be accessible by all nodes in the cluster.
4.8.3.1. Challenge Handshake Authentication Protocol (CHAP) configuration
Optionally, OpenShift Container Platform can use CHAP to authenticate itself to iSCSI targets:
apiVersion: v1
kind: PersistentVolume
metadata:
name: iscsi-pv
spec:
capacity:
storage: 1Gi
accessModes:
- ReadWriteOnce
iscsi:
targetPortal: 10.0.0.1:3260
iqn: iqn.2016-04.test.com:storage.target00
lun: 0
fsType: ext4
chapAuthDiscovery: true
chapAuthSession: true
secretRef:
name: chap-secret 4.8.4. iSCSI multipathing
For iSCSI-based storage, you can configure multiple paths by using the same IQN for more than one target portal IP address. Multipathing ensures access to the persistent volume when one or more of the components in a path fail.
Procedure
-
To specify multi-paths in the pod specification, specify a value in the
portalsfield of thePersistentVolumedefinition object.
Example PersistentVolume object with a value specified in the portals field.
apiVersion: v1
kind: PersistentVolume
metadata:
name: iscsi-pv
spec:
capacity:
storage: 1Gi
accessModes:
- ReadWriteOnce
iscsi:
targetPortal: 10.0.0.1:3260
portals: ['10.0.2.16:3260', '10.0.2.17:3260', '10.0.2.18:3260']
iqn: iqn.2016-04.test.com:storage.target00
lun: 0
fsType: ext4
readOnly: false- 1
- Add additional target portals using the
portalsfield.
4.8.5. iSCSI custom initiator IQN
Configure the custom initiator iSCSI Qualified Name (IQN) if the iSCSI targets are restricted to certain IQNs, but the nodes that the iSCSI PVs are attached to are not guaranteed to have these IQNs.
Procedure
-
To specify a custom initiator IQN, update the
initiatorNamefield in thePersistentVolumedefinition object .
Example PersistentVolume object with a value specified in the initiatorName field.
apiVersion: v1
kind: PersistentVolume
metadata:
name: iscsi-pv
spec:
capacity:
storage: 1Gi
accessModes:
- ReadWriteOnce
iscsi:
targetPortal: 10.0.0.1:3260
portals: ['10.0.2.16:3260', '10.0.2.17:3260', '10.0.2.18:3260']
iqn: iqn.2016-04.test.com:storage.target00
lun: 0
initiatorName: iqn.2016-04.test.com:custom.iqn
fsType: ext4
readOnly: false- 1
- Specify the name of the initiator.
4.9. Persistent storage using NFS
OpenShift Container Platform clusters can be provisioned with persistent storage using NFS. Persistent volumes (PVs) and persistent volume claims (PVCs) provide a convenient method for sharing a volume across a project. While the NFS-specific information contained in a PV definition could also be defined directly in a Pod definition, doing so does not create the volume as a distinct cluster resource, making the volume more susceptible to conflicts.
4.9.1. Provisioning
Storage must exist in the underlying infrastructure before it can be mounted as a volume in OpenShift Container Platform. To provision NFS volumes, a list of NFS servers and export paths are all that is required.
Procedure
Create an object definition for the PV:
apiVersion: v1 kind: PersistentVolume metadata: name: pv00011 spec: capacity: storage: 5Gi2 accessModes: - ReadWriteOnce3 nfs:4 path: /tmp5 server: 172.17.0.26 persistentVolumeReclaimPolicy: Retain7 - 1
- The name of the volume. This is the PV identity in various
oc <command> podcommands. - 2
- The amount of storage allocated to this volume.
- 3
- Though this appears to be related to controlling access to the volume, it is actually used similarly to labels and used to match a PVC to a PV. Currently, no access rules are enforced based on the
accessModes. - 4
- The volume type being used, in this case the
nfsplugin. - 5
- The path that is exported by the NFS server.
- 6
- The hostname or IP address of the NFS server.
- 7
- The reclaim policy for the PV. This defines what happens to a volume when released.
NoteEach NFS volume must be mountable by all schedulable nodes in the cluster.
Verify that the PV was created:
$ oc get pvExample output
NAME LABELS CAPACITY ACCESSMODES STATUS CLAIM REASON AGE pv0001 <none> 5Gi RWO Available 31sCreate a persistent volume claim that binds to the new PV:
apiVersion: v1 kind: PersistentVolumeClaim metadata: name: nfs-claim1 spec: accessModes: - ReadWriteOnce1 resources: requests: storage: 5Gi2 volumeName: pv0001 storageClassName: ""Verify that the persistent volume claim was created:
$ oc get pvcExample output
NAME STATUS VOLUME CAPACITY ACCESS MODES STORAGECLASS AGE nfs-claim1 Bound pv0001 5Gi RWO 2m
4.9.2. Enforce disk quotas
You can use disk partitions to enforce disk quotas and size constraints. Each partition can be its own export. Each export is one PV. OpenShift Container Platform enforces unique names for PVs, but the uniqueness of the NFS volume’s server and path is up to the administrator.
Enforcing quotas in this way allows the developer to request persistent storage by a specific amount, such as 10Gi, and be matched with a corresponding volume of equal or greater capacity.
4.9.3. NFS volume security
This section covers NFS volume security, including matching permissions and SELinux considerations. The user is expected to understand the basics of POSIX permissions, process UIDs, supplemental groups, and SELinux.
Developers request NFS storage by referencing either a PVC by name or the NFS volume plugin directly in the volumes section of their Pod definition.
The /etc/exports file on the NFS server contains the accessible NFS directories. The target NFS directory has POSIX owner and group IDs. The OpenShift Container Platform NFS plugin mounts the container’s NFS directory with the same POSIX ownership and permissions found on the exported NFS directory. However, the container is not run with its effective UID equal to the owner of the NFS mount, which is the desired behavior.
As an example, if the target NFS directory appears on the NFS server as:
$ ls -lZ /opt/nfs -dExample output
drwxrws---. nfsnobody 5555 unconfined_u:object_r:usr_t:s0 /opt/nfs$ id nfsnobodyExample output
uid=65534(nfsnobody) gid=65534(nfsnobody) groups=65534(nfsnobody)
Then the container must match SELinux labels, and either run with a UID of 65534, the nfsnobody owner, or with 5555 in its supplemental groups to access the directory.
The owner ID of 65534 is used as an example. Even though NFS’s root_squash maps root, uid 0, to nfsnobody, uid 65534, NFS exports can have arbitrary owner IDs. Owner 65534 is not required for NFS exports.
4.9.3.1. Group IDs
The recommended way to handle NFS access, assuming it is not an option to change permissions on the NFS export, is to use supplemental groups. Supplemental groups in OpenShift Container Platform are used for shared storage, of which NFS is an example. In contrast, block storage such as iSCSI uses the fsGroup SCC strategy and the fsGroup value in the securityContext of the pod.
To gain access to persistent storage, it is generally preferable to use supplemental group IDs versus user IDs.
Because the group ID on the example target NFS directory is 5555, the pod can define that group ID using supplementalGroups under the securityContext definition of the pod. For example:
spec:
containers:
- name:
...
securityContext:
supplementalGroups: [5555]
Assuming there are no custom SCCs that might satisfy the pod requirements, the pod likely matches the restricted SCC. This SCC has the supplementalGroups strategy set to RunAsAny, meaning that any supplied group ID is accepted without range checking.
As a result, the above pod passes admissions and is launched. However, if group ID range checking is desired, a custom SCC is the preferred solution. A custom SCC can be created such that minimum and maximum group IDs are defined, group ID range checking is enforced, and a group ID of 5555 is allowed.
To use a custom SCC, you must first add it to the appropriate service account. For example, use the default service account in the given project unless another has been specified on the Pod specification.
4.9.3.2. User IDs
User IDs can be defined in the container image or in the Pod definition.
It is generally preferable to use supplemental group IDs to gain access to persistent storage versus using user IDs.
In the example target NFS directory shown above, the container needs its UID set to 65534, ignoring group IDs for the moment, so the following can be added to the Pod definition:
spec:
containers:
- name:
...
securityContext:
runAsUser: 65534
Assuming that the project is default and the SCC is restricted, the user ID of 65534 as requested by the pod is not allowed. Therefore, the pod fails for the following reasons:
-
It requests
65534as its user ID. -
All SCCs available to the pod are examined to see which SCC allows a user ID of
65534. While all policies of the SCCs are checked, the focus here is on user ID. -
Because all available SCCs use
MustRunAsRangefor theirrunAsUserstrategy, UID range checking is required. -
65534is not included in the SCC or project’s user ID range.
It is generally considered a good practice not to modify the predefined SCCs. The preferred way to fix this situation is to create a custom SCC A custom SCC can be created such that minimum and maximum user IDs are defined, UID range checking is still enforced, and the UID of 65534 is allowed.
To use a custom SCC, you must first add it to the appropriate service account. For example, use the default service account in the given project unless another has been specified on the Pod specification.
4.9.3.3. SELinux
Red Hat Enterprise Linux (RHEL) and Red Hat Enterprise Linux CoreOS (RHCOS) systems are configured to use SELinux on remote NFS servers by default.
For non-RHEL and non-RHCOS systems, SELinux does not allow writing from a pod to a remote NFS server. The NFS volume mounts correctly but it is read-only. You will need to enable the correct SELinux permissions by using the following procedure.
Prerequisites
-
The
container-selinuxpackage must be installed. This package provides thevirt_use_nfsSELinux boolean.
Procedure
Enable the
virt_use_nfsboolean using the following command. The-Poption makes this boolean persistent across reboots.# setsebool -P virt_use_nfs 1
4.9.3.4. Export settings
To enable arbitrary container users to read and write the volume, each exported volume on the NFS server should conform to the following conditions:
Every export must be exported using the following format:
/<example_fs> *(rw,root_squash)The firewall must be configured to allow traffic to the mount point.
For NFSv4, configure the default port
2049(nfs).NFSv4
# iptables -I INPUT 1 -p tcp --dport 2049 -j ACCEPTFor NFSv3, there are three ports to configure:
2049(nfs),20048(mountd), and111(portmapper).NFSv3
# iptables -I INPUT 1 -p tcp --dport 2049 -j ACCEPT# iptables -I INPUT 1 -p tcp --dport 20048 -j ACCEPT# iptables -I INPUT 1 -p tcp --dport 111 -j ACCEPT
-
The NFS export and directory must be set up so that they are accessible by the target pods. Either set the export to be owned by the container’s primary UID, or supply the pod group access using
supplementalGroups, as shown in the group IDs above.
4.9.4. Reclaiming resources
NFS implements the OpenShift Container Platform Recyclable plugin interface. Automatic processes handle reclamation tasks based on policies set on each persistent volume.
By default, PVs are set to Retain.
Once claim to a PVC is deleted, and the PV is released, the PV object should not be reused. Instead, a new PV should be created with the same basic volume details as the original.
For example, the administrator creates a PV named nfs1:
apiVersion: v1
kind: PersistentVolume
metadata:
name: nfs1
spec:
capacity:
storage: 1Mi
accessModes:
- ReadWriteMany
nfs:
server: 192.168.1.1
path: "/"
The user creates PVC1, which binds to nfs1. The user then deletes PVC1, releasing claim to nfs1. This results in nfs1 being Released. If the administrator wants to make the same NFS share available, they should create a new PV with the same NFS server details, but a different PV name:
apiVersion: v1
kind: PersistentVolume
metadata:
name: nfs2
spec:
capacity:
storage: 1Mi
accessModes:
- ReadWriteMany
nfs:
server: 192.168.1.1
path: "/"
Deleting the original PV and re-creating it with the same name is discouraged. Attempting to manually change the status of a PV from Released to Available causes errors and potential data loss.
4.9.5. Additional configuration and troubleshooting
Depending on what version of NFS is being used and how it is configured, there may be additional configuration steps needed for proper export and security mapping. The following are some that may apply:
|
NFSv4 mount incorrectly shows all files with ownership of |
|
| Disabling ID mapping on NFSv4 |
|
4.10. Red Hat OpenShift Data Foundation
Red Hat OpenShift Data Foundation is a provider of agnostic persistent storage for OpenShift Container Platform supporting file, block, and object storage, either in-house or in hybrid clouds. As a Red Hat storage solution, Red Hat OpenShift Data Foundation is completely integrated with OpenShift Container Platform for deployment, management, and monitoring. For more information, see the Red Hat OpenShift Data Foundation documentation.
OpenShift Data Foundation on top of Red Hat Hyperconverged Infrastructure (RHHI) for Virtualization, which uses hyperconverged nodes that host virtual machines installed with OpenShift Container Platform, is not a supported configuration. For more information about supported platforms, see the Red Hat OpenShift Data Foundation Supportability and Interoperability Guide.
4.11. Persistent storage using VMware vSphere volumes
OpenShift Container Platform allows use of VMware vSphere’s Virtual Machine Disk (VMDK) volumes. You can provision your OpenShift Container Platform cluster with persistent storage using VMware vSphere. Some familiarity with Kubernetes and VMware vSphere is assumed.
VMware vSphere volumes can be provisioned dynamically. OpenShift Container Platform creates the disk in vSphere and attaches this disk to the correct image.
OpenShift Container Platform provisions new volumes as independent persistent disks that can freely attach and detach the volume on any node in the cluster. Consequently, you cannot back up volumes that use snapshots, or restore volumes from snapshots. See Snapshot Limitations for more information.
The Kubernetes persistent volume framework allows administrators to provision a cluster with persistent storage and gives users a way to request those resources without having any knowledge of the underlying infrastructure.
Persistent volumes are not bound to a single project or namespace; they can be shared across the OpenShift Container Platform cluster. Persistent volume claims are specific to a project or namespace and can be requested by users.
For vSphere:
For new installations of OpenShift Container Platform 4.13, or later, automatic migration is enabled by default. Updating to OpenShift Container Platform 4.14 and later also provides automatic migration.
CSI automatic migration should be seamless. Migration does not change how you use all existing API objects, such as persistent volumes, persistent volume claims, and storage classes. For more information about migration, see CSI automatic migration.
- When updating from OpenShift Container Platform 4.12, or earlier, to 4.13, automatic CSI migration for vSphere only occurs if you opt in. If you do not opt in, OpenShift Container Platform defaults to using the in-tree (non-CSI) plugin to provision vSphere storage. Carefully review the indicated consequences before opting in to migration.
4.11.1. Dynamically provisioning VMware vSphere volumes
Dynamically provisioning VMware vSphere volumes is the recommended method.
4.11.2. Prerequisites
- An OpenShift Container Platform cluster installed on a VMware vSphere version that meets the requirements for the components that you use. See Installing a cluster on vSphere for information about vSphere version support.
You can use either of the following procedures to dynamically provision these volumes using the default storage class.
4.11.2.1. Dynamically provisioning VMware vSphere volumes using the UI
OpenShift Container Platform installs a default storage class, named thin, that uses the thin disk format for provisioning volumes.
Prerequisites
- Storage must exist in the underlying infrastructure before it can be mounted as a volume in OpenShift Container Platform.
Procedure
- In the OpenShift Container Platform console, click Storage → Persistent Volume Claims.
- In the persistent volume claims overview, click Create Persistent Volume Claim.
Define the required options on the resulting page.
-
Select the
thinstorage class. - Enter a unique name for the storage claim.
- Select the access mode to determine the read and write access for the created storage claim.
- Define the size of the storage claim.
-
Select the
- Click Create to create the persistent volume claim and generate a persistent volume.
4.11.2.2. Dynamically provisioning VMware vSphere volumes using the CLI
OpenShift Container Platform installs a default StorageClass, named thin, that uses the thin disk format for provisioning volumes.
Prerequisites
- Storage must exist in the underlying infrastructure before it can be mounted as a volume in OpenShift Container Platform.
Procedure (CLI)
You can define a VMware vSphere PersistentVolumeClaim by creating a file,
pvc.yaml, with the following contents:kind: PersistentVolumeClaim apiVersion: v1 metadata: name: pvc1 spec: accessModes: - ReadWriteOnce2 resources: requests: storage: 1Gi3 Enter the following command to create the
PersistentVolumeClaimobject from the file:$ oc create -f pvc.yaml
4.11.3. Statically provisioning VMware vSphere volumes
To statically provision VMware vSphere volumes you must create the virtual machine disks for reference by the persistent volume framework.
Prerequisites
- Storage must exist in the underlying infrastructure before it can be mounted as a volume in OpenShift Container Platform.
Procedure
Create the virtual machine disks. Virtual machine disks (VMDKs) must be created manually before statically provisioning VMware vSphere volumes. Use either of the following methods:
Create using
vmkfstools. Access ESX through Secure Shell (SSH) and then use following command to create a VMDK volume:$ vmkfstools -c <size> /vmfs/volumes/<datastore-name>/volumes/<disk-name>.vmdkCreate using
vmware-diskmanager:$ shell vmware-vdiskmanager -c -t 0 -s <size> -a lsilogic <disk-name>.vmdk
Create a persistent volume that references the VMDKs. Create a file,
pv1.yaml, with thePersistentVolumeobject definition:apiVersion: v1 kind: PersistentVolume metadata: name: pv11 spec: capacity: storage: 1Gi2 accessModes: - ReadWriteOnce persistentVolumeReclaimPolicy: Retain vsphereVolume:3 volumePath: "[datastore1] volumes/myDisk"4 fsType: ext45 - 1
- The name of the volume. This name is how it is identified by persistent volume claims or pods.
- 2
- The amount of storage allocated to this volume.
- 3
- The volume type used, with
vsphereVolumefor vSphere volumes. The label is used to mount a vSphere VMDK volume into pods. The contents of a volume are preserved when it is unmounted. The volume type supports VMFS and VSAN datastore. - 4
- The existing VMDK volume to use. If you used
vmkfstools, you must enclose the datastore name in square brackets,[], in the volume definition, as shown previously. - 5
- The file system type to mount. For example, ext4, xfs, or other file systems.
ImportantChanging the value of the fsType parameter after the volume is formatted and provisioned can result in data loss and pod failure.
Create the
PersistentVolumeobject from the file:$ oc create -f pv1.yamlCreate a persistent volume claim that maps to the persistent volume you created in the previous step. Create a file,
pvc1.yaml, with thePersistentVolumeClaimobject definition:apiVersion: v1 kind: PersistentVolumeClaim metadata: name: pvc11 spec: accessModes: - ReadWriteOnce2 resources: requests: storage: "1Gi"3 volumeName: pv14 Create the
PersistentVolumeClaimobject from the file:$ oc create -f pvc1.yaml
4.11.3.1. Formatting VMware vSphere volumes
Before OpenShift Container Platform mounts the volume and passes it to a container, it checks that the volume contains a file system that is specified by the fsType parameter value in the PersistentVolume (PV) definition. If the device is not formatted with the file system, all data from the device is erased, and the device is automatically formatted with the specified file system.
Because OpenShift Container Platform formats them before the first use, you can use unformatted vSphere volumes as PVs.
Chapter 5. Persistent storage using local storage
5.1. Local storage overview
You can use any of the following solutions to provision local storage:
- HostPath Provisioner (HPP)
- Local Storage Operator (LSO)
- Logical Volume Manager (LVM) Storage
These solutions support provisioning only node-local storage. The workloads are bound to the nodes that provide the storage. If the node becomes unavailable, the workload also becomes unavailable. To maintain workload availability despite node failures, you must ensure storage data replication through active or passive replication mechanisms.
5.1.1. Overview of HostPath Provisioner functionality
You can perform the following actions using HostPath Provisioner (HPP):
- Map the host filesystem paths to storage classes for provisioning local storage.
- Statically create storage classes to configure filesystem paths on a node for storage consumption.
- Statically provision Persistent Volumes (PVs) based on the storage class.
- Create workloads and PersistentVolumeClaims (PVCs) while being aware of the underlying storage topology.
HPP is available in upstream Kubernetes. However, it is not recommended to use HPP from upstream Kubernetes.
5.1.2. Overview of Local Storage Operator functionality
You can perform the following actions using Local Storage Operator (LSO):
- Assign the storage devices (disks or partitions) to the storage classes without modifying the device configuration.
-
Statically provision PVs and storage classes by configuring the
LocalVolumecustom resource (CR). - Create workloads and PVCs while being aware of the underlying storage topology.
LSO is developed and delivered by Red Hat.
5.1.3. Overview of LVM Storage functionality
You can perform the following actions using Logical Volume Manager (LVM) Storage:
- Configure storage devices (disks or partitions) as lvm2 volume groups and expose the volume groups as storage classes.
- Create workloads and request storage by using PVCs without considering the node topology.
LVM Storage uses the TopoLVM CSI driver to dynamically allocate storage space to the nodes in the topology and provision PVs.
LVM Storage is developed and maintained by Red Hat. The CSI driver provided with LVM Storage is the upstream project "topolvm".
5.1.4. Comparison of LVM Storage, LSO, and HPP
The following sections compare the functionalities provided by LVM Storage, Local Storage Operator (LSO), and HostPath Provisioner (HPP) to provision local storage.
5.1.4.1. Comparison of the support for storage types and filesystems
The following table compares the support for storage types and filesystems provided by LVM Storage, Local Storage Operator (LSO), and HostPath Provisioner (HPP) to provision local storage:
| Functionality | LVM Storage | LSO | HPP |
|---|---|---|---|
| Support for block storage | Yes | Yes | No |
| Support for file storage | Yes | Yes | Yes |
| Support for object storage [1] | No | No | No |
| Available filesystems |
|
| Any mounted system available on the node is supported. |
-
None of the solutions (LVM Storage, LSO, and HPP) provide support for object storage. Therefore, if you want to use object storage, you need an S3 object storage solution, such as
MultiClusterGatewayfrom the Red Hat OpenShift Data Foundation. All of the solutions can serve as underlying storage providers for the S3 object storage solutions.
5.1.4.2. Comparison of the support for core functionalities
The following table compares how LVM Storage, Local Storage Operator (LSO), and HostPath Provisioner (HPP) support core functionalities for provisioning local storage:
| Functionality | LVM Storage | LSO | HPP |
|---|---|---|---|
| Support for automatic file system formatting | Yes | Yes | N/A |
| Support for dynamic provisioning | Yes | No | No |
| Support for using software Redundant Array of Independent Disks (RAID) arrays | Yes Supported on 4.15 and later. | Yes | Yes |
| Support for transparent disk encryption | Yes Supported on 4.16 and later. | Yes | Yes |
| Support for volume based disk encryption | No | No | No |
| Support for disconnected installation | Yes | Yes | Yes |
| Support for PVC expansion | Yes | No | No |
| Support for volume snapshots and volume clones | Yes | No | No |
| Support for thin provisioning | Yes Devices are thin-provisioned by default. | Yes You can configure the devices to point to the thin-provisioned volumes | Yes You can configure a path to point to the thin-provisioned volumes. |
| Support for automatic disk discovery and setup | Yes
Automatic disk discovery is available during installation and runtime. You can also dynamically add the disks to the | Technology Preview Automatic disk discovery is available during installation. | No |
5.1.4.3. Comparison of performance and isolation capabilities
The following table compares the performance and isolation capabilities of LVM Storage, Local Storage Operator (LSO), and HostPath Provisioner (HPP) in provisioning local storage.
| Functionality | LVM Storage | LSO | HPP |
|---|---|---|---|
| Performance | I/O speed is shared for all workloads that use the same storage class. Block storage allows direct I/O operations. Thin provisioning can affect the performance. | I/O depends on the LSO configuration. Block storage allows direct I/O operations. | I/O speed is shared for all workloads that use the same storage class. The restrictions imposed by the underlying filesystem can affect the I/O speed. |
| Isolation boundary [1] | LVM Logical Volume (LV) It provides higher level of isolation compared to HPP. | LVM Logical Volume (LV) It provides higher level of isolation compared to HPP | Filesystem path It provides lower level of isolation compared to LSO and LVM Storage. |
- Isolation boundary refers to the level of separation between different workloads or applications that use local storage resources.
5.1.4.4. Comparison of the support for additional functionalities
The following table compares the additional features provided by LVM Storage, Local Storage Operator (LSO), and HostPath Provisioner (HPP) to provision local storage:
| Functionality | LVM Storage | LSO | HPP |
|---|---|---|---|
| Support for generic ephemeral volumes | Yes | No | No |
| Support for CSI inline ephemeral volumes | No | No | No |
| Support for storage topology | Yes Supports CSI node topology | Yes LSO provides partial support for storage topology through node tolerations. | No |
|
Support for | No | No | No |
-
All of the solutions (LVM Storage, LSO, and HPP) have the
ReadWriteOnce(RWO) access mode. RWO access mode allows access from multiple pods on the same node.
5.2. Persistent storage using local volumes
OpenShift Container Platform can be provisioned with persistent storage by using local volumes. Local persistent volumes allow you to access local storage devices, such as a disk or partition, by using the standard persistent volume claim interface.
Local volumes can be used without manually scheduling pods to nodes because the system is aware of the volume node constraints. However, local volumes are still subject to the availability of the underlying node and are not suitable for all applications.
Local volumes can only be used as a statically created persistent volume.
5.2.1. Installing the Local Storage Operator
The Local Storage Operator is not installed in OpenShift Container Platform by default. Use the following procedure to install and configure this Operator to enable local volumes in your cluster.
Prerequisites
- Access to the OpenShift Container Platform web console or command-line interface (CLI).
Procedure
Create the
openshift-local-storageproject:$ oc adm new-project openshift-local-storageOptional: Allow local storage creation on infrastructure nodes.
You might want to use the Local Storage Operator to create volumes on infrastructure nodes in support of components such as logging and monitoring.
You must adjust the default node selector so that the Local Storage Operator includes the infrastructure nodes, and not just worker nodes.
To block the Local Storage Operator from inheriting the cluster-wide default selector, enter the following command:
$ oc annotate namespace openshift-local-storage openshift.io/node-selector=''Optional: Allow local storage to run on the management pool of CPUs in single-node deployment.
Use the Local Storage Operator in single-node deployments and allow the use of CPUs that belong to the
managementpool. Perform this step on single-node installations that use management workload partitioning.To allow Local Storage Operator to run on the management CPU pool, run following commands:
$ oc annotate namespace openshift-local-storage workload.openshift.io/allowed='management'
From the UI
To install the Local Storage Operator from the web console, follow these steps:
- Log in to the OpenShift Container Platform web console.
- Navigate to Operators → OperatorHub.
- Type Local Storage into the filter box to locate the Local Storage Operator.
- Click Install.
- On the Install Operator page, select A specific namespace on the cluster. Select openshift-local-storage from the drop-down menu.
- Adjust the values for Update Channel and Approval Strategy to the values that you want.
- Click Install.
Once finished, the Local Storage Operator will be listed in the Installed Operators section of the web console.
From the CLI
Install the Local Storage Operator from the CLI.
Create an object YAML file to define an Operator group and subscription for the Local Storage Operator, such as
openshift-local-storage.yaml:Example openshift-local-storage.yaml
apiVersion: operators.coreos.com/v1 kind: OperatorGroup metadata: name: local-operator-group namespace: openshift-local-storage spec: targetNamespaces: - openshift-local-storage --- apiVersion: operators.coreos.com/v1alpha1 kind: Subscription metadata: name: local-storage-operator namespace: openshift-local-storage spec: channel: stable installPlanApproval: Automatic1 name: local-storage-operator source: redhat-operators sourceNamespace: openshift-marketplace- 1
- The user approval policy for an install plan.
Create the Local Storage Operator object by entering the following command:
$ oc apply -f openshift-local-storage.yamlAt this point, the Operator Lifecycle Manager (OLM) is now aware of the Local Storage Operator. A ClusterServiceVersion (CSV) for the Operator should appear in the target namespace, and APIs provided by the Operator should be available for creation.
Verify local storage installation by checking that all pods and the Local Storage Operator have been created:
Check that all the required pods have been created:
$ oc -n openshift-local-storage get podsExample output
NAME READY STATUS RESTARTS AGE local-storage-operator-746bf599c9-vlt5t 1/1 Running 0 19mCheck the ClusterServiceVersion (CSV) YAML manifest to see that the Local Storage Operator is available in the
openshift-local-storageproject:$ oc get csvs -n openshift-local-storageExample output
NAME DISPLAY VERSION REPLACES PHASE local-storage-operator.4.2.26-202003230335 Local Storage 4.2.26-202003230335 Succeeded
After all checks have passed, the Local Storage Operator is installed successfully.
5.2.2. Provisioning local volumes by using the Local Storage Operator
Local volumes cannot be created by dynamic provisioning. Instead, persistent volumes can be created by the Local Storage Operator. The local volume provisioner looks for any file system or block volume devices at the paths specified in the defined resource.
Prerequisites
- The Local Storage Operator is installed.
You have a local disk that meets the following conditions:
- It is attached to a node.
- It is not mounted.
- It does not contain partitions.
Procedure
Create the local volume resource. This resource must define the nodes and paths to the local volumes.
NoteDo not use different storage class names for the same device. Doing so will create multiple persistent volumes (PVs).
Example: Filesystem
apiVersion: "local.storage.openshift.io/v1" kind: "LocalVolume" metadata: name: "local-disks" namespace: "openshift-local-storage"1 spec: nodeSelector:2 nodeSelectorTerms: - matchExpressions: - key: kubernetes.io/hostname operator: In values: - ip-10-0-140-183 - ip-10-0-158-139 - ip-10-0-164-33 storageClassDevices: - storageClassName: "local-sc"3 volumeMode: Filesystem4 fsType: xfs5 devicePaths:6 - /path/to/device7 - 1
- The namespace where the Local Storage Operator is installed.
- 2
- Optional: A node selector containing a list of nodes where the local storage volumes are attached. This example uses the node hostnames, obtained from
oc get node. If a value is not defined, then the Local Storage Operator will attempt to find matching disks on all available nodes. - 3
- The name of the storage class to use when creating persistent volume objects. The Local Storage Operator automatically creates the storage class if it does not exist. Be sure to use a storage class that uniquely identifies this set of local volumes.
- 4
- The volume mode, either
FilesystemorBlock, that defines the type of local volumes.NoteA raw block volume (
volumeMode: Block) is not formatted with a file system. Use this mode only if any application running on the pod can use raw block devices. - 5
- The file system that is created when the local volume is mounted for the first time.
- 6
- The path containing a list of local storage devices to choose from.
- 7
- Replace this value with your actual local disks filepath to the
LocalVolumeresourceby-id, such as/dev/disk/by-id/wwn. PVs are created for these local disks when the provisioner is deployed successfully.NoteIf you are running OpenShift Container Platform with RHEL KVM, you must assign a serial number to your VM disk. Otherwise, the VM disk can not be identified after reboot. You can use the
virsh edit <VM>command to add the<serial>mydisk</serial>definition.
Example: Block
apiVersion: "local.storage.openshift.io/v1" kind: "LocalVolume" metadata: name: "local-disks" namespace: "openshift-local-storage"1 spec: nodeSelector:2 nodeSelectorTerms: - matchExpressions: - key: kubernetes.io/hostname operator: In values: - ip-10-0-136-143 - ip-10-0-140-255 - ip-10-0-144-180 storageClassDevices: - storageClassName: "local-sc"3 volumeMode: Block4 devicePaths:5 - /path/to/device6 - 1
- The namespace where the Local Storage Operator is installed.
- 2
- Optional: A node selector containing a list of nodes where the local storage volumes are attached. This example uses the node hostnames, obtained from
oc get node. If a value is not defined, then the Local Storage Operator will attempt to find matching disks on all available nodes. - 3
- The name of the storage class to use when creating persistent volume objects.
- 4
- The volume mode, either
FilesystemorBlock, that defines the type of local volumes. - 5
- The path containing a list of local storage devices to choose from.
- 6
- Replace this value with your actual local disks filepath to the
LocalVolumeresourceby-id, such asdev/disk/by-id/wwn. PVs are created for these local disks when the provisioner is deployed successfully.
NoteIf you are running OpenShift Container Platform with RHEL KVM, you must assign a serial number to your VM disk. Otherwise, the VM disk can not be identified after reboot. You can use the
virsh edit <VM>command to add the<serial>mydisk</serial>definition.Create the local volume resource in your OpenShift Container Platform cluster. Specify the file you just created:
$ oc create -f <local-volume>.yamlVerify that the provisioner was created and that the corresponding daemon sets were created:
$ oc get all -n openshift-local-storageExample output
NAME READY STATUS RESTARTS AGE pod/diskmaker-manager-9wzms 1/1 Running 0 5m43s pod/diskmaker-manager-jgvjp 1/1 Running 0 5m43s pod/diskmaker-manager-tbdsj 1/1 Running 0 5m43s pod/local-storage-operator-7db4bd9f79-t6k87 1/1 Running 0 14m NAME TYPE CLUSTER-IP EXTERNAL-IP PORT(S) AGE service/local-storage-operator-metrics ClusterIP 172.30.135.36 <none> 8383/TCP,8686/TCP 14m NAME DESIRED CURRENT READY UP-TO-DATE AVAILABLE NODE SELECTOR AGE daemonset.apps/diskmaker-manager 3 3 3 3 3 <none> 5m43s NAME READY UP-TO-DATE AVAILABLE AGE deployment.apps/local-storage-operator 1/1 1 1 14m NAME DESIRED CURRENT READY AGE replicaset.apps/local-storage-operator-7db4bd9f79 1 1 1 14mNote the desired and current number of daemon set processes. A desired count of
0indicates that the label selectors were invalid.Verify that the persistent volumes were created:
$ oc get pvExample output
NAME CAPACITY ACCESS MODES RECLAIM POLICY STATUS CLAIM STORAGECLASS REASON AGE local-pv-1cec77cf 100Gi RWO Delete Available local-sc 88m local-pv-2ef7cd2a 100Gi RWO Delete Available local-sc 82m local-pv-3fa1c73 100Gi RWO Delete Available local-sc 48m
Editing the LocalVolume object does not change the fsType or volumeMode of existing persistent volumes because doing so might result in a destructive operation.
5.2.3. Provisioning local volumes without the Local Storage Operator
Local volumes cannot be created by dynamic provisioning. Instead, persistent volumes can be created by defining the persistent volume (PV) in an object definition. The local volume provisioner looks for any file system or block volume devices at the paths specified in the defined resource.
Manual provisioning of PVs includes the risk of potential data leaks across PV reuse when PVCs are deleted. The Local Storage Operator is recommended for automating the life cycle of devices when provisioning local PVs.
Prerequisites
- Local disks are attached to the OpenShift Container Platform nodes.
Procedure
Define the PV. Create a file, such as
example-pv-filesystem.yamlorexample-pv-block.yaml, with thePersistentVolumeobject definition. This resource must define the nodes and paths to the local volumes.NoteDo not use different storage class names for the same device. Doing so will create multiple PVs.
example-pv-filesystem.yaml
apiVersion: v1 kind: PersistentVolume metadata: name: example-pv-filesystem spec: capacity: storage: 100Gi volumeMode: Filesystem1 accessModes: - ReadWriteOnce persistentVolumeReclaimPolicy: Delete storageClassName: local-sc2 local: path: /dev/xvdf3 nodeAffinity: required: nodeSelectorTerms: - matchExpressions: - key: kubernetes.io/hostname operator: In values: - example-node- 1
- The volume mode, either
FilesystemorBlock, that defines the type of PVs. - 2
- The name of the storage class to use when creating PV resources. Use a storage class that uniquely identifies this set of PVs.
- 3
- The path containing a list of local storage devices to choose from, or a directory. You can only specify a directory with
FilesystemvolumeMode.
NoteA raw block volume (
volumeMode: block) is not formatted with a file system. Use this mode only if any application running on the pod can use raw block devices.example-pv-block.yaml
apiVersion: v1 kind: PersistentVolume metadata: name: example-pv-block spec: capacity: storage: 100Gi volumeMode: Block1 accessModes: - ReadWriteOnce persistentVolumeReclaimPolicy: Delete storageClassName: local-sc2 local: path: /dev/xvdf3 nodeAffinity: required: nodeSelectorTerms: - matchExpressions: - key: kubernetes.io/hostname operator: In values: - example-nodeCreate the PV resource in your OpenShift Container Platform cluster. Specify the file you just created:
$ oc create -f <example-pv>.yamlVerify that the local PV was created:
$ oc get pvExample output
NAME CAPACITY ACCESS MODES RECLAIM POLICY STATUS CLAIM STORAGECLASS REASON AGE example-pv-filesystem 100Gi RWO Delete Available local-sc 3m47s example-pv1 1Gi RWO Delete Bound local-storage/pvc1 local-sc 12h example-pv2 1Gi RWO Delete Bound local-storage/pvc2 local-sc 12h example-pv3 1Gi RWO Delete Bound local-storage/pvc3 local-sc 12h
5.2.4. Creating the local volume persistent volume claim
Local volumes must be statically created as a persistent volume claim (PVC) to be accessed by the pod.
Prerequisites
- Persistent volumes have been created using the local volume provisioner.
Procedure
Create the PVC using the corresponding storage class:
kind: PersistentVolumeClaim apiVersion: v1 metadata: name: local-pvc-name1 spec: accessModes: - ReadWriteOnce volumeMode: Filesystem2 resources: requests: storage: 100Gi3 storageClassName: local-sc4 Create the PVC in the OpenShift Container Platform cluster, specifying the file you just created:
$ oc create -f <local-pvc>.yaml
5.2.5. Attach the local claim
After a local volume has been mapped to a persistent volume claim it can be specified inside of a resource.
Prerequisites
- A persistent volume claim exists in the same namespace.
Procedure
Include the defined claim in the resource spec. The following example declares the persistent volume claim inside a pod:
apiVersion: v1 kind: Pod spec: # ... containers: volumeMounts: - name: local-disks1 mountPath: /data2 volumes: - name: local-disks persistentVolumeClaim: claimName: local-pvc-name3 # ...- 1
- The name of the volume to mount.
- 2
- The path inside the pod where the volume is mounted. Do not mount to the container root,
/, or any path that is the same in the host and the container. This can corrupt your host system if the container is sufficiently privileged, such as the host/dev/ptsfiles. It is safe to mount the host by using/host. - 3
- The name of the existing persistent volume claim to use.
Create the resource in the OpenShift Container Platform cluster, specifying the file you just created:
$ oc create -f <local-pod>.yaml
5.2.6. Automating discovery and provisioning for local storage devices
The Local Storage Operator automates local storage discovery and provisioning. With this feature, you can simplify installation when dynamic provisioning is not available during deployment, such as with bare metal, VMware, or AWS store instances with attached devices.
Automatic discovery and provisioning is a Technology Preview feature only. Technology Preview features are not supported with Red Hat production service level agreements (SLAs) and might not be functionally complete. Red Hat does not recommend using them in production. These features provide early access to upcoming product features, enabling customers to test functionality and provide feedback during the development process.
For more information about the support scope of Red Hat Technology Preview features, see Technology Preview Features Support Scope.
Automatic discovery and provisioning is fully supported when used to deploy Red Hat OpenShift Data Foundation on-premise or with platform-agnostic deployment.
Use the following procedure to automatically discover local devices, and to automatically provision local volumes for selected devices.
Use the LocalVolumeSet object with caution. When you automatically provision persistent volumes (PVs) from local disks, the local PVs might claim all devices that match. If you are using a LocalVolumeSet object, make sure the Local Storage Operator is the only entity managing local devices on the node. Creating multiple instances of a LocalVolumeSet that target a node more than once is not supported.
Prerequisites
- You have cluster administrator permissions.
- You have installed the Local Storage Operator.
- You have attached local disks to OpenShift Container Platform nodes.
-
You have access to the OpenShift Container Platform web console and the
occommand-line interface (CLI).
Procedure
To enable automatic discovery of local devices from the web console:
- Click Operators → Installed Operators.
-
In the
openshift-local-storagenamespace, click Local Storage. - Click the Local Volume Discovery tab.
- Click Create Local Volume Discovery and then select either Form view or YAML view.
-
Configure the
LocalVolumeDiscoveryobject parameters. Click Create.
The Local Storage Operator creates a local volume discovery instance named
auto-discover-devices.
To display a continuous list of available devices on a node:
- Log in to the OpenShift Container Platform web console.
- Navigate to Compute → Nodes.
- Click the node name that you want to open. The "Node Details" page is displayed.
Select the Disks tab to display the list of the selected devices.
The device list updates continuously as local disks are added or removed. You can filter the devices by name, status, type, model, capacity, and mode.
To automatically provision local volumes for the discovered devices from the web console:
- Navigate to Operators → Installed Operators and select Local Storage from the list of Operators.
- Select Local Volume Set → Create Local Volume Set.
- Enter a volume set name and a storage class name.
Choose All nodes or Select nodes to apply filters accordingly.
NoteOnly worker nodes are available, regardless of whether you filter using All nodes or Select nodes.
Select the disk type, mode, size, and limit you want to apply to the local volume set, and click Create.
A message displays after several minutes, indicating that the "Operator reconciled successfully."
Alternatively, to provision local volumes for the discovered devices from the CLI:
Create an object YAML file to define the local volume set, such as
local-volume-set.yaml, as shown in the following example:apiVersion: local.storage.openshift.io/v1alpha1 kind: LocalVolumeSet metadata: name: example-autodetect spec: nodeSelector: nodeSelectorTerms: - matchExpressions: - key: kubernetes.io/hostname operator: In values: - worker-0 - worker-1 storageClassName: local-sc1 volumeMode: Filesystem fsType: ext4 maxDeviceCount: 10 deviceInclusionSpec: deviceTypes:2 - disk - part deviceMechanicalProperties: - NonRotational minSize: 10G maxSize: 100G models: - SAMSUNG - Crucial_CT525MX3 vendors: - ATA - ST2000LM- 1
- Determines the storage class that is created for persistent volumes that are provisioned from discovered devices. The Local Storage Operator automatically creates the storage class if it does not exist. Be sure to use a storage class that uniquely identifies this set of local volumes.
- 2
- When using the local volume set feature, the Local Storage Operator does not support the use of logical volume management (LVM) devices.
Create the local volume set object:
$ oc apply -f local-volume-set.yamlVerify that the local persistent volumes were dynamically provisioned based on the storage class:
$ oc get pvExample output
NAME CAPACITY ACCESS MODES RECLAIM POLICY STATUS CLAIM STORAGECLASS REASON AGE local-pv-1cec77cf 100Gi RWO Delete Available local-sc 88m local-pv-2ef7cd2a 100Gi RWO Delete Available local-sc 82m local-pv-3fa1c73 100Gi RWO Delete Available local-sc 48m
Results are deleted after they are removed from the node. Symlinks must be manually removed.
5.2.7. Using tolerations with Local Storage Operator pods
Taints can be applied to nodes to prevent them from running general workloads. To allow the Local Storage Operator to use tainted nodes, you must add tolerations to the Pod or DaemonSet definition. This allows the created resources to run on these tainted nodes.
You apply tolerations to the Local Storage Operator pod through the LocalVolume resource and apply taints to a node through the node specification. A taint on a node instructs the node to repel all pods that do not tolerate the taint. Using a specific taint that is not on other pods ensures that the Local Storage Operator pod can also run on that node.
Taints and tolerations consist of a key, value, and effect. As an argument, it is expressed as key=value:effect. An operator allows you to leave one of these parameters empty.
Prerequisites
- The Local Storage Operator is installed.
- Local disks are attached to OpenShift Container Platform nodes with a taint.
- Tainted nodes are expected to provision local storage.
Procedure
To configure local volumes for scheduling on tainted nodes:
Modify the YAML file that defines the
Podand add theLocalVolumespec, as shown in the following example:apiVersion: "local.storage.openshift.io/v1" kind: "LocalVolume" metadata: name: "local-disks" namespace: "openshift-local-storage" spec: tolerations: - key: localstorage1 operator: Equal2 value: "localstorage"3 storageClassDevices: - storageClassName: "local-sc" volumeMode: Block4 devicePaths:5 - /dev/xvdg- 1
- Specify the key that you added to the node.
- 2
- Specify the
Equaloperator to require thekey/valueparameters to match. If operator isExists, the system checks that the key exists and ignores the value. If operator isEqual, then the key and value must match. - 3
- Specify the value
localof the tainted node. - 4
- The volume mode, either
FilesystemorBlock, defining the type of the local volumes. - 5
- The path containing a list of local storage devices to choose from.
Optional: To create local persistent volumes on only tainted nodes, modify the YAML file and add the
LocalVolumespec, as shown in the following example:spec: tolerations: - key: node-role.kubernetes.io/master operator: Exists
The defined tolerations will be passed to the resulting daemon sets, allowing the diskmaker and provisioner pods to be created for nodes that contain the specified taints.
5.2.8. Local Storage Operator Metrics
OpenShift Container Platform provides the following metrics for the Local Storage Operator:
-
lso_discovery_disk_count: total number of discovered devices on each node -
lso_lvset_provisioned_PV_count: total number of PVs created byLocalVolumeSetobjects -
lso_lvset_unmatched_disk_count: total number of disks that Local Storage Operator did not select for provisioning because of mismatching criteria -
lso_lvset_orphaned_symlink_count: number of devices with PVs that no longer matchLocalVolumeSetobject criteria -
lso_lv_orphaned_symlink_count: number of devices with PVs that no longer matchLocalVolumeobject criteria -
lso_lv_provisioned_PV_count: total number of provisioned PVs forLocalVolume
To use these metrics, enable them by doing one of the following:
- When installing the Local Storage Operator from OperatorHub in the web console, select the Enable Operator recommended cluster monitoring on this Namespace checkbox.
Manually add the
openshift.io/cluster-monitoring=truelabel to the Operator namespace by running the following command:$ oc label ns/openshift-local-storage openshift.io/cluster-monitoring=true
For more information about metrics, see Accessing metrics as an administrator.
5.2.9. Deleting the Local Storage Operator resources
5.2.9.1. Removing a local volume or local volume set
Occasionally, local volumes and local volume sets must be deleted. While removing the entry in the resource and deleting the persistent volume is typically enough, if you want to reuse the same device path or have it managed by a different storage class, then additional steps are needed.
The following procedure outlines an example for removing a local volume. The same procedure can also be used to remove symlinks for a local volume set custom resource.
Prerequisites
The persistent volume must be in a
ReleasedorAvailablestate.WarningDeleting a persistent volume that is still in use can result in data loss or corruption.
Procedure
Edit the previously created local volume to remove any unwanted disks.
Edit the cluster resource:
$ oc edit localvolume <local_volume_name> -n openshift-local-storage-
Navigate to the lines under
devicePaths, and delete any representing unwanted disks.
Delete any persistent volumes created.
$ oc delete pv <pv_name>Delete directory and included symlinks on the node.
WarningThe following step involves accessing a node as the root user. Modifying the state of the node beyond the steps in this procedure could result in cluster instability.
$ oc debug node/<node_name> -- chroot /host rm -rf /mnt/local-storage/<sc_name>1 - 1
- The name of the storage class used to create the local volumes.
5.2.9.2. Uninstalling the Local Storage Operator
To uninstall the Local Storage Operator, you must remove the Operator and all created resources in the openshift-local-storage project.
Uninstalling the Local Storage Operator while local storage PVs are still in use is not recommended. While the PVs will remain after the Operator’s removal, there might be indeterminate behavior if the Operator is uninstalled and reinstalled without removing the PVs and local storage resources.
Prerequisites
- Access to the OpenShift Container Platform web console.
Procedure
Delete any local volume resources installed in the project, such as
localvolume,localvolumeset, andlocalvolumediscoveryby running the following commands:$ oc delete localvolume --all --all-namespaces$ oc delete localvolumeset --all --all-namespaces$ oc delete localvolumediscovery --all --all-namespacesUninstall the Local Storage Operator from the web console.
- Log in to the OpenShift Container Platform web console.
- Navigate to Operators → Installed Operators.
- Type Local Storage into the filter box to locate the Local Storage Operator.
-
Click the Options menu
 at the end of the Local Storage Operator.
- Click Uninstall Operator.
- Click Remove in the window that appears.
The PVs created by the Local Storage Operator will remain in the cluster until deleted. After these volumes are no longer in use, delete them by running the following command:
$ oc delete pv <pv-name>Delete the
openshift-local-storageproject by running the following command:$ oc delete project openshift-local-storage
5.3. Persistent storage using hostPath
A hostPath volume in an OpenShift Container Platform cluster mounts a file or directory from the host node’s filesystem into your pod. Most pods will not need a hostPath volume, but it does offer a quick option for testing should an application require it.
The cluster administrator must configure pods to run as privileged. This grants access to pods in the same node.
5.3.1. Overview
OpenShift Container Platform supports hostPath mounting for development and testing on a single-node cluster.
In a production cluster, you would not use hostPath. Instead, a cluster administrator would provision a network resource, such as a GCE Persistent Disk volume, an NFS share, or an Amazon EBS volume. Network resources support the use of storage classes to set up dynamic provisioning.
A hostPath volume must be provisioned statically.
Do not mount to the container root, /, or any path that is the same in the host and the container. This can corrupt your host system if the container is sufficiently privileged. It is safe to mount the host by using /host. The following example shows the / directory from the host being mounted into the container at /host.
apiVersion: v1
kind: Pod
metadata:
name: test-host-mount
spec:
containers:
- image: registry.access.redhat.com/ubi9/ubi
name: test-container
command: ['sh', '-c', 'sleep 3600']
volumeMounts:
- mountPath: /host
name: host-slash
volumes:
- name: host-slash
hostPath:
path: /
type: ''5.3.2. Statically provisioning hostPath volumes
A pod that uses a hostPath volume must be referenced by manual (static) provisioning.
Procedure
Define the persistent volume (PV) by creating a
pv.yamlfile with thePersistentVolumeobject definition:apiVersion: v1 kind: PersistentVolume metadata: name: task-pv-volume1 labels: type: local spec: storageClassName: manual2 capacity: storage: 5Gi accessModes: - ReadWriteOnce3 persistentVolumeReclaimPolicy: Retain hostPath: path: "/mnt/data"4 - 1
- The name of the volume. This name is how the volume is identified by persistent volume (PV) claims or pods.
- 2
- Used to bind persistent volume claim (PVC) requests to the PV.
- 3
- The volume can be mounted as
read-writeby a single node. - 4
- The configuration file specifies that the volume is at
/mnt/dataon the cluster’s node. To avoid corrupting your host system, do not mount to the container root,/, or any path that is the same in the host and the container. You can safely mount the host by using/host
Create the PV from the file:
$ oc create -f pv.yamlDefine the PVC by creating a
pvc.yamlfile with thePersistentVolumeClaimobject definition:apiVersion: v1 kind: PersistentVolumeClaim metadata: name: task-pvc-volume spec: accessModes: - ReadWriteOnce resources: requests: storage: 1Gi storageClassName: manualCreate the PVC from the file:
$ oc create -f pvc.yaml
5.3.3. Mounting the hostPath share in a privileged pod
After the persistent volume claim has been created, it can be used inside by an application. The following example demonstrates mounting this share inside of a pod.
Prerequisites
- A persistent volume claim exists that is mapped to the underlying hostPath share.
Procedure
Create a privileged pod that mounts the existing persistent volume claim:
apiVersion: v1 kind: Pod metadata: name: pod-name1 spec: containers: ... securityContext: privileged: true2 volumeMounts: - mountPath: /data3 name: hostpath-privileged ... securityContext: {} volumes: - name: hostpath-privileged persistentVolumeClaim: claimName: task-pvc-volume4 - 1
- The name of the pod.
- 2
- The pod must run as privileged to access the node’s storage.
- 3
- The path to mount the host path share inside the privileged pod. Do not mount to the container root,
/, or any path that is the same in the host and the container. This can corrupt your host system if the container is sufficiently privileged, such as the host/dev/ptsfiles. It is safe to mount the host by using/host. - 4
- The name of the
PersistentVolumeClaimobject that has been previously created.
5.4. Persistent storage using Logical Volume Manager Storage
Logical Volume Manager (LVM) Storage uses Logical Volume Manager (LVM2) through the TopoLVM Container Storage Interface (CSI) driver to dynamically provision local storage on a cluster with limited resources.
You can create volume groups, persistent volume claims (PVCs), volume snapshots, and volume clones by using LVM Storage.
5.4.1. Logical Volume Manager Storage installation
You can install Logical Volume Manager (LVM) Storage on a single-node OpenShift cluster and configure it to dynamically provision storage for your workloads.
You can deploy LVM Storage on single-node OpenShift clusters by using the OpenShift Container Platform CLI (oc), OpenShift Container Platform web console, or Red Hat Advanced Cluster Management (RHACM).
5.4.1.1. Prerequisites to install LVM Storage
The prerequisites to install LVM Storage are as follows:
- Ensure that you have a minimum of 10 milliCPU and 100 MiB of RAM.
- Ensure that every managed cluster has dedicated disks that are used to provision storage. LVM Storage uses only those disks that are empty and do not contain file system signatures. To ensure that the disks are empty and do not contain file system signatures, wipe the disks before using them.
Before installing LVM Storage in a private CI environment where you can reuse the storage devices that you configured in the previous LVM Storage installation, ensure that you have wiped the disks that are not in use. If you do not wipe the disks before installing LVM Storage, you cannot reuse the disks without manual intervention.
NoteYou cannot wipe the disks that are in use.
- If you want to install LVM Storage by using Red Hat Advanced Cluster Management (RHACM), ensure that you have installed RHACM on an OpenShift Container Platform cluster. For more information, see "Installing LVM Storage by using RHACM".
5.4.1.2. Installing LVM Storage by using the CLI
As a cluster administrator, you can install Logical Volume Manager (LVM) Storage by using the OpenShift CLI (oc).
Prerequisites
-
You have installed the OpenShift CLI (
oc). -
You have logged in to OpenShift Container Platform as a user with
cluster-adminand Operator installation permissions.
Procedure
Create a YAML file and add the configuration for creating a namespace.
Example YAML configuration for creating a namespace
apiVersion: v1 kind: Namespace metadata: labels: openshift.io/cluster-monitoring: "true" pod-security.kubernetes.io/enforce: privileged pod-security.kubernetes.io/audit: privileged pod-security.kubernetes.io/warn: privileged name: openshift-storageCreate the namespace by running the following command:
$ oc create -f <file_name>Create an
OperatorGroupcustom resource (CR) YAML file.Example
OperatorGroupCRapiVersion: operators.coreos.com/v1 kind: OperatorGroup metadata: name: openshift-storage-operatorgroup namespace: openshift-storage spec: targetNamespaces: - openshift-storageCreate the
OperatorGroupCR by running the following command:$ oc create -f <file_name>Create a
SubscriptionCR YAML file.Example
SubscriptionCRapiVersion: operators.coreos.com/v1alpha1 kind: Subscription metadata: name: lvms namespace: openshift-storage spec: installPlanApproval: Automatic name: lvms-operator source: redhat-operators sourceNamespace: openshift-marketplaceCreate the
SubscriptionCR by running the following command:$ oc create -f <file_name>
Verification
To verify that LVM Storage is installed, run the following command:
$ oc get csv -n openshift-storage -o custom-columns=Name:.metadata.name,Phase:.status.phaseExample output
Name Phase 4.13.0-202301261535 Succeeded
5.4.1.3. Installing LVM Storage by using the web console
You can install Logical Volume Manager (LVM) Storage by using the OpenShift Container Platform web console.
Prerequisites
- You have access to the single-node OpenShift cluster.
-
You have access to OpenShift Container Platform with
cluster-adminand Operator installation permissions.
Procedure
- Log in to the OpenShift Container Platform web console.
- Click Operators → OperatorHub.
- Click LVM Storage on the OperatorHub page.
Set the following options on the Operator Installation page:
- Update Channel as stable-4.14.
- Installation Mode as A specific namespace on the cluster.
-
Installed Namespace as Operator recommended namespace openshift-storage. If the
openshift-storagenamespace does not exist, it is created during the operator installation. Update approval as Automatic or Manual.
NoteIf you select Automatic updates, the Operator Lifecycle Manager (OLM) automatically updates the running instance of LVM Storage without any intervention.
If you select Manual updates, the OLM creates an update request. As a cluster administrator, you must manually approve the update request to update LVM Storage to a newer version.
- Optional: Select the Enable Operator recommended cluster monitoring on this Namespace checkbox.
- Click Install.
Verification steps
- Verify that LVM Storage shows a green tick, indicating successful installation.
5.4.1.4. Installing LVM Storage in a disconnected environment
You can install Logical Volume Manager (LVM) Storage on OpenShift Container Platform 4.14 in a disconnected environment. All sections referenced in this procedure are linked in the "Additional resources" section.
Prerequisites
- You read the "About disconnected installation mirroring" section.
- You have access to the OpenShift Container Platform image repository.
- You created a mirror registry.
Procedure
Follow the steps in the "Creating the image set configuration" procedure. To create an image set configuration for LVM Storage, you can use the following example
ImageSetConfigurationobject configuration:Example ImageSetConfiguration file for LVM Storage
kind: ImageSetConfiguration apiVersion: mirror.openshift.io/v1alpha2 archiveSize: 41 storageConfig:2 registry: imageURL: example.com/mirror/oc-mirror-metadata3 skipTLS: false mirror: platform: channels: - name: stable-4.144 type: ocp graph: true5 operators: - catalog: registry.redhat.io/redhat/redhat-operator-index:v4.146 packages: - name: lvms-operator7 channels: - name: stable8 additionalImages: - name: registry.redhat.io/ubi9/ubi:latest9 helm: {}- 1
- Set the maximum size (in gibibytes) of each file within the image set.
- 2
- Specify the location in which you want to save the image set. This location can be a registry or a local directory.
- 3
- Specify the storage URL for the image stream when using a registry. For more information, see "Why use imagestreams".
- 4
- Specify the channel from which you want to retrieve the OpenShift Container Platform images.
- 5
- Set this field to
trueto generate the OpenShift Update Service (OSUS) graph image. For more information, see "About the OpenShift Update Service". - 6
- Specify the Operator catalog from which you want to retrieve the OpenShift Container Platform images.
- 7
- Specify the Operator packages to include in the image set. If this field is empty, all packages in the catalog are retrieved.
- 8
- Specify the channels of the Operator packages to include in the image set. You must include the default channel for the Operator package even if you do not use the bundles in that channel. You can find the default channel by running the following command:
$ oc mirror list operators --catalog=<catalog_name> --package=<package_name>. - 9
- Specify any additional images to include in the image set.
- Follow the procedure in the "Mirroring an image set to a mirror registry" section.
- Follow the procedure in the "Configuring image registry repository mirroring" section.
5.4.1.5. Installing LVM Storage by using RHACM
To install Logical Volume Manager (LVM) Storage on the clusters by using Red Hat Advanced Cluster Management (RHACM), you must create a Policy custom resource (CR). You can also configure the criteria to select the clusters on which you want to install LVM Storage.
The Policy CR that is created to install LVM Storage is also applied to the clusters that are imported or created after creating the Policy CR.
Prerequisites
-
You have access to the RHACM cluster using an account with
cluster-adminand Operator installation permissions. - You have dedicated disks that LVM Storage can use on each cluster.
- The cluster must be managed by RHACM.
Procedure
- Log in to the RHACM CLI using your OpenShift Container Platform credentials.
Create a namespace by running the following command:
$ oc create ns <namespace>Create a
PolicyCR YAML file.Example
PolicyCR to install and configure LVM StorageapiVersion: apps.open-cluster-management.io/v1 kind: PlacementRule metadata: name: placement-install-lvms spec: clusterConditions: - status: "True" type: ManagedClusterConditionAvailable clusterSelector:1 matchExpressions: - key: mykey operator: In values: - myvalue --- apiVersion: policy.open-cluster-management.io/v1 kind: PlacementBinding metadata: name: binding-install-lvms placementRef: apiGroup: apps.open-cluster-management.io kind: PlacementRule name: placement-install-lvms subjects: - apiGroup: policy.open-cluster-management.io kind: Policy name: install-lvms --- apiVersion: policy.open-cluster-management.io/v1 kind: Policy metadata: annotations: policy.open-cluster-management.io/categories: CM Configuration Management policy.open-cluster-management.io/controls: CM-2 Baseline Configuration policy.open-cluster-management.io/standards: NIST SP 800-53 name: install-lvms spec: disabled: false remediationAction: enforce policy-templates: - objectDefinition: apiVersion: policy.open-cluster-management.io/v1 kind: ConfigurationPolicy metadata: name: install-lvms spec: object-templates: - complianceType: musthave objectDefinition:2 apiVersion: v1 kind: Namespace metadata: labels: openshift.io/cluster-monitoring: "true" pod-security.kubernetes.io/enforce: privileged pod-security.kubernetes.io/audit: privileged pod-security.kubernetes.io/warn: privileged name: openshift-storage - complianceType: musthave objectDefinition:3 apiVersion: operators.coreos.com/v1 kind: OperatorGroup metadata: name: openshift-storage-operatorgroup namespace: openshift-storage spec: targetNamespaces: - openshift-storage - complianceType: musthave objectDefinition:4 apiVersion: operators.coreos.com/v1alpha1 kind: Subscription metadata: name: lvms namespace: openshift-storage spec: installPlanApproval: Automatic name: lvms-operator source: redhat-operators sourceNamespace: openshift-marketplace remediationAction: enforce severity: lowCreate the
PolicyCR by running the following command:$ oc create -f <file_name> -n <namespace>Upon creating the
PolicyCR, the following custom resources are created on the clusters that match the selection criteria configured in thePlacementRuleCR:-
Namespace -
OperatorGroup -
Subscription
-
5.4.2. About the LVMCluster custom resource
You can configure the LVMCluster custom resource (CR) to perform the following actions:
- Create LVM volume groups that you can use to provision persistent volume claims (PVCs).
- Configure a list of devices that you want to add to the LVM volume groups.
- Configure the requirements to select the nodes on which you want to create an LVM volume group, and the thin pool configuration for the volume group.
After you have installed LVM Storage, you must create an LVMCluster custom resource (CR).
Example LVMCluster CR YAML file
apiVersion: lvm.topolvm.io/v1alpha1
kind: LVMCluster
metadata:
name: my-lvmcluster
spec:
tolerations:
- effect: NoSchedule
key: xyz
operator: Equal
value: "true"
storage:
deviceClasses:
- name: vg1
fstype: ext4
default: true
nodeSelector:
nodeSelectorTerms:
- matchExpressions:
- key: mykey
operator: In
values:
- ssd
deviceSelector:
paths:
- /dev/disk/by-path/pci-0000:87:00.0-nvme-1
- /dev/disk/by-path/pci-0000:88:00.0-nvme-1
optionalPaths:
- /dev/disk/by-path/pci-0000:89:00.0-nvme-1
- /dev/disk/by-path/pci-0000:90:00.0-nvme-1
thinPoolConfig:
name: thin-pool-1
sizePercent: 90
overprovisionRatio: 105.4.2.1. Explanation of fields in the LVMCluster CR
The LVMCluster CR fields are described in the following table:
| Field | Type | Description |
|---|---|---|
|
|
| Contains the configuration to assign the local storage devices to the LVM volume groups. LVM Storage creates a storage class and volume snapshot class for each device class that you create.
If you add or remove a device class, the update reflects in the cluster only after deleting and recreating the |
|
|
| Specify a name for the LVM volume group (VG). |
|
|
|
Set this field to |
|
|
|
Set this field to |
|
|
| Contains the configuration to choose the nodes on which you want to create the LVM volume group. If this field is empty, all nodes without no-schedule taints are considered. On the control-plane node, LVM Storage detects and uses the additional worker nodes when the new nodes become active in the cluster. |
|
|
| Configure the requirements that are used to select the node. |
|
|
| Contains the configuration to specify the paths to the devices that you want to add to the LVM volume group. For more information, see "About adding devices to a volume group". |
|
|
| Specify the device paths.
If the device path specified in this field does not exist, the |
|
|
| Specify the optional device paths. If the device path specified in this field does not exist, LVM Storage ignores the device without causing an error. |
|
|
| Contains the configuration to create a thin pool in the LVM volume group. |
|
|
| Specify a name for the thin pool. |
|
|
| Specify the percentage of space in the LVM volume group for creating the thin pool. By default, this field is set to 90. The minimum value that you can set is 10, and the maximum value is 90. |
|
|
| Specify a factor by which you can provision additional storage based on the available storage in the thin pool. For example, if this field is set to 10, you can provision up to 10 times the amount of available storage in the thin pool. To disable over-provisioning, set this field to 1. |
5.4.2.2. About adding devices to a volume group
The deviceSelector field in the LVMCluster custom resource (CR) contains the configuration to specify the paths to the devices that you want to add to the LVM volume group.
You can specify the device paths in the deviceSelector.paths field, the deviceSelector.optionalPaths field, or both. If you do not specify the device paths in both the deviceSelector.paths field and the deviceSelector.optionalPaths field, LVM Storage adds the unused devices to the LVM volume group.
It is recommended to avoid referencing disks using symbolic naming, such as /dev/sdX, as these names may change across reboots within RHCOS. Instead, you must use stable naming schemes, such as /dev/disk/by-path/ or /dev/disk/by-id/, to ensure consistent disk identification.
With this change, you might need to adjust existing automation workflows in the cases where monitoring collects information about the install device for each node.
For more information, see the RHEL documentation.
If you do not add the deviceSelector field in the LVMCluster CR, LVM Storage automatically adds the new devices when the devices are available.
LVM Storage adds the devices to the LVM volume group only if the device path exists.
After a device is added to the LVM volume group, it cannot be removed.
5.4.3. Ways to create an LVMCluster custom resource
You can create an LVMCluster custom resource (CR) by using the OpenShift CLI (oc) or the OpenShift Container Platform web console. If you have installed LVM Storage by using Red Hat Advanced Cluster Management (RHACM), you can also create an LVMCluster CR by using RHACM.
Upon creating the LVMCluster CR, LVM Storage creates the following system-managed CRs:
A
storageClassandvolumeSnapshotClassfor each device class.NoteLVM Storage configures the name of the storage class and volume snapshot class in the format
lvms-<device_class_name>, where,<device_class_name>is the value of thedeviceClasses.namefield in theLVMClusterCR. For example, if thedeviceClasses.namefield is set tovg1, the name of the storage class and volume snapshot class islvms-vg1.-
LVMVolumeGroup: This CR is a specific type of persistent volume (PV) that is backed by an LVM volume group. It tracks the individual volume groups across multiple nodes. -
LVMVolumeGroupNodeStatus: This CR tracks the status of the volume groups on a node.
5.4.3.1. Creating an LVMCluster CR by using the CLI
You can create an LVMCluster custom resource (CR) on a worker node using the OpenShift CLI (oc).
You can only create a single instance of the LVMCluster custom resource (CR) on an OpenShift Container Platform cluster.
Prerequisites
-
You have installed the OpenShift CLI (
oc). -
You have logged in to OpenShift Container Platform as a user with
cluster-adminprivileges. - You have installed LVM Storage.
- You have installed a worker node in the cluster.
- You read the "About the LVMCluster custom resource" section.
Procedure
Create an
LVMClustercustom resource (CR) YAML file:Example
LVMClusterCR YAML fileapiVersion: lvm.topolvm.io/v1alpha1 kind: LVMCluster metadata: name: my-lvmcluster namespace: openshift-storage spec: # ... storage: deviceClasses:1 # ... nodeSelector:2 # ... deviceSelector:3 # ... thinPoolConfig:4 # ...- 1
- Contains the configuration to assign the local storage devices to the LVM volume groups.
- 2
- Contains the configuration to choose the nodes on which you want to create the LVM volume group. If this field is empty, all nodes without no-schedule taints are considered.
- 3
- Contains the configuration to specify the paths to the devices that you want to add to the LVM volume group.
- 4
- Contains the configuration to create a thin pool in the LVM volume group.
Create the
LVMClusterCR by running the following command:$ oc create -f <file_name>Example output
lvmcluster/lvmcluster created
Verification
Check that the
LVMClusterCR is in theReadystate:$ oc get lvmclusters.lvm.topolvm.io -o jsonpath='{.items[*].status.state}' -n <namespace>Example output
{"deviceClassStatuses":1 [ { "name": "vg1", "nodeStatus": [2 { "devices": [3 "/dev/nvme0n1", "/dev/nvme1n1", "/dev/nvme2n1" ], "node": "kube-node",4 "status": "Ready"5 } ] } ] "state":"Ready"}6 NoteIf the
LVMClusterCR is in theFailedstate, you can view the reason for failure in thestatusfield.Example
statusfield with the reason for failure:status: deviceClassStatuses: - name: vg1 nodeStatus: - node: my-node-1.example.com reason: no available devices found for volume group status: Failed state: FailedOptional: To view the storage classes created by LVM Storage for each device class, run the following command:
$ oc get storageclassExample output
NAME PROVISIONER RECLAIMPOLICY VOLUMEBINDINGMODE ALLOWVOLUMEEXPANSION AGE lvms-vg1 topolvm.io Delete WaitForFirstConsumer true 31mOptional: To view the volume snapshot classes created by LVM Storage for each device class, run the following command:
$ oc get volumesnapshotclassExample output
NAME DRIVER DELETIONPOLICY AGE lvms-vg1 topolvm.io Delete 24h
5.4.3.2. Creating an LVMCluster CR by using the web console
You can create an LVMCluster CR on a worker node using the OpenShift Container Platform web console.
You can only create a single instance of the LVMCluster custom resource (CR) on an OpenShift Container Platform cluster.
Prerequisites
-
You have access to the OpenShift Container Platform cluster with
cluster-adminprivileges. - You have installed LVM Storage.
- You have installed a worker node in the cluster.
- You read the "About the LVMCluster custom resource" section.
Procedure
- Log in to the OpenShift Container Platform web console.
- Click Operators → Installed Operators.
-
In the
openshift-storagenamespace, click LVM Storage. - Click Create LVMCluster and select either Form view or YAML view.
-
Configure the required
LVMClusterCR parameters. - Click Create.
Optional: If you want to edit the
LVMCLusterCR, perform the following actions:- Click the LVMCluster tab.
- From the Actions menu, select Edit LVMCluster.
-
Click YAML and edit the required
LVMCLusterCR parameters. - Click Save.
Verification
-
On the LVMCLuster page, check that the
LVMClusterCR is in theReadystate. - Optional: To view the available storage classes created by LVM Storage for each device class, click Storage → StorageClasses.
- Optional: To view the available volume snapshot classes created by LVM Storage for each device class, click Storage → VolumeSnapshotClasses.
5.4.3.3. Creating an LVMCluster CR by using RHACM
After you have installed Logical Volume Manager (LVM) Storage by using RHACM, you must create an LVMCluster custom resource (CR).
Prerequisites
- You have installed LVM Storage by using RHACM.
-
You have access to the RHACM cluster using an account with
cluster-adminpermissions.
Procedure
- Log in to the RHACM CLI using your OpenShift Container Platform credentials.
Create a
ConfigurationPolicyCR YAML file with the configuration to create anLVMClusterCR.Example
ConfigurationPolicyCR YAML file to create anLVMClusterCRapiVersion: policy.open-cluster-management.io/v1 kind: ConfigurationPolicy metadata: name: lvms namespace: openshift-storage spec: object-templates: - complianceType: musthave objectDefinition: apiVersion: lvm.topolvm.io/v1alpha1 kind: LVMCluster metadata: name: my-lvmcluster namespace: openshift-storage spec: storage: deviceClasses:1 # ... deviceSelector:2 # ... thinPoolConfig:3 # ... nodeSelector:4 # ... remediationAction: enforce severity: low- 1
- Contains the configuration to assign the local storage devices to the LVM volume groups.
- 2
- Contains the configuration to specify the paths to the devices that you want to add to the LVM volume group.
- 3
- Contains the configuration to create a thin pool in the LVM volume group.
- 4
- Contains the configuration to choose the nodes on which you want to create the LVM volume groups. If this field is empty, then all nodes without no-schedule taints are considered.
Create the
ConfigurationPolicyCR by running the following command:$ oc create -f <file_name> -n <cluster_namespace>1 - 1
- Namespace of the OpenShift Container Platform cluster on which LVM Storage is installed.
5.4.4. Ways to delete an LVMCluster custom resource
You can delete an LVMCluster custom resource (CR) by using the OpenShift CLI (oc) or the OpenShift Container Platform web console. If you have installed LVM Storage by using Red Hat Advanced Cluster Management (RHACM), you can also delete an LVMCluster CR by using RHACM.
Upon deleting the LVMCluster CR, LVM Storage deletes the following CRs:
-
storageClass -
volumeSnapshotClass -
LVMVolumeGroup -
LVMVolumeGroupNodeStatus
5.4.4.1. Deleting an LVMCluster CR by using the CLI
You can delete the LVMCluster custom resource (CR) using the OpenShift CLI (oc).
Prerequisites
-
You have access to OpenShift Container Platform as a user with
cluster-adminpermissions. - You have deleted the persistent volume claims (PVCs), volume snapshots, and volume clones provisioned by LVM Storage. You have also deleted the applications that are using these resources.
Procedure
-
Log in to the OpenShift CLI (
oc). Delete the
LVMClusterCR by running the following command:$ oc delete lvmcluster <lvm_cluster_name> -n openshift-storage
Verification
To verify that the
LVMClusterCR has been deleted, run the following command:$ oc get lvmcluster -n <namespace>Example output
No resources found in openshift-storage namespace.
5.4.4.2. Deleting an LVMCluster CR by using the web console
You can delete the LVMCluster custom resource (CR) using the OpenShift Container Platform web console.
Prerequisites
-
You have access to OpenShift Container Platform as a user with
cluster-adminpermissions. - You have deleted the persistent volume claims (PVCs), volume snapshots, and volume clones provisioned by LVM Storage. You have also deleted the applications that are using these resources.
Procedure
- Log in to the OpenShift Container Platform web console.
- Click Operators → Installed Operators to view all the installed Operators.
-
Click LVM Storage in the
openshift-storagenamespace. - Click the LVMCluster tab.
- From the Actions, select Delete LVMCluster.
- Click Delete.
Verification
-
On the
LVMCLusterpage, check that theLVMClusterCR has been deleted.
5.4.4.3. Deleting an LVMCluster CR by using RHACM
If you have installed Logical Volume Manager (LVM) Storage by using Red Hat Advanced Cluster Management (RHACM), you can delete an LVMCluster custom resource (CR) by using RHACM.
Prerequisites
-
You have access to the RHACM cluster as a user with
cluster-adminpermissions. You have deleted the following resources provisioned by LVM Storage:
- Persistent volume claims (PVCs)
- Volume snapshots
Volume clones
You have also deleted any applications that are using these resources.
Procedure
- Log in to the RHACM CLI using your OpenShift Container Platform credentials.
Delete the
ConfigurationPolicyCR for theLVMClusterCR by running the following command:$ oc delete -f <file_name> -n <cluster_namespace>1 - 1
- Namespace of the OpenShift Container Platform cluster on which LVM Storage is installed.
Create a
PolicyCR YAML file to delete theLVMClusterCR.Example
PolicyCR to delete theLVMClusterCRapiVersion: policy.open-cluster-management.io/v1 kind: Policy metadata: name: policy-lvmcluster-delete annotations: policy.open-cluster-management.io/standards: NIST SP 800-53 policy.open-cluster-management.io/categories: CM Configuration Management policy.open-cluster-management.io/controls: CM-2 Baseline Configuration spec: remediationAction: enforce disabled: false policy-templates: - objectDefinition: apiVersion: policy.open-cluster-management.io/v1 kind: ConfigurationPolicy metadata: name: policy-lvmcluster-removal spec: remediationAction: enforce1 severity: low object-templates: - complianceType: mustnothave objectDefinition: kind: LVMCluster apiVersion: lvm.topolvm.io/v1alpha1 metadata: name: my-lvmcluster namespace: openshift-storage2 --- apiVersion: policy.open-cluster-management.io/v1 kind: PlacementBinding metadata: name: binding-policy-lvmcluster-delete placementRef: apiGroup: apps.open-cluster-management.io kind: PlacementRule name: placement-policy-lvmcluster-delete subjects: - apiGroup: policy.open-cluster-management.io kind: Policy name: policy-lvmcluster-delete --- apiVersion: apps.open-cluster-management.io/v1 kind: PlacementRule metadata: name: placement-policy-lvmcluster-delete spec: clusterConditions: - status: "True" type: ManagedClusterConditionAvailable clusterSelector:3 matchExpressions: - key: mykey operator: In values: - myvalue- 1
- The
spec.remediationActioninpolicy-templateis overridden by the preceding parameter value forspec.remediationAction. - 2
- This
namespacefield must have theopenshift-storagevalue. - 3
- Configure the requirements to select the clusters. LVM Storage is uninstalled on the clusters that match the selection criteria.
Create the
PolicyCR by running the following command:$ oc create -f <file_name> -n <namespace>Create a
PolicyCR YAML file to check if theLVMClusterCR has been deleted.Example
PolicyCR to check if theLVMClusterCR has been deletedapiVersion: policy.open-cluster-management.io/v1 kind: Policy metadata: name: policy-lvmcluster-inform annotations: policy.open-cluster-management.io/standards: NIST SP 800-53 policy.open-cluster-management.io/categories: CM Configuration Management policy.open-cluster-management.io/controls: CM-2 Baseline Configuration spec: remediationAction: inform disabled: false policy-templates: - objectDefinition: apiVersion: policy.open-cluster-management.io/v1 kind: ConfigurationPolicy metadata: name: policy-lvmcluster-removal-inform spec: remediationAction: inform1 severity: low object-templates: - complianceType: mustnothave objectDefinition: kind: LVMCluster apiVersion: lvm.topolvm.io/v1alpha1 metadata: name: my-lvmcluster namespace: openshift-storage2 --- apiVersion: policy.open-cluster-management.io/v1 kind: PlacementBinding metadata: name: binding-policy-lvmcluster-check placementRef: apiGroup: apps.open-cluster-management.io kind: PlacementRule name: placement-policy-lvmcluster-check subjects: - apiGroup: policy.open-cluster-management.io kind: Policy name: policy-lvmcluster-inform --- apiVersion: apps.open-cluster-management.io/v1 kind: PlacementRule metadata: name: placement-policy-lvmcluster-check spec: clusterConditions: - status: "True" type: ManagedClusterConditionAvailable clusterSelector: matchExpressions: - key: mykey operator: In values: - myvalueCreate the
PolicyCR by running the following command:$ oc create -f <file_name> -n <namespace>
Verification
Check the status of the
PolicyCRs by running the following command:$ oc get policy -n <namespace>Example output
NAME REMEDIATION ACTION COMPLIANCE STATE AGE policy-lvmcluster-delete enforce Compliant 15m policy-lvmcluster-inform inform Compliant 15mImportantThe
PolicyCRs must be inCompliantstate.
5.4.5. Provisioning storage
After you have created the LVM volume groups using the LVMCluster custom resource (CR), you can provision the storage by creating persistent volume claims (PVCs).
To create a PVC, you must create a PersistentVolumeClaim object.
Prerequisites
-
You have created an
LVMClusterCR.
Procedure
-
Log in to the OpenShift CLI (
oc). Create a
PersistentVolumeClaimobject similar to the following:Example
PersistentVolumeClaimobjectapiVersion: v1 kind: PersistentVolumeClaim metadata: name: lvm-block-11 namespace: default spec: accessModes: - ReadWriteOnce volumeMode: Block2 resources: requests: storage: 10Gi3 storageClassName: lvms-vg14 - 1
- Specify a name for the PVC.
- 2
- To create a block PVC, set this field to
Block. To create a file PVC, set this field toFilesystem. - 3
- Specify the storage size. Logical Volume Manager (LVM) Storage provisions PVCs in units of 1 GiB (gibibytes). The requested storage is rounded up to the nearest GiB. The total storage size you can provision is limited by the size of the LVM thin pool and the overprovisioning factor.
- 4
- The value of the
storageClassNamefield must be in the formatlvms-<device_class_name>where<device_class_name>is the value of thedeviceClasses.namefield in theLVMClusterCR. For example, if thedeviceClasses.namefield is set tovg1, you must set thestorageClassNamefield tolvms-vg1.
NoteThe
volumeBindingModefield of the storage class is set toWaitForFirstConsumer.Create the PVC by running the following command:
$ oc create -f <file_name> -n <application_namespace>NoteThe created PVCs remain in
Pendingstate until you deploy the workloads that use them.
Verification
To verify that the PVC is created, run the following command:
$ oc get pvc -n <namespace>Example output
NAME STATUS VOLUME CAPACITY ACCESS MODES STORAGECLASS AGE lvm-block-1 Bound pvc-e90169a8-fd71-4eea-93b8-817155f60e47 1Gi RWO lvms-vg1 5s
5.4.6. Ways to scale up the storage of a single-node OpenShift cluster
You can scale up the storage of a single-node OpenShift cluster by adding new devices to the existing node.
To add a new device to the existing node on a single-node OpenShift cluster, you must add the path to the new device in the deviceSelector field of the LVMCluster custom resource (CR).
You can add the deviceSelector field in the LVMCluster CR only while creating the LVMCluster CR. If you have not added the deviceSelector field while creating the LVMCluster CR, you must delete the LVMCluster CR and create a new LVMCluster CR containing the deviceSelector field.
If you do not add the deviceSelector field in the LVMCluster CR, LVM Storage automatically adds the new devices when the devices are available.
5.4.6.1. Scaling up the storage of a single-node OpenShift cluster by using the CLI
You can scale up the storage capacity of the existing node on a single-node OpenShift cluster by using the OpenShift CLI (oc).
Prerequisites
- You have additional unused devices on the single-node OpenShift cluster to be used by Logical Volume Manager (LVM) Storage.
-
You have installed the OpenShift CLI (
oc). -
You have created an
LVMClustercustom resource (CR).
Procedure
Edit the
LVMClusterCR by running the following command:$ oc edit <lvmcluster_file_name> -n <namespace>Add the path to the new device in the
deviceSelectorfield:Example
LVMClusterCRapiVersion: lvm.topolvm.io/v1alpha1 kind: LVMCluster metadata: name: my-lvmcluster spec: storage: deviceClasses: # ... deviceSelector:1 paths:2 - /dev/disk/by-path/pci-0000:87:00.0-nvme-1 - /dev/disk/by-path/pci-0000:88:00.0-nvme-1 optionalPaths:3 - /dev/disk/by-path/pci-0000:89:00.0-nvme-1 - /dev/disk/by-path/pci-0000:90:00.0-nvme-1 # ...- 1
- Contains the configuration to specify the paths to the devices that you want to add to the Logical Volume Manager (LVM) volume group. You can specify the device paths in the
pathsfield, theoptionalPathsfield, or both. If you do not specify the device paths in bothpathsandoptionalPaths, LVM Storage adds the supported unused devices to the LVM volume group. LVM Storage adds the devices to the LVM volume group only if the device path exists. - 2
- Specify the device paths. If the device path specified in this field does not exist, the
LVMClusterCR moves to theFailedstate. - 3
- Specify the optional device paths. If the device path specified in this field does not exist, LVM Storage ignores the device without causing an error.
ImportantAfter a device is added to the LVM volume group, it cannot be removed.
-
Save the
LVMClusterCR.
5.4.6.2. Scaling up the storage of a single-node OpenShift cluster by using the web console
You can scale up the storage capacity of the existing node on a single-node OpenShift cluster by using the OpenShift Container Platform web console.
Prerequisites
- You have additional unused devices on the single-node OpenShift cluster to be used by Logical Volume Manager (LVM) Storage.
-
You have created an
LVMClustercustom resource (CR).
Procedure
- Log in to the OpenShift Container Platform web console.
- Click Operators → Installed Operators.
-
Click LVM Storage in the
openshift-storagenamespace. -
Click the LVMCluster tab to view the
LVMClusterCR created on the cluster. - From the Actions menu, select Edit LVMCluster.
- Click the YAML tab.
Edit the
LVMClusterCR to add the new device path in thedeviceSelectorfield:Example
LVMClusterCRapiVersion: lvm.topolvm.io/v1alpha1 kind: LVMCluster metadata: name: my-lvmcluster spec: storage: deviceClasses: # ... deviceSelector:1 paths:2 - /dev/disk/by-path/pci-0000:87:00.0-nvme-1 - /dev/disk/by-path/pci-0000:88:00.0-nvme-1 optionalPaths:3 - /dev/disk/by-path/pci-0000:89:00.0-nvme-1 - /dev/disk/by-path/pci-0000:90:00.0-nvme-1 # ...- 1
- Contains the configuration to specify the paths to the devices that you want to add to the Logical Volume Manager (LVM) volume group. You can specify the device paths in the
pathsfield, theoptionalPathsfield, or both. If you do not specify the device paths in bothpathsandoptionalPaths, LVM Storage adds the supported unused devices to the LVM volume group. LVM Storage adds the devices to the LVM volume group only if the device path exists. - 2
- Specify the device paths. If the device path specified in this field does not exist, the
LVMClusterCR moves to theFailedstate. - 3
- Specify the optional device paths. If the device path specified in this field does not exist, LVM Storage ignores the device without causing an error.
ImportantAfter a device is added to the LVM volume group, it cannot be removed.
- Click Save.
5.4.6.3. Scaling up the storage of single-node OpenShift clusters by using RHACM
You can scale up the storage capacity of the existing node on single-node OpenShift clusters by using RHACM.
Prerequisites
-
You have access to the RHACM cluster using an account with
cluster-adminprivileges. -
You have created an
LVMClustercustom resource (CR) by using RHACM. - You have additional unused devices on each single-node OpenShift cluster to be used by Logical Volume Manager (LVM) Storage.
Procedure
- Log in to the RHACM CLI using your OpenShift Container Platform credentials.
Edit the
LVMClusterCR that you created using RHACM by running the following command:$ oc edit -f <file_name> -n <namespace>1 - 1
- Replace
<file_name>with the name of theLVMClusterCR.
In the
LVMClusterCR, add the path to the new device in thedeviceSelectorfield.Example
LVMClusterCR:apiVersion: policy.open-cluster-management.io/v1 kind: ConfigurationPolicy metadata: name: lvms spec: object-templates: - complianceType: musthave objectDefinition: apiVersion: lvm.topolvm.io/v1alpha1 kind: LVMCluster metadata: name: my-lvmcluster namespace: openshift-storage spec: storage: deviceClasses: # ... deviceSelector:1 paths:2 - /dev/disk/by-path/pci-0000:87:00.0-nvme-1 optionalPaths:3 - /dev/disk/by-path/pci-0000:89:00.0-nvme-1 # ...- 1
- Contains the configuration to specify the paths to the devices that you want to add to the Logical Volume Manager (LVM) volume group. You can specify the device paths in the
pathsfield, theoptionalPathsfield, or both. If you do not specify the device paths in bothpathsandoptionalPaths, LVM Storage adds the unused devices to the LVM volume group. LVM Storage adds the devices to the LVM volume group only if the device path exists. - 2
- Specify the device paths. If the device path specified in this field does not exist, the
LVMClusterCR moves to theFailedstate. - 3
- Specify the optional device paths. If the device path specified in this field does not exist, LVM Storage ignores the device without causing an error.
ImportantAfter a device is added to the LVM volume group, it cannot be removed.
-
Save the
LVMClusterCR.
5.4.7. Expanding a persistent volume claim
After scaling up the storage of a cluster, you can expand the existing persistent volume claims (PVCs).
To expand a PVC, you must update the requests.storage field in the PVC.
Prerequisites
- Dynamic provisioning is used.
-
The
StorageClassobject associated with the PVC has theallowVolumeExpansionfield set totrue.
Procedure
-
Log in to the OpenShift CLI (
oc). Update the value of the
spec.resources.requests.storagefield to a value that is greater than the current value by running the following command:$ oc patch pvc <pvc_name> -n <application_namespace> -p \1 '{ "spec": { "resources": { "requests": { "storage": "<desired_size>" }}}}' --type=merge2
Verification
To verify that resizing is completed, run the following command:
$ oc get pvc <pvc_name> -n <application_namespace> -o=jsonpath={.status.capacity.storage}Logical Volume Manager (LVM) Storage adds the
Resizingcondition to the PVC during expansion. It deletes theResizingcondition after the PVC expansion.
5.4.8. Deleting a persistent volume claim
You can delete a persistent volume claim (PVC) by using the OpenShift CLI (oc).
Prerequisites
-
You have access to OpenShift Container Platform as a user with
cluster-adminpermissions.
Procedure
-
Log in to the OpenShift CLI (
oc). Delete the PVC by running the following command:
$ oc delete pvc <pvc_name> -n <namespace>
Verification
To verify that the PVC is deleted, run the following command:
$ oc get pvc -n <namespace>The deleted PVC must not be present in the output of this command.
5.4.9. About volume snapshots
You can create snapshots of persistent volume claims (PVCs) that are provisioned by LVM Storage.
You can perform the following actions using the volume snapshots:
Back up your application data.
ImportantVolume snapshots are located on the same devices as the original data. To use the volume snapshots as backups, you must move the snapshots to a secure location. You can use OpenShift API for Data Protection (OADP) backup and restore solutions. For information on OADP, see "OADP features".
- Revert to a state at which the volume snapshot was taken.
You can also create volume snapshots of volume clones.
5.4.9.1. Creating volume snapshots
You can create volume snapshots based on the available capacity of the thin pool and the over-provisioning limits. To create a volume snapshot, you must create a VolumeSnapshot object.
Prerequisites
-
You have access to OpenShift Container Platform as a user with
cluster-adminpermissions. -
You ensured that the persistent volume claim (PVC) is in
Boundstate. This is required for a consistent snapshot. - You stopped all the I/O to the PVC.
Procedure
-
Log in to the OpenShift CLI (
oc). Create a
VolumeSnapshotobject:Example
VolumeSnapshotobjectapiVersion: snapshot.storage.k8s.io/v1 kind: VolumeSnapshot metadata: name: lvm-block-1-snap1 spec: source: persistentVolumeClaimName: lvm-block-12 volumeSnapshotClassName: lvms-vg13 NoteTo get the list of available volume snapshot classes, run the following command:
$ oc get volumesnapshotclassCreate the volume snapshot in the namespace where you created the source PVC by running the following command:
$ oc create -f <file_name> -n <namespace>LVM Storage creates a read-only copy of the PVC as a volume snapshot.
Verification
To verify that the volume snapshot is created, run the following command:
$ oc get volumesnapshot -n <namespace>Example output
NAME READYTOUSE SOURCEPVC SOURCESNAPSHOTCONTENT RESTORESIZE SNAPSHOTCLASS SNAPSHOTCONTENT CREATIONTIME AGE lvm-block-1-snap true lvms-test-1 1Gi lvms-vg1 snapcontent-af409f97-55fc-40cf-975f-71e44fa2ca91 19s 19sThe value of the
READYTOUSEfield for the volume snapshot that you created must betrue.
5.4.9.2. Restoring volume snapshots
To restore a volume snapshot, you must create a persistent volume claim (PVC) with the dataSource.name field set to the name of the volume snapshot.
The restored PVC is independent of the volume snapshot and the source PVC.
Prerequisites
-
You have access to OpenShift Container Platform as a user with
cluster-adminpermissions. - You have created a volume snapshot.
Procedure
-
Log in to the OpenShift CLI (
oc). Create a
PersistentVolumeClaimobject with the configuration to restore the volume snapshot:Example
PersistentVolumeClaimobject to restore a volume snapshotkind: PersistentVolumeClaim apiVersion: v1 metadata: name: lvm-block-1-restore spec: accessModes: - ReadWriteOnce volumeMode: Block Resources: Requests: storage: 2Gi1 storageClassName: lvms-vg12 dataSource: name: lvm-block-1-snap3 kind: VolumeSnapshot apiGroup: snapshot.storage.k8s.io- 1
- Specify the storage size of the PVC. The storage size of the requested PVC must be greater than or equal to the stoage size of the volume snapshot that you want to restore. If a larger PVC is required, you can also resize the PVC after restoring the volume snapshot.
- 2
- Set this field to the value of the
storageClassNamefield in the source PVC of the volume snapshot that you want to restore. - 3
- Set this field to the name of the volume snapshot that you want to restore.
Create the PVC in the namespace where you created the volume snapshot by running the following command:
$ oc create -f <file_name> -n <namespace>
Verification
To verify that the volume snapshot is restored, create a workload using the restored PVC and then run the following command:
$ oc get pvc -n <namespace>Example output
NAME STATUS VOLUME CAPACITY ACCESS MODES STORAGECLASS AGE lvm-block-1-restore Bound pvc-e90169a8-fd71-4eea-93b8-817155f60e47 1Gi RWO lvms-vg1 5s
5.4.9.3. Deleting volume snapshots
You can delete the volume snapshots of the persistent volume claims (PVCs).
When you delete a persistent volume claim (PVC), LVM Storage deletes only the PVC, but not the snapshots of the PVC.
Prerequisites
-
You have access to OpenShift Container Platform as a user with
cluster-adminpermissions. - You have ensured that the volume snpashot that you want to delete is not in use.
Procedure
-
Log in to the OpenShift CLI (
oc). Delete the volume snapshot by running the following command:
$ oc delete volumesnapshot <volume_snapshot_name> -n <namespace>
Verification
To verify that the volume snapshot is deleted, run the following command:
$ oc get volumesnapshot -n <namespace>The deleted volume snapshot must not be present in the output of this command.
5.4.10. About volume clones
A volume clone is a duplicate of an existing persistent volume claim (PVC). You can create a volume clone to make a point-in-time copy of the data.
5.4.10.1. Creating volume clones
To create a clone of a persistent volume claim (PVC), you must create a PersistentVolumeClaim object in the namespace where you created the source PVC.
The cloned PVC has write access.
Prerequisites
-
You ensured that the source PVC is in
Boundstate. This is required for a consistent clone.
Procedure
-
Log in to the OpenShift CLI (
oc). Create a
PersistentVolumeClaimobject:Example
PersistentVolumeClaimobject to create a volume clonekind: PersistentVolumeClaim apiVersion: v1 metadata: name: lvm-pvc-clone spec: accessModes: - ReadWriteOnce storageClassName: lvms-vg11 volumeMode: Filesystem2 dataSource: kind: PersistentVolumeClaim name: lvm-pvc3 resources: requests: storage: 1Gi4 - 1
- Set this field to the value of the
storageClassNamefield in the source PVC. - 2
- Set this field to the
volumeModefield in the source PVC. - 3
- Specify the name of the source PVC.
- 4
- Specify the storage size for the cloned PVC. The storage size of the cloned PVC must be greater than or equal to the storage size of the source PVC.
Create the PVC in the namespace where you created the source PVC by running the following command:
$ oc create -f <file_name> -n <namespace>
Verification
To verify that the volume clone is created, create a workload using the cloned PVC and then run the following command:
$ oc get pvc -n <namespace>Example output
NAME STATUS VOLUME CAPACITY ACCESS MODES STORAGECLASS AGE lvm-block-1-clone Bound pvc-e90169a8-fd71-4eea-93b8-817155f60e47 1Gi RWO lvms-vg1 5s
5.4.10.2. Deleting volume clones
You can delete volume clones.
When you delete a persistent volume claim (PVC), LVM Storage deletes only the source persistent volume claim (PVC) but not the clones of the PVC.
Prerequisites
-
You have access to OpenShift Container Platform as a user with
cluster-adminpermissions.
Procedure
-
Log in to the OpenShift CLI (
oc). Delete the cloned PVC by running the following command:
# oc delete pvc <clone_pvc_name> -n <namespace>
Verification
To verify that the volume clone is deleted, run the following command:
$ oc get pvc -n <namespace>The deleted volume clone must not be present in the output of this command.
5.4.11. Updating LVM Storage on a single-node OpenShift cluster
You can update LVM Storage to ensure compatibility with the single-node OpenShift version.
Prerequisites
- You have updated your single-node OpenShift cluster.
- You have installed a previous version of LVM Storage.
-
You have installed the OpenShift CLI (
oc). -
You have access to the cluster using an account with
cluster-adminpermissions.
Procedure
-
Log in to the OpenShift CLI (
oc). Update the
Subscriptioncustom resource (CR) that you created while installing LVM Storage by running the following command:$ oc patch subscription lvms-operator -n openshift-storage --type merge --patch '{"spec":{"channel":"<update_channel>"}}'1 - 1
- Replace
<update_channel>with the version of LVM Storage that you want to install. For example,stable-4.14.
View the update events to check that the installation is complete by running the following command:
$ oc get events -n openshift-storageExample output
... 8m13s Normal RequirementsUnknown clusterserviceversion/lvms-operator.v4.14 requirements not yet checked 8m11s Normal RequirementsNotMet clusterserviceversion/lvms-operator.v4.14 one or more requirements couldn't be found 7m50s Normal AllRequirementsMet clusterserviceversion/lvms-operator.v4.14 all requirements found, attempting install 7m50s Normal InstallSucceeded clusterserviceversion/lvms-operator.v4.14 waiting for install components to report healthy 7m49s Normal InstallWaiting clusterserviceversion/lvms-operator.v4.14 installing: waiting for deployment lvms-operator to become ready: deployment "lvms-operator" waiting for 1 outdated replica(s) to be terminated 7m39s Normal InstallSucceeded clusterserviceversion/lvms-operator.v4.14 install strategy completed with no errors ...
Verification
Verify the LVM Storage version by running the following command:
$ oc get subscription lvms-operator -n openshift-storage -o jsonpath='{.status.installedCSV}'Example output
lvms-operator.v4.14
5.4.12. Monitoring LVM Storage
To enable cluster monitoring, you must add the following label in the namespace where you have installed LVM Storage:
openshift.io/cluster-monitoring=trueFor information about enabling cluster monitoring in RHACM, see Observability and Adding custom metrics.
5.4.12.1. Metrics
You can monitor LVM Storage by viewing the metrics.
The following table describes the topolvm metrics:
| Alert | Description |
|---|---|
|
| Indicates the percentage of data space used in the LVM thinpool. |
|
| Indicates the percentage of metadata space used in the LVM thinpool. |
|
| Indicates the size of the LVM thin pool in bytes. |
|
| Indicates the available space in the LVM volume group in bytes. |
|
| Indicates the size of the LVM volume group in bytes. |
|
| Indicates the available over-provisioned size of the LVM thin pool in bytes. |
Metrics are updated every 10 minutes or when there is a change, such as a new logical volume creation, in the thin pool.
5.4.12.2. Alerts
When the thin pool and volume group reach maximum storage capacity, further operations fail. This can lead to data loss.
LVM Storage sends the following alerts when the usage of the thin pool and volume group exceeds a certain value:
| Alert | Description |
|---|---|
|
| This alert is triggered when both the volume group and thin pool usage exceeds 75% on nodes. Data deletion or volume group expansion is required. |
|
| This alert is triggered when both the volume group and thin pool usage exceeds 85% on nodes. In this case, the volume group is critically full. Data deletion or volume group expansion is required. |
|
| This alert is triggered when the thin pool data usage in the volume group exceeds 75% on nodes. Data deletion or thin pool expansion is required. |
|
| This alert is triggered when the thin pool data usage in the volume group exceeds 85% on nodes. Data deletion or thin pool expansion is required. |
|
| This alert is triggered when the thin pool metadata usage in the volume group exceeds 75% on nodes. Data deletion or thin pool expansion is required. |
|
| This alert is triggered when the thin pool metadata usage in the volume group exceeds 85% on nodes. Data deletion or thin pool expansion is required. |
5.4.13. Uninstalling LVM Storage by using the CLI
You can uninstall LVM Storage by using the OpenShift CLI (oc).
Prerequisites
-
You have logged in to
ocas a user withcluster-adminpermissions. - You deleted the persistent volume claims (PVCs), volume snapshots, and volume clones provisioned by LVM Storage. You have also deleted the applications that are using these resources.
-
You deleted the
LVMClustercustom resource (CR).
Procedure
Get the
currentCSVvalue for the LVM Storage Operator by running the following command:$ oc get subscription.operators.coreos.com lvms-operator -n <namespace> -o yaml | grep currentCSVExample output
currentCSV: lvms-operator.v4.15.3Delete the subscription by running the following command:
$ oc delete subscription.operators.coreos.com lvms-operator -n <namespace>Example output
subscription.operators.coreos.com "lvms-operator" deletedDelete the CSV for the LVM Storage Operator in the target namespace by running the following command:
$ oc delete clusterserviceversion <currentCSV> -n <namespace>1 - 1
- Replace
<currentCSV>with thecurrentCSVvalue for the LVM Storage Operator.
Example output
clusterserviceversion.operators.coreos.com "lvms-operator.v4.15.3" deleted
Verification
To verify that the LVM Storage Operator is uninstalled, run the following command:
$ oc get csv -n <namespace>If the LVM Storage Operator was successfully uninstalled, it does not appear in the output of this command.
5.4.14. Uninstalling LVM Storage by using the web console
You can uninstall Logical Volume Manager (LVM) Storage using the OpenShift Container Platform web console.
Prerequisites
-
You have access to the single-node OpenShift cluster as a user with
cluster-adminpermissions. - You have deleted the persistent volume claims (PVCs), volume snapshots, and volume clones provisioned by LVM Storage. You have also deleted the applications that are using these resources.
-
You have deleted the
LVMClustercustom resource (CR).
Procedure
- Log in to the OpenShift Container Platform web console.
- Click Operators → Installed Operators.
-
Click LVM Storage in the
openshift-storagenamespace. - Click the Details tab.
- From the Actions menu, click Uninstall Operator.
- Optional: When prompted, select the Delete all operand instances for this operator checkbox to delete the operand instances for LVM Storage.
- Click Uninstall.
5.4.15. Uninstalling LVM Storage installed using RHACM
To uninstall Logical Volume Manager (LVM) Storage that you installed using RHACM, you must delete the RHACM Policy custom resource (CR) that you created for installing and configuring LVM Storage.
Prerequisites
-
You have access to the RHACM cluster as a user with
cluster-adminpermissions. You have deleted the following resources provisioned by LVM Storage:
- Persistent volume claims (PVCs)
- Volume snapshots
Volume clones
You have also deleted any applications that are using these resources.
-
You have deleted the
LVMClusterCR that you created using RHACM.
Procedure
-
Log in to the OpenShift CLI (
oc). Delete the RHACM
PolicyCR that you created for installing and configuring LVM Storage by running the following command:$ oc delete -f <policy> -n <namespace>1 - 1
- Replace
<policy>with the name of thePolicyCR YAML file.
Create a
PolicyCR YAML file with the configuration to uninstall LVM Storage.Example
PolicyCR to uninstall LVM StorageapiVersion: apps.open-cluster-management.io/v1 kind: PlacementRule metadata: name: placement-uninstall-lvms spec: clusterConditions: - status: "True" type: ManagedClusterConditionAvailable clusterSelector: matchExpressions: - key: mykey operator: In values: - myvalue --- apiVersion: policy.open-cluster-management.io/v1 kind: PlacementBinding metadata: name: binding-uninstall-lvms placementRef: apiGroup: apps.open-cluster-management.io kind: PlacementRule name: placement-uninstall-lvms subjects: - apiGroup: policy.open-cluster-management.io kind: Policy name: uninstall-lvms --- apiVersion: policy.open-cluster-management.io/v1 kind: Policy metadata: annotations: policy.open-cluster-management.io/categories: CM Configuration Management policy.open-cluster-management.io/controls: CM-2 Baseline Configuration policy.open-cluster-management.io/standards: NIST SP 800-53 name: uninstall-lvms spec: disabled: false policy-templates: - objectDefinition: apiVersion: policy.open-cluster-management.io/v1 kind: ConfigurationPolicy metadata: name: uninstall-lvms spec: object-templates: - complianceType: mustnothave objectDefinition: apiVersion: v1 kind: Namespace metadata: name: openshift-storage - complianceType: mustnothave objectDefinition: apiVersion: operators.coreos.com/v1 kind: OperatorGroup metadata: name: openshift-storage-operatorgroup namespace: openshift-storage spec: targetNamespaces: - openshift-storage - complianceType: mustnothave objectDefinition: apiVersion: operators.coreos.com/v1alpha1 kind: Subscription metadata: name: lvms-operator namespace: openshift-storage remediationAction: enforce severity: low - objectDefinition: apiVersion: policy.open-cluster-management.io/v1 kind: ConfigurationPolicy metadata: name: policy-remove-lvms-crds spec: object-templates: - complianceType: mustnothave objectDefinition: apiVersion: apiextensions.k8s.io/v1 kind: CustomResourceDefinition metadata: name: logicalvolumes.topolvm.io - complianceType: mustnothave objectDefinition: apiVersion: apiextensions.k8s.io/v1 kind: CustomResourceDefinition metadata: name: lvmclusters.lvm.topolvm.io - complianceType: mustnothave objectDefinition: apiVersion: apiextensions.k8s.io/v1 kind: CustomResourceDefinition metadata: name: lvmvolumegroupnodestatuses.lvm.topolvm.io - complianceType: mustnothave objectDefinition: apiVersion: apiextensions.k8s.io/v1 kind: CustomResourceDefinition metadata: name: lvmvolumegroups.lvm.topolvm.io remediationAction: enforce severity: highCreate the
PolicyCR by running the following command:$ oc create -f <policy> -ns <namespace>
5.4.16. Downloading log files and diagnostic information using must-gather
When LVM Storage is unable to automatically resolve a problem, use the must-gather tool to collect the log files and diagnostic information so that you or the Red Hat Support can review the problem and determine a solution.
Procedure
Run the
must-gathercommand from the client connected to the LVM Storage cluster:$ oc adm must-gather --image=registry.redhat.io/lvms4/lvms-must-gather-rhel9:v4.14 --dest-dir=<directory_name>
5.4.17. Troubleshooting persistent storage
While configuring persistent storage using Logical Volume Manager (LVM) Storage, you can encounter several issues that require troubleshooting.
5.4.17.1. Investigating a PVC stuck in the Pending state
A persistent volume claim (PVC) can get stuck in the Pending state for the following reasons:
- Insufficient computing resources.
- Network problems.
- Mismatched storage class or node selector.
- No available persistent volumes (PVs).
-
The node with the PV is in the
Not Readystate.
Prerequisites
-
You have installed the OpenShift CLI (
oc). -
You have logged in to the OpenShift CLI (
oc) as a user withcluster-adminpermissions.
Procedure
Retrieve the list of PVCs by running the following command:
$ oc get pvcExample output
NAME STATUS VOLUME CAPACITY ACCESS MODES STORAGECLASS AGE lvms-test Pending lvms-vg1 11sInspect the events associated with a PVC stuck in the
Pendingstate by running the following command:$ oc describe pvc <pvc_name>1 - 1
- Replace
<pvc_name>with the name of the PVC. For example,lvms-vg1.
Example output
Type Reason Age From Message ---- ------ ---- ---- ------- Warning ProvisioningFailed 4s (x2 over 17s) persistentvolume-controller storageclass.storage.k8s.io "lvms-vg1" not found
5.4.17.2. Recovering from a missing storage class
If you encounter the storage class not found error, check the LVMCluster custom resource (CR) and ensure that all the Logical Volume Manager (LVM) Storage pods are in the Running state.
Prerequisites
-
You have installed the OpenShift CLI (
oc). -
You have logged in to the OpenShift CLI (
oc) as a user withcluster-adminpermissions.
Procedure
Verify that the
LVMClusterCR is present by running the following command:$ oc get lvmcluster -n openshift-storageExample output
NAME AGE my-lvmcluster 65m-
If the
LVMClusterCR is not present, create anLVMClusterCR. For more information, see "Ways to create an LVMCluster custom resource". In the
openshift-storagenamespace, check that all the LVM Storage pods are in theRunningstate by running the following command:$ oc get pods -n openshift-storageExample output
NAME READY STATUS RESTARTS AGE lvms-operator-7b9fb858cb-6nsml 3/3 Running 0 70m topolvm-controller-5dd9cf78b5-7wwr2 5/5 Running 0 66m topolvm-node-dr26h 4/4 Running 0 66m vg-manager-r6zdv 1/1 Running 0 66mThe output of this command must contain a running instance of the following pods:
-
lvms-operator -
vg-manager -
topolvm-controller topolvm-nodeIf the
topolvm-nodepod is stuck in theInitstate, it is due to a failure to locate an available disk for LVM Storage to use. To retrieve the necessary information to troubleshoot this issue, review the logs of thevg-managerpod by running the following command:$ oc logs -l app.kubernetes.io/component=vg-manager -n openshift-storage
-
5.4.17.3. Recovering from node failure
A persistent volume claim (PVC) can be stuck in the Pending state due to a node failure in the cluster.
To identify the failed node, you can examine the restart count of the topolvm-node pod. An increased restart count indicates potential problems with the underlying node, which might require further investigation and troubleshooting.
Prerequisites
-
You have installed the OpenShift CLI (
oc). -
You have logged in to the OpenShift CLI (
oc) as a user withcluster-adminpermissions.
Procedure
Examine the restart count of the
topolvm-nodepod instances by running the following command:$ oc get pods -n openshift-storageExample output
NAME READY STATUS RESTARTS AGE lvms-operator-7b9fb858cb-6nsml 3/3 Running 0 70m topolvm-controller-5dd9cf78b5-7wwr2 5/5 Running 0 66m topolvm-node-dr26h 4/4 Running 0 66m topolvm-node-54as8 4/4 Running 0 66m topolvm-node-78fft 4/4 Running 17 (8s ago) 66m vg-manager-r6zdv 1/1 Running 0 66m vg-manager-990ut 1/1 Running 0 66m vg-manager-an118 1/1 Running 0 66m
Next steps
-
If the PVC is stuck in the
Pendingstate even after you have resolved any issues with the node, you must perform a forced clean-up. For more information, see "Performing a forced clean-up".
5.4.17.4. Recovering from disk failure
If you see a failure message while inspecting the events associated with the persistent volume claim (PVC), there can be a problem with the underlying volume or disk.
Disk and volume provisioning issues result with a generic error message such as Failed to provision volume with storage class <storage_class_name>. The generic error message is followed by a specific volume failure error message.
The following table describes the volume failure error messages:
| Error message | Description |
|---|---|
|
| Indicates a problem in verifying whether the volume already exists. Volume verification failure can be caused by network connectivity problems or other failures. |
|
| Failure to bind a volume can happen if the persistent volume (PV) that is available does not match the requirements of the PVC. |
|
| This error indicates problems when trying to mount the volume to a node. If the disk has failed, this error can appear when a pod tries to use the PVC. |
|
| This error indicates problems when trying to unmount a volume from a node. If the disk has failed, this error can appear when a pod tries to use the PVC. |
|
|
This error can appear with storage solutions that do not support |
Prerequisites
-
You have installed the OpenShift CLI (
oc). -
You have logged in to the OpenShift CLI (
oc) as a user withcluster-adminpermissions.
Procedure
Inspect the events associated with a PVC by running the following command:
$ oc describe pvc <pvc_name>1 - 1
- Replace
<pvc_name>with the name of the PVC.
- Establish a direct connection to the host where the problem is occurring.
- Resolve the disk issue.
Next steps
- If the volume failure messages persist or recur even after you have resolved the issue with the disk, you must perform a forced clean-up. For more information, see "Performing a forced clean-up".
5.4.17.5. Performing a forced clean-up
If the disk or node-related problems persist even after you have completed the troubleshooting procedures, you must perform a forced clean-up. A forced clean-up is used to address persistent issues and ensure the proper functioning of Logical Volume Manager (LVM) Storage.
Prerequisites
-
You have installed the OpenShift CLI (
oc). -
You have logged in to the OpenShift CLI (
oc) as a user withcluster-adminpermissions. - You have deleted all the persistent volume claims (PVCs) that were created by using LVM Storage.
- You have stopped the pods that are using the PVCs that were created by using LVM Storage.
Procedure
Switch to the
openshift-storagenamespace by running the following command:$ oc project openshift-storageCheck if the
LogicalVolumecustom resources (CRs) are present by running the following command:$ oc get logicalvolumeIf the
LogicalVolumeCRs are present, delete them by running the following command:$ oc delete logicalvolume <name>1 - 1
- Replace
<name>with the name of theLogicalVolumeCR.
After deleting the
LogicalVolumeCRs, remove their finalizers by running the following command:$ oc patch logicalvolume <name> -p '{"metadata":{"finalizers":[]}}' --type=merge1 - 1
- Replace
<name>with the name of theLogicalVolumeCR.
Check if the
LVMVolumeGroupCRs are present by running the following command:$ oc get lvmvolumegroupIf the
LVMVolumeGroupCRs are present, delete them by running the following command:$ oc delete lvmvolumegroup <name>1 - 1
- Replace
<name>with the name of theLVMVolumeGroupCR.
After deleting the
LVMVolumeGroupCRs, remove their finalizers by running the following command:$ oc patch lvmvolumegroup <name> -p '{"metadata":{"finalizers":[]}}' --type=merge1 - 1
- Replace
<name>with the name of theLVMVolumeGroupCR.
Delete any
LVMVolumeGroupNodeStatusCRs by running the following command:$ oc delete lvmvolumegroupnodestatus --allDelete the
LVMClusterCR by running the following command:$ oc delete lvmcluster --allAfter deleting the
LVMClusterCR, remove its finalizer by running the following command:$ oc patch lvmcluster <name> -p '{"metadata":{"finalizers":[]}}' --type=merge1 - 1
- Replace
<name>with the name of theLVMClusterCR.
Chapter 6. Using Container Storage Interface (CSI)
6.1. Configuring CSI volumes
The Container Storage Interface (CSI) allows OpenShift Container Platform to consume storage from storage back ends that implement the CSI interface as persistent storage.
OpenShift Container Platform 4.14 supports version 1.6.0 of the CSI specification.
6.1.1. CSI architecture
CSI drivers are typically shipped as container images. These containers are not aware of OpenShift Container Platform where they run. To use CSI-compatible storage back end in OpenShift Container Platform, the cluster administrator must deploy several components that serve as a bridge between OpenShift Container Platform and the storage driver.
The following diagram provides a high-level overview about the components running in pods in the OpenShift Container Platform cluster.
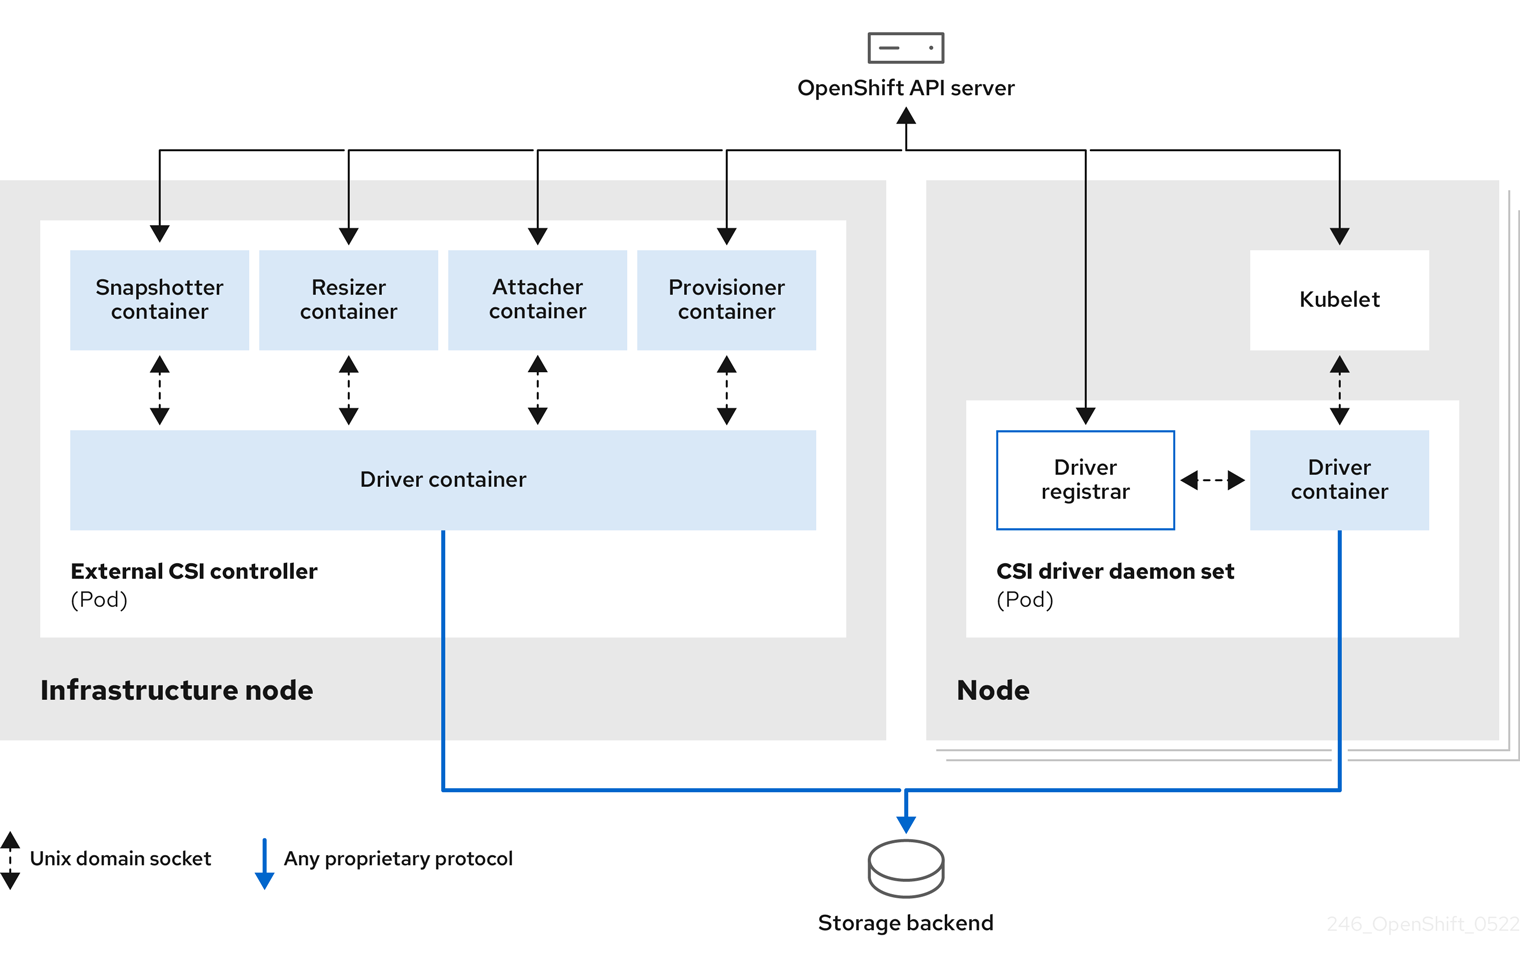
It is possible to run multiple CSI drivers for different storage back ends. Each driver needs its own external controllers deployment and daemon set with the driver and CSI registrar.
6.1.1.1. External CSI controllers
External CSI controllers is a deployment that deploys one or more pods with five containers:
-
The snapshotter container watches
VolumeSnapshotandVolumeSnapshotContentobjects and is responsible for the creation and deletion ofVolumeSnapshotContentobject. -
The resizer container is a sidecar container that watches for
PersistentVolumeClaimupdates and triggersControllerExpandVolumeoperations against a CSI endpoint if you request more storage onPersistentVolumeClaimobject. -
An external CSI attacher container translates
attachanddetachcalls from OpenShift Container Platform to respectiveControllerPublishandControllerUnpublishcalls to the CSI driver. -
An external CSI provisioner container that translates
provisionanddeletecalls from OpenShift Container Platform to respectiveCreateVolumeandDeleteVolumecalls to the CSI driver. - A CSI driver container.
The CSI attacher and CSI provisioner containers communicate with the CSI driver container using UNIX Domain Sockets, ensuring that no CSI communication leaves the pod. The CSI driver is not accessible from outside of the pod.
The attach, detach, provision, and delete operations typically require the CSI driver to use credentials to the storage backend. Run the CSI controller pods on infrastructure nodes so the credentials are never leaked to user processes, even in the event of a catastrophic security breach on a compute node.
The external attacher must also run for CSI drivers that do not support third-party attach or detach operations. The external attacher will not issue any ControllerPublish or ControllerUnpublish operations to the CSI driver. However, it still must run to implement the necessary OpenShift Container Platform attachment API.
6.1.1.2. CSI driver daemon set
The CSI driver daemon set runs a pod on every node that allows OpenShift Container Platform to mount storage provided by the CSI driver to the node and use it in user workloads (pods) as persistent volumes (PVs). The pod with the CSI driver installed contains the following containers:
-
A CSI driver registrar, which registers the CSI driver into the
openshift-nodeservice running on the node. Theopenshift-nodeprocess running on the node then directly connects with the CSI driver using the UNIX Domain Socket available on the node. - A CSI driver.
The CSI driver deployed on the node should have as few credentials to the storage back end as possible. OpenShift Container Platform will only use the node plugin set of CSI calls such as NodePublish/NodeUnpublish and NodeStage/NodeUnstage, if these calls are implemented.
6.1.2. CSI drivers supported by OpenShift Container Platform
OpenShift Container Platform installs certain CSI drivers by default, giving users storage options that are not possible with in-tree volume plugins.
To create CSI-provisioned persistent volumes that mount to these supported storage assets, OpenShift Container Platform installs the necessary CSI driver Operator, the CSI driver, and the required storage class by default. For more details about the default namespace of the Operator and driver, see the documentation for the specific CSI Driver Operator.
The AWS EFS and GCP Filestore CSI drivers are not installed by default, and must be installed manually. For instructions on installing the AWS EFS CSI driver, see Setting up AWS Elastic File Service CSI Driver Operator. For instructions on installing the GCP Filestore CSI driver, see Google Compute Platform Filestore CSI Driver Operator.
The following table describes the CSI drivers that are supported by OpenShift Container Platform and which CSI features they support, such as volume snapshots and resize.
If your CSI driver is not listed in the following table, you must follow the installation instructions provided by your CSI storage vendor to use their supported CSI features.
For a list of third-party-certified CSI drivers, see the Red Hat ecosystem portal under Additional resources.
| CSI driver | CSI volume snapshots | CSI cloning | CSI resize | Inline ephemeral volumes |
|---|---|---|---|---|
| AliCloud Disk |
✅ |
- |
✅ |
- |
| AWS EBS |
✅ |
- |
✅ |
- |
| AWS EFS |
- |
- |
- |
- |
| Google Compute Platform (GCP) persistent disk (PD) |
✅ |
✅ |
✅ |
- |
| GCP Filestore |
✅ |
- |
✅ |
- |
| IBM Power® Virtual Server Block |
- |
- |
✅ |
- |
| IBM Cloud® Block |
✅[3] |
- |
✅[3] |
- |
| LVM Storage |
✅ |
✅ |
✅ |
- |
| Microsoft Azure Disk |
✅ |
✅ |
✅ |
- |
| Microsoft Azure Stack Hub |
✅ |
✅ |
✅ |
- |
| Microsoft Azure File |
- |
- |
✅ |
✅ |
| OpenStack Cinder |
✅ |
✅ |
✅ |
- |
| OpenShift Data Foundation |
✅ |
✅ |
✅ |
- |
| OpenStack Manila |
✅ |
- |
- |
- |
| Shared Resource |
- |
- |
- |
✅ |
| VMware vSphere |
✅[1] |
- |
✅[2] |
- |
1.
- Requires vSphere version 7.0 Update 3 or later for both vCenter Server and ESXi.
- Does not support fileshare volumes.
2.
- Offline volume expansion: minimum required vSphere version is 6.7 Update 3 P06
- Online volume expansion: minimum required vSphere version is 7.0 Update 2.
3.
- Does not support offline snapshots or resize. Volume must be attached to a running pod.
If your CSI driver is not listed in the preceding table, you must follow the installation instructions provided by your CSI storage vendor to use their supported CSI features.
6.1.3. Dynamic provisioning
Dynamic provisioning of persistent storage depends on the capabilities of the CSI driver and underlying storage back end. The provider of the CSI driver should document how to create a storage class in OpenShift Container Platform and the parameters available for configuration.
The created storage class can be configured to enable dynamic provisioning.
Procedure
Create a default storage class that ensures all PVCs that do not require any special storage class are provisioned by the installed CSI driver.
# oc create -f - << EOF apiVersion: storage.k8s.io/v1 kind: StorageClass metadata: name: <storage-class>1 annotations: storageclass.kubernetes.io/is-default-class: "true" provisioner: <provisioner-name>2 parameters: csi.storage.k8s.io/fstype: xfs3 EOF
6.1.4. Example using the CSI driver
The following example installs a default MySQL template without any changes to the template.
Prerequisites
- The CSI driver has been deployed.
- A storage class has been created for dynamic provisioning.
Procedure
Create the MySQL template:
# oc new-app mysql-persistentExample output
--> Deploying template "openshift/mysql-persistent" to project default ...# oc get pvcExample output
NAME STATUS VOLUME CAPACITY ACCESS MODES STORAGECLASS AGE mysql Bound kubernetes-dynamic-pv-3271ffcb4e1811e8 1Gi RWO cinder 3s
6.1.5. Volume populators
Volume populators use the datasource field in a persistent volume claim (PVC) spec to create pre-populated volumes.
Volume population is currently enabled, and supported as a Technology Preview feature. However, OpenShift Container Platform does not ship with any volume populators.
Volume populators is a Technology Preview feature only. Technology Preview features are not supported with Red Hat production service level agreements (SLAs) and might not be functionally complete. Red Hat does not recommend using them in production. These features provide early access to upcoming product features, enabling customers to test functionality and provide feedback during the development process.
For more information about the support scope of Red Hat Technology Preview features, see Technology Preview Features Support Scope.
For more information about volume populators, see Kubernetes volume populators.
6.2. CSI inline ephemeral volumes
Container Storage Interface (CSI) inline ephemeral volumes allow you to define a Pod spec that creates inline ephemeral volumes when a pod is deployed and delete them when a pod is destroyed.
This feature is only available with supported Container Storage Interface (CSI) drivers:
- Shared Resource CSI driver
- Azure File CSI driver
- Secrets Store CSI driver
6.2.1. Overview of CSI inline ephemeral volumes
Traditionally, volumes that are backed by Container Storage Interface (CSI) drivers can only be used with a PersistentVolume and PersistentVolumeClaim object combination.
This feature allows you to specify CSI volumes directly in the Pod specification, rather than in a PersistentVolume object. Inline volumes are ephemeral and do not persist across pod restarts.
6.2.1.1. Support limitations
By default, OpenShift Container Platform supports CSI inline ephemeral volumes with these limitations:
- Support is only available for CSI drivers. In-tree and FlexVolumes are not supported.
-
The Shared Resource CSI Driver supports using inline ephemeral volumes only to access
SecretsorConfigMapsacross multiple namespaces as a Technology Preview feature. - Community or storage vendors provide other CSI drivers that support these volumes. Follow the installation instructions provided by the CSI driver provider.
CSI drivers might not have implemented the inline volume functionality, including Ephemeral capacity. For details, see the CSI driver documentation.
Shared Resource CSI Driver is a Technology Preview feature only. Technology Preview features are not supported with Red Hat production service level agreements (SLAs) and might not be functionally complete. Red Hat does not recommend using them in production. These features provide early access to upcoming product features, enabling customers to test functionality and provide feedback during the development process.
For more information about the support scope of Red Hat Technology Preview features, see Technology Preview Features Support Scope.
6.2.2. CSI Volume Admission plugin
The Container Storage Interface (CSI) Volume Admission plugin allows you to restrict the use of an individual CSI driver capable of provisioning CSI ephemeral volumes on pod admission. Administrators can add a csi-ephemeral-volume-profile label, and this label is then inspected by the Admission plugin and used in enforcement, warning, and audit decisions.
6.2.2.1. Overview
To use the CSI Volume Admission plugin, administrators add the security.openshift.io/csi-ephemeral-volume-profile label to a CSIDriver object, which declares the CSI driver’s effective pod security profile when it is used to provide CSI ephemeral volumes, as shown in the following example:
kind: CSIDriver
metadata:
name: csi.mydriver.company.org
labels:
security.openshift.io/csi-ephemeral-volume-profile: restricted - 1
- CSI driver object YAML file with the
csi-ephemeral-volume-profilelabel set to "restricted"
This “effective profile” communicates that a pod can use the CSI driver to mount CSI ephemeral volumes when the pod’s namespace is governed by a pod security standard.
The CSI Volume Admission plugin inspects pod volumes when pods are created; existing pods that use CSI volumes are not affected. If a pod uses a container storage interface (CSI) volume, the plugin looks up the CSIDriver object and inspects the csi-ephemeral-volume-profile label, and then use the label’s value in its enforcement, warning, and audit decisions.
6.2.2.2. Pod security profile enforcement
When a CSI driver has the csi-ephemeral-volume-profile label, pods using the CSI driver to mount CSI ephemeral volumes must run in a namespace that enforces a pod security standard of equal or greater permission. If the namespace enforces a more restrictive standard, the CSI Volume Admission plugin denies admission. The following table describes the enforcement behavior for different pod security profiles for given label values.
| Pod security profile | Driver label: restricted | Driver label: baseline | Driver label: privileged |
|---|---|---|---|
| Restricted |
Allowed |
Denied |
Denied |
| Baseline |
Allowed |
Allowed |
Denied |
| Privileged |
Allowed |
Allowed |
Allowed |
6.2.2.3. Pod security profile warning
The CSI Volume Admission plugin can warn you if the CSI driver’s effective profile is more permissive than the pod security warning profile for the pod namespace. The following table shows when a warning occurs for different pod security profiles for given label values.
| Pod security profile | Driver label: restricted | Driver label: baseline | Driver label: privileged |
|---|---|---|---|
| Restricted |
No warning |
Warning |
Warning |
| Baseline |
No warning |
No warning |
Warning |
| Privileged |
No warning |
No warning |
No warning |
6.2.2.4. Pod security profile audit
The CSI Volume Admission plugin can apply audit annotations to the pod if the CSI driver’s effective profile is more permissive than the pod security audit profile for the pod namespace. The following table shows the audit annotation applied for different pod security profiles for given label values.
| Pod security profile | Driver label: restricted | Driver label: baseline | Driver label: privileged |
|---|---|---|---|
| Restricted |
No audit |
Audit |
Audit |
| Baseline |
No audit |
No audit |
Audit |
| Privileged |
No audit |
No audit |
No audit |
6.2.2.5. Default behavior for the CSI Volume Admission plugin
If the referenced CSI driver for a CSI ephemeral volume does not have the csi-ephemeral-volume-profile label, the CSI Volume Admission plugin considers the driver to have the privileged profile for enforcement, warning, and audit behaviors. Likewise, if the pod’s namespace does not have the pod security admission label set, the Admission plugin assumes the restricted profile is allowed for enforcement, warning, and audit decisions. Therefore, if no labels are set, CSI ephemeral volumes using that CSI driver are only usable in privileged namespaces by default.
The CSI drivers that ship with OpenShift Container Platform and support ephemeral volumes have a reasonable default set for the csi-ephemeral-volume-profile label:
- Shared Resource CSI driver: restricted
- Azure File CSI driver: privileged
An admin can change the default value of the label if desired.
6.2.3. Embedding a CSI inline ephemeral volume in the pod specification
You can embed a CSI inline ephemeral volume in the Pod specification in OpenShift Container Platform. At runtime, nested inline volumes follow the ephemeral lifecycle of their associated pods so that the CSI driver handles all phases of volume operations as pods are created and destroyed.
Procedure
-
Create the
Podobject definition and save it to a file. Embed the CSI inline ephemeral volume in the file.
my-csi-app.yaml
kind: Pod apiVersion: v1 metadata: name: my-csi-app spec: containers: - name: my-frontend image: busybox volumeMounts: - mountPath: "/data" name: my-csi-inline-vol command: [ "sleep", "1000000" ] volumes:1 - name: my-csi-inline-vol csi: driver: inline.storage.kubernetes.io volumeAttributes: foo: bar- 1
- The name of the volume that is used by pods.
Create the object definition file that you saved in the previous step.
$ oc create -f my-csi-app.yaml
6.4. CSI volume snapshots
This document describes how to use volume snapshots with supported Container Storage Interface (CSI) drivers to help protect against data loss in OpenShift Container Platform. Familiarity with persistent volumes is suggested.
6.4.1. Overview of CSI volume snapshots
A snapshot represents the state of the storage volume in a cluster at a particular point in time. Volume snapshots can be used to provision a new volume.
OpenShift Container Platform supports Container Storage Interface (CSI) volume snapshots by default. However, a specific CSI driver is required.
With CSI volume snapshots, a cluster administrator can:
- Deploy a third-party CSI driver that supports snapshots.
- Create a new persistent volume claim (PVC) from an existing volume snapshot.
- Take a snapshot of an existing PVC.
- Restore a snapshot as a different PVC.
- Delete an existing volume snapshot.
With CSI volume snapshots, an app developer can:
- Use volume snapshots as building blocks for developing application- or cluster-level storage backup solutions.
- Rapidly rollback to a previous development version.
- Use storage more efficiently by not having to make a full copy each time.
Be aware of the following when using volume snapshots:
- Support is only available for CSI drivers. In-tree and FlexVolumes are not supported.
- OpenShift Container Platform only ships with select CSI drivers. For CSI drivers that are not provided by an OpenShift Container Platform Driver Operator, it is recommended to use the CSI drivers provided by community or storage vendors. Follow the installation instructions furnished by the CSI driver provider.
-
CSI drivers may or may not have implemented the volume snapshot functionality. CSI drivers that have provided support for volume snapshots will likely use the
csi-external-snapshottersidecar. See documentation provided by the CSI driver for details.
6.4.2. CSI snapshot controller and sidecar
OpenShift Container Platform provides a snapshot controller that is deployed into the control plane. In addition, your CSI driver vendor provides the CSI snapshot sidecar as a helper container that is installed during the CSI driver installation.
The CSI snapshot controller and sidecar provide volume snapshotting through the OpenShift Container Platform API. These external components run in the cluster.
The external controller is deployed by the CSI Snapshot Controller Operator.
6.4.2.1. External controller
The CSI snapshot controller binds VolumeSnapshot and VolumeSnapshotContent objects. The controller manages dynamic provisioning by creating and deleting VolumeSnapshotContent objects.
6.4.2.2. External sidecar
Your CSI driver vendor provides the csi-external-snapshotter sidecar. This is a separate helper container that is deployed with the CSI driver. The sidecar manages snapshots by triggering CreateSnapshot and DeleteSnapshot operations. Follow the installation instructions provided by your vendor.
6.4.3. About the CSI Snapshot Controller Operator
The CSI Snapshot Controller Operator runs in the openshift-cluster-storage-operator namespace. It is installed by the Cluster Version Operator (CVO) in all clusters by default.
The CSI Snapshot Controller Operator installs the CSI snapshot controller, which runs in the openshift-cluster-storage-operator namespace.
6.4.3.1. Volume snapshot CRDs
During OpenShift Container Platform installation, the CSI Snapshot Controller Operator creates the following snapshot custom resource definitions (CRDs) in the snapshot.storage.k8s.io/v1 API group:
VolumeSnapshotContentA snapshot taken of a volume in the cluster that has been provisioned by a cluster administrator.
Similar to the
PersistentVolumeobject, theVolumeSnapshotContentCRD is a cluster resource that points to a real snapshot in the storage back end.For manually pre-provisioned snapshots, a cluster administrator creates a number of
VolumeSnapshotContentCRDs. These carry the details of the real volume snapshot in the storage system.The
VolumeSnapshotContentCRD is not namespaced and is for use by a cluster administrator.VolumeSnapshotSimilar to the
PersistentVolumeClaimobject, theVolumeSnapshotCRD defines a developer request for a snapshot. The CSI Snapshot Controller Operator runs the CSI snapshot controller, which handles the binding of aVolumeSnapshotCRD with an appropriateVolumeSnapshotContentCRD. The binding is a one-to-one mapping.The
VolumeSnapshotCRD is namespaced. A developer uses the CRD as a distinct request for a snapshot.VolumeSnapshotClassAllows a cluster administrator to specify different attributes belonging to a
VolumeSnapshotobject. These attributes may differ among snapshots taken of the same volume on the storage system, in which case they would not be expressed by using the same storage class of a persistent volume claim.The
VolumeSnapshotClassCRD defines the parameters for thecsi-external-snapshottersidecar to use when creating a snapshot. This allows the storage back end to know what kind of snapshot to dynamically create if multiple options are supported.Dynamically provisioned snapshots use the
VolumeSnapshotClassCRD to specify storage-provider-specific parameters to use when creating a snapshot.The
VolumeSnapshotContentClassCRD is not namespaced and is for use by a cluster administrator to enable global configuration options for their storage back end.
6.4.4. Volume snapshot provisioning
There are two ways to provision snapshots: dynamically and manually.
6.4.4.1. Dynamic provisioning
Instead of using a preexisting snapshot, you can request that a snapshot be taken dynamically from a persistent volume claim. Parameters are specified using a VolumeSnapshotClass CRD.
6.4.4.2. Manual provisioning
As a cluster administrator, you can manually pre-provision a number of VolumeSnapshotContent objects. These carry the real volume snapshot details available to cluster users.
6.4.5. Creating a volume snapshot
When you create a VolumeSnapshot object, OpenShift Container Platform creates a volume snapshot.
Prerequisites
- Logged in to a running OpenShift Container Platform cluster.
-
A PVC created using a CSI driver that supports
VolumeSnapshotobjects. - A storage class to provision the storage back end.
No pods are using the persistent volume claim (PVC) that you want to take a snapshot of.
WarningCreating a volume snapshot of a PVC that is in use by a pod can cause unwritten data and cached data to be excluded from the snapshot. To ensure that all data is written to the disk, delete the pod that is using the PVC before creating the snapshot.
Procedure
To dynamically create a volume snapshot:
Create a file with the
VolumeSnapshotClassobject described by the following YAML:volumesnapshotclass.yaml
apiVersion: snapshot.storage.k8s.io/v1 kind: VolumeSnapshotClass metadata: name: csi-hostpath-snap driver: hostpath.csi.k8s.io1 deletionPolicy: Delete- 1
- The name of the CSI driver that is used to create snapshots of this
VolumeSnapshotClassobject. The name must be the same as theProvisionerfield of the storage class that is responsible for the PVC that is being snapshotted.
NoteDepending on the driver that you used to configure persistent storage, additional parameters might be required. You can also use an existing
VolumeSnapshotClassobject.Create the object you saved in the previous step by entering the following command:
$ oc create -f volumesnapshotclass.yamlCreate a
VolumeSnapshotobject:volumesnapshot-dynamic.yaml
apiVersion: snapshot.storage.k8s.io/v1 kind: VolumeSnapshot metadata: name: mysnap spec: volumeSnapshotClassName: csi-hostpath-snap1 source: persistentVolumeClaimName: myclaim2 - 1
- The request for a particular class by the volume snapshot. If the
volumeSnapshotClassNamesetting is absent and there is a default volume snapshot class, a snapshot is created with the default volume snapshot class name. But if the field is absent and no default volume snapshot class exists, then no snapshot is created. - 2
- The name of the
PersistentVolumeClaimobject bound to a persistent volume. This defines what you want to create a snapshot of. Required for dynamically provisioning a snapshot.
Create the object you saved in the previous step by entering the following command:
$ oc create -f volumesnapshot-dynamic.yaml
To manually provision a snapshot:
Provide a value for the
volumeSnapshotContentNameparameter as the source for the snapshot, in addition to defining volume snapshot class as shown above.volumesnapshot-manual.yaml
apiVersion: snapshot.storage.k8s.io/v1 kind: VolumeSnapshot metadata: name: snapshot-demo spec: source: volumeSnapshotContentName: mycontent1 - 1
- The
volumeSnapshotContentNameparameter is required for pre-provisioned snapshots.
Create the object you saved in the previous step by entering the following command:
$ oc create -f volumesnapshot-manual.yaml
Verification
After the snapshot has been created in the cluster, additional details about the snapshot are available.
To display details about the volume snapshot that was created, enter the following command:
$ oc describe volumesnapshot mysnapThe following example displays details about the
mysnapvolume snapshot:volumesnapshot.yaml
apiVersion: snapshot.storage.k8s.io/v1 kind: VolumeSnapshot metadata: name: mysnap spec: source: persistentVolumeClaimName: myclaim volumeSnapshotClassName: csi-hostpath-snap status: boundVolumeSnapshotContentName: snapcontent-1af4989e-a365-4286-96f8-d5dcd65d78d61 creationTime: "2020-01-29T12:24:30Z"2 readyToUse: true3 restoreSize: 500Mi- 1
- The pointer to the actual storage content that was created by the controller.
- 2
- The time when the snapshot was created. The snapshot contains the volume content that was available at this indicated time.
- 3
- If the value is set to
true, the snapshot can be used to restore as a new PVC.
If the value is set tofalse, the snapshot was created. However, the storage back end needs to perform additional tasks to make the snapshot usable so that it can be restored as a new volume. For example, Amazon Elastic Block Store data might be moved to a different, less expensive location, which can take several minutes.
To verify that the volume snapshot was created, enter the following command:
$ oc get volumesnapshotcontentThe pointer to the actual content is displayed. If the
boundVolumeSnapshotContentNamefield is populated, aVolumeSnapshotContentobject exists and the snapshot was created.-
To verify that the snapshot is ready, confirm that the
VolumeSnapshotobject hasreadyToUse: true.
6.4.6. Deleting a volume snapshot
You can configure how OpenShift Container Platform deletes volume snapshots.
Procedure
Specify the deletion policy that you require in the
VolumeSnapshotClassobject, as shown in the following example:volumesnapshotclass.yaml
apiVersion: snapshot.storage.k8s.io/v1 kind: VolumeSnapshotClass metadata: name: csi-hostpath-snap driver: hostpath.csi.k8s.io deletionPolicy: Delete1 - 1
- When deleting the volume snapshot, if the
Deletevalue is set, the underlying snapshot is deleted along with theVolumeSnapshotContentobject. If theRetainvalue is set, both the underlying snapshot andVolumeSnapshotContentobject remain.
If theRetainvalue is set and theVolumeSnapshotobject is deleted without deleting the correspondingVolumeSnapshotContentobject, the content remains. The snapshot itself is also retained in the storage back end.
Delete the volume snapshot by entering the following command:
$ oc delete volumesnapshot <volumesnapshot_name>Example output
volumesnapshot.snapshot.storage.k8s.io "mysnapshot" deletedIf the deletion policy is set to
Retain, delete the volume snapshot content by entering the following command:$ oc delete volumesnapshotcontent <volumesnapshotcontent_name>Optional: If the
VolumeSnapshotobject is not successfully deleted, enter the following command to remove any finalizers for the leftover resource so that the delete operation can continue:ImportantOnly remove the finalizers if you are confident that there are no existing references from either persistent volume claims or volume snapshot contents to the
VolumeSnapshotobject. Even with the--forceoption, the delete operation does not delete snapshot objects until all finalizers are removed.$ oc patch -n $PROJECT volumesnapshot/$NAME --type=merge -p '{"metadata": {"finalizers":null}}'Example output
volumesnapshotclass.snapshot.storage.k8s.io "csi-ocs-rbd-snapclass" deletedThe finalizers are removed and the volume snapshot is deleted.
6.4.7. Restoring a volume snapshot
The VolumeSnapshot CRD content can be used to restore the existing volume to a previous state.
After your VolumeSnapshot CRD is bound and the readyToUse value is set to true, you can use that resource to provision a new volume that is pre-populated with data from the snapshot.
Prerequisites
- Logged in to a running OpenShift Container Platform cluster.
- A persistent volume claim (PVC) created using a Container Storage Interface (CSI) driver that supports volume snapshots.
- A storage class to provision the storage back end.
- A volume snapshot has been created and is ready to use.
Procedure
Specify a
VolumeSnapshotdata source on a PVC as shown in the following:pvc-restore.yaml
apiVersion: v1 kind: PersistentVolumeClaim metadata: name: myclaim-restore spec: storageClassName: csi-hostpath-sc dataSource: name: mysnap1 kind: VolumeSnapshot2 apiGroup: snapshot.storage.k8s.io3 accessModes: - ReadWriteOnce resources: requests: storage: 1GiCreate a PVC by entering the following command:
$ oc create -f pvc-restore.yamlVerify that the restored PVC has been created by entering the following command:
$ oc get pvcA new PVC such as
myclaim-restoreis displayed.
6.5. CSI volume cloning
Volume cloning duplicates an existing persistent volume to help protect against data loss in OpenShift Container Platform. This feature is only available with supported Container Storage Interface (CSI) drivers. You should be familiar with persistent volumes before you provision a CSI volume clone.
6.5.1. Overview of CSI volume cloning
A Container Storage Interface (CSI) volume clone is a duplicate of an existing persistent volume at a particular point in time.
Volume cloning is similar to volume snapshots, although it is more efficient. For example, a cluster administrator can duplicate a cluster volume by creating another instance of the existing cluster volume.
Cloning creates an exact duplicate of the specified volume on the back-end device, rather than creating a new empty volume. After dynamic provisioning, you can use a volume clone just as you would use any standard volume.
No new API objects are required for cloning. The existing dataSource field in the PersistentVolumeClaim object is expanded so that it can accept the name of an existing PersistentVolumeClaim in the same namespace.
6.5.1.1. Support limitations
By default, OpenShift Container Platform supports CSI volume cloning with these limitations:
- The destination persistent volume claim (PVC) must exist in the same namespace as the source PVC.
Cloning is supported with a different Storage Class.
- Destination volume can be the same for a different storage class as the source.
-
You can use the default storage class and omit
storageClassNamein thespec.
- Support is only available for CSI drivers. In-tree and FlexVolumes are not supported.
- CSI drivers might not have implemented the volume cloning functionality. For details, see the CSI driver documentation.
6.5.2. Provisioning a CSI volume clone
When you create a cloned persistent volume claim (PVC) API object, you trigger the provisioning of a CSI volume clone. The clone pre-populates with the contents of another PVC, adhering to the same rules as any other persistent volume. The one exception is that you must add a dataSource that references an existing PVC in the same namespace.
Prerequisites
- You are logged in to a running OpenShift Container Platform cluster.
- Your PVC is created using a CSI driver that supports volume cloning.
- Your storage back end is configured for dynamic provisioning. Cloning support is not available for static provisioners.
Procedure
To clone a PVC from an existing PVC:
Create and save a file with the
PersistentVolumeClaimobject described by the following YAML:pvc-clone.yaml
apiVersion: v1 kind: PersistentVolumeClaim metadata: name: pvc-1-clone namespace: mynamespace spec: storageClassName: csi-cloning1 accessModes: - ReadWriteOnce resources: requests: storage: 5Gi dataSource: kind: PersistentVolumeClaim name: pvc-1- 1
- The name of the storage class that provisions the storage back end. The default storage class can be used and
storageClassNamecan be omitted in the spec.
Create the object you saved in the previous step by running the following command:
$ oc create -f pvc-clone.yamlA new PVC
pvc-1-cloneis created.Verify that the volume clone was created and is ready by running the following command:
$ oc get pvc pvc-1-cloneThe
pvc-1-cloneshows that it isBound.You are now ready to use the newly cloned PVC to configure a pod.
Create and save a file with the
Podobject described by the YAML. For example:kind: Pod apiVersion: v1 metadata: name: mypod spec: containers: - name: myfrontend image: dockerfile/nginx volumeMounts: - mountPath: "/var/www/html" name: mypd volumes: - name: mypd persistentVolumeClaim: claimName: pvc-1-clone1 - 1
- The cloned PVC created during the CSI volume cloning operation.
The created
Podobject is now ready to consume, clone, snapshot, or delete your cloned PVC independently of its originaldataSourcePVC.
6.6. Managing the default storage class
6.6.1. Overview
Managing the default storage class allows you to accomplish several different objectives:
- Enforcing static provisioning by disabling dynamic provisioning.
- When you have other preferred storage classes, preventing the storage operator from re-creating the initial default storage class.
- Renaming, or otherwise changing, the default storage class
To accomplish these objectives, you change the setting for the spec.storageClassState field in the ClusterCSIDriver object. The possible settings for this field are:
- Managed: (Default) The Container Storage Interface (CSI) operator is actively managing its default storage class, so that most manual changes made by a cluster administrator to the default storage class are removed, and the default storage class is continuously re-created if you attempt to manually delete it.
- Unmanaged: You can modify the default storage class. The CSI operator is not actively managing storage classes, so that it is not reconciling the default storage class it creates automatically.
- Removed: The CSI operators deletes the default storage class.
Managing the default storage classes is supported by the following Container Storage Interface (CSI) driver operators:
6.6.2. Managing the default storage class using the web console
Prerequisites
- Access to the OpenShift Container Platform web console.
- Access to the cluster with cluster-admin privileges.
Procedure
To manage the default storage class using the web console:
- Log in to the web console.
- Click Administration > CustomResourceDefinitions.
-
On the CustomResourceDefinitions page, type
clustercsidriverto find theClusterCSIDriverobject. - Click ClusterCSIDriver, and then click the Instances tab.
- Click the name of the desired instance, and then click the YAML tab.
Add the
spec.storageClassStatefield with a value ofManaged,Unmanaged, orRemoved.Example
... spec: driverConfig: driverType: '' logLevel: Normal managementState: Managed observedConfig: null operatorLogLevel: Normal storageClassState: Unmanaged1 ...- 1
spec.storageClassStatefield set to "Unmanaged"
- Click Save.
6.6.3. Managing the default storage class using the CLI
Prerequisites
- Access to the cluster with cluster-admin privileges.
Procedure
To manage the storage class using the CLI, run the following command:
$ oc patch clustercsidriver $DRIVERNAME --type=merge -p "{\"spec\":{\"storageClassState\":\"${STATE}\"}}" - 1
- Where
${STATE}is "Removed" or "Managed" or "Unmanaged".Where
$DRIVERNAMEis the provisioner name. You can find the provisioner name by running the commandoc get sc.
6.6.4. Absent or multiple default storage classes
6.6.4.1. Multiple default storage classes
Multiple default storage classes can occur if you mark a non-default storage class as default and do not unset the existing default storage class, or you create a default storage class when a default storage class is already present. With multiple default storage classes present, any persistent volume claim (PVC) requesting the default storage class (pvc.spec.storageClassName=nil) gets the most recently created default storage class, regardless of the default status of that storage class, and the administrator receives an alert in the alerts dashboard that there are multiple default storage classes, MultipleDefaultStorageClasses.
6.6.4.2. Absent default storage class
There are two possible scenarios where PVCs can attempt to use a non-existent default storage class:
- An administrator removes the default storage class or marks it as non-default, and then a user creates a PVC requesting the default storage class.
- During installation, the installer creates a PVC requesting the default storage class, which has not yet been created.
In the preceding scenarios, the PVCs remain in pending state indefinitely.
OpenShift Container Platform provides a feature to retroactively assign the default storage class to PVCs, so that they do not remain in the pending state. With this feature enabled, PVCs requesting the default storage class that are created when no default storage classes exists, remain in the pending state until a default storage class is created, or one of the existing storage classes is declared the default. As soon as the default storage class is created or declared, the PVC gets the new default storage class.
Retroactive default storage class assignment is a Technology Preview feature only. Technology Preview features are not supported with Red Hat production service level agreements (SLAs) and might not be functionally complete. Red Hat does not recommend using them in production. These features provide early access to upcoming product features, enabling customers to test functionality and provide feedback during the development process.
For more information about the support scope of Red Hat Technology Preview features, see Technology Preview Features Support Scope.
6.6.4.2.1. Procedure
To enable retroactive default storage class assignment:
Enable feature gates (see Nodes → Working with clusters → Enabling features using feature gates).
ImportantAfter turning on Technology Preview features using feature gates, they cannot be turned off. As a result, cluster upgrades are prevented.
The following configuration example enables retroactive default storage class assignment, and all other Technology Preview features:
apiVersion: config.openshift.io/v1 kind: FeatureGate metadata: name: cluster spec: featureSet: TechPreviewNoUpgrade1 ...- 1
- Enables retroactive default storage class assignment.
6.6.5. Changing the default storage class
Use the following procedure to change the default storage class.
For example, if you have two defined storage classes, gp3 and standard, and you want to change the default storage class from gp3 to standard.
Prerequisites
- Access to the cluster with cluster-admin privileges.
Procedure
To change the default storage class:
List the storage classes:
$ oc get storageclassExample output
NAME TYPE gp3 (default) kubernetes.io/aws-ebs1 standard kubernetes.io/aws-ebs- 1
(default)indicates the default storage class.
Make the desired storage class the default.
For the desired storage class, set the
storageclass.kubernetes.io/is-default-classannotation totrueby running the following command:$ oc patch storageclass standard -p '{"metadata": {"annotations": {"storageclass.kubernetes.io/is-default-class": "true"}}}'NoteYou can have multiple default storage classes for a short time. However, you should ensure that only one default storage class exists eventually.
With multiple default storage classes present, any persistent volume claim (PVC) requesting the default storage class (
pvc.spec.storageClassName=nil) gets the most recently created default storage class, regardless of the default status of that storage class, and the administrator receives an alert in the alerts dashboard that there are multiple default storage classes,MultipleDefaultStorageClasses.Remove the default storage class setting from the old default storage class.
For the old default storage class, change the value of the
storageclass.kubernetes.io/is-default-classannotation tofalseby running the following command:$ oc patch storageclass gp3 -p '{"metadata": {"annotations": {"storageclass.kubernetes.io/is-default-class": "false"}}}'Verify the changes:
$ oc get storageclassExample output
NAME TYPE gp3 kubernetes.io/aws-ebs standard (default) kubernetes.io/aws-ebs
6.7. CSI automatic migration
In-tree storage drivers that are traditionally shipped with OpenShift Container Platform are being deprecated and replaced by their equivalent Container Storage Interface (CSI) drivers. OpenShift Container Platform provides automatic migration for in-tree volume plugins to their equivalent CSI drivers.
6.7.1. Overview of CSI automatic migration
This feature automatically migrates volumes that were provisioned using in-tree storage plugins to their counterpart Container Storage Interface (CSI) drivers.
This process does not perform any data migration; OpenShift Container Platform only translates the persistent volume object in memory. As a result, the translated persistent volume object is not stored on disk, nor is its contents changed. CSI automatic migration should be seamless. This feature does not change how you use all existing API objects: for example, PersistentVolumes, PersistentVolumeClaims, and StorageClasses.
The following in-tree to CSI drivers are automatically migrated:
- Azure Disk
- OpenStack Cinder
- Amazon Web Services (AWS) Elastic Block Storage (EBS)
- Google Compute Engine Persistent Disk (GCP PD)
- Azure File
- VMware vSphere (see information below for specific migration behavior for vSphere)
CSI migration for these volume types is considered generally available (GA), and requires no manual intervention.
CSI automatic migration of in-tree persistent volumes (PVs) or persistent volume claims (PVCs) does not enable any new CSI driver features, such as snapshots or expansion, if the original in-tree storage plugin did not support it.
6.7.2. Storage class implications
For new OpenShift Container Platform 4.13, and later, installations, the default storage class is the CSI storage class. All volumes provisioned using this storage class are CSI persistent volumes (PVs).
For clusters upgraded from 4.12, and earlier, to 4.13, and later, the CSI storage class is created, and is set as the default if no default storage class was set prior to the upgrade. In the very unlikely case that there is a storage class with the same name, the existing storage class remains unchanged. Any existing in-tree storage classes remain, and might be necessary for certain features, such as volume expansion to work for existing in-tree PVs. While storage class referencing to the in-tree storage plugin will continue working, we recommend that you switch the default storage class to the CSI storage class.
To change the default storage class, see Changing the default storage class.
6.7.3. vSphere CSI automatic migration
6.7.3.1. New installations of OpenShift Container Platform
For new installations of OpenShift Container Platform 4.13, or later, automatic migration is enabled by default.
6.7.3.2. Updating from OpenShift Container Platform 4.13 to 4.14
If you are using vSphere in-tree persistent volumes (PVs) and want to update from OpenShift Container Platform 4.13 to 4.14, update vSphere vCenter and ESXI host to 7.0 Update 3L or 8.0 Update 2, otherwise the OpenShift Container Platform update is blocked. After updating vSphere, your OpenShift Container Platform update can occur and automatic migration is enabled by default.
Alternatively, if you do not want to update vSphere, you can proceed with an OpenShift Container Platform update by performing an administrator acknowledgment:
oc -n openshift-config patch cm admin-acks --patch '{"data":{"ack-4.13-kube-127-vsphere-migration-in-4.14":"true"}}' --type=mergeIf you do not update to vSphere 7.0 Update 3L or 8.0 Update 2 and use an administrator acknowledgment to update to OpenShift Container Platform 4.14, known issues can occur due to CSI migration being enabled by default in OpenShift Container Platform 4.14. Before proceeding with the administrator acknowledgement, carefully read this knowledge base article.
6.7.3.3. Updating from OpenShift Container Platform 4.12 to 4.14
If you are using vSphere in-tree persistent volumes (PVs) and want to update from OpenShift Container Platform 4.12 to 4.14, update vSphere vCenter and ESXI host to 7.0 Update 3L or 8.0 Update 2, otherwise the OpenShift Container Platform update is blocked. After updating vSphere, your OpenShift Container Platform update can occur and automatic migration is enabled by default.
Alternatively, if you do not want to update vSphere, you can proceed with an OpenShift Container Platform update by performing an administrator acknowledgment by running both of the following commands:
oc -n openshift-config patch cm admin-acks --patch '{"data":{"ack-4.12-kube-126-vsphere-migration-in-4.14":"true"}}' --type=mergeoc -n openshift-config patch cm admin-acks --patch '{"data":{"ack-4.13-kube-127-vsphere-migration-in-4.14":"true"}}' --type=mergeIf you do not update to vSphere 7.0 Update 3L or 8.0 Update 2 and use an administrator acknowledgment to update to OpenShift Container Platform 4.14, known issues can occur due to CSI migration being enabled by default in OpenShift Container Platform 4.14. Before proceeding with the administrator acknowledgement, carefully read this knowledge base article.
Updating from OpenShift Container Platform 4.12 to 4.14 is an Extended Update Support (EUS)-to-EUS update. To understand the ramifications for this type of update and how to perform it, see the Control Plane Only update link in the Additional resources section below.
6.8. AliCloud Disk CSI Driver Operator
6.8.1. Overview
OpenShift Container Platform is capable of provisioning persistent volumes (PVs) using the Container Storage Interface (CSI) driver for Alibaba AliCloud Disk Storage.
Familiarity with persistent storage and configuring CSI volumes is recommended when working with a CSI Operator and driver.
To create CSI-provisioned PVs that mount to AliCloud Disk storage assets, OpenShift Container Platform installs the AliCloud Disk CSI Driver Operator and the AliCloud Disk CSI driver, by default, in the openshift-cluster-csi-drivers namespace.
-
The AliCloud Disk CSI Driver Operator provides a storage class (
alicloud-disk) that you can use to create persistent volume claims (PVCs). The AliCloud Disk CSI Driver Operator supports dynamic volume provisioning by allowing storage volumes to be created on demand, eliminating the need for cluster administrators to pre-provision storage. You can disable this default storage class if desired (see Managing the default storage class). - The AliCloud Disk CSI driver enables you to create and mount AliCloud Disk PVs.
6.8.2. About CSI
Storage vendors have traditionally provided storage drivers as part of Kubernetes. With the implementation of the Container Storage Interface (CSI), third-party providers can instead deliver storage plugins using a standard interface without ever having to change the core Kubernetes code.
CSI Operators give OpenShift Container Platform users storage options, such as volume snapshots, that are not possible with in-tree volume plugins.
Additional resources
6.9. AWS Elastic Block Store CSI Driver Operator
6.9.1. Overview
OpenShift Container Platform is capable of provisioning persistent volumes (PVs) using the AWS EBS CSI driver.
Familiarity with persistent storage and configuring CSI volumes is recommended when working with a Container Storage Interface (CSI) Operator and driver.
To create CSI-provisioned PVs that mount to AWS EBS storage assets, OpenShift Container Platform installs the AWS EBS CSI Driver Operator (a Red Hat operator) and the AWS EBS CSI driver by default in the openshift-cluster-csi-drivers namespace.
- The AWS EBS CSI Driver Operator provides a StorageClass by default that you can use to create PVCs. You can disable this default storage class if desired (see Managing the default storage class). You also have the option to create the AWS EBS StorageClass as described in Persistent storage using Amazon Elastic Block Store.
- The AWS EBS CSI driver enables you to create and mount AWS EBS PVs.
If you installed the AWS EBS CSI Operator and driver on an OpenShift Container Platform 4.5 cluster, you must uninstall the 4.5 Operator and driver before you update to OpenShift Container Platform 4.14.
6.9.2. About CSI
Storage vendors have traditionally provided storage drivers as part of Kubernetes. With the implementation of the Container Storage Interface (CSI), third-party providers can instead deliver storage plugins using a standard interface without ever having to change the core Kubernetes code.
CSI Operators give OpenShift Container Platform users storage options, such as volume snapshots, that are not possible with in-tree volume plugins.
OpenShift Container Platform defaults to using the CSI plugin to provision Amazon Elastic Block Store (Amazon EBS) storage.
For information about dynamically provisioning AWS EBS persistent volumes in OpenShift Container Platform, see Persistent storage using Amazon Elastic Block Store.
6.9.3. User-managed encryption
The user-managed encryption feature allows you to provide keys during installation that encrypt OpenShift Container Platform node root volumes, and enables all managed storage classes to use these keys to encrypt provisioned storage volumes. You must specify the custom key in the platform.<cloud_type>.defaultMachinePlatform field in the install-config YAML file.
This features supports the following storage types:
- Amazon Web Services (AWS) Elastic Block storage (EBS)
- Microsoft Azure Disk storage
- Google Cloud Platform (GCP) persistent disk (PD) storage
If there is no encrypted key defined in the storage class, only set encrypted: "true" in the storage class. The AWS EBS CSI driver uses the AWS managed alias/aws/ebs, which is created by Amazon EBS automatically in each region by default to encrypt provisioned storage volumes. In addition, the managed storage classes all have the encrypted: "true" setting.
For information about installing with user-managed encryption for Amazon EBS, see Installation configuration parameters.
6.10. AWS Elastic File Service CSI Driver Operator
6.10.1. Overview
OpenShift Container Platform is capable of provisioning persistent volumes (PVs) using the Container Storage Interface (CSI) driver for AWS Elastic File Service (EFS).
Familiarity with persistent storage and configuring CSI volumes is recommended when working with a CSI Operator and driver.
After installing the AWS EFS CSI Driver Operator, OpenShift Container Platform installs the AWS EFS CSI Operator and the AWS EFS CSI driver by default in the openshift-cluster-csi-drivers namespace. This allows the AWS EFS CSI Driver Operator to create CSI-provisioned PVs that mount to AWS EFS assets.
-
The AWS EFS CSI Driver Operator, after being installed, does not create a storage class by default to use to create persistent volume claims (PVCs). However, you can manually create the AWS EFS
StorageClass. The AWS EFS CSI Driver Operator supports dynamic volume provisioning by allowing storage volumes to be created on-demand. This eliminates the need for cluster administrators to pre-provision storage. - The AWS EFS CSI driver enables you to create and mount AWS EFS PVs.
AWS EFS only supports regional volumes, not zonal volumes.
6.10.2. About CSI
Storage vendors have traditionally provided storage drivers as part of Kubernetes. With the implementation of the Container Storage Interface (CSI), third-party providers can instead deliver storage plugins using a standard interface without ever having to change the core Kubernetes code.
CSI Operators give OpenShift Container Platform users storage options, such as volume snapshots, that are not possible with in-tree volume plugins.
6.10.3. Setting up the AWS EFS CSI Driver Operator
- If you are using AWS EFS with AWS Secure Token Service (STS), obtain a role Amazon Resource Name (ARN) for STS. This is required for installing the AWS EFS CSI Driver Operator.
- Install the AWS EFS CSI Driver Operator.
- Install the AWS EFS CSI Driver.
6.10.3.1. Obtaining a role Amazon Resource Name for Security Token Service
This procedure explains how to obtain a role Amazon Resource Name (ARN) to configure the AWS EFS CSI Driver Operator with OpenShift Container Platform on AWS Security Token Service (STS).
Perform this procedure before you install the AWS EFS CSI Driver Operator (see Installing the AWS EFS CSI Driver Operator procedure).
Prerequisites
- Access to the cluster as a user with the cluster-admin role.
- AWS account credentials
Procedure
You can obtain the ARN role in multiple ways. The following procedure shows one method that uses the same concept and CCO utility (ccoctl) binary tool as cluster installation.
To obtain a role ARN for configuring AWS EFS CSI Driver Operator using STS:
-
Extract the
ccoctlfrom the OpenShift Container Platform release image, which you used to install the cluster with STS. For more information, see "Configuring the Cloud Credential Operator utility". Create and save an EFS
CredentialsRequestYAML file, such as shown in the following example, and then place it in thecredrequestsdirectory:Example
apiVersion: cloudcredential.openshift.io/v1 kind: CredentialsRequest metadata: name: openshift-aws-efs-csi-driver namespace: openshift-cloud-credential-operator spec: providerSpec: apiVersion: cloudcredential.openshift.io/v1 kind: AWSProviderSpec statementEntries: - action: - elasticfilesystem:* effect: Allow resource: '*' secretRef: name: aws-efs-cloud-credentials namespace: openshift-cluster-csi-drivers serviceAccountNames: - aws-efs-csi-driver-operator - aws-efs-csi-driver-controller-saRun the
ccoctltool to generate a new IAM role in AWS, and create a YAML file for it in the local file system (<path_to_ccoctl_output_dir>/manifests/openshift-cluster-csi-drivers-aws-efs-cloud-credentials-credentials.yaml).$ ccoctl aws create-iam-roles --name=<name> --region=<aws_region> --credentials-requests-dir=<path_to_directory_with_list_of_credentials_requests>/credrequests --identity-provider-arn=arn:aws:iam::<aws_account_id>:oidc-provider/<name>-oidc.s3.<aws_region>.amazonaws.com-
name=<name>is the name used to tag any cloud resources that are created for tracking. -
region=<aws_region>is the AWS region where cloud resources are created. -
dir=<path_to_directory_with_list_of_credentials_requests>/credrequestsis the directory containing the EFS CredentialsRequest file in previous step. <aws_account_id>is the AWS account ID.Example
$ ccoctl aws create-iam-roles --name my-aws-efs --credentials-requests-dir credrequests --identity-provider-arn arn:aws:iam::123456789012:oidc-provider/my-aws-efs-oidc.s3.us-east-2.amazonaws.comExample output
2022/03/21 06:24:44 Role arn:aws:iam::123456789012:role/my-aws-efs -openshift-cluster-csi-drivers-aws-efs-cloud- created 2022/03/21 06:24:44 Saved credentials configuration to: /manifests/openshift-cluster-csi-drivers-aws-efs-cloud-credentials-credentials.yaml 2022/03/21 06:24:45 Updated Role policy for Role my-aws-efs-openshift-cluster-csi-drivers-aws-efs-cloud-
-
Copy the role ARN from the first line of the Example output in the preceding step. The role ARN is between "Role" and "created". In this example, the role ARN is "arn:aws:iam::123456789012:role/my-aws-efs -openshift-cluster-csi-drivers-aws-efs-cloud".
You will need the role ARN when you install the AWS EFS CSI Driver Operator.
Next steps
6.10.3.2. Installing the AWS EFS CSI Driver Operator
The AWS EFS CSI Driver Operator (a Red Hat operator) is not installed in OpenShift Container Platform by default. Use the following procedure to install and configure the AWS EFS CSI Driver Operator in your cluster.
Prerequisites
- Access to the OpenShift Container Platform web console.
Procedure
To install the AWS EFS CSI Driver Operator from the web console:
- Log in to the web console.
Install the AWS EFS CSI Operator:
- Click Operators → OperatorHub.
- Locate the AWS EFS CSI Operator by typing AWS EFS CSI in the filter box.
Click the AWS EFS CSI Driver Operator button.
ImportantBe sure to select the AWS EFS CSI Driver Operator and not the AWS EFS Operator. The AWS EFS Operator is a community Operator and is not supported by Red Hat.
- On the AWS EFS CSI Driver Operator page, click Install.
On the Install Operator page, ensure that:
- If you are using AWS EFS with AWS Secure Token Service (STS), in the role ARN field, enter the ARN role copied from the last step of the Obtaining a role Amazon Resource Name for Security Token Service procedure.
- All namespaces on the cluster (default) is selected.
- Installed Namespace is set to openshift-cluster-csi-drivers.
Click Install.
After the installation finishes, the AWS EFS CSI Operator is listed in the Installed Operators section of the web console.
Next steps
6.10.3.3. Installing the AWS EFS CSI Driver
Prerequisites
- Access to the OpenShift Container Platform web console.
Procedure
- Click Administration → CustomResourceDefinitions → ClusterCSIDriver.
- On the Instances tab, click Create ClusterCSIDriver.
Use the following YAML file:
apiVersion: operator.openshift.io/v1 kind: ClusterCSIDriver metadata: name: efs.csi.aws.com spec: managementState: Managed- Click Create.
Wait for the following Conditions to change to a "True" status:
- AWSEFSDriverNodeServiceControllerAvailable
- AWSEFSDriverControllerServiceControllerAvailable
6.10.4. Creating the AWS EFS storage class
Storage classes are used to differentiate and delineate storage levels and usages. By defining a storage class, users can obtain dynamically provisioned persistent volumes.
The AWS EFS CSI Driver Operator (a Red Hat operator), after being installed, does not create a storage class by default. However, you can manually create the AWS EFS storage class.
6.10.4.1. Creating the AWS EFS storage class using the console
Procedure
- In the OpenShift Container Platform console, click Storage → StorageClasses.
- On the StorageClasses page, click Create StorageClass.
On the StorageClass page, perform the following steps:
- Enter a name to reference the storage class.
- Optional: Enter the description.
- Select the reclaim policy.
-
Select
efs.csi.aws.comfrom the Provisioner drop-down list. - Optional: Set the configuration parameters for the selected provisioner.
- Click Create.
6.10.4.2. Creating the AWS EFS storage class using the CLI
Procedure
Create a
StorageClassobject:kind: StorageClass apiVersion: storage.k8s.io/v1 metadata: name: efs-sc provisioner: efs.csi.aws.com parameters: provisioningMode: efs-ap1 fileSystemId: fs-a53249112 directoryPerms: "700"3 gidRangeStart: "1000"4 gidRangeEnd: "2000"5 basePath: "/dynamic_provisioning"6 - 1
provisioningModemust beefs-apto enable dynamic provisioning.- 2
fileSystemIdmust be the ID of the EFS volume created manually.- 3
directoryPermsis the default permission of the root directory of the volume. In this example, the volume is accessible only by the owner.- 4 5
gidRangeStartandgidRangeEndset the range of POSIX Group IDs (GIDs) that are used to set the GID of the AWS access point. If not specified, the default range is 50000-7000000. Each provisioned volume, and thus AWS access point, is assigned a unique GID from this range.- 6
basePathis the directory on the EFS volume that is used to create dynamically provisioned volumes. In this case, a PV is provisioned as “/dynamic_provisioning/<random uuid>” on the EFS volume. Only the subdirectory is mounted to pods that use the PV.
NoteA cluster admin can create several
StorageClassobjects, each using a different EFS volume.
6.10.5. AWS EFS CSI cross account support
Cross account support allows you to have an OpenShift Container Platform cluster in one AWS account and mount your file system in another AWS account using the AWS Elastic File System (EFS) Container Storage Interface (CSI) driver.
Prerequisites
- Access to an OpenShift Container Platform cluster with administrator rights
- Two valid AWS accounts
- The EFS CSI Operator has been installed. For information about installing the EFS CSI Operator, see the Installing the AWS EFS CSI Driver Operator section.
- Both the OpenShift Container Platform cluster and EFS file system must be located in the same AWS region.
- Ensure that the two virtual private clouds (VPCs) used in the following procedure use different network Classless Inter-Domain Routing (CIDR) ranges.
-
Access to OpenShift Container Platform CLI (
oc). - Access to AWS CLI.
-
Access to
jqcommand-line JSON processor.
Procedure
The following procedure explains how to set up:
- OpenShift Container Platform AWS Account A: Contains a Red Hat OpenShift Container Platform cluster v4.16, or later, deployed within a VPC
- AWS Account B: Contains a VPC (including subnets, route tables, and network connectivity). The EFS filesystem will be created in this VPC.
To use AWS EFS across accounts:
Set up the environment:
Configure environment variables by running the following commands:
export CLUSTER_NAME="<CLUSTER_NAME>"1 export AWS_REGION="<AWS_REGION>"2 export AWS_ACCOUNT_A_ID="<ACCOUNT_A_ID>"3 export AWS_ACCOUNT_B_ID="<ACCOUNT_B_ID>"4 export AWS_ACCOUNT_A_VPC_CIDR="<VPC_A_CIDR>"5 export AWS_ACCOUNT_B_VPC_CIDR="<VPC_B_CIDR>"6 export AWS_ACCOUNT_A_VPC_ID="<VPC_A_ID>"7 export AWS_ACCOUNT_B_VPC_ID="<VPC_B_ID>"8 export SCRATCH_DIR="<WORKING_DIRECTORY>"9 export CSI_DRIVER_NAMESPACE="openshift-cluster-csi-drivers"10 export AWS_PAGER=""11 - 1
- Cluster name of choice.
- 2
- AWS region of choice.
- 3
- AWS Account A ID.
- 4
- AWS Account B ID.
- 5
- CIDR range of VPC in Account A.
- 6
- CIDR range of VPC in Account B.
- 7
- VPC ID in Account A (cluster)
- 8
- VPC ID in Account B (EFS cross account)
- 9
- Any writeable directory of choice to use to store temporary files.
- 10
- If your driver is installed in a non-default namespace, change this value.
- 11
- Makes AWS CLI output everything directly to stdout.
Create the working directory by running the following command:
mkdir -p $SCRATCH_DIRVerify cluster connectivity by running the following command in the OpenShift Container Platform CLI:
$ oc whoamiDetermine the OpenShift Container Platform cluster type and set node selector:
The EFS cross account feature requires assigning AWS IAM policies to nodes running EFS CSI controller pods. However, this is not consistent for every OpenShift Container Platform type.
If your cluster is deployed as a Hosted Control Plane (HyperShift), set the
NODE_SELECTORenvironment variable to hold the worker node label by running the following command:export NODE_SELECTOR=node-role.kubernetes.io/workerFor all other OpenShift Container Platform types, set the
NODE_SELECTORenvironment variable to hold the master node label by running the following command:export NODE_SELECTOR=node-role.kubernetes.io/master
Configure AWS CLI profiles as environment variables for account switching by running the following commands:
export AWS_ACCOUNT_A="<ACCOUNT_A_NAME>" export AWS_ACCOUNT_B="<ACCOUNT_B_NAME>"Ensure that your AWS CLI is configured with JSON output format as the default for both accounts by running the following commands:
export AWS_DEFAULT_PROFILE=${AWS_ACCOUNT_A} aws configure get output export AWS_DEFAULT_PROFILE=${AWS_ACCOUNT_B} aws configure get outputIf the preceding commands return:
- No value: The default output format is already set to JSON and no changes are required.
- Any value: Reconfigure your AWS CLI to use JSON format. For information about changing output formats, see Setting the output format in the AWS CLI in the AWS documentation.
Unset
AWS_PROFILEin your shell to prevent conflicts withAWS_DEFAULT_PROFILEby running the following command:unset AWS_PROFILE
Configure the AWS Account B IAM roles and policies:
Switch to your Account B profile by running the following command:
export AWS_DEFAULT_PROFILE=${AWS_ACCOUNT_B}Define the IAM role name for the EFS CSI Driver Operator by running the following command:
export ACCOUNT_B_ROLE_NAME=${CLUSTER_NAME}-cross-account-aws-efs-csi-operatorCreate the IAM trust policy file by running the following command:
cat <<EOF > $SCRATCH_DIR/AssumeRolePolicyInAccountB.json { "Version": "2012-10-17", "Statement": [ { "Effect": "Allow", "Principal": { "AWS": "arn:aws:iam::${AWS_ACCOUNT_A_ID}:root" }, "Action": "sts:AssumeRole", "Condition": {} } ] } EOFCreate the IAM role for the EFS CSI Driver Operator by running the following command:
ACCOUNT_B_ROLE_ARN=$(aws iam create-role \ --role-name "${ACCOUNT_B_ROLE_NAME}" \ --assume-role-policy-document file://$SCRATCH_DIR/AssumeRolePolicyInAccountB.json \ --query "Role.Arn" --output text) \ && echo $ACCOUNT_B_ROLE_ARNCreate the IAM policy file by running the following command:
cat << EOF > $SCRATCH_DIR/EfsPolicyInAccountB.json { "Version": "2012-10-17", "Statement": [ { "Sid": "VisualEditor0", "Effect": "Allow", "Action": [ "ec2:DescribeNetworkInterfaces", "ec2:DescribeSubnets" ], "Resource": "*" }, { "Sid": "VisualEditor1", "Effect": "Allow", "Action": [ "elasticfilesystem:DescribeMountTargets", "elasticfilesystem:DeleteAccessPoint", "elasticfilesystem:ClientMount", "elasticfilesystem:DescribeAccessPoints", "elasticfilesystem:ClientWrite", "elasticfilesystem:ClientRootAccess", "elasticfilesystem:DescribeFileSystems", "elasticfilesystem:CreateAccessPoint", "elasticfilesystem:TagResource" ], "Resource": "*" } ] } EOFCreate the IAM policy by running the following command:
ACCOUNT_B_POLICY_ARN=$(aws iam create-policy --policy-name "${CLUSTER_NAME}-efs-csi-policy" \ --policy-document file://$SCRATCH_DIR/EfsPolicyInAccountB.json \ --query 'Policy.Arn' --output text) \ && echo ${ACCOUNT_B_POLICY_ARN}Attach the policy to the role by running the following command:
aws iam attach-role-policy \ --role-name "${ACCOUNT_B_ROLE_NAME}" \ --policy-arn "${ACCOUNT_B_POLICY_ARN}"
Configure the AWS Account A IAM roles and policies:
Switch to your Account A profile by running the following command:
export AWS_DEFAULT_PROFILE=${AWS_ACCOUNT_A}Create the IAM policy document by running the following command:
cat << EOF > $SCRATCH_DIR/AssumeRoleInlinePolicyPolicyInAccountA.json { "Version": "2012-10-17", "Statement": [ { "Effect": "Allow", "Action": "sts:AssumeRole", "Resource": "${ACCOUNT_B_ROLE_ARN}" } ] } EOFIn AWS Account A, attach the AWS-managed policy "AmazonElasticFileSystemClientFullAccess" to the OpenShift Container Platform cluster master role by running the following command:
EFS_CLIENT_FULL_ACCESS_BUILTIN_POLICY_ARN=arn:aws:iam::aws:policy/AmazonElasticFileSystemClientFullAccess declare -A ROLE_SEEN for NODE in $(oc get nodes --selector="${NODE_SELECTOR}" -o jsonpath='{.items[*].metadata.name}'); do INSTANCE_PROFILE=$(aws ec2 describe-instances \ --filters "Name=private-dns-name,Values=${NODE}" \ --query 'Reservations[].Instances[].IamInstanceProfile.Arn' \ --output text | awk -F'/' '{print $NF}' | xargs) MASTER_ROLE_ARN=$(aws iam get-instance-profile \ --instance-profile-name "${INSTANCE_PROFILE}" \ --query 'InstanceProfile.Roles[0].Arn' \ --output text | xargs) MASTER_ROLE_NAME=$(echo "${MASTER_ROLE_ARN}" | awk -F'/' '{print $NF}' | xargs) echo "Checking role: '${MASTER_ROLE_NAME}'" if [[ -n "${ROLE_SEEN[$MASTER_ROLE_NAME]:-}" ]]; then echo "Already processed role: '${MASTER_ROLE_NAME}', skipping." continue fi ROLE_SEEN["$MASTER_ROLE_NAME"]=1 echo "Assigning policy ${EFS_CLIENT_FULL_ACCESS_BUILTIN_POLICY_ARN} to role ${MASTER_ROLE_NAME}" aws iam attach-role-policy --role-name "${MASTER_ROLE_NAME}" --policy-arn "${EEFS_CLIENT_FULL_ACCESS_BUILTIN_POLICY_ARN}" done
Attach the policy to the IAM entity to allow role assumption:
This step depends on your cluster configuration. In both of the following scenarios, the EFS CSI Driver Operator uses an entity to authenticate to AWS, and this entity must be granted permission to assume roles in Account B.
If your cluster:
- Does not have STS enabled: The EFS CSI Driver Operator uses an IAM User entity for AWS authentication. Continue with the step "Attach policy to IAM User to allow role assumption".
- Has STS enabled: The EFS CSI Driver Operator uses an IAM role entity for AWS authentication. Continue with the step "Attach policy to IAM Role to allow role assumption".
Attach policy to IAM User to allow role assumption
Identify the IAM User used by the EFS CSI Driver Operator by running the following command:
EFS_CSI_DRIVER_OPERATOR_USER=$(oc -n openshift-cloud-credential-operator get credentialsrequest/openshift-aws-efs-csi-driver -o json | jq -r '.status.providerStatus.user')Attach the policy to the IAM user by running the following command:
aws iam put-user-policy \ --user-name "${EFS_CSI_DRIVER_OPERATOR_USER}" \ --policy-name efs-cross-account-inline-policy \ --policy-document file://$SCRATCH_DIR/AssumeRoleInlinePolicyPolicyInAccountA.json
Attach the policy to the IAM role to allow role assumption:
Identify the IAM role name currently used by the EFS CSI Driver Operator by running the following command:
EFS_CSI_DRIVER_OPERATOR_ROLE=$(oc -n ${CSI_DRIVER_NAMESPACE} get secret/aws-efs-cloud-credentials -o jsonpath='{.data.credentials}' | base64 -d | grep role_arn | cut -d'/' -f2) && echo ${EFS_CSI_DRIVER_OPERATOR_ROLE}Attach the policy to the IAM role used by the EFS CSI Driver Operator by running the following command:
aws iam put-role-policy \ --role-name "${EFS_CSI_DRIVER_OPERATOR_ROLE}" \ --policy-name efs-cross-account-inline-policy \ --policy-document file://$SCRATCH_DIR/AssumeRoleInlinePolicyPolicyInAccountA.json
Configure VPC peering:
Initiate a peering request from Account A to Account B by running the following command:
export AWS_DEFAULT_PROFILE=${AWS_ACCOUNT_A} PEER_REQUEST_ID=$(aws ec2 create-vpc-peering-connection --vpc-id "${AWS_ACCOUNT_A_VPC_ID}" --peer-vpc-id "${AWS_ACCOUNT_B_VPC_ID}" --peer-owner-id "${AWS_ACCOUNT_B_ID}" --query VpcPeeringConnection.VpcPeeringConnectionId --output text)Accept the peering request from Account B by running the following command:
export AWS_DEFAULT_PROFILE=${AWS_ACCOUNT_B} aws ec2 accept-vpc-peering-connection --vpc-peering-connection-id "${PEER_REQUEST_ID}"Retrieve the route table IDs for Account A and add routes to the Account B VPC by running the following command:
export AWS_DEFAULT_PROFILE=${AWS_ACCOUNT_A} for NODE in $(oc get nodes --selector=node-role.kubernetes.io/worker | tail -n +2 | awk '{print $1}') do SUBNET=$(aws ec2 describe-instances --filters "Name=private-dns-name,Values=$NODE" --query 'Reservations[*].Instances[*].NetworkInterfaces[*].SubnetId' | jq -r '.[0][0][0]') echo SUBNET is ${SUBNET} ROUTE_TABLE_ID=$(aws ec2 describe-route-tables --filters "Name=association.subnet-id,Values=${SUBNET}" --query 'RouteTables[*].RouteTableId' | jq -r '.[0]') echo Route table ID is $ROUTE_TABLE_ID aws ec2 create-route --route-table-id ${ROUTE_TABLE_ID} --destination-cidr-block ${AWS_ACCOUNT_B_VPC_CIDR} --vpc-peering-connection-id ${PEER_REQUEST_ID} doneRetrieve the route table IDs for Account B and add routes to the Account A VPC by running the following command:
export AWS_DEFAULT_PROFILE=${AWS_ACCOUNT_B} for ROUTE_TABLE_ID in $(aws ec2 describe-route-tables --filters "Name=vpc-id,Values=${AWS_ACCOUNT_B_VPC_ID}" --query "RouteTables[].RouteTableId" | jq -r '.[]') do echo Route table ID is $ROUTE_TABLE_ID aws ec2 create-route --route-table-id ${ROUTE_TABLE_ID} --destination-cidr-block ${AWS_ACCOUNT_A_VPC_CIDR} --vpc-peering-connection-id ${PEER_REQUEST_ID} done
Configure security groups in Account B to allow NFS traffic from Account A to EFS:
Switch to your Account B profile by running the following command:
export AWS_DEFAULT_PROFILE=${AWS_ACCOUNT_B}Configure the VPC security groups for EFS access by running the following command:
SECURITY_GROUP_ID=$(aws ec2 describe-security-groups --filters Name=vpc-id,Values="${AWS_ACCOUNT_B_VPC_ID}" | jq -r '.SecurityGroups[].GroupId') aws ec2 authorize-security-group-ingress \ --group-id "${SECURITY_GROUP_ID}" \ --protocol tcp \ --port 2049 \ --cidr "${AWS_ACCOUNT_A_VPC_CIDR}" | jq .
Create a region-wide EFS filesystem in Account B:
Switch to your Account B profile by running the following command:
export AWS_DEFAULT_PROFILE=${AWS_ACCOUNT_B}Create a region-wide EFS file system by running the following command:
CROSS_ACCOUNT_FS_ID=$(aws efs create-file-system --creation-token efs-token-1 \ --region ${AWS_REGION} \ --encrypted | jq -r '.FileSystemId') \ && echo $CROSS_ACCOUNT_FS_IDConfigure region-wide mount targets for EFS by running the following command:
for SUBNET in $(aws ec2 describe-subnets \ --filters "Name=vpc-id,Values=${AWS_ACCOUNT_B_VPC_ID}" \ --region ${AWS_REGION} \ | jq -r '.Subnets.[].SubnetId'); do \ MOUNT_TARGET=$(aws efs create-mount-target --file-system-id ${CROSS_ACCOUNT_FS_ID} \ --subnet-id ${SUBNET} \ --region ${AWS_REGION} \ | jq -r '.MountTargetId'); \ echo ${MOUNT_TARGET}; \ doneThis creates a mount point in each subnet of your VPC.
Configure the EFS Operator for cross-account access:
Define custom names for the secret and storage class that you will create in subsequent steps by running the following command:
export SECRET_NAME=my-efs-cross-account export STORAGE_CLASS_NAME=efs-sc-crossCreate a secret that references the role ARN in Account B by running the following command in the OpenShift Container Platform CLI:
oc create secret generic ${SECRET_NAME} -n ${CSI_DRIVER_NAMESPACE} --from-literal=awsRoleArn="${ACCOUNT_B_ROLE_ARN}"Grant the CSI driver controller access to the newly created secret by running the following commands in the OpenShift Container Platform CLI:
oc -n ${CSI_DRIVER_NAMESPACE} create role access-secrets --verb=get,list,watch --resource=secrets oc -n ${CSI_DRIVER_NAMESPACE} create rolebinding --role=access-secrets default-to-secrets --serviceaccount=${CSI_DRIVER_NAMESPACE}:aws-efs-csi-driver-controller-saCreate a new storage class that references the EFS ID from Account B and the secret created previously by running the following command in the OpenShift Container Platform CLI:
cat << EOF | oc apply -f - kind: StorageClass apiVersion: storage.k8s.io/v1 metadata: name: ${STORAGE_CLASS_NAME} provisioner: efs.csi.aws.com parameters: provisioningMode: efs-ap fileSystemId: ${CROSS_ACCOUNT_FS_ID} directoryPerms: "700" gidRangeStart: "1000" gidRangeEnd: "2000" basePath: "/dynamic_provisioning" csi.storage.k8s.io/provisioner-secret-name: ${SECRET_NAME} csi.storage.k8s.io/provisioner-secret-namespace: ${CSI_DRIVER_NAMESPACE} EOF
6.10.6. Dynamic provisioning for Amazon Elastic File Storage
The AWS EFS CSI driver supports a different form of dynamic provisioning than other CSI drivers. It provisions new PVs as subdirectories of a pre-existing EFS volume. The PVs are independent of each other. However, they all share the same EFS volume. When the volume is deleted, all PVs provisioned out of it are deleted too. The EFS CSI driver creates an AWS Access Point for each such subdirectory. Due to AWS AccessPoint limits, you can only dynamically provision 1000 PVs from a single StorageClass/EFS volume.
Note that PVC.spec.resources is not enforced by EFS.
In the example below, you request 5 GiB of space. However, the created PV is limitless and can store any amount of data (like petabytes). A broken application, or even a rogue application, can cause significant expenses when it stores too much data on the volume.
Using monitoring of EFS volume sizes in AWS is strongly recommended.
Prerequisites
- You have created Amazon Elastic File Storage (Amazon EFS) volumes.
- You have created the AWS EFS storage class.
Procedure
To enable dynamic provisioning:
Create a PVC (or StatefulSet or Template) as usual, referring to the
StorageClasscreated previously.apiVersion: v1 kind: PersistentVolumeClaim metadata: name: test spec: storageClassName: efs-sc accessModes: - ReadWriteMany resources: requests: storage: 5Gi
If you have problems setting up dynamic provisioning, see AWS EFS troubleshooting.
6.10.7. Creating static PVs with Amazon Elastic File Storage
It is possible to use an Amazon Elastic File Storage (Amazon EFS) volume as a single PV without any dynamic provisioning. The whole volume is mounted to pods.
Prerequisites
- You have created Amazon EFS volumes.
Procedure
Create the PV using the following YAML file:
apiVersion: v1 kind: PersistentVolume metadata: name: efs-pv spec: capacity:1 storage: 5Gi volumeMode: Filesystem accessModes: - ReadWriteMany - ReadWriteOnce persistentVolumeReclaimPolicy: Retain csi: driver: efs.csi.aws.com volumeHandle: fs-ae66151a2 volumeAttributes: encryptInTransit: "false"3 - 1
spec.capacitydoes not have any meaning and is ignored by the CSI driver. It is used only when binding to a PVC. Applications can store any amount of data to the volume.- 2
volumeHandlemust be the same ID as the EFS volume you created in AWS. If you are providing your own access point,volumeHandleshould be<EFS volume ID>::<access point ID>. For example:fs-6e633ada::fsap-081a1d293f0004630.- 3
- If desired, you can disable encryption in transit. Encryption is enabled by default.
If you have problems setting up static PVs, see AWS EFS troubleshooting.
6.10.8. Amazon Elastic File Storage security
The following information is important for Amazon Elastic File Storage (Amazon EFS) security.
When using access points, for example, by using dynamic provisioning as described earlier, Amazon automatically replaces GIDs on files with the GID of the access point. In addition, EFS considers the user ID, group ID, and secondary group IDs of the access point when evaluating file system permissions. EFS ignores the NFS client’s IDs. For more information about access points, see https://docs.aws.amazon.com/efs/latest/ug/efs-access-points.html.
As a consequence, EFS volumes silently ignore FSGroup; OpenShift Container Platform is not able to replace the GIDs of files on the volume with FSGroup. Any pod that can access a mounted EFS access point can access any file on it.
Unrelated to this, encryption in transit is enabled by default. For more information, see https://docs.aws.amazon.com/efs/latest/ug/encryption-in-transit.html.
6.10.9. Amazon Elastic File Storage troubleshooting
The following information provides guidance on how to troubleshoot issues with Amazon Elastic File Storage (Amazon EFS):
-
The AWS EFS Operator and CSI driver run in namespace
openshift-cluster-csi-drivers. To initiate gathering of logs of the AWS EFS Operator and CSI driver, run the following command:
$ oc adm must-gather [must-gather ] OUT Using must-gather plugin-in image: quay.io/openshift-release-dev/ocp-v4.0-art-dev@sha256:125f183d13601537ff15b3239df95d47f0a604da2847b561151fedd699f5e3a5 [must-gather ] OUT namespace/openshift-must-gather-xm4wq created [must-gather ] OUT clusterrolebinding.rbac.authorization.k8s.io/must-gather-2bd8x created [must-gather ] OUT pod for plug-in image quay.io/openshift-release-dev/ocp-v4.0-art-dev@sha256:125f183d13601537ff15b3239df95d47f0a604da2847b561151fedd699f5e3a5 createdTo show AWS EFS Operator errors, view the
ClusterCSIDriverstatus:$ oc get clustercsidriver efs.csi.aws.com -o yamlIf a volume cannot be mounted to a pod (as shown in the output of the following command):
$ oc describe pod ... Type Reason Age From Message ---- ------ ---- ---- ------- Normal Scheduled 2m13s default-scheduler Successfully assigned default/efs-app to ip-10-0-135-94.ec2.internal Warning FailedMount 13s kubelet MountVolume.SetUp failed for volume "pvc-d7c097e6-67ec-4fae-b968-7e7056796449" : rpc error: code = DeadlineExceeded desc = context deadline exceeded1 Warning FailedMount 10s kubelet Unable to attach or mount volumes: unmounted volumes=[persistent-storage], unattached volumes=[persistent-storage kube-api-access-9j477]: timed out waiting for the condition- 1
- Warning message indicating volume not mounted.
This error is frequently caused by AWS dropping packets between an OpenShift Container Platform node and Amazon EFS.
Check that the following are correct:
- AWS firewall and Security Groups
- Networking: port number and IP addresses
6.10.10. Uninstalling the AWS EFS CSI Driver Operator
All EFS PVs are inaccessible after uninstalling the AWS EFS CSI Driver Operator (a Red Hat operator).
Prerequisites
- Access to the OpenShift Container Platform web console.
Procedure
To uninstall the AWS EFS CSI Driver Operator from the web console:
- Log in to the web console.
- Stop all applications that use AWS EFS PVs.
Delete all AWS EFS PVs:
- Click Storage → PersistentVolumeClaims.
- Select each PVC that is in use by the AWS EFS CSI Driver Operator, click the drop-down menu on the far right of the PVC, and then click Delete PersistentVolumeClaims.
Uninstall the AWS EFS CSI driver:
NoteBefore you can uninstall the Operator, you must remove the CSI driver first.
- Click Administration → CustomResourceDefinitions → ClusterCSIDriver.
- On the Instances tab, for efs.csi.aws.com, on the far left side, click the drop-down menu, and then click Delete ClusterCSIDriver.
- When prompted, click Delete.
Uninstall the AWS EFS CSI Operator:
- Click Operators → Installed Operators.
- On the Installed Operators page, scroll or type AWS EFS CSI into the Search by name box to find the Operator, and then click it.
- On the upper, right of the Installed Operators > Operator details page, click Actions → Uninstall Operator.
When prompted on the Uninstall Operator window, click the Uninstall button to remove the Operator from the namespace. Any applications deployed by the Operator on the cluster need to be cleaned up manually.
After uninstalling, the AWS EFS CSI Driver Operator is no longer listed in the Installed Operators section of the web console.
Before you can destroy a cluster (openshift-install destroy cluster), you must delete the EFS volume in AWS. An OpenShift Container Platform cluster cannot be destroyed when there is an EFS volume that uses the cluster’s VPC. Amazon does not allow deletion of such a VPC.
6.11. Azure Disk CSI Driver Operator
6.11.1. Overview
OpenShift Container Platform is capable of provisioning persistent volumes (PVs) using the Container Storage Interface (CSI) driver for Microsoft Azure Disk Storage.
Familiarity with persistent storage and configuring CSI volumes is recommended when working with a CSI Operator and driver.
To create CSI-provisioned PVs that mount to Azure Disk storage assets, OpenShift Container Platform installs the Azure Disk CSI Driver Operator and the Azure Disk CSI driver by default in the openshift-cluster-csi-drivers namespace.
-
The Azure Disk CSI Driver Operator provides a storage class named
managed-csithat you can use to create persistent volume claims (PVCs). The Azure Disk CSI Driver Operator supports dynamic volume provisioning by allowing storage volumes to be created on-demand, eliminating the need for cluster administrators to pre-provision storage. You can disable this default storage class if desired (see Managing the default storage class). - The Azure Disk CSI driver enables you to create and mount Azure Disk PVs.
6.11.2. About CSI
Storage vendors have traditionally provided storage drivers as part of Kubernetes. With the implementation of the Container Storage Interface (CSI), third-party providers can instead deliver storage plugins using a standard interface without ever having to change the core Kubernetes code.
CSI Operators give OpenShift Container Platform users storage options, such as volume snapshots, that are not possible with in-tree volume plugins.
OpenShift Container Platform provides automatic migration for the Azure Disk in-tree volume plugin to its equivalent CSI driver. For more information, see CSI automatic migration.
6.11.3. Creating a storage class with storage account type
Storage classes are used to differentiate and delineate storage levels and usages. By defining a storage class, you can obtain dynamically provisioned persistent volumes.
When creating a storage class, you can designate the storage account type. This corresponds to your Azure storage account SKU tier. Valid options are Standard_LRS, Premium_LRS, StandardSSD_LRS, UltraSSD_LRS, Premium_ZRS, StandardSSD_ZRS, and PremiumV2_LRS. For information about finding your Azure SKU tier, see SKU Types.
Both ZRS and PremiumV2_LRS have some region limitations. For information about these limitations, see ZRS limitations and Premium_LRS limitations.
Prerequisites
- Access to an OpenShift Container Platform cluster with administrator rights
Procedure
Use the following steps to create a storage class with a storage account type.
Create a storage class designating the storage account type using a YAML file similar to the following:
$ oc create -f - << EOF apiVersion: storage.k8s.io/v1 kind: StorageClass metadata: name: <storage-class>1 provisioner: disk.csi.azure.com parameters: skuName: <storage-class-account-type>2 reclaimPolicy: Delete volumeBindingMode: WaitForFirstConsumer allowVolumeExpansion: true EOFNoteFor PremiumV2_LRS, specify
cachingMode: Noneinstorageclass.parameters.Ensure that the storage class was created by listing the storage classes:
$ oc get storageclassExample output
$ oc get storageclass NAME PROVISIONER RECLAIMPOLICY VOLUMEBINDINGMODE ALLOWVOLUMEEXPANSION AGE azurefile-csi file.csi.azure.com Delete Immediate true 68m managed-csi (default) disk.csi.azure.com Delete WaitForFirstConsumer true 68m sc-prem-zrs disk.csi.azure.com Delete WaitForFirstConsumer true 4m25s1 - 1
- New storage class with storage account type.
6.11.4. User-managed encryption
The user-managed encryption feature allows you to provide keys during installation that encrypt OpenShift Container Platform node root volumes, and enables all managed storage classes to use these keys to encrypt provisioned storage volumes. You must specify the custom key in the platform.<cloud_type>.defaultMachinePlatform field in the install-config YAML file.
This features supports the following storage types:
- Amazon Web Services (AWS) Elastic Block storage (EBS)
- Microsoft Azure Disk storage
- Google Cloud Platform (GCP) persistent disk (PD) storage
If the OS (root) disk is encrypted, and there is no encrypted key defined in the storage class, Azure Disk CSI driver uses the OS disk encryption key by default to encrypt provisioned storage volumes.
For information about installing with user-managed encryption for Azure, see Enabling user-managed encryption for Azure.
6.11.5. Machine sets that deploy machines with ultra disks using PVCs
You can create a machine set running on Azure that deploys machines with ultra disks. Ultra disks are high-performance storage that are intended for use with the most demanding data workloads.
Both the in-tree plugin and CSI driver support using PVCs to enable ultra disks. You can also deploy machines with ultra disks as data disks without creating a PVC.
6.11.5.1. Creating machines with ultra disks by using machine sets
You can deploy machines with ultra disks on Azure by editing your machine set YAML file.
Prerequisites
- Have an existing Microsoft Azure cluster.
Procedure
Copy an existing Azure
MachineSetcustom resource (CR) and edit it by running the following command:$ oc edit machineset <machine_set_name>where
<machine_set_name>is the machine set that you want to provision machines with ultra disks.Add the following lines in the positions indicated:
apiVersion: machine.openshift.io/v1beta1 kind: MachineSet spec: template: spec: metadata: labels: disk: ultrassd1 providerSpec: value: ultraSSDCapability: Enabled2 Create a machine set using the updated configuration by running the following command:
$ oc create -f <machine_set_name>.yamlCreate a storage class that contains the following YAML definition:
apiVersion: storage.k8s.io/v1 kind: StorageClass metadata: name: ultra-disk-sc1 parameters: cachingMode: None diskIopsReadWrite: "2000"2 diskMbpsReadWrite: "320"3 kind: managed skuname: UltraSSD_LRS provisioner: disk.csi.azure.com4 reclaimPolicy: Delete volumeBindingMode: WaitForFirstConsumer5 - 1
- Specify the name of the storage class. This procedure uses
ultra-disk-scfor this value. - 2
- Specify the number of IOPS for the storage class.
- 3
- Specify the throughput in MBps for the storage class.
- 4
- For Azure Kubernetes Service (AKS) version 1.21 or later, use
disk.csi.azure.com. For earlier versions of AKS, usekubernetes.io/azure-disk. - 5
- Optional: Specify this parameter to wait for the creation of the pod that will use the disk.
Create a persistent volume claim (PVC) to reference the
ultra-disk-scstorage class that contains the following YAML definition:apiVersion: v1 kind: PersistentVolumeClaim metadata: name: ultra-disk1 spec: accessModes: - ReadWriteOnce storageClassName: ultra-disk-sc2 resources: requests: storage: 4Gi3 Create a pod that contains the following YAML definition:
apiVersion: v1 kind: Pod metadata: name: nginx-ultra spec: nodeSelector: disk: ultrassd1 containers: - name: nginx-ultra image: alpine:latest command: - "sleep" - "infinity" volumeMounts: - mountPath: "/mnt/azure" name: volume volumes: - name: volume persistentVolumeClaim: claimName: ultra-disk2
Verification
Validate that the machines are created by running the following command:
$ oc get machinesThe machines should be in the
Runningstate.For a machine that is running and has a node attached, validate the partition by running the following command:
$ oc debug node/<node_name> -- chroot /host lsblkIn this command,
oc debug node/<node_name>starts a debugging shell on the node<node_name>and passes a command with--. The passed commandchroot /hostprovides access to the underlying host OS binaries, andlsblkshows the block devices that are attached to the host OS machine.
Next steps
To use an ultra disk from within a pod, create a workload that uses the mount point. Create a YAML file similar to the following example:
apiVersion: v1 kind: Pod metadata: name: ssd-benchmark1 spec: containers: - name: ssd-benchmark1 image: nginx ports: - containerPort: 80 name: "http-server" volumeMounts: - name: lun0p1 mountPath: "/tmp" volumes: - name: lun0p1 hostPath: path: /var/lib/lun0p1 type: DirectoryOrCreate nodeSelector: disktype: ultrassd
6.11.5.2. Troubleshooting resources for machine sets that enable ultra disks
Use the information in this section to understand and recover from issues you might encounter.
6.11.5.2.1. Unable to mount a persistent volume claim backed by an ultra disk
If there is an issue mounting a persistent volume claim backed by an ultra disk, the pod becomes stuck in the ContainerCreating state and an alert is triggered.
For example, if the additionalCapabilities.ultraSSDEnabled parameter is not set on the machine that backs the node that hosts the pod, the following error message appears:
StorageAccountType UltraSSD_LRS can be used only when additionalCapabilities.ultraSSDEnabled is set.To resolve this issue, describe the pod by running the following command:
$ oc -n <stuck_pod_namespace> describe pod <stuck_pod_name>
6.12. Azure File CSI Driver Operator
6.12.1. Overview
OpenShift Container Platform is capable of provisioning persistent volumes (PVs) by using the Container Storage Interface (CSI) driver for Microsoft Azure File Storage.
Familiarity with persistent storage and configuring CSI volumes is recommended when working with a CSI Operator and driver.
To create CSI-provisioned PVs that mount to Azure File storage assets, OpenShift Container Platform installs the Azure File CSI Driver Operator and the Azure File CSI driver by default in the openshift-cluster-csi-drivers namespace.
-
The Azure File CSI Driver Operator provides a storage class that is named
azurefile-csithat you can use to create persistent volume claims (PVCs). You can disable this default storage class if desired (see Managing the default storage class). - The Azure File CSI driver enables you to create and mount Azure File PVs. The Azure File CSI driver supports dynamic volume provisioning by allowing storage volumes to be created on-demand, eliminating the need for cluster administrators to pre-provision storage.
Azure File CSI Driver Operator does not support:
- Virtual hard disks (VHD)
- Running on nodes with Federal Information Processing Standard (FIPS) mode enabled for Server Message Block (SMB) file share. However, Network File System (NFS) does support FIPS mode.
For more information about supported features, see Supported CSI drivers and features.
6.12.2. NFS support
OpenShift Container Platform supports the Azure File Container Storage Interface (CSI) Driver Operator with Network File System (NFS) with the following restrictions:
- If you create a volume smaller than 100GiB, the CSI driver rounds it up to 100GiB.
Creating pods with Azure File NFS volumes that are scheduled to the control plane node causes the mount to be denied.
To work around this issue: If your control plane nodes are schedulable, and the pods can run on worker nodes, use
nodeSelectoror Affinity to schedule the pod in worker nodes.FS Group policy behavior:
ImportantAzure File CSI with NFS does not honor the fsGroupChangePolicy requested by pods. Azure File CSI with NFS applies a default OnRootMismatch FS Group policy regardless of the policy requested by the pod.
The Azure File CSI Operator does not automatically create a storage class for NFS. You must create it manually. Use a file similar to the following:
apiVersion: storage.k8s.io/v1 kind: StorageClass metadata: name: <storage-class-name>1 provisioner: file.csi.azure.com2 parameters: protocol: nfs3 skuName: Premium_LRS # available values: Premium_LRS, Premium_ZRS mountOptions: - nconnect=4
6.12.3. About CSI
Storage vendors have traditionally provided storage drivers as part of Kubernetes. With the implementation of the Container Storage Interface (CSI), third-party providers can instead deliver storage plugins using a standard interface without ever having to change the core Kubernetes code.
CSI Operators give OpenShift Container Platform users storage options, such as volume snapshots, that are not possible with in-tree volume plugins.
6.12.4. Static provisioning for Azure File
For static provisioning, cluster administrators create persistent volumes (PVs) that define the details of the real storage. Cluster users can then create persistent volume claims (PVCs) that consume these PVs.
Prerequisites
- Access to an OpenShift Container Platform cluster with administrator rights
Procedure
To use static provisioning for Azure File:
If you have not yet created a secret for the Azure storage account, create it now:
This secret must contain the Azure Storage Account name and key with the following very specific format with two key-value pairs:
-
azurestorageaccountname: <storage_account_name> azurestorageaccountkey: <account_key>To create a secret named azure-secret, run the following command:
oc create secret generic azure-secret -n <namespace_name> --type=Opaque --from-literal=azurestorageaccountname="<storage_account_name>" --from-literal=azurestorageaccountkey="<account_key>"1 2
-
Create a PV by using the following example YAML file:
Example PV YAML file
apiVersion: v1 kind: PersistentVolume metadata: annotations: pv.kubernetes.io/provisioned-by: file.csi.azure.com name: pv-azurefile spec: capacity: storage: 5Gi1 accessModes: - ReadWriteMany2 persistentVolumeReclaimPolicy: Retain3 storageClassName: <sc-name>4 mountOptions: - dir_mode=07775 - file_mode=0777 - uid=0 - gid=0 - cache=strict6 - nosharesock7 - actimeo=308 - nobrl9 csi: driver: file.csi.azure.com volumeHandle: "{resource-group-name}#{account-name}#{file-share-name}"10 volumeAttributes: shareName: EXISTING_FILE_SHARE_NAME11 nodeStageSecretRef: name: azure-secret12 namespace: <my-namespace>13 - 1
- Volume size.
- 2
- Access mode. Defines the read-write and mount permissions. For more information, under Additional resources, see Access modes.
- 3
- Reclaim policy. Tells the cluster what to do with the volume after it is released. Accepted values are
Retain,Recycle, orDelete. - 4
- Storage class name. This name is used by the PVC to bind to this specific PV. For static provisioning, a
StorageClassobject does not need to exist, but the name in the PV and PVC must match. - 5
- Modify this permission if you want to enhance the security.
- 6
- Cache mode. Accepted values are
none,strict, andloose. The default isstrict. - 7
- Use to reduce the probability of a reconnect race.
- 8
- The time (in seconds) that the CIFS client caches attributes of a file or directory before it requests attribute information from a server.
- 9
- Disables sending byte range lock requests to the server, and for applications which have challenges with POSIX locks.
- 10
- Ensure that
volumeHandleis unique across the cluster. Theresource-group-nameis the Azure resource group where the storage account resides. - 11
- File share name. Use only the file share name; do not use full path.
- 12
- Provide the name of the secret created in step 1 of this procedure. In this example, it is azure-secret.
- 13
- The namespace that the secret was created in. This must be the namespace where the PV is consumed.
Create a PVC that references the PV using the following example file:
Example PVC YAML file
apiVersion: v1 kind: PersistentVolumeClaim metadata: name: <pvc-name>1 namespace: <my-namespace>2 spec: volumeName: pv-azurefile3 storageClassName: <sc-name>4 accessModes: - ReadWriteMany5 resources: requests: storage: 5Gi6 - 1
- PVC name.
- 2
- Namespace for the PVC.
- 3
- The name of the PV that you created in the previous step.
- 4
- Storage class name. This name is used by the PVC to bind to this specific PV. For static provisioning, a
StorageClassobject does not need to exist, but the name in the PV and PVC must match. - 5
- Access mode. Defines the requested read-write access for the PVC. Claims use the same conventions as volumes when requesting storage with specific access modes. For more information, under Additional resources, see Access modes.
- 6
- PVC size.
Ensure that the PVC is created and in
Boundstatus after a while by running the following command:$ oc get pvc <pvc-name>1 - 1
- The name of your PVC.
Example output
NAME STATUS VOLUME CAPACITY ACCESS MODES STORAGECLASS AGE pvc-name Bound pv-azurefile 5Gi ReadWriteMany my-sc 7m2s
6.13. Azure Stack Hub CSI Driver Operator
6.13.1. Overview
OpenShift Container Platform is capable of provisioning persistent volumes (PVs) using the Container Storage Interface (CSI) driver for Azure Stack Hub Storage. Azure Stack Hub, which is part of the Azure Stack portfolio, allows you to run apps in an on-premise environment and deliver Azure services in your datacenter.
Familiarity with persistent storage and configuring CSI volumes is recommended when working with a CSI Operator and driver.
To create CSI-provisioned PVs that mount to Azure Stack Hub storage assets, OpenShift Container Platform installs the Azure Stack Hub CSI Driver Operator and the Azure Stack Hub CSI driver by default in the openshift-cluster-csi-drivers namespace.
-
The Azure Stack Hub CSI Driver Operator provides a storage class (
managed-csi), with "Standard_LRS" as the default storage account type, that you can use to create persistent volume claims (PVCs). The Azure Stack Hub CSI Driver Operator supports dynamic volume provisioning by allowing storage volumes to be created on-demand, eliminating the need for cluster administrators to pre-provision storage. - The Azure Stack Hub CSI driver enables you to create and mount Azure Stack Hub PVs.
6.13.2. About CSI
Storage vendors have traditionally provided storage drivers as part of Kubernetes. With the implementation of the Container Storage Interface (CSI), third-party providers can instead deliver storage plugins using a standard interface without ever having to change the core Kubernetes code.
CSI Operators give OpenShift Container Platform users storage options, such as volume snapshots, that are not possible with in-tree volume plugins.
6.14. GCP PD CSI Driver Operator
6.14.1. Overview
OpenShift Container Platform can provision persistent volumes (PVs) using the Container Storage Interface (CSI) driver for Google Cloud Platform (GCP) persistent disk (PD) storage.
Familiarity with persistent storage and configuring CSI volumes is recommended when working with a Container Storage Interface (CSI) Operator and driver.
To create CSI-provisioned persistent volumes (PVs) that mount to GCP PD storage assets, OpenShift Container Platform installs the GCP PD CSI Driver Operator and the GCP PD CSI driver by default in the openshift-cluster-csi-drivers namespace.
- GCP PD CSI Driver Operator: By default, the Operator provides a storage class that you can use to create PVCs. You can disable this default storage class if desired (see Managing the default storage class). You also have the option to create the GCP PD storage class as described in Persistent storage using GCE Persistent Disk.
- GCP PD driver: The driver enables you to create and mount GCP PD PVs.
OpenShift Container Platform provides automatic migration for the GCE Persistent Disk in-tree volume plugin to its equivalent CSI driver. For more information, see CSI automatic migration.
6.14.2. About CSI
Storage vendors have traditionally provided storage drivers as part of Kubernetes. With the implementation of the Container Storage Interface (CSI), third-party providers can instead deliver storage plugins using a standard interface without ever having to change the core Kubernetes code.
CSI Operators give OpenShift Container Platform users storage options, such as volume snapshots, that are not possible with in-tree volume plugins.
6.14.3. GCP PD CSI driver storage class parameters
The Google Cloud Platform (GCP) persistent disk (PD) Container Storage Interface (CSI) driver uses the CSI external-provisioner sidecar as a controller. This is a separate helper container that is deployed with the CSI driver. The sidecar manages persistent volumes (PVs) by triggering the CreateVolume operation.
The GCP PD CSI driver uses the csi.storage.k8s.io/fstype parameter key to support dynamic provisioning. The following table describes all the GCP PD CSI storage class parameters that are supported by OpenShift Container Platform.
| Parameter | Values | Default | Description |
|---|---|---|---|
|
|
|
| Allows you to choose between standard PVs or solid-state-drive PVs. The driver does not validate the value, thus all the possible values are accepted. |
|
|
|
| Allows you to choose between zonal or regional PVs. |
|
| Fully qualified resource identifier for the key to use to encrypt new disks. | Empty string | Uses customer-managed encryption keys (CMEK) to encrypt new disks. |
6.14.4. Creating a custom-encrypted persistent volume
When you create a PersistentVolumeClaim object, OpenShift Container Platform provisions a new persistent volume (PV) and creates a PersistentVolume object. You can add a custom encryption key in Google Cloud Platform (GCP) to protect a PV in your cluster by encrypting the newly created PV.
For encryption, the newly attached PV that you create uses customer-managed encryption keys (CMEK) on a cluster by using a new or existing Google Cloud Key Management Service (KMS) key.
Prerequisites
- You are logged in to a running OpenShift Container Platform cluster.
- You have created a Cloud KMS key ring and key version.
For more information about CMEK and Cloud KMS resources, see Using customer-managed encryption keys (CMEK).
Procedure
To create a custom-encrypted PV, complete the following steps:
Create a storage class with the Cloud KMS key. The following example enables dynamic provisioning of encrypted volumes:
apiVersion: storage.k8s.io/v1 kind: StorageClass metadata: name: csi-gce-pd-cmek provisioner: pd.csi.storage.gke.io volumeBindingMode: "WaitForFirstConsumer" allowVolumeExpansion: true parameters: type: pd-standard disk-encryption-kms-key: projects/<key-project-id>/locations/<location>/keyRings/<key-ring>/cryptoKeys/<key>1 - 1
- This field must be the resource identifier for the key that will be used to encrypt new disks. Values are case-sensitive. For more information about providing key ID values, see Retrieving a resource’s ID and Getting a Cloud KMS resource ID.
NoteYou cannot add the
disk-encryption-kms-keyparameter to an existing storage class. However, you can delete the storage class and recreate it with the same name and a different set of parameters. If you do this, the provisioner of the existing class must bepd.csi.storage.gke.io.Deploy the storage class on your OpenShift Container Platform cluster using the
occommand:$ oc describe storageclass csi-gce-pd-cmekExample output
Name: csi-gce-pd-cmek IsDefaultClass: No Annotations: None Provisioner: pd.csi.storage.gke.io Parameters: disk-encryption-kms-key=projects/key-project-id/locations/location/keyRings/ring-name/cryptoKeys/key-name,type=pd-standard AllowVolumeExpansion: true MountOptions: none ReclaimPolicy: Delete VolumeBindingMode: WaitForFirstConsumer Events: noneCreate a file named
pvc.yamlthat matches the name of your storage class object that you created in the previous step:kind: PersistentVolumeClaim apiVersion: v1 metadata: name: podpvc spec: accessModes: - ReadWriteOnce storageClassName: csi-gce-pd-cmek resources: requests: storage: 6GiNoteIf you marked the new storage class as default, you can omit the
storageClassNamefield.Apply the PVC on your cluster:
$ oc apply -f pvc.yamlGet the status of your PVC and verify that it is created and bound to a newly provisioned PV:
$ oc get pvcExample output
NAME STATUS VOLUME CAPACITY ACCESS MODES STORAGECLASS AGE podpvc Bound pvc-e36abf50-84f3-11e8-8538-42010a800002 10Gi RWO csi-gce-pd-cmek 9sNoteIf your storage class has the
volumeBindingModefield set toWaitForFirstConsumer, you must create a pod to use the PVC before you can verify it.
Your CMEK-protected PV is now ready to use with your OpenShift Container Platform cluster.
6.14.5. User-managed encryption
The user-managed encryption feature allows you to provide keys during installation that encrypt OpenShift Container Platform node root volumes, and enables all managed storage classes to use these keys to encrypt provisioned storage volumes. You must specify the custom key in the platform.<cloud_type>.defaultMachinePlatform field in the install-config YAML file.
This features supports the following storage types:
- Amazon Web Services (AWS) Elastic Block storage (EBS)
- Microsoft Azure Disk storage
- Google Cloud Platform (GCP) persistent disk (PD) storage
For information about installing with user-managed encryption for GCP PD, see Installation configuration parameters.
6.15. Google Compute Platform Filestore CSI Driver Operator
6.15.1. Overview
OpenShift Container Platform is capable of provisioning persistent volumes (PVs) using the Container Storage Interface (CSI) driver for Google Compute Platform (GCP) Filestore Storage.
Familiarity with persistent storage and configuring CSI volumes is recommended when working with a CSI Operator and driver.
To create CSI-provisioned PVs that mount to GCP Filestore Storage assets, you install the GCP Filestore CSI Driver Operator and the GCP Filestore CSI driver in the openshift-cluster-csi-drivers namespace.
- The GCP Filestore CSI Driver Operator does not provide a storage class by default, but you can create one if needed. The GCP Filestore CSI Driver Operator supports dynamic volume provisioning by allowing storage volumes to be created on demand, eliminating the need for cluster administrators to pre-provision storage.
- The GCP Filestore CSI driver enables you to create and mount GCP Filestore PVs.
6.15.2. About CSI
Storage vendors have traditionally provided storage drivers as part of Kubernetes. With the implementation of the Container Storage Interface (CSI), third-party providers can instead deliver storage plugins using a standard interface without ever having to change the core Kubernetes code.
CSI Operators give OpenShift Container Platform users storage options, such as volume snapshots, that are not possible with in-tree volume plugins.
6.15.3. Installing the GCP Filestore CSI Driver Operator
The Google Compute Platform (GCP) Filestore Container Storage Interface (CSI) Driver Operator is not installed in OpenShift Container Platform by default. Use the following procedure to install the GCP Filestore CSI Driver Operator in your cluster.
Prerequisites
- Access to the OpenShift Container Platform web console.
Procedure
To install the GCP Filestore CSI Driver Operator from the web console:
- Log in to the web console.
Enable the Filestore API in the GCE project by running the following command:
$ gcloud services enable file.googleapis.com --project <my_gce_project>1 - 1
- Replace
<my_gce_project>with your Google Cloud project.
You can also do this using Google Cloud web console.
Install the GCP Filestore CSI Operator:
- Click Operators → OperatorHub.
- Locate the GCP Filestore CSI Operator by typing GCP Filestore in the filter box.
- Click the GCP Filestore CSI Driver Operator button.
- On the GCP Filestore CSI Driver Operator page, click Install.
On the Install Operator page, ensure that:
- All namespaces on the cluster (default) is selected.
- Installed Namespace is set to openshift-cluster-csi-drivers.
Click Install.
After the installation finishes, the GCP Filestore CSI Operator is listed in the Installed Operators section of the web console.
Install the GCP Filestore CSI Driver:
- Click administration → CustomResourceDefinitions → ClusterCSIDriver.
On the Instances tab, click Create ClusterCSIDriver.
Use the following YAML file:
apiVersion: operator.openshift.io/v1 kind: ClusterCSIDriver metadata: name: filestore.csi.storage.gke.io spec: managementState: Managed- Click Create.
Wait for the following Conditions to change to a "true" status:
- GCPFilestoreDriverCredentialsRequestControllerAvailable
- GCPFilestoreDriverNodeServiceControllerAvailable
- GCPFilestoreDriverControllerServiceControllerAvailable
6.15.4. Creating a storage class for GCP Filestore Storage
After installing the Operator, you should create a storage class for dynamic provisioning of Google Compute Platform (GCP) Filestore volumes.
Prerequisites
- You are logged in to the running OpenShift Container Platform cluster.
Procedure
To create a storage class:
Create a storage class using the following example YAML file:
Example YAML file
kind: StorageClass apiVersion: storage.k8s.io/v1 metadata: name: filestore-csi provisioner: filestore.csi.storage.gke.io parameters: network: network-name1 allowVolumeExpansion: true volumeBindingMode: WaitForFirstConsumer- 1
- Specify the name of the GCP virtual private cloud (VPC) network where Filestore instances should be created in.
Specify the name of the VPC network where Filestore instances should be created in.
It is recommended to specify the VPC network that the Filestore instances should be created in. If no VPC network is specified, the Container Storage Interface (CSI) driver tries to create the instances in the default VPC network of the project. On IPI installations, the VPC network name is typically the cluster name with the suffix "-network". However, on UPI installations, the VPC network name can be any value chosen by the user.
You can find out the VPC network name by inspecting the
MachineSetsobjects with the following command:$ oc -n openshift-machine-api get machinesets -o yaml | grep "network:" - network: gcp-filestore-network (...)In this example, the VPC network name in this cluster is "gcp-filestore-network".
6.15.5. Destroying clusters and GCP Filestore
Typically, if you destroy a cluster, the OpenShift Container Platform installer deletes all of the cloud resources that belong to that cluster. However, when a cluster is destroyed, Google Compute Platform (GCP) Filestore instances are not automatically deleted, so you must manually delete all persistent volume claims (PVCs) that use the Filestore storage class before destroying the cluster.
Procedure
To delete all GCP Filestore PVCs:
List all PVCs that were created using the storage class
filestore-csi:$ oc get pvc -o json -A | jq -r '.items[] | select(.spec.storageClassName == "filestore-csi")Delete all of the PVCs listed by the previous command:
$ oc delete <pvc-name>1 - 1
- Replace <pvc-name> with the name of any PVC that you need to delete.
6.16. IBM VPC Block CSI Driver Operator
6.16.1. Overview
OpenShift Container Platform is capable of provisioning persistent volumes (PVs) using the Container Storage Interface (CSI) driver for IBM® Virtual Private Cloud (VPC) Block Storage.
Familiarity with persistent storage and configuring CSI volumes is recommended when working with a CSI Operator and driver.
To create CSI-provisioned PVs that mount to IBM® VPC Block storage assets, OpenShift Container Platform installs the IBM® VPC Block CSI Driver Operator and the IBM® VPC Block CSI driver by default in the openshift-cluster-csi-drivers namespace.
-
The IBM® VPC Block CSI Driver Operator provides three storage classes named
ibmc-vpc-block-10iops-tier(default),ibmc-vpc-block-5iops-tier, andibmc-vpc-block-customfor different tiers that you can use to create persistent volume claims (PVCs). The IBM® VPC Block CSI Driver Operator supports dynamic volume provisioning by allowing storage volumes to be created on demand, eliminating the need for cluster administrators to pre-provision storage. You can disable this default storage class if desired (see Managing the default storage class). - The IBM® VPC Block CSI driver enables you to create and mount IBM® VPC Block PVs.
6.16.2. About CSI
Storage vendors have traditionally provided storage drivers as part of Kubernetes. With the implementation of the Container Storage Interface (CSI), third-party providers can instead deliver storage plugins using a standard interface without ever having to change the core Kubernetes code.
CSI Operators give OpenShift Container Platform users storage options, such as volume snapshots, that are not possible with in-tree volume plugins.
Additional resources
6.17. IBM Power Virtual Server Block CSI Driver Operator
6.17.1. Introduction
The IBM Power® Virtual Server Block CSI Driver will be installed through IBM Power® Virtual Server Block CSI Driver Operator and the operator is based on libarary-go. The OpenShift library-go is a collection of functions that allow us to build OpenShift operators easily. Most of the functionality of a CSI driver operator is already available there. The IBM Power® Virtual Server Block CSI Driver Operator is installed by the cluster-storage-operator. The Cluster-storage-operator installs the IBM Power® Virtual Server Block CSI Driver Operator if the Platform type is Power Virtual Servers.
6.17.2. Overview
OpenShift Container Platform can provision persistent volumes (PVs) by using the Container Storage Interface (CSI) driver for IBM Power® Virtual Server Block Storage.
IBM Power Virtual Server Block CSI Driver Operator is a Technology Preview feature only. Technology Preview features are not supported with Red Hat production service level agreements (SLAs) and might not be functionally complete. Red Hat does not recommend using them in production. These features provide early access to upcoming product features, enabling customers to test functionality and provide feedback during the development process.
For more information about the support scope of Red Hat Technology Preview features, see Technology Preview Features Support Scope.
Familiarity with persistent storage and configuring CSI volumes is helpful when working with a CSI Operator and driver.
To create CSI-provisioned PVs that mount to IBM Power® Virtual Server Block storage assets, OpenShift Container Platform installs the IBM Power® Virtual Server Block CSI Driver Operator and the IBM Power® Virtual Server Block CSI driver by default in the openshift-cluster-csi-drivers namespace.
-
The IBM Power® Virtual Server Block CSI Driver Operator provides two storage classes named
ibm-powervs-tier1(default), andibm-powervs-tier3for different tiers that you can use to create persistent volume claims (PVCs). The IBM Power® Virtual Server Block CSI Driver Operator supports dynamic volume provisioning by allowing storage volumes to be created on demand, eliminating the need for cluster administrators to pre-provision storage. - The IBM Power® Virtual Server Block CSI driver allows you to create and mount IBM Power® Virtual Server Block PVs.
6.17.3. About CSI
Storage vendors have traditionally provided storage drivers as part of Kubernetes. With the implementation of the Container Storage Interface (CSI), third-party providers can instead deliver storage plugins using a standard interface without ever having to change the core Kubernetes code.
CSI Operators give OpenShift Container Platform users storage options, such as volume snapshots, that are not possible with in-tree volume plugins.
6.18. OpenStack Cinder CSI Driver Operator
6.18.1. Overview
OpenShift Container Platform is capable of provisioning persistent volumes (PVs) using the Container Storage Interface (CSI) driver for OpenStack Cinder.
Familiarity with persistent storage and configuring CSI volumes is recommended when working with a Container Storage Interface (CSI) Operator and driver.
To create CSI-provisioned PVs that mount to OpenStack Cinder storage assets, OpenShift Container Platform installs the OpenStack Cinder CSI Driver Operator and the OpenStack Cinder CSI driver in the openshift-cluster-csi-drivers namespace.
- The OpenStack Cinder CSI Driver Operator provides a CSI storage class that you can use to create PVCs. You can disable this default storage class if desired (see Managing the default storage class).
- The OpenStack Cinder CSI driver enables you to create and mount OpenStack Cinder PVs.
OpenShift Container Platform provides automatic migration for the Cinder in-tree volume plugin to its equivalent CSI driver. For more information, see CSI automatic migration.
6.18.2. About CSI
Storage vendors have traditionally provided storage drivers as part of Kubernetes. With the implementation of the Container Storage Interface (CSI), third-party providers can instead deliver storage plugins using a standard interface without ever having to change the core Kubernetes code.
CSI Operators give OpenShift Container Platform users storage options, such as volume snapshots, that are not possible with in-tree volume plugins.
OpenShift Container Platform defaults to using the CSI plugin to provision Cinder storage.
6.18.3. Making OpenStack Cinder CSI the default storage class
The OpenStack Cinder CSI driver uses the cinder.csi.openstack.org parameter key to support dynamic provisioning.
To enable OpenStack Cinder CSI provisioning in OpenShift Container Platform, it is recommended that you overwrite the default in-tree storage class with standard-csi. Alternatively, you can create the persistent volume claim (PVC) and specify the storage class as "standard-csi".
In OpenShift Container Platform, the default storage class references the in-tree Cinder driver. However, with CSI automatic migration enabled, volumes created using the default storage class actually use the CSI driver.
Procedure
Use the following steps to apply the standard-csi storage class by overwriting the default in-tree storage class.
List the storage class:
$ oc get storageclassExample output
NAME PROVISIONER RECLAIMPOLICY VOLUMEBINDINGMODE ALLOWVOLUMEEXPANSION AGE standard(default) cinder.csi.openstack.org Delete WaitForFirstConsumer true 46h standard-csi kubernetes.io/cinder Delete WaitForFirstConsumer true 46hChange the value of the annotation
storageclass.kubernetes.io/is-default-classtofalsefor the default storage class, as shown in the following example:$ oc patch storageclass standard -p '{"metadata": {"annotations": {"storageclass.kubernetes.io/is-default-class": "false"}}}'Make another storage class the default by adding or modifying the annotation as
storageclass.kubernetes.io/is-default-class=true.$ oc patch storageclass standard-csi -p '{"metadata": {"annotations": {"storageclass.kubernetes.io/is-default-class": "true"}}}'Verify that the PVC is now referencing the CSI storage class by default:
$ oc get storageclassExample output
NAME PROVISIONER RECLAIMPOLICY VOLUMEBINDINGMODE ALLOWVOLUMEEXPANSION AGE standard kubernetes.io/cinder Delete WaitForFirstConsumer true 46h standard-csi(default) cinder.csi.openstack.org Delete WaitForFirstConsumer true 46hOptional: You can define a new PVC without having to specify the storage class:
apiVersion: v1 kind: PersistentVolumeClaim metadata: name: cinder-claim spec: accessModes: - ReadWriteOnce resources: requests: storage: 1GiA PVC that does not specify a specific storage class is automatically provisioned by using the default storage class.
Optional: After the new file has been configured, create it in your cluster:
$ oc create -f cinder-claim.yaml
6.19. OpenStack Manila CSI Driver Operator
6.19.1. Overview
OpenShift Container Platform is capable of provisioning persistent volumes (PVs) using the Container Storage Interface (CSI) driver for the OpenStack Manila shared file system service.
Familiarity with persistent storage and configuring CSI volumes is recommended when working with a Container Storage Interface (CSI) Operator and driver.
To create CSI-provisioned PVs that mount to Manila storage assets, OpenShift Container Platform installs the Manila CSI Driver Operator and the Manila CSI driver by default on any OpenStack cluster that has the Manila service enabled.
-
The Manila CSI Driver Operator creates the required storage class that is needed to create PVCs for all available Manila share types. The Operator is installed in the
openshift-cluster-csi-driversnamespace. -
The Manila CSI driver enables you to create and mount Manila PVs. The driver is installed in the
openshift-manila-csi-drivernamespace.
6.19.2. About CSI
Storage vendors have traditionally provided storage drivers as part of Kubernetes. With the implementation of the Container Storage Interface (CSI), third-party providers can instead deliver storage plugins using a standard interface without ever having to change the core Kubernetes code.
CSI Operators give OpenShift Container Platform users storage options, such as volume snapshots, that are not possible with in-tree volume plugins.
6.19.3. Manila CSI Driver Operator limitations
The following limitations apply to the Manila Container Storage Interface (CSI) Driver Operator:
- Only NFS is supported
- OpenStack Manila supports many network-attached storage protocols, such as NFS, CIFS, and CEPHFS, and these can be selectively enabled in the OpenStack cloud. The Manila CSI Driver Operator in OpenShift Container Platform only supports using the NFS protocol. If NFS is not available and enabled in the underlying OpenStack cloud, you cannot use the Manila CSI Driver Operator to provision storage for OpenShift Container Platform.
- Snapshots are not supported if the back end is CephFS-NFS
-
To take snapshots of persistent volumes (PVs) and revert volumes to snapshots, you must ensure that the Manila share type that you are using supports these features. A Red Hat OpenStack administrator must enable support for snapshots (
share type extra-spec snapshot_support) and for creating shares from snapshots (share type extra-spec create_share_from_snapshot_support) in the share type associated with the storage class you intend to use. - FSGroups are not supported
-
Since Manila CSI provides shared file systems for access by multiple readers and multiple writers, it does not support the use of FSGroups. This is true even for persistent volumes created with the ReadWriteOnce access mode. It is therefore important not to specify the
fsTypeattribute in any storage class that you manually create for use with Manila CSI Driver.
In Red Hat OpenStack Platform 16.x and 17.x, the Shared File Systems service (Manila) with CephFS through NFS fully supports serving shares to OpenShift Container Platform through the Manila CSI. However, this solution is not intended for massive scale. Be sure to review important recommendations in CephFS NFS Manila-CSI Workload Recommendations for Red Hat OpenStack Platform.
6.19.4. Dynamically provisioning Manila CSI volumes
OpenShift Container Platform installs a storage class for each available Manila share type.
The YAML files that are created are completely decoupled from Manila and from its Container Storage Interface (CSI) plugin. As an application developer, you can dynamically provision ReadWriteMany (RWX) storage and deploy pods with applications that safely consume the storage using YAML manifests.
You can use the same pod and persistent volume claim (PVC) definitions on-premise that you use with OpenShift Container Platform on AWS, Google Cloud, Azure, and other platforms, with the exception of the storage class reference in the PVC definition.
By default the access-rule assigned to a volume is set to 0.0.0.0/0. To limit the clients that can mount the persistent volume (PV), create a new storage class with an IP or a subnet mask in the nfs-shareClient storage class parameter.
Manila service is optional. If the service is not enabled in Red Hat OpenStack Platform (RHOSP), the Manila CSI driver is not installed and the storage classes for Manila are not created.
Prerequisites
- RHOSP is deployed with appropriate Manila share infrastructure so that it can be used to dynamically provision and mount volumes in OpenShift Container Platform.
Procedure (UI)
To dynamically create a Manila CSI volume using the web console:
- In the OpenShift Container Platform console, click Storage → Persistent Volume Claims.
- In the persistent volume claims overview, click Create Persistent Volume Claim.
Define the required options on the resulting page.
- Select the appropriate storage class.
- Enter a unique name for the storage claim.
Select the access mode to specify read and write access for the PVC you are creating.
ImportantUse RWX if you want the PV that fulfills this PVC to be mounted to multiple pods on multiple nodes in the cluster.
- Define the size of the storage claim.
- Click Create to create the PVC and generate a PV.
Procedure (CLI)
To dynamically create a Manila CSI volume using the command-line interface (CLI):
Create and save a file with the
PersistentVolumeClaimobject described by the following YAML:pvc-manila.yaml
apiVersion: v1 kind: PersistentVolumeClaim metadata: name: pvc-manila spec: accessModes:1 - ReadWriteMany resources: requests: storage: 10Gi storageClassName: csi-manila-gold2 Create the object you saved in the previous step by running the following command:
$ oc create -f pvc-manila.yamlA new PVC is created.
To verify that the volume was created and is ready, run the following command:
$ oc get pvc pvc-manilaThe
pvc-manilashows that it isBound.
You can now use the new PVC to configure a pod.
6.20. Secrets Store CSI driver
6.20.1. Overview
Kubernetes secrets are stored with Base64 encoding. etcd provides encryption at rest for these secrets, but when secrets are retrieved, they are decrypted and presented to the user. If role-based access control is not configured properly on your cluster, anyone with API or etcd access can retrieve or modify a secret. Additionally, anyone who is authorized to create a pod in a namespace can use that access to read any secret in that namespace.
To store and manage your secrets securely, you can configure the OpenShift Container Platform Secrets Store Container Storage Interface (CSI) Driver Operator to mount secrets from an external secret management system, such as Azure Key Vault, by using a provider plugin. Applications can then use the secret, but the secret does not persist on the system after the application pod is destroyed.
The Secrets Store CSI Driver Operator, secrets-store.csi.k8s.io, enables OpenShift Container Platform to mount multiple secrets, keys, and certificates stored in enterprise-grade external secrets stores into pods as a volume. The Secrets Store CSI Driver Operator communicates with the provider using gRPC to fetch the mount contents from the specified external secrets store. After the volume is attached, the data in it is mounted into the container’s file system. Secrets store volumes are mounted in-line.
For more information about CSI inline volumes, see CSI inline ephemeral volumes.
The Secrets Store CSI Driver Operator is a Technology Preview feature only. Technology Preview features are not supported with Red Hat production service level agreements (SLAs) and might not be functionally complete. Red Hat does not recommend using them in production. These features provide early access to upcoming product features, enabling customers to test functionality and provide feedback during the development process.
For more information about the support scope of Red Hat Technology Preview features, see Technology Preview Features Support Scope.
Familiarity with persistent storage and configuring CSI volumes is recommended when working with a CSI driver.
6.20.1.1. Secrets store providers
The following secrets store providers are available for use with the Secrets Store CSI Driver Operator:
- AWS Secrets Manager
- AWS Systems Manager Parameter Store
- Azure Key Vault
6.20.2. About CSI
Storage vendors have traditionally provided storage drivers as part of Kubernetes. With the implementation of the Container Storage Interface (CSI), third-party providers can instead deliver storage plugins using a standard interface without ever having to change the core Kubernetes code.
CSI Operators give OpenShift Container Platform users storage options, such as volume snapshots, that are not possible with in-tree volume plugins.
6.20.3. Installing the Secrets Store CSI driver
Prerequisites
- Access to the OpenShift Container Platform web console.
- Administrator access to the cluster.
Procedure
To install the Secrets Store CSI driver:
Install the Secrets Store CSI Driver Operator:
- Log in to the web console.
- Click Operators → OperatorHub.
- Locate the Secrets Store CSI Driver Operator by typing "Secrets Store CSI" in the filter box.
- Click the Secrets Store CSI Driver Operator button.
- On the Secrets Store CSI Driver Operator page, click Install.
On the Install Operator page, ensure that:
- All namespaces on the cluster (default) is selected.
- Installed Namespace is set to openshift-cluster-csi-drivers.
Click Install.
After the installation finishes, the Secrets Store CSI Driver Operator is listed in the Installed Operators section of the web console.
Create the
ClusterCSIDriverinstance for the driver (secrets-store.csi.k8s.io):- Click Administration → CustomResourceDefinitions → ClusterCSIDriver.
On the Instances tab, click Create ClusterCSIDriver.
Use the following YAML file:
apiVersion: operator.openshift.io/v1 kind: ClusterCSIDriver metadata: name: secrets-store.csi.k8s.io spec: managementState: Managed- Click Create.
6.20.4. Uninstalling the Secrets Store CSI Driver Operator
Prerequisites
- Access to the OpenShift Container Platform web console.
- Administrator access to the cluster.
Procedure
To uninstall the Secrets Store CSI Driver Operator:
-
Stop all application pods that use the
secrets-store.csi.k8s.ioprovider. - Remove any third-party provider plug-in for your chosen secret store.
Remove the Container Storage Interface (CSI) driver and associated manifests:
- Click Administration → CustomResourceDefinitions → ClusterCSIDriver.
- On the Instances tab, for secrets-store.csi.k8s.io, on the far left side, click the drop-down menu, and then click Delete ClusterCSIDriver.
- When prompted, click Delete.
- Verify that the CSI driver pods are no longer running.
Uninstall the Secrets Store CSI Driver Operator:
NoteBefore you can uninstall the Operator, you must remove the CSI driver first.
- Click Operators → Installed Operators.
- On the Installed Operators page, scroll or type "Secrets Store CSI" into the Search by name box to find the Operator, and then click it.
- On the upper, right of the Installed Operators > Operator details page, click Actions → Uninstall Operator.
When prompted on the Uninstall Operator window, click the Uninstall button to remove the Operator from the namespace. Any applications deployed by the Operator on the cluster need to be cleaned up manually.
After uninstalling, the Secrets Store CSI Driver Operator is no longer listed in the Installed Operators section of the web console.
6.21. VMware vSphere CSI Driver Operator
6.21.1. Overview
OpenShift Container Platform can provision persistent volumes (PVs) using the Container Storage Interface (CSI) VMware vSphere driver for Virtual Machine Disk (VMDK) volumes.
Familiarity with persistent storage and configuring CSI volumes is recommended when working with a CSI Operator and driver.
To create CSI-provisioned persistent volumes (PVs) that mount to vSphere storage assets, OpenShift Container Platform installs the vSphere CSI Driver Operator and the vSphere CSI driver by default in the openshift-cluster-csi-drivers namespace.
-
vSphere CSI Driver Operator: The Operator provides a storage class, called
thin-csi, that you can use to create persistent volumes claims (PVCs). The vSphere CSI Driver Operator supports dynamic volume provisioning by allowing storage volumes to be created on-demand, eliminating the need for cluster administrators to pre-provision storage. You can disable this default storage class if desired (see Managing the default storage class). - vSphere CSI driver: The driver enables you to create and mount vSphere PVs. In OpenShift Container Platform 4.14, the driver version is 3.0.2. The vSphere CSI driver supports all of the file systems supported by the underlying Red Hat Core OS release, including XFS and Ext4. For more information about supported file systems, see Overview of available file systems.
For vSphere:
For new installations of OpenShift Container Platform 4.13, or later, automatic migration is enabled by default. Updating to OpenShift Container Platform 4.14 and later also provides automatic migration.
CSI automatic migration should be seamless. Migration does not change how you use all existing API objects, such as persistent volumes, persistent volume claims, and storage classes. For more information about migration, see CSI automatic migration.
- When updating from OpenShift Container Platform 4.12, or earlier, to 4.13, automatic CSI migration for vSphere only occurs if you opt in. If you do not opt in, OpenShift Container Platform defaults to using the in-tree (non-CSI) plugin to provision vSphere storage. Carefully review the indicated consequences before opting in to migration.
6.21.2. About CSI
Storage vendors have traditionally provided storage drivers as part of Kubernetes. With the implementation of the Container Storage Interface (CSI), third-party providers can instead deliver storage plugins using a standard interface without ever having to change the core Kubernetes code.
CSI Operators give OpenShift Container Platform users storage options, such as volume snapshots, that are not possible with in-tree volume plugins.
6.21.3. vSphere CSI limitations
The following limitations apply to the vSphere Container Storage Interface (CSI) Driver Operator:
-
The vSphere CSI Driver supports dynamic and static provisioning. However, when using static provisioning in the PV specifications, do not use the key
storage.kubernetes.io/csiProvisionerIdentityincsi.volumeAttributesbecause this key indicates dynamically provisioned PVs. - Migrating persistent container volumes between datastores using the vSphere client interface is not supported with OpenShift Container Platform.
6.21.4. vSphere storage policy
The vSphere CSI Driver Operator storage class uses vSphere’s storage policy. OpenShift Container Platform automatically creates a storage policy that targets datastore configured in cloud configuration:
kind: StorageClass
apiVersion: storage.k8s.io/v1
metadata:
name: thin-csi
provisioner: csi.vsphere.vmware.com
parameters:
StoragePolicyName: "$openshift-storage-policy-xxxx"
volumeBindingMode: WaitForFirstConsumer
allowVolumeExpansion: false
reclaimPolicy: Delete6.21.5. ReadWriteMany vSphere volume support
If the underlying vSphere environment supports the vSAN file service, then vSphere Container Storage Interface (CSI) Driver Operator installed by OpenShift Container Platform supports provisioning of ReadWriteMany (RWX) volumes. If vSAN file service is not configured, then ReadWriteOnce (RWO) is the only access mode available. If you do not have vSAN file service configured, and you request RWX, the volume fails to get created and an error is logged.
For more information about configuring the vSAN file service in your environment, see vSAN File Service.
You can request RWX volumes by making the following persistent volume claim (PVC):
kind: PersistentVolumeClaim
apiVersion: v1
metadata:
name: myclaim
spec:
resources:
requests:
storage: 1Gi
accessModes:
- ReadWriteMany
storageClassName: thin-csiRequesting a PVC of the RWX volume type should result in provisioning of persistent volumes (PVs) backed by the vSAN file service.
6.21.6. VMware vSphere CSI Driver Operator requirements
To install the vSphere CSI Driver Operator, the following requirements must be met:
- VMware vSphere version: 7.0 Update 2 or later, or VMware Cloud Foundation 4.3 or later; 8.0 Update 1 or later, or VMware Cloud Foundation 5.0 or later
- vCenter version: 7.0 Update 2 or later, or VMware Cloud Foundation 4.3 or later; 8.0 Update 1 or later, or VMware Cloud Foundation 5.0 or later
- Virtual machines of hardware version 15 or later
- No third-party vSphere CSI driver already installed in the cluster
If a third-party vSphere CSI driver is present in the cluster, OpenShift Container Platform does not overwrite it. The presence of a third-party vSphere CSI driver prevents OpenShift Container Platform from updating to OpenShift Container Platform 4.13 or later.
The VMware vSphere CSI Driver Operator is supported only on clusters deployed with platform: vsphere in the installation manifest.
To remove a third-party CSI driver, see Removing a third-party vSphere CSI Driver.
6.21.7. Removing a third-party vSphere CSI Driver Operator
OpenShift Container Platform 4.10, and later, includes a built-in version of the vSphere Container Storage Interface (CSI) Operator Driver that is supported by Red Hat. If you have installed a vSphere CSI driver provided by the community or another vendor, updates to the next major version of OpenShift Container Platform, such as 4.13, or later, might be disabled for your cluster.
OpenShift Container Platform 4.12, and later, clusters are still fully supported, and updates to z-stream releases of 4.12, such as 4.12.z, are not blocked, but you must correct this state by removing the third-party vSphere CSI Driver before updates to next major version of OpenShift Container Platform can occur. Removing the third-party vSphere CSI driver does not require deletion of associated persistent volume (PV) objects, and no data loss should occur.
These instructions may not be complete, so consult the vendor or community provider uninstall guide to ensure removal of the driver and components.
To uninstall the third-party vSphere CSI Driver:
- Delete the third-party vSphere CSI Driver (VMware vSphere Container Storage Plugin) Deployment and Daemonset objects.
- Delete the configmap and secret objects that were installed previously with the third-party vSphere CSI Driver.
Delete the third-party vSphere CSI driver
CSIDriverobject:$ oc delete CSIDriver csi.vsphere.vmware.comcsidriver.storage.k8s.io "csi.vsphere.vmware.com" deleted
After you have removed the third-party vSphere CSI Driver from the OpenShift Container Platform cluster, installation of Red Hat’s vSphere CSI Driver Operator automatically resumes, and any conditions that could block upgrades to OpenShift Container Platform 4.11, or later, are automatically removed. If you had existing vSphere CSI PV objects, their lifecycle is now managed by Red Hat’s vSphere CSI Driver Operator.
6.21.8. vSphere persistent disks encryption
You can encrypt virtual machines (VMs) and dynamically provisioned persistent volumes (PVs) on OpenShift Container Platform running on top of vSphere.
OpenShift Container Platform does not support RWX-encrypted PVs. You cannot request RWX PVs out of a storage class that uses an encrypted storage policy.
You must encrypt VMs before you can encrypt PVs, which you can do during or after installation.
For information about encrypting VMs, see:
After encrypting VMs, you can configure a storage class that supports dynamic encryption volume provisioning using the vSphere Container Storage Interface (CSI) driver. This can be accomplished in one of two ways using:
- Datastore URL: This approach is not very flexible, and forces you to use a single datastore. It also does not support topology-aware provisioning.
- Tag-based placement: Encrypts the provisioned volumes and uses tag-based placement to target specific datastores.
6.21.8.1. Using datastore URL
Procedure
To encrypt using the datastore URL:
Find out the name of the default storage policy in your datastore that supports encryption.
This is same policy that was used for encrypting your VMs.
Create a storage class that uses this storage policy:
kind: StorageClass apiVersion: storage.k8s.io/v1 metadata: name: encryption provisioner: csi.vsphere.vmware.com parameters: storagePolicyName: <storage-policy-name>1 datastoreurl: "ds:///vmfs/volumes/vsan:522e875627d-b090c96b526bb79c/"- 1
- Name of default storage policy in your datastore that supports encryption
6.21.8.2. Using tag-based placement
Procedure
To encrypt using tag-based placement:
- In vCenter create a category for tagging datastores that will be made available to this storage class. Also, ensure that StoragePod(Datastore clusters), Datastore, and Folder are selected as Associable Entities for the created category.
- In vCenter, create a tag that uses the category created earlier.
- Assign the previously created tag to each datastore that will be made available to the storage class. Make sure that datastores are shared with hosts participating in the OpenShift Container Platform cluster.
- In vCenter, from the main menu, click Policies and Profiles.
- On the Policies and Profiles page, in the navigation pane, click VM Storage Policies.
- Click CREATE.
- Type a name for the storage policy.
- Select Enable host based rules and Enable tag based placement rules.
In the Next tab:
- Select Encryption and Default Encryption Properties.
- Select the tag category created earlier, and select tag selected. Verify that the policy is selecting matching datastores.
- Create the storage policy.
Create a storage class that uses the storage policy:
kind: StorageClass apiVersion: storage.k8s.io/v1 metadata: name: csi-encrypted provisioner: csi.vsphere.vmware.com reclaimPolicy: Delete volumeBindingMode: WaitForFirstConsumer parameters: storagePolicyName: <storage-policy-name>1 - 1
- Name of the storage policy that you created for encryption
6.21.9. vSphere CSI topology overview
OpenShift Container Platform provides the ability to deploy OpenShift Container Platform for vSphere on different zones and regions, which allows you to deploy over multiple compute clusters and datacenters, thus helping to avoid a single point of failure.
This is accomplished by defining zone and region categories in vCenter, and then assigning these categories to different failure domains, such as a compute cluster, by creating tags for these zone and region categories. After you have created the appropriate categories, and assigned tags to vCenter objects, you can create additional machinesets that create virtual machines (VMs) that are responsible for scheduling pods in those failure domains.
The following example defines two failure domains with one region and two zones:
| Compute cluster | Failure domain | Description |
|---|---|---|
| Compute cluster: ocp1, Datacenter: Atlanta | openshift-region: us-east-1 (tag), openshift-zone: us-east-1a (tag) | This defines a failure domain in region us-east-1 with zone us-east-1a. |
| Computer cluster: ocp2, Datacenter: Atlanta | openshift-region: us-east-1 (tag), openshift-zone: us-east-1b (tag) | This defines a different failure domain within the same region called us-east-1b. |
6.21.9.1. Creating vSphere storage topology during installation
6.21.9.1.1. Procedure
- Specify the topology during installation. See the Configuring regions and zones for a VMware vCenter section.
No additional action is necessary and the default storage class that is created by OpenShift Container Platform is topology aware and should allow provisioning of volumes in different failure domains.
6.21.9.2. Creating vSphere storage topology postinstallation
6.21.9.2.1. Procedure
In the VMware vCenter vSphere client GUI, define appropriate zone and region catagories and tags.
While vSphere allows you to create categories with any arbitrary name, OpenShift Container Platform strongly recommends use of
openshift-regionandopenshift-zonenames for defining topology categories.For more information about vSphere categories and tags, see the VMware vSphere documentation.
- In OpenShift Container Platform, create failure domains. See the Specifying multiple regions and zones for your cluster on vSphere section.
Create a tag to assign to datastores across failure domains:
When an OpenShift Container Platform spans more than one failure domain, the datastore might not be shared across those failure domains, which is where topology-aware provisioning of persistent volumes (PVs) is useful.
-
In vCenter, create a category for tagging the datastores. For example,
openshift-zonal-datastore-cat. You can use any other category name, provided the category uniquely is used for tagging datastores participating in OpenShift Container Platform cluster. Also, ensure thatStoragePod,Datastore, andFolderare selected as Associable Entities for the created category. -
In vCenter, create a tag that uses the previously created category. This example uses the tag name
openshift-zonal-datastore. Assign the previously created tag (in this example
openshift-zonal-datastore) to each datastore in a failure domain that would be considered for dynamic provisioning.NoteYou can use any names you like for datastore categories and tags. The names used in this example are provided as recommendations. Ensure that the tags and categories that you define uniquely identify only datastores that are shared with all hosts in the OpenShift Container Platform cluster.
-
In vCenter, create a category for tagging the datastores. For example,
As needed, create a storage policy that targets the tag-based datastores in each failure domain:
- In vCenter, from the main menu, click Policies and Profiles.
- On the Policies and Profiles page, in the navigation pane, click VM Storage Policies.
- Click CREATE.
- Type a name for the storage policy.
For the rules, choose Tag Placement rules and select the tag and category that targets the desired datastores (in this example, the
openshift-zonal-datastoretag).The datastores are listed in the storage compatibility table.
Create a new storage class that uses the new zoned storage policy:
- Click Storage > StorageClasses.
- On the StorageClasses page, click Create StorageClass.
- Type a name for the new storage class in Name.
- Under Provisioner, select csi.vsphere.vmware.com.
- Under Additional parameters, for the StoragePolicyName parameter, set Value to the name of the new zoned storage policy that you created earlier.
Click Create.
Example output
kind: StorageClass apiVersion: storage.k8s.io/v1 metadata: name: zoned-sc1 provisioner: csi.vsphere.vmware.com parameters: StoragePolicyName: zoned-storage-policy2 reclaimPolicy: Delete allowVolumeExpansion: true volumeBindingMode: WaitForFirstConsumerNoteYou can also create the storage class by editing the preceding YAML file and running the command
oc create -f $FILE.
6.21.9.3. Creating vSphere storage topology without an infra topology
OpenShift Container Platform recommends using the infrastructure object for specifying failure domains in a topology aware setup. Specifying failure domains in the infrastructure object and specify topology-categories in the ClusterCSIDriver object at the same time is an unsupported operation.
6.21.9.3.1. Procedure
In the VMware vCenter vSphere client GUI, define appropriate zone and region catagories and tags.
While vSphere allows you to create categories with any arbitrary name, OpenShift Container Platform strongly recommends use of
openshift-regionandopenshift-zonenames for defining topology.For more information about vSphere categories and tags, see the VMware vSphere documentation.
To allow the container storage interface (CSI) driver to detect this topology, edit the
clusterCSIDriverobject YAML filedriverConfigsection:-
Specify the
openshift-zoneandopenshift-regioncategories that you created earlier. Set
driverTypetovSphere.~ $ oc edit clustercsidriver csi.vsphere.vmware.com -o yamlExample output
apiVersion: operator.openshift.io/v1 kind: ClusterCSIDriver metadata: name: csi.vsphere.vmware.com spec: logLevel: Normal managementState: Managed observedConfig: null operatorLogLevel: Normal unsupportedConfigOverrides: null driverConfig: driverType: vSphere1 vSphere: topologyCategories:2 - openshift-zone - openshift-region
-
Specify the
Verify that
CSINodeobject has topology keys by running the following commands:~ $ oc get csinodeExample output
NAME DRIVERS AGE co8-4s88d-infra-2m5vd 1 27m co8-4s88d-master-0 1 70m co8-4s88d-master-1 1 70m co8-4s88d-master-2 1 70m co8-4s88d-worker-j2hmg 1 47m co8-4s88d-worker-mbb46 1 47m co8-4s88d-worker-zlk7d 1 47m~ $ oc get csinode co8-4s88d-worker-j2hmg -o yamlExample output
... spec: drivers: - allocatable: count: 59 name: csi-vsphere.vmware.com nodeID: co8-4s88d-worker-j2hmg topologyKeys:1 - topology.csi.vmware.com/openshift-zone - topology.csi.vmware.com/openshift-region- 1
- Topology keys from vSphere
openshift-zoneandopenshift-regioncatagories.
NoteCSINodeobjects might take some time to receive updated topology information. After the driver is updated,CSINodeobjects should have topology keys in them.Create a tag to assign to datastores across failure domains:
When an OpenShift Container Platform spans more than one failure domain, the datastore might not be shared across those failure domains, which is where topology-aware provisioning of persistent volumes (PVs) is useful.
-
In vCenter, create a category for tagging the datastores. For example,
openshift-zonal-datastore-cat. You can use any other category name, provided the category uniquely is used for tagging datastores participating in OpenShift Container Platform cluster. Also, ensure thatStoragePod,Datastore, andFolderare selected as Associable Entities for the created category. -
In vCenter, create a tag that uses the previously created category. This example uses the tag name
openshift-zonal-datastore. Assign the previously created tag (in this example
openshift-zonal-datastore) to each datastore in a failure domain that would be considered for dynamic provisioning.NoteYou can use any names you like for categories and tags. The names used in this example are provided as recommendations. Ensure that the tags and categories that you define uniquely identify only datastores that are shared with all hosts in the OpenShift Container Platform cluster.
-
In vCenter, create a category for tagging the datastores. For example,
Create a storage policy that targets the tag-based datastores in each failure domain:
- In vCenter, from the main menu, click Policies and Profiles.
- On the Policies and Profiles page, in the navigation pane, click VM Storage Policies.
- Click CREATE.
- Type a name for the storage policy.
For the rules, choose Tag Placement rules and select the tag and category that targets the desired datastores (in this example, the
openshift-zonal-datastoretag).The datastores are listed in the storage compatibility table.
Create a new storage class that uses the new zoned storage policy:
- Click Storage > StorageClasses.
- On the StorageClasses page, click Create StorageClass.
- Type a name for the new storage class in Name.
- Under Provisioner, select csi.vsphere.vmware.com.
- Under Additional parameters, for the StoragePolicyName parameter, set Value to the name of the new zoned storage policy that you created earlier.
Click Create.
Example output
kind: StorageClass apiVersion: storage.k8s.io/v1 metadata: name: zoned-sc1 provisioner: csi.vsphere.vmware.com parameters: StoragePolicyName: zoned-storage-policy2 reclaimPolicy: Delete allowVolumeExpansion: true volumeBindingMode: WaitForFirstConsumerNoteYou can also create the storage class by editing the preceding YAML file and running the command
oc create -f $FILE.
6.21.9.4. Results
Creating persistent volume claims (PVCs) and PVs from the topology aware storage class are truly zonal, and should use the datastore in their respective zone depending on how pods are scheduled:
$ oc get pv <pv_name> -o yamlExample output
...
nodeAffinity:
required:
nodeSelectorTerms:
- matchExpressions:
- key: topology.csi.vmware.com/openshift-zone
operator: In
values:
- <openshift_zone>
- key: topology.csi.vmware.com/openshift-region
operator: In
values:
- <openshift_region>
...
peristentVolumeclaimPolicy: Delete
storageClassName: <zoned_storage_class_name>
volumeMode: Filesystem
...6.21.10. Additional resources
Chapter 7. Generic ephemeral volumes
7.1. Overview
Generic ephemeral volumes are a type of ephemeral volume that can be provided by all storage drivers that support persistent volumes and dynamic provisioning. Generic ephemeral volumes are similar to emptyDir volumes in that they provide a per-pod directory for scratch data, which is usually empty after provisioning.
Generic ephemeral volumes are specified inline in the pod spec and follow the pod’s lifecycle. They are created and deleted along with the pod.
Generic ephemeral volumes have the following features:
- Storage can be local or network-attached.
- Volumes can have a fixed size that pods are not able to exceed.
- Volumes might have some initial data, depending on the driver and parameters.
- Typical operations on volumes are supported, assuming that the driver supports them, including snapshotting, cloning, resizing, and storage capacity tracking.
Generic ephemeral volumes do not support offline snapshots and resize.
Due to this limitation, the following Container Storage Interface (CSI) drivers do not support the following features for generic ephemeral volumes:
- Azure Disk CSI driver does not support resize.
- Cinder CSI driver does not support snapshot.
7.2. Lifecycle and persistent volume claims
The parameters for a volume claim are allowed inside a volume source of a pod. Labels, annotations, and the whole set of fields for persistent volume claims (PVCs) are supported. When such a pod is created, the ephemeral volume controller then creates an actual PVC object (from the template shown in the Creating generic ephemeral volumes procedure) in the same namespace as the pod, and ensures that the PVC is deleted when the pod is deleted. This triggers volume binding and provisioning in one of two ways:
Either immediately, if the storage class uses immediate volume binding.
With immediate binding, the scheduler is forced to select a node that has access to the volume after it is available.
When the pod is tentatively scheduled onto a node (
WaitForFirstConsumervolumebinding mode).This volume binding option is recommended for generic ephemeral volumes because then the scheduler can choose a suitable node for the pod.
In terms of resource ownership, a pod that has generic ephemeral storage is the owner of the PVCs that provide that ephemeral storage. When the pod is deleted, the Kubernetes garbage collector deletes the PVC, which then usually triggers deletion of the volume because the default reclaim policy of storage classes is to delete volumes. You can create quasi-ephemeral local storage by using a storage class with a reclaim policy of retain: the storage outlives the pod, and in this case, you must ensure that volume clean-up happens separately. While these PVCs exist, they can be used like any other PVC. In particular, they can be referenced as data source in volume cloning or snapshotting. The PVC object also holds the current status of the volume.
7.3. Security
You can enable the generic ephemeral volume feature to allows users who can create pods to also create persistent volume claims (PVCs) indirectly. This feature works even if these users do not have permission to create PVCs directly. Cluster administrators must be aware of this. If this does not fit your security model, use an admission webhook that rejects objects such as pods that have a generic ephemeral volume.
The normal namespace quota for PVCs still applies, so even if users are allowed to use this new mechanism, they cannot use it to circumvent other policies.
7.4. Persistent volume claim naming
Automatically created persistent volume claims (PVCs) are named by a combination of the pod name and the volume name, with a hyphen (-) in the middle. This naming convention also introduces a potential conflict between different pods, and between pods and manually created PVCs.
For example, pod-a with volume scratch and pod with volume a-scratch both end up with the same PVC name, pod-a-scratch.
Such conflicts are detected, and a PVC is only used for an ephemeral volume if it was created for the pod. This check is based on the ownership relationship. An existing PVC is not overwritten or modified, but this does not resolve the conflict. Without the right PVC, a pod cannot start.
Be careful when naming pods and volumes inside the same namespace so that naming conflicts do not occur.
7.5. Creating generic ephemeral volumes
Procedure
-
Create the
podobject definition and save it to a file. Include the generic ephemeral volume information in the file.
my-example-pod-with-generic-vols.yaml
kind: Pod apiVersion: v1 metadata: name: my-app spec: containers: - name: my-frontend image: busybox:1.28 volumeMounts: - mountPath: "/mnt/storage" name: data command: [ "sleep", "1000000" ] volumes: - name: data1 ephemeral: volumeClaimTemplate: metadata: labels: type: my-app-ephvol spec: accessModes: [ "ReadWriteOnce" ] storageClassName: "gp2-csi" resources: requests: storage: 1Gi- 1
- Generic ephemeral volume claim.
Chapter 8. Expanding persistent volumes
8.1. Enabling volume expansion support
Before you can expand persistent volumes, the StorageClass object must have the allowVolumeExpansion field set to true.
Procedure
Edit the
StorageClassobject and add theallowVolumeExpansionattribute by running the following command:$ oc edit storageclass <storage_class_name>1 - 1
- Specifies the name of the storage class.
The following example demonstrates adding this line at the bottom of the storage class configuration.
apiVersion: storage.k8s.io/v1 kind: StorageClass ... parameters: type: gp2 reclaimPolicy: Delete allowVolumeExpansion: true1 - 1
- Setting this attribute to
trueallows PVCs to be expanded after creation.
8.2. Expanding CSI volumes
You can use the Container Storage Interface (CSI) to expand storage volumes after they have already been created.
CSI volume expansion does not support the following:
- Recovering from failure when expanding volumes
- Shrinking
Prerequisites
- The underlying CSI driver supports resize.
- Dynamic provisioning is used.
-
The controlling
StorageClassobject hasallowVolumeExpansionset totrue. For more information, see "Enabling volume expansion support."
Procedure
-
For the persistent volume claim (PVC), set
.spec.resources.requests.storageto the desired new size. -
Watch the
status.conditionsfield of the PVC to see if the resize has completed. OpenShift Container Platform adds theResizingcondition to the PVC during expansion, which is removed after expansion completes.
8.3. Expanding FlexVolume with a supported driver
When using FlexVolume to connect to your back-end storage system, you can expand persistent storage volumes after they have already been created. This is done by manually updating the persistent volume claim (PVC) in OpenShift Container Platform.
FlexVolume allows expansion if the driver is set with RequiresFSResize to true. The FlexVolume can be expanded on pod restart.
Similar to other volume types, FlexVolume volumes can also be expanded when in use by a pod.
Prerequisites
- The underlying volume driver supports resize.
-
The driver is set with the
RequiresFSResizecapability totrue. - Dynamic provisioning is used.
-
The controlling
StorageClassobject hasallowVolumeExpansionset totrue.
Procedure
To use resizing in the FlexVolume plugin, you must implement the
ExpandableVolumePlugininterface using these methods:RequiresFSResize-
If
true, updates the capacity directly. Iffalse, calls theExpandFSmethod to finish the filesystem resize. ExpandFS-
If
true, callsExpandFSto resize filesystem after physical volume expansion is done. The volume driver can also perform physical volume resize together with filesystem resize.
Because OpenShift Container Platform does not support installation of FlexVolume plugins on control plane nodes, it does not support control-plane expansion of FlexVolume.
8.4. Expanding local volumes
You can manually expand persistent volumes (PVs) and persistent volume claims (PVCs) created by using the local storage operator (LSO).
Procedure
- Expand the underlying devices. Ensure that appropriate capacity is available on these devices.
-
Update the corresponding PV objects to match the new device sizes by editing the
.spec.capacityfield of the PV. -
For the storage class that is used for binding the PVC to PVet, set
allowVolumeExpansion:true. -
For the PVC, set
.spec.resources.requests.storageto match the new size.
Kubelet should automatically expand the underlying file system on the volume, if necessary, and update the status field of the PVC to reflect the new size.
8.5. Expanding persistent volume claims (PVCs) with a file system
Expanding PVCs based on volume types that need file system resizing, such as GCE, EBS, and Cinder, is a two-step process. First, expand the volume objects in the cloud provider. Second, expand the file system on the node.
Expanding the file system on the node only happens when a new pod is started with the volume.
Prerequisites
-
The controlling
StorageClassobject must haveallowVolumeExpansionset totrue.
Procedure
Edit the PVC and request a new size by editing
spec.resources.requests. For example, the following expands theebsPVC to 8 Gi:kind: PersistentVolumeClaim apiVersion: v1 metadata: name: ebs spec: storageClass: "storageClassWithFlagSet" accessModes: - ReadWriteOnce resources: requests: storage: 8Gi1 - 1
- Updating
spec.resources.requeststo a larger amount expands the PVC.
After the cloud provider object has finished resizing, the PVC is set to
FileSystemResizePending. Check the condition by entering the following command:$ oc describe pvc <pvc_name>-
When the cloud provider object has finished resizing, the
PersistentVolumeobject reflects the newly requested size inPersistentVolume.Spec.Capacity. At this point, you can create or recreate a new pod from the PVC to finish the file system resizing. Once the pod is running, the newly requested size is available and theFileSystemResizePendingcondition is removed from the PVC.
8.6. Recovering from failure when expanding volumes
If expanding underlying storage fails, the OpenShift Container Platform administrator can manually recover the persistent volume claim (PVC) state and cancel the resize requests. Otherwise, the resize requests are continuously retried by the controller.
Procedure
-
Mark the persistent volume (PV) that is bound to the PVC with the
Retainreclaim policy. This can be done by editing the PV and changingpersistentVolumeReclaimPolicytoRetain. - Delete the PVC.
-
Manually edit the PV and delete the
claimRefentry from the PV specs to ensure that the newly created PVC can bind to the PV markedRetain. This marks the PV asAvailable. - Re-create the PVC in a smaller size, or a size that can be allocated by the underlying storage provider.
-
Set the
volumeNamefield of the PVC to the name of the PV. This binds the PVC to the provisioned PV only. - Restore the reclaim policy on the PV.
Chapter 9. Dynamic provisioning
9.1. About dynamic provisioning
The StorageClass resource object describes and classifies storage that can be requested, as well as provides a means for passing parameters for dynamically provisioned storage on demand. StorageClass objects can also serve as a management mechanism for controlling different levels of storage and access to the storage. Cluster Administrators (cluster-admin) or Storage Administrators (storage-admin) define and create the StorageClass objects that users can request without needing any detailed knowledge about the underlying storage volume sources.
The OpenShift Container Platform persistent volume framework enables this functionality and allows administrators to provision a cluster with persistent storage. The framework also gives users a way to request those resources without having any knowledge of the underlying infrastructure.
Many storage types are available for use as persistent volumes in OpenShift Container Platform. While all of them can be statically provisioned by an administrator, some types of storage are created dynamically using the built-in provider and plugin APIs.
9.2. Available dynamic provisioning plugins
OpenShift Container Platform provides the following provisioner plugins, which have generic implementations for dynamic provisioning that use the cluster’s configured provider’s API to create new storage resources:
| Storage type | Provisioner plugin name | Notes |
|---|---|---|
| Red Hat OpenStack Platform (RHOSP) Cinder |
| |
| RHOSP Manila Container Storage Interface (CSI) |
| Once installed, the OpenStack Manila CSI Driver Operator and ManilaDriver automatically create the required storage classes for all available Manila share types needed for dynamic provisioning. |
| Amazon Elastic Block Store (Amazon EBS) |
|
For dynamic provisioning when using multiple clusters in different zones, tag each node with |
| Azure Disk |
| |
| Azure File |
|
The |
| GCE Persistent Disk (gcePD) |
| In multi-zone configurations, it is advisable to run one OpenShift Container Platform cluster per GCE project to avoid PVs from being created in zones where no node in the current cluster exists. |
| IBM Power® Virtual Server Block |
| After installation, the IBM Power® Virtual Server Block CSI Driver Operator and IBM Power® Virtual Server Block CSI Driver automatically create the required storage classes for dynamic provisioning. |
|
|
Any chosen provisioner plugin also requires configuration for the relevant cloud, host, or third-party provider as per the relevant documentation.
9.3. Defining a storage class
StorageClass objects are currently a globally scoped object and must be created by cluster-admin or storage-admin users.
The Cluster Storage Operator might install a default storage class depending on the platform in use. This storage class is owned and controlled by the Operator. It cannot be deleted or modified beyond defining annotations and labels. If different behavior is desired, you must define a custom storage class.
The following sections describe the basic definition for a StorageClass object and specific examples for each of the supported plugin types.
9.3.1. Basic StorageClass object definition
The following resource shows the parameters and default values that you use to configure a storage class. This example uses the AWS ElasticBlockStore (EBS) object definition.
Sample StorageClass definition
kind: StorageClass
apiVersion: storage.k8s.io/v1
metadata:
name: <storage-class-name>
annotations:
storageclass.kubernetes.io/is-default-class: 'true'
...
provisioner: kubernetes.io/aws-ebs
parameters:
type: gp3
...- 1
- (required) The API object type.
- 2
- (required) The current apiVersion.
- 3
- (required) The name of the storage class.
- 4
- (optional) Annotations for the storage class.
- 5
- (required) The type of provisioner associated with this storage class.
- 6
- (optional) The parameters required for the specific provisioner, this will change from plug-in to plug-in.
9.3.2. Storage class annotations
To set a storage class as the cluster-wide default, add the following annotation to your storage class metadata:
storageclass.kubernetes.io/is-default-class: "true"For example:
apiVersion: storage.k8s.io/v1
kind: StorageClass
metadata:
annotations:
storageclass.kubernetes.io/is-default-class: "true"
...This enables any persistent volume claim (PVC) that does not specify a specific storage class to automatically be provisioned through the default storage class. However, your cluster can have more than one storage class, but only one of them can be the default storage class.
The beta annotation storageclass.beta.kubernetes.io/is-default-class is still working; however, it will be removed in a future release.
To set a storage class description, add the following annotation to your storage class metadata:
kubernetes.io/description: My Storage Class DescriptionFor example:
apiVersion: storage.k8s.io/v1
kind: StorageClass
metadata:
annotations:
kubernetes.io/description: My Storage Class Description
...9.3.3. RHOSP Cinder object definition
cinder-storageclass.yaml
kind: StorageClass
apiVersion: storage.k8s.io/v1
metadata:
name: <storage-class-name>
provisioner: kubernetes.io/cinder
parameters:
type: fast
availability: nova
fsType: ext4 - 1
- Name of the storage class. The persistent volume claim uses this storage class for provisioning the associated persistent volumes.
- 2
- Volume type created in Cinder. Default is empty.
- 3
- Availability Zone. If not specified, volumes are generally round-robined across all active zones where the OpenShift Container Platform cluster has a node.
- 4
- File system that is created on dynamically provisioned volumes. This value is copied to the
fsTypefield of dynamically provisioned persistent volumes and the file system is created when the volume is mounted for the first time. The default value isext4.
9.3.4. RHOSP Manila Container Storage Interface (CSI) object definition
Once installed, the OpenStack Manila CSI Driver Operator and ManilaDriver automatically create the required storage classes for all available Manila share types needed for dynamic provisioning.
9.3.5. AWS Elastic Block Store (EBS) object definition
aws-ebs-storageclass.yaml
kind: StorageClass
apiVersion: storage.k8s.io/v1
metadata:
name: <storage-class-name>
provisioner: kubernetes.io/aws-ebs
parameters:
type: io1
iopsPerGB: "10"
encrypted: "true"
kmsKeyId: keyvalue
fsType: ext4 - 1
- (required) Name of the storage class. The persistent volume claim uses this storage class for provisioning the associated persistent volumes.
- 2
- (required) Select from
io1,gp3,sc1,st1. The default isgp3. See the AWS documentation for valid Amazon Resource Name (ARN) values. - 3
- Optional: Only for io1 volumes. I/O operations per second per GiB. The AWS volume plugin multiplies this with the size of the requested volume to compute IOPS of the volume. The value cap is 20,000 IOPS, which is the maximum supported by AWS. See the AWS documentation for further details.
- 4
- Optional: Denotes whether to encrypt the EBS volume. Valid values are
trueorfalse. - 5
- Optional: The full ARN of the key to use when encrypting the volume. If none is supplied, but
encyptedis set totrue, then AWS generates a key. See the AWS documentation for a valid ARN value. - 6
- Optional: File system that is created on dynamically provisioned volumes. This value is copied to the
fsTypefield of dynamically provisioned persistent volumes and the file system is created when the volume is mounted for the first time. The default value isext4.
9.3.6. Azure Disk object definition
azure-advanced-disk-storageclass.yaml
apiVersion: storage.k8s.io/v1
kind: StorageClass
metadata:
name: <storage-class-name>
provisioner: kubernetes.io/azure-disk
volumeBindingMode: WaitForFirstConsumer
allowVolumeExpansion: true
parameters:
kind: Managed
storageaccounttype: Premium_LRS
reclaimPolicy: Delete- 1
- Name of the storage class. The persistent volume claim uses this storage class for provisioning the associated persistent volumes.
- 2
- Using
WaitForFirstConsumeris strongly recommended. This provisions the volume while allowing enough storage to schedule the pod on a free worker node from an available zone. - 3
- Possible values are
Shared(default),Managed, andDedicated.ImportantRed Hat only supports the use of
kind: Managedin the storage class.With
SharedandDedicated, Azure creates unmanaged disks, while OpenShift Container Platform creates a managed disk for machine OS (root) disks. But because Azure Disk does not allow the use of both managed and unmanaged disks on a node, unmanaged disks created withSharedorDedicatedcannot be attached to OpenShift Container Platform nodes. - 4
- Azure storage account SKU tier. Default is empty. Note that Premium VMs can attach both
Standard_LRSandPremium_LRSdisks, Standard VMs can only attachStandard_LRSdisks, Managed VMs can only attach managed disks, and unmanaged VMs can only attach unmanaged disks.-
If
kindis set toShared, Azure creates all unmanaged disks in a few shared storage accounts in the same resource group as the cluster. -
If
kindis set toManaged, Azure creates new managed disks. If
kindis set toDedicatedand astorageAccountis specified, Azure uses the specified storage account for the new unmanaged disk in the same resource group as the cluster. For this to work:- The specified storage account must be in the same region.
- Azure Cloud Provider must have write access to the storage account.
-
If
kindis set toDedicatedand astorageAccountis not specified, Azure creates a new dedicated storage account for the new unmanaged disk in the same resource group as the cluster.
-
If
9.3.7. Azure File object definition
The Azure File storage class uses secrets to store the Azure storage account name and the storage account key that are required to create an Azure Files share. These permissions are created as part of the following procedure.
Procedure
Define a
ClusterRoleobject that allows access to create and view secrets:apiVersion: rbac.authorization.k8s.io/v1 kind: ClusterRole metadata: # name: system:azure-cloud-provider name: <persistent-volume-binder-role>1 rules: - apiGroups: [''] resources: ['secrets'] verbs: ['get','create']- 1
- The name of the cluster role to view and create secrets.
Add the cluster role to the service account:
$ oc adm policy add-cluster-role-to-user <persistent-volume-binder-role> system:serviceaccount:kube-system:persistent-volume-binderCreate the Azure File
StorageClassobject:kind: StorageClass apiVersion: storage.k8s.io/v1 metadata: name: <azure-file>1 provisioner: kubernetes.io/azure-file parameters: location: eastus2 skuName: Standard_LRS3 storageAccount: <storage-account>4 reclaimPolicy: Delete volumeBindingMode: Immediate- 1
- Name of the storage class. The persistent volume claim uses this storage class for provisioning the associated persistent volumes.
- 2
- Location of the Azure storage account, such as
eastus. Default is empty, meaning that a new Azure storage account will be created in the OpenShift Container Platform cluster’s location. - 3
- SKU tier of the Azure storage account, such as
Standard_LRS. Default is empty, meaning that a new Azure storage account will be created with theStandard_LRSSKU. - 4
- Name of the Azure storage account. If a storage account is provided, then
skuNameandlocationare ignored. If no storage account is provided, then the storage class searches for any storage account that is associated with the resource group for any accounts that match the definedskuNameandlocation.
9.3.7.1. Considerations when using Azure File
The following file system features are not supported by the default Azure File storage class:
- Symlinks
- Hard links
- Extended attributes
- Sparse files
- Named pipes
Additionally, the owner user identifier (UID) of the Azure File mounted directory is different from the process UID of the container. The uid mount option can be specified in the StorageClass object to define a specific user identifier to use for the mounted directory.
The following StorageClass object demonstrates modifying the user and group identifier, along with enabling symlinks for the mounted directory.
kind: StorageClass
apiVersion: storage.k8s.io/v1
metadata:
name: azure-file
mountOptions:
- uid=1500
- gid=1500
- mfsymlinks
provisioner: kubernetes.io/azure-file
parameters:
location: eastus
skuName: Standard_LRS
reclaimPolicy: Delete
volumeBindingMode: Immediate9.3.8. GCE PersistentDisk (gcePD) object definition
gce-pd-storageclass.yaml
apiVersion: storage.k8s.io/v1
kind: StorageClass
metadata:
name: <storage-class-name>
provisioner: kubernetes.io/gce-pd
parameters:
type: pd-standard
replication-type: none
volumeBindingMode: WaitForFirstConsumer
allowVolumeExpansion: true
reclaimPolicy: Delete9.3.9. VMware vSphere object definition
vsphere-storageclass.yaml
kind: StorageClass
apiVersion: storage.k8s.io/v1
metadata:
name: <storage-class-name>
provisioner: csi.vsphere.vmware.com - 1
- Name of the storage class. The persistent volume claim uses this storage class for provisioning the associated persistent volumes.
- 2
- For more information about using VMware vSphere CSI with OpenShift Container Platform, see the Kubernetes documentation.
9.4. Changing the default storage class
Use the following procedure to change the default storage class.
For example, if you have two defined storage classes, gp3 and standard, and you want to change the default storage class from gp3 to standard.
Prerequisites
- Access to the cluster with cluster-admin privileges.
Procedure
To change the default storage class:
List the storage classes:
$ oc get storageclassExample output
NAME TYPE gp3 (default) kubernetes.io/aws-ebs1 standard kubernetes.io/aws-ebs- 1
(default)indicates the default storage class.
Make the desired storage class the default.
For the desired storage class, set the
storageclass.kubernetes.io/is-default-classannotation totrueby running the following command:$ oc patch storageclass standard -p '{"metadata": {"annotations": {"storageclass.kubernetes.io/is-default-class": "true"}}}'NoteYou can have multiple default storage classes for a short time. However, you should ensure that only one default storage class exists eventually.
With multiple default storage classes present, any persistent volume claim (PVC) requesting the default storage class (
pvc.spec.storageClassName=nil) gets the most recently created default storage class, regardless of the default status of that storage class, and the administrator receives an alert in the alerts dashboard that there are multiple default storage classes,MultipleDefaultStorageClasses.Remove the default storage class setting from the old default storage class.
For the old default storage class, change the value of the
storageclass.kubernetes.io/is-default-classannotation tofalseby running the following command:$ oc patch storageclass gp3 -p '{"metadata": {"annotations": {"storageclass.kubernetes.io/is-default-class": "false"}}}'Verify the changes:
$ oc get storageclassExample output
NAME TYPE gp3 kubernetes.io/aws-ebs standard (default) kubernetes.io/aws-ebs
Chapter 10. Detach volumes after non-graceful node shutdown
This feature allows drivers to automatically detach volumes when a node goes down non-gracefully.
Detach CSI volumes after non-graceful node shutdown is a Technology Preview feature only. Technology Preview features are not supported with Red Hat production service level agreements (SLAs) and might not be functionally complete. Red Hat does not recommend using them in production. These features provide early access to upcoming product features, enabling customers to test functionality and provide feedback during the development process.
For more information about the support scope of Red Hat Technology Preview features, see Technology Preview Features Support Scope.
10.1. Overview
A graceful node shutdown occurs when the kubelet’s node shutdown manager detects the upcoming node shutdown action. Non-graceful shutdowns occur when the kubelet does not detect a node shutdown action, which can occur because of system or hardware failures. Also, the kubelet may not detect a node shutdown action when the shutdown command does not trigger the Inhibitor Locks mechanism used by the kubelet on Linux, or because of a user error, for example, if the shutdownGracePeriod and shutdownGracePeriodCriticalPods details are not configured correctly for that node.
With this feature, when a non-graceful node shutdown occurs, you can manually add an out-of-service taint on the node to allow volumes to automatically detach from the node.
10.2. Adding an out-of-service taint manually for automatic volume detachment
Prerequisites
- Access to the cluster with cluster-admin privileges.
Procedure
To allow volumes to detach automatically from a node after a non-graceful node shutdown:
- After a node is detected as unhealthy, shut down the worker node.
Ensure that the node is shutdown by running the following command and checking the status:
$ oc get node <node_name>1 - 1
- <node_name> = name of the node that shut down non-gracefully
ImportantIf the node is not completely shut down, do not proceed with tainting the node. If the node is still up and the taint is applied, filesystem corruption can occur.
Taint the corresponding node object by running the following command:
ImportantTainting a node this way deletes all pods on that node. This also causes any pods that are backed by statefulsets to be evicted, and replacement pods to be created on a different node.
$ oc adm taint node <node_name> node.kubernetes.io/out-of-service=nodeshutdown:NoExecute1 - 1
- <node_name> = name of the node that shut down non-gracefully
After the taint is applied, the volumes detach from the shutdown node allowing their disks to be attached to a different node.
Example
The resulting YAML file resembles the following:
spec: taints: - effect: NoExecute key: node.kubernetes.io/out-of-service value: nodeshutdown- Restart the node.
- Remove the taint.
Legal Notice
Copyright © Red Hat
OpenShift documentation is licensed under the Apache License 2.0 (https://www.apache.org/licenses/LICENSE-2.0).
Modified versions must remove all Red Hat trademarks.
Portions adapted from https://github.com/kubernetes-incubator/service-catalog/ with modifications by Red Hat.
Red Hat, Red Hat Enterprise Linux, the Red Hat logo, the Shadowman logo, JBoss, OpenShift, Fedora, the Infinity logo, and RHCE are trademarks of Red Hat, Inc., registered in the United States and other countries.
Linux® is the registered trademark of Linus Torvalds in the United States and other countries.
Java® is a registered trademark of Oracle and/or its affiliates.
XFS® is a trademark of Silicon Graphics International Corp. or its subsidiaries in the United States and/or other countries.
MySQL® is a registered trademark of MySQL AB in the United States, the European Union and other countries.
Node.js® is an official trademark of the OpenJS Foundation.
The OpenStack® Word Mark and OpenStack logo are either registered trademarks/service marks or trademarks/service marks of the OpenStack Foundation, in the United States and other countries and are used with the OpenStack Foundation’s permission. We are not affiliated with, endorsed or sponsored by the OpenStack Foundation, or the OpenStack community.
All other trademarks are the property of their respective owners.