Este conteúdo não está disponível no idioma selecionado.
Chapter 4. Configuring multi-supplier replication using the web console
In a multi-supplier replication environment, two or more writable suppliers replicate data with each other. For example, set up multi-supplier replication to provide a fail-over environment and distribute the load over multiple servers. Clients can then perform read and write operations on any host that is a read-write replica.
This section assumes that you have an existing Directory Server instance running on a host named supplier1.example.com. The procedures describe how to add another read-write replica named supplier2.example.com to the topology, and how to configure multi-supplier replication for the dc=example,dc=com suffix.
4.1. Preparing the new supplier using the web console
To prepare the supplier2.example.com host, enable replication. This process:
- Configures the role of this server in the replication topology
- Defines the suffix that is replicated
- Creates the replication manager account the supplier uses to connect to this host
Perform this procedure on the supplier that you want to add to the replication topology.
Prerequisites
- You installed the Directory Server instance. For details, see Setting up a new instance using the web console.
-
The database for the
dc=example,dc=comsuffix exists. - You are logged in to the instance in the web console.
Procedure
- Open the Replication menu.
-
Select the
dc=example,dc=comsuffix. Enable replication:
- Click .
Select
Supplierin the Replication Role field, enter a replica ID, as well as the distinguished name (DN) and password of the replication manager account to create: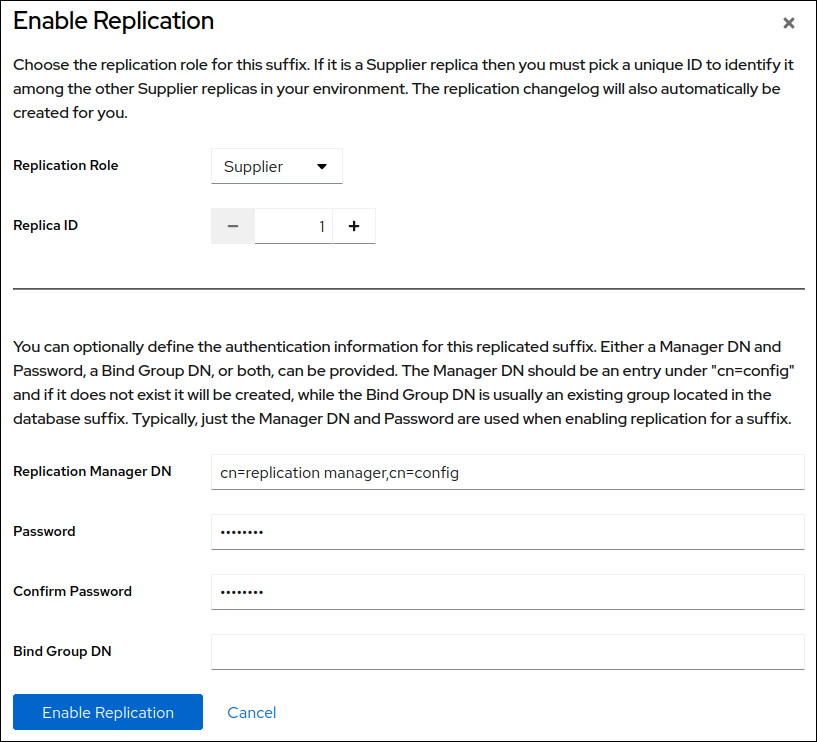
These settings configure the host as a supplier for the
dc=example,dc=comsuffix and set the replica ID of this entry to1.ImportantThe replica ID must be a unique integer between
1and65534for a suffix across all suppliers in the topology.If you set no replication manager DN, set a bind group DN. You can then use any member of this group in the replication agreement.
- Click .
Verification
- Open the Replication menu.
-
Select the
dc=example,dc=comsuffix. -
If the Replica Role field contains the value
Supplier, replication is enabled, and the host is configured as a supplier.
4.2. Configuring the existing server as a supplier to the new server using the web console
To prepare the existing server supplier1.example.com as a supplier, you need to:
- Enable replication for the suffix.
- Create a replication agreement to the new supplier.
- Initialize the new supplier.
Perform this procedure on the existing supplier in the replication topology.
Prerequisites
-
You enabled replication for the
dc=example,dc=comsuffix on the supplier to join. - You are logged in to the instance in the web console.
Procedure
- Open the Replication menu.
-
Select the
dc=example,dc=comsuffix. Enable replication:
- Click .
Select
Supplierin the Replication Role field, enter a replica ID, as well as the distinguished name (DN) and password of the replication manager account to create:
These settings configure the host as a supplier for the
dc=example,dc=comsuffix and set the replica ID of this entry to2.ImportantThe replica ID must be a unique integer between
1and65534for a suffix across all suppliers in the topology.- Click .
Add a replication agreement and initialize the new server:
On the Agreements tab, click , and fill the fields:

These settings create a replication agreement named
example-agreement-supplier1-to-supplier2. The replication agreement defines settings, such as the new supplier’s host name, protocol, and authentication information that the supplier uses when connecting and replicating data to the new supplier.-
Select
Do Online Initializationin the Consumer Initialization field to automatically initialize the new server after saving the agreement. Click .
After the agreement was created, Directory Server initializes
supplier2.example.com. Depending on the amount of data to replicate, initialization can be time-consuming.
Verification
- Open the Replication menu.
-
Select the
dc=example,dc=comsuffix. On the Agreements tab, verify the status of the agreement in the State column of the table.

4.3. Configuring the new server as a supplier to the existing server using the web console
To prepare the new server supplier2.example.com as a supplier, you need to:
- Enable replication for the suffix.
- Create a replication agreement to the existing server.
- Initialize the existing server.
Perform this procedure on the existing supplier in the replication topology.
Do not continue if you have not initialized the replication agreement on the existing server. Otherwise, the empty database from the new server overrides the database on the existing supplier.
Prerequisites
-
You enabled replication for the
dc=example,dc=comsuffix on the new server. -
You enabled replication for the
dc=example,dc=comsuffix on the existing server. - The new server to join is successfully initialized.
- You are logged in to the instance in the web console.
Procedure
- Open the Replication menu.
-
Select the
dc=example,dc=comsuffix. Add a replication agreement and initialize the existing server:
On the Agreements tab, click , and fill the fields:

These settings create a replication agreement named
example-agreement-supplier2-to-supplier1. The replication agreement defines settings, such as the existing server’s host name, protocol, and authentication information that the supplier uses when connecting and replicating data to the existing supplier.-
Select
Do Online Initializationin the Consumer Initialization field to automatically initialize the new server after saving the agreement. Click .
After the agreement was created, Directory Server initializes
supplier1.example.com. Depending on the amount of data to replicate, initialization can be time-consuming.
Verification
- Open the Replication menu.
-
Select the
dc=example,dc=comsuffix. On the Agreements tab, verify the status of the agreement in the State column of the table.