Este conteúdo não está disponível no idioma selecionado.
Chapter 14. Setting up a remote diskless system
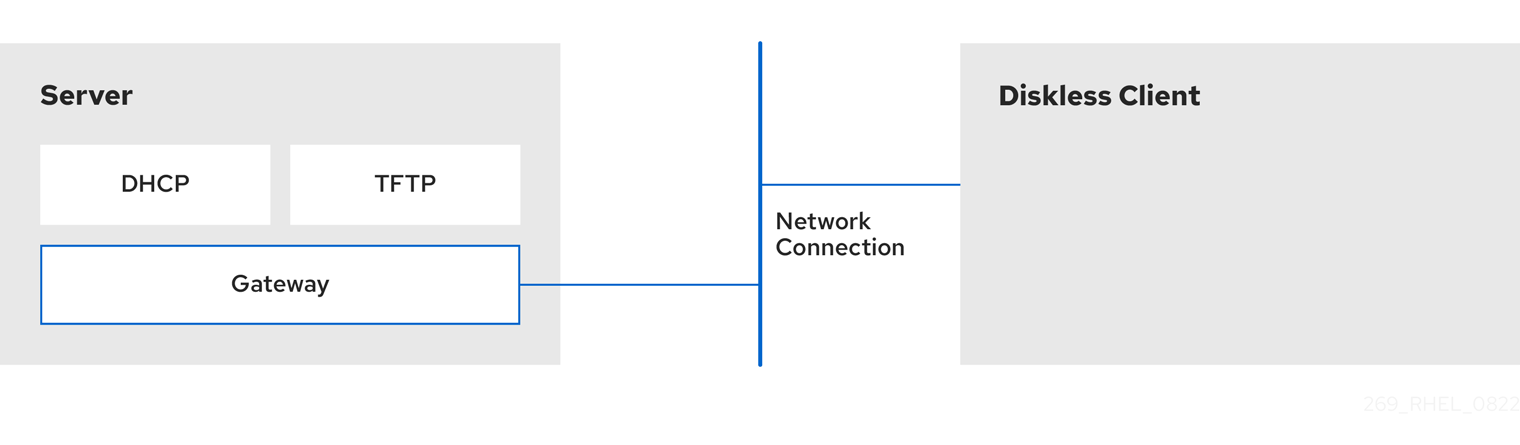
In a network environment, you can set up multiple clients with the identical configuration by deploying a remote diskless system. By using the current Red Hat Enterprise Linux server version, you can save the cost of hard drives for these clients and configure the gateway on a separate server.
The following diagram describes the connection of a diskless client with the server through Dynamic Host Configuration Protocol (DHCP) and Trivial File Transfer Protocol (TFTP) services.
Figure 14.1. Remote diskless system settings diagram
14.1. Preparing environments for the remote diskless system
Prepare your environment to continue with remote diskless system implementation. The remote diskless system booting requires the following services:
- Trivial File Transfer Protocol (TFTP) service, which is provided by tftp-server. The system uses the tftp service to retrieve the kernel image and the initial RAM disk, initrd, over the network, through the Preboot Execution Environment (PXE) loader.
- Dynamic Host Configuration Protocol (DHCP) service, which is provided by dhcp.
Prerequisites
- You have set up your network connection.
Procedure
Install the
dracut-networkpackage:dnf install dracut-network
# dnf install dracut-networkCopy to Clipboard Copied! Toggle word wrap Toggle overflow Add the following line to the
/etc/dracut.conf.d/network.conffile:add_dracutmodules+=" nfs "
add_dracutmodules+=" nfs "Copy to Clipboard Copied! Toggle word wrap Toggle overflow Ensure correct functionality of the remote diskless system in your environment by configuring services in the following order:
- Configure a TFTP service. For more information, see Configuring a TFTP service for diskless clients.
- Configure a DHCP server. For more information, see Configuring a DHCP server for diskless clients.
- Configure the Network File System (NFS) and an exported file system. For more information, see Configuring an exported file system for diskless clients.
14.2. Configuring a TFTP service for diskless clients
For the remote diskless system to function correctly in your environment, you need to first configure a Trivial File Transfer Protocol (TFTP) service for diskless clients.
This configuration does not boot over the Unified Extensible Firmware Interface (UEFI). For UEFI based installation, see Configuring a TFTP server for UEFI-based clients.
Prerequisites
You have installed the following packages:
-
tftp-server -
syslinux
-
Procedure
Enable the
tftpservice:systemctl enable --now tftp
# systemctl enable --now tftpCopy to Clipboard Copied! Toggle word wrap Toggle overflow Create a
pxelinuxdirectory in thetftproot directory:mkdir -p /var/lib/tftpboot/pxelinux/
# mkdir -p /var/lib/tftpboot/pxelinux/Copy to Clipboard Copied! Toggle word wrap Toggle overflow Copy the
/usr/share/syslinux/pxelinux.0file to the/var/lib/tftpboot/pxelinux/directory:cp /usr/share/syslinux/pxelinux.0 /var/lib/tftpboot/pxelinux/
# cp /usr/share/syslinux/pxelinux.0 /var/lib/tftpboot/pxelinux/Copy to Clipboard Copied! Toggle word wrap Toggle overflow Copy
/usr/share/syslinux/ldlinux.c32to/var/lib/tftpboot/pxelinux/:cp /usr/share/syslinux/ldlinux.c32 /var/lib/tftpboot/pxelinux/
# cp /usr/share/syslinux/ldlinux.c32 /var/lib/tftpboot/pxelinux/Copy to Clipboard Copied! Toggle word wrap Toggle overflow Create a
pxelinux.cfgdirectory in thetftproot directory:mkdir -p /var/lib/tftpboot/pxelinux/pxelinux.cfg/
# mkdir -p /var/lib/tftpboot/pxelinux/pxelinux.cfg/Copy to Clipboard Copied! Toggle word wrap Toggle overflow
Verification
Check status of service
tftp:systemctl status tftp
# systemctl status tftp
...
Active: active (running)
...
Copy to Clipboard Copied! Toggle word wrap Toggle overflow
14.3. Configuring a DHCP server for diskless clients
The remote diskless system requires several pre-installed services to enable correct functionality.
Prerequisites
- Install the Trivial File Transfer Protocol (TFTP) service.
You have installed the following package:
-
dhcp-server
-
-
You have configured the
tftpservice for diskless clients. For more information, see Configuring a TFTP service for diskless clients.
Procedure
Add the following configuration to the
/etc/dhcp/dhcpd.conffile to setup a DHCP server and enable Preboot Execution Environment (PXE) for booting:Copy to Clipboard Copied! Toggle word wrap Toggle overflow Your DHCP configuration might be different depending on your environment, like setting lease time or fixed address. For details, see Providing DHCP services.
NoteWhile using
libvirtvirtual machine as a diskless client, thelibvirtdaemon provides the DHCP service, and the standalone DHCP server is not used. In this situation, network booting must be enabled with thebootp file=<filename>option in thelibvirtnetwork configuration,virsh net-edit.Enable
dhcpd.service:systemctl enable --now dhcpd.service
# systemctl enable --now dhcpd.serviceCopy to Clipboard Copied! Toggle word wrap Toggle overflow
Verification
Check the status of service
dhcpd.service:systemctl status dhcpd.service
# systemctl status dhcpd.service
...
Active: active (running)
...
Copy to Clipboard Copied! Toggle word wrap Toggle overflow
14.4. Configuring an exported file system for diskless clients
As a part of configuring a remote diskless system in your environment, you must configure an exported file system for diskless clients.
Prerequisites
-
You have configured the
tftpservice for diskless clients. See section Configuring a TFTP service for diskless clients. - You have configured the Dynamic Host Configuration Protocol (DHCP) server. See section Configuring a DHCP server for diskless clients.
Procedure
-
Configure the Network File System (NFS) server to export the root directory by adding it to the
/etc/exportsdirectory. For the complete set of instructions see Deploying an NFS server Install a complete version of Red Hat Enterprise Linux to the root directory to accommodate completely diskless clients. To do that you can either install a new base system or clone an existing installation.
Install Red Hat Enterprise Linux to the exported location by replacing exported-root-directory with the path to the exported file system:
dnf install @Base kernel dracut-network nfs-utils --installroot=exported-root-directory --releasever=/
# dnf install @Base kernel dracut-network nfs-utils --installroot=exported-root-directory --releasever=/Copy to Clipboard Copied! Toggle word wrap Toggle overflow By setting the
releaseveroption to/, releasever is detected from the host (/) system.Use the
rsyncutility to synchronize with a running system:rsync -a -e ssh --exclude='/proc/' --exclude='/sys/' example.com:/ exported-root-directory
# rsync -a -e ssh --exclude='/proc/' --exclude='/sys/' example.com:/ exported-root-directoryCopy to Clipboard Copied! Toggle word wrap Toggle overflow -
Replace example.com with the hostname of the running system with which to synchronize via the
rsyncutility. Replace exported-root-directory with the path to the exported file system.
Note, that for this option you must have a separate existing running system, which you will clone to the server by the command above.
-
Replace example.com with the hostname of the running system with which to synchronize via the
Configure the file system, which is ready for export, before you can use it with diskless clients:
Copy the diskless client supported kernel (
vmlinuz-_kernel-version_pass:attributes) to thetftpboot directory:cp /exported-root-directory/boot/vmlinuz-kernel-version /var/lib/tftpboot/pxelinux/
# cp /exported-root-directory/boot/vmlinuz-kernel-version /var/lib/tftpboot/pxelinux/Copy to Clipboard Copied! Toggle word wrap Toggle overflow Create the
initramfs-kernel-version.imgfile locally and move it to the exported root directory with NFS support:dracut --add nfs initramfs-kernel-version.img kernel-version
# dracut --add nfs initramfs-kernel-version.img kernel-versionCopy to Clipboard Copied! Toggle word wrap Toggle overflow For example:
dracut --add nfs /exports/root/boot/initramfs-5.14.0-202.el9.x86_64.img 5.14.0-202.el9.x86_64
# dracut --add nfs /exports/root/boot/initramfs-5.14.0-202.el9.x86_64.img 5.14.0-202.el9.x86_64Copy to Clipboard Copied! Toggle word wrap Toggle overflow Example for creating initrd, using current running kernel version, and overwriting existing image:
dracut -f --add nfs "boot/initramfs-$(uname -r).img" "$(uname -r)"
# dracut -f --add nfs "boot/initramfs-$(uname -r).img" "$(uname -r)"Copy to Clipboard Copied! Toggle word wrap Toggle overflow Change the file permissions for
initrdto0644:chmod 0644 /exported-root-directory/boot/initramfs-kernel-version.img
# chmod 0644 /exported-root-directory/boot/initramfs-kernel-version.imgCopy to Clipboard Copied! Toggle word wrap Toggle overflow WarningIf you do not change the
initrdfile permissions, thepxelinux.0boot loader fails with a "file not found" error.Copy the resulting
initramfs-kernel-version.imgfile into thetftpboot directory:cp /exported-root-directory/boot/initramfs-kernel-version.img /var/lib/tftpboot/pxelinux/
# cp /exported-root-directory/boot/initramfs-kernel-version.img /var/lib/tftpboot/pxelinux/Copy to Clipboard Copied! Toggle word wrap Toggle overflow Add the following configuration in the
/var/lib/tftpboot/pxelinux/pxelinux.cfg/defaultfile to edit the default boot configuration for using theinitrdand the kernel:default rhel9 label rhel9 kernel vmlinuz-kernel-version append initrd=initramfs-kernel-version.img root=nfs:_server-ip_:/exported-root-directory rw
default rhel9 label rhel9 kernel vmlinuz-kernel-version append initrd=initramfs-kernel-version.img root=nfs:_server-ip_:/exported-root-directory rwCopy to Clipboard Copied! Toggle word wrap Toggle overflow This configuration instructs the diskless client root to mount the
/exported-root-directoryexported file system in a read/write format.Optional: Mount the file system in a
read-only`format by editing the/var/lib/tftpboot/pxelinux/pxelinux.cfg/defaultfile with the following configuration:default rhel9 label rhel9 kernel vmlinuz-kernel-version append initrd=initramfs-kernel-version.img root=nfs:server-ip:/exported-root-directory ro
default rhel9 label rhel9 kernel vmlinuz-kernel-version append initrd=initramfs-kernel-version.img root=nfs:server-ip:/exported-root-directory roCopy to Clipboard Copied! Toggle word wrap Toggle overflow Restart the NFS server:
systemctl restart nfs-server.service
# systemctl restart nfs-server.serviceCopy to Clipboard Copied! Toggle word wrap Toggle overflow
You can now export the NFS share to diskless clients. These clients can boot over the network via Preboot Execution Environment (PXE).
14.5. Re-configuring a remote diskless system
If you want to install packages, restart services, or debug the issues, you can reconfigure the system.
Prerequisites
-
You have enabled the
no_root_squashoption in the exported file system.
Procedure
Change the user password:
Change the command line to /exported/root/directory:
chroot /exported/root/directory /bin/bash
# chroot /exported/root/directory /bin/bashCopy to Clipboard Copied! Toggle word wrap Toggle overflow Change the password for the user you want:
passwd <username>
# passwd <username>Copy to Clipboard Copied! Toggle word wrap Toggle overflow Replace the <username> with a real user for whom you want to change the password.
- Exit the command line.
Install software on a remote diskless system:
dnf install <package> --installroot=/exported/root/directory --releasever=/ --config /etc/dnf/dnf.conf --setopt=reposdir=/etc/yum.repos.d/
# dnf install <package> --installroot=/exported/root/directory --releasever=/ --config /etc/dnf/dnf.conf --setopt=reposdir=/etc/yum.repos.d/Copy to Clipboard Copied! Toggle word wrap Toggle overflow Replace <package> with the actual package you want to install.
- Configure two separate exports to split a remote diskless system into a /usr and a /var. For more information, see Deploying an NFS server.
14.6. Troubleshooting common issues with loading a remote diskless system
Based on the earlier configuration, some issues can occur while loading the remote diskless system. Following are some examples of the most common issues and ways to troubleshoot them on a Red Hat Enterprise Linux server.
Example 14.1. The client does not get an IP address
Check if the Dynamic Host Configuration Protocol (DHCP) service is enabled on the server.
Check if the
dhcp.serviceis running:systemctl status dhcpd.service
# systemctl status dhcpd.serviceCopy to Clipboard Copied! Toggle word wrap Toggle overflow If the
dhcp.serviceis inactive, enable and start it:systemctl enable dhcpd.service systemctl start dhcpd.service
# systemctl enable dhcpd.service
# systemctl start dhcpd.service
Copy to Clipboard Copied! Toggle word wrap Toggle overflow - Reboot the diskless client.
-
Check the DHCP configuration file
/etc/dhcp/dhcpd.conf. For details, see Configuring a DHCP server for diskless clients.
Check if the Firewall ports are opened.
Check if the
dhcp.serviceis listed in active services:firewall-cmd --get-active-zones firewall-cmd --info-zone=public
# firewall-cmd --get-active-zones
# firewall-cmd --info-zone=public
Copy to Clipboard Copied! Toggle word wrap Toggle overflow If the
dhcp.serviceis not listed in active services, add it to the list:firewall-cmd --add-service=dhcp --permanent
# firewall-cmd --add-service=dhcp --permanentCopy to Clipboard Copied! Toggle word wrap Toggle overflow Check if the
nfs.serviceis listed in active services:firewall-cmd --get-active-zones firewall-cmd --info-zone=public
# firewall-cmd --get-active-zones
# firewall-cmd --info-zone=public
Copy to Clipboard Copied! Toggle word wrap Toggle overflow If the
nfs.serviceis not listed in active services, add it to the list:firewall-cmd --add-service=nfs --permanent
# firewall-cmd --add-service=nfs --permanentCopy to Clipboard Copied! Toggle word wrap Toggle overflow
Example 14.2. The file is not available during the booting a remote diskless system
-
Check if the file is in the
/var/lib/tftpboot/directory. If the file is in the directory, ensure if it has the following permissions:
chmod 644 pxelinux.0
# chmod 644 pxelinux.0Copy to Clipboard Copied! Toggle word wrap Toggle overflow - Check if the Firewall ports are opened.
Example 14.3. System boot failed after loading kernel/initrd
Check if the NFS service is enabled on a server.
Check if
nfs.serviceis running:systemctl status nfs.service
# systemctl status nfs.serviceCopy to Clipboard Copied! Toggle word wrap Toggle overflow If the
nfs.serviceis inactive, you must start and enable it:systemctl start nfs.service systemctl enable nfs.service
# systemctl start nfs.service
# systemctl enable nfs.service
Copy to Clipboard Copied! Toggle word wrap Toggle overflow
-
Check if the parameters are correct in the
/var/lib/tftpboot/pxelinux.cfg/directory. For details, see Configuring an exported file system for diskless clients. - Check if the Firewall ports are opened.