11.2. 运行 ConfigMap Property Source 的教程
以下教程允许您实验设置 Kubernetes Secret 和 ConfigMap。如 Enabling Spring Boot with Kubernetes Integration 所述启用 Spring Cloud Kubernetes 插件,将 Kubernetes 配置对象与 Spring Boot Externalized 配置集成。
11.2.1. 运行 Spring Boot Camel 配置快速入门
以下教程基于 spring-boot-camel-config-archetype Maven archetype,它可让您设置 Kubernetes Secret 和 ConfigMap。
流程
打开新的 shell 提示符,并输入以下 Maven 命令以创建简单的 Camel Spring Boot 项目。
mvn org.apache.maven.plugins:maven-archetype-plugin:2.4:generate \
  -DarchetypeCatalog=https://maven.repository.redhat.com/ga/io/fabric8/archetypes/archetypes-catalog/2.2.0.fuse-sb2-7_11_1-00018-redhat-00002/archetypes-catalog-2.2.0.fuse-sb2-7_11_1-00018-redhat-00002-archetype-catalog.xml \
  -DarchetypeGroupId=org.jboss.fuse.fis.archetypes \
  -DarchetypeArtifactId=spring-boot-camel-config-archetype \
  -DarchetypeVersion=2.2.0.fuse-sb2-7_11_1-00018-redhat-00002
archetype 插件切换到互动模式,提示您输入其余字段:
Define value for property 'groupId': : org.example.fis
Define value for property 'artifactId': : fuse711-configmap
Define value for property 'version':  1.0-SNAPSHOT: :
Define value for property 'package':  org.example.fis: :
Confirm properties configuration:
groupId: org.example.fis
artifactId: fuse711-configmap
version: 1.0-SNAPSHOT
package: org.example.fis
Y: : Y
在提示时,输入
groupId值的org.example.fis,为artifactId值输入fuse711-configmap。接受其余字段的默认值。登录 OpenShift 并切换到要部署应用的 OpenShift 项目。例如,要以
developer用户身份登录并部署到openshift项目,请输入以下命令:oc login -u developer -p developer oc project openshift在命令行中,更改到新
fuse711-configmap项目的目录,再为此应用创建 Secret 对象。cd fuse711-configmap oc create -f sample-secret.yml注意在部署应用程序前,需要创建 Secret 对象,否则部署的容器进入等待状态,直到 Secret 可用为止。如果您随后创建 Secret,容器将不会出现等待状态。有关如何设置 Secret 对象的更多信息,请参阅设置 Secret。
构建和部署快速入门应用程序。在
fuse711-configmap项目的顶层,输入:mvn oc:deploy -Popenshift按如下所示查看应用程序日志:
- 导航到浏览器中的 OpenShift Web 控制台(https://OPENSHIFT_IP_ADDR,将 OPENSHIFT_IP_ADDR 替换为集群的 IP 地址),并使用您的凭证(例如,使用用户名 developer 和密码 developer)登录控制台。
- 在左侧侧面板中展开 Home。点 Status 查看 Project Status 页面。此时会显示所选命名空间中的所有现有应用程序(如 openshift)。
-
单击
fuse711-configmap,以查看 Quickstart 的 Overview 信息页面。 - 在左侧侧面板中展开 Workloads。
-
单击 Pods,然后单击
fuse711-configmap-xxxx。此时会显示应用程序的 Pod 详情。 - 点 Logs 选项卡查看应用程序日志。
默认接收者列表(在
src/main/resources/application.properties中)将生成的消息发送到两个 dummy 端点:direct:async-queue和direct:file。这会导致以下信息被写入应用程序日志:5:44:57.377 [Camel (camel) thread #0 - timer://order] INFO generate-order-route - Generating message message-44, sending to the recipient list 15:44:57.378 [Camel (camel) thread #0 - timer://order] INFO target-route-queue - ----> message-44 pushed to an async queue (simulation) 15:44:57.379 [Camel (camel) thread #0 - timer://order] INFO target-route-queue - ----> Using username 'myuser' for the async queue 15:44:57.380 [Camel (camel) thread #0 - timer://order] INFO target-route--file - ----> message-44 written to a file在使用 ConfigMap 对象更新
fuse711-configmap应用程序配置前,您必须授予fuse711-configmap应用程序权限,以查看 OpenShift ApiServer 中的数据。输入以下命令为fuse711-configmap应用的服务帐户提供view权限:oc policy add-role-to-user view system:serviceaccount:openshift:qs-camel-config注意服务帐户通过语法
system:serviceaccount:PROJECT_NAME:SERVICE_ACCOUNT_NAME指定。fis-config部署描述符将SERVICE_ACCOUNT_NAME定义为qs-camel-config。要查看操作中的 live reload 功能,请按如下所示创建一个 ConfigMap 对象:
oc create -f sample-configmap.yml新的 ConfigMap 覆盖正在运行的应用程序中 Camel 路由的接收者列表,将其配置为将生成的消息发送到 三个 虚拟端点:
direct:async-queue、direct:file和direct:mail。如需有关 ConfigMap 对象的更多信息,请参阅设置 ConfigMap。这会导致以下信息被写入应用程序日志:16:25:24.121 [Camel (camel) thread #0 - timer://order] INFO generate-order-route - Generating message message-9, sending to the recipient list 16:25:24.124 [Camel (camel) thread #0 - timer://order] INFO target-route-queue - ----> message-9 pushed to an async queue (simulation) 16:25:24.125 [Camel (camel) thread #0 - timer://order] INFO target-route-queue - ----> Using username 'myuser' for the async queue 16:25:24.125 [Camel (camel) thread #0 - timer://order] INFO target-route--file - ----> message-9 written to a file (simulation) 16:25:24.126 [Camel (camel) thread #0 - timer://order] INFO target-route--mail - ----> message-9 sent via mail
11.2.2. 配置属性 bean
配置属性 bean 是一个常规 Java bean,可通过注入来接收配置设置。它在 Java 代码和外部配置机制之间提供了基本接口。
外部化配置和 Bean 注册表
下图显示了 Spring Boot Externalized Configuration 如何在 spring-boot-camel-config quickstart 中工作。
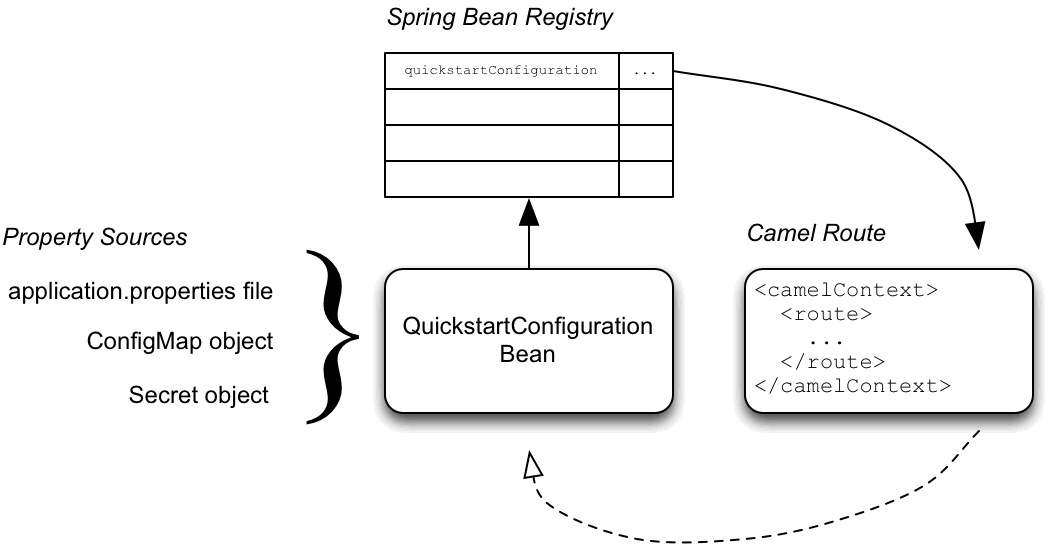
配置机制有以下主要部分:
- 属性源
-
提供注入到配置中的属性设置。默认属性源是应用程序的
application.properties文件,这可以被 ConfigMap 对象或 Secret 对象覆盖。 - 配置属性an
-
从属性源接收配置更新。配置属性 bean 是
@Configuration和@ConfigurationProperties注释的 Java bean decorated。 - Spring bean registry
- 使用 requisite 注解时,在 Spring bean registry 中注册了配置属性 bean。
- 与 Camel Bean registry 集成
- Camel Bean registry 会自动与 Spring bean registry 集成,以便在 Camel 路由中引用注册的 Spring Bean。
QuickstartConfiguration 类
fuse711-configmap 项目的配置属性定义为 QuickstartConfiguration Java 类(在 src/main/java/org/example/fis/ fis/ 目录下),如下所示:
package org.example.fis;

import org.springframework.boot.context.properties.ConfigurationProperties;
import org.springframework.context.annotation.Configuration;

@Configuration
@ConfigurationProperties(prefix = "quickstart")
public class QuickstartConfiguration {

    /**
     * A comma-separated list of routes to use as recipients for messages.
     */
    private String recipients;
    /**
     * The username to use when connecting to the async queue (simulation)
     */
    private String queueUsername;
    /**
     * The password to use when connecting to the async queue (simulation)
     */
    private String queuePassword;
    // Setters and Getters for Bean properties
    // NOT SHOWN
    ...
}- 1
@Configuration注释会使QuickstartConfiguration类实例化并在 Spring 中进行注册,作为 ID 为 QuickstartConfiguration。这样会自动从 Camel 访问 bean。例如,target-route-queue路由可以使用 Camel 语法${bean:quickstartConfiguration?method=getQueueUsername}访问queueUserName属性。- 2
@ConfigurationProperties注释定义了一个前缀 Quickstart,必须在定义属性源中的属性值时使用。例如,属性文件将接收者属性引用为quickstart.recipients。- 3
接收者属性可从属性源注入。- 4
queueUsername属性可以从属性源注入。- 5
queuePassword属性可以从属性源注入。
11.2.3. 设置 Secret
此快速入门中的 Kubernetes Secret 以标准的方式设置,除了一个额外的需要步骤中: Spring Cloud Kubernetes 插件必须使用 Secret 的挂载路径进行配置,以便它在运行时读取 Secret。设置 Secret:
- 创建 Sample Secret 对象
- 为 Secret 配置卷挂载
- 配置 spring-cloud-kubernetes 来读取 Secret 属性
Secret 对象示例
Quickstart 项目提供了一个示例 Secret sample-secret.yml,如下所示:Secret 对象中的属性值始终采用 base64 编码(使用 base64 命令行工具)。当 Secret 挂载到 pod 的文件系统中时,这些值会自动解码回纯文本。
sample-secret.yml file
apiVersion: v1
kind: Secret
metadata:
  name: camel-config
type: Opaque
data:
  # The username is 'myuser'
  quickstart.queue-username: bXl1c2VyCg==
quickstart.queue-password: MWYyZDFlMmU2N2Rm
Kubernetes 不允许在 CamelCase 中定义属性名称(它要求属性名称为小写)。要临时解决这个问题,使用连字符形式 queue-username,其中的 Spring Boot 与 queueUsername 匹配。这可利用 Spring Boot 的 relaxed 绑定规则 进行外部化配置。
为 Secret 配置卷挂载
必须将应用程序配置为在运行时载入 Secret,方法是将 Secret 配置为卷挂载。应用程序启动后,Secret 属性会在文件系统中的指定位置可用。应用的 deployment.yml 文件位于 src/main/jkube/ 目录下,用于定义 Secret 的卷挂载。
deployment.yml file
spec:
  template:
    spec:
      serviceAccountName: "qs-camel-config"
      volumes:
        - name: "camel-config"
          secret:
            # The secret must be created before deploying this application
            secretName: "camel-config"
      containers:
        -
          volumeMounts:
            - name: "camel-config"
              readOnly: true
              # Mount the secret where spring-cloud-kubernetes is configured to read it
              # see src/main/resources/bootstrap.yml
              mountPath: "/etc/secrets/camel-config"
          resources:
#            requests:
#              cpu: "0.2"
#              memory: 256Mi
#            limits:
#              cpu: "1.0"
#              memory: 256Mi
             env:
              - name: SPRING_APPLICATION_JSON
value: '{"server":{"undertow":{"io-threads":1, "worker-threads":2 }}}'配置 spring-cloud-kubernetes 来读取 Secret 属性
要将 secret 与 Spring Boot 外部化配置集成,Spring Cloud Kubernetes 插件必须配置有 secret 的挂载路径。Spring Cloud Kubernetes 从指定位置读取 secret,并将其作为属性源可用于 Spring Boot。Spring Cloud Kubernetes 插件由 bootstrap.yml 文件中的设置进行配置,位于 quickstart 项目中的 src/main/resources 下。
bootstrap.yml file
# Startup configuration of Spring-cloud-kubernetes
spring:
  application:
    name: camel-config
  cloud:
    kubernetes:
      reload:
        # Enable live reload on ConfigMap change (disabled for Secrets by default)
        enabled: true
      secrets:
        paths: /etc/secrets/camel-config
spring.cloud.kubernetes.secrets.paths 属性指定 pod 中挂载 secret 卷的路径列表。
bootstrap.properties 文件(或 bootstrap.yml 文件)的行为与 application.properties 文件类似,但在应用程序的启动阶段载入。在 bootstrap.properties 文件中设置与 Spring Cloud Kubernetes 插件相关的属性更为可靠。
11.2.4. 设置 ConfigMap
除了创建 ConfigMap 对象并设置 view 权限外,还需要将 ConfigMap 的 metadata.name 与项目的 bootstrap.yml 文件中配置的 spring.application.name 属性的值匹配。设置 ConfigMap:
- 创建示例 ConfigMap 对象
- 设置 view 权限
- 配置 Spring Cloud Kubernetes 插件
ConfigMap 对象示例
Quickstart 项目提供了一个示例 ConfigMap sample-configmap.yml。
kind: ConfigMap
apiVersion: v1
metadata:
  # Must match the 'spring.application.name' property of the application
  name: camel-config
data:
  application.properties: |
    # Override the configuration properties here
quickstart.recipients=direct:async-queue,direct:file,direct:mail 设置查看权限
如 Secret 的 deployment.yml 文件中所示,serviceAccountName 在项目的 deployment.yml 文件中被设置为 qs-camel-config。因此,您需要输入以下命令在快速启动应用程序上启用 查看 权限(假设它部署到 测试 项目命名空间中):
oc policy add-role-to-user view system:serviceaccount:test:qs-camel-config配置 Spring Cloud Kubernetes 插件
Spring Cloud Kubernetes 插件由 bootstrap.yml 文件中的以下设置配置。
- spring.application.name
-
这个值必须与 ConfigMap 对象的
metadata.name匹配(如 Quickstart 项目中的sample-configmap.yml中定义的 )。它默认为应用程序。 - spring.cloud.kubernetes.reload.enabled
-
把它设置为
true可启用对 ConfigMap 对象的动态重新载入。
有关支持的属性的详情,请参阅 PropertySource Reload Configuration Properties。