此内容没有您所选择的语言版本。
23.2. Configuring the Apache SNMP Module
To discover a Red Hat JBoss Web Server's virtual hosts and collect metrics for them, the SNMP module must be configured on that Red Hat JBoss Web Server.
Apache HTTP Server 2.2 is supported on Red Hat Enterprise Linux and Windows Server.
Important
To monitor Apache HTTP Server using JBoss ON, the SNMP module needs to be compiled prior to configuration following the instructions in Section 23.2.1, “Preparing the Apache SNMP module for use with Apache HTTP Server”.
The SNMP Plugin is already installed and enabled for JBoss ON 3.3, and the SNMP modules are pre-installed within Red Hat JBoss Web Server. To configure Red Hat JBoss Web Server for monitoring with JBoss ON:
- Open the
httpd.conffile for editing.$ sudo vim JWS_install_directory/conf/httpd.conf - Enable the module by adding these lines to the
httpd.conffile under the Dynamic Shared Object Support section.LoadModule snmpcommon_module JWS_install_directory/modules/snmpcommon.so LoadModule snmpagt_module JWS_install_directorymodules/snmpmonagt.so SNMPConf JWS_install_directory/conf SNMPVar JWS_install_directory/varFor Windows Server:LoadModule snmpcommon_module modules/libsnmpcommon.so LoadModule snmpagt_module modules/libsnmpmonagt.so SNMPConf conf SNMPVar var - Verify the main configuration section of the
httpd.conffile, as well as each <VirtualHost> configuration block, contains a ServerName directive with a port. The SNMP module uses this directive to uniquely identify the main server and each virtual host, so each ServerName directive must contain a unique value. For example:ServerName main.example.com:80 ... <VirtualHost vhost1.example.com:80> ServerName vhost1.example.com:80 ... </VirtualHost> - If there is more than one Apache instance on the same machine, it is possible to use different SNMP files for each instance.
- Each web server instance has its own
httpd.conffile. Set the SNMPConf directory in each file to its own SNMP configuration directory. For example, for instance1:$ sudo vim instance1-httpd.conf SNMPConf /opt/apache-instance1/confThen, for instance2:$ sudo vim instance2-httpd.conf SNMPConf /opt/apache-instance2/confEachsnmpd.conffile should be in the specified directory. - Edit the agentaddress property in JWS_install_directory
/conf/snmpd.confso that each instance has a different value agent address and port, so there is no conflict between instances.See the snmpd.conf documentation for a description of this property's syntax.
- Restart Red Hat JBoss Web Server.
$ sudo apachectl -k restart - Verify that the SNMP module is installed and configured by inspecting the Red Hat JBoss Web Server error log for notices regarding the SNMP module:
$ grep SNMP JWS_installation_dir/logs/error_log

[Wed Mar 19 09:54:34 2008] [notice] Apache/2.0.63 (Unix) CovalentSNMP/2.3.0 configured -- resuming normal operations
[Wed Mar 19 09:54:35 2008] [notice] SNMP: CovalentSNMP/2.3.0 started (user '1000' - SNMP address '1610' - pid '26738')
The HTTP Server can now be added to the JBoss ON monitored resources using the JBoss ON User Interface by selecting the Inventory tab, followed by the Discovery Queue under the Resources menu.
If the SNMP connectors are required for supported versions of Apache HTTP Server (other than Red Hat JBoss Web Server 2.x), they need to be compiled from source and installed.
Important
To use the Response Time module, the Apache server needs to have been compiled with shared object support. For Red Hat Enterprise Linux systems and Red Hat JBoss Web Server servers, this is enabled by default.
To verify that the Apache HTTP Server was compiled with shared object support, use the apachectl -l command to list the compiled modules and look for the
mod_so.c module:
$ sudo apachectl -l

	Compiled in modules:
		  core.c
		  prefork.c
		  http_core.c
		  mod_so.c
To compile Apache HTTP Server with shared object support, use the
--enable-module=so option:
$ ./configure --enable-module=so
$ make install- Apache connectors can be compiled for other platforms, like Solaris, from the source files in
connector-apache.zip. - Download the source files for the Apache modules from the JBoss ON UI.
- Log into the JBoss ON UI.
https://server.example.com:7080 - Click the Administration tab in the top menu.
- In the Configuration menu box on the left, select the Downloads item.
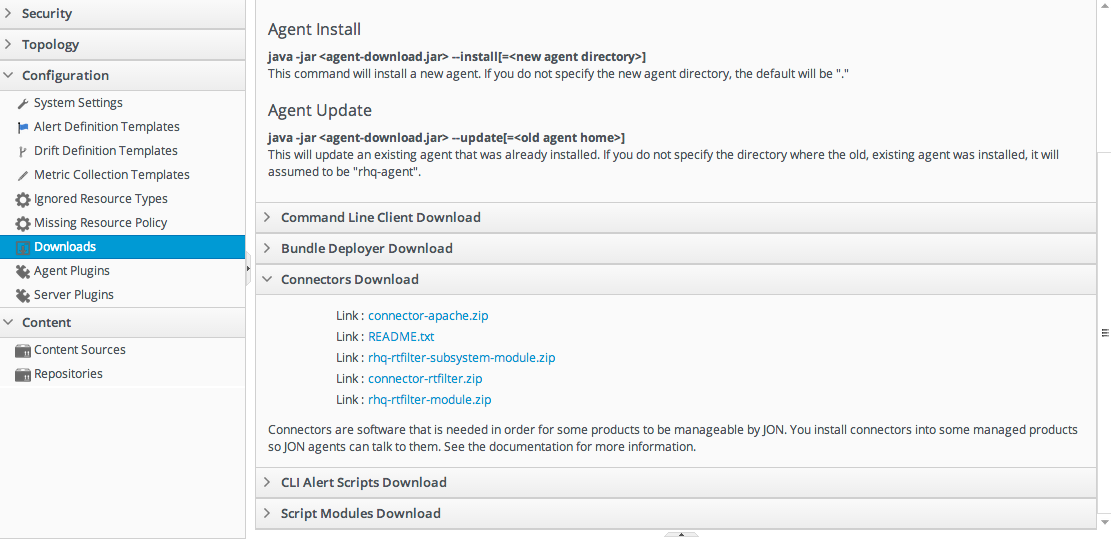
- Scroll to Connector Downloads, and click the
connector-apache.ziplink to download the Apache connectors.
NoteThe zip file containing the source files for the SNMP module can be found atJON_SERVER_INSTALL_DIR/modules/org/rhq/server-startup/main/deployments/rhq.ear/rhq-downloads/connectors/connector-apache.zip. - To compile the SNMP modules, you need to have the following packages installed: perl, make, automake and libtool.Additionally apxs should be present as part of your Apache installation.
sudo yum install perl make automake libtool - Unzip the Apache connectors and run the build script.
$ sudo unzip connector-apache.zip $ sudo cd apache-snmp/sources/ $ sudo chmod 755 ./build_apache_snmp.sh $ sudo ./build_apache_snmp.sh 2.0 [APACHE_INSTALL_DIR/sbin/apxs] - Install the module from the directory where
build_apache_snmp.shis located. For example:$ sudo cd snmp_module_# $ sudo cp module/* apache_install_directory/modules $ sudo cp conf/* apache_install_directory/conf $ sudo mkdir apache_install_directory/varWhere # is the Apache version (either 2.0 or 2.2)On Windows Server:> xcopy /e JON_AGENT_INSTALL_DIR\product_connectors\apache-snmp\binaries\x86 - The Apache SNMP module is now ready to be configured using the same process as configuring the module for Red Hat JBoss Web Server, detailed in Section 23.2, “Configuring the Apache SNMP Module”.