此内容没有您所选择的语言版本。
Chapter 2. Operators
2.1. Understanding Operators
Conceptually, Operators take human operational knowledge and encode it into software that is more easily shared with consumers.
Operators are pieces of software that ease the operational complexity of running another piece of software. They act like an extension of the software vendor’s engineering team, watching over a Kubernetes environment (such as OpenShift Container Platform) and using its current state to make decisions in real time. Advanced Operators are designed to handle upgrades seamlessly, react to failures automatically, and not take shortcuts, like skipping a software backup process to save time.
More technically, Operators are a method of packaging, deploying, and managing a Kubernetes application.
A Kubernetes application is an app that is both deployed on Kubernetes and managed using the Kubernetes APIs and kubectl or oc tooling. To be able to make the most of Kubernetes, you require a set of cohesive APIs to extend in order to service and manage your apps that run on Kubernetes. Think of Operators as the runtime that manages this type of app on Kubernetes.
2.1.1. Why use Operators?
Operators provide:
- Repeatability of installation and upgrade.
- Constant health checks of every system component.
- Over-the-air (OTA) updates for OpenShift components and ISV content.
- A place to encapsulate knowledge from field engineers and spread it to all users, not just one or two.
- Why deploy on Kubernetes?
- Kubernetes (and by extension, OpenShift Container Platform) contains all of the primitives needed to build complex distributed systems – secret handling, load balancing, service discovery, autoscaling – that work across on-premise and cloud providers.
- Why manage your app with Kubernetes APIs and
kubectltooling? -
These APIs are feature rich, have clients for all platforms and plug into the cluster’s access control/auditing. An Operator uses the Kubernetes' extension mechanism, Custom Resource Definitions (CRDs), so your custom object, for example
MongoDB, looks and acts just like the built-in, native Kubernetes objects. - How do Operators compare with Service Brokers?
- A Service Broker is a step towards programmatic discovery and deployment of an app. However, because it is not a long running process, it cannot execute Day 2 operations like upgrade, failover, or scaling. Customizations and parameterization of tunables are provided at install time, versus an Operator that is constantly watching your cluster’s current state. Off-cluster services continue to be a good match for a Service Broker, although Operators exist for these as well.
2.1.2. Operator Framework
The Operator Framework is a family of tools and capabilities to deliver on the customer experience described above. It is not just about writing code; testing, delivering, and updating Operators is just as important. The Operator Framework components consist of open source tools to tackle these problems:
- Operator SDK
- Assists Operator authors in bootstrapping, building, testing, and packaging their own Operator based on their expertise without requiring knowledge of Kubernetes API complexities.
- Operator Lifecycle Manager
- Controls the installation, upgrade, and role-based access control (RBAC) of Operators in a cluster. Deployed by default in OpenShift Container Platform 4.1.
- Operator Metering
- Collects operational metrics about Operators on the cluster for Day 2 management and aggregating usage metrics.
- OperatorHub
- Web console for discovering and installing Operators on your cluster. Deployed by default in OpenShift Container Platform 4.1.
These tools are designed to be composable, so you can use any that are useful to you.
2.1.3. Operator maturity model
The level of sophistication of the management logic encapsulated within an Operator can vary. This logic is also in general highly dependent on the type of the service represented by the Operator.
One can however generalize the scale of the maturity of an Operator’s encapsulated operations for certain set of capabilities that most Operators can include. To this end, the following Operator Maturity model defines five phases of maturity for generic day two operations of an Operator:
Figure 2.1. Operator maturity model
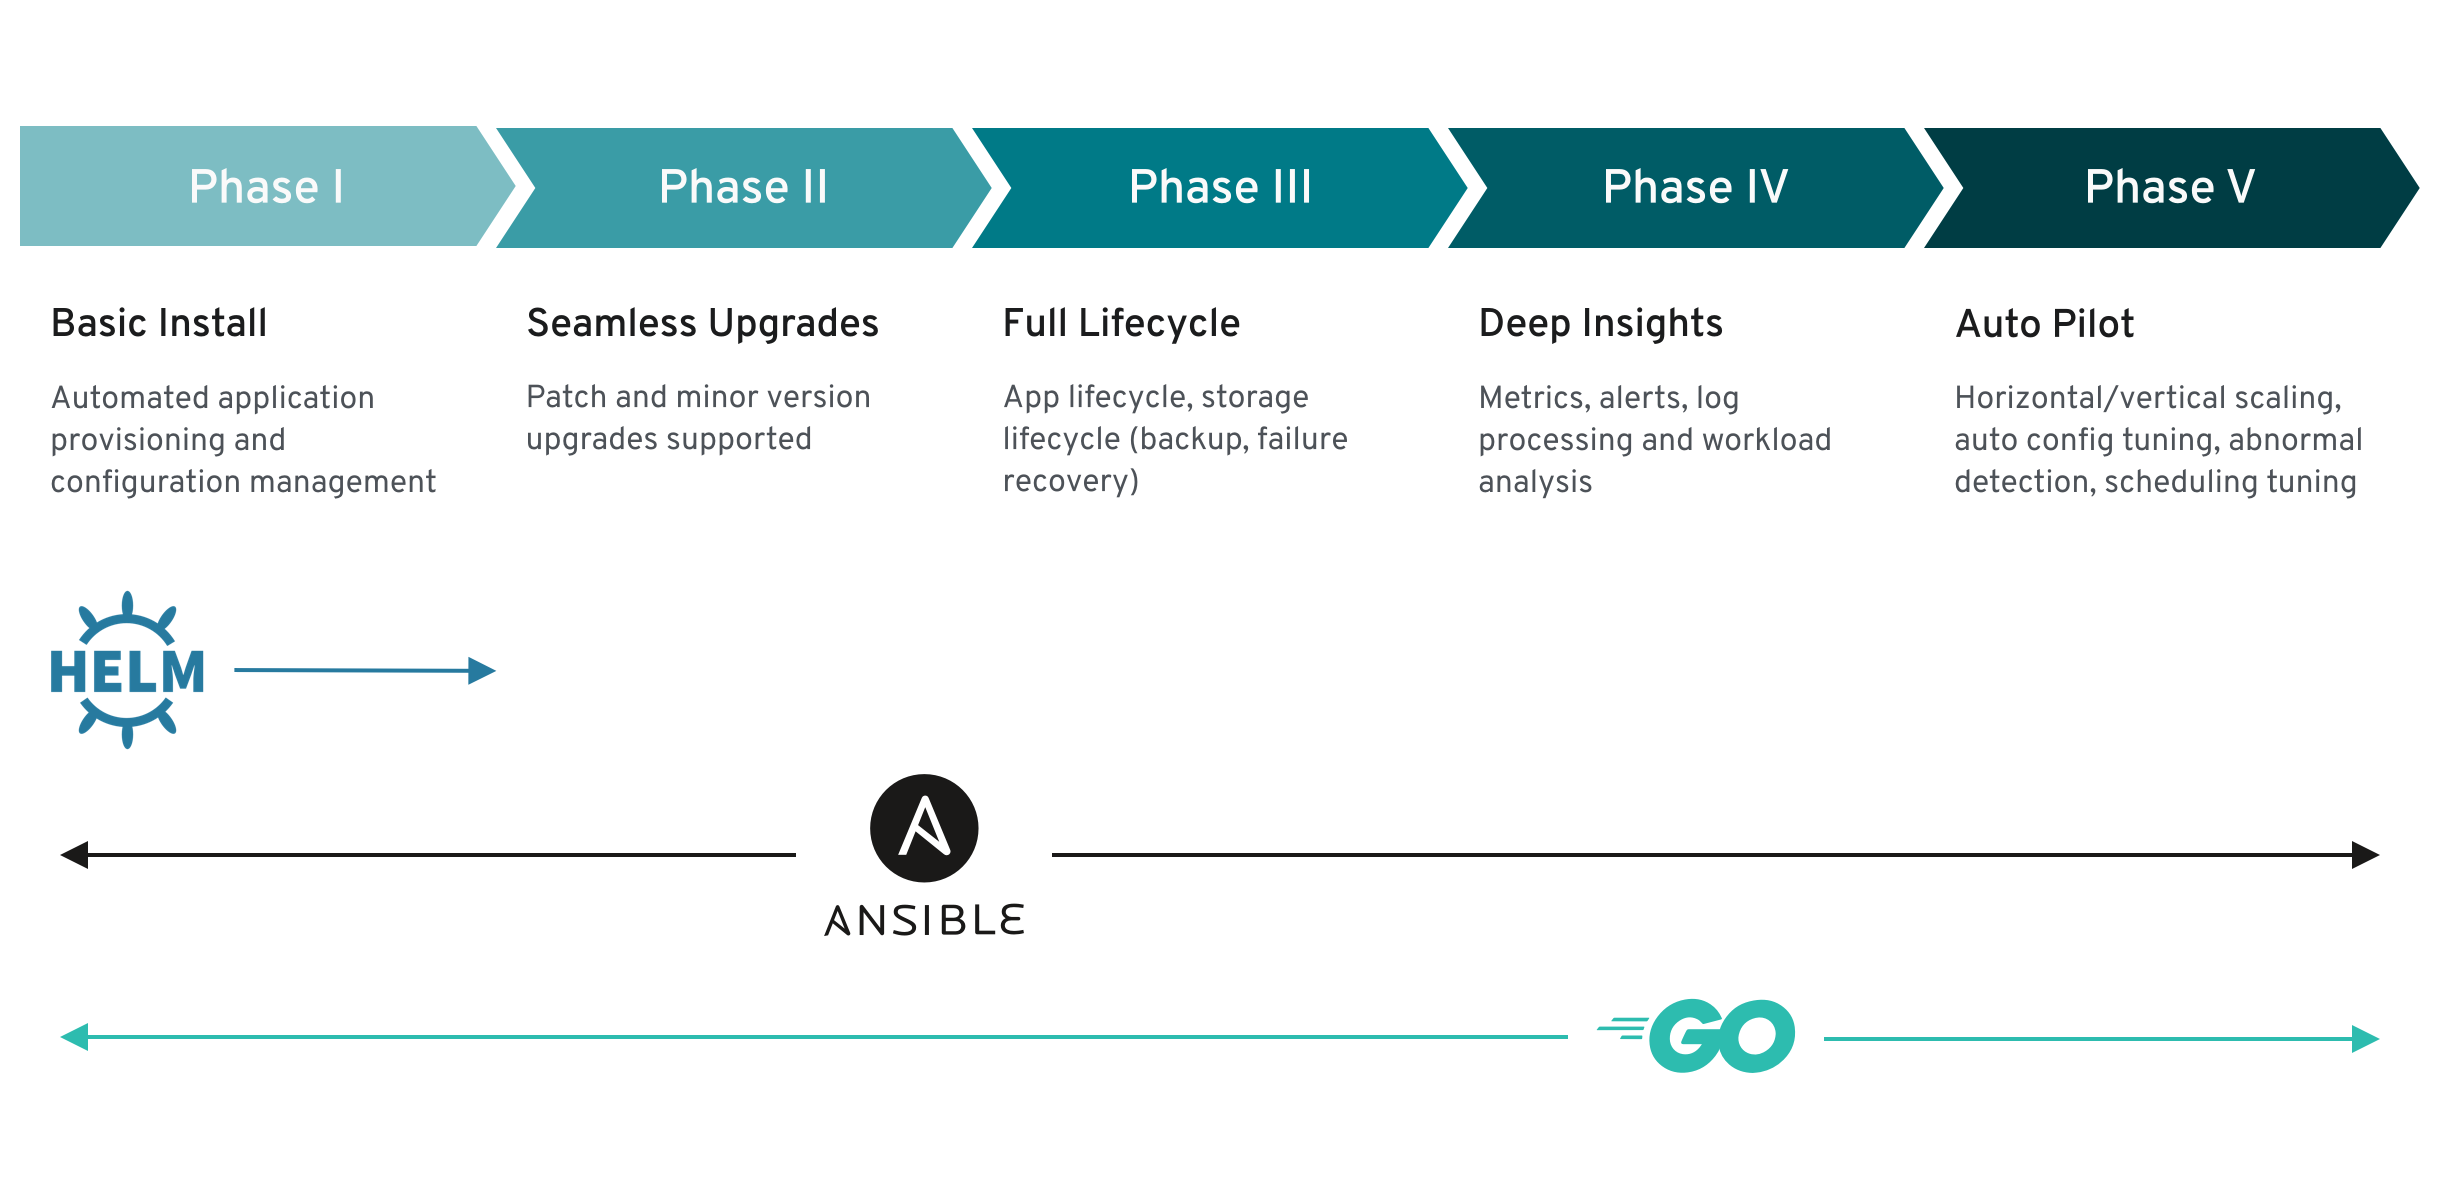
The above model also shows how these capabilities can best be developed through the Operator SDK’s Helm, Go, and Ansible capabilities.
2.2. Understanding the Operator Lifecycle Manager
This guide outlines the workflow and architecture of the Operator Lifecycle Manager (OLM) in OpenShift Container Platform.
2.2.1. Overview of the Operator Lifecycle Manager
In OpenShift Container Platform 4.1, the Operator Lifecycle Manager (OLM) helps users install, update, and manage the lifecycle of all Operators and their associated services running across their clusters. It is part of the Operator Framework, an open source toolkit designed to manage Kubernetes native applications (Operators) in an effective, automated, and scalable way.
Figure 2.2. Operator Lifecycle Manager workflow
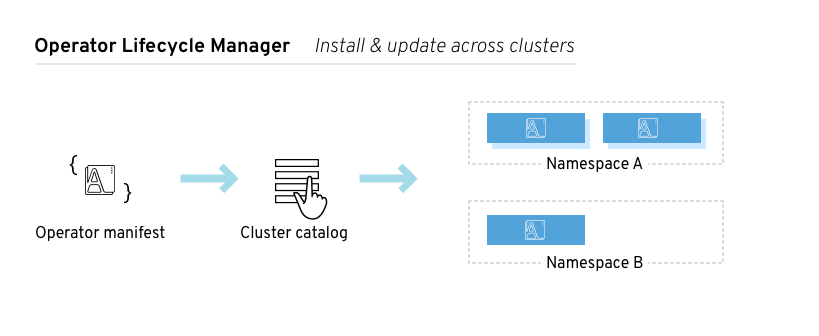
The OLM runs by default in OpenShift Container Platform 4.1, which aids cluster administrators in installing, upgrading, and granting access to Operators running on their cluster. The OpenShift Container Platform web console provides management screens for cluster administrators to install Operators, as well as grant specific projects access to use the catalog of Operators available on the cluster.
For developers, a self-service experience allows provisioning and configuring instances of databases, monitoring, and big data services without having to be subject matter experts, because the Operator has that knowledge baked into it.
2.2.2. ClusterServiceVersions (CSVs)
A ClusterServiceVersion (CSV) is a YAML manifest created from Operator metadata that assists the Operator Lifecycle Manager (OLM) in running the Operator in a cluster. It is the metadata that accompanies an Operator container image, used to populate user interfaces with information like its logo, description, and version. It is also a source of technical information needed to run the Operator, like the RBAC rules it requires and which Custom Resources (CRs) it manages or depends on.
A CSV is composed of:
- Metadata
Application metadata:
- Name, description, version (semver compliant), links, labels, icon, etc.
- Install strategy
Type: Deployment
- Set of service accounts and required permissions
- Set of Deployments.
- Custom Resource Definitions (CRDs)
- Type
- Owned: Managed by this service
- Required: Must exist in the cluster for this service to run
- Resources: A list of resources that the Operator interacts with
- Descriptors: Annotate CRD spec and status fields to provide semantic information
2.2.3. Operator Lifecycle Manager architecture
The Operator Lifecycle Manager (OLM) is composed of two Operators: the OLM Operator and the Catalog Operator.
Each of these Operators are responsible for managing the Custom Resource Definitions (CRDs) that are the basis for the OLM framework:
| Resource | Short name | Owner | Description |
|---|---|---|---|
| ClusterServiceVersion |
| OLM | Application metadata: name, version, icon, required resources, installation, etc. |
| InstallPlan |
| Catalog | Calculated list of resources to be created in order to automatically install or upgrade a CSV. |
| CatalogSource |
| Catalog | A repository of CSVs, CRDs, and packages that define an application. |
| Subscription |
| Catalog | Keeps CSVs up to date by tracking a channel in a package. |
| OperatorGroup |
| OLM | Configures all Operators deployed in the same namespace as the OperatorGroup object to watch for their Custom Resource (CR) in a list of namespaces or cluster-wide. |
Each of these Operators are also responsible for creating resources:
| Resource | Owner |
|---|---|
| Deployments | OLM |
| ServiceAccounts | |
| (Cluster)Roles | |
| (Cluster)RoleBindings | |
| Custom Resource Definitions (CRDs) | Catalog |
| ClusterServiceVersions (CSVs) |
2.2.3.1. OLM Operator
The OLM Operator is responsible for deploying applications defined by CSV resources after the required resources specified in the CSV are present in the cluster.
The OLM Operator is not concerned with the creation of the required resources; users can choose to manually create these resources using the CLI, or users can choose to create these resources using the Catalog Operator. This separation of concern enables users incremental buy-in in terms of how much of the OLM framework they choose to leverage for their application.
While the OLM Operator is often configured to watch all namespaces, it can also be operated alongside other OLM Operators so long as they all manage separate namespaces.
OLM Operator workflow
Watches for ClusterServiceVersion (CSVs) in a namespace and checks that requirements are met. If so, runs the install strategy for the CSV.
NoteA CSV must be an active member of an OperatorGroup in order for the install strategy to be run.
2.2.3.2. Catalog Operator
The Catalog Operator is responsible for resolving and installing CSVs and the required resources they specify. It is also responsible for watching CatalogSources for updates to packages in channels and upgrading them (optionally automatically) to the latest available versions.
A user that wishes to track a package in a channel creates a Subscription resource configuring the desired package, channel, and the CatalogSource from which to pull updates. When updates are found, an appropriate InstallPlan is written into the namespace on behalf of the user.
Users can also create an InstallPlan resource directly, containing the names of the desired CSV and an approval strategy, and the Catalog Operator creates an execution plan for the creation of all of the required resources. After it is approved, the Catalog Operator creates all of the resources in an InstallPlan; this then independently satisfies the OLM Operator, which proceeds to install the CSVs.
Catalog Operator workflow
- Has a cache of CRDs and CSVs, indexed by name.
Watches for unresolved InstallPlans created by a user:
- Finds the CSV matching the name requested and adds it as a resolved resource.
- For each managed or required CRD, adds it as a resolved resource.
- For each required CRD, finds the CSV that manages it.
- Watches for resolved InstallPlans and creates all of the discovered resources for it (if approved by a user or automatically).
- Watches for CatalogSources and Subscriptions and creates InstallPlans based on them.
2.2.3.3. Catalog Registry
The Catalog Registry stores CSVs and CRDs for creation in a cluster and stores metadata about packages and channels.
A package manifest is an entry in the Catalog Registry that associates a package identity with sets of CSVs. Within a package, channels point to a particular CSV. Because CSVs explicitly reference the CSV that they replace, a package manifest provides the Catalog Operator all of the information that is required to update a CSV to the latest version in a channel (stepping through each intermediate version).
2.2.4. OperatorGroups
An OperatorGroup is an OLM resource that provides multitenant configuration to OLM-installed Operators. An OperatorGroup selects a set of target namespaces in which to generate required RBAC access for its member Operators. The set of target namespaces is provided by a comma-delimited string stored in the CSV’s olm.targetNamespaces annotation. This annotation is applied to member Operator’s CSV instances and is projected into their deployments.
2.2.4.1. OperatorGroup membership
An Operator is considered a member of an OperatorGroup if the following conditions are true:
- The Operator’s CSV exists in the same namespace as the OperatorGroup.
- The Operator’s CSV’s InstallModes support the set of namespaces targeted by the OperatorGroup.
An InstallMode consists of an InstallModeType field and a boolean Supported field. A CSV’s spec can contain a set of InstallModes of four distinct InstallModeTypes:
| InstallModeType | Description |
|---|---|
|
| The Operator can be a member of an OperatorGroup that selects its own namespace. |
|
| The Operator can be a member of an OperatorGroup that selects one namespace. |
|
| The Operator can be a member of an OperatorGroup that selects more than one namespace. |
|
|
The Operator can be a member of an OperatorGroup that selects all namespaces (target namespace set is the empty string |
If a CSV’s spec omits an entry of InstallModeType, then that type is considered unsupported unless support can be inferred by an existing entry that implicitly supports it.
2.2.4.1.1. Troubleshooting OperatorGroup membership
-
If more than one OperatorGroup exists in a single namespace, any CSV created in that namespace will transition to a failure state with the reason
TooManyOperatorGroups. CSVs in a failed state for this reason will transition to pending once the number of OperatorGroups in their namespaces reaches one. -
If a CSV’s InstallModes do not support the target namespace selection of the OperatorGroup in its namespace, the CSV will transition to a failure state with the reason
UnsupportedOperatorGroup. CSVs in a failed state for this reason will transition to pending once either the OperatorGroup’s target namespace selection changes to a supported configuration, or the CSV’s InstallModes are modified to support the OperatorGroup’s target namespace selection.
2.2.4.2. Target namespace selection
Specify the set of namespaces for the OperatorGroup using a label selector with the spec.selector field:
apiVersion: operators.coreos.com/v1
kind: OperatorGroup
metadata:
  name: my-group
  namespace: my-namespace
  spec:
    selector:
      matchLabels:
        cool.io/prod: "true"
You can also explicitly name the target namespaces using the spec.targetNamespaces field:
apiVersion: operators.coreos.com/v1
kind: OperatorGroup
metadata:
  name: my-group
  namespace: my-namespace
spec:
  targetNamespaces:
  - my-namespace
  - my-other-namespace
  - my-other-other-namespace
If both spec.targetNamespaces and spec.selector are defined, spec.selector is ignored.
Alternatively, you can omit both spec.selector and spec.targetNamespaces to specify a global OperatorGroup, which selects all namespaces:
apiVersion: operators.coreos.com/v1
kind: OperatorGroup
metadata:
  name: my-group
  namespace: my-namespace
The resolved set of selected namespaces is shown in an OperatorGroup’s status.namespaces field. A global OperatorGroup’s status.namespace contains the empty string (""), which signals to a consuming Operator that it should watch all namespaces.
2.2.4.3. OperatorGroup CSV annotations
Member CSVs of an OperatorGroup have the following annotations:
| Annotation | Description |
|---|---|
|
| Contains the name of the OperatorGroup. |
|
| Contains the namespace of the OperatorGroup. |
|
| Contains a comma-delimited string that lists the OperatorGroup’s target namespace selection. |
All annotations except olm.targetNamespaces are included with copied CSVs. Omitting the olm.targetNamespaces annotation on copied CSVs prevents the duplication of target namespaces between tenants.
2.2.4.4. Provided APIs annotation
Information about what GroupVersionKinds (GVKs) are provided by an OperatorGroup are shown in an olm.providedAPIs annotation. The annotation’s value is a string consisting of <kind>.<version>.<group> delimited with commas. The GVKs of CRDs and APIServices provided by all active member CSVs of an OperatorGroup are included.
Review the following example of an OperatorGroup with a single active member CSV that provides the PackageManifest resource:
apiVersion: operators.coreos.com/v1
kind: OperatorGroup
metadata:
  annotations:
    olm.providedAPIs: PackageManifest.v1alpha1.packages.apps.redhat.com
  name: olm-operators
  namespace: local
  ...
spec:
  selector: {}
  serviceAccount:
    metadata:
      creationTimestamp: null
  targetNamespaces:
  - local
status:
  lastUpdated: 2019-02-19T16:18:28Z
  namespaces:
  - local
2.2.4.5. Role-based access control
When an OperatorGroup is created, three ClusterRoles are generated. Each contains a single AggregationRule with a ClusterRoleSelector set to match a label, as shown below:
| ClusterRole | Label to match |
|---|---|
|
|
|
|
|
|
|
|
|
The following RBAC resources are generated when a CSV becomes an active member of an OperatorGroup, as long as the CSV is watching all namespaces with the AllNamespaces InstallMode and is not in a failed state with reason InterOperatorGroupOwnerConflict.
| ClusterRole | Settings |
|---|---|
|
|
Verbs on
Aggregation labels:
|
|
|
Verbs on
Aggregation labels:
|
|
|
Verbs on
Aggregation labels:
|
|
|
Verbs on
Aggregation labels:
|
| ClusterRole | Settings |
|---|---|
|
|
Verbs on
Aggregation labels:
|
|
|
Verbs on
Aggregation labels:
|
|
|
Verbs on
Aggregation labels:
|
Additional Roles and RoleBindings
-
If the CSV defines exactly one target namespace that contains
*, then a ClusterRole and corresponding ClusterRoleBinding are generated for each permission defined in the CSV’s permissions field. All resources generated are given theolm.owner: <csv_name>andolm.owner.namespace: <csv_namespace>labels. -
If the CSV does not define exactly one target namespace that contains
*, then all Roles and RoleBindings in the Operator namespace with theolm.owner: <csv_name>andolm.owner.namespace: <csv_namespace>labels are copied into the target namespace.
2.2.4.6. Copied CSVs
OLM creates copies of all active member CSVs of an OperatorGroup in each of that OperatorGroup’s target namespaces. The purpose of a copied CSV is to tell users of a target namespace that a specific Operator is configured to watch resources created there. Copied CSVs have a status reason Copied and are updated to match the status of their source CSV. The olm.targetNamespaces annotation is stripped from copied CSVs before they are created on the cluster. Omitting the target namespace selection avoids the duplication of target namespaces between tenants. Copied CSVs are deleted when their source CSV no longer exists or the OperatorGroup that their source CSV belongs to no longer targets the copied CSV’s namespace.
2.2.4.7. Static OperatorGroups
An OperatorGroup is static if its spec.staticProvidedAPIs field is set to true. As a result, OLM does not modify the OperatorGroup’s olm.providedAPIs annotation, which means that it can be set in advance. This is useful when a user wants to use an OperatorGroup to prevent resource contention in a set of namespaces but does not have active member CSVs that provide the APIs for those resources.
Below is an example of an OperatorGroup that protects Prometheus resources in all namespaces with the something.cool.io/cluster-monitoring: "true" annotation:
apiVersion: operators.coreos.com/v1
kind: OperatorGroup
metadata:
  name: cluster-monitoring
  namespace: cluster-monitoring
  annotations:
    olm.providedAPIs: Alertmanager.v1.monitoring.coreos.com,Prometheus.v1.monitoring.coreos.com,PrometheusRule.v1.monitoring.coreos.com,ServiceMonitor.v1.monitoring.coreos.com
spec:
  staticProvidedAPIs: true
  selector:
    matchLabels:
      something.cool.io/cluster-monitoring: "true"
2.2.4.8. OperatorGroup intersection
Two OperatorGroups are said to have intersecting provided APIs if the intersection of their target namespace sets is not an empty set and the intersection of their provided API sets, defined by olm.providedAPIs annotations, is not an empty set.
A potential issue is that OperatorGroups with intersecting provided APIs can compete for the same resources in the set of intersecting namespaces.
When checking intersection rules, an OperatorGroup’s namespace is always included as part of its selected target namespaces.
2.2.4.8.1. Rules for intersection
Each time an active member CSV synchronizes, OLM queries the cluster for the set of intersecting provided APIs between the CSV’s OperatorGroup and all others. OLM then checks if that set is an empty set:
If
trueand the CSV’s provided APIs are a subset of the OperatorGroup’s:- Continue transitioning.
If
trueand the CSV’s provided APIs are not a subset of the OperatorGroup’s:If the OperatorGroup is static:
- Clean up any deployments that belong to the CSV.
-
Transition the CSV to a failed state with status reason
CannotModifyStaticOperatorGroupProvidedAPIs.
If the OperatorGroup is not static:
-
Replace the OperatorGroup’s
olm.providedAPIsannotation with the union of itself and the CSV’s provided APIs.
-
Replace the OperatorGroup’s
If
falseand the CSV’s provided APIs are not a subset of the OperatorGroup’s:- Clean up any deployments that belong to the CSV.
-
Transition the CSV to a failed state with status reason
InterOperatorGroupOwnerConflict.
If
falseand the CSV’s provided APIs are a subset of the OperatorGroup’s:If the OperatorGroup is static:
- Clean up any deployments that belong to the CSV.
-
Transition the CSV to a failed state with status reason
CannotModifyStaticOperatorGroupProvidedAPIs.
If the OperatorGroup is not static:
-
Replace the OperatorGroup’s
olm.providedAPIsannotation with the difference between itself and the CSV’s provided APIs.
-
Replace the OperatorGroup’s
Failure states caused by OperatorGroups are non-terminal.
The following actions are performed each time an OperatorGroup synchronizes:
- The set of provided APIs from active member CSVs is calculated from the cluster. Note that copied CSVs are ignored.
-
The cluster set is compared to
olm.providedAPIs, and ifolm.providedAPIscontains any extra APIs, then those APIs are pruned. - All CSVs that provide the same APIs across all namespaces are requeued. This notifies conflicting CSVs in intersecting groups that their conflict has possibly been resolved, either through resizing or through deletion of the conflicting CSV.
2.2.5. Metrics
The OLM exposes certain OLM-specific resources for use by the Prometheus-based OpenShift Container Platform cluster monitoring stack.
| Name | Description |
|---|---|
|
| Number of CSVs successfully registered. |
|
| Number of InstallPlans. |
|
| Number of Subscriptions. |
|
| Monotonic count of CatalogSources. |
2.3. Understanding the OperatorHub
This guide outlines the architecture of the OperatorHub.
2.3.1. Overview of the OperatorHub
The OperatorHub is available via the OpenShift Container Platform web console and is the interface that cluster administrators use to discover and install Operators. With one click, an Operator can be pulled from their off-cluster source, installed and subscribed on the cluster, and made ready for engineering teams to self-service manage the product across deployment environments using the Operator Lifecycle Manager (OLM).
Cluster administrators can choose from OperatorSources grouped into the following categories:
| Category | Description |
|---|---|
| Red Hat Operators | Red Hat products packaged and shipped by Red Hat. Supported by Red Hat. |
| Certified Operators | Products from leading independent software vendors (ISVs). Red Hat partners with ISVs to package and ship. Supported by the ISV. |
| Community Operators | Optionally-visible software maintained by relevant representatives in the operator-framework/community-operators GitHub repository. No official support. |
| Custom Operators | Operators you add to the cluster yourself. If you have not added any Custom Operators, the Custom category does not appear in the Web console on your OperatorHub. |
The OperatorHub component is installed and run as an Operator by default on OpenShift Container Platform in the openshift-marketplace namespace.
2.3.2. OperatorHub architecture
The OperatorHub component’s Operator manages two Custom Resource Definitions (CRDs): an OperatorSource and a CatalogSourceConfig.
Although some OperatorSource and CatalogSourceConfig information is exposed through the OperatorHub user interface, those files are only used directly by those who are creating their own Operators.
2.3.2.1. OperatorSource
For each Operator, the OperatorSource is used to define the external data store used to store Operator bundles. A simple OperatorSource includes:
| Field | Description |
|---|---|
|
|
To identify the data store as an application registry, |
|
|
Currently, Quay is the external data store used by the OperatorHub, so the endpoint is set to |
|
|
For a Community Operator, this is set to |
|
| Optionally set to a name that appears in the OperatorHub user interface for the Operator. |
|
| Optionally set to the person or organization publishing the Operator, so it can be displayed on the OperatorHub. |
2.3.2.2. CatalogSourceConfig
An Operator’s CatalogSourceConfig is used to enable an Operator present in the OperatorSource on the cluster.
A simple CatalogSourceConfig must identify:
| Field | Description |
|---|---|
|
|
The location where the Operator would be deployed and updated, such as |
|
| A comma-separated list of packages that make up the content of the Operator. |
2.4. Adding Operators to a cluster
This guide walks cluster administrators through installing Operators to an OpenShift Container Platform cluster.
2.4.1. Installing Operators from the OperatorHub
As a cluster administrator, you can install an Operator from the OperatorHub using the OpenShift Container Platform web console or the CLI. You can then subscribe the Operator to one or more namespaces to make it available for developers on your cluster.
During installation, you must determine the following initial settings for the Operator:
- Installation Mode
- Choose All namespaces on the cluster (default) to have the Operator installed on all namespaces or choose individual namespaces, if available, to only install the Operator on selected namespaces. This example chooses All namespaces… to make the Operator available to all users and projects.
- Update Channel
- If an Operator is available through multiple channels, you can choose which channel you want to subscribe to. For example, to deploy from the stable channel, if available, select it from the list.
- Approval Strategy
- You can choose Automatic or Manual updates. If you choose Automatic updates for an installed Operator, when a new version of that Operator is available, the Operator Lifecycle Manager (OLM) automatically upgrades the running instance of your Operator without human intervention. If you select Manual updates, when a newer version of an Operator is available, the OLM creates an update request. As a cluster administrator, you must then manually approve that update request to have the Operator updated to the new version.
2.4.1.1. Installing from the OperatorHub using the web console
This procedure uses the Couchbase Operator as an example to install and subscribe to an Operator from the OperatorHub using the OpenShift Container Platform web console.
Prerequisites
-
Access to an OpenShift Container Platform cluster using an account with
cluster-adminpermissions.
Procedure
-
Navigate in the web console to the Catalog
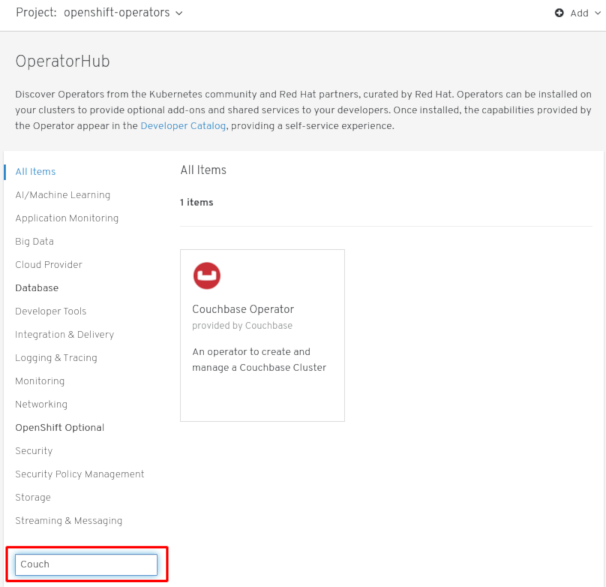
OperatorHub page. Scroll or type a keyword into the Filter by keyword box (in this case,
Couchbase) to find the Operator you want.Figure 2.3. Filter Operators by keyword
- Select the Operator. For a Community Operator, you are warned that Red Hat does not certify those Operators. You must acknowledge that warning before continuing. Information about the Operator is displayed.
- Read the information about the Operator and click Install.
On the Create Operator Subscription page:
Select one of the following:
-
All namespaces on the cluster (default) installs the Operator in the default
openshift-operatorsnamespace to watch and be made available to all namespaces in the cluster. This option is not always available. - A specific namespace on the cluster allows you to choose a specific, single namespace in which to install the Operator. The Operator will only watch and be made available for use in this single namespace.
-
All namespaces on the cluster (default) installs the Operator in the default
- Select an Update Channel (if more than one is available).
- Select Automatic or Manual approval strategy, as described earlier.
- Click Subscribe to make the Operator available to the selected namespaces on this OpenShift Container Platform cluster.
From the Catalog
Operator Management page, you can monitor an Operator Subscription’s installation and upgrade progress. If you selected a Manual approval strategy, the Subscription’s upgrade status will remain Upgrading until you review and approve its Install Plan.
Figure 2.4. Manually approving from the Install Plan page
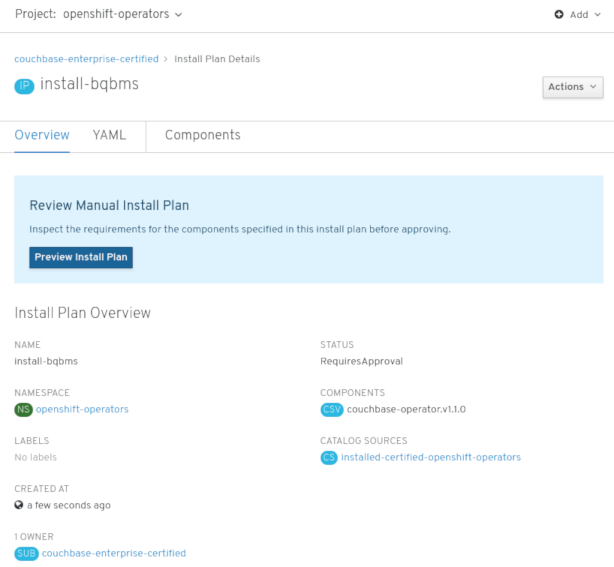
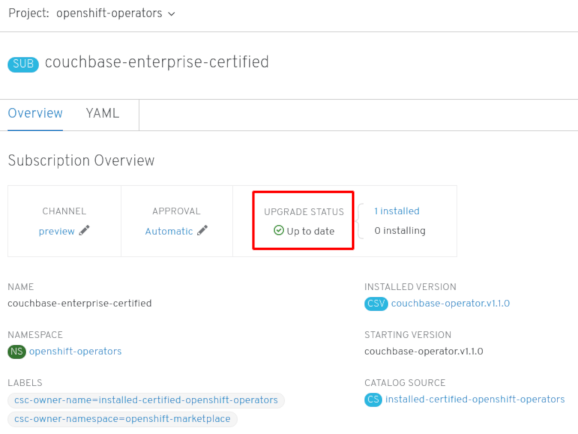
After approving on the Install Plan page, the Subscription upgrade status moves to Up to date.
If you selected an Automatic approval strategy, the upgrade status should resolve to Up to date without intervention.
Figure 2.5. Subscription upgrade status Up to date
After the Subscription’s upgrade status is Up to date, select Catalog
Installed Operators to verify that the Couchbase ClusterServiceVersion (CSV) eventually shows up and its Status ultimately resolves to InstallSucceeded in the relevant namespace. NoteFor the All namespaces… Installation Mode, the status resolves to InstallSucceeded in the
openshift-operatorsnamespace, but the status is Copied if you check in other namespaces.If it does not:
-
Switch to the Catalog
Operator Management page and inspect the Operator Subscriptions and Install Plans tabs for any failure or errors under Status. -
Check the logs in any Pods in the
openshift-operatorsproject (or other relevant namespace if A specific namespace… Installation Mode was selected) on the WorkloadsPods page that are reporting issues to troubleshoot further.
-
Switch to the Catalog
2.4.1.2. Installing from the OperatorHub using the CLI
Instead of using the OpenShift Container Platform web console, you can install an Operator from the OperatorHub using the CLI. Use the oc command to create or update a CatalogSourceConfig object, then add a Subscription object.
The web console version of this procedure handles the creation of the CatalogSourceConfig and Subscription objects behind the scenes for you, appearing as if it was one step.
Prerequisites
-
Access to an OpenShift Container Platform cluster using an account with
cluster-adminpermissions. - Install the oc command to your local system.
Procedure
View the list of Operators available to the cluster from the OperatorHub:
$ oc get packagemanifests -n openshift-marketplace
NAME                     AGE
amq-streams              14h
packageserver            15h
couchbase-enterprise     14h
mongodb-enterprise       14h
etcd                     14h
myoperator               14h
...
To identify the Operators to enable on the cluster, create a CatalogSourceConfig object YAML file (for example,
csc.cr.yaml). Include one or more packages listed in the previous step (such as couchbase-enterprise or etcd). For example:Example CatalogSourceConfig
apiVersion: operators.coreos.com/v1
kind: CatalogSourceConfig
metadata:
  name: example
  namespace: openshift-marketplace
spec:
  targetNamespace: openshift-operators 1
  packages: myoperator 2
The Operator generates a CatalogSource from your CatalogSourceConfig in the namespace specified in
targetNamespace.Create the CatalogSourceConfig to enable the specified Operators in the selected namespace:
$ oc apply -f csc.cr.yaml
Create a Subscription object YAML file (for example,
myoperator-sub.yaml) to subscribe a namespace to an Operator. Note that the namespace you pick must have an OperatorGroup that matches the installMode (either AllNamespaces or SingleNamespace modes):Example Subscription
apiVersion: operators.coreos.com/v1alpha1
kind: Subscription
metadata:
  name: myoperator
  namespace: openshift-operators
spec:
  channel: alpha
  name: myoperator 1
  source: example 2
  sourceNamespace: openshift-operators
Create the Subscription object:
$ oc apply -f myoperator-sub.yaml
At this point, the OLM is now aware of the selected Operator. A ClusterServiceVersion (CSV) for the Operator should appear in the target namespace, and APIs provided by the Operator should be available for creation.
Later, if you want to install more Operators:
Update your CatalogSourceConfig file (in this example,
csc.cr.yaml) with more packages. For example:Example updated CatalogSourceConfig
apiVersion: operators.coreos.com/v1 kind: CatalogSourceConfig metadata: name: example namespace: openshift-marketplace spec: targetNamespace: global packages: myoperator,another-operator 1- 1
- Add new packages to existing package list.
Update the CatalogSourceConfig object:
$ oc apply -f csc.cr.yaml
- Create additional Subscription objects for the new Operators.
Additional resources
-
To install custom Operators to a cluster using the OperatorHub, you must first upload your Operator artifacts to Quay.io, then add your own
OperatorSourceto your cluster. Optionally, you can add Secrets to your Operator to provide authentication. After, you can manage the Operator in your cluster as you would any other Operator. For these steps, see Testing Operators.
2.5. Deleting Operators from a cluster
To delete (uninstall) an Operator from your cluster, you can simply delete the subscription to remove it from the subscribed namespace. If you want a clean slate, you can also remove the operator CSV and deployment, then delete Operator’s entry in the CatalogSourceConfig. The following text describes how to delete Operators from a cluster using either the web console or the command line.
2.5.1. Deleting Operators from a cluster using the web console
To delete an installed Operator from the selected namespace through the web console, follow these steps:
Procedure
Select the Operator to delete. There are two paths to do this:
From the Catalog
OperatorHub page: -
Scroll or type a keyword into the Filter by keyword box (in this case,
jaeger) to find the Operator you want and click on it. - Click Uninstall.
-
Scroll or type a keyword into the Filter by keyword box (in this case,
From the Catalog
Operator Management page: -
Select the namespace where the Operator is installed from the Project list. For cluster-wide Operators, the default is
openshift-operators. From the Operator Subscriptions tab, find the Operator you want to delete (in this example,
jaeger) and click the Options menu at the end of its entry.
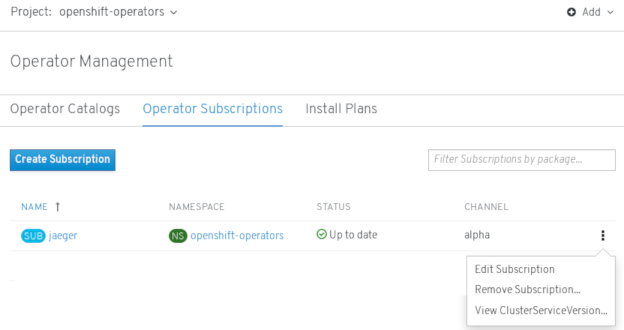
- Click Remove Subscription.
-
Select the namespace where the Operator is installed from the Project list. For cluster-wide Operators, the default is
- When prompted by the Remove Subscription window, optionally select the Also completely remove the jaeger Operator from the selected namespace check box if you want all components related to the installation to be removed. This removes the CSV, which in turn removes the Pods, Deployments, CRDs, and CRs associated with the Operator.
- Select Remove. This Operator will stop running and no longer receive updates.
Although the Operator is no longer installed or receiving updates, that Operator will still appear on the Operator Catalogs list, ready to re-subscribe. To remove the Operator from that listing, you can delete the Operator’s entry in the CatalogSourceConfig from the command line (as shown in last step of "Deleting operators from a cluster using the CLI").
2.5.2. Deleting Operators from a cluster using the CLI
Instead of using the OpenShift Container Platform web console, you can delete an Operator from your cluster by using the CLI. You do this by deleting the Subscription and ClusterServiceVersion from the targetNamespace, then editing the CatalogSourceConfig to remove the Operator’s package name.
Prerequisites
-
Access to an OpenShift Container Platform cluster using an account with
cluster-adminpermissions. -
Install the
occommand on your local system.
Procedure
In this example, there are two Operators (Jaeger and Descheduler) installed in the openshift-operators namespace. The goal is to remove Jaeger without removing Descheduler.
Check the current version of the subscribed Operator (for example,
jaeger) in thecurrentCSVfield:$ oc get subscription jaeger -n openshift-operators -o yaml | grep currentCSV currentCSV: jaeger-operator.v1.8.2
Delete the Operator’s Subscription (for example,
jaeger):$ oc delete subscription jaeger -n openshift-operators subscription.operators.coreos.com "jaeger" deleted
Delete the CSV for the Operator in the target namespace using the
currentCSVvalue from the previous step:$ oc delete clusterserviceversion jaeger-operator.v1.8.2 -n openshift-operators clusterserviceversion.operators.coreos.com "jaeger-operator.v1.8.2" deleted
Display the contents of the
CatalogSourceConfigresource and review the list of packages in thespecsection:$ oc get catalogsourceconfig -n openshift-marketplace \ installed-community-openshift-operators -o yamlFor example, the spec section might appear as follows:
Example of CatalogSourceConfig
spec:
  csDisplayName: Community Operators
  csPublisher: Community
  packages: jaeger,descheduler
  targetNamespace: openshift-operators
Remove the Operator from the CatalogSourceConfig in one of two ways:
If you have multiple Operators, edit the CatalogSourceConfig resource and remove the Operator’s package:
$ oc edit catalogsourceconfig -n openshift-marketplace \
    installed-community-openshift-operators
Remove the package from the
packagesline, as shown:Example of modified packages in CatalogSourceConfig
packages: descheduler
Save the change and the
marketplace-operatorwill reconcile the CatalogSourceConfig.If there is only one Operator in the CatalogSourceConfig, you can remove it by deleting the entire CatalogSourceConfig as follows:
$ oc delete catalogsourceconfig -n openshift-marketplace \
    installed-community-openshift-operators
2.6. Creating applications from installed Operators
This guide walks developers through an example of creating applications from an installed Operator using the OpenShift Container Platform 4.1 web console.
2.6.1. Creating an etcd cluster using an Operator
This procedure walks through creating a new etcd cluster using the etcd Operator, managed by the Operator Lifecycle Manager (OLM).
Prerequisites
- Access to an OpenShift Container Platform 4.1 cluster.
- The etcd Operator already installed cluster-wide by an administrator.
Procedure
- Create a new project in the OpenShift Container Platform web console for this procedure. This example uses a project called my-etcd.
Navigate to the Catalogs
Installed Operators page. The Operators that have been installed to the cluster by the cluster administrator and are available for use are shown here as a list of ClusterServiceVersions (CSVs). CSVs are used to launch and manage the software provided by the Operator. TipYou can get this list from the CLI using:
$ oc get csv
On the Installed Operators page, click Copied, and then click the etcd Operator to view more details and available actions:
Figure 2.6. etcd Operator overview
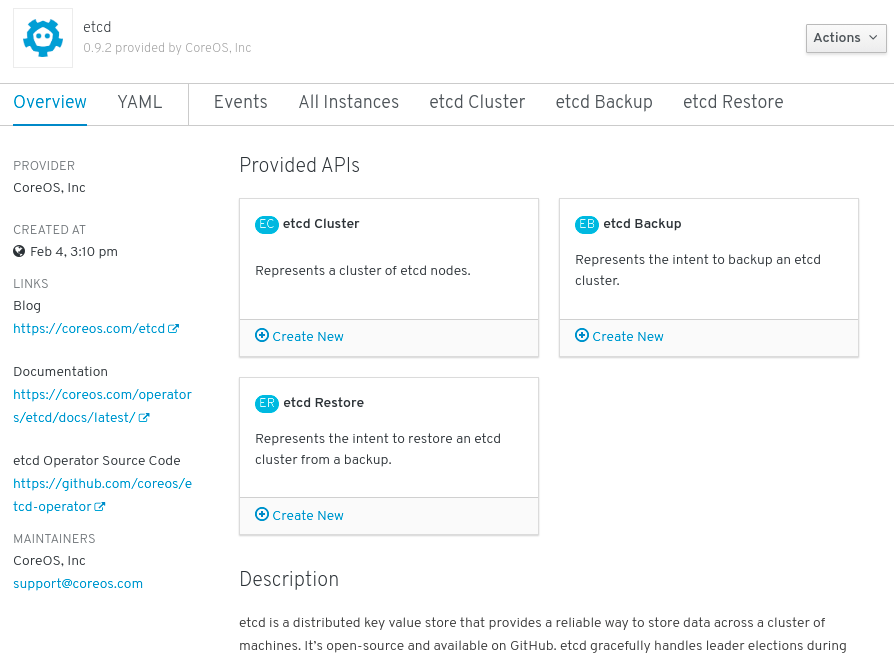
As shown under Provided APIs, this Operator makes available three new resource types, including one for an etcd Cluster (the
EtcdClusterresource). These objects work similar to the built-in native Kubernetes ones, such asDeploymentsorReplicaSets, but contain logic specific to managing etcd.Create a new etcd cluster:
- In the etcd Cluster API box, click Create New.
-
The next screen allows you to make any modifications to the minimal starting template of an
EtcdClusterobject, such as the size of the cluster. For now, click Create to finalize. This triggers the Operator to start up the Pods, Services, and other components of the new etcd cluster.
Click the Resources tab to see that your project now contains a number of resources created and configured automatically by the Operator.
Figure 2.7. etcd Operator resources
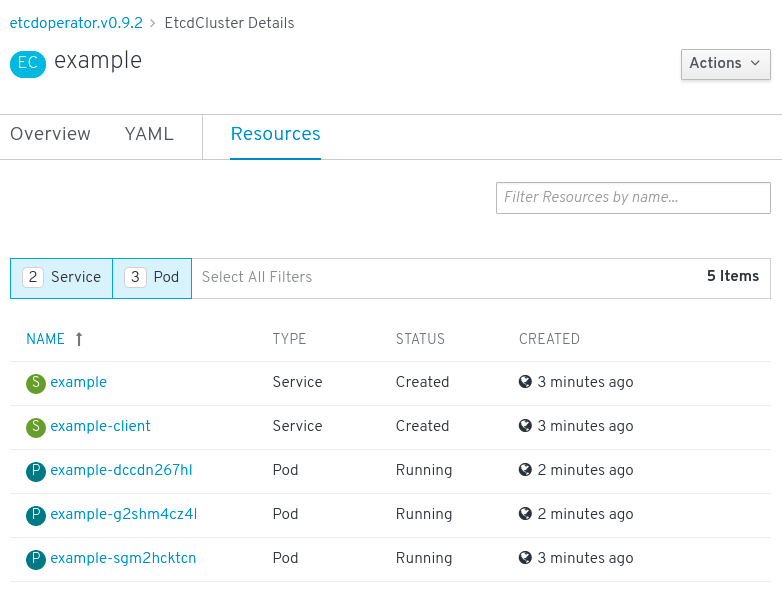
Verify that a Kubernetes service has been created that allows you to access the database from other Pods in your project.
All users with the
editrole in a given project can create, manage, and delete application instances (an etcd cluster, in this example) managed by Operators that have already been created in the project, in a self-service manner, just like a cloud service. If you want to enable additional users with this ability, project administrators can add the role using the following command:$ oc policy add-role-to-user edit <user> -n <target_project>
You now have an etcd cluster that will react to failures and rebalance data as Pods become unhealthy or are migrated between nodes in the cluster. Most importantly, cluster administrators or developers with proper access can now easily use the database with their applications.
2.7. Managing resources from Custom Resource Definitions
This guide describes how developers can manage Custom Resources (CRs) that come from Custom Resource Definitions (CRDs).
2.7.1. Custom Resource Definitions
In the Kubernetes API, a resource is an endpoint that stores a collection of API objects of a certain kind. For example, the built-in Pods resource contains a collection of Pod objects.
A Custom Resource Definition (CRD) object defines a new, unique object Kind in the cluster and lets the Kubernetes API server handle its entire lifecycle.
Custom Resource (CR) objects are created from CRDs that have been added to the cluster by a cluster administrator, allowing all cluster users to add the new resource type into projects.
Operators in particular make use of CRDs by packaging them with any required RBAC policy and other software-specific logic. Cluster administrators can also add CRDs manually to the cluster outside of an Operator’s lifecycle, making them available to all users.
While only cluster administrators can create CRDs, developers can create the CR from an existing CRD if they have read and write permission to it.
2.7.2. Creating Custom Resources from a file
After a Custom Resource Definition (CRD) has been added to the cluster, Custom Resources (CRs) can be created with the CLI from a file using the CR specification.
Prerequisites
- CRD added to the cluster by a cluster administrator.
Procedure
Create a YAML file for the CR. In the following example definition, the
cronSpecandimagecustom fields are set in a CR ofKind: CronTab. TheKindcomes from thespec.kindfield of the CRD object.Example YAML file for a CR
apiVersion: "stable.example.com/v1" 1
kind: CronTab 2
metadata:
  name: my-new-cron-object 3
  finalizers: 4
  - finalizer.stable.example.com
spec: 5
  cronSpec: "* * * * /5"
  image: my-awesome-cron-image
- 1
- Specify the group name and API version (name/version) from the Custom Resource Definition.
- 2
- Specify the type in the CRD.
- 3
- Specify a name for the object.
- 4
- Specify the finalizers for the object, if any. Finalizers allow controllers to implement conditions that must be completed before the object can be deleted.
- 5
- Specify conditions specific to the type of object.
After you create the file, create the object:
$ oc create -f <file_name>.yaml
2.7.3. Inspecting Custom Resources
You can inspect Custom Resource (CR) objects that exist in your cluster using the CLI.
Prerequisites
- A CR object exists in a namespace to which you have access.
Procedure
To get information on a specific
Kindof a CR, run:$ oc get <kind>
For example:
$ oc get crontab

NAME                 KIND
my-new-cron-object   CronTab.v1.stable.example.com
Resource names are not case-sensitive, and you can use either the singular or plural forms defined in the CRD, as well as any short name. For example:
$ oc get crontabs
$ oc get crontab
$ oc get ct
You can also view the raw YAML data for a CR:
$ oc get <kind> -o yaml
$ oc get ct -o yaml

apiVersion: v1
items:
- apiVersion: stable.example.com/v1
  kind: CronTab
  metadata:
    clusterName: ""
    creationTimestamp: 2017-05-31T12:56:35Z
    deletionGracePeriodSeconds: null
    deletionTimestamp: null
    name: my-new-cron-object
    namespace: default
    resourceVersion: "285"
    selfLink: /apis/stable.example.com/v1/namespaces/default/crontabs/my-new-cron-object
    uid: 9423255b-4600-11e7-af6a-28d2447dc82b
  spec:
    cronSpec: '* * * * /5' 1
    image: my-awesome-cron-image 2