此内容没有您所选择的语言版本。
9.5. Import From Flat File Source
You can import metadata from your flat file data sources and create the metamodels required to query your data in minutes. Using the steps below you will define your flat file data source, configure your parsing parameters for the flat file, generate a source model containing the standard Teiid flat file procedure and create view tables containing the SQL defining the column data in your flat file.
JBoss Data Virtualization supports Flat Files as data sources. Teiid Designer provides an Import wizard designed to assist in creating the metadata models required to access the data in your flat files. As with Designer's JDBC, Salesforce and WSDL importers, the Flat File importer is based on utilizing a specific Data Tools Connection Profile.
The results of the importer will include a source model containing the
getTextFiles() procedures supported by JBoss Data Virtualization.
The importer will also create a new view model containing a view table for your selected flat file source file. Within the view table will be generated SQL transformation containing the
getTextFiles() procedure from your source model as well as the column definitions and parameters required for the Teiid TEXTTABLE() function used to query the data file. You can also choose to update an existing view model instead of creating a new view model.
The
TEXTTABLE function processes character input to produce tabular output. It supports both fixed and delimited file format parsing. The function itself defines what columns it projects. The TEXTTABLE function is implicitly a nested table and may be correlated to preceding FROM clause entries.
TEXTTABLE(expression COLUMNS <COLUMN>, ... [DELIMITER char] [(QUOTE|ESCAPE) char] [HEADER [integer]] [SKIP integer]) AS name
Teiid Designer will construct the full SQL statement for each view table in the form:
SELECT A.Name, A.Sport, A.Position, A.Team, A.City, A.StateCode, A.AnnualSalary FROM (EXEC PlayerDataSource.getTextFiles('PlayerData.txt')) AS f, TEXTTABLE(f.file COLUMNS Name string, Sport string, Position string, Team string, City string, StateCode string, AnnualSalary string HEADER 2 SKIP 3) AS A
To import from your flat file source follow the steps below.
- In Model Explorer, click File > Import action
 in the toolbar or select a project, folder or model in the tree and click Import...
- Select the import option Teiid Designer > File Source (Flat) >> Source and View Model and click Next>.
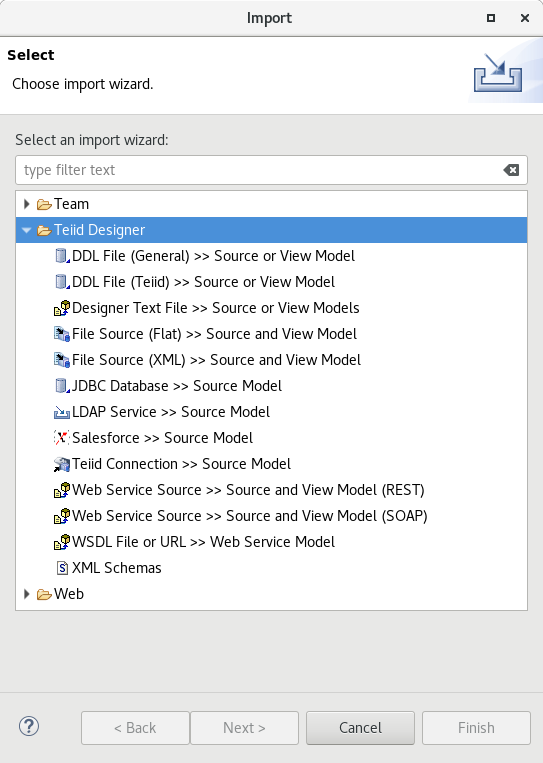
Figure 9.10. Import from Flat File Source
- Select Flat File Import Mode and then select either Flat file on local file system or Flat file via remote URL and click Next>.
- Select existing or previous connection profile from the drop-down selector or click button to launch the New Connection Profile dialog or to modify or change an existing connection profile prior to selection. Note that the Flat File Source selection list will be populated with only Flat File connection profiles.After selecting a Connection Profile, the file contents of the folder defined in the connection profile will be displayed in the Available Data Files panel. Select the data file you wish to process. The data from this file, along with your custom import options, will be used to construct a view table containing the required SQL transformation for retrieving your data and returning a result set.
Note
The path to the data file you select must not contain spaces.Lastly enter a unique source model name in the Source Model Definition section at the bottom of the page or select an existing source model using the Browse button. Note the Model Status section which will indicate the validity of the model name, whether the model exists or not and whether the model already contains thegetTextFiles()procedure. In this case, the source model nor the procedure will be generated.When finished with this page, click Next>.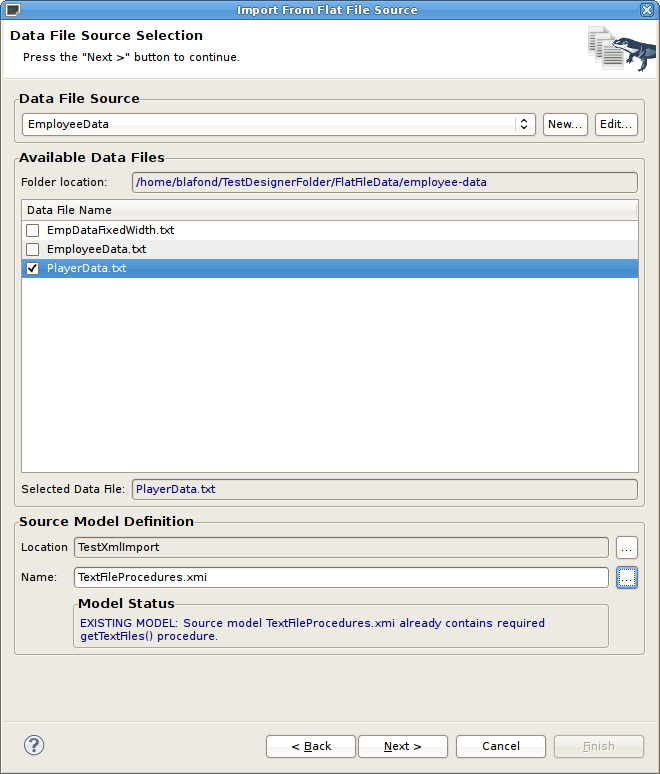
Figure 9.11. Data File Source Selection Page
- On the next page enter the JNDI name and click Next >.
- The next page, titled Flat File Column Format Definition, requires defining the format of your column data in the file. The options are and . This page contains a preview of the contents of your file to aid in determining the format. The wizard defaults to displaying the first 20 lines, but you can change that value if you wish.When finished with this page, click Next>.

Figure 9.12. Data File Source Selection Page
- Character Delimited Option - The primary purpose of this importer is to help you create a view table containing the transformation required to query the user defined data file. This page presents a number of options you can use to customize the Generated SQL Statement, shown in the bottom panel, for the character delimited option. Specify header options (Column names in header, header line number and first data line number), Parse selected row and changed character delimiter.If columns names are not defined in a file header or if you wish to modify or create custom columns, you can use the , , , to manage the column info in your SQL.When finished with this page, click Next>.

Figure 9.13. Flat File Delimited Columns Options Page
To aid in determining if your parser settings are correct you can select a data row in your File Contents Preview section and click the Parse Selected Row button. A dialog will be displayed showing the list of columns and the resulting column data. If your column data is not what you expected, you'll need to adjust your settings accordingly.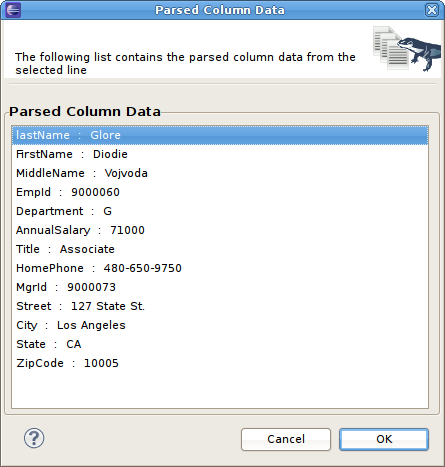
Figure 9.14. Parse Column Data Dialog
- Fixed Column Width Option - The primary purpose of this importer is to help you create a view table containing the transformation required to query the user defined data file. This page presents a number of options you can use to customize the Generated SQL Statement, shown in the bottom panel, for the fixed column width option. Specify header options such as first data line number and changed character delimiter.If columns names are not defined in a file header or if you wish to modify or create custom columns, you can use the , , , to manage the column info in your SQL.You can also utilize the cursor position and text length values in the upper left panel to determine what your column widths are in your data file.When finished with this page, click Next>.
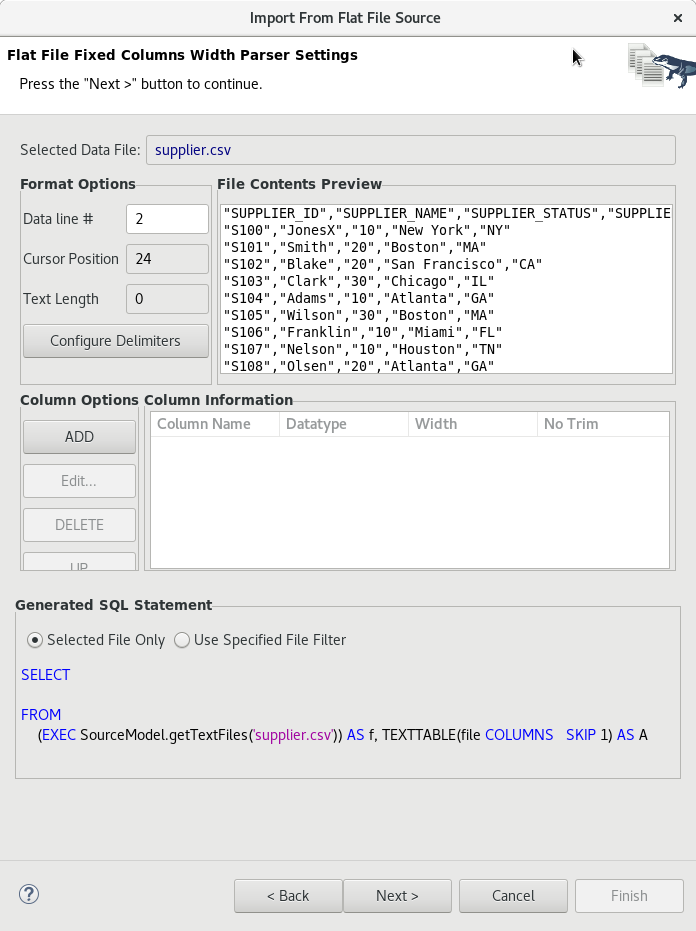
Figure 9.15. Flat File Fixed Columns Width Options Page
- On the View Model Definition page, select the target folder location where your new view model will be created. You can also select an existing model for your new view tables. Note the Model Status section which will indicate the validity of the model name, whether the model exists or not. Lastly, enter a unique, valid view table name. Click Finish to generate your models and finish the wizard.
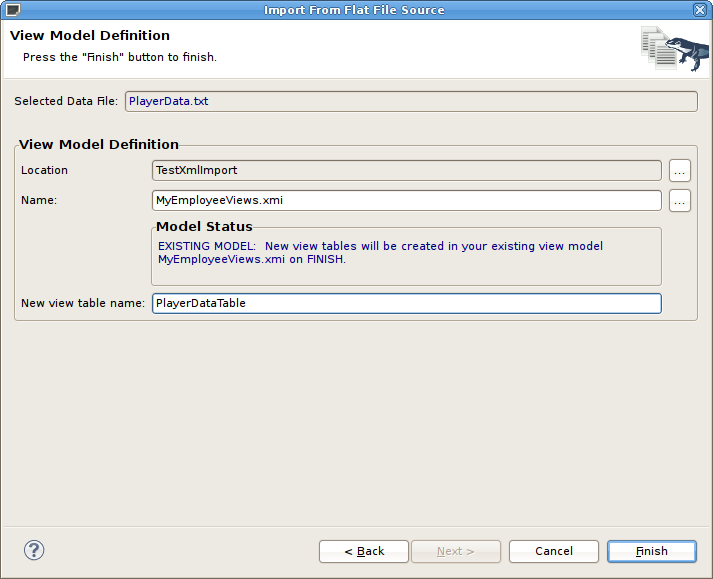
Figure 9.16. View Model Definition Page
When your import is finished your source model will be opened in an editor and show a diagram containing the your
getTextFiles() procedure.
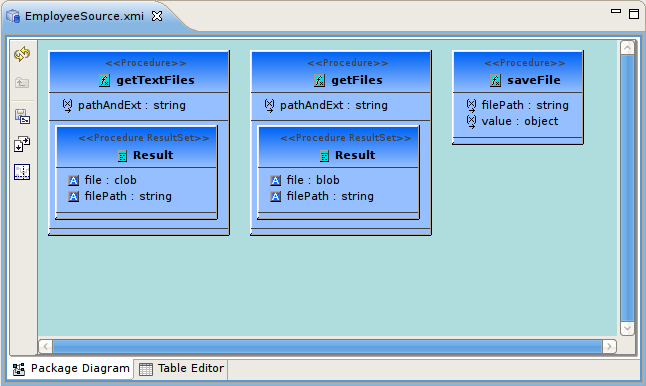
Figure 9.17. Generated Flat File Procedures
In addition, the view model will be opened in an editor and will show the generated view tables containing the completed SQL required to access the data in your flat file using the
getTextFiles procedure above and the Teiid TEXTTABLE() function. The following figure is an example of a generated view table.
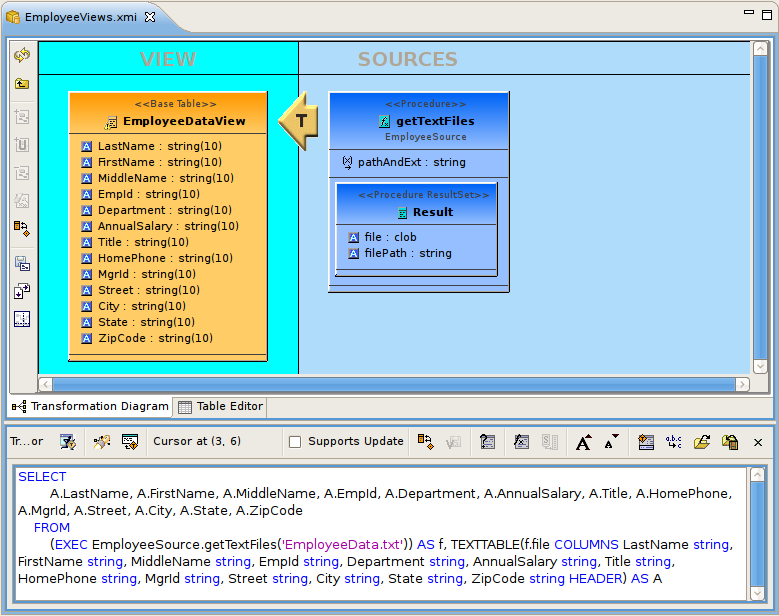
Figure 9.18. Generated Flat File View Table