此内容没有您所选择的语言版本。
Chapter 12. Identity Brokering
An Identity Broker is an intermediary service that connects multiple service providers with different identity providers. As an intermediary service, the identity broker is responsible for creating a trust relationship with an external identity provider in order to use its identities to access internal services exposed by service providers.
From a user perspective, an identity broker provides a user-centric and centralized way to manage identities across different security domains or realms. An existing account can be linked with one or more identities from different identity providers or even created based on the identity information obtained from them.
An identity provider is usually based on a specific protocol that is used to authenticate and communicate authentication and authorization information to their users. It can be a social provider such as Facebook, Google or Twitter. It can be a business partner whose users need to access your services. Or it an be a cloud-based identity service that you want to integrate with.
Usually, identity providers are based on the following protocols:
-
SAML v2.0 -
OpenID Connect v1.0 -
OAuth v2.0
In the next sections we’ll see how to configure and use Red Hat Single Sign-On as an identity broker, covering some important aspects such as:
-
Social Authentication -
OpenID Connect v1.0 Brokering -
SAML v2.0 Brokering -
Identity Federation
12.1. Brokering Overview
When using Red Hat Single Sign-On as an identity broker, users are not forced to provide their credentials in order to authenticate in a specific realm. Instead, they are presented with a list of identity providers from which they can authenticate.
You can also configure a default broker. In this case the user will not be given a choice, but instead be redirected directly to the parent broker. The following diagram demonstrates the steps involved when using Red Hat Single Sign-On to broker an external identity provider:
Identity Broker Flow
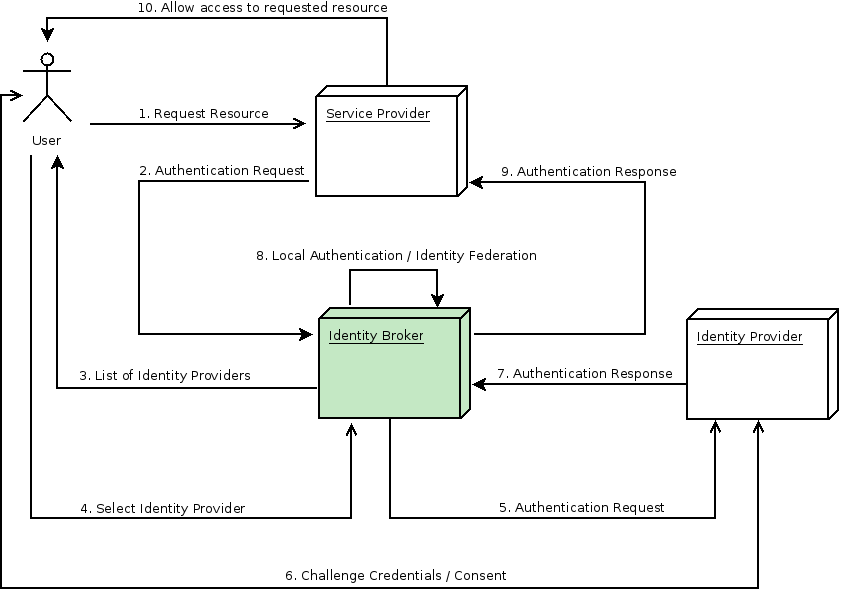
- User is not authenticated and requests a protected resource in a client application.
- The client applications redirects the user to Red Hat Single Sign-On to authenticate.
- At this point the user is presented with the login page where there is a list of identity providers supported by a realm.
- User selects one of the identity providers by clicking on its respective button or link.
- Red Hat Single Sign-On issues an authentication request to the target identity provider asking for authentication and the user is redirected to the login page of the identity provider. The connection properties and other configuration options for the identity provider were previously set by the administrator in the Admin Console.
- User provides his credentials or consent in order to authenticate in the identity provider.
- Upon a successful authentication by the identity provider, the user is redirected back to Red Hat Single Sign-On with an authentication response. Usually this response contains a security token that will be used by Red Hat Single Sign-On to trust the authentication performed by the identity provider and retrieve information about the user.
- Now Red Hat Single Sign-On is going to check if the response from the identity provider is valid. If valid, it will import and create a new user or just skip that if the user already exists. If it is a new user, Red Hat Single Sign-On may ask the identity provider for information about the user if that info doesn’t already exist in the token. This is what we call identity federation. If the user already exists Red Hat Single Sign-On may ask him to link the identity returned from the identity provider with his existing account. We call this process account linking. What exactly is done is configurable and can be specified by setup of First Login Flow . At the end of this step, Red Hat Single Sign-On authenticates the user and issues its own token in order to access the requested resource in the service provider.
- Once the user is locally authenticated, Red Hat Single Sign-On redirects the user to the service provider by sending the token previously issued during the local authentication.
- The service provider receives the token from Red Hat Single Sign-On and allows access to the protected resource.
There are some variations of this flow that we will talk about later. For instance, instead of presenting a list of identity providers, the client application can request a specific one. Or you can tell Red Hat Single Sign-On to force the user to provide additional information before federating his identity.
Different protocols may require different authentication flows. At this moment, all the identity providers supported by Red Hat Single Sign-On use a flow just like described above. However, despite the protocol in use, user experience should be pretty much the same.
As you may notice, at the end of the authentication process Red Hat Single Sign-On will always issue its own token to client applications. What this means is that client applications are completely decoupled from external identity providers. They don’t need to know which protocol (eg.: SAML, OpenID Connect, OAuth, etc) was used or how the user’s identity was validated. They only need to know about Red Hat Single Sign-On.
12.2. General Configuration
The identity broker configuration is all based on identity providers. Identity providers are created for each realm and by default they are enabled for every single application. That means that users from a realm can use any of the registered identity providers when signing in to an application.
In order to create an identity provider click the Identity Providers left menu item.
Identity Providers
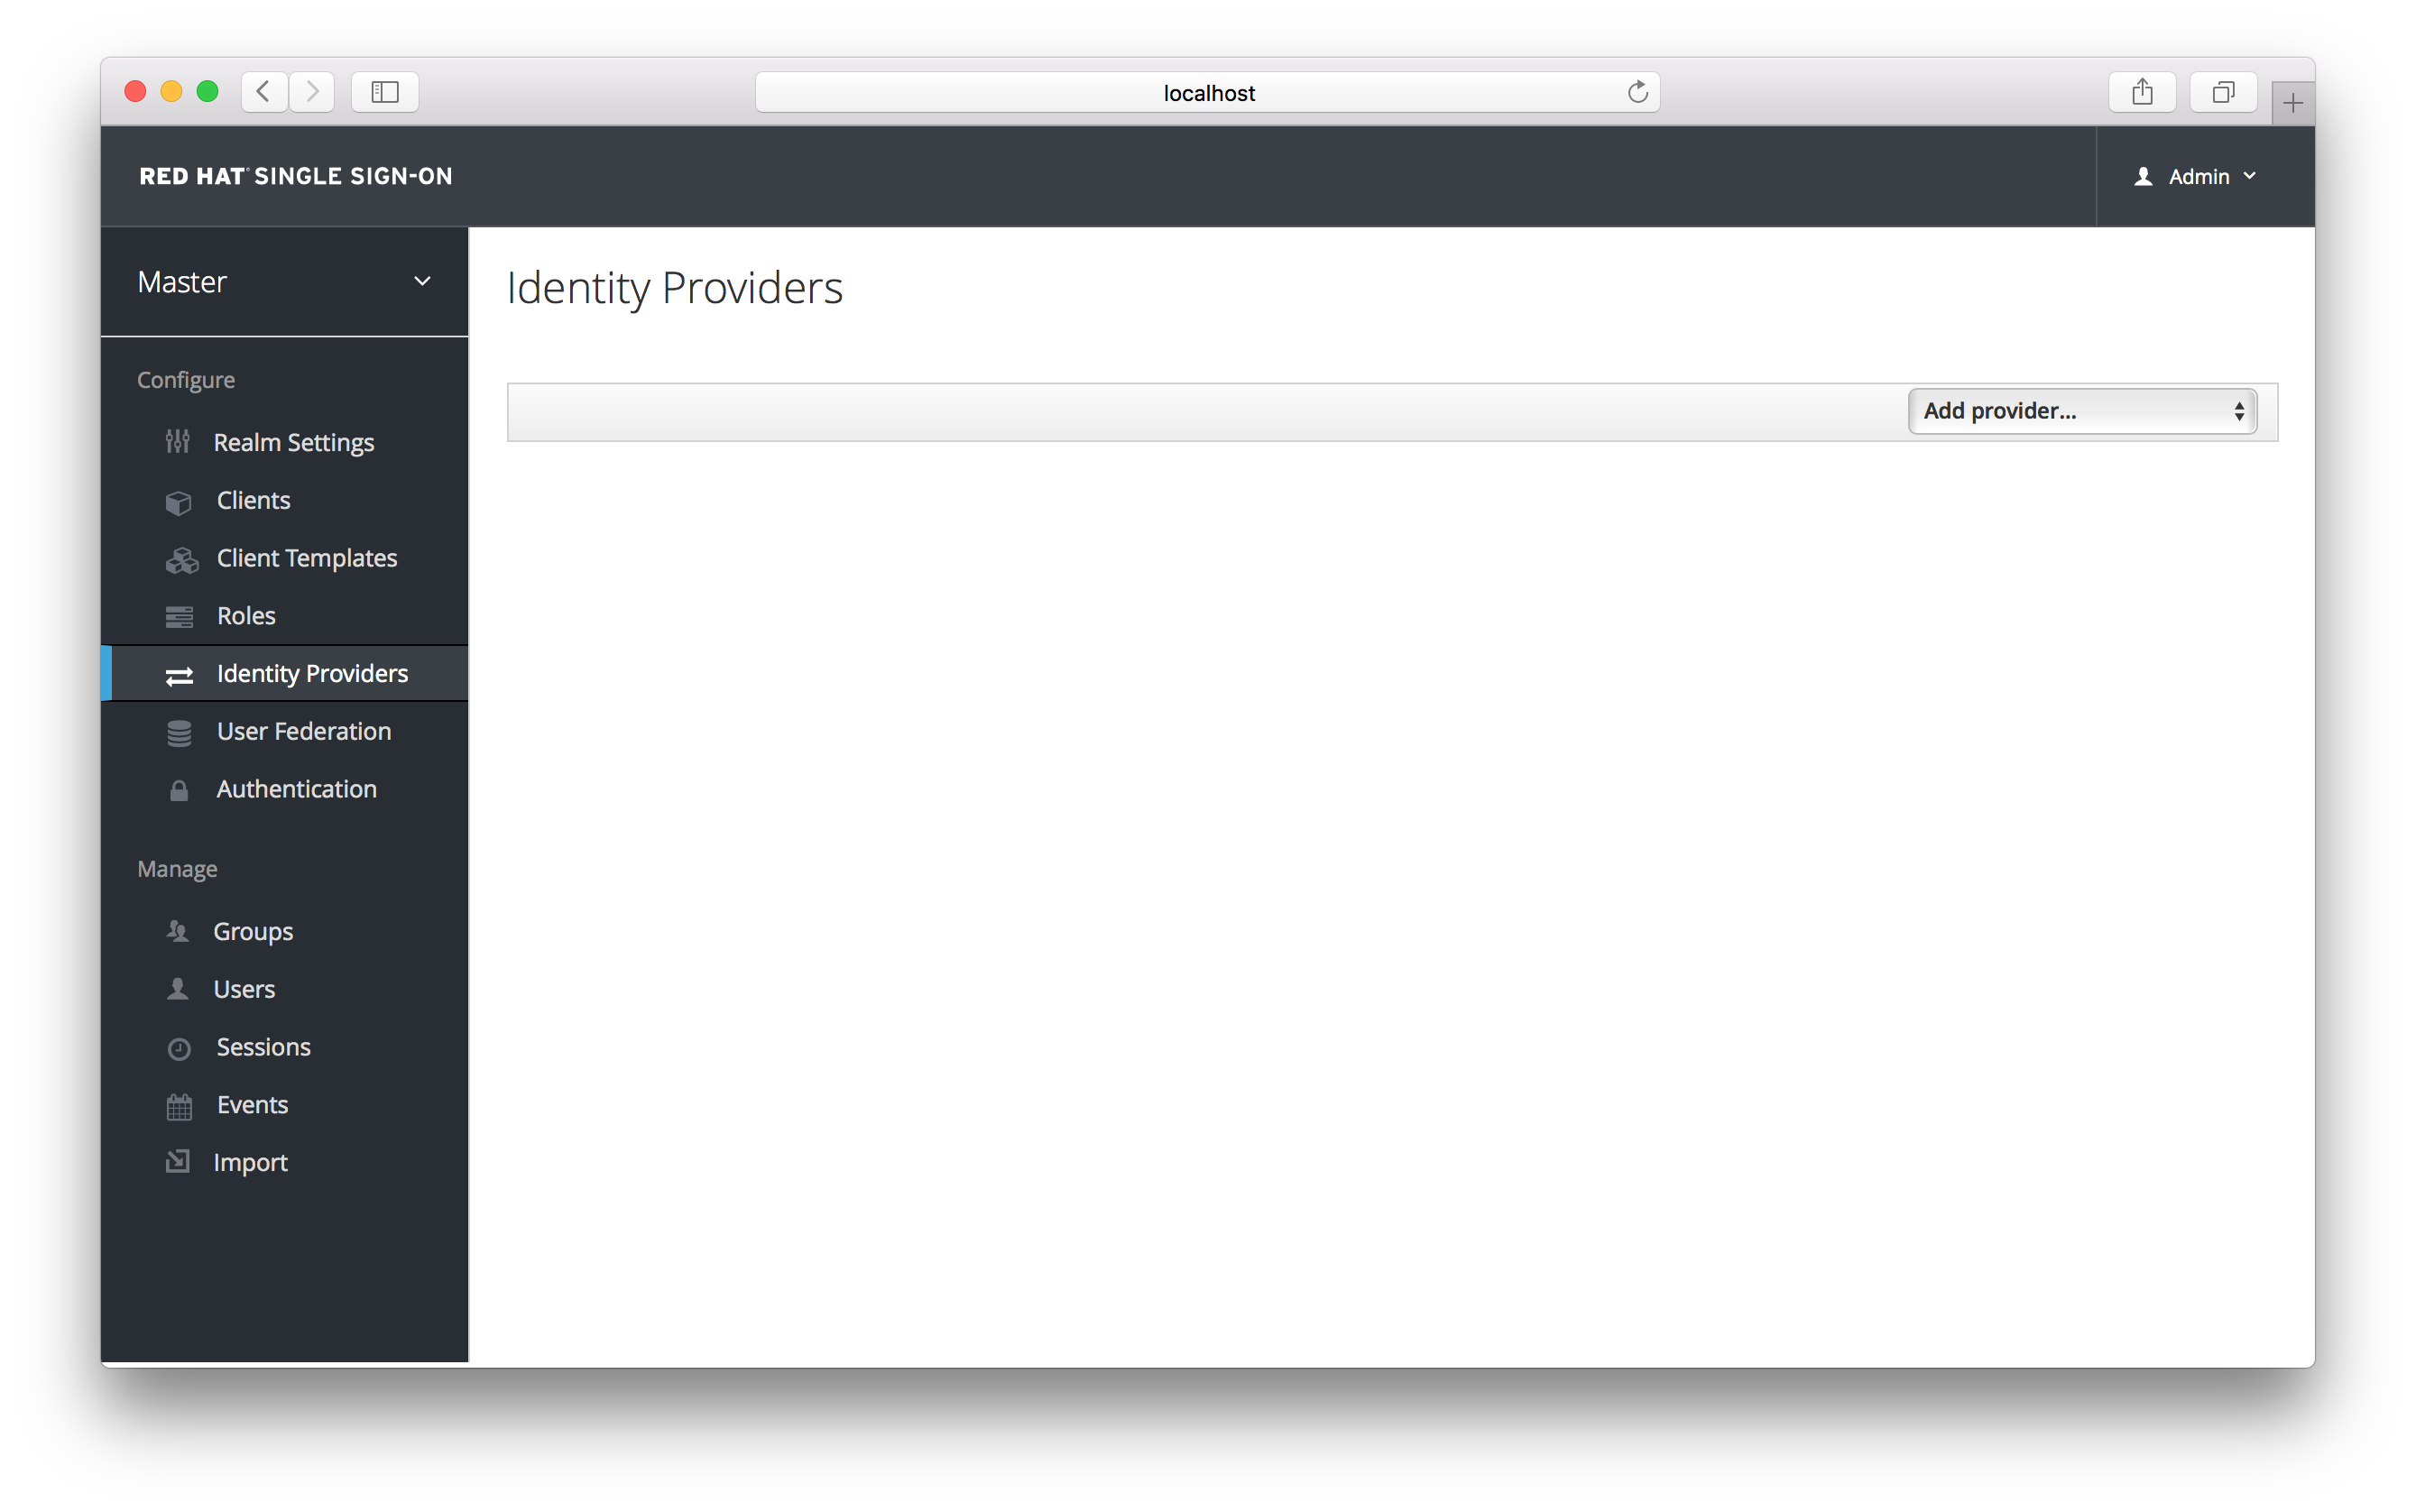
In the right hand drop down list box, choose the identity provider you want to add. This will bring you to the configuration page for that identity provider type.
Add Identity Provider
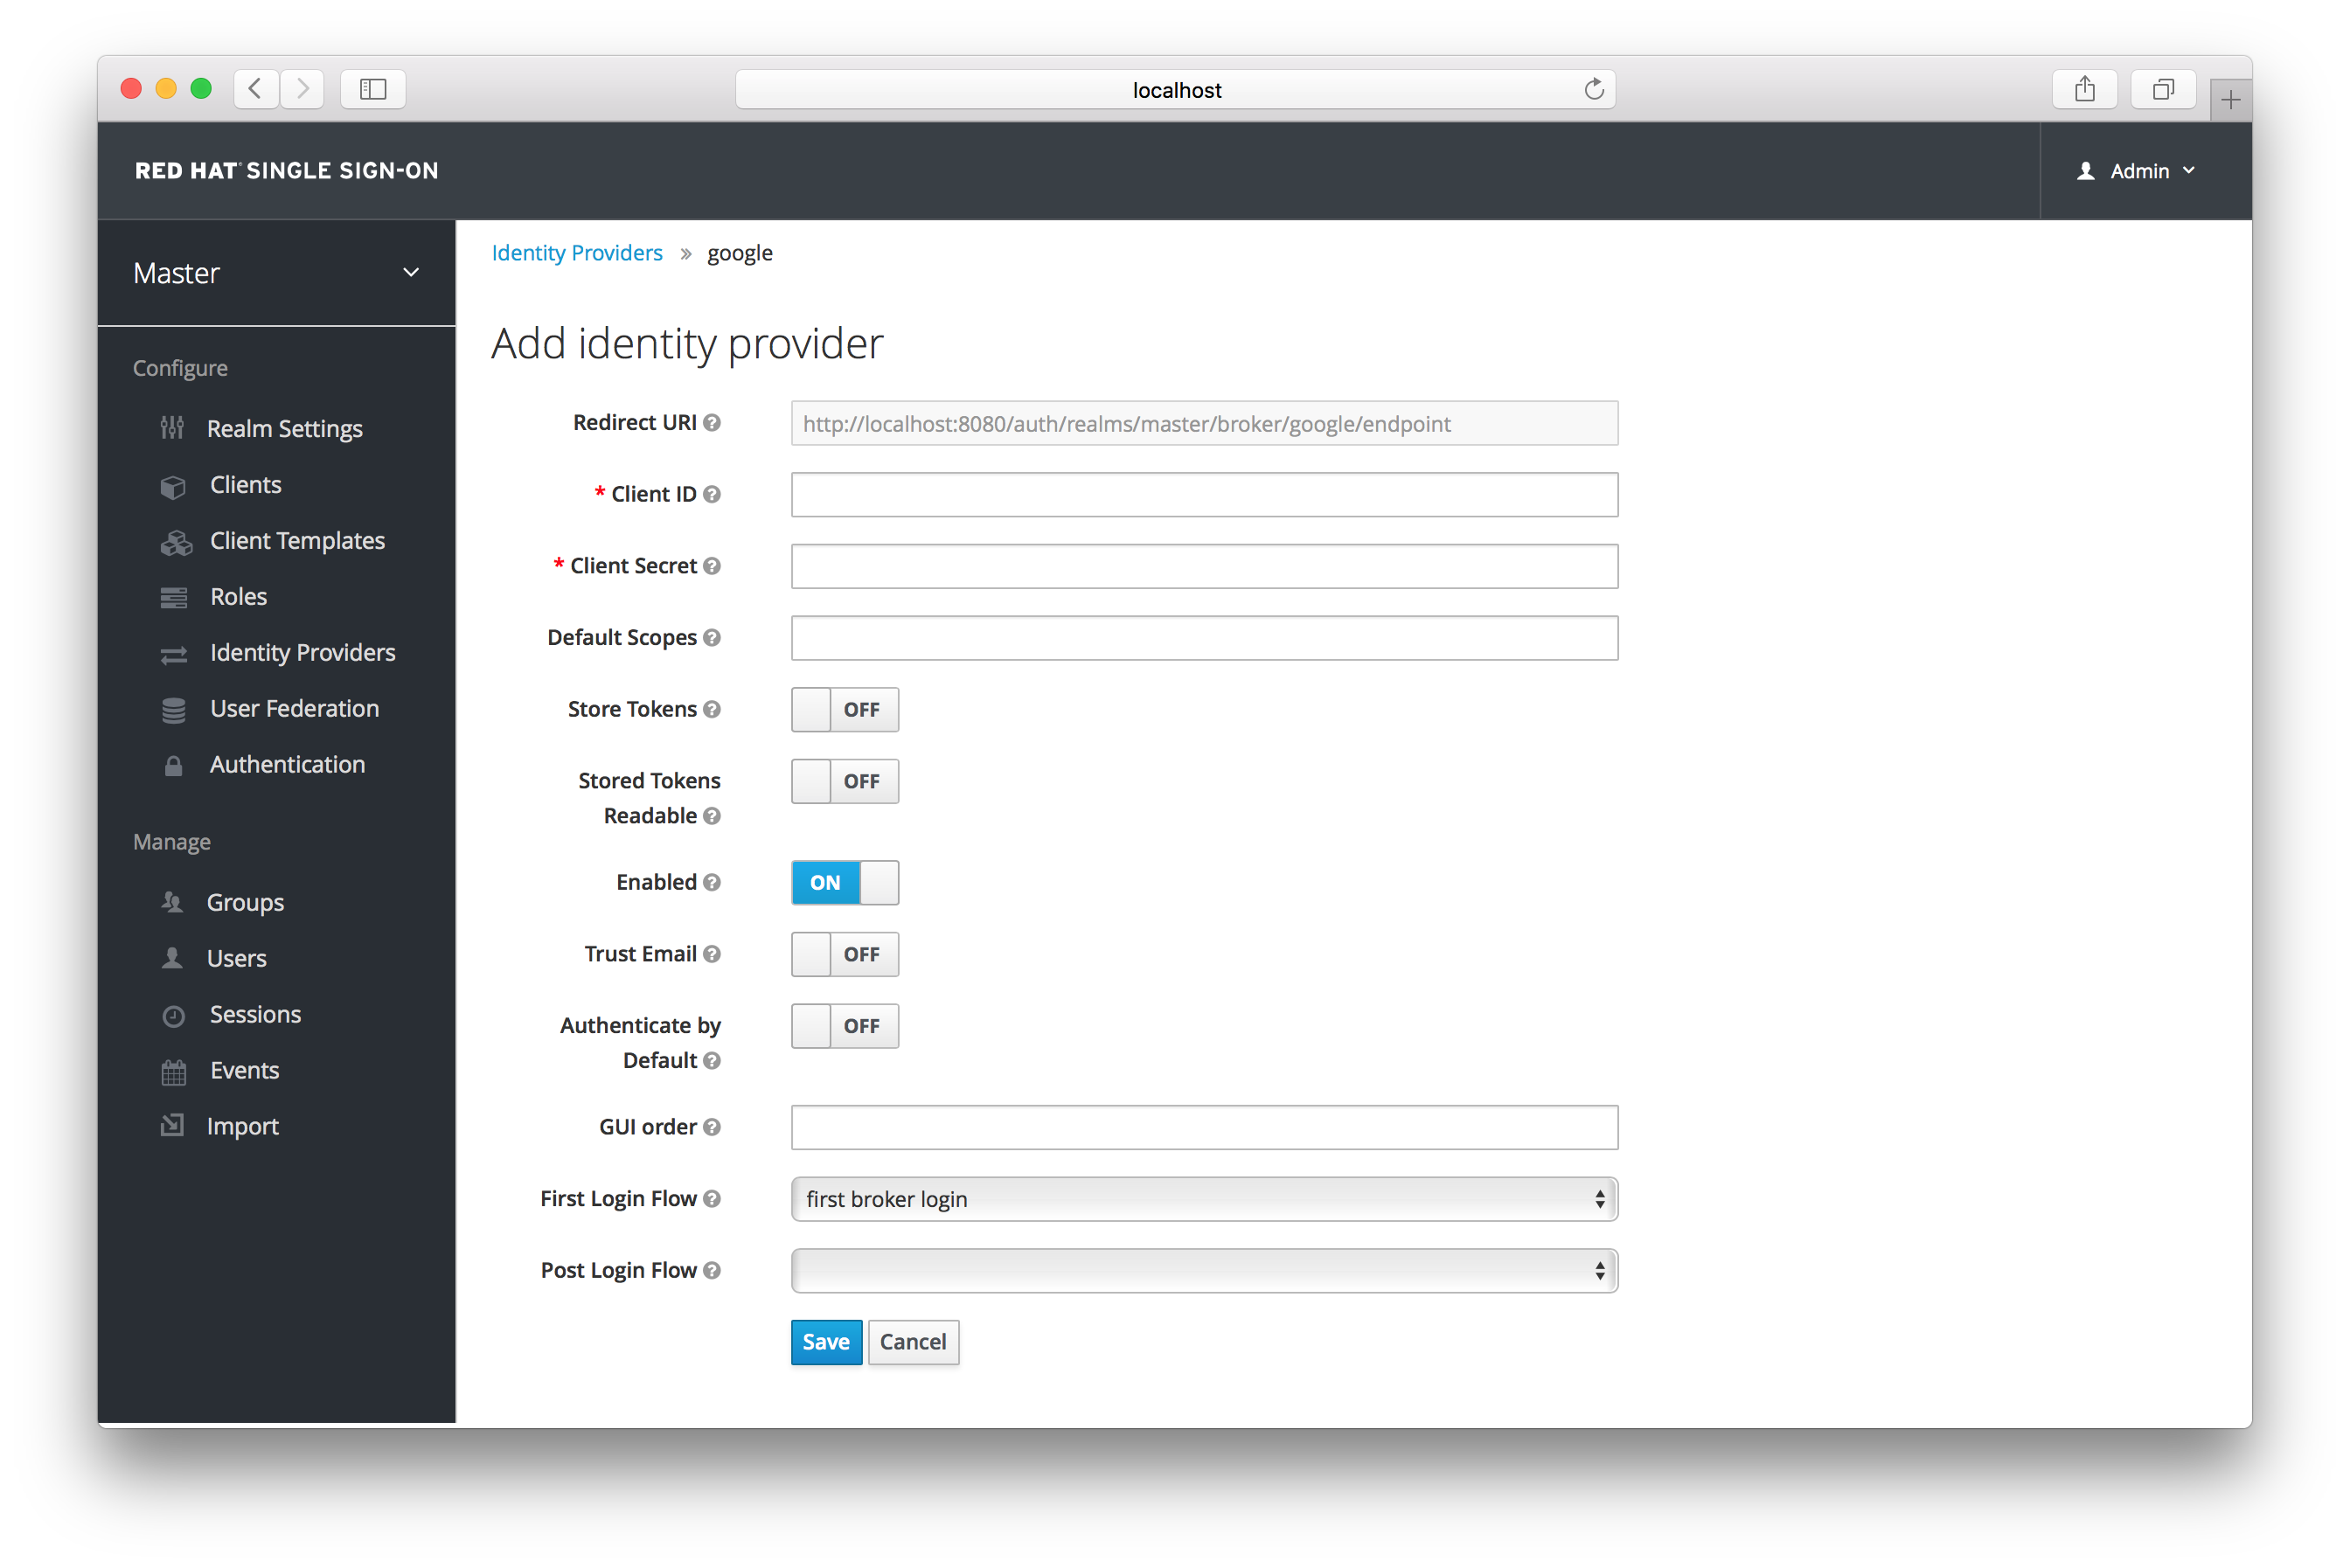
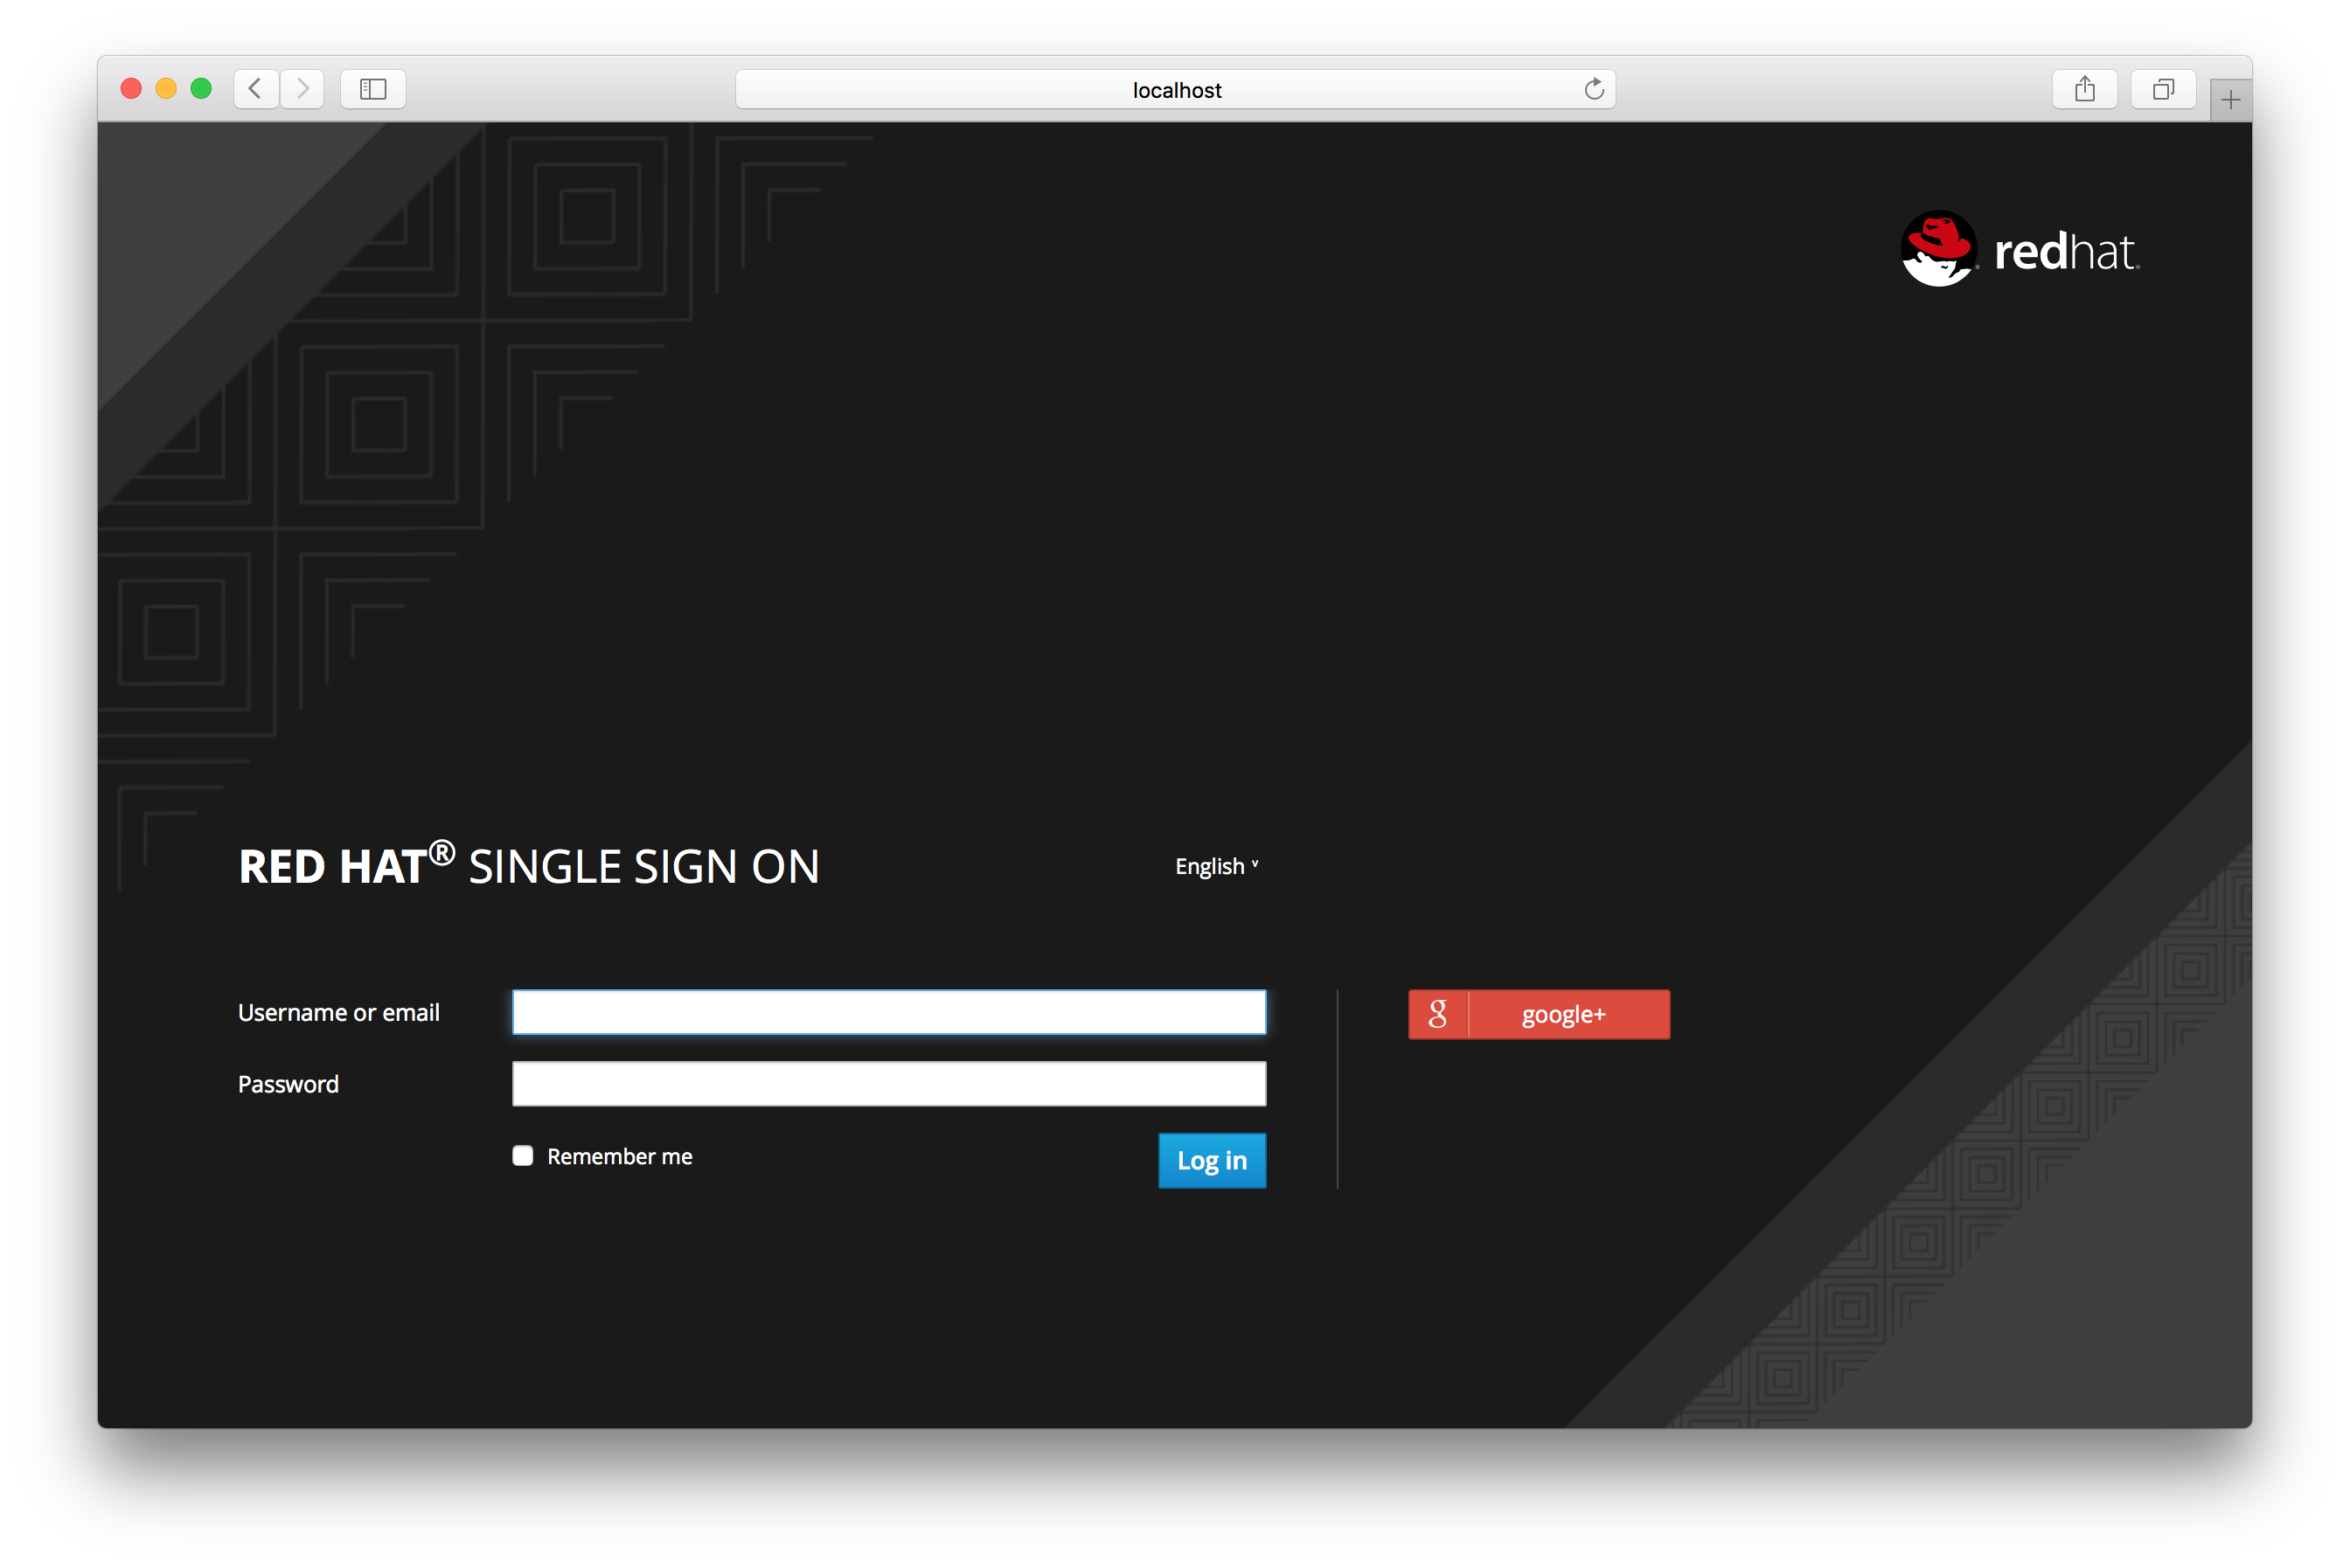
Above is an example of configuring a Google social login provider. Once you configure an IDP, it will appear on the Red Hat Single Sign-On login page as an option.
IDP login page
- Social
- Social providers allow you to enable social authentication in your realm. Red Hat Single Sign-On makes it easy to let users log in to your application using an existing account with a social network. Currently Facebook, Google, Twitter, GitHub, LinkedIn, Microsoft, and StackOverflow are supported with more planned for the future.
- Protocol-based
- Protocol-based providers are those that rely on a specific protocol in order to authenticate and authorize users. They allow you to connect to any identity provider compliant with a specific protocol. Red Hat Single Sign-On provides support for SAML v2.0 and OpenID Connect v1.0 protocols. It makes it easy to configure and broker any identity provider based on these open standards.
Although each type of identity provider has its own configuration options, all of them share some very common configuration. Regardless the identity provider you are creating, you’ll see the following configuration options avaivable:
| Configuration | Description |
|---|---|
| Alias | The alias is an unique identifier for an identity provider. It is used to reference an identity provider internally. Some protocols such as OpenID Connect require a redirect URI or callback url in order to communicate with an identity provider. In this case, the alias is used to build the redirect URI. Every single identity provider must have an alias. Examples are facebook, google, idp.acme.com, etc. |
| Enabled | Turn the provider on/off |
| Store Tokens | Whether or not to store the token received from the identity provider. |
| Stored Tokens Readable | Whether or not users are allowed to retrieve the stored identity provider token. This also applies to the broker client-level role read token |
| Trust email | If the identity provider supplies an email address this email address will be trusted. If the realm required email validation, users that log in from this IDP will not have to go through the email verification process. |
| Authenticate By Default | If checked, the Red Hat Single Sign-On login screen will be completely bypassed and the browser will be redirected directly to the IDP. |
| GUI order | The order number that sorts how the available IDPs are listed on the Red Hat Single Sign-On login page. |
| First Login Flow | This is the authentication flow that will be triggered for users that log into Red Hat Single Sign-On through this IDP for the first time ever. |
| Post Login Flow | Authentication flow that is triggered after the user finishes logging in with the external identity provider. |
12.4. OpenID Connect v1.0 Identity Providers
Red Hat Single Sign-On can broker identity providers based on the OpenID Connect protocol. These IDPs must support the Authorization Code Flow as defined by the specification in order to authenticate the user and authorize access.
To begin configuring an OIDC provider, go to the Identity Providers left menu item and select OpenID Connect v1.0 from the Add provider drop down list. This will bring you to the Add identity provider page.
Add Identity Provider
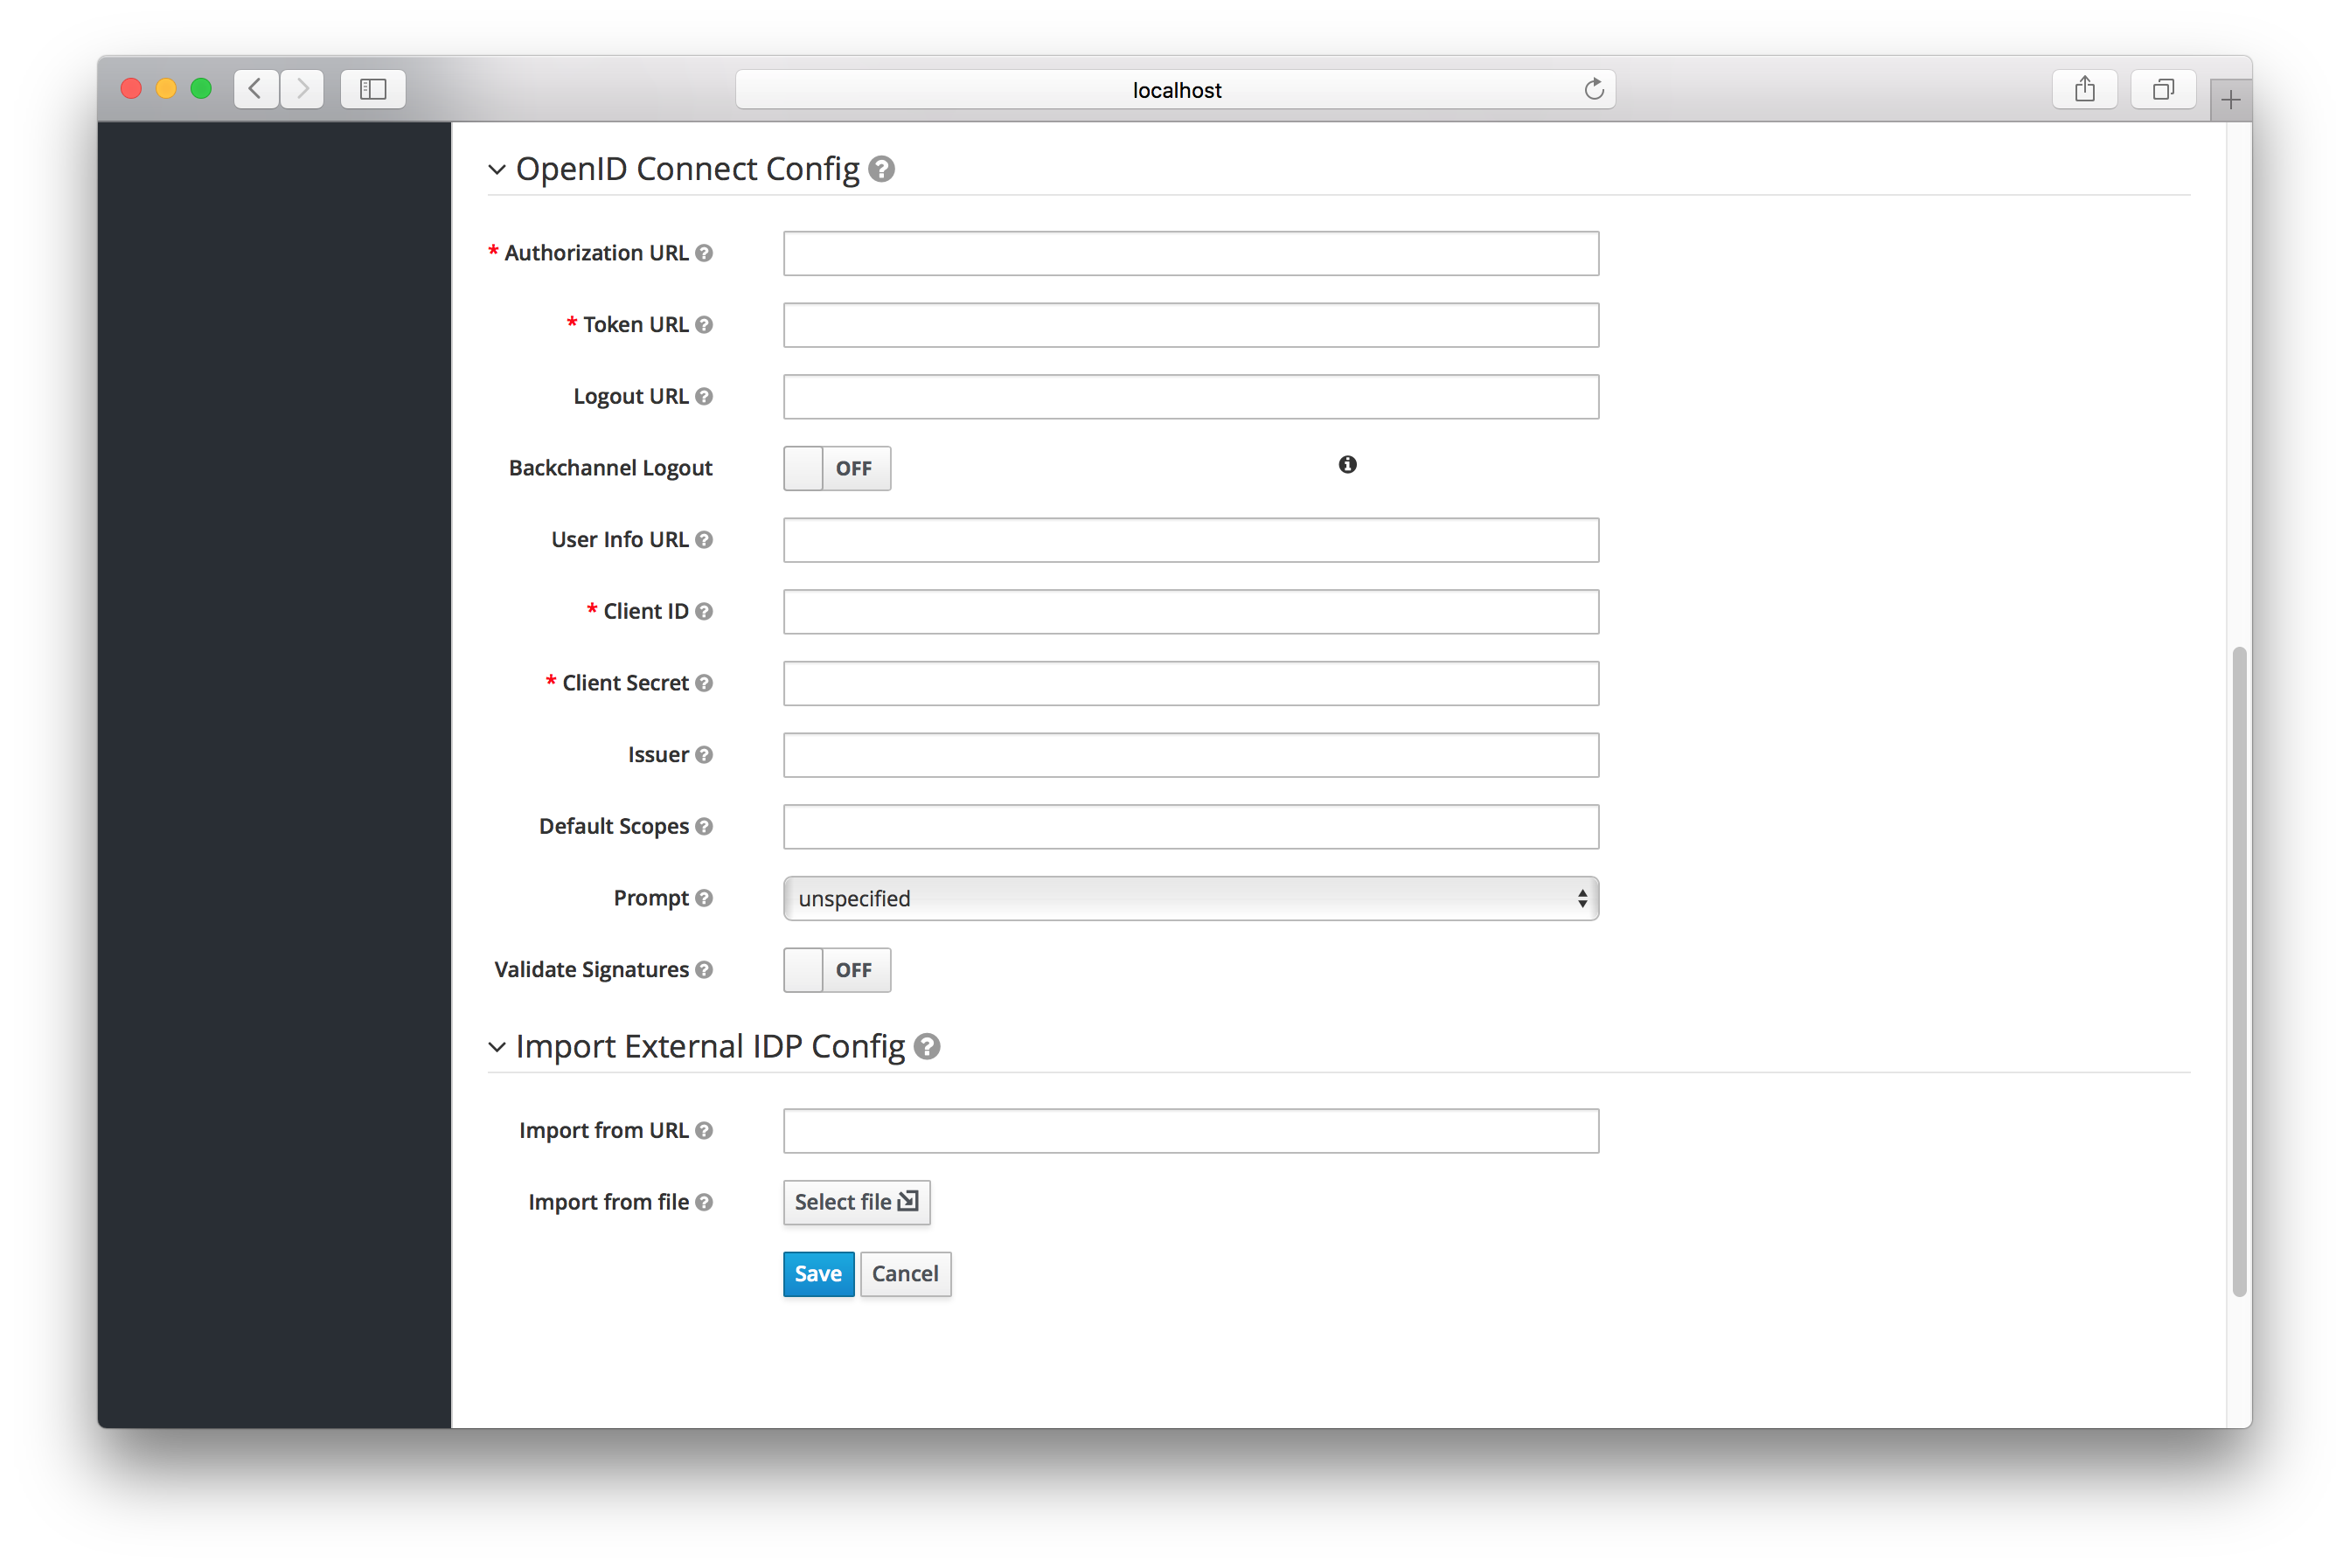
The initial configuration options on this page are described in General IDP Configuration. You must define the OpenID Connection configuration options as well. They basically describe the OIDC IDP you are communicating with.
| Configuration | Description |
|---|---|
| Authorization URL | Authorization URL endpoint required by the OIDC protocol |
| Token URL | Token URL endpoint required by the OIDC protocol |
| Logout URL | Logout URL endpoint defined in the OIDC protocol. This value is optional. |
| Backchannel Logout | Backchannel logout is a background, out-of-band, REST invocation to the IDP to logout the user. Some IDPs can only perform logout through browser redirects as they may only be able to identity sessions via a browser cookie. |
| User Info URL | User Info URL endpoint defined by the OIDC protocol. This is an endpoint from which user profile information can be downloaded. |
| Client ID | This realm will act as an OIDC client to the external federation IDP you are configuring here. Your realm will need a OIDC client ID when using the Authorization Code Flow to interact with the external IDP |
| Client Secret | This realm will need a client secret to use when using the Authorization Code Flow. |
| Issuer | Responses from the IDP may contain an issuer claim. This config value is optional. If specified, this claim will be validated against the value you provide. |
| Default Scopes |
Space-separated list of OIDC scopes to send with the authentication request. The default is |
| Prompt | Another optional switch. This is the prompt parameter defined by the OIDC specification. Through it you can force re-authentication and other options. See the specification for more details |
You can also import all this configuration data by providing a URL or file that points to OpenID Provider Metadata (see OIDC Discovery specification). If you are connecting to a Red Hat Single Sign-On external IDP, you can import the IDP setttings from the url <root>/auth/realms/{realm-name}/.well-known/openid-configuration. This link is a JSON document describing metadata about the IDP.
12.5. SAML v2.0 Identity Providers
Red Hat Single Sign-On can broker identity providers based on the SAML v2.0 protocol.
To begin configuring an OIDC provider, go to the Identity Providers left menu item and select SAML v2.0 from the Add provider drop down list. This will bring you to the Add identity provider page.
Add Identity Provider
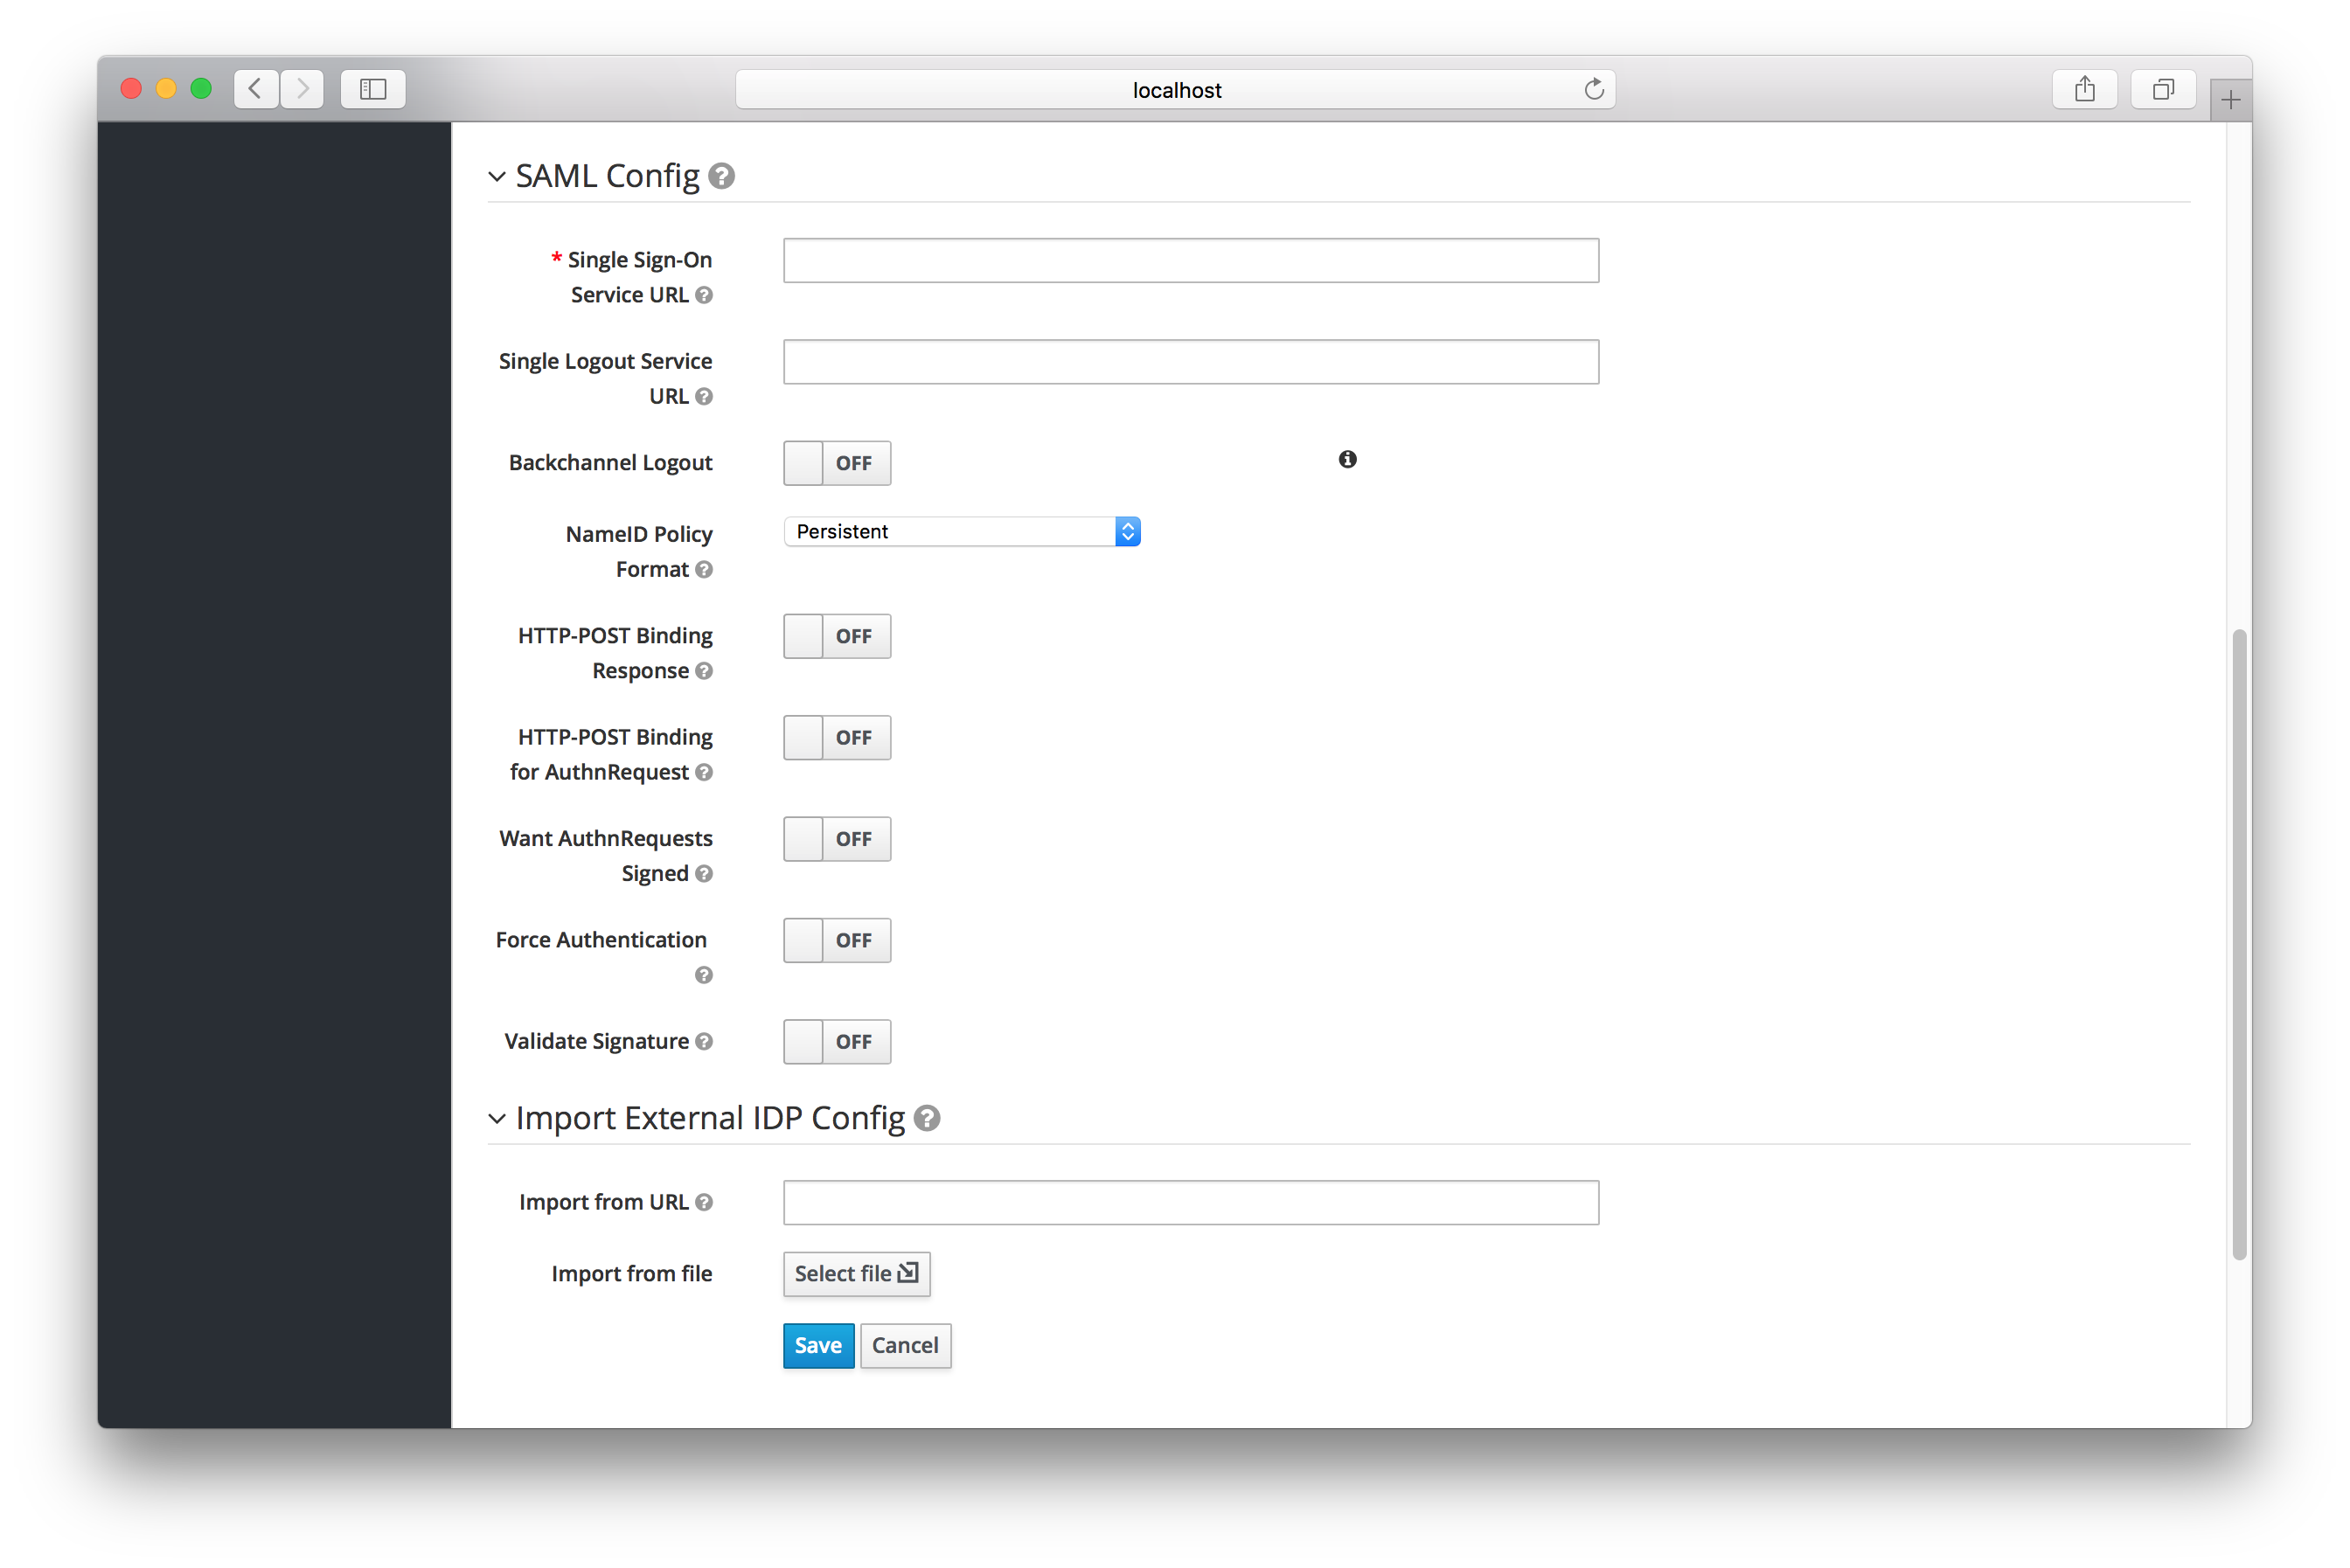
The initial configuration options on this page are described in General IDP Configuration. You must define the SAML configuration options as well. They basically describe the SAML IDP you are communicating with.
| Configuration | Description |
|---|---|
| Single Sign-On Service URL | This is a required field and specifies the SAML endpoint to start the authentication process. If your SAML IDP publishes an IDP entity descriptor, the value of this field will be specified there. |
| Single Logout Service URL | This is an optional field that specifies the SAML logout endpoint. If your SAML IDP publishes an IDP entity descriptor, the value of this field will be specified there. |
| Backchannel Logout | Enable if your SAML IDP supports backchannel logout |
| NameID Policy Format | Specifies the URI reference corresponding to a name identifier format. Defaults to urn:oasis:names:tc:SAML:2.0:nameid-format:persistent. |
| HTTP-POST Binding Response |
When this realm responds to any SAML requests sent by the external IDP, which SAML binding should be used? If set to |
| HTTP-POST Binding for AuthnRequest |
When this realm requests authentication from the external SAML IDP, which SAML binding should be used? If set to |
| Want AuthnRequests Signed | If true, it will use the realm’s keypair to sign requests sent to the external SAML IDP |
| Signature Algorithm |
If |
| Force Authentication | Indicates that the user will be forced to enter in their credentials at the external IDP even if they are already logged in. |
| Validate Signature | Whether or not the realm should expect that SAML requests and responses from the external IDP be digitally signed. It is highly recommended you turn this on! |
| Validating X509 Certificate | The public certificate that will be used to validate the signatures of SAML requests and responses from the external IDP. |
You can also import all this configuration data by providing a URL or file that points to the SAML IDP entity descriptor of the external IDP. If you are connecting to a Red Hat Single Sign-On external IDP, you can import the IDP setttings from the url <root>/auth/realms/{realm-name}/protocol/saml/descriptor. This link is an XML document describing metadata about the IDP.
You can also import all this configuration data by providing a URL or XML file that points to the entity descriptor of the external SAML IDP you want to connect to.
12.5.1. SP Descriptor
Once you create a SAML provider, there is an EXPORT button that appears when viewing that provider. Clicking this button will export a SAML SP entity descriptor which you can use to import into the external SP provider.
This metadata is also available publicly by going to the URL
http[s]://{host:port}/auth/realms/{realm-name}/broker/{broker-alias}/endpoint/descriptor12.6. Client Suggested Identity Provider
Each identity provider has an option Authenticate By Default, which allows that Identity provider to be automatically selected during authentication. The user won’t see the Red Hat Single Sign-On login page and will instead be automatically redirected to the default identity provider.
OIDC applications can also bypass the Red Hat Single Sign-On login page by specifying a hint on which identity provider they want to use. This is done by appending the kc_idp_hint query parameter in the Authorization Code Flow authorization endpoint.
Red Hat Single Sign-On OIDC client adapters also allow you to specify this query parameter when you access a secured resource at the application.
For example
GET /myapplication.com?kc_idp_hint=facebook HTTP/1.1
Host: localhost:8080
In this case, is expected that your realm has an identity provider with an alias facebook.
If you are using keycloak.js adapter, you can also achieve the same behavior:
var keycloak = new Keycloak('keycloak.json');

keycloak.createLoginUrl({
	idpHint: 'facebook'
});
12.7. Mapping Claims and Assertions
You can import the SAML and OpenID Connect metadata provided by the external IDP you are authenticating with into the environment of the realm. This allows you to extract user profile metadata and other information so that you can make it available to your applications.
Each new user that logs into your realm via an external identity provider will have an entry for it created in the local Red Hat Single Sign-On database. The act of importing metadata from the SAML or OIDC assertions and claims will create this data with the local realm database.
If you click on an identity provider listed in the Identity Providers page for your realm, you will be brought to the IDPs Settings tab. On this page is also a Mappers tab. Click on that tab to start mapping your incoming IDP metadata.
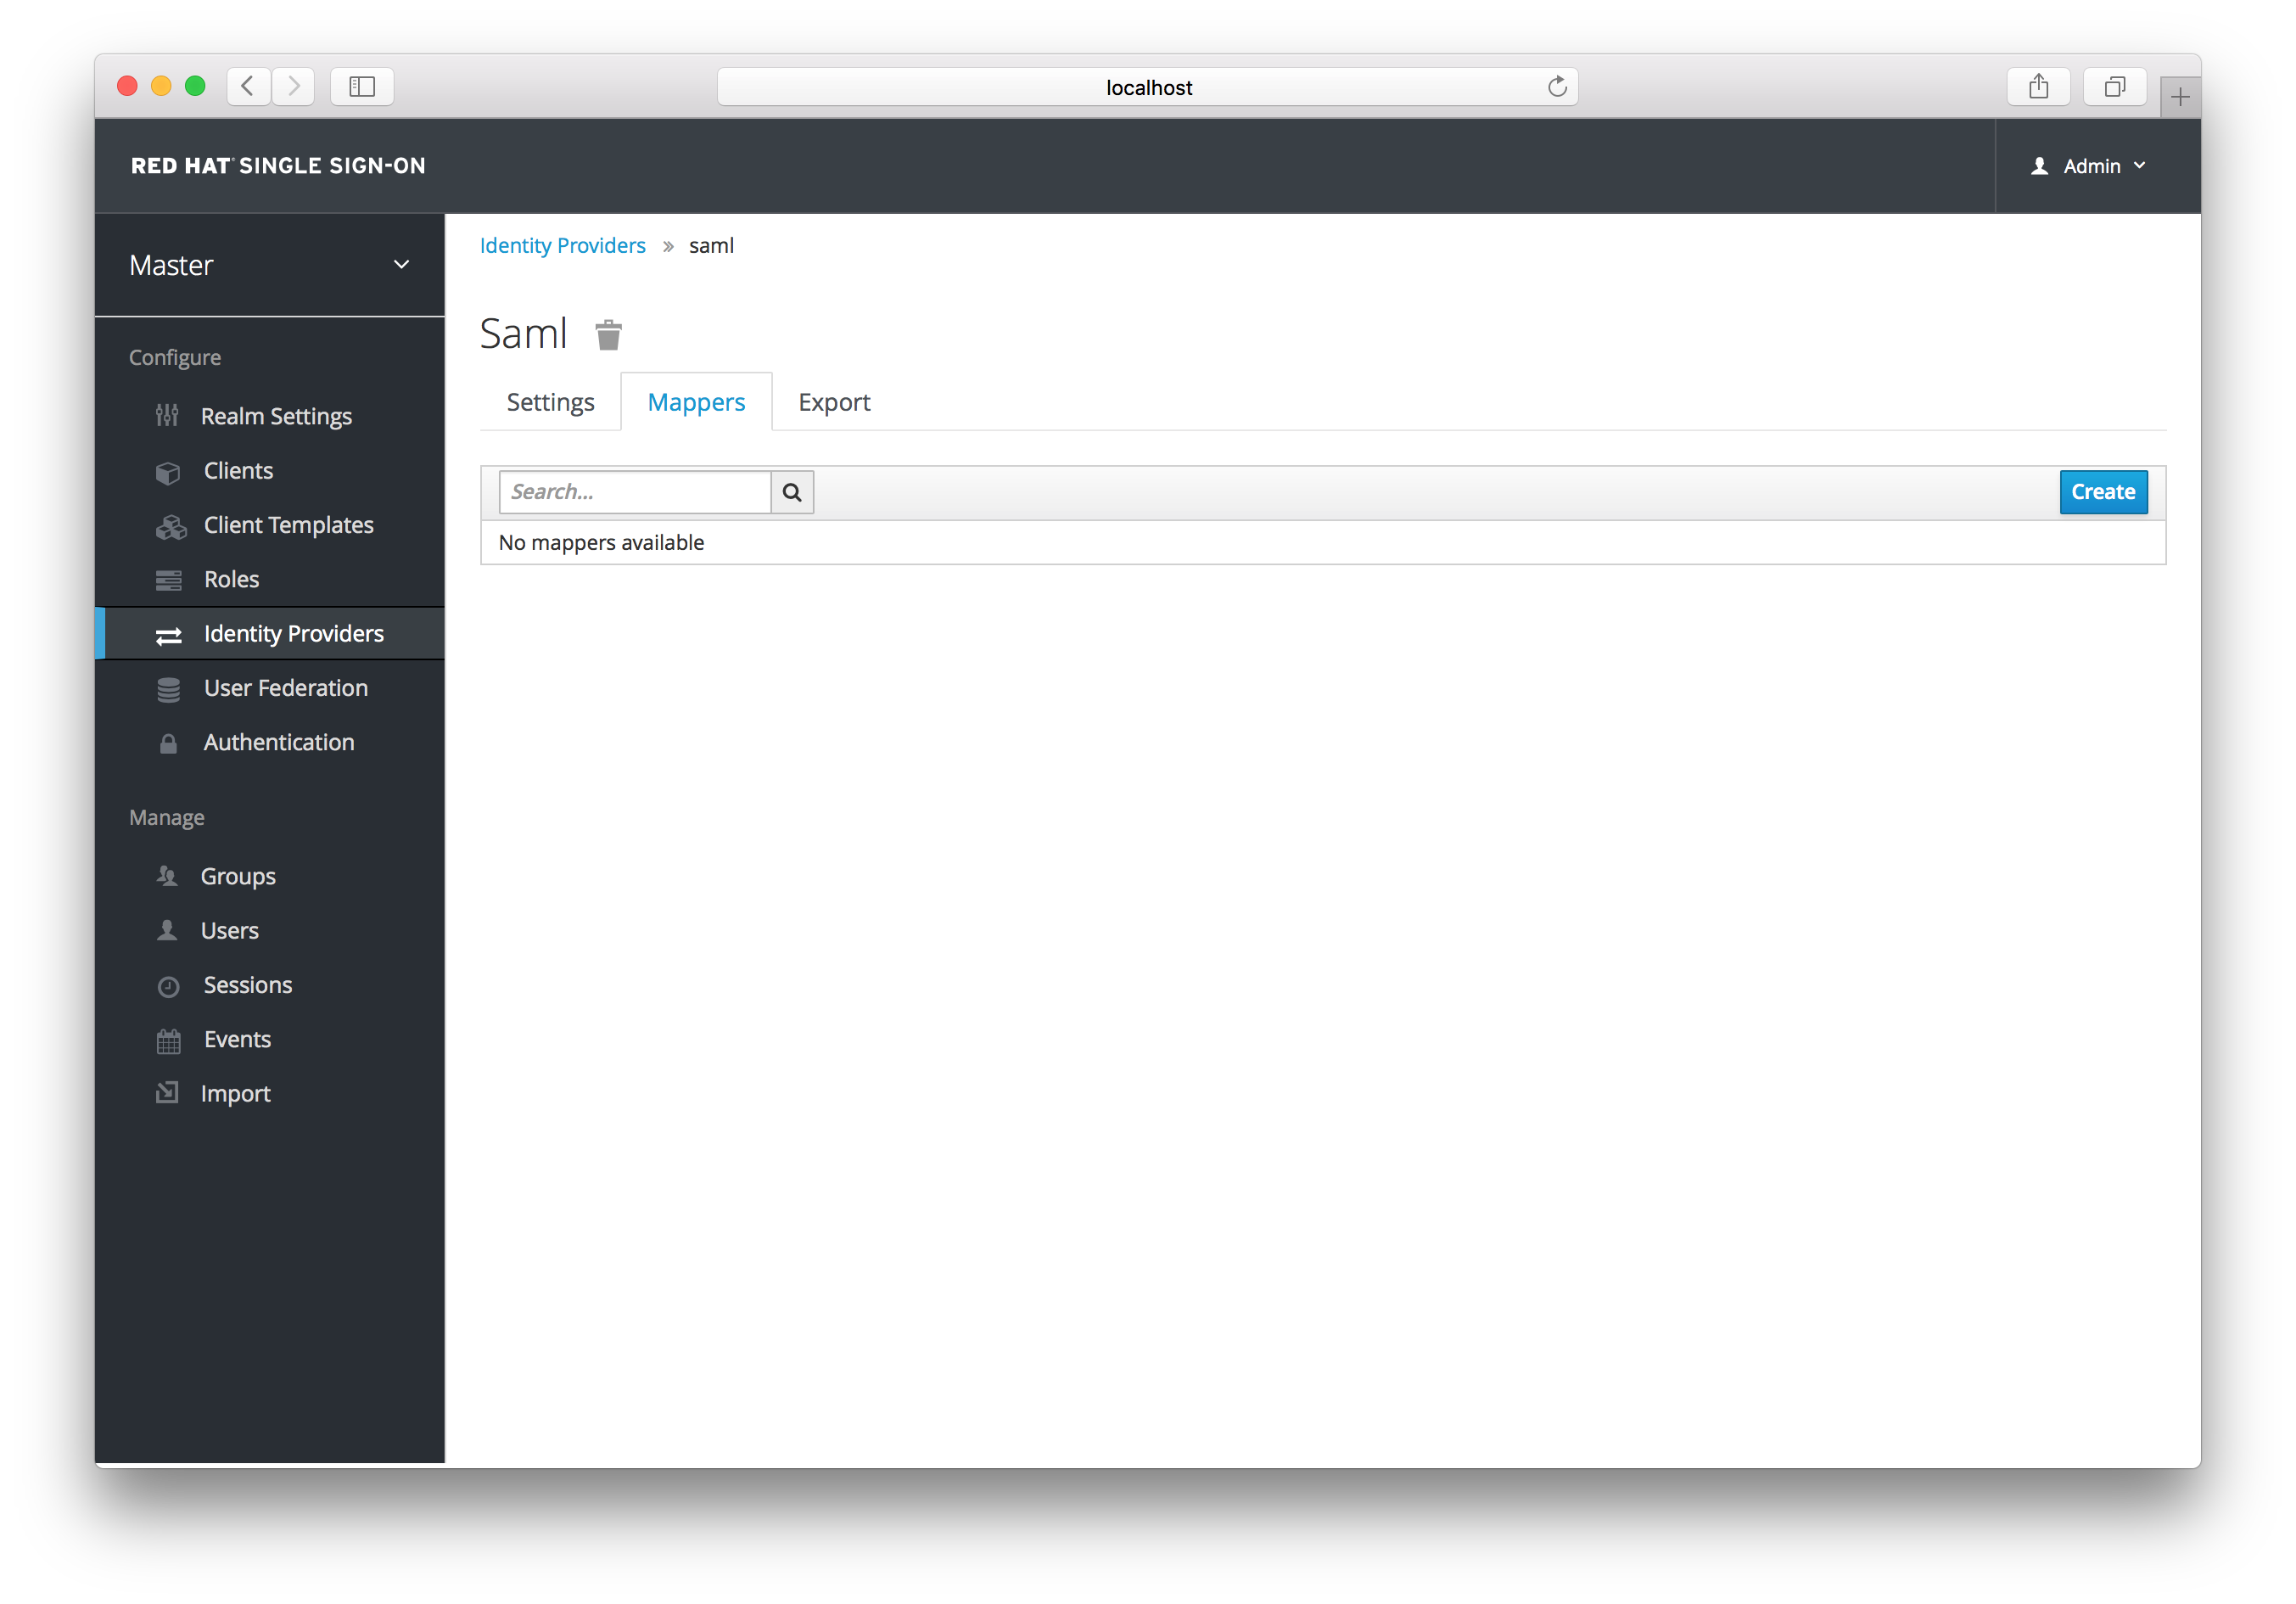
There is a Create button on this page. Clicking on this create button allows you to create a broker mapper. Broker mappers can import SAML attributes or OIDC ID/Access token claims into user attributes and user role mappings.
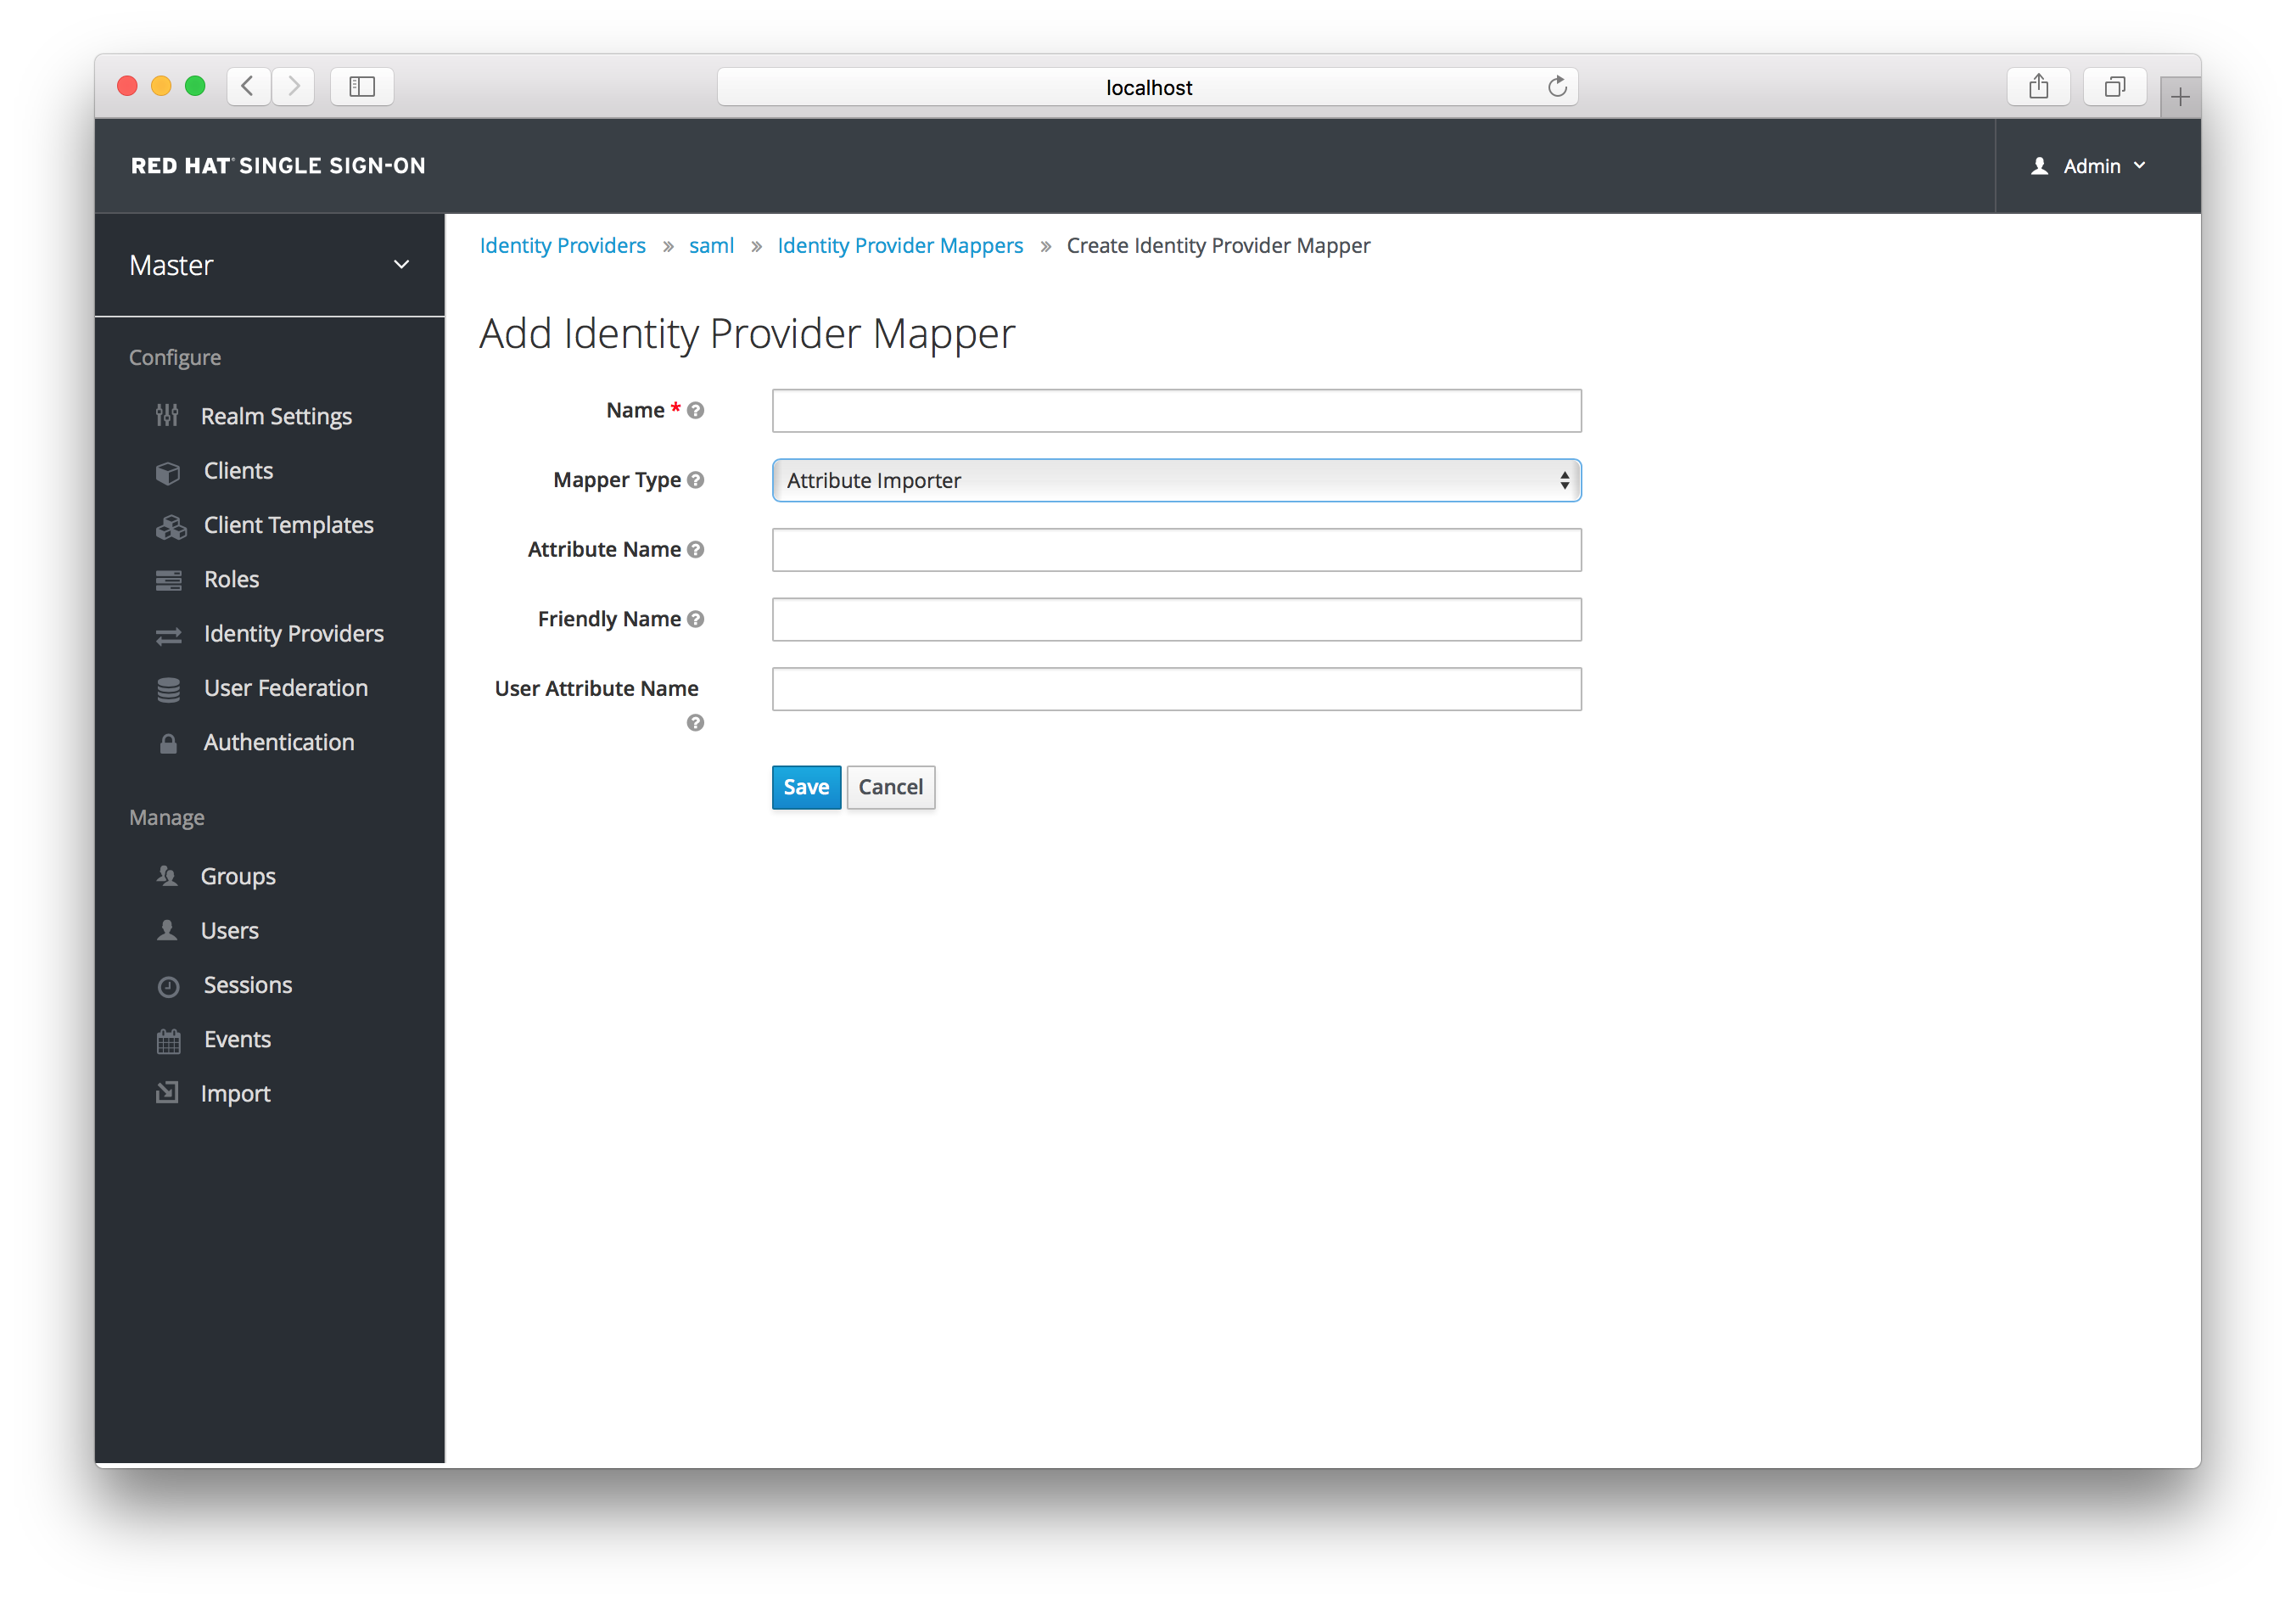
Select a mapper from the Mapper Type list. Hover over the tooltip to see a description of what the mapper does. The tooltips also describe what configuration information you need to enter. Click Save and your new mapper will be added.
For JSON based claims, you can use dot notation for nesting and square brackets to access array fields by index. For example 'contact.address[0].country'.
To investigate the structure of user profile JSON data provided by social providers you can enable the DEBUG level logger org.keycloak.social.user_profile_dump. This is done in the server’s app-server configuration file (domain.xml or standalone.xml).
12.8. Available User Session Data
After a user logs in from the external IDP, there’s some additional user session note data that Red Hat Single Sign-On stores that you can access. This data can be propagated to the client requesting a login via the token or SAML assertion being passed back to it by using an appropriate client mapper.
- BROKER_PROVIDER_ID
- This is the IDP alias of the broker used to perform the login.
You can use a Protocol Mapper to propagate this information to your clients.
12.9. First Login Flow
When a user logs in through identity brokering some aspects of the user are imported and linked within the realm’s local database. When Red Hat Single Sign-On successfully authenticates users through an external identity provider there can be two situations:
- There is already a Red Hat Single Sign-On user account imported and linked with the authenticated identity provider account. In this case, Red Hat Single Sign-On will just authenticate as the existing user and redirect back to application.
- There is not yet an existing Red Hat Single Sign-On user account imported and linked for this external user. Usually you just want to register and import the new account into Red Hat Single Sign-On database, but what if there is an existing Red Hat Single Sign-On account with the same email? Automatically linking the existing local account to the external identity provider is a potential security hole as you can’t always trust the information you get from the external identity provider.
Different organizations have different requirements when dealing with some of the conflicts and situations listed above. For this, there is a First Login Flow option in the IDP settings which allows you to choose a workflow that will be used after a user logs in from an external IDP the first time. By default it points to first broker login flow, but you can configure and use your own flow and use different flows for different identity providers.
The flow itself is configured in admin console under Authentication tab. When you choose First Broker Login flow, you will see what authenticators are used by default. You can re-configure the existing flow. (For example you can disable some authenticators, mark some of them as required, configure some authenticators, etc).
12.9.1. Default First Login Flow
Let’s describe the default behaviour provided by First Broker Login flow.
- Review Profile
-
This authenticator might display the profile info page, where the user can review his profile retrieved from an identity provider. The authenticator is configurable. You can set the
Update Profile On First Loginoption. WhenOn, users will be always presented with the profile page asking for additional information in order to federate their identities. Whenmissing, users will be presented with the profile page only if some mandatory information (email, first name, last name) is not provided by the identity provider. IfOff, the profile page won’t be displayed, unless user clicks in later phase onReview profile infolink (page displayed in later phase byConfirm Link Existing Accountauthenticator) - Create User If Unique
-
This authenticator checks if there is already an existing Red Hat Single Sign-On account with same email or username like the account from the identity provider. If it’s not, then the authenticator just creates a new local Red Hat Single Sign-On account and links it with the identity provider and the whole flow is finished. Otherwise it goes to the next
Handle Existing Accountsubflow. If you always want to ensure that there is no duplicated account, you can mark this authenticator asREQUIRED. In this case, the user will see the error page if there is existing Red Hat Single Sign-On account and the user will need to link his identity provider account through Account management. - Confirm Link Existing Account
-
On the info page, the user will see that there is an existing Red Hat Single Sign-On account with same email. He can review his profile again and use different email or username (flow is restarted and goes back to
Review Profileauthenticator). Or he can confirm that he wants to link the identity provider account with his existing Red Hat Single Sign-On account. Disable this authenticator if you don’t want users to see this confirmation page, but go straight to linking identity provider account by email verification or re-authentication. - Verify Existing Account By Email
-
This authenticator is
ALTERNATIVEby default, so it’s used only if the realm has SMTP setup configured. It will send mail to the user, where he can confirm that he wants to link the identity provider with his Red Hat Single Sign-On account. Disable this if you don’t want to confirm linking by email, but instead you always want users to reauthenticate with their password (and alternatively OTP). - Verify Existing Account By Re-authentication
- This authenticator is used if email authenticator is disabled or non-available (SMTP not configured for realm). It will display a login screen where the user needs to authenticate with his password to link his Red Hat Single Sign-On account with the Identity provider. User can also re-authenticate with some different identity provider, which is already linked to his Red Hat Single Sign-On account. You can also force users to use OTP. Otherwise it’s optional and used only if OTP is already set for the user account.
12.10. Retrieving External IDP Tokens
Red Hat Single Sign-On allows you to store tokens and responses from the authentication process with the external IDP. For that, you can use the Store Token configuration option on the IDP’s settings page.
Application code can retrieve these tokens and responses to pull in extra user information, or to securely invoke requests on the external IDP. For example, an application might want to use the Google token to invoke on other Google services and REST APIs. To retrieve a token for a particular identity provider you need to send a request as follows:
GET /auth/realms/{realm}/broker/{provider_alias}/token HTTP/1.1
Host: localhost:8080
Authorization: Bearer {keycloak_access_token}
An application must have authenticated with Red Hat Single Sign-On and have received an access token. This access token will need to have the broker client-level role read-token set. This means that the user must have a role mapping for this role and the client application must have that role within its scope. In this case, given that you are accessing a protected service in Red Hat Single Sign-On, you need to send the access token issued by Red Hat Single Sign-On during the user authentication.
In the broker configuration page you can automatically assign this role to newly imported users by turning on the Stored Tokens Readable switch.
12.3. Social Identity Providers
For Internet facing applications, it is quite burdensome for users to have to register at your site to obtain access. It requires them to remember yet another username and password combination. Social identity providers allow you to delegate authentication to a semi-trusted and respected entity where the user probably already has an account. Red Hat Single Sign-On provides built-in support for the most common social networks out there, such as Google, Facebook, Twitter, Github, LinkedIn, Microsoft and StackOverflow.
12.3.1. Google
There are a number of steps you have to complete to be able to login to Google. First, go to the
Identity Providersleft menu item and selectGooglefrom theAdd providerdrop down list. This will bring you to theAdd identity providerpage.Add Identity Provider
You can’t click save yet, as you’ll need to obtain a
Client IDandClient Secretfrom Google. One piece of data you’ll need from this page is theRedirect URI. You’ll have to provide that to Google when you register Red Hat Single Sign-On as a client there, so copy this URI to your clipboard.To enable login with Google you first have to create a project and a client in the Google Developer Console. Then you need to copy the client id and secret into the Red Hat Single Sign-On Admin Console.
Google often changes the look and feel of the Google Developer Console, so these directions might not always be up to date and the configuration steps might be slightly different.
Let’s see first how to create a project with Google.
Log in to the Google Developer Console.
Google Developer Console
Click the
Create Projectbutton. Use any value forProject nameandProject IDyou want, then click theCreatebutton. Wait for the project to be created (this may take a while). Once created you will be brought to the project’s dashboard.Dashboard
To be able to retrieve the profiles of Google users, you need to turn on the Google+ APIs. Select the
Enable and manage APIsand click theGoogle+ APIlink.APIs
Click the
Enablebutton on this page. You will get a message that you must create the credentials of your project. So click theGo to Credentialsbutton.Go To Credentials
You will then be brought to the credentials page.
If you logout in the middle of this, there is a menu in the top left hand corner. Select
API Managerand it will bring you to your desired screen.You will then be asked to specify what credentials you need and what type of data you will be accessing.
Add Credentials
Select
Web serverandUser dataand click theWhat credentials do I need?button.Create OAuth ID
Next you’ll need to create an OAuth 2.0 client ID. Specify the name you want for your client. You’ll also need to copy and paste the
Redirect URIfrom the Red Hat Single Sign-OnAdd Identity Providerpage into theAuthorized redirect URIsfield. After you do this, click theCreate client IDbutton.When users log into Google from Red Hat Single Sign-On they will see a consent screen from Google which will ask the user if Red Hat Single Sign-On is allowed to view information about their user profile. The next Google config screen asks you for information about this screen.
Once you click
Doneyou will be brought to theCredentialspage. Click on your new OAuth 2.0 Client ID to view the settings of your new Google Client.Google Client Credentials
You will need to obtain the client ID and secret from this page so you can enter them into the Red Hat Single Sign-On
Add identity providerpage. Go back to Red Hat Single Sign-On and specify those items.One config option to note on the
Add identity providerpage for Google is theDefault Scopesfield. This field allows you to manually specify the scopes that users must authorize when authenticating with this provider. For a complete list of scopes, please take a look at https://developers.google.com/oauthplayground/ . By default, Red Hat Single Sign-On uses the following scopes:openidprofileemail.12.3.2. Facebook
There are a number of steps you have to complete to be able to login to Facebook. First, go to the
Identity Providersleft menu item and selectFacebookfrom theAdd providerdrop down list. This will bring you to theAdd identity providerpage.Add Identity Provider
You can’t click save yet, as you’ll need to obtain a
Client IDandClient Secretfrom Facebook. One piece of data you’ll need from this page is theRedirect URI. You’ll have to provide that to Facebook when you register Red Hat Single Sign-On as a client there, so copy this URI to your clipboard.To enable login with Facebook you first have to create a project and a client in the Facebook Developer Console.
Facebook often changes the look and feel of the Facebook Developer Console, so these directions might not always be up to date and the configuration steps might be slightly different.
Once you’ve logged into the console there is a pull down menu in the top right corner of the screen that says
My Apps. Select theAdd a New Appmenu item.Add a New App
Select the
Websiteicon. Click theSkip and Create App IDbutton.Create a New App ID
The email address and app category are required fields. Once you’re done with that, you will be brought to the dashboard for the application. Click the
Settingsleft menu item.Create a New App ID
Click on the
+ Add Platformbutton at the end of this page and select theWebsiteicon. Copy and paste theRedirect URIfrom the Red Hat Single Sign-OnAdd identity providerpage into theSite URLof the FacebookWebsitesettings block.Specify Website
After this it is necessary to make the Facebook app public. Click
App Reviewleft menu item and switch button to "Yes".You will need also to obtain the App ID and App Secret from this page so you can enter them into the Red Hat Single Sign-On
Add identity providerpage. To obtain this click on theDashboardleft menu item and click onShowunderApp Secret. Go back to Red Hat Single Sign-On and specify those items and finally save your Facebook Identity Provider.One config option to note on the
Add identity providerpage for Facebook is theDefault Scopesfield. This field allows you to manually specify the scopes that users must authorize when authenticating with this provider. For a complete list of scopes, please take a look at https://developers.facebook.com/docs/graph-api. By default, Red Hat Single Sign-On uses the following scopes:email.12.3.3. Twitter
There are a number of steps you have to complete to be able to login to Twitter. First, go to the
Identity Providersleft menu item and selectTwitterfrom theAdd providerdrop down list. This will bring you to theAdd identity providerpage.Add Identity Provider
You can’t click save yet, as you’ll need to obtain a
Client IDandClient Secretfrom Twitter. One piece of data you’ll need from this page is theRedirect URI. You’ll have to provide that to Twitter when you register Red Hat Single Sign-On as a client there, so copy this URI to your clipboard.To enable login with Twtter you first have to create an application in the Twitter Application Management.
Register Application
Click on the
Create New Appbutton. This will bring you to theCreate an Applicationpage.Register Application
Enter in a Name and Description. The Website can be anything, but cannot have a
localhostaddress. For theCallback URLyou must copy theRedirect URIfrom the Red Hat Single Sign-OnAdd Identity Providerpage.You cannot use
localhostin theCallback URL. Instead replace it with127.0.0.1if you are trying to testdrive Twitter login on your laptop.After clicking save you will be brought to the
Detailspage.App Details
Next go to the
Keys and Access Tokenstab.Keys and Access Tokens
Finally, you will need to obtain the API Key and secret from this page and copy them back into the
Client IDandClient Secretfields on the Red Hat Single Sign-OnAdd identity providerpage.12.3.4. Github
There are a number of steps you have to complete to be able to login to Github. First, go to the
Identity Providersleft menu item and selectGithubfrom theAdd providerdrop down list. This will bring you to theAdd identity providerpage.Add Identity Provider
You can’t click save yet, as you’ll need to obtain a
Client IDandClient Secretfrom Github. One piece of data you’ll need from this page is theRedirect URI. You’ll have to provide that to Github when you register Red Hat Single Sign-On as a client there, so copy this URI to your clipboard.To enable login with Github you first have to register an application project in GitHub Application Settings. Select the
Developer applicationstab.Github often changes the look and feel of application registration, so these directions might not always be up to date and the configuration steps might be slightly different.
Add a New App
Click the
Register a new applicationbutton.Register App
You’ll have to copy the
Redirect URIfrom the Red Hat Single Sign-OnAdd Identity Providerpage and enter it into theAuthorization callback URLfield on the GithubRegister a new OAuth applicationpage. Once you’ve completed this page you will be brought to the application’s management page.Github App Page
You will need to obtain the client ID and secret from this page so you can enter them into the Red Hat Single Sign-On
Add identity providerpage. Go back to Red Hat Single Sign-On and specify those items.12.3.5. LinkedIn
There are a number of steps you have to complete to be able to login to LinkedIn. First, go to the
Identity Providersleft menu item and selectLinkedInfrom theAdd providerdrop down list. This will bring you to theAdd identity providerpage.Add Identity Provider
You can’t click save yet, as you’ll need to obtain a
Client IDandClient Secretfrom LinkedIn. One piece of data you’ll need from this page is theRedirect URI. You’ll have to provide that to LinkedIn when you register Red Hat Single Sign-On as a client there, so copy this URI to your clipboard.To enable login with LinkedIn you first have to create an application in LinkedIn Developer Network.
LinkedIn may change the look and feel of application registration, so these directions may not always be up to date.
Developer Network
Click on the
Create Applicationbutton. This will bring you to theCreate a New ApplicationPage.Create App
Fill in the form with the approriate values, then click the
Submitbutton. This will bring you to the new application’s settings page.App Settings
Select
r_basicprofileandr_emailaddressin theDefault Application Permissionssection. You’ll have to copy theRedirect URIfrom the Red Hat Single Sign-OnAdd Identity Providerpage and enter it into theOAuth 2.0Authorized Redirect URLsfield on the LinkedIn app settings page. Don’t forget to click theUpdatebutton after you do this!You will then need to obtain the client ID and secret from this page so you can enter them into the Red Hat Single Sign-On
Add identity providerpage. Go back to Red Hat Single Sign-On and specify those items.12.3.6. Microsoft
There are a number of steps you have to complete to be able to login to Microsoft. First, go to the
Identity Providersleft menu item and selectMicrosoftfrom theAdd providerdrop down list. This will bring you to theAdd identity providerpage.Add Identity Provider
You can’t click save yet, as you’ll need to obtain a
Client IDandClient Secretfrom Microsoft. One piece of data you’ll need from this page is theRedirect URI. You’ll have to provide that to Microsoft when you register Red Hat Single Sign-On as a client there, so copy this URI to your clipboard.To enable login with Microsoft account you first have to register an OAuth application at Microsoft. Go to the Microsoft Application Registration url.
Microsoft often changes the look and feel of application registration, so these directions might not always be up to date and the configuration steps might be slightly different.
Register Application
Enter in the application name and click
Create application. This will bring you to the application settings page of your new application.Settings
You’ll have to copy the
Redirect URIfrom the Red Hat Single Sign-OnAdd Identity Providerpage and add it to theRedirect URIsfield on the Microsoft application page. Be sure to click theAdd Urlbutton andSaveyour changes.Finally, you will need to obtain the Application ID and secret from this page so you can enter them back on the Red Hat Single Sign-On
Add identity providerpage. Go back to Red Hat Single Sign-On and specify those items.12.3.7. StackOverflow
There are a number of steps you have to complete to be able to login to StackOverflow. First, go to the
Identity Providersleft menu item and selectStackOverflowfrom theAdd providerdrop down list. This will bring you to theAdd identity providerpage.Add Identity Provider
To enable login with StackOverflow you first have to register an OAuth application on StackApps. Go to registering your application on Stack Apps url and login.
StackOverflow often changes the look and feel of application registration, so these directions might not always be up to date and the configuration steps might be slightly different.
Register Application
Enter in the application name and the OAuth Domain Name of your application and click
Register your Application. Type in anything you want for the other items.Settings
Finally, you will need to obtain the client ID, secret, and key from this page so you can enter them back on the Red Hat Single Sign-On
Add identity providerpage. Go back to Red Hat Single Sign-On and specify those items.