48.7.6. IPsec Host-to-Host Configuration
IPsec can be configured to connect one desktop or workstation (host) to another using a host-to-host connection. This type of connection uses the network to which each host is connected to create a secure tunnel between each host. The requirements of a host-to-host connection are minimal, as is the configuration of IPsec on each host. The hosts need only a dedicated connection to a carrier network (such as the Internet) and Red Hat Enterprise Linux to create the IPsec connection.
48.7.6.1. Host-to-Host Connection
Link kopierenLink in die Zwischenablage kopiert!
A host-to-host IPsec connection is an encrypted connection between two systems, both running IPsec with the same authentication key. With the IPsec connection active, any network traffic between the two hosts is encrypted.
To configure a host-to-host IPsec connection, use the following steps for each host:
Note
You should perform the following procedures on the actual machine that you are configuring. Avoid attempting to configure and establish IPsec connections remotely.
- In a command shell, type
system-config-networkto start the Network Administration Tool. - On the IPsec tab, click to start the IPsec configuration wizard.
- Click to start configuring a host-to-host IPsec connection.
- Enter a unique name for the connection, for example,
ipsec0. If required, select the check box to automatically activate the connection when the computer starts. Click to continue. - Select Host to Host encryption as the connection type, and then click .
- Select the type of encryption to use: manual or automatic.If you select manual encryption, an encryption key must be provided later in the process. If you select automatic encryption, the
racoondaemon manages the encryption key. Theipsec-toolspackage must be installed if you want to use automatic encryption.Click to continue. - Enter the IP address of the remote host.To determine the IP address of the remote host, use the following command on the remote host:
ifconfig <device>
ifconfig <device>Copy to Clipboard Copied! Toggle word wrap Toggle overflow where <device> is the Ethernet device that you want to use for the VPN connection.If only one Ethernet card exists in the system, the device name is typically eth0. The following example shows the relevant information from this command (note that this is an example output only):eth0 Link encap:Ethernet HWaddr 00:0C:6E:E8:98:1D inet addr:172.16.44.192 Bcast:172.16.45.255 Mask:255.255.254.0eth0 Link encap:Ethernet HWaddr 00:0C:6E:E8:98:1D inet addr:172.16.44.192 Bcast:172.16.45.255 Mask:255.255.254.0Copy to Clipboard Copied! Toggle word wrap Toggle overflow The IP address is the number following theinet addr:label.Note
For host-to-host connections, both hosts should have a public, routable address. Alternatively, both hosts can have a private, non-routable address (for example, from the 10.x.x.x or 192.168.x.x ranges) as long as they are on the sam LAN.If the hosts are on different LANs, or one has a public address while the other has a private address, refer to Section 48.7.7, “IPsec Network-to-Network Configuration”.Click to continue. - If manual encryption was selected in step 6, specify the encryption key to use, or click to create one.
- Specify an authentication key or click to generate one. It can be any combination of numbers and letters.
- Click to continue.
- Verify the information on the IPsec — Summary page, and then click .
- Click > to save the configuration.You may need to restart the network for the changes to take effect. To restart the network, use the following command:
service network restart
service network restartCopy to Clipboard Copied! Toggle word wrap Toggle overflow - Select the IPsec connection from the list and click the button.
- Repeat the entire procedure for the other host. It is essential that the same keys from step 8 be used on the other hosts. Otherwise, IPsec will not work.
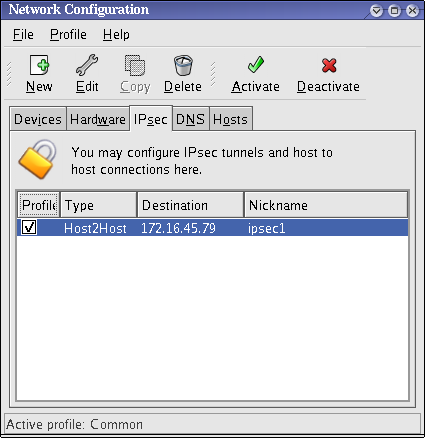
After configuring the IPsec connection, it appears in the IPsec list as shown in Figure 48.10, “IPsec Connection”.
Figure 48.10. IPsec Connection
The following files are created when the IPsec connection is configured:
/etc/sysconfig/network-scripts/ifcfg-<nickname>/etc/sysconfig/network-scripts/keys-<nickname>/etc/racoon/<remote-ip>.conf/etc/racoon/psk.txt
If automatic encryption is selected,
/etc/racoon/racoon.conf is also created.
When the interface is up,
/etc/racoon/racoon.conf is modified to include <remote-ip>.conf.
