チュートリアル
OpenShift Container Platform のスタートガイド
概要
第1章 チュートリアルの概要
OpenShift CLI (oc) または Web コンソールを使用して、OpenShift Container Platform にアプリケーションをデプロイするエンドツーエンドの例に従うことができます。
1.1. 追加の学習リソース
OpenShift Container Platform の追加のチュートリアルと実践的な学習リソースは、追加の実践的な学習 を参照してください。
第2章 チュートリアル: Web コンソールを使用してアプリケーションをデプロイする
このチュートリアルでは、世界中の国立公園の地図を表示する national-parks-app というアプリケーションを OpenShift Container Platform 上に立ち上げるためのサービスをデプロイする手順を説明します。このチュートリアルを完了するには、OpenShift Container Platform Web コンソールを使用します。
次の手順を実行し、このチュートリアルを完了します。
この手順により、アプリケーションを他のクラスターユーザーのワークロードから分離できます。
このステップでは、OpenShift API と対話してプロジェクト内で実行されているサービスやその他のリソースを検出する
viewパーミッションが付与されます。この手順では、
parksmapフロントエンドアプリケーションをデプロイし、外部に公開して、2 つのインスタンスにスケールアップします。このステップでは、
nationalparksバックエンドアプリケーションをデプロイし、外部に公開します。このステップでは、
mongodb-nationalparksMongoDB データベースをデプロイし、データベースにデータをロードして、データベースにアクセスするために必要な認証情報をセットアップします。
これらの手順を完了すると、Web ブラウザーで国立公園アプリケーションを表示 できるようになります。
2.1. 前提条件
このチュートリアルを開始する前に、次の前提条件が満たされていることを確認してください。
テスト用の OpenShift Container Platform クラスターにアクセスできる。
組織にテスト用のクラスターがない場合は、Developer Sandbox へのアクセスをリクエストして、OpenShift Container Platform を試用できます。
プロジェクトとその中にアプリケーションを作成するための適切なパーミッション (
cluster-adminクラスターロール など) がある。必要なパーミッションがない場合は、クラスター管理者に問い合わせてください。プロジェクトを作成するには
self-provisionerロールが必要で、そのプロジェクト内のリソースを変更するにはプロジェクトのadminロールが必要です。Developer Sandbox を使用している場合は、必要なパーミッションを持つプロジェクトが作成されます。
- You have OpenShift Container Platform Web コンソールにログインしている。
2.2. プロジェクトの作成
プロジェクト により、ユーザーコミュニティーは、切り離された状態で独自のコンテンツを整理し、管理できます。プロジェクトは、Kubernetes namespace に対する OpenShift Container Platform 拡張です。プロジェクトには、ユーザーのセルフプロビジョニングを可能にする追加機能があります。各プロジェクトには、オブジェクト、ポリシー、制約、およびサービスアカウントの独自のセットがあります。
クラスター管理者は、開発者が専用のプロジェクトを作成するのを許可できます。ほとんどの場合、独自のプロジェクトに自動的にアクセスできます。管理者は必要に応じて、他のプロジェクトへのアクセス権を付与できます。
この手順では、user-getting-started という新しいプロジェクトが作成されます。このチュートリアルの残りの部分では、このプロジェクトを使用します。
このチュートリアルを完了するために Developer Sandbox を使用している場合は、この手順をスキップしてください。プロジェクトはすでに作成されています。
前提条件
- OpenShift Container Platform Web コンソールにログインしている。
手順
- Home → Projects に移動します。
- Create Project をクリックします。
-
Name フィールドで、
user-getting-startedを入力します。 - Create をクリックします。
2.3. 表示パーミッションの付与
OpenShift Container Platform は、すべてのプロジェクトに複数のサービスアカウントを自動的に作成します。default サービスアカウントが、Pod を実行します。OpenShift Container Platform は、このサービスアカウントを使用して、起動するすべての Pod に挿入します。
デフォルトでは、default サービスアカウントは、OpenShift API と対話するための権限が制限されています。
アプリケーションの要件として、default サービスアカウントに view ロールを割り当てて、OpenShift API と通信し、プロジェクト内の Pod、サービス、リソースを学習できるようにする必要があります。
前提条件
-
cluster-adminまたはプロジェクトレベルのadmin特権がある。
手順
- User Management → RoleBindings に移動します。
- Create binding をクリックします。
-
Name フィールドで、
sa-user-accountを入力します。 Namespace フィールドで、
user-getting-startedを検索して選択します。重要別のプロジェクトを使用している場合は、プロジェクトの名前を選択します。
-
Role name フィールドで、
viewを検索して選択します。 -
Subject の下で、
ServiceAccountを選択します。 Subject namespace フィールドで、
user-getting-startedを検索して選択します。重要別のプロジェクトを使用している場合は、プロジェクトの名前を選択します。
-
Subject name フィールドに
defaultを入力します。 - Create をクリックします。
2.4. フロントエンドアプリケーションのデプロイ
OpenShift Container Platform でアプリケーションをデプロイする最も簡単な方法は、提供されているコンテナーイメージを実行することです。
次の手順では、national-parks-app アプリケーションのフロントエンドコンポーネントである parksmap をデプロイします。この Web アプリケーションは、世界中の国立公園の位置を示すインタラクティブマップを表示します。
手順
-
右上隅の Quick create (
 ) メニューで、Container images をクリックします。
-
Image name from external registry を選択し、
quay.io/openshiftroadshow/parksmap:latestと入力します。 - General セクションまでスクロールします。
-
Application name フィールドに
national-parks-appと入力します。 -
Name フィールドの値が
parksmapであることを確認します。 - Deploy セクションまでスクロールします。
- Resource type フィールドで、Deployment が選択されていることを確認します。
Advanced options セクションで、Create a route が選択されていることを確認します。
デフォルトでは、OpenShift Container Platform で実行されているサービスは外部からアクセスできません。外部クライアントがサービスにアクセスできるようにルートを作成するには、このオプションを選択する必要があります。
Labels のハイパーリンクをクリックします。
アプリケーションコードでは、特定のラベルを設定する必要があります。
次のラベルをテキスト領域に追加し、各キー/値のペアの後に Enter キーを押します。
-
app=national-parks-app -
component=parksmap -
role=frontend
-
- Create をクリックします。
Topology ページにリダイレクトされ、ここで national-parks-app アプリケーションに parksmap デプロイメントを確認できます。
2.4.1. Pod の詳細を表示する
OpenShift Container Platform は、Pod の Kubernetes の概念を活用しています。これは、1 つのホストにともにデプロイされる 1 つ以上のコンテナーであり、定義、デプロイ、管理できる最小のコンピュート単位です。Pod は、コンテナーに対して、(物理または仮想) マシンインスタンスとほぼ同等のものです。
Overview パネルで、parksmap デプロイメントの多くの機能にアクセスできます。Details と Resources タブを使用すると、アプリケーション Pod をスケーリングしたり、ビルド、サービス、ルートのステータスを確認したりできます。
前提条件
-
parksmapフロントエンドアプリケーションをデプロイしている。
手順
- Workloads → Topology に移動します。
national-parks-appアプリケーションでparksmapデプロイメントをクリックします。図2.1 parksmap デプロイメント
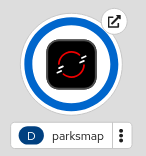
これにより、次のタブを含む概要パネルが開きます。
- Details: デプロイメントの詳細を表示し、特定の設定を編集してデプロイメントをスケーリングします。
- Resources: デプロイメントに関連付けられている Pod、サービス、ルートの詳細を表示します。
- Observe: デプロイメントのメトリクスとイベントを表示します。
-
Pod のログを表示するには、Resources タブを選択し、
parksmapPod の横にある View logs をクリックします。
2.4.2. アプリケーションのスケールアップ
Kubernetes では、Deployment オブジェクトはアプリケーションのデプロイメント方法を定義します。ほとんどの場合、アプリケーションをデプロイすると、OpenShift Container Platform によって Pod、Service、ReplicaSet、および Deployment リソースが作成されます。
parksmap イメージをデプロイすると、デプロイメントリソースが作成されます。この例では、1 つの Pod のみがデプロイされます。ユーザーの需要に応えるため、または 1 つの Pod がダウンした場合でもアプリケーションが常に実行されるようにするために、アプリケーションをスケールアップする必要がある場合があります。
次の手順では、parksmap のデプロイメントをスケーリングして 2 つのインスタンスを使用します。
前提条件
-
parksmapフロントエンドアプリケーションをデプロイしている。
手順
-
Workloads → Topology に移動し、
parksmapデプロイメントをクリックします。 - Details タブを選択します。
上矢印を使用して、Pod を 2 つのインスタンスにスケーリングします。
図2.2 アプリケーションのスケーリング
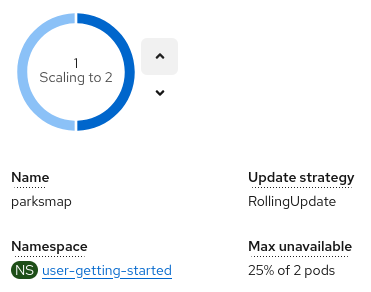
下向きの矢印を使用して、デプロイメントを 1 つの Pod インスタンスにスケールダウンできます。
2.5. バックエンドアプリケーションのデプロイ
次の手順では、national-parks-app アプリケーションのバックエンドコンポーネントである nationalparks をデプロイします。Python アプリケーションは、MongoDB データベースに対して二次元地理空間クエリーを実行して、世界中のすべての国立公園を探して地図上の座標を返します。
前提条件
-
parksmapフロントエンドアプリケーションをデプロイしている。
手順
-
右上隅の Quick create (
) メニューで、Import from Git をクリックします。
Git Repo URL フィールドに
https://github.com/openshift-roadshow/nationalparks-py.gitと入力します。ビルダーイメージは自動的に検出されますが、デフォルトのインポートストラテジーは Python ではなく Dockerfile になります。
インポートストラテジーを変更します。
- Edit Import Strategy をクリックします。
- Builder Image を選択します。
- Python を選択します。
- General セクションまでスクロールします。
-
Application フィールドで、値が
national-parks-appであることを確認します。 -
Name フィールドに
nationalparksと入力します。 - Deploy セクションまでスクロールします。
- Resource type フィールドで、Deployment が選択されていることを確認します。
Advanced options セクションで、Create a route が選択されていることを確認します。
デフォルトでは、OpenShift Container Platform で実行されているサービスは外部からアクセスできません。外部クライアントがサービスにアクセスできるようにルートを作成するには、このオプションを選択する必要があります。
Labels のハイパーリンクをクリックします。
アプリケーションコードでは、特定のラベルを設定する必要があります。
次のラベルをテキスト領域に追加し、各キー/値のペアの後に Enter キーを押します。
-
app=national-parks-app -
component=nationalparks -
role=backend -
type=parksmap-backend
-
- Create をクリックします。
Topology ページにリダイレクトされ、ここで national-parks-app アプリケーションの nationalparks デプロイメントが表示されます。
検証
- Workloads → Topology に移動します。
-
national-parks-appアプリケーションでnationalparksデプロイメントをクリックします。 Resources タブをクリックします。
ビルドが正常に完了するまで待ちます。
2.6. データベースアプリケーションのデプロイ
次の手順では、国立公園の位置情報を保持する MongoDB データベースである mongodb-nationalparks をデプロイします。
前提条件
-
parksmapフロントエンドアプリケーションをデプロイしている。 -
nationalparksバックエンドアプリケーションをデプロイしている。
手順
-
右上隅の Quick create (
) メニューで、Container images をクリックします。
-
Image name from external registry を選択し、
registry.redhat.io/rhmap47/mongodbと入力します。 -
Runtime icon フィールドで、
mongodbを検索して選択します。 - General セクションまでスクロールします。
-
Application name フィールドに
national-parks-appと入力します。 -
Name フィールドに
mongodb-nationalparksと入力します。 - Deploy セクションまでスクロールします。
- Resource type フィールドで、Deployment が選択されていることを確認します。
- Show advanced Deployment option をクリックします。
Environment variables (runtime only) の下に、次の名前と値を追加します。
Expand 表2.1 環境変数の名前および値 名前 値 MONGODB_USERmongodbMONGODB_PASSWORDmongodbMONGODB_DATABASEmongodbMONGODB_ADMIN_PASSWORDmongodbヒント追加の各環境変数を追加するには、Add value をクリックします。
Advanced options セクションで、Create a route をオフにします。
データベースアプリケーションは外部からアクセスする必要がないため、ルートは必要ありません。
- Create をクリックします。
Topology ページにリダイレクトされ、ここで national-parks-app アプリケーションの mongodb-nationalparks デプロイメントが表示されます。
2.6.1. シークレットを作成してデータベースへのアクセスを提供する
nationalparks アプリケーションでは、MongoDB データベースにアクセスするために、データベース名、ユーザー名、パスワードなどの情報が必要です。ただし、これらは機密情報であるため、Pod に直接保存しないでください。
シークレット を使用して機密情報を保存し、そのシークレットをワークロードと共有します。
Secret オブジェクトは、パスワード、OpenShift Container Platform クライアント設定ファイル、プライベートソースリポジトリーの認証情報などの機密情報を保持するためのメカニズムを提供します。シークレットは機密内容を Pod から切り離します。ボリュームプラグインを使用するか、シークレットを環境変数として渡すことで、シークレットをコンテナーにマウントできます。その後、システムはシークレットを使用して、Pod に機密情報を提供できます。
次の手順では、nationalparks-mongodb-parameters シークレットを作成し、それを nationalparks ワークロードにマウントします。
前提条件
-
nationalparksバックエンドアプリケーションをデプロイしている。 -
mongodb-nationalparksデータベースアプリケーションをデプロイしている。
手順
- Workloads → Secrets に移動します。
- Create → Key/value secret をクリックします。
-
Secret name フィールドに
nationalparks-mongodb-parametersを入力します。 Key および Value に以下の値を入力します。
Expand 表2.2 シークレットのキーおよび値 キー 値 DATABASE_SERVICE_NAMEmongodb-nationalparksMONGODB_USERmongodbMONGODB_PASSWORDmongodbMONGODB_DATABASEmongodbMONGODB_ADMIN_PASSWORDmongodbヒント追加の各キー/値ペアを追加するには、Add key/value をクリックします。
- Create をクリックします。
- Add Secret to workload をクリックします。
-
Add this secret to workload リストから、
nationalparksを選択します。 - Save をクリックします。
設定をこのように変更すると、環境変数が適切に挿入された状態で nationalparks デプロイメントの新しいロールアウトがトリガーされます。
2.6.2. データベースへのデータのロード
mongodb-nationalparks データベースをデプロイしたら、国立公園の位置情報をデータベースにロードできます。
前提条件
-
nationalparksバックエンドアプリケーションをデプロイしている。 -
mongodb-nationalparksデータベースアプリケーションをデプロイしている。
手順
- Workloads → Topology に移動します。
-
nationalparksデプロイメントをクリックし、Resources タブを選択します。 - ルートから Location URL をコピーします。
URL を Web ブラウザーにペーストし、URL の最後に以下を追加します。
/ws/data/load以下に例を示します。
https://nationalparks-user-getting-started.apps.cluster.example.com/ws/data/load出力例
Items inserted in database: 2893
2.7. Web ブラウザーでアプリケーションを表示する
必要なアプリケーションをデプロイし、データをデータベースにロードしたら、ブラウザーで国立公園アプリケーションを表示できるようになります。
フロントエンドアプリケーションの URL を開くと、アプリケーションにアクセスできます。
前提条件
-
parksmapフロントエンドアプリケーションをデプロイしている。 -
nationalparksバックエンドアプリケーションをデプロイしている。 -
mongodb-nationalparksデータベースアプリケーションをデプロイしている。 -
データを
mongodb-nationalparksデータベースにロードしている。
手順
- Workloads → Topology に移動します。
parksmapデプロイメントから Open URL のリンクをクリックします。図2.3 世界中の国立公園

Web ブラウザーに世界中の国立公園の地図が表示されていることを確認します。
図2.4 世界中の国立公園

アプリケーションに位置情報へのアクセスを許可すると、地図はあなたの現在地を中心に表示されます。
第3章 チュートリアル: CLI を使用してアプリケーションをデプロイする
このチュートリアルでは、世界中の国立公園の地図を表示する national-parks-app というアプリケーションを OpenShift Container Platform 上に立ち上げるためのサービスをデプロイする手順を説明します。このチュートリアルを完了するには、OpenShift CLI (oc) を使用します。
次の手順を実行し、このチュートリアルを完了します。
この手順により、アプリケーションを他のクラスターユーザーのワークロードから分離できます。
このステップでは、OpenShift API と対話してプロジェクト内で実行されているサービスやその他のリソースを検出する
viewパーミッションが付与されます。この手順では、
parksmapフロントエンドアプリケーションをデプロイし、外部に公開して、2 つのインスタンスにスケールアップします。このステップでは、
nationalparksバックエンドアプリケーションをデプロイし、外部に公開します。このステップでは、
mongodb-nationalparksMongoDB データベースをデプロイし、データベースにデータをロードして、データベースにアクセスするために必要な認証情報をセットアップします。
これらの手順を完了すると、Web ブラウザーで国立公園アプリケーションを表示 できるようになります。
3.1. 前提条件
このチュートリアルを開始する前に、次の前提条件が満たされていることを確認してください。
-
OpenShift CLI (
oc) がインストールされている。 テスト用の OpenShift Container Platform クラスターにアクセスできる。
組織にテスト用のクラスターがない場合は、Developer Sandbox へのアクセスをリクエストして、OpenShift Container Platform を試用できます。
プロジェクトとその中にアプリケーションを作成するための適切なパーミッション (
cluster-adminクラスターロール など) がある。必要なパーミッションがない場合は、クラスター管理者に問い合わせてください。プロジェクトを作成するには
self-provisionerロールが必要で、そのプロジェクト内のリソースを変更するにはプロジェクトのadminロールが必要です。Developer Sandbox を使用している場合は、必要なパーミッションを持つプロジェクトが作成されます。
-
OpenShift CLI (
oc) を使用してクラスターにログインしている。
3.2. プロジェクトの作成
プロジェクト により、ユーザーコミュニティーは、切り離された状態で独自のコンテンツを整理し、管理できます。プロジェクトは、Kubernetes namespace に対する OpenShift Container Platform 拡張です。プロジェクトには、ユーザーのセルフプロビジョニングを可能にする追加機能があります。各プロジェクトには、オブジェクト、ポリシー、制約、およびサービスアカウントの独自のセットがあります。
クラスター管理者は、開発者が専用のプロジェクトを作成するのを許可できます。ほとんどの場合、独自のプロジェクトに自動的にアクセスできます。管理者は必要に応じて、他のプロジェクトへのアクセス権を付与できます。
この手順では、user-getting-started という新しいプロジェクトが作成されます。このチュートリアルの残りの部分では、このプロジェクトを使用します。
このチュートリアルを完了するために Developer Sandbox を使用している場合は、この手順をスキップしてください。プロジェクトはすでに作成されています。
前提条件
-
OpenShift CLI (
oc) にログインしている。
手順
次のコマンドを実行してプロジェクトを作成します。
$ oc new-project user-getting-started出力例
Now using project "user-getting-started" on server "https://openshift.example.com:6443". ...
3.3. 表示パーミッションの付与
OpenShift Container Platform は、すべてのプロジェクトに複数のサービスアカウントを自動的に作成します。default サービスアカウントが、Pod を実行します。OpenShift Container Platform は、このサービスアカウントを使用して、起動するすべての Pod に挿入します。
デフォルトでは、default サービスアカウントは、OpenShift API と対話するための権限が制限されています。
アプリケーションの要件として、default サービスアカウントに view ロールを割り当てて、OpenShift API と通信し、プロジェクト内の Pod、サービス、リソースを学習できるようにする必要があります。
前提条件
- OpenShift Container Platform クラスターにアクセスできる。
-
OpenShift CLI (
oc) がインストールされている。 -
cluster-adminまたはプロジェクトレベルのadmin特権がある。
手順
次のコマンドを実行して、
user-getting-startedプロジェクトのdefaultサービスアカウントにviewロールを追加します。$ oc adm policy add-role-to-user view -z default -n user-getting-started重要別のプロジェクトを使用している場合は、
user-getting-startedを独自のプロジェクトの名前に置き換えます。
3.4. フロントエンドアプリケーションのデプロイ
OpenShift Container Platform でアプリケーションをデプロイする最も簡単な方法は、提供されているコンテナーイメージを実行することです。
次の手順では、national-parks-app アプリケーションのフロントエンドコンポーネントである parksmap をデプロイします。この Web アプリケーションは、世界中の国立公園の位置を示すインタラクティブマップを表示します。
前提条件
- OpenShift Container Platform クラスターにアクセスできる。
-
OpenShift CLI (
oc) がインストールされている。
手順
次のコマンドを実行して、
parksmapアプリケーションをデプロイします。$ oc new-app quay.io/openshiftroadshow/parksmap:latest --name=parksmap -l 'app=national-parks-app,component=parksmap,role=frontend,app.kubernetes.io/part-of=national-parks-app'出力例
--> Found container image 0c2f55f (4 years old) from quay.io for "quay.io/openshiftroadshow/parksmap:latest" * An image stream tag will be created as "parksmap:latest" that will track this image --> Creating resources with label app=national-parks-app,app.kubernetes.io/part-of=national-parks-app,component=parksmap,role=frontend ... imagestream.image.openshift.io "parksmap" created deployment.apps "parksmap" created service "parksmap" created --> Success Application is not exposed. You can expose services to the outside world by executing one or more of the commands below: 'oc expose service/parksmap' Run 'oc status' to view your app.
3.4.1. フロントエンドサービスの公開
デフォルトでは、OpenShift Container Platform で実行されているサービスは外部からアクセスできません。
外部クライアントがアクセスできるようにサービスを公開するには、ルート を作成します。Route オブジェクトは、Kubernetes Ingress オブジェクトに似た OpenShift Container Platform ネットワークリソースです。デフォルトの OpenShift Container Platform ルーター (HAProxy) は、受信リクエストの HTTP ヘッダーを使用して、接続をプロキシー処理する場所を決定します。
オプションとして、ルートに TLS などのセキュリティーを定義できます。
前提条件
-
parksmapフロントエンドアプリケーションをデプロイしている。 -
cluster-adminまたはプロジェクトレベルのadmin特権がある。
手順
次のコマンドを実行して、
parksmapフロントエンドアプリケーションを公開するためのルートを作成します。$ oc create route edge parksmap --service=parksmap
検証
次のコマンドを実行して、アプリケーションルートが正常に作成されたことを確認します。
$ oc get route parksmap出力例
NAME HOST/PORT PATH SERVICES PORT TERMINATION WILDCARD parksmap parksmap-user-getting-started.apps.cluster.example.com parksmap 8080-tcp edge None
3.4.2. Pod の詳細を表示する
OpenShift Container Platform は、Pod の Kubernetes の概念を活用しています。これは、1 つのホストにともにデプロイされる 1 つ以上のコンテナーであり、定義、デプロイ、管理できる最小のコンピュート単位です。Pod は、コンテナーに対して、(物理または仮想) マシンインスタンスとほぼ同等のものです。
クラスターの Pod を表示し、それらの Pod およびクラスター全体としての正常性を判別できます。
前提条件
-
parksmapフロントエンドアプリケーションをデプロイしている。
手順
次のコマンドを実行して、現在のプロジェクト内のすべての Pod をリスト表示します。
$ oc get pods出力例
NAME READY STATUS RESTARTS AGE parksmap-5f9579955-6sng8 1/1 Running 0 77s次のコマンドを実行して、Pod の詳細を表示します。
$ oc describe pod parksmap-5f9579955-6sng8出力例
Name: parksmap-5f9579955-6sng8 Namespace: user-getting-started Priority: 0 Service Account: default Node: ci-ln-fr1rt92-72292-4fzf9-worker-a-g9g7c/10.0.128.4 Start Time: Wed, 26 Mar 2025 14:03:19 -0400 Labels: app=national-parks-app app.kubernetes.io/part-of=national-parks-app component=parksmap deployment=parksmap pod-template-hash=848bd4954b role=frontend ...次のコマンドを実行して、Pod のログを表示します。
$ oc logs parksmap-5f9579955-6sng8出力例
... 2025-03-26 18:03:24.774 INFO 1 --- [ main] o.s.m.s.b.SimpleBrokerMessageHandler : Started. 2025-03-26 18:03:24.798 INFO 1 --- [ main] s.b.c.e.t.TomcatEmbeddedServletContainer : Tomcat started on port(s): 8080 (http) 2025-03-26 18:03:24.801 INFO 1 --- [ main] c.o.evg.roadshow.ParksMapApplication : Started ParksMapApplication in 4.053 seconds (JVM running for 4.46)
3.4.3. デプロイメントのスケールアップ
Kubernetes では、Deployment オブジェクトはアプリケーションのデプロイメント方法を定義します。ほとんどの場合、アプリケーションをデプロイすると、OpenShift Container Platform によって Pod、Service、ReplicaSet、および Deployment リソースが作成されます。
parksmap イメージをデプロイすると、デプロイメントリソースが作成されます。この例では、1 つの Pod のみがデプロイされます。ユーザーの需要に応えるため、または 1 つの Pod がダウンした場合でもアプリケーションが常に実行されるようにするために、アプリケーションをスケールアップする必要がある場合があります。
次の手順では、parksmap のデプロイメントをスケーリングして 2 つのインスタンスを使用します。
前提条件
-
parksmapフロントエンドアプリケーションをデプロイしている。
手順
次のコマンドを実行して、デプロイメントを 1 つの Pod インスタンスから 2 つの Pod インスタンスにスケーリングします。
$ oc scale --replicas=2 deployment/parksmap出力例
deployment.apps/parksmap scaled
検証
次のコマンドを実行して、デプロイメントが適切にスケールアップされたことを確認します。
$ oc get pods出力例
NAME READY STATUS RESTARTS AGE parksmap-5f9579955-6sng8 1/1 Running 0 7m39s parksmap-5f9579955-8tgft 1/1 Running 0 24s2 つの
parksmapPod がリスト表示されていることを確認します。
デプロイメントを 1 つの Pod インスタンスにスケールダウンするには、--replicas オプションに 1 を渡します。
$ oc scale --replicas=1 deployment/parksmap3.5. バックエンドアプリケーションのデプロイ
次の手順では、national-parks-app アプリケーションのバックエンドコンポーネントである nationalparks をデプロイします。Python アプリケーションは、MongoDB データベースに対して二次元地理空間クエリーを実行して、世界中のすべての国立公園を探して地図上の座標を返します。
前提条件
-
parksmapフロントエンドアプリケーションをデプロイしている。
手順
次のコマンドを実行して、
nationalparksバックエンドアプリケーションを作成します。$ oc new-app python~https://github.com/openshift-roadshow/nationalparks-py.git --name nationalparks -l 'app=national-parks-app,component=nationalparks,role=backend,app.kubernetes.io/part-of=national-parks-app,app.kubernetes.io/name=python' --allow-missing-images=true出力例
--> Found image 9531750 (2 weeks old) in image stream "openshift/python" under tag "3.11-ubi8" for "python" Python 3.11 ----------- ... --> Creating resources with label app=national-parks-app,app.kubernetes.io/name=python,app.kubernetes.io/part-of=national-parks-app,component=nationalparks,role=backend ... imagestream.image.openshift.io "nationalparks" created buildconfig.build.openshift.io "nationalparks" created deployment.apps "nationalparks" created service "nationalparks" created --> Success Build scheduled, use 'oc logs -f buildconfig/nationalparks' to track its progress. Application is not exposed. You can expose services to the outside world by executing one or more of the commands below: 'oc expose service/nationalparks' Run 'oc status' to view your app.
3.5.1. バックエンドサービスの公開
外部クライアントにフロントエンドサービスを公開した方法と同様に、ルートを作成してバックエンドサービスを公開する必要があります。
前提条件
-
nationalparksバックエンドアプリケーションをデプロイしている。 -
cluster-adminまたはプロジェクトレベルのadmin特権がある。
手順
次のコマンドを実行して、
nationalparksバックエンドアプリケーションを公開するためのルートを作成します。$ oc create route edge nationalparks --service=nationalparks次のコマンドを実行して、
nationalparksルートにラベルを付けます。$ oc label route nationalparks type=parksmap-backendアプリケーションコードでは、
nationalparksルートにtype=parksmap-backendのラベルが付けられていることを想定しています。
3.6. データベースアプリケーションのデプロイ
次の手順では、国立公園の位置情報を保持する MongoDB データベースである mongodb-nationalparks をデプロイします。
前提条件
-
parksmapフロントエンドアプリケーションをデプロイしている。 -
nationalparksバックエンドアプリケーションをデプロイしている。
手順
次のコマンドを実行して、
mongodb-nationalparksデータベースアプリケーションをデプロイします。$ oc new-app registry.redhat.io/rhmap47/mongodb --name mongodb-nationalparks -e MONGODB_USER=mongodb -e MONGODB_PASSWORD=mongodb -e MONGODB_DATABASE=mongodb -e MONGODB_ADMIN_PASSWORD=mongodb -l 'app.kubernetes.io/part-of=national-parks-app,app.kubernetes.io/name=mongodb'出力例
--> Found container image 7a61087 (12 days old) from quay.io for "quay.io/mongodb/mongodb-enterprise-server" * An image stream tag will be created as "mongodb-nationalparks:latest" that will track this image --> Creating resources with label app.kubernetes.io/name=mongodb,app.kubernetes.io/part-of=national-parks-app ... imagestream.image.openshift.io "mongodb-nationalparks" created deployment.apps "mongodb-nationalparks" created service "mongodb-nationalparks" created --> Success Application is not exposed. You can expose services to the outside world by executing one or more of the commands below: 'oc expose service/mongodb-nationalparks' Run 'oc status' to view your app.
3.6.1. シークレットを作成してデータベースへのアクセスを提供する
nationalparks アプリケーションでは、MongoDB データベースにアクセスするために、データベース名、ユーザー名、パスワードなどの情報が必要です。ただし、これらは機密情報であるため、Pod に直接保存しないでください。
シークレット を使用して機密情報を保存し、そのシークレットをワークロードと共有します。
Secret オブジェクトは、パスワード、OpenShift Container Platform クライアント設定ファイル、プライベートソースリポジトリーの認証情報などの機密情報を保持するためのメカニズムを提供します。シークレットは機密内容を Pod から切り離します。ボリュームプラグインを使用するか、シークレットを環境変数として渡すことで、シークレットをコンテナーにマウントできます。その後、システムはシークレットを使用して、Pod に機密情報を提供できます。
次の手順では、nationalparks-mongodb-parameters シークレットを作成し、それを nationalparks ワークロードにマウントします。
前提条件
-
nationalparksバックエンドアプリケーションをデプロイしている。 -
mongodb-nationalparksデータベースアプリケーションをデプロイしている。
手順
次のコマンドを実行して、必要なデータベースアクセス情報を含むシークレットを作成します。
$ oc create secret generic nationalparks-mongodb-parameters --from-literal=DATABASE_SERVICE_NAME=mongodb-nationalparks --from-literal=MONGODB_USER=mongodb --from-literal=MONGODB_PASSWORD=mongodb --from-literal=MONGODB_DATABASE=mongodb --from-literal=MONGODB_ADMIN_PASSWORD=mongodb次のコマンドを実行して、シークレットから
nationalparksワークロードに環境をインポートします。$ oc set env --from=secret/nationalparks-mongodb-parameters deploy/nationalparksこの環境情報を含む新しいリビジョンが
nationalparksデプロイメントでロールアウトされるまで待ちます。次のコマンドを実行して、nationalparksデプロイメントのステータスを確認します。$ oc rollout status deployment nationalparks出力例
deployment "nationalparks" successfully rolled out
3.6.2. データベースへのデータのロード
mongodb-nationalparks データベースをデプロイしたら、国立公園の位置情報をデータベースにロードできます。
前提条件
-
nationalparksバックエンドアプリケーションをデプロイしている。 -
mongodb-nationalparksデータベースアプリケーションをデプロイしている。
手順
次のコマンドを実行して国立公園のデータをロードします。
$ oc exec $(oc get pods -l component=nationalparks | tail -n 1 | awk '{print $1;}') -- curl -s http://localhost:8080/ws/data/load出力例
"Items inserted in database: 2893"
検証
次のコマンドを実行して、マップデータが正しくロードされたことを確認します。
$ oc exec $(oc get pods -l component=nationalparks | tail -n 1 | awk '{print $1;}') -- curl -s http://localhost:8080/ws/data/all出力例 (一部)
... , {"id": "Great Zimbabwe", "latitude": "-20.2674635", "longitude": "30.9337986", "name": "Great Zimbabwe"}]
3.7. Web ブラウザーでアプリケーションを表示する
必要なアプリケーションをデプロイし、データをデータベースにロードしたら、ブラウザーで国立公園アプリケーションを表示できるようになります。
フロントエンドアプリケーションのルート情報を取得することで、アプリケーションの URL を取得できます。
前提条件
-
parksmapフロントエンドアプリケーションをデプロイしている。 -
nationalparksバックエンドアプリケーションをデプロイしている。 -
mongodb-nationalparksデータベースアプリケーションをデプロイしている。 -
データを
mongodb-nationalparksデータベースにロードしている。
手順
次のコマンドを実行して、ルート情報を取得し、マップアプリケーションの URL を取得します。
$ oc get route parksmap出力例
NAME HOST/PORT PATH SERVICES PORT TERMINATION WILDCARD parksmap parksmap-user-getting-started.apps.cluster.example.com parksmap 8080-tcp edge None-
上記の出力から、
HOST/PORT列の値をコピーします。 コピーした値の前に
https://を追加して、アプリケーション URL を取得します。これは、ルートが保護されたルートであるため必要です。アプリケーション URL の例
https://parksmap-user-getting-started.apps.cluster.example.comこのアプリケーション URL を Web ブラウザーに貼り付けます。ブラウザーに、世界中の国立公園の地図が表示されるはずです。
図3.1 世界中の国立公園
アプリケーションに位置情報へのアクセスを許可すると、地図はあなたの現在地を中心に表示されます。
第4章 追加の実践的な学習
Red Hat は、管理者と開発者が OpenShift Container Platform の実践的な経験を積むための追加の学習リソースを多数提供しています。
4.1. Red Hat Developer ラーニングパス
Red Hat Developer プログラムでは、開発者が OpenShift Container Platform を使い始めるためのラーニングパスをいくつか提供しています。
次の表には、OpenShift Container Platform の推奨学習パスがいくつか示されています。
| ラーニングパス | 説明 |
|---|---|
| このラーニングパスでは、Red Hat OpenShift の基本概念と、さまざまな方法でアプリケーションを作成およびデプロイする方法を説明します。 | |
| このラーニングパスでは、クラスターアクセスの管理、データベース操作、およびリソース管理を説明します。 | |
| このラーニングパスでは、ソースコードやイメージからのアプリケーションのデプロイ、および Node.js を使った開発を説明します。 | |
| このラーニングパスでは、OpenShift Container Platform クラスターにフルスタック JavaScript アプリケーションをデプロイする方法を説明します。 | |
| このラーニングパスでは、OpenShift Container Platform の永続ストレージ用の永続ボリューム要求 (PVC) を作成して使用する方法を説明します。 |
OpenShift Container Platform の利用可能な Red Hat Developer ラーニングパスの完全なリストは、OpenShift および Kubernetes のラーニング を参照してください。
4.2. Red Hat トレーニングコース
Red Hat トレーニングでは、Red Hat OpenShift と関連テクノロジーの学習に役立つ、オンラインと対面、無料と有料のさまざまなコースを提供しています。
次の表には、開発者と管理者の両方を対象とした、OpenShift Container Platform の推奨トレーニングコースがいくつか示されています。
| コース | 説明 |
|---|---|
| このコースは、開発者が OpenShift Container Platform でアプリケーションをデプロイ、スケーリング、トラブルシューティングする方法を学習するのに役立ちます。 | |
| このコースは、開発者が Podman と OpenShift Container Platform を使用してコンテナーを構築、実行、管理する方法を学習するのに役立ちます。 | |
| このコースでは、開発者が OpenShift Container Platform クラスター上でコンテナー化されたソフトウェアアプリケーションを設計、構築、およびデプロイする方法を学習できます。 |
| コース | 説明 |
|---|---|
| このコースは、クラスター管理者が OpenShift Container Platform クラスターを管理し、開発者と協力してアプリケーションワークロードをサポートする方法を学習するのに役立ちます。 | |
| このコースは、クラスター管理者がセキュリティー機能の設定、Operator の管理、クラスターの更新の実行を学習するのに役立ちます。 | |
| このコースは、クラスター管理者がさまざまな環境に OpenShift Container Platform クラスターをインストールする方法を学習するのに役立ちます。 |
利用可能なコースの完全なリストは、Red Hat トレーニングおよび認定 を参照してください。スキル評価 を受けて、どこから学習を開始すればよいかのアドバイスを得ることもできます。
4.3. Red Hat チートシート
Red Hat は、OpenShift Container Platform を使用するための一般的な OpenShift CLI (oc) コマンドのクイックリファレンスとなるチートシートをいくつか提供しています。
次の表には、OpenShift Container Platform に推奨されるチートシートがいくつか示されています。
| チートシート | 説明 |
|---|---|
|
このチートシートでは、アプリケーションのライフサイクルを管理するための OpenShift CLI ( | |
|
このチートシートでは、アプリケーションの作成、デバッグ、デプロイメントの編集など、いくつかの重要な OpenShift CLI ( |
利用可能なチートシートの完全なリストは、Red Hat Developer チートシート を参照してください。
Legal Notice
Copyright © Red Hat
OpenShift documentation is licensed under the Apache License 2.0 (https://www.apache.org/licenses/LICENSE-2.0).
Modified versions must remove all Red Hat trademarks.
Portions adapted from https://github.com/kubernetes-incubator/service-catalog/ with modifications by Red Hat.
Red Hat, Red Hat Enterprise Linux, the Red Hat logo, the Shadowman logo, JBoss, OpenShift, Fedora, the Infinity logo, and RHCE are trademarks of Red Hat, Inc., registered in the United States and other countries.
Linux® is the registered trademark of Linus Torvalds in the United States and other countries.
Java® is a registered trademark of Oracle and/or its affiliates.
XFS® is a trademark of Silicon Graphics International Corp. or its subsidiaries in the United States and/or other countries.
MySQL® is a registered trademark of MySQL AB in the United States, the European Union and other countries.
Node.js® is an official trademark of the OpenJS Foundation.
The OpenStack® Word Mark and OpenStack logo are either registered trademarks/service marks or trademarks/service marks of the OpenStack Foundation, in the United States and other countries and are used with the OpenStack Foundation’s permission. We are not affiliated with, endorsed or sponsored by the OpenStack Foundation, or the OpenStack community.
All other trademarks are the property of their respective owners.