安装集群
在 AWS (ROSA) 集群上安装、访问和删除 Red Hat OpenShift Service。
摘要
第 1 章 Red Hat OpenShift Service on AWS 快速启动指南
按照本指南,使用 ROSA 命令行界面(CLI) (rosa)快速创建 Red Hat OpenShift Service on AWS 集群,授予用户访问权限、部署第一个应用程序,并了解如何撤销用户访问和删除集群。
1.1. 默认集群规格概述
您可以使用默认安装选项快速创建 Red Hat OpenShift Service on AWS 集群。
以下概述描述了默认集群规格。
| 组件 | 默认规格 |
|---|---|
| 帐户和角色 |
|
| 集群设置 |
|
| Compute 节点机器池 |
|
| 网络配置 |
|
| 无类别域间路由 (CIDR) 范围 |
|
| 集群角色和策略 |
|
| 存储 |
|
| 集群更新策略 |
|
1.2. 设置环境
在创建 Red Hat OpenShift Service on AWS 集群前,您必须完成以下任务来设置您的环境:
- 根据您的 AWS 和红帽帐户,验证 Red Hat OpenShift Service on AWS 的先决条件。
- 安装和配置所需的命令行界面(CLI)工具。
- 验证 CLI 工具的配置。
您可以按照本节中的步骤完成这些设置要求。
1.2.1. 验证 Red Hat OpenShift Service on AWS 的先决条件
使用这个流程中的步骤在 AWS 帐户中启用 Red Hat OpenShift Service on AWS。
先决条件
- 您有红帽帐户。
您有一个 AWS 帐户。
注意考虑使用专用的 AWS 帐户来运行生产环境集群。如果使用 AWS Organizations,您可以使用您所在机构的 AWS 帐户或创建一个新账户。
流程
- 登录到 AWS 管理控制台。
- 导航到 ROSA 服务。
点 Get started。
此时会打开 Verify ROSA 先决条件 页面。
在 ROSA 启用 下,确保
显示绿色勾号以及之前启用的 ROSA。如果没有,请按照以下步骤执行:
-
选中
我同意与红帽共享我的联系信息旁边的复选框。 点 Enable ROSA。
在短暂等待后,会显示应绿色勾号并显示
启用了 ROSA的信息。
-
选中
在 Service Quotas 下,确保显示绿色检查
,并且您的配额满足 ROSA 的要求。如果您看到
您的配额不符合最低要求,请记下配额类型和错误消息中列出的最小值。有关 请求增加配额的信息, 请参阅 Amazon 文档。Amazon 可能需要几小时时间才能批准您的配额请求。-
在 ELB 服务链接的角色 下,确保显示绿色勾号,
AWSServiceRoleForElasticLoadBalancing 已存在。 单击 Continue to Red Hat。
Get started with Red Hat OpenShift Service on AWS (ROSA) 页面会在一个新标签页中打开。您已在此页中完成了第 1 步,现在可以继续执行第 2 步。
1.2.2. 安装和配置所需的 CLI 工具
部署和使用集群需要几个命令行界面(CLI)工具。
先决条件
- 您有一个 AWS 帐户。
- 您有红帽帐户。
流程
登录到您的红帽帐户和 AWS 帐户,访问每个所需工具的下载页面。
- 在 console.redhat.com 中登录到您的红帽帐户。
- 登录到位于 aws.amazon.com 的 AWS 帐户。
安装和配置最新的 AWS CLI (
aws)。- 按照适用于您的工作站的 AWS 命令行接口 文档安装 AWS CLI。
通过在
.aws/credentials文件中指定aws_access_key_id、aws_secret_access_key和region来配置 AWS CLI。如需更多信息,请参阅 AWS 文档中的 AWS 配置基础知识。注意您可以选择使用
AWS_DEFAULT_REGION环境变量设置默认 AWS 区域。查询 AWS API 以验证是否已安装并配置了 AWS CLI:
$ aws sts get-caller-identity --output text例如:
<aws_account_id> arn:aws:iam::<aws_account_id>:user/<username> <aws_user_id>
安装和配置最新的 ROSA CLI。
- 导航到 Downloads。
在工具列表中找到 Red Hat OpenShift Service on AWS 命令行界面(
rosa),然后点 Download。rosa-linux.tar.gz文件下载到您的默认下载位置。从下载的存档中提取
rosa二进制文件。以下示例从 Linux tar 归档中提取二进制文件:$ tar xvf rosa-linux.tar.gz将
rosa二进制文件移到执行路径的目录中。在以下示例中,/usr/local/bin目录包含在用户的路径中:$ sudo mv rosa /usr/local/bin/rosa通过查询
rosa版本来验证 ROSA CLI 是否已正确安装:$ rosa version例如:
1.2.47
Your ROSA CLI is up to date.
使用离线访问令牌登录到 ROSA CLI。
运行 login 命令:
$ rosa login例如:
To login to your Red Hat account, get an offline access token at https://console.redhat.com/openshift/token/rosa ? Copy the token and paste it here:- 导航到命令输出中列出的 URL,以查看您的离线访问令牌。
在命令行提示符处输入离线访问令牌以进行登录。
? Copy the token and paste it here: ******************* [full token length omitted]注意以后,您可以在运行
rosa login命令时使用--token="<offline_access_token>" 参数指定离线访问令牌。在继续操作前,验证您是否已登录并确认您的凭证正确:
$ rosa whoami例如:
AWS Account ID:               <aws_account_number>
AWS Default Region:           us-east-1
AWS ARN:                      arn:aws:iam::<aws_account_number>:user/<aws_user_name>
OCM API:                      https://api.openshift.com
OCM Account ID:               <red_hat_account_id>
OCM Account Name:             Your Name
OCM Account Username:         you@domain.com
OCM Account Email:            you@domain.com
OCM Organization ID:          <org_id>
OCM Organization Name:        Your organization
OCM Organization External ID: <external_org_id>
安装和配置最新的 OpenShift CLI (
oc)。使用 ROSA CLI 下载
ocCLI。以下命令将 CLI 的最新版本下载到当前工作目录:
$ rosa download openshift-client从下载的存档中提取
oc二进制文件。以下示例从 Linux tar 归档中提取文件:$ tar xvf openshift-client-linux.tar.gz将
oc二进制文件移到执行路径的目录中。在以下示例中,/usr/local/bin目录包含在用户的路径中:$ sudo mv oc /usr/local/bin/oc验证
ocCLI 是否已正确安装:$ rosa verify openshift-client例如:
I: Verifying whether OpenShift command-line tool is available...
I: Current OpenShift Client Version: 4.17.3
后续步骤
在使用 Red Hat Hybrid Cloud Console 在 AWS 集群上部署 Red Hat OpenShift Service 前,您必须将 AWS 帐户与您的红帽机构关联,并为 AWS 上的 Red Hat OpenShift Service 创建所需的帐户范围 AWS IAM STS 角色和策略。
1.3. 创建集群范围的 STS 角色和策略
在使用 Red Hat Hybrid Cloud Console 创建使用 AWS 安全令牌服务(STS)的 Red Hat OpenShift Service on AWS 集群前,请创建所需的账户范围的 STS 角色和策略,包括 Operator 策略。
流程
如果您的 AWS 帐户不存在它们,请创建所需的帐户范围 AWS IAM STS 角色和策略:
$ rosa create account-roles --hosted-cp选择提示中的默认值,以快速创建角色和策略。
1.4. 为 Red Hat OpenShift Service on AWS 集群创建虚拟私有云
您必须有一个 AWS Virtual Private Cloud (VPC)才能在 AWS 集群上创建 Red Hat OpenShift Service。您可以使用以下方法创建 VPC:
- 使用 ROSA CLI 创建 VPC
- 使用 Terraform 模板创建 VPC
- 在 AWS 控制台中手动创建 VPC 资源
Terraform 指令用于测试和演示目的。您自己的安装需要对 VPC 的一些修改才能自行使用。您还应确保使用此链接的 Terraform 配置时,它位于您要安装集群的同一区域。在这些示例中,使用了 us-east-2。
1.4.1. 使用 ROSA CLI 创建 AWS VPC
rosa create network 命令在 ROSA CLI 的 v.1.2.48 或更高版本中提供。命令使用 AWS CloudFormation 创建 VPC 以及在 AWS 集群上安装 Red Hat OpenShift Service 所需的相关网络组件。CloudFormation 是一个原生 AWS 基础架构即代码工具,与 AWS CLI 兼容。
如果没有指定模板,CloudFormation 将使用以下参数来创建资源的默认模板:
| VPC 参数 | value |
|---|---|
| 可用区 | 1 |
| 区域 |
|
| VPC CIDR |
|
您可以创建和自定义 CloudFormation 模板,以用于 rosa create network 命令。如需有关默认 VPC 模板的信息,请参阅本节的其他资源。
先决条件
- 您已配置了 AWS 帐户
- 您已配置了您的红帽帐户
- 已安装 ROSA CLI 并将其配置为最新版本
流程
运行以下命令,使用默认的 CloudFormations 模板创建 AWS VPC:
$ rosa create network可选:通过指定附加参数来自定义 VPC。
您可以使用-
-param标志指定对默认 VPC 模板的更改。以下示例命令为region、Name、AvailabilityZoneCount和VpcCidr指定自定义值。$ rosa create network --param Region=us-east-2 --param Name=quickstart-stack --param AvailabilityZoneCount=3 --param VpcCidr=10.0.0.0/16该命令需要大约 5 分钟来运行,并在创建资源时从 AWS 提供常规状态更新。如果 CloudFormation 存在问题,则会尝试回滚。对于遇到的所有其他错误,请按照错误消息说明或联系 AWS 支持。
验证
完成后,您会收到创建的资源概述:
INFO[0140] Resources created in stack:
INFO[0140] Resource: AttachGateway, Type: AWS::EC2::VPCGatewayAttachment, ID: <gateway_id>
INFO[0140] Resource: EC2VPCEndpoint, Type: AWS::EC2::VPCEndpoint, ID: <vpce_id>
INFO[0140] Resource: EcrApiVPCEndpoint, Type: AWS::EC2::VPCEndpoint, ID: <vpce_id>
INFO[0140] Resource: EcrDkrVPCEndpoint, Type: AWS::EC2::VPCEndpoint, ID: <vpce_id>
INFO[0140] Resource: ElasticIP1, Type: AWS::EC2::EIP, ID: <IP>
INFO[0140] Resource: ElasticIP2, Type: AWS::EC2::EIP, ID: <IP>
INFO[0140] Resource: InternetGateway, Type: AWS::EC2::InternetGateway, ID: igw-016e1a71b9812464e
INFO[0140] Resource: KMSVPCEndpoint, Type: AWS::EC2::VPCEndpoint, ID: <vpce_id>
INFO[0140] Resource: NATGateway1, Type: AWS::EC2::NatGateway, ID: <nat-gateway_id>
INFO[0140] Resource: PrivateRoute, Type: AWS::EC2::Route, ID: <route_id>
INFO[0140] Resource: PrivateRouteTable, Type: AWS::EC2::RouteTable, ID: <route_id>
INFO[0140] Resource: PrivateSubnetRouteTableAssociation1, Type: AWS::EC2::SubnetRouteTableAssociation, ID: <route_id>
INFO[0140] Resource: PublicRoute, Type: AWS::EC2::Route, ID: <route_id>
INFO[0140] Resource: PublicRouteTable, Type: AWS::EC2::RouteTable, ID: <route_id>
INFO[0140] Resource: PublicSubnetRouteTableAssociation1, Type: AWS::EC2::SubnetRouteTableAssociation, ID: <route_id>
INFO[0140] Resource: S3VPCEndpoint, Type: AWS::EC2::VPCEndpoint, ID: <vpce_id>
INFO[0140] Resource: STSVPCEndpoint, Type: AWS::EC2::VPCEndpoint, ID: <vpce_id>
INFO[0140] Resource: SecurityGroup, Type: AWS::EC2::SecurityGroup, ID: <security-group_id>
INFO[0140] Resource: SubnetPrivate1, Type: AWS::EC2::Subnet, ID: <private_subnet_id-1> \
1 INFO[0140] Resource: SubnetPublic1, Type: AWS::EC2::Subnet, ID: <public_subnet_id-1> \2 INFO[0140] Resource: VPC, Type: AWS::EC2::VPC, ID: <vpc_id> INFO[0140] Stack rosa-network-stack-5555 created \3
1.4.1.1. 使用 Terraform 创建虚拟私有云
Terraform 是一个工具,可让您使用已建立的模板创建各种资源。以下流程根据需要使用默认选项在 AWS 集群上创建 Red Hat OpenShift Service。有关使用 Terraform 的更多信息,请参阅其他资源。
先决条件
- 您已在机器上安装 Terraform 版本 1.4.0 或更新版本。
- 您已在机器上安装了 Git。
流程
运行以下命令,打开 shell 提示符并克隆 Terraform VPC 存储库:
$ git clone https://github.com/openshift-cs/terraform-vpc-example运行以下命令来进入创建的目录:
$ cd terraform-vpc-example运行以下命令来启动 Terraform 文件:
$ terraform init在此过程完成后会显示确认初始化的消息。
要根据现有的 Terraform 模板构建 VPC Terraform 计划,请运行
plan命令。您必须包含 AWS 区域。您可以选择指定集群名称。在terraform plan完成后,一个rosa.tfplan文件会被添加到hypershift-tf目录。有关更详细的选项,请参阅 Terraform VPC 存储库的 README 文件。$ terraform plan -out rosa.tfplan -var region=<region>运行以下命令应用此计划文件来构建 VPC:
$ terraform apply rosa.tfplan可选:您可以通过运行以下命令捕获在创建 Red Hat OpenShift Service on AWS 集群时要使用的 Terraform-provisioned private、public 和 machinepool 子网 ID 的值:
$ export SUBNET_IDS=$(terraform output -raw cluster-subnets-string)使用以下命令验证变量是否已正确设置:
$ echo $SUBNET_IDS输出示例
$ subnet-0a6a57e0f784171aa,subnet-078e84e5b10ecf5b0
1.4.2. 手动创建 AWS Virtual Private Cloud
如果您选择手动创建 AWS Virtual Private Cloud (VPC)而不是使用 Terraform,请访问 AWS 控制台中的 VPC 页面。
您的 VPC 必须满足下表中显示的要求。
| 要求 | 详情 |
|---|---|
| VPC 名称 | 创建集群时,您需要具有特定的 VPC 名称和 ID。 |
| CIDR 范围 | 您的 VPC CIDR 范围应该与您的机器 CIDR 匹配。 |
| 可用区 | 您需要一个区域的可用区,并且需要三个用于多区的可用区。 |
| 公共子网 | 您必须有一个公共子网,其中包含公共集群的 NAT 网关。私有集群不需要公共子网。 |
| DNS 主机名和解析 | 您必须确保启用 DNS 主机名和解析。 |
1.5. 创建 OpenID 连接配置
在 AWS 集群上创建 Red Hat OpenShift Service 时,您可以在创建集群前创建 OpenID Connect (OIDC)配置。此配置注册到 OpenShift Cluster Manager。
先决条件
- 您已完成 Red Hat OpenShift Service on AWS 的 AWS 先决条件。
-
您已在安装主机上安装和配置了最新的 ROSA 命令行界面(CLI) (
rosa)。
流程
要创建 OIDC 配置以及 AWS 资源,请运行以下命令:
$ rosa create oidc-config --mode=auto --yes此命令返回以下信息:
例如:
? Would you like to create a Managed (Red Hat hosted) OIDC Configuration Yes
I: Setting up managed OIDC configuration
I: To create Operator Roles for this OIDC Configuration, run the following command and remember to replace <user-defined> with a prefix of your choice:
	rosa create operator-roles --prefix <user-defined> --oidc-config-id 13cdr6b
If you are going to create a Hosted Control Plane cluster please include '--hosted-cp'
I: Creating OIDC provider using 'arn:aws:iam::4540112244:user/userName'
? Create the OIDC provider? Yes
I: Created OIDC provider with ARN 'arn:aws:iam::4540112244:oidc-provider/dvbwgdztaeq9o.cloudfront.net/13cdr6b'
在创建集群时,您必须提供 OIDC 配置 ID。CLI 输出为--
mode auto提供了此值,否则您必须根据awsCLI 输出用于-模式手动确定这些值。可选: 您可以将 OIDC 配置 ID 保存为稍后使用的变量。运行以下命令来保存变量:
$ export OIDC_ID=<oidc_config_id><oidc_config_id>-
在本例中,OIDC 配置 ID 是
13cdr6b。
运行以下命令,查看变量的值:
$ echo $OIDC_ID例如:
13cdr6b
验证
您可以列出与您的用户机构关联的集群可用的 OIDC 配置。运行以下命令:
$ rosa list oidc-config例如:
ID                                MANAGED  ISSUER URL                                                             SECRET ARN
2330dbs0n8m3chkkr25gkkcd8pnj3lk2  true     https://dvbwgdztaeq9o.cloudfront.net/2330dbs0n8m3chkkr25gkkcd8pnj3lk2
233hvnrjoqu14jltk6lhbhf2tj11f8un  false    https://oidc-r7u1.s3.us-east-1.amazonaws.com                           aws:secretsmanager:us-east-1:242819244:secret:rosa-private-key-oidc-r7u1-tM3MDN
1.6. 创建 Operator 角色和策略
在 AWS 集群上部署 Red Hat OpenShift Service 时,您必须创建 Operator IAM 角色。集群 Operator 使用 Operator 角色和策略获取执行集群操作所需的临时权限,如管理后端存储和对集群的外部访问权限。
先决条件
- 您已完成 Red Hat OpenShift Service on AWS 的 AWS 先决条件。
-
您已在安装主机上安装和配置了最新的 ROSA 命令行界面(CLI) (
rosa)。 - 您创建了集群范围的 AWS 角色。
流程
要创建 Operator 角色,请运行以下命令:
$ rosa create operator-roles --hosted-cp --prefix=$OPERATOR_ROLES_PREFIX --oidc-config-id=$OIDC_ID --installer-role-arn arn:aws:iam::$AWS_ACCOUNT_ID:role/${ACCOUNT_ROLES_PREFIX}-HCP-ROSA-Installer-Role以下分类提供了创建 Operator 角色的选项。
$ rosa create operator-roles --hosted-cp
	--prefix=$OPERATOR_ROLES_PREFIX
	--oidc-config-id=$OIDC_ID
	--installer-role-arn arn:aws:iam::$AWS_ACCOUNT_ID:role/$ACCOUNT_ROLES_PREFIX-HCP-ROSA-Installer-Role
其中:
--prefix=- 在创建这些 Operator 角色时,您必须提供一个前缀。如果不这样做,则会产生错误。如需有关 Operator 前缀的信息,请参阅本节的额外资源。
--oidc-config-id=- 这个值是您为 Red Hat OpenShift Service on AWS 创建的 OIDC 配置 ID。
--installer-role-arn- 这个值是您在创建 Red Hat OpenShift Service on AWS 帐户角色时创建的安装程序角色 ARN。
您必须包含
-hosted-cp参数,以便为 Red Hat OpenShift Service on AWS 集群创建正确的角色。此命令返回以下信息:例如:
? Role creation mode: auto
? Operator roles prefix: <pre-filled_prefix>
? OIDC Configuration ID: 23soa2bgvpek9kmes9s7os0a39i13qm4 | https://dvbwgdztaeq9o.cloudfront.net/23soa2bgvpek9kmes9s7os0a39i13qm4
? Create hosted control plane operator roles: Yes
W: More than one Installer role found
? Installer role ARN: arn:aws:iam::4540112244:role/<prefix>-HCP-ROSA-Installer-Role
? Permissions boundary ARN (optional):
I: Reusable OIDC Configuration detected. Validating trusted relationships to operator roles:
I: Creating roles using 'arn:aws:iam::4540112244:user/<userName>'
I: Created role '<prefix>-openshift-cluster-csi-drivers-ebs-cloud-credentials' with ARN 'arn:aws:iam::4540112244:role/<prefix>-openshift-cluster-csi-drivers-ebs-cloud-credentials'
I: Created role '<prefix>-openshift-cloud-network-config-controller-cloud-credenti' with ARN 'arn:aws:iam::4540112244:role/<prefix>-openshift-cloud-network-config-controller-cloud-credenti'
I: Created role '<prefix>-kube-system-kube-controller-manager' with ARN 'arn:aws:iam::4540112244:role/<prefix>-kube-system-kube-controller-manager'
I: Created role '<prefix>-kube-system-capa-controller-manager' with ARN 'arn:aws:iam::4540112244:role/<prefix>-kube-system-capa-controller-manager'
I: Created role '<prefix>-kube-system-control-plane-operator' with ARN 'arn:aws:iam::4540112244:role/<prefix>-kube-system-control-plane-operator'
I: Created role '<prefix>-kube-system-kms-provider' with ARN 'arn:aws:iam::4540112244:role/<prefix>-kube-system-kms-provider'
I: Created role '<prefix>-openshift-image-registry-installer-cloud-credentials' with ARN 'arn:aws:iam::4540112244:role/<prefix>-openshift-image-registry-installer-cloud-credentials'
I: Created role '<prefix>-openshift-ingress-operator-cloud-credentials' with ARN 'arn:aws:iam::4540112244:role/<prefix>-openshift-ingress-operator-cloud-credentials'
I: To create a cluster with these roles, run the following command:
	rosa create cluster --sts --oidc-config-id 23soa2bgvpek9kmes9s7os0a39i13qm4 --operator-roles-prefix <prefix> --hosted-cp
其中:
Operator 角色前缀- 此字段会预先填充您在初始创建命令中设置的前缀。
OIDC 配置 ID- 此字段要求您选择为 Red Hat OpenShift Service on AWS 集群创建的 OIDC 配置。
现在,Operator 角色已创建并可用于创建 Red Hat OpenShift Service on AWS 集群。
验证
您可以列出与 Red Hat OpenShift Service on AWS 帐户关联的 Operator 角色。运行以下命令:
$ rosa list operator-roles例如:
I: Fetching operator roles
ROLE PREFIX  AMOUNT IN BUNDLE
<prefix>      8
? Would you like to detail a specific prefix Yes
? Operator Role Prefix: <prefix>
ROLE NAME                                                         ROLE ARN                                                                                         VERSION  MANAGED
<prefix>-kube-system-capa-controller-manager                       arn:aws:iam::4540112244:role/<prefix>-kube-system-capa-controller-manager                       4.13     No
<prefix>-kube-system-control-plane-operator                        arn:aws:iam::4540112244:role/<prefix>-kube-system-control-plane-operator                        4.13     No
<prefix>-kube-system-kms-provider                                  arn:aws:iam::4540112244:role/<prefix>-kube-system-kms-provider                                  4.13     No
<prefix>-kube-system-kube-controller-manager                       arn:aws:iam::4540112244:role/<prefix>-kube-system-kube-controller-manager                       4.13     No
<prefix>-openshift-cloud-network-config-controller-cloud-credenti  arn:aws:iam::4540112244:role/<prefix>-openshift-cloud-network-config-controller-cloud-credenti  4.13     No
<prefix>-openshift-cluster-csi-drivers-ebs-cloud-credentials       arn:aws:iam::4540112244:role/<prefix>-openshift-cluster-csi-drivers-ebs-cloud-credentials       4.13     No
<prefix>-openshift-image-registry-installer-cloud-credentials      arn:aws:iam::4540112244:role/<prefix>-openshift-image-registry-installer-cloud-credentials      4.13     No
<prefix>-openshift-ingress-operator-cloud-credentials              arn:aws:iam::4540112244:role/<prefix>-openshift-ingress-operator-cloud-credentials              4.13     No
命令运行后,它会显示与 AWS 帐户关联的所有前缀,并记录与这个前缀关联的角色数量。如果您需要查看所有这些角色及其详情,请在详情提示符处输入"是",使这些角色以特定形式列出。
1.7. 使用 CLI 创建 Red Hat OpenShift Service on AWS 集群
使用 ROSA CLI ( rosa )创建集群时,您可以选择默认选项来快速创建集群。
先决条件
- 您已完成 Red Hat OpenShift Service on AWS 的 AWS 先决条件。
- 您有可用的 AWS 服务配额。
- 您已在 AWS 控制台中启用了 Red Hat OpenShift Service on AWS。
-
您已在安装主机上安装和配置了最新的 ROSA CLI (
rosa)。运行rosa 版本,以查看您当前安装的 ROSA CLI 版本。如果有更新的版本,CLI 提供了下载此升级的链接。 - 已使用 ROSA CLI 登录您的红帽帐户。
- 您已创建了 OIDC 配置。
- 您已确认 AWS Elastic Load Balancing (ELB)服务角色存在于 AWS 帐户中。
流程
使用以下命令之一在 AWS 集群上创建 Red Hat OpenShift Service:
注意在 AWS 集群上创建 Red Hat OpenShift Service 时,默认的无类别域间路由(CIDR)为
10.0.0.0/16。如果这与 VPC 子网的 CIDR 范围不匹配,请在以下命令中添加--machine-cidr <address_block>。要了解更多有关 Red Hat OpenShift Service on AWS 的默认 CIDR 范围的信息,请参阅 CIDR 范围定义。如果您没有设置环境变量,请运行以下命令:
$ rosa create cluster --cluster-name=<cluster_name> \1 --mode=auto --hosted-cp [--private] \2 --operator-roles-prefix <operator-role-prefix> \3 --external-id <external-id> \4 --oidc-config-id <id-of-oidc-configuration> \ --subnet-ids=<public-subnet-id>,<private-subnet-id>- 1
- 指定集群的名称。如果集群名称超过 15 个字符,它将包含自动生成的域前缀,作为 openshiftapps.com 上置备的集群的子域。要自定义子域,请使用 the
-domain-prefix标志。域前缀不能超过 15 个字符,必须是唯一的,且在集群创建后无法更改。 - 2
- 可选
:--private参数用于在 AWS 集群上创建私有 Red Hat OpenShift Service。如果使用此参数,请确保只使用专用子网 ID for-subnet-ids。 - 3
- 默认情况下,特定于集群的 Operator 角色名称使用集群名称和随机 4 位哈希值作为前缀。您可以选择指定一个自定义前缀来替换角色名称中的 <
cluster_name>-<hash>。创建特定于集群的 Operator IAM 角色时会应用前缀。有关前缀的详情,请参阅关于自定义 Operator IAM 角色前缀。注意如果您在创建关联的集群范围的角色时指定了自定义 ARN 路径,则会自动检测到自定义路径。在以后的步骤中创建它们时,自定义路径会应用于特定于集群的 Operator 角色。
- 4
- 可选:在另一个帐户中假定角色时可能需要的唯一标识符。
如果设置环境变量,请运行以下命令创建带有单个初始机器池的集群,使用公开或私有可用的 API,以及公开或私有可用的 Ingress:
$ rosa create cluster --private --cluster-name=<cluster_name> \
    --mode=auto --hosted-cp --operator-roles-prefix=$OPERATOR_ROLES_PREFIX \
    --oidc-config-id=$OIDC_ID --subnet-ids=$SUBNET_IDS
如果设置环境变量,请运行以下命令创建带有单个初始机器池、公开可用的 API 和公开的 Ingress 的集群:
$ rosa create cluster --cluster-name=<cluster_name> --mode=auto \
    --hosted-cp --operator-roles-prefix=$OPERATOR_ROLES_PREFIX \
    --oidc-config-id=$OIDC_ID --subnet-ids=$SUBNET_IDS
运行以下命令检查集群的状态:
$ rosa describe cluster --cluster=<cluster_name>在集群安装过程中,输出中会列出以下
State字段更改:-
待定(准备帐户) -
安装(进行中的DNS 设置) -
installing ready注意如果安装失败,或者
State字段在超过 10 分钟后没有变为ready,请检查安装故障排除文档以了解详细信息。如需更多信息,请参阅 故障排除安装。有关联系红帽支持以获取帮助的步骤,请参阅 获取对 Red Hat OpenShift Service on AWS 的支持。
-
通过观察 Red Hat OpenShift Service on AWS 安装程序日志来跟踪集群创建的进度。要检查日志,请运行以下命令:
$ rosa logs install --cluster=<cluster_name> --watch \1 - 1
- 可选: 要在安装过程中监视新日志消息,请使用--
watch参数。
1.8. 授予用户对集群的访问权限
您可以通过将 Red Hat OpenShift Service 添加到您配置的身份提供程序来授予用户对 Red Hat OpenShift Service on AWS 集群的访问权限。
您可以为 Red Hat OpenShift Service on AWS 集群配置不同类型的身份提供程序。以下示例流程将用户添加到配置为集群身份的 GitHub 机构中。
流程
- 进入 github.com 并登录到您的 GitHub 帐户。
- 邀请需要访问您的 GitHub 机构 Red Hat OpenShift Service on AWS 集群的用户。按照 GitHub 文档中的邀请用户加入到您的机构 。
1.9. 为用户授予管理员权限
将用户添加到配置的身份提供程序后,您可以在 AWS 集群上为 Red Hat OpenShift Service 授予用户 cluster-admin 或 dedicated-admin 权限。
流程
为身份提供程序用户配置
cluster-admin权限:授予用户
cluster-admin权限:$ rosa grant user cluster-admin --user=<idp_user_name> --cluster=<cluster_name>1 - 1
- 使用身份提供程序用户和集群名称替换
<idp_user_name>和<cluster_name>。
输出示例
I: Granted role 'cluster-admins' to user '<idp_user_name>' on cluster '<cluster_name>'验证该用户是否被列为
cluster-admins组的成员:$ rosa list users --cluster=<cluster_name>输出示例
ID                 GROUPS
<idp_user_name>    cluster-admins
为身份提供程序用户配置
dedicated-admin权限:授予用户
dedicated-admin权限:$ rosa grant user dedicated-admin --user=<idp_user_name> --cluster=<cluster_name>输出示例
I: Granted role 'dedicated-admins' to user '<idp_user_name>' on cluster '<cluster_name>'验证该用户是否被列为
dedicated-admins组的成员:$ rosa list users --cluster=<cluster_name>输出示例
ID                 GROUPS
<idp_user_name>    dedicated-admins
1.10. 通过 Web 控制台访问集群
创建集群管理员用户或将用户添加到配置的身份提供程序后,您可以通过 Web 控制台登录到 Red Hat OpenShift Service on AWS 集群。
流程
获取集群的控制台 URL:
$ rosa describe cluster -c <cluster_name> | grep Console1 - 1
- 将
<cluster_name>替换为集群的名称。
输出示例
Console URL: https://console-openshift-console.apps.example-cluster.wxyz.p1.openshiftapps.com进入上一步输出中的控制台 URL 并登录。
-
如果创建了
cluster-admin用户,请使用提供的凭证登录。 - 如果您为集群配置了身份提供程序,请在 Log in with… 对话框中选择身份提供程序名称,并完成您的供应商出示的任何授权请求。
-
如果创建了
1.11. 从 Developer Catalog 部署应用程序
在 AWS Web 控制台中,从 Developer Catalog 部署测试应用程序,并使用路由公开测试应用程序。
先决条件
- 已登陆到 Red Hat Hybrid Cloud Console。
- 您在 AWS 集群上创建了 Red Hat OpenShift Service。
- 已为集群配置身份提供程序。
- 将您的用户帐户添加到配置的身份提供程序中。
流程
- 进入 OpenShift Cluster Manager 中的 Cluster List 页面。
- 点您要查看的集群旁的选项图标 (HBAC)。
- 点 Open console。
- 集群控制台将在新的浏览器窗口中打开。使用您配置的身份提供程序凭证登录到您的红帽帐户。
- 在 Administrator 视角中,选择 Home → Projects → Create Project。
- 输入项目的名称,并选择性地添加 Display Name 和 Description。
- 点 Create 以创建该项目。
- 切换到 Developer 视角并选择 +Add。验证所选项目是您刚才创建的项目。
- 在 Developer Catalog 对话框中,选择 All services。
- 在 Developer Catalog 页面中,从菜单中选择 Languages → JavaScript。
点 Node.js,然后点 Create 以打开 Create Source-to-Image 应用程序 页面。
注意您可能需要点 Clear All Filters 以显示 Node.js 选项。
- 在 Git 部分中,点 Try sample。
- 在 Name 字段中添加一个唯一名称。该值将用于命名关联的资源。
- 确认选择了 Deployment 和 Create a route。
- 点 Create 以部署应用。部署 pod 需要几分钟时间。
-
可选:选择 Node.js 应用程序并查看其边栏来检查 Topology 窗格中的 pod 状态。您必须等待
nodejs构建完成,并且nodejsPod 处于 Running 状态,然后继续。 部署完成后,点应用程序的路由 URL,其格式类似如下:
https://nodejs-<project>.<cluster_name>.<hash>.<region>.openshiftapps.com/浏览器中打开一个新标签页,其中包含类似如下的信息:
Welcome to your Node.js application on OpenShift可选:删除应用程序并清理您创建的资源:
- 在 Administrator 视角中,进入 Home → Projects。
- 点项目的操作菜单,再选择 Delete Project。
1.12. 撤销管理员特权和用户访问权限
您可以使用 ROSA CLI rosa 从用户撤销 cluster-admin 或 dedicated-admin 权限。
要从用户撤销集群访问,您必须从配置的身份提供程序中删除该用户。
按照本节中的步骤从用户撤销管理员权限或集群访问。
1.12.1. 从用户撤销管理员权限
按照本节中的步骤从用户撤销 cluster-admin 或 dedicated-admin 权限。
流程
从身份提供程序用户撤销
cluster-admin权限:撤销
cluster-admin权限:$ rosa revoke user cluster-admin --user=<idp_user_name> --cluster=<cluster_name>1 - 1
- 使用身份提供程序用户和集群名称替换
<idp_user_name>和<cluster_name>。
输出示例
? Are you sure you want to revoke role cluster-admins from user <idp_user_name> in cluster <cluster_name>? Yes
I: Revoked role 'cluster-admins' from user '<idp_user_name>' on cluster '<cluster_name>'
验证该用户没有列为
cluster-admins组的成员:$ rosa list users --cluster=<cluster_name>输出示例
W: There are no users configured for cluster '<cluster_name>'
从身份提供程序用户撤销
dedicated-admin权限:撤销
dedicated-admin权限:$ rosa revoke user dedicated-admin --user=<idp_user_name> --cluster=<cluster_name>输出示例
? Are you sure you want to revoke role dedicated-admins from user <idp_user_name> in cluster <cluster_name>? Yes
I: Revoked role 'dedicated-admins' from user '<idp_user_name>' on cluster '<cluster_name>'
验证该用户没有列为
dedicated-admins组的成员:$ rosa list users --cluster=<cluster_name>输出示例
W: There are no users configured for cluster '<cluster_name>'
1.12.2. 撤销对集群的用户访问权限
您可以将身份提供程序用户从配置的身份提供程序中删除来撤销集群访问权限。
您可以为 Red Hat OpenShift Service on AWS 集群配置不同类型的身份提供程序。以下示例流程为为集群配置身份的 GitHub 组织的成员撤销集群访问权限。
流程
- 进入 github.com 并登录到您的 GitHub 帐户。
- 从 GitHub 组织中删除该用户。按照 GitHub 文档中的从您的机构中删除成员的步骤进行操作。
您可以使用 ROSA CLI rosa 删除 Red Hat OpenShift Service on AWS 集群。您还可以使用 ROSA CLI 删除 AWS Identity and Access Management (IAM) 帐户范围内的角色、特定于集群的 Operator 角色,以及 OpenID Connect (OIDC)供应商。要删除集群范围的和 Operator 策略,您可以使用 AWS IAM 控制台或 AWS CLI。
帐户范围的 IAM 角色和策略可能被同一 AWS 帐户中的其他 Red Hat OpenShift Service on AWS 使用。只有其他集群不需要的资源,才必须删除这些资源。
流程
删除集群并观察日志,将
<cluster_name>替换为集群的名称或 ID:$ rosa delete cluster --cluster=<cluster_name> --watch重要在删除 IAM 角色、策略和 OIDC 供应商前,您必须等待集群删除完成。需要集群范围的角色来删除安装程序创建的资源。需要特定于集群的 Operator 角色来清理 OpenShift Operator 创建的资源。Operator 使用 OIDC 供应商与 AWS API 进行身份验证。
删除集群后,删除集群 Operator 用于身份验证的 OIDC 供应商:
$ rosa delete oidc-provider -c <cluster_id> --mode auto1 - 1
- 将
<cluster_id>替换为集群的 ID。
注意您可以使用
-y选项,在提示符处自动回答 yes。删除特定于集群的 Operator IAM 角色:
$ rosa delete operator-roles -c <cluster_id> --mode auto1 - 1
- 将
<cluster_id>替换为集群的 ID。
删除集群范围的角色:
重要帐户范围的 IAM 角色和策略可能被同一 AWS 帐户中的其他 Red Hat OpenShift Service on AWS 使用。只有其他集群不需要的资源,才必须删除这些资源。
$ rosa delete account-roles --prefix <prefix> --mode auto1 - 1
- 您必须包含
--<prefix>参数。将<prefix>替换为要删除的集群范围角色前缀。如果您在创建集群范围的角色时没有指定自定义前缀,请指定默认前缀,具体取决于它们创建的方式,即HCP-ROSA或ManagedOpenShift。
删除您为 Red Hat OpenShift Service on AWS 部署创建的账户范围和 Operator IAM 策略:
- 登录到 AWS IAM 控制台。
- 进入到 Access management → Policies,再选中其中一个帐户范围策略的复选框。
- 选择策略后,点 Actions → Delete 以打开删除策略对话框。
- 输入策略名称以确认删除,然后选择 Delete 以删除策略。
- 重复此步骤,从集群中删除每个集群范围的 Operator 策略。
第 2 章 使用默认选项在 AWS 集群上创建 Red Hat OpenShift Service
使用托管 control plane 的 Red Hat OpenShift Service on AWS 提供了一个更有效且可靠的架构,用于创建 Red Hat OpenShift Service on AWS 集群。使用托管的 control plane,每个集群在 AWS 帐户中有一个隔离的专用 control plane。
使用默认选项和自动 AWS Identity and Access Management (IAM)资源创建来快速创建 Red Hat OpenShift Service on AWS 集群。您可以使用 ROSA CLI (rosa)部署集群。
由于无法将现有 Red Hat OpenShift Service on AWS (类架构)集群升级到托管的 control plane 架构,所以必须创建新集群以使用 Red Hat OpenShift Service on AWS 功能。
Red Hat OpenShift Service on AWS 集群只支持 AWS IAM 安全令牌服务(STS)身份验证。
进一步阅读
- 有关以自动 模式 使用 ROSA CLI 开始使用 Red Hat OpenShift Service on AWS 的信息, 请参阅 AWS 文档。
2.1. 自动创建模式的注意事项
本文档中的步骤使用 ROSA CLI 中的 auto 模式来立即使用当前的 AWS 帐户创建所需的 IAM 资源。所需资源包括帐户范围内的 IAM 角色和策略、特定于集群的 Operator 角色和策略,以及 OpenID Connect (OIDC)身份提供程序。
另外,您可以使用 手动模式 输出创建 IAM 资源所需的 aws 命令,而不是自动部署它们。
后续步骤
- 确保您已完成 AWS 先决条件。
2.2. 默认集群规格概述
您可以使用默认安装选项快速创建 Red Hat OpenShift Service on AWS 集群。
以下概述描述了默认集群规格。
| 组件 | 默认规格 |
|---|---|
| 帐户和角色 |
|
| 集群设置 |
|
| Compute 节点机器池 |
|
| 网络配置 |
|
| 无类别域间路由 (CIDR) 范围 |
|
| 集群角色和策略 |
|
| 存储 |
|
| 集群更新策略 |
|
2.3. Red Hat OpenShift Service on AWS 的先决条件
要创建 Red Hat OpenShift Service on AWS 集群,您必须有以下项目:
- 配置的虚拟私有云(VPC)
- 集群范围的角色
- OIDC 配置
- Operator 角色
2.3.1. 为 Red Hat OpenShift Service on AWS 集群创建虚拟私有云
您必须具有 Virtual Private Cloud (VPC)才能在 AWS 集群上创建 Red Hat OpenShift Service。您可以使用以下方法创建 VPC:
- 使用 ROSA CLI 创建 VPC
- 使用 Terraform 模板创建 VPC
- 在 AWS 控制台中手动创建 VPC 资源
Terraform 指令用于测试和演示目的。您自己的安装需要对 VPC 的一些修改才能自行使用。您还应确保使用此 Terraform 配置时,它位于您要安装集群的同一区域。在这些示例中,使用了 us-east-2。
2.3.1.1. 使用 ROSA CLI 创建 AWS VPC
rosa create network 命令在 ROSA CLI 的 v.1.2.48 或更高版本中提供。命令使用 AWS CloudFormation 创建 VPC 以及在 AWS 集群上安装 Red Hat OpenShift Service 所需的相关网络组件。CloudFormation 是一个原生 AWS 基础架构即代码工具,与 AWS CLI 兼容。
如果没有指定模板,CloudFormation 将使用以下参数来创建资源的默认模板:
| VPC 参数 | value |
|---|---|
| 可用区 | 1 |
| 区域 |
|
| VPC CIDR |
|
您可以创建和自定义 CloudFormation 模板,以用于 rosa create network 命令。如需有关默认 VPC 模板的信息,请参阅本节的其他资源。
先决条件
- 您已配置了 AWS 帐户
- 您已配置了您的红帽帐户
- 已安装 ROSA CLI 并将其配置为最新版本
流程
运行以下命令,使用默认的 CloudFormations 模板创建 AWS VPC:
$ rosa create network可选:通过指定附加参数来自定义 VPC。
您可以使用-
-param标志指定对默认 VPC 模板的更改。以下示例命令为region、Name、AvailabilityZoneCount和VpcCidr指定自定义值。$ rosa create network --param Region=us-east-2 --param Name=quickstart-stack --param AvailabilityZoneCount=3 --param VpcCidr=10.0.0.0/16该命令需要大约 5 分钟来运行,并在创建资源时从 AWS 提供常规状态更新。如果 CloudFormation 存在问题,则会尝试回滚。对于遇到的所有其他错误,请按照错误消息说明或联系 AWS 支持。
验证
完成后,您会收到创建的资源概述:
INFO[0140] Resources created in stack:
INFO[0140] Resource: AttachGateway, Type: AWS::EC2::VPCGatewayAttachment, ID: <gateway_id>
INFO[0140] Resource: EC2VPCEndpoint, Type: AWS::EC2::VPCEndpoint, ID: <vpce_id>
INFO[0140] Resource: EcrApiVPCEndpoint, Type: AWS::EC2::VPCEndpoint, ID: <vpce_id>
INFO[0140] Resource: EcrDkrVPCEndpoint, Type: AWS::EC2::VPCEndpoint, ID: <vpce_id>
INFO[0140] Resource: ElasticIP1, Type: AWS::EC2::EIP, ID: <IP>
INFO[0140] Resource: ElasticIP2, Type: AWS::EC2::EIP, ID: <IP>
INFO[0140] Resource: InternetGateway, Type: AWS::EC2::InternetGateway, ID: igw-016e1a71b9812464e
INFO[0140] Resource: KMSVPCEndpoint, Type: AWS::EC2::VPCEndpoint, ID: <vpce_id>
INFO[0140] Resource: NATGateway1, Type: AWS::EC2::NatGateway, ID: <nat-gateway_id>
INFO[0140] Resource: PrivateRoute, Type: AWS::EC2::Route, ID: <route_id>
INFO[0140] Resource: PrivateRouteTable, Type: AWS::EC2::RouteTable, ID: <route_id>
INFO[0140] Resource: PrivateSubnetRouteTableAssociation1, Type: AWS::EC2::SubnetRouteTableAssociation, ID: <route_id>
INFO[0140] Resource: PublicRoute, Type: AWS::EC2::Route, ID: <route_id>
INFO[0140] Resource: PublicRouteTable, Type: AWS::EC2::RouteTable, ID: <route_id>
INFO[0140] Resource: PublicSubnetRouteTableAssociation1, Type: AWS::EC2::SubnetRouteTableAssociation, ID: <route_id>
INFO[0140] Resource: S3VPCEndpoint, Type: AWS::EC2::VPCEndpoint, ID: <vpce_id>
INFO[0140] Resource: STSVPCEndpoint, Type: AWS::EC2::VPCEndpoint, ID: <vpce_id>
INFO[0140] Resource: SecurityGroup, Type: AWS::EC2::SecurityGroup, ID: <security-group_id>
INFO[0140] Resource: SubnetPrivate1, Type: AWS::EC2::Subnet, ID: <private_subnet_id-1> \
1 INFO[0140] Resource: SubnetPublic1, Type: AWS::EC2::Subnet, ID: <public_subnet_id-1> \2 INFO[0140] Resource: VPC, Type: AWS::EC2::VPC, ID: <vpc_id> INFO[0140] Stack rosa-network-stack-5555 created \3
2.3.1.2. 使用 Terraform 创建虚拟私有云
Terraform 是一个工具,可让您使用已建立的模板创建各种资源。以下流程根据需要使用默认选项在 AWS 集群上创建 Red Hat OpenShift Service。有关使用 Terraform 的更多信息,请参阅其他资源。
先决条件
- 您已在机器上安装 Terraform 版本 1.4.0 或更新版本。
- 您已在机器上安装了 Git。
流程
运行以下命令,打开 shell 提示符并克隆 Terraform VPC 存储库:
$ git clone https://github.com/openshift-cs/terraform-vpc-example运行以下命令来进入创建的目录:
$ cd terraform-vpc-example运行以下命令来启动 Terraform 文件:
$ terraform init在此过程完成后会显示确认初始化的消息。
要根据现有的 Terraform 模板构建 VPC Terraform 计划,请运行
plan命令。您必须包含 AWS 区域。您可以选择指定集群名称。在terraform plan完成后,一个rosa.tfplan文件会被添加到hypershift-tf目录。有关更详细的选项,请参阅 Terraform VPC 存储库的 README 文件。$ terraform plan -out rosa.tfplan -var region=<region>运行以下命令应用此计划文件来构建 VPC:
$ terraform apply rosa.tfplan可选:您可以通过运行以下命令捕获在创建 Red Hat OpenShift Service on AWS 集群时要使用的 Terraform-provisioned private、public 和 machinepool 子网 ID 的值:
$ export SUBNET_IDS=$(terraform output -raw cluster-subnets-string)使用以下命令验证变量是否已正确设置:
$ echo $SUBNET_IDS输出示例
$ subnet-0a6a57e0f784171aa,subnet-078e84e5b10ecf5b0
2.3.2. 手动创建 AWS Virtual Private Cloud
如果您选择手动创建 AWS Virtual Private Cloud (VPC)而不是使用 Terraform,请访问 AWS 控制台中的 VPC 页面。
您的 VPC 必须满足下表中显示的要求。
| 要求 | 详情 |
|---|---|
| VPC 名称 | 创建集群时,您需要具有特定的 VPC 名称和 ID。 |
| CIDR 范围 | 您的 VPC CIDR 范围应该与您的机器 CIDR 匹配。 |
| 可用区 | 您需要一个区域的可用区,并且需要三个用于多区的可用区。 |
| 公共子网 | 您必须有一个公共子网,其中包含公共集群的 NAT 网关。私有集群不需要公共子网。 |
| DNS 主机名和解析 | 您必须确保启用 DNS 主机名和解析。 |
2.3.4. 创建集群范围的 STS 角色和策略
在 AWS 集群上创建 Red Hat OpenShift Service 前,您必须创建所需的帐户范围的角色和策略。
Red Hat OpenShift Service on AWS 的特定 AWS 管理策略必须附加到每个角色。客户管理的策略不能与这些所需的帐户角色一起使用。有关 Red Hat OpenShift Service on AWS 集群的 AWS 管理策略的更多信息,请参阅 ROSA 的 AWS 受管策略。
先决条件
- 您已完成 Red Hat OpenShift Service on AWS 的 AWS 先决条件。
- 您有可用的 AWS 服务配额。
- 您已在 AWS 控制台中启用了 Red Hat OpenShift Service on AWS。
-
您已在安装主机上安装和配置了最新的 ROSA CLI (
rosa)。 - 已使用 ROSA CLI 登录您的红帽帐户。
流程
如果您的 AWS 帐户不存在它们,请创建所需的账户范围 STS 角色,并通过运行以下命令来附加策略:
$ rosa create account-roles --hosted-cp可选:运行以下命令,将您的前缀设置为环境变量:
$ export ACCOUNT_ROLES_PREFIX=<account_role_prefix>运行以下命令,查看变量的值:
$ echo $ACCOUNT_ROLES_PREFIX例如:
ManagedOpenShift如需有关 AWS 上 Red Hat OpenShift Service 的 AWS 管理的 IAM 策略的更多信息,请参阅 ROSA 的 AWS 管理的 IAM 策略。
2.3.5. 创建 OpenID 连接配置
在 AWS 集群上创建 Red Hat OpenShift Service 时,您可以在创建集群前创建 OpenID Connect (OIDC)配置。此配置注册到 OpenShift Cluster Manager。
先决条件
- 您已完成 Red Hat OpenShift Service on AWS 的 AWS 先决条件。
-
您已在安装主机上安装和配置了最新的 ROSA 命令行界面(CLI) (
rosa)。
流程
要创建 OIDC 配置以及 AWS 资源,请运行以下命令:
$ rosa create oidc-config --mode=auto --yes此命令返回以下信息:
例如:
? Would you like to create a Managed (Red Hat hosted) OIDC Configuration Yes
I: Setting up managed OIDC configuration
I: To create Operator Roles for this OIDC Configuration, run the following command and remember to replace <user-defined> with a prefix of your choice:
	rosa create operator-roles --prefix <user-defined> --oidc-config-id 13cdr6b
If you are going to create a Hosted Control Plane cluster please include '--hosted-cp'
I: Creating OIDC provider using 'arn:aws:iam::4540112244:user/userName'
? Create the OIDC provider? Yes
I: Created OIDC provider with ARN 'arn:aws:iam::4540112244:oidc-provider/dvbwgdztaeq9o.cloudfront.net/13cdr6b'
在创建集群时,您必须提供 OIDC 配置 ID。CLI 输出为--
mode auto提供了此值,否则您必须根据awsCLI 输出用于-模式手动确定这些值。可选: 您可以将 OIDC 配置 ID 保存为稍后使用的变量。运行以下命令来保存变量:
$ export OIDC_ID=<oidc_config_id><oidc_config_id>-
在本例中,OIDC 配置 ID 是
13cdr6b。
运行以下命令,查看变量的值:
$ echo $OIDC_ID例如:
13cdr6b
验证
您可以列出与您的用户机构关联的集群可用的 OIDC 配置。运行以下命令:
$ rosa list oidc-config例如:
ID                                MANAGED  ISSUER URL                                                             SECRET ARN
2330dbs0n8m3chkkr25gkkcd8pnj3lk2  true     https://dvbwgdztaeq9o.cloudfront.net/2330dbs0n8m3chkkr25gkkcd8pnj3lk2
233hvnrjoqu14jltk6lhbhf2tj11f8un  false    https://oidc-r7u1.s3.us-east-1.amazonaws.com                           aws:secretsmanager:us-east-1:242819244:secret:rosa-private-key-oidc-r7u1-tM3MDN
2.3.6. 创建 Operator 角色和策略
在 AWS 集群上部署 Red Hat OpenShift Service 时,您必须创建 Operator IAM 角色。集群 Operator 使用 Operator 角色和策略获取执行集群操作所需的临时权限,如管理后端存储和对集群的外部访问权限。
先决条件
- 您已完成 Red Hat OpenShift Service on AWS 的 AWS 先决条件。
-
您已在安装主机上安装和配置了最新的 ROSA 命令行界面(CLI) (
rosa)。 - 您创建了集群范围的 AWS 角色。
流程
要创建 Operator 角色,请运行以下命令:
$ rosa create operator-roles --hosted-cp --prefix=$OPERATOR_ROLES_PREFIX --oidc-config-id=$OIDC_ID --installer-role-arn arn:aws:iam::$AWS_ACCOUNT_ID:role/${ACCOUNT_ROLES_PREFIX}-HCP-ROSA-Installer-Role以下分类提供了创建 Operator 角色的选项。
$ rosa create operator-roles --hosted-cp
	--prefix=$OPERATOR_ROLES_PREFIX
	--oidc-config-id=$OIDC_ID
	--installer-role-arn arn:aws:iam::$AWS_ACCOUNT_ID:role/$ACCOUNT_ROLES_PREFIX-HCP-ROSA-Installer-Role
其中:
--prefix=- 在创建这些 Operator 角色时,您必须提供一个前缀。如果不这样做,则会产生错误。如需有关 Operator 前缀的信息,请参阅本节的额外资源。
--oidc-config-id=- 这个值是您为 Red Hat OpenShift Service on AWS 创建的 OIDC 配置 ID。
--installer-role-arn- 这个值是您在创建 Red Hat OpenShift Service on AWS 帐户角色时创建的安装程序角色 ARN。
您必须包含
-hosted-cp参数,以便为 Red Hat OpenShift Service on AWS 集群创建正确的角色。此命令返回以下信息:例如:
? Role creation mode: auto
? Operator roles prefix: <pre-filled_prefix>
? OIDC Configuration ID: 23soa2bgvpek9kmes9s7os0a39i13qm4 | https://dvbwgdztaeq9o.cloudfront.net/23soa2bgvpek9kmes9s7os0a39i13qm4
? Create hosted control plane operator roles: Yes
W: More than one Installer role found
? Installer role ARN: arn:aws:iam::4540112244:role/<prefix>-HCP-ROSA-Installer-Role
? Permissions boundary ARN (optional):
I: Reusable OIDC Configuration detected. Validating trusted relationships to operator roles:
I: Creating roles using 'arn:aws:iam::4540112244:user/<userName>'
I: Created role '<prefix>-openshift-cluster-csi-drivers-ebs-cloud-credentials' with ARN 'arn:aws:iam::4540112244:role/<prefix>-openshift-cluster-csi-drivers-ebs-cloud-credentials'
I: Created role '<prefix>-openshift-cloud-network-config-controller-cloud-credenti' with ARN 'arn:aws:iam::4540112244:role/<prefix>-openshift-cloud-network-config-controller-cloud-credenti'
I: Created role '<prefix>-kube-system-kube-controller-manager' with ARN 'arn:aws:iam::4540112244:role/<prefix>-kube-system-kube-controller-manager'
I: Created role '<prefix>-kube-system-capa-controller-manager' with ARN 'arn:aws:iam::4540112244:role/<prefix>-kube-system-capa-controller-manager'
I: Created role '<prefix>-kube-system-control-plane-operator' with ARN 'arn:aws:iam::4540112244:role/<prefix>-kube-system-control-plane-operator'
I: Created role '<prefix>-kube-system-kms-provider' with ARN 'arn:aws:iam::4540112244:role/<prefix>-kube-system-kms-provider'
I: Created role '<prefix>-openshift-image-registry-installer-cloud-credentials' with ARN 'arn:aws:iam::4540112244:role/<prefix>-openshift-image-registry-installer-cloud-credentials'
I: Created role '<prefix>-openshift-ingress-operator-cloud-credentials' with ARN 'arn:aws:iam::4540112244:role/<prefix>-openshift-ingress-operator-cloud-credentials'
I: To create a cluster with these roles, run the following command:
	rosa create cluster --sts --oidc-config-id 23soa2bgvpek9kmes9s7os0a39i13qm4 --operator-roles-prefix <prefix> --hosted-cp
其中:
Operator 角色前缀- 此字段会预先填充您在初始创建命令中设置的前缀。
OIDC 配置 ID- 此字段要求您选择为 Red Hat OpenShift Service on AWS 集群创建的 OIDC 配置。
现在,Operator 角色已创建并可用于创建 Red Hat OpenShift Service on AWS 集群。
验证
您可以列出与 Red Hat OpenShift Service on AWS 帐户关联的 Operator 角色。运行以下命令:
$ rosa list operator-roles例如:
I: Fetching operator roles
ROLE PREFIX  AMOUNT IN BUNDLE
<prefix>      8
? Would you like to detail a specific prefix Yes
? Operator Role Prefix: <prefix>
ROLE NAME                                                         ROLE ARN                                                                                         VERSION  MANAGED
<prefix>-kube-system-capa-controller-manager                       arn:aws:iam::4540112244:role/<prefix>-kube-system-capa-controller-manager                       4.13     No
<prefix>-kube-system-control-plane-operator                        arn:aws:iam::4540112244:role/<prefix>-kube-system-control-plane-operator                        4.13     No
<prefix>-kube-system-kms-provider                                  arn:aws:iam::4540112244:role/<prefix>-kube-system-kms-provider                                  4.13     No
<prefix>-kube-system-kube-controller-manager                       arn:aws:iam::4540112244:role/<prefix>-kube-system-kube-controller-manager                       4.13     No
<prefix>-openshift-cloud-network-config-controller-cloud-credenti  arn:aws:iam::4540112244:role/<prefix>-openshift-cloud-network-config-controller-cloud-credenti  4.13     No
<prefix>-openshift-cluster-csi-drivers-ebs-cloud-credentials       arn:aws:iam::4540112244:role/<prefix>-openshift-cluster-csi-drivers-ebs-cloud-credentials       4.13     No
<prefix>-openshift-image-registry-installer-cloud-credentials      arn:aws:iam::4540112244:role/<prefix>-openshift-image-registry-installer-cloud-credentials      4.13     No
<prefix>-openshift-ingress-operator-cloud-credentials              arn:aws:iam::4540112244:role/<prefix>-openshift-ingress-operator-cloud-credentials              4.13     No
命令运行后,它会显示与 AWS 帐户关联的所有前缀,并记录与这个前缀关联的角色数量。如果您需要查看所有这些角色及其详情,请在详情提示符处输入"是",使这些角色以特定形式列出。
2.4. 使用 CLI 创建 Red Hat OpenShift Service on AWS 集群
使用 ROSA CLI ( rosa )创建集群时,您可以选择默认选项来快速创建集群。
先决条件
- 您已完成 Red Hat OpenShift Service on AWS 的 AWS 先决条件。
- 您有可用的 AWS 服务配额。
- 您已在 AWS 控制台中启用了 Red Hat OpenShift Service on AWS。
-
您已在安装主机上安装和配置了最新的 ROSA CLI (
rosa)。运行rosa 版本,以查看您当前安装的 ROSA CLI 版本。如果有更新的版本,CLI 提供了下载此升级的链接。 - 已使用 ROSA CLI 登录您的红帽帐户。
- 您已创建了 OIDC 配置。
- 您已确认 AWS Elastic Load Balancing (ELB)服务角色存在于 AWS 帐户中。
流程
使用以下命令之一在 AWS 集群上创建 Red Hat OpenShift Service:
注意在 AWS 集群上创建 Red Hat OpenShift Service 时,默认的无类别域间路由(CIDR)为
10.0.0.0/16。如果这与 VPC 子网的 CIDR 范围不匹配,请在以下命令中添加--machine-cidr <address_block>。要了解更多有关 Red Hat OpenShift Service on AWS 的默认 CIDR 范围的信息,请参阅 CIDR 范围定义。如果您没有设置环境变量,请运行以下命令:
$ rosa create cluster --cluster-name=<cluster_name> \1 --mode=auto --hosted-cp [--private] \2 --operator-roles-prefix <operator-role-prefix> \3 --external-id <external-id> \4 --oidc-config-id <id-of-oidc-configuration> \ --subnet-ids=<public-subnet-id>,<private-subnet-id>- 1
- 指定集群的名称。如果集群名称超过 15 个字符,它将包含自动生成的域前缀,作为 openshiftapps.com 上置备的集群的子域。要自定义子域,请使用 the
-domain-prefix标志。域前缀不能超过 15 个字符,必须是唯一的,且在集群创建后无法更改。 - 2
- 可选
:--private参数用于在 AWS 集群上创建私有 Red Hat OpenShift Service。如果使用此参数,请确保只使用专用子网 ID for-subnet-ids。 - 3
- 默认情况下,特定于集群的 Operator 角色名称使用集群名称和随机 4 位哈希值作为前缀。您可以选择指定一个自定义前缀来替换角色名称中的 <
cluster_name>-<hash>。创建特定于集群的 Operator IAM 角色时会应用前缀。有关前缀的详情,请参阅关于自定义 Operator IAM 角色前缀。注意如果您在创建关联的集群范围的角色时指定了自定义 ARN 路径,则会自动检测到自定义路径。在以后的步骤中创建它们时,自定义路径会应用于特定于集群的 Operator 角色。
- 4
- 可选:在另一个帐户中假定角色时可能需要的唯一标识符。
如果设置环境变量,请运行以下命令创建带有单个初始机器池的集群,使用公开或私有可用的 API,以及公开或私有可用的 Ingress:
$ rosa create cluster --private --cluster-name=<cluster_name> \
    --mode=auto --hosted-cp --operator-roles-prefix=$OPERATOR_ROLES_PREFIX \
    --oidc-config-id=$OIDC_ID --subnet-ids=$SUBNET_IDS
如果设置环境变量,请运行以下命令创建带有单个初始机器池、公开可用的 API 和公开的 Ingress 的集群:
$ rosa create cluster --cluster-name=<cluster_name> --mode=auto \
    --hosted-cp --operator-roles-prefix=$OPERATOR_ROLES_PREFIX \
    --oidc-config-id=$OIDC_ID --subnet-ids=$SUBNET_IDS
运行以下命令检查集群的状态:
$ rosa describe cluster --cluster=<cluster_name>在集群安装过程中,输出中会列出以下
State字段更改:-
待定(准备帐户) -
安装(进行中的DNS 设置) -
installing ready注意如果安装失败,或者
State字段在超过 10 分钟后没有变为ready,请检查安装故障排除文档以了解详细信息。如需更多信息,请参阅 故障排除安装。有关联系红帽支持以获取帮助的步骤,请参阅 获取对 Red Hat OpenShift Service on AWS 的支持。
-
通过观察 Red Hat OpenShift Service on AWS 安装程序日志来跟踪集群创建的进度。要检查日志,请运行以下命令:
$ rosa logs install --cluster=<cluster_name> --watch \1 - 1
- 可选: 要在安装过程中监视新日志消息,请使用--
watch参数。
第 3 章 使用 Terraform 创建 ROSA 集群
使用使用默认集群选项配置的 Terraform 集群模板快速创建 Red Hat OpenShift Service on AWS 集群。
以下描述的集群创建过程使用 Terraform 配置来使用以下资源准备 Red Hat OpenShift Service on AWS 集群:
-
带有受管
oidc-config配置的 OIDC 供应商 - 带有关联的 AWS Managed Red Hat OpenShift Service on AWS 策略的先决条件 IAM Operator 角色
- 带有关联的 AWS Managed Red Hat OpenShift Service on AWS 策略的 IAM 帐户角色
- 在 AWS 集群上创建 Red Hat OpenShift Service 所需的所有其他 AWS 资源
3.1.1. Terraform 概述
Terraform 是一个基础架构即代码工具,提供一次配置资源并根据需要复制这些资源的方法。Terraform 使用声明性语言完成创建任务。您可以声明基础架构资源的最终状态,Terraform 会根据您的规格创建这些资源。
先决条件
要在 Terraform 配置中使用 Red Hat Cloud Services 供应商,您必须满足以下先决条件:
- 已安装 ROSA CLI 工具。
- 您有离线的 Red Hat OpenShift Cluster Manager 令牌。
- 已安装 Terraform 版本 1.4.6 或更新版本。
您已创建了 AWS 帐户范围的 IAM 角色。
特定的帐户范围的 IAM 角色和策略提供 Red Hat OpenShift Service on AWS 支持、安装、control plane 和计算功能所需的 STS 权限。这包括集群范围的 Operator 策略。如需有关 AWS 帐户角色的更多信息,请参阅附加资源。
- 您有一个 AWS 帐户 和相关凭证,供您创建资源。为 AWS 供应商配置了凭证。请参阅 AWS Terraform 供应商文档中的 身份验证和 配置部分。
您至少在 AWS IAM 角色策略中具有以下权限,其运行 Terraform。在 AWS 控制台中检查这些权限。
例 3.1. Terraform 的最低 AWS 权限
{
  "Version": "2012-10-17",
  "Statement": [
    {
      "Sid": "VisualEditor0",
      "Effect": "Allow",
      "Action": [
        "iam:GetPolicyVersion",
        "iam:DeletePolicyVersion",
        "iam:CreatePolicyVersion",
        "iam:UpdateAssumeRolePolicy",
        "secretsmanager:DescribeSecret",
        "iam:ListRoleTags",
        "secretsmanager:PutSecretValue",
        "secretsmanager:CreateSecret",
        "iam:TagRole",
        "secretsmanager:DeleteSecret",
        "iam:UpdateOpenIDConnectProviderThumbprint",
        "iam:DeletePolicy",
        "iam:CreateRole",
        "iam:AttachRolePolicy",
        "iam:ListInstanceProfilesForRole",
        "secretsmanager:GetSecretValue",
        "iam:DetachRolePolicy",
        "iam:ListAttachedRolePolicies",
        "iam:ListPolicyTags",
        "iam:ListRolePolicies",
        "iam:DeleteOpenIDConnectProvider",
        "iam:DeleteInstanceProfile",
        "iam:GetRole",
        "iam:GetPolicy",
        "iam:ListEntitiesForPolicy",
        "iam:DeleteRole",
        "iam:TagPolicy",
        "iam:CreateOpenIDConnectProvider",
        "iam:CreatePolicy",
        "secretsmanager:GetResourcePolicy",
        "iam:ListPolicyVersions",
        "iam:UpdateRole",
        "iam:GetOpenIDConnectProvider",
        "iam:TagOpenIDConnectProvider",
        "secretsmanager:TagResource",
        "sts:AssumeRoleWithWebIdentity",
        "iam:ListRoles"
      ],
      "Resource": [
        "arn:aws:secretsmanager:*:<ACCOUNT_ID>:secret:*",
        "arn:aws:iam::<ACCOUNT_ID>:instance-profile/*",
        "arn:aws:iam::<ACCOUNT_ID>:role/*",
        "arn:aws:iam::<ACCOUNT_ID>:oidc-provider/*",
        "arn:aws:iam::<ACCOUNT_ID>:policy/*"
      ]
    },
    {
      "Sid": "VisualEditor1",
      "Effect": "Allow",
      "Action": [
        "s3:*"
        ],
      "Resource": "*"
    }
  ]
}
3.1.2. 使用 Terraform 时的注意事项
通常,使用 Terraform 管理云资源应按照预期完成任何更改,以便使用 Terraform 方法进行任何更改。使用 Terraform 以外的工具(如 AWS 控制台或红帽控制台)修改由 Terraform 创建的云资源时,请小心。使用 Terraform 以外的工具来管理已经由 Terraform 管理的云资源,从您声明的 Terraform 配置中引入配置偏移。
例如,如果您使用 Red Hat Hybrid Cloud Console 升级 Terraform 创建的集群,则需要在应用任何受影响的配置更改前协调 Terraform 状态。如需更多信息,请参阅 HashiCorp Developer 文档中的管理 Terraform 状态的资源。
3.1.3. 默认集群规格概述
您可以使用默认安装选项快速创建 Red Hat OpenShift Service on AWS 集群。
以下概述描述了默认集群规格。
| 组件 | 默认规格 |
|---|---|
| 帐户和角色 |
|
| 集群设置 |
|
| Compute 节点机器池 |
|
| 网络配置 |
|
| 无类别域间路由 (CIDR) 范围 |
|
| 集群角色和策略 |
|
| 存储 |
|
| 集群更新策略 |
|
以下概述的集群创建过程演示了如何使用 Terraform 创建帐户范围的 IAM 角色和带有受管 OIDC 配置的 Red Hat OpenShift Service on AWS 集群。
3.1.4.1. 为 Terraform 准备您的环境
在使用 Terraform 在 AWS 集群上创建 Red Hat OpenShift Service 前,您需要导出 离线 Red Hat OpenShift Cluster Manager 令牌。
流程
可选 : 因为在此过程中,Terraform 文件会在当前目录中创建,因此您可以创建一个新目录来存储这些文件并运行以下命令来进入其中:
$ mkdir terraform-cluster && cd terraform-cluster- 使用 离线 Red Hat OpenShift Cluster Manager 令牌 向您的帐户授予权限。
复制离线令牌,并通过运行以下命令来将令牌设置为环境变量:
$ export RHCS_TOKEN=<your_offline_token>注意此环境变量会在每个会话的末尾重置,如重启计算机或关闭终端。
验证
导出令牌后,运行以下命令来验证值:
$ echo $RHCS_TOKEN
3.1.4.2. 在本地创建 Terraform 文件
设置 离线 Red Hat OpenShift Cluster Manager 令牌 后,您需要在本地创建 Terraform 文件以构建集群。您可以使用以下代码模板创建这些文件。
流程
运行以下命令来创建
main.tf文件:$ cat<<-EOF>main.tf # # Copyright (c) 2023 Red Hat, Inc. # # Licensed under the Apache License, Version 2.0 (the "License"); # you may not use this file except in compliance with the License. # You may obtain a copy of the License at # # http://www.apache.org/licenses/LICENSE-2.0 # # Unless required by applicable law or agreed to in writing, software # distributed under the License is distributed on an "AS IS" BASIS, # WITHOUT WARRANTIES OR CONDITIONS OF ANY KIND, either express or implied. # See the License for the specific language governing permissions and # limitations under the License. # terraform { required_providers { aws = { source = "hashicorp/aws" version = ">= 4.20.0" } rhcs = { version = ">= 1.6.3" source = "terraform-redhat/rhcs" } } } # Export token using the RHCS_TOKEN environment variable provider "rhcs" {} provider "aws" { region = var.aws_region ignore_tags { key_prefixes = ["kubernetes.io/"] } default_tags { tags = var.default_aws_tags } } data "aws_availability_zones" "available" {} locals { # Extract availability zone names for the specified region, limit it to 3 if multi az or 1 if single region_azs = var.multi_az ? slice([for zone in data.aws_availability_zones.available.names : format("%s", zone)], 0, 3) : slice([for zone in data.aws_availability_zones.available.names : format("%s", zone)], 0, 1) } resource "random_string" "random_name" { length = 6 special = false upper = false } locals { worker_node_replicas = var.multi_az ? 3 : 2 # If cluster_name is not null, use that, otherwise generate a random cluster name cluster_name = coalesce(var.cluster_name, "rosa-\${random_string.random_name.result}") } # The network validator requires an additional 60 seconds to validate Terraform clusters. resource "time_sleep" "wait_60_seconds" { count = var.create_vpc ? 1 : 0 depends_on = [module.vpc] create_duration = "60s" } module "rosa-hcp" { source = "terraform-redhat/rosa-hcp/rhcs" version = "1.6.3" cluster_name = local.cluster_name openshift_version = var.openshift_version account_role_prefix = local.cluster_name operator_role_prefix = local.cluster_name replicas = local.worker_node_replicas aws_availability_zones = local.region_azs create_oidc = true private = var.private_cluster aws_subnet_ids = var.create_vpc ? var.private_cluster ? module.vpc[0].private_subnets : concat(module.vpc[0].public_subnets, module.vpc[0].private_subnets) : var.aws_subnet_ids create_account_roles = true create_operator_roles = true # Optional: Configure a cluster administrator user \1 # # Option 1: Default cluster-admin user # Create an administrator user (cluster-admin) and automatically # generate a password by uncommenting the following parameter: # create_admin_user = true # Generated administrator credentials are displayed in terminal output. # # Option 2: Specify administrator username and password # Create an administrator user and define your own password # by uncommenting and editing the values of the following parameters: # admin_credentials_username = <username> # admin_credentials_password = <password> depends_on = [time_sleep.wait_60_seconds] } EOF- 1
- 可选: 在集群创建过程中创建管理员用户,方法是取消注释适当的参数并在需要时编辑其值。
运行以下命令来创建
variables.tf文件:注意在运行该命令 以构建 集群前复制并编辑此文件。
$ cat<<-EOF>variables.tf
#
# Copyright (c) 2023 Red Hat, Inc.
#
# Licensed under the Apache License, Version 2.0 (the "License");
# you may not use this file except in compliance with the License.
# You may obtain a copy of the License at
#
#   http://www.apache.org/licenses/LICENSE-2.0
#
# Unless required by applicable law or agreed to in writing, software
# distributed under the License is distributed on an "AS IS" BASIS,
# WITHOUT WARRANTIES OR CONDITIONS OF ANY KIND, either express or implied.
# See the License for the specific language governing permissions and
# limitations under the License.
#
variable "openshift_version" {
  type        = string
  default     = "4.14.20"
  description = "Desired version of OpenShift for the cluster, for example '4.14.20'. If version is greater than the currently running version, an upgrade will be scheduled."
}

variable "create_vpc" {
  type        = bool
  description = "If you would like to create a new VPC, set this value to 'true'. If you do not want to create a new VPC, set this value to 'false'."
}

# ROSA Cluster info
variable "cluster_name" {
  default     = null
  type        = string
  description = "The name of the ROSA cluster to create"
}

variable "additional_tags" {
  default = {
    Terraform   = "true"
    Environment = "dev"
  }
  description = "Additional AWS resource tags"
  type        = map(string)
}

variable "multi_az" {
  type        = bool
  description = "Multi AZ Cluster for High Availability"
  default     = true
}

variable "worker_node_replicas" {
  default     = 3
  description = "Number of worker nodes to provision. Single zone clusters need at least 2 nodes, multizone clusters need at least 3 nodes"
  type        = number
}

variable "aws_subnet_ids" {
  type        = list(any)
  description = "A list of either the public or public + private subnet IDs to use for the cluster blocks to use for the cluster"
  default     = ["subnet-01234567890abcdef", "subnet-01234567890abcdef", "subnet-01234567890abcdef"]
}

variable "private_cluster" {
  type        = bool
  description = "If you want to create a private cluster, set this value to 'true'. If you want a publicly available cluster, set this value to 'false'."
}

#VPC Info
variable "vpc_name" {
  type        = string
  description = "VPC Name"
  default     = "tf-qs-vpc"
}

variable "vpc_cidr_block" {
  type        = string
  description = "value of the CIDR block to use for the VPC"
  default     = "10.0.0.0/16"
}

variable "private_subnet_cidrs" {
  type        = list(any)
  description = "The CIDR blocks to use for the private subnets"
  default     = ["10.0.1.0/24", "10.0.2.0/24", "10.0.3.0/24"]
}

variable "public_subnet_cidrs" {
  type        = list(any)
  description = "The CIDR blocks to use for the public subnets"
  default     = ["10.0.101.0/24", "10.0.102.0/24", "10.0.103.0/24"]
}

variable "single_nat_gateway" {
  type        = bool
  description = "Single NAT or per NAT for subnet"
  default     = false
}

#AWS Info
variable "aws_region" {
  type    = string
  default = "us-east-2"
}

variable "default_aws_tags" {
  type        = map(string)
  description = "Default tags for AWS"
  default     = {}
}
EOF
运行以下命令来创建
vpc.tf文件:$ cat<<-EOF>vpc.tf # # Copyright (c) 2023 Red Hat, Inc. # # Licensed under the Apache License, Version 2.0 (the "License"); # you may not use this file except in compliance with the License. # You may obtain a copy of the License at # # http://www.apache.org/licenses/LICENSE-2.0 # # Unless required by applicable law or agreed to in writing, software # distributed under the License is distributed on an "AS IS" BASIS, # WITHOUT WARRANTIES OR CONDITIONS OF ANY KIND, either express or implied. # See the License for the specific language governing permissions and # limitations under the License. # module "vpc" { source = "terraform-aws-modules/vpc/aws" version = "5.1.2" count = var.create_vpc ? 1 : 0 name = var.vpc_name cidr = var.vpc_cidr_block azs = local.region_azs private_subnets = var.multi_az ? var.private_subnet_cidrs : [var.private_subnet_cidrs[0]] public_subnets = var.multi_az ? var.public_subnet_cidrs : [var.public_subnet_cidrs[0]] enable_nat_gateway = true single_nat_gateway = var.single_nat_gateway enable_dns_hostnames = true enable_dns_support = true tags = var.additional_tags } EOF您已准备好启动 Terraform。
创建 Terraform 文件后,您必须启动 Terraform 以提供所有需要的依赖软件包。然后应用 Terraform 计划。
不要修改 Terraform 状态文件。如需更多信息,请参阅使用 Terraform 时的注意事项
流程
将 Terraform 设置为根据您的 Terraform 文件创建资源,运行以下命令:
$ terraform init可选 :运行以下命令来验证您复制的 Terraform 是否正确:
$ terraform validate输出示例
Success! The configuration is valid.运行以下命令,使用 Terraform 创建集群:
$ terraform applyTerraform 界面需要两个问题来创建集群,如下所示:
输出示例
var.create_vpc
  If you would like to create a new VPC, set this value to 'true'. If you do not want to create a new VPC, set this value to 'false'.

  Enter a value:

var.private_cluster
  If you want to create a private cluster, set this value to 'true'. If you want a publicly available cluster, set this value to 'false'.

  Enter a value:
当 Terraform 界面列出要创建或修改的资源并提示确认时,输入
yes才能继续或取消:输出示例
Plan: 63 to add, 0 to change, 0 to destroy.

Do you want to perform these actions?
  Terraform will perform the actions described above.
  Only 'yes' will be accepted to approve.
如果您输入
yes,您的 Terraform 计划将启动,创建 AWS 帐户角色、Operator 角色和 Red Hat OpenShift Service on AWS 集群。
验证
运行以下命令验证集群是否已创建:
$ rosa list clusters显示集群的 ID、名称和状态的输出示例
ID                                NAME          STATE  TOPOLOGY
27c3snjsupa9obua74ba8se5kcj11269  rosa-tf-demo  ready  Hosted CP
运行以下命令验证您的帐户角色是否已创建:
$ rosa list account-roles输出示例
I: Fetching account roles
ROLE NAME                                   ROLE TYPE      ROLE ARN                                                           OPENSHIFT VERSION  AWS Managed
ROSA-demo-Installer-Role                    Installer      arn:aws:iam::<ID>:role/ROSA-demo-Installer-Role                    4.14               No
ROSA-demo-Support-Role                      Support        arn:aws:iam::<ID>:role/ROSA-demo-Support-Role                      4.14               No
ROSA-demo-Worker-Role                       Worker         arn:aws:iam::<ID>:role/ROSA-demo-Worker-Role                       4.14               No
运行以下命令验证您的 Operator 角色是否已创建:
$ rosa list operator-roles显示 Terraform 创建的 Operator 角色的输出示例
I: Fetching operator roles
ROLE PREFIX    AMOUNT IN BUNDLE
rosa-demo      8
使用 terraform destroy 命令删除使用 terraform apply 命令创建的所有资源。
在销毁资源前不要修改 Terraform .tf 文件。这些变量与要删除的资源匹配。
流程
在运行
terraform apply命令来创建集群的目录中,运行以下命令删除集群:$ terraform destroyTerraform 接口提示您输入两个变量。它们应与创建集群时提供的答案匹配:
var.create_vpc
  If you would like to create a new VPC, set this value to 'true.' If you do not want to create a new VPC, set this value to 'false.'

  Enter a value:

var.private_cluster
  If you want to create a private cluster, set this value to 'true.' If you want a publicly available cluster, set this value to 'false.'

  Enter a value:
输入
yes以启动角色和集群删除:输出示例
Plan: 0 to add, 0 to change, 63 to destroy.

Do you really want to destroy all resources?
  Terraform will destroy all your managed infrastructure, as shown above.
  There is no undo. Only 'yes' will be accepted to confirm.

  Enter a value: yes
验证
运行以下命令验证集群是否已销毁:
$ rosa list clusters没有显示集群的输出示例
I: No clusters available运行以下命令验证帐户角色是否已销毁:
$ rosa list account-roles没有显示 Terraform 创建帐户角色的输出示例
I: Fetching account roles
I: No account roles available
运行以下命令验证 Operator 角色是否已销毁:
$ rosa list operator-roles输出显示没有 Terraform 创建的 Operator 角色的示例
I: Fetching operator roles
I: No operator roles available
第 4 章 使用自定义 AWS KMS 加密密钥创建带有 HCP 集群的 ROSA
使用自定义 AWS 密钥管理服务(KMS)密钥创建 Red Hat OpenShift Service on AWS 集群。
4.1. Red Hat OpenShift Service on AWS 的先决条件
要创建 Red Hat OpenShift Service on AWS 集群,您必须有以下项目:
- 配置的虚拟私有云(VPC)
- 集群范围的角色
- OIDC 配置
- Operator 角色
4.2. 为 Red Hat OpenShift Service on AWS 集群创建虚拟私有云
您必须具有 Virtual Private Cloud (VPC)才能在 AWS 集群上创建 Red Hat OpenShift Service。使用以下方法之一创建 VPC:
- 使用 ROSA 命令行界面(CLI)创建 VPC
- 使用 Terraform 模板创建 VPC
- 在 AWS 控制台中手动创建 VPC 资源
Terraform 指令用于测试和演示目的。您自己的安装需要对 VPC 的一些修改才能自行使用。您还应确保使用这个 Terraform 脚本位于您要安装集群的同一区域。在这些示例中,使用 us-east-2。
4.2.1. 使用 ROSA CLI 创建 AWS VPC
rosa create network 命令在 ROSA CLI 的 v.1.2.48 或更高版本中提供。命令使用 AWS CloudFormation 创建 VPC 以及在 AWS 集群上安装 Red Hat OpenShift Service 所需的相关网络组件。CloudFormation 是一个原生 AWS 基础架构即代码工具,与 AWS CLI 兼容。
如果没有指定模板,CloudFormation 将使用以下参数来创建资源的默认模板:
| VPC 参数 | value |
|---|---|
| 可用区 | 1 |
| 区域 |
|
| VPC CIDR |
|
您可以创建和自定义 CloudFormation 模板,以用于 rosa create network 命令。如需有关默认 VPC 模板的信息,请参阅本节的其他资源。
先决条件
- 您已配置了 AWS 帐户
- 您已配置了您的红帽帐户
- 已安装 ROSA CLI 并将其配置为最新版本
流程
运行以下命令,使用默认的 CloudFormations 模板创建 AWS VPC:
$ rosa create network可选:通过指定附加参数来自定义 VPC。
您可以使用-
-param标志指定对默认 VPC 模板的更改。以下示例命令为region、Name、AvailabilityZoneCount和VpcCidr指定自定义值。$ rosa create network --param Region=us-east-2 --param Name=quickstart-stack --param AvailabilityZoneCount=3 --param VpcCidr=10.0.0.0/16该命令需要大约 5 分钟来运行,并在创建资源时从 AWS 提供常规状态更新。如果 CloudFormation 存在问题,则会尝试回滚。对于遇到的所有其他错误,请按照错误消息说明或联系 AWS 支持。
验证
完成后,您会收到创建的资源概述:
INFO[0140] Resources created in stack:
INFO[0140] Resource: AttachGateway, Type: AWS::EC2::VPCGatewayAttachment, ID: <gateway_id>
INFO[0140] Resource: EC2VPCEndpoint, Type: AWS::EC2::VPCEndpoint, ID: <vpce_id>
INFO[0140] Resource: EcrApiVPCEndpoint, Type: AWS::EC2::VPCEndpoint, ID: <vpce_id>
INFO[0140] Resource: EcrDkrVPCEndpoint, Type: AWS::EC2::VPCEndpoint, ID: <vpce_id>
INFO[0140] Resource: ElasticIP1, Type: AWS::EC2::EIP, ID: <IP>
INFO[0140] Resource: ElasticIP2, Type: AWS::EC2::EIP, ID: <IP>
INFO[0140] Resource: InternetGateway, Type: AWS::EC2::InternetGateway, ID: igw-016e1a71b9812464e
INFO[0140] Resource: KMSVPCEndpoint, Type: AWS::EC2::VPCEndpoint, ID: <vpce_id>
INFO[0140] Resource: NATGateway1, Type: AWS::EC2::NatGateway, ID: <nat-gateway_id>
INFO[0140] Resource: PrivateRoute, Type: AWS::EC2::Route, ID: <route_id>
INFO[0140] Resource: PrivateRouteTable, Type: AWS::EC2::RouteTable, ID: <route_id>
INFO[0140] Resource: PrivateSubnetRouteTableAssociation1, Type: AWS::EC2::SubnetRouteTableAssociation, ID: <route_id>
INFO[0140] Resource: PublicRoute, Type: AWS::EC2::Route, ID: <route_id>
INFO[0140] Resource: PublicRouteTable, Type: AWS::EC2::RouteTable, ID: <route_id>
INFO[0140] Resource: PublicSubnetRouteTableAssociation1, Type: AWS::EC2::SubnetRouteTableAssociation, ID: <route_id>
INFO[0140] Resource: S3VPCEndpoint, Type: AWS::EC2::VPCEndpoint, ID: <vpce_id>
INFO[0140] Resource: STSVPCEndpoint, Type: AWS::EC2::VPCEndpoint, ID: <vpce_id>
INFO[0140] Resource: SecurityGroup, Type: AWS::EC2::SecurityGroup, ID: <security-group_id>
INFO[0140] Resource: SubnetPrivate1, Type: AWS::EC2::Subnet, ID: <private_subnet_id-1> \
1 INFO[0140] Resource: SubnetPublic1, Type: AWS::EC2::Subnet, ID: <public_subnet_id-1> \2 INFO[0140] Resource: VPC, Type: AWS::EC2::VPC, ID: <vpc_id> INFO[0140] Stack rosa-network-stack-5555 created \3
4.2.2. 使用 Terraform 创建虚拟私有云
Terraform 是一个工具,可让您使用已建立的模板创建各种资源。以下流程根据需要使用默认选项在 AWS 集群上创建 Red Hat OpenShift Service。有关使用 Terraform 的更多信息,请参阅其他资源。
先决条件
- 您已在机器上安装 Terraform 版本 1.4.0 或更新版本。
- 您已在机器上安装了 Git。
流程
运行以下命令,打开 shell 提示符并克隆 Terraform VPC 存储库:
$ git clone https://github.com/openshift-cs/terraform-vpc-example运行以下命令来进入创建的目录:
$ cd terraform-vpc-example运行以下命令来启动 Terraform 文件:
$ terraform init在此过程完成后会显示确认初始化的消息。
要根据现有的 Terraform 模板构建 VPC Terraform 计划,请运行
plan命令。您必须包含 AWS 区域。您可以选择指定集群名称。在terraform plan完成后,一个rosa.tfplan文件会被添加到hypershift-tf目录。有关更详细的选项,请参阅 Terraform VPC 存储库的 README 文件。$ terraform plan -out rosa.tfplan -var region=<region>运行以下命令应用此计划文件来构建 VPC:
$ terraform apply rosa.tfplan可选:您可以通过运行以下命令捕获在创建 Red Hat OpenShift Service on AWS 集群时要使用的 Terraform-provisioned private、public 和 machinepool 子网 ID 的值:
$ export SUBNET_IDS=$(terraform output -raw cluster-subnets-string)使用以下命令验证变量是否已正确设置:
$ echo $SUBNET_IDS输出示例
$ subnet-0a6a57e0f784171aa,subnet-078e84e5b10ecf5b0
4.2.3. 手动创建 AWS Virtual Private Cloud
如果您选择手动创建 AWS Virtual Private Cloud (VPC)而不是使用 Terraform,请访问 AWS 控制台中的 VPC 页面。
您的 VPC 必须满足下表中显示的要求。
| 要求 | 详情 |
|---|---|
| VPC 名称 | 创建集群时,您需要具有特定的 VPC 名称和 ID。 |
| CIDR 范围 | 您的 VPC CIDR 范围应该与您的机器 CIDR 匹配。 |
| 可用区 | 您需要一个区域的可用区,并且需要三个用于多区的可用区。 |
| 公共子网 | 您必须有一个公共子网,其中包含公共集群的 NAT 网关。私有集群不需要公共子网。 |
| DNS 主机名和解析 | 您必须确保启用 DNS 主机名和解析。 |
4.2.5. 创建集群范围的 STS 角色和策略
在 AWS 集群上创建 Red Hat OpenShift Service 前,您必须创建所需的帐户范围的角色和策略。
Red Hat OpenShift Service on AWS 的特定 AWS 管理策略必须附加到每个角色。客户管理的策略不能与这些所需的帐户角色一起使用。有关 Red Hat OpenShift Service on AWS 集群的 AWS 管理策略的更多信息,请参阅 ROSA 的 AWS 受管策略。
先决条件
- 您已完成 Red Hat OpenShift Service on AWS 的 AWS 先决条件。
- 您有可用的 AWS 服务配额。
- 您已在 AWS 控制台中启用了 Red Hat OpenShift Service on AWS。
-
您已在安装主机上安装和配置了最新的 ROSA CLI (
rosa)。 - 已使用 ROSA CLI 登录您的红帽帐户。
流程
如果您的 AWS 帐户不存在它们,请创建所需的账户范围 STS 角色,并通过运行以下命令来附加策略:
$ rosa create account-roles --hosted-cp可选:运行以下命令,将您的前缀设置为环境变量:
$ export ACCOUNT_ROLES_PREFIX=<account_role_prefix>运行以下命令,查看变量的值:
$ echo $ACCOUNT_ROLES_PREFIX例如:
ManagedOpenShift如需有关 AWS 上 Red Hat OpenShift Service 的 AWS 管理的 IAM 策略的更多信息,请参阅 ROSA 的 AWS 管理的 IAM 策略。
4.2.6. 创建 OpenID 连接配置
在 AWS 集群上创建 Red Hat OpenShift Service 时,您可以在创建集群前创建 OpenID Connect (OIDC)配置。此配置注册到 OpenShift Cluster Manager。
先决条件
- 您已完成 Red Hat OpenShift Service on AWS 的 AWS 先决条件。
-
您已在安装主机上安装和配置了最新的 ROSA 命令行界面(CLI) (
rosa)。
流程
要创建 OIDC 配置以及 AWS 资源,请运行以下命令:
$ rosa create oidc-config --mode=auto --yes此命令返回以下信息:
例如:
? Would you like to create a Managed (Red Hat hosted) OIDC Configuration Yes
I: Setting up managed OIDC configuration
I: To create Operator Roles for this OIDC Configuration, run the following command and remember to replace <user-defined> with a prefix of your choice:
	rosa create operator-roles --prefix <user-defined> --oidc-config-id 13cdr6b
If you are going to create a Hosted Control Plane cluster please include '--hosted-cp'
I: Creating OIDC provider using 'arn:aws:iam::4540112244:user/userName'
? Create the OIDC provider? Yes
I: Created OIDC provider with ARN 'arn:aws:iam::4540112244:oidc-provider/dvbwgdztaeq9o.cloudfront.net/13cdr6b'
在创建集群时,您必须提供 OIDC 配置 ID。CLI 输出为--
mode auto提供了此值,否则您必须根据awsCLI 输出用于-模式手动确定这些值。可选: 您可以将 OIDC 配置 ID 保存为稍后使用的变量。运行以下命令来保存变量:
$ export OIDC_ID=<oidc_config_id><oidc_config_id>-
在本例中,OIDC 配置 ID 是
13cdr6b。
运行以下命令,查看变量的值:
$ echo $OIDC_ID例如:
13cdr6b
验证
您可以列出与您的用户机构关联的集群可用的 OIDC 配置。运行以下命令:
$ rosa list oidc-config例如:
ID                                MANAGED  ISSUER URL                                                             SECRET ARN
2330dbs0n8m3chkkr25gkkcd8pnj3lk2  true     https://dvbwgdztaeq9o.cloudfront.net/2330dbs0n8m3chkkr25gkkcd8pnj3lk2
233hvnrjoqu14jltk6lhbhf2tj11f8un  false    https://oidc-r7u1.s3.us-east-1.amazonaws.com                           aws:secretsmanager:us-east-1:242819244:secret:rosa-private-key-oidc-r7u1-tM3MDN
4.2.7. 创建 Operator 角色和策略
在 AWS 集群上部署 Red Hat OpenShift Service 时,您必须创建 Operator IAM 角色。集群 Operator 使用 Operator 角色和策略获取执行集群操作所需的临时权限,如管理后端存储和对集群的外部访问权限。
先决条件
- 您已完成 Red Hat OpenShift Service on AWS 的 AWS 先决条件。
-
您已在安装主机上安装和配置了最新的 ROSA 命令行界面(CLI) (
rosa)。 - 您创建了集群范围的 AWS 角色。
流程
要创建 Operator 角色,请运行以下命令:
$ rosa create operator-roles --hosted-cp --prefix=$OPERATOR_ROLES_PREFIX --oidc-config-id=$OIDC_ID --installer-role-arn arn:aws:iam::$AWS_ACCOUNT_ID:role/${ACCOUNT_ROLES_PREFIX}-HCP-ROSA-Installer-Role以下分类提供了创建 Operator 角色的选项。
$ rosa create operator-roles --hosted-cp
	--prefix=$OPERATOR_ROLES_PREFIX
	--oidc-config-id=$OIDC_ID
	--installer-role-arn arn:aws:iam::$AWS_ACCOUNT_ID:role/$ACCOUNT_ROLES_PREFIX-HCP-ROSA-Installer-Role
其中:
--prefix=- 在创建这些 Operator 角色时,您必须提供一个前缀。如果不这样做,则会产生错误。如需有关 Operator 前缀的信息,请参阅本节的额外资源。
--oidc-config-id=- 这个值是您为 Red Hat OpenShift Service on AWS 创建的 OIDC 配置 ID。
--installer-role-arn- 这个值是您在创建 Red Hat OpenShift Service on AWS 帐户角色时创建的安装程序角色 ARN。
您必须包含
-hosted-cp参数,以便为 Red Hat OpenShift Service on AWS 集群创建正确的角色。此命令返回以下信息:例如:
? Role creation mode: auto
? Operator roles prefix: <pre-filled_prefix>
? OIDC Configuration ID: 23soa2bgvpek9kmes9s7os0a39i13qm4 | https://dvbwgdztaeq9o.cloudfront.net/23soa2bgvpek9kmes9s7os0a39i13qm4
? Create hosted control plane operator roles: Yes
W: More than one Installer role found
? Installer role ARN: arn:aws:iam::4540112244:role/<prefix>-HCP-ROSA-Installer-Role
? Permissions boundary ARN (optional):
I: Reusable OIDC Configuration detected. Validating trusted relationships to operator roles:
I: Creating roles using 'arn:aws:iam::4540112244:user/<userName>'
I: Created role '<prefix>-openshift-cluster-csi-drivers-ebs-cloud-credentials' with ARN 'arn:aws:iam::4540112244:role/<prefix>-openshift-cluster-csi-drivers-ebs-cloud-credentials'
I: Created role '<prefix>-openshift-cloud-network-config-controller-cloud-credenti' with ARN 'arn:aws:iam::4540112244:role/<prefix>-openshift-cloud-network-config-controller-cloud-credenti'
I: Created role '<prefix>-kube-system-kube-controller-manager' with ARN 'arn:aws:iam::4540112244:role/<prefix>-kube-system-kube-controller-manager'
I: Created role '<prefix>-kube-system-capa-controller-manager' with ARN 'arn:aws:iam::4540112244:role/<prefix>-kube-system-capa-controller-manager'
I: Created role '<prefix>-kube-system-control-plane-operator' with ARN 'arn:aws:iam::4540112244:role/<prefix>-kube-system-control-plane-operator'
I: Created role '<prefix>-kube-system-kms-provider' with ARN 'arn:aws:iam::4540112244:role/<prefix>-kube-system-kms-provider'
I: Created role '<prefix>-openshift-image-registry-installer-cloud-credentials' with ARN 'arn:aws:iam::4540112244:role/<prefix>-openshift-image-registry-installer-cloud-credentials'
I: Created role '<prefix>-openshift-ingress-operator-cloud-credentials' with ARN 'arn:aws:iam::4540112244:role/<prefix>-openshift-ingress-operator-cloud-credentials'
I: To create a cluster with these roles, run the following command:
	rosa create cluster --sts --oidc-config-id 23soa2bgvpek9kmes9s7os0a39i13qm4 --operator-roles-prefix <prefix> --hosted-cp
其中:
Operator 角色前缀- 此字段会预先填充您在初始创建命令中设置的前缀。
OIDC 配置 ID- 此字段要求您选择为 Red Hat OpenShift Service on AWS 集群创建的 OIDC 配置。
现在,Operator 角色已创建并可用于创建 Red Hat OpenShift Service on AWS 集群。
验证
您可以列出与 Red Hat OpenShift Service on AWS 帐户关联的 Operator 角色。运行以下命令:
$ rosa list operator-roles例如:
I: Fetching operator roles
ROLE PREFIX  AMOUNT IN BUNDLE
<prefix>      8
? Would you like to detail a specific prefix Yes
? Operator Role Prefix: <prefix>
ROLE NAME                                                         ROLE ARN                                                                                         VERSION  MANAGED
<prefix>-kube-system-capa-controller-manager                       arn:aws:iam::4540112244:role/<prefix>-kube-system-capa-controller-manager                       4.13     No
<prefix>-kube-system-control-plane-operator                        arn:aws:iam::4540112244:role/<prefix>-kube-system-control-plane-operator                        4.13     No
<prefix>-kube-system-kms-provider                                  arn:aws:iam::4540112244:role/<prefix>-kube-system-kms-provider                                  4.13     No
<prefix>-kube-system-kube-controller-manager                       arn:aws:iam::4540112244:role/<prefix>-kube-system-kube-controller-manager                       4.13     No
<prefix>-openshift-cloud-network-config-controller-cloud-credenti  arn:aws:iam::4540112244:role/<prefix>-openshift-cloud-network-config-controller-cloud-credenti  4.13     No
<prefix>-openshift-cluster-csi-drivers-ebs-cloud-credentials       arn:aws:iam::4540112244:role/<prefix>-openshift-cluster-csi-drivers-ebs-cloud-credentials       4.13     No
<prefix>-openshift-image-registry-installer-cloud-credentials      arn:aws:iam::4540112244:role/<prefix>-openshift-image-registry-installer-cloud-credentials      4.13     No
<prefix>-openshift-ingress-operator-cloud-credentials              arn:aws:iam::4540112244:role/<prefix>-openshift-ingress-operator-cloud-credentials              4.13     No
命令运行后,它会显示与 AWS 帐户关联的所有前缀,并记录与这个前缀关联的角色数量。如果您需要查看所有这些角色及其详情,请在详情提示符处输入"是",使这些角色以特定形式列出。
您可以使用客户提供的 KMS 密钥在 AWS 集群上创建 Red Hat OpenShift Service,用于加密节点根卷、etcd 数据库或两者。可以为每个选项提供不同的 KMS 密钥 ARN。
Red Hat OpenShift Service on AWS 不会自动配置 默认存储类 来使用客户提供的 KMS 密钥加密持久性卷。这是可在安装后配置在集群内的一些内容。
流程
运行以下命令,创建自定义 AWS 客户管理的 KMS 密钥:
$ KMS_ARN=$(aws kms create-key --region $AWS_REGION --description 'Custom ROSA Encryption Key' --tags TagKey=red-hat,TagValue=true --query KeyMetadata.Arn --output text)这个命令保存此自定义密钥的 Amazon 资源名称(ARN)输出以进一步的步骤。
注意客户必须提供客户 KMS 密钥所需的标签
TagKey=red-hat,TagValue=true参数。运行以下命令验证 KMS 密钥是否已创建:
$ echo $KMS_ARN将 AWS 帐户 ID 设置为环境变量。
$ AWS_ACCOUNT_ID=<aws_account_id>将上一步中创建的 account-wide installer 角色和 operator 角色的 ARN 添加到该文件的
Statement.Principal.AWS部分。在以下示例中,添加了默认的ManagedOpenShift-HCP-ROSA-Installer-Role角色的 ARN:{ "Version": "2012-10-17", "Id": "key-rosa-policy-1", "Statement": [ { "Sid": "Enable IAM User Permissions", "Effect": "Allow", "Principal": { "AWS": "arn:aws:iam::${AWS_ACCOUNT_ID}:root" }, "Action": "kms:*", "Resource": "*" }, { "Sid": "Installer Permissions", "Effect": "Allow", "Principal": { "AWS": "arn:aws:iam::${AWS_ACCOUNT_ID}:role/ManagedOpenShift-HCP-ROSA-Installer-Role" }, "Action": [ "kms:CreateGrant", "kms:DescribeKey", "kms:GenerateDataKeyWithoutPlaintext" ], "Resource": "*" }, { "Sid": "ROSA KubeControllerManager Permissions", "Effect": "Allow", "Principal": { "AWS": "arn:aws:iam::${AWS_ACCOUNT_ID}:role/<operator_role_prefix>-kube-system-kube-controller-manager" }, "Action": "kms:DescribeKey", "Resource": "*" }, { "Sid": "ROSA KMS Provider Permissions", "Effect": "Allow", "Principal": { "AWS": "arn:aws:iam::${AWS_ACCOUNT_ID}:role/<operator_role_prefix>-kube-system-kms-provider" }, "Action": [ "kms:Encrypt", "kms:Decrypt", "kms:DescribeKey" ], "Resource": "*" }, { "Sid": "ROSA NodeManager Permissions", "Effect": "Allow", "Principal": { "AWS": "arn:aws:iam::${AWS_ACCOUNT_ID}:role/<operator_role_prefix>-kube-system-capa-controller-manager" }, "Action": [ "kms:DescribeKey", "kms:GenerateDataKeyWithoutPlaintext", "kms:CreateGrant" ], "Resource": "*" } ] }运行以下命令确认创建的策略文件详情:
$ cat rosa-key-policy.json运行以下命令,将新生成的密钥策略应用到自定义 KMS 密钥:
$ aws kms put-key-policy --key-id $KMS_ARN \
--policy file://rosa-key-policy.json \
--policy-name default
运行以下命令来创建集群:
注意如果集群名称超过 15 个字符,它将包含自动生成的域前缀,作为您置备的集群
的子域前缀。要自定义子域,请使用 the
-domain-prefix标志。域前缀不能超过 15 个字符,必须是唯一的,且在集群创建后无法更改。$ rosa create cluster --cluster-name <cluster_name> \ --subnet-ids <private_subnet_id>,<public_subnet_id> \ --sts \ --mode auto \ --machine-cidr 10.0.0.0/16 \ --compute-machine-type m5.xlarge \ --hosted-cp \ --region <aws_region> \ --oidc-config-id $OIDC_ID \ --kms-key-arn $KMS_ARN \1 --etcd-encryption-kms-arn $KMS_ARN \2 --operator-roles-prefix $OPERATOR_ROLES_PREFIX
验证
您可以使用 OpenShift Cluster Manager 验证 KMS 密钥是否正常工作。
- 导航到 OpenShift Cluster Manager,再选择 Instances。
- 选择您的实例。
- 点 Storage 选项卡。
- 复制 KMS 密钥 ID。
- 搜索并选择 密钥管理服务。
- 在 Filter 字段中输入您复制的 KMS 密钥 ID。
第 5 章 为 Red Hat OpenShift Service on AWS 集群配置共享 VPC
您可以在共享、集中管理的 AWS 虚拟私有云(VPC)中创建 Red Hat OpenShift Service on AWS 集群。
不支持将新的 Red Hat OpenShift Service on AWS 集群安装到 VPC 中,它由安装程序为不同的集群自动创建。
- 此过程需要 两个属于同一 AWS 机构的独立 AWS 帐户。一个帐户作为 VPC-owning AWS 帐户(VPC Owner),另一个帐户在集群创建 AWS 帐户(Cluster Creator)中创建集群。
- 在共享 VPC 上安装集群只支持 OpenShift 4.17.9 及更新的版本。

:可在集中管理的 VPC 帐户或部署集群的工作负载帐户中创建托管区。
仅支持特定的 cluster-to-VPC 关系。不支持单个 VPC 中的多个 Red Hat OpenShift Service on AWS 集群。如需更多信息,请参阅 单个 VPC 中的多个 Red Hat OpenShift Service on AWS 集群
VPC Owner的先决条件
- 您有一个具有适当权限的 AWS 帐户,以创建角色和共享资源。
- 您从机构的管理帐户 中启用了资源共享。
- 您可以访问 AWS 控制台或 AWS 命令行界面(CLI)等 AWS 入口点。https://signin.aws.amazon.com
集群创建器的先决条件
-
已安装 ROSA CLI (
rosa) 1.2.49 或更高版本。 - 已创建用于创建集群所需的所有 Red Hat OpenShift Service on AWS 帐户角色。
- Cluster Creator 的 AWS 帐户与 VPC Owner 的 AWS 帐户分开。
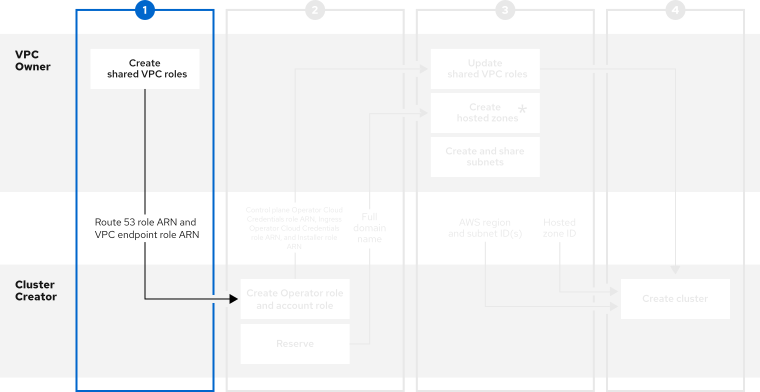
5.1. 第 1 步 - VPC 所有者:将 VPC 配置为在您的 AWS 机构中共享
您可以在 VPC 中与 AWS 机构中另一个 AWS 帐户共享子网。
流程
- 在 AWS 控制台的 VPC 部分中 根据您的规格创建或修改 VPC。确保您已选择正确的区域。
创建
Route 53 角色。注意您必须在计划创建 Amazon
Route 53 托管区(在第 3 步中创建的)中创建 Route 53 角色。例如,如果要在集中管理的 VPC 帐户中创建托管区,您必须在 VPC Owner帐户中创建 Route 53 角色。如果要在工作负载帐户中创建托管区,您必须在 Cluster Creator帐户中创建 Route 53 角色。创建自定义信任策略文件,该文件授予假定角色的权限:
$ cat <<EOF > /tmp/route53-role.json
{
    "Version": "2012-10-17",
    "Statement": [
        {
            "Effect": "Allow",
            "Principal": {
                "AWS": "arn:aws:iam::<Account-ID>:root"
1 }, "Action": "sts:AssumeRole" } ] } EOF- 1
- 信任策略主体可以限定到 ingress Operator 角色和安装程序帐户角色,而不是
root。
为 AWS 受管策略
ROSASharedVPCRoute53Policy创建 IAM 角色。$ aws iam create-role --role-name <role_name> \1 --assume-role-policy-document file:///tmp/route53-role.json- 1
- 将 < role_name > 替换为您要创建的角色的名称。
附加 AWS 受管策略
ROSASharedVPCRoute53Policy,以允许必要的共享 VPC 权限。$ aws iam attach-role-policy --role-name <role_name> \1 --policy-arn arn:aws:iam::aws:policy/ROSASharedVPCRoute53Policy- 1
- 将 <role_name > 替换为您创建的角色的名称。
创建
VPC 端点角色。创建自定义信任策略文件,该文件授予假定角色的权限:
$ cat <<EOF > /tmp/shared-vpc-role.json
{
    "Version": "2012-10-17",
    "Statement": [
        {
            "Effect": "Allow",
            "Principal": {
                "AWS": "arn:aws:iam::<Account-ID>:root"
1 }, "Action": "sts:AssumeRole" } ] } EOF- 1
- 信任策略主体可以限定到 ingress Operator 角色和安装程序帐户角色,而不是
root。
为 AWS 受管策略
ROSASharedVPCEndpointPolicy创建 IAM 角色:$ aws iam create-role --role-name <role_name> \1 --assume-role-policy-document file:///tmp/vpce-role.json- 1
- 将 < role_name > 替换为您要创建的角色的名称。
附加 AWS 受管策略
ROSASharedVPCEndpointPolicy,以允许必要的共享 VPC 权限。$ aws iam attach-role-policy --role-name <role_name> \1 --policy-arn arn:aws:iam::aws:policy/ROSASharedVPCEndpointPolicy- 1
- 将 <role_name > 替换为您创建的角色的名称。
-
为 Cluster Creator 提供
Route 53ARN 来继续配置。角色ARN 和 VPC 端点角色
5.2. 步骤 2 - 集群 Creator :保留 DNS 条目并创建集群 Operator 角色
VPC Owner 创建虚拟私有云(VPC)、子网和用于共享 VPC 资源的 IAM 角色后,保留 openshiftapps.com DNS 域并创建 Operator 角色,以传回 VPC Owner。
对于共享 VPC 集群,您可以选择在集群创建步骤后创建 Operator 角色。集群将处于等待状态,直到 Ingress Operator 角色 ARN 添加到共享 VPC 角色可信关系中。

先决条件
-
您有 VPC Owner 中的 IAM 角色的
Route 53 角色ARN。 -
您有
VPC Owner中的 IAM 角色的 VPC 端点角色 ARN。
流程
使用以下命令保留
openshiftapps.comDNS 域:$ rosa create dns-domain --hosted-cp命令创建保留的
openshiftapps.comDNS 域。I: DNS domain '14eo.p3.openshiftapps.com' has been created. I: To view all DNS domains, run 'rosa list dns-domains'创建 OIDC 配置。
有关 OIDC 配置流程的更多信息,请参阅这篇文章。以下命令生成您需要的 OIDC 配置 ID:
$ rosa create oidc-config您收到确认命令创建了 OIDC 配置:
I: To create Operator Roles for this OIDC Configuration, run the following command and remember to replace <user-defined> with a prefix of your choice:
	rosa create operator-roles --prefix <user-defined> --oidc-config-id 25tu67hq45rto1am3slpf5lq6jargg
运行以下命令来创建帐户角色:
$ rosa create account-roles
    --route53-role-arn <Created_Route_53_Role_Arn>
1 --vpc-endpoint-role-arn <Created_VPC_Endpoint_Role_Arn>2 --prefix <user_defined_account_role_prefix>3 --hosted-cp运行以下命令来创建 Operator 角色:
$ rosa create operator-roles --oidc-config-id <oidc-config-ID>1 --installer-role-arn <Installer_Role>2 --route53-role-arn <Created_Route_53_Role_Arn>3 --vpc-endpoint-role-arn <Created_VPC_Endpoint_Role_Arn>4 --prefix <operator-prefix>5 --hosted-cp注意安装程序帐户角色和共享 VPC 角色必须具有一对一的关系。如果要创建多个共享 VPC 角色,您应该为每个共享 VPC 角色创建一个帐户角色。
创建 Operator 角色后,共享 Ingress Operator Cloud Credentials 角色的 ARN、安装程序 角色的 ARN,以及您的 Control plane Operator Cloud Credentials 角色与 VPC Owner 的 ARN 来继续配置。
共享信息类似这些示例:
-
my-rosa-cluster.14eo.p1.openshiftapps.com -
arn:aws:iam::111122223333:role/ManagedOpenShift-Installer-Role -
arn:aws:iam::111122223333:role/my-rosa-cluster-openshift-ingress-operator-cloud-credentials -
arn:aws:iam::111122223333:role/my-rosa-cluster-control-plane-operator
-
5.3. 步骤三 - VPC Owner:更新共享 VPC 角色并创建托管区
Cluster Creator 提供 DNS 域和 IAM 角色后,创建两个托管区,并更新为共享 VPC 创建的 IAM 角色上的信任策略。
托管区可以在集中管理的 VPC 帐户或工作负载帐户中创建。
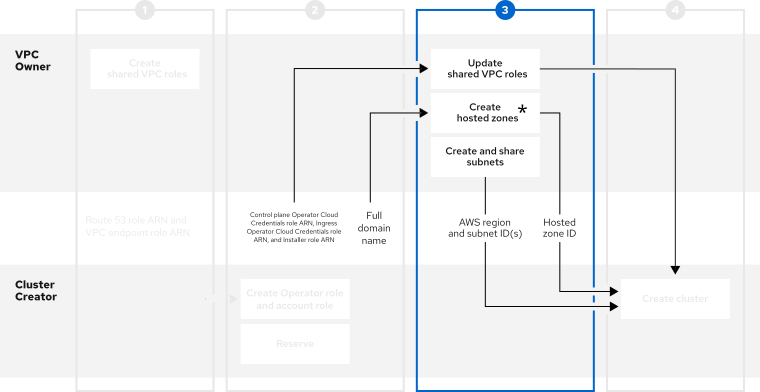
:可在集中管理的 VPC 帐户或部署集群的工作负载帐户中创建托管区。
先决条件
- 您有 Cluster Creator 的完整域名。
- 您有来自 Cluster Creator 的 Ingress Operator Cloud Credentials 角色 ARN。
- 您有 Cluster Creator 中的 安装程序 角色 ARN。
- 您有来自 Cluster Creator 的 Control plane Operator Cloud Credentials 角色 ARN。
如果集群名称超过 15 个字符,它将包含自动生成的域前缀,作为您置备的集群 的子域 前缀。
要自定义子域,请使用 the -domain-prefix 标志。域前缀不能超过 15 个字符,必须是唯一的,且在集群创建后无法更改。
流程
- 在 AWS 控制台的 Resource Access Manager 中,创建一个资源共享,该资源共享之前创建的 VPC 的公共和专用子网与 Cluster Creator 的 AWS 帐户 ID。
更新
Route 53 角色,并将 Installer 和 Ingress Operator Cloud Credentials 角色添加到信任策略的 principal 部分。{ "Version": "2012-10-17", "Statement": [ { "Sid": "Statement1", "Effect": "Allow", "Principal": { "AWS": [ "arn:aws:iam::<Cluster-Creator's-AWS-Account-ID>:role/<prefix>-ingress-operator-cloud-credentials", "arn:aws:iam::<Cluster-Creator's-AWS-Account-ID>:role/<prefix>-hcp-Installer-Role", "arn:aws:iam::<Cluster-Creator's-AWS-Account-ID>:role/<prefix>-control-plane-operator-cloud-credentials" ] }, "Action": "sts:AssumeRole" } ] }更新
VPC 端点角色,并将 Installer 和 Ingress Operator Cloud Credentials 角色添加到信任策略的 principal 部分。{ "Version": "2012-10-17", "Statement": [ { "Sid": "Statement1", "Effect": "Allow", "Principal": { "AWS": [ "arn:aws:iam::<Cluster-Creator's-AWS-Account-ID>:role/<prefix>-hcp-Installer-Role", "arn:aws:iam::<Cluster-Creator's-AWS-Account-ID>:role/<prefix>-control-plane-operator-cloud-credentials" ] }, "Action": "sts:AssumeRole" } ] }-
在 AWS 控制台的 Route 53 部分中 创建一个私有托管区。在托管区配置中,域名是
rosa.<cluster-name>.<base-domain>。私有托管区必须与网络所有者的 VPC 关联。 -
在 AWS 控制台的 Route 53 部分中 创建一个本地托管区。在托管区配置中,域名是 <
cluster-name>.hypershift.local。本地托管区必须与网络所有者的 VPC 关联。 创建托管区并与网络所有者的 VPC 关联后,为 Cluster Creator 提供以下内容以继续配置:
- 托管区 ID
- AWS 区域
- 子网 ID
5.4. 步骤四 - 集群 Creator: 在共享 VPC 中创建集群
要在共享 VPC 中创建集群,请完成以下步骤。
在共享 VPC 上安装集群只支持 OpenShift 4.17.9 及更新的版本。

先决条件
- 您有来自 VPC Owner 的托管区 ID。
- 您有 VPC Owner 中的 AWS 区域。
- 您有 VPC Owner 中的子网 ID。
-
您有 VPC Owner
中的 Route 53 角色ARN。 -
您有
VPC Owner中的 VPC 端点角色 ARN。
流程
在终端中,输入以下命令来创建共享 VPC:
$ rosa create cluster --cluster-name <cluster_name> --sts --operator-roles-prefix <prefix> --oidc-config-id <oidc_config_id> --region us-east-1 --subnet-ids <subnet_ids> --hcp-internal-communication-hosted-zone-id <local_hosted_zone_ID> --ingress-private-hosted-zone-id <private_hosted_zone_ID> --route53-role-arn <route_53_role_arn> vpc-endpoint-role-arn <vpc_endpoint_role_arn> --base-domain <dns-domain> --additional-allowed-principals <route53-role-arn>,<vpc-endpoint-role-arn> --hosted-cp
第 6 章 在 Red Hat OpenShift Service on AWS 上创建私有集群
对于不需要公共互联网访问的 Red Hat OpenShift Service on AWS 工作负载,您可以创建一个私有集群。
6.1. 使用 ROSA CLI 在 AWS 集群上创建私有 Red Hat OpenShift Service
您可以使用 ROSA 命令行界面(CLI)在 AWS 上创建具有多个可用区(Multi-AZ)的私有集群。
先决条件
- 您有可用的 AWS 服务配额。
- 您已在 AWS 控制台中启用了 Red Hat OpenShift Service on AWS。
- 您已在安装主机上安装和配置了 ROSA CLI 的最新版本。
流程
使用托管 control plane 创建集群可能需要大约 10 分钟。
创建带有至少一个专用子网的 VPC。确保您的机器的无类别域间路由(CIDR)与您的虚拟私有云的 CIDR 匹配。如需更多信息,请参阅 使用您自己的 VPC 和 VPC 验证 的要求。
重要如果使用防火墙,您必须进行配置,以便 ROSA 可以访问正常工作所需的站点。
如需更多信息,请参阅"AWS PrivateLink 防火墙先决条件"部分。
运行以下命令来创建集群范围的 IAM 角色:
$ rosa create account-roles --hosted-cp运行以下命令来创建 OIDC 配置:
$ rosa create oidc-config --mode=auto --yes保存 OIDC 配置 ID,因为您需要它来创建 Operator 角色。
输出示例
I: Setting up managed OIDC configuration
I: To create Operator Roles for this OIDC Configuration, run the following command and remember to replace <user-defined> with a prefix of your choice:
	rosa create operator-roles --prefix <user-defined> --oidc-config-id 28s4avcdt2l318r1jbk3ifmimkurk384
If you are going to create a Hosted Control Plane cluster please include '--hosted-cp'
I: Creating OIDC provider using 'arn:aws:iam::46545644412:user/user'
I: Created OIDC provider with ARN 'arn:aws:iam::46545644412:oidc-provider/oidc.op1.openshiftapps.com/28s4avcdt2l318r1jbk3ifmimkurk384'
运行以下命令来创建 Operator 角色:
$ rosa create operator-roles --hosted-cp --prefix <operator_roles_prefix> --oidc-config-id <oidc_config_id> --installer-role-arn arn:aws:iam::$<account_roles_prefix>:role/$<account_roles_prefix>-HCP-ROSA-Installer-Role运行以下命令,在 AWS 集群上创建私有 Red Hat OpenShift Service:
$ rosa create cluster --private --cluster-name=<cluster-name> --sts --mode=auto --hosted-cp --operator-roles-prefix <operator_role_prefix> --oidc-config-id <oidc_config_id> [--machine-cidr=<VPC CIDR>/16] --subnet-ids=<private-subnet-id1>[,<private-subnet-id2>,<private-subnet-id3>]输入以下命令检查集群的状态。在集群创建过程中,输出中的
State字段将从pending转变为安装,最后变为ready。$ rosa describe cluster --cluster=<cluster_name>注意如果安装失败,或者
State字段在 10 分钟后没有变为ready,请参阅附加资源部分中的 "Troubleshooting Red Hat OpenShift Service on AWS installation" 文档。输入以下命令跟踪 OpenShift 安装程序日志以跟踪集群进度:
$ rosa logs install --cluster=<cluster_name> --watch
6.2. 在 AWS PrivateLink 端点中添加额外的 AWS 安全组
在 AWS 集群上,AWS PrivateLink 端点在主机的 Virtual Private Cloud (VPC)中公开的 AWS PrivateLink 端点有一个安全组,限制对来自集群 Machine CIDR 范围内的请求的访问。您必须创建并附加另一个安全组到 PrivateLink 端点,以便通过 VPC 对等、传输网关或其他网络连接向 VPC 之外的实体授予访问权限。
在 AWS PrivateLink 端点中添加额外的 AWS 安全组,仅适用于 Red Hat OpenShift Service on AWS 4.17.2 及更新的版本。
先决条件
- 您的企业网络或其他 VPC 具有连接。
- 您有在 VPC 中创建和附加安全组的权限。
流程
运行以下命令,将集群名称设置为环境变量:
$ export CLUSTER_NAME=<cluster_name>运行以下命令验证变量是否存在:
$ echo $CLUSTER_NAME输出示例
hcp-private运行以下命令,查找 VPC 端点(VPCE) ID 和 VPC ID:
$ read -r VPCE_ID VPC_ID <<< $(aws ec2 describe-vpc-endpoints --filters "Name=tag:api.openshift.com/id,Values=$(rosa describe cluster -c ${CLUSTER_NAME} -o yaml | grep '^id: ' | cut -d' ' -f2)" --query 'VpcEndpoints[].[VpcEndpointId,VpcId]' --output text)警告不支持修改或删除默认的 AWS PrivateLink 端点安全组,可能会导致意外行为。
运行以下命令来创建额外的安全组:
$ export SG_ID=$(aws ec2 create-security-group --description "Granting API access to ${CLUSTER_NAME} from outside of VPC" --group-name "${CLUSTER_NAME}-api-sg" --vpc-id $VPC_ID --output text)运行以下命令,在安全组中添加入站(入口)规则:
$ aws ec2 authorize-security-group-ingress --group-id $SG_ID --ip-permissions FromPort=443,ToPort=443,IpProtocol=tcp,IpRanges=[{CidrIp=<cidr-to-allow>}] \1 - 1
- 指定要允许从中访问的 CIDR 块。
运行以下命令,将新安全组添加到 VPCE 中:
$ aws ec2 modify-vpc-endpoint --vpc-endpoint-id $VPCE_ID --add-security-group-ids $SG_ID
现在,您可以从指定的 CIDR 块访问 Red Hat OpenShift Service on AWS 私有集群的 API。
6.3. Red Hat OpenShift Service on AWS 集群上的额外主体
您可以允许 AWS Identity and Access Management (IAM)角色作为额外的主体来连接到集群的私有 API 服务器端点。
您可以从公共互联网或 VPC 专用子网中创建的接口端点访问 Red Hat OpenShift Service on AWS 集群的 API 服务器端点。默认情况下,您可以使用 -kube-system-kube-controller-manager Operator 角色私有访问 AWS API 服务器上的 Red Hat OpenShift Service。为了能够直接从另一个帐户访问 Red Hat OpenShift Service on AWS API 服务器,而无需使用安装集群的主帐户,您必须将跨帐户 IAM 角色作为额外主体包含。此功能允许您简化网络架构,并通过避免将跨帐户 VPC 附加到集群的 VPC 来降低数据传输成本。

在这个示意图中,集群创建帐户指定为 Account A。此帐户指定另一个帐户(Account B)应有权访问 API 服务器。
配置额外的允许主体后,您必须在 VPC 中创建接口 VPC 端点,其中您要访问跨帐户 Red Hat OpenShift Service on AWS API 服务器。然后,在 Route53 中创建私有托管区,以路由对跨帐户 Red Hat OpenShift Service on AWS API 服务器的调用,以便通过创建的 VPC 端点。
6.3.1. 在创建 Red Hat OpenShift Service on AWS 集群时添加额外的主体
使用 --additional-allowed-principals 参数允许通过其他角色访问。
流程
在
rosa create cluster命令中添加--additional-allowed-principals参数,如下所示:$ rosa create cluster [...] --additional-allowed-principals <arn_string>您可以使用
arn:aws:iam::account_id:role/role_name批准特定角色。当集群创建命令运行时,您会收到指定了
--additional-allowed-principals的集群摘要:输出示例
Name:                       mycluster
Domain Prefix:              mycluster
Display Name:               mycluster
ID:                         <cluster-id>
External ID:                <cluster-id>
Control Plane:              ROSA Service Hosted
OpenShift Version:          4.15.17
Channel Group:              stable
DNS:                        Not ready
AWS Account:                <aws_id>
AWS Billing Account:        <aws_id>
API URL:
Console URL:
Region:                     us-east-2
Availability:
 - Control Plane:           MultiAZ
 - Data Plane:              SingleAZ

Nodes:
 - Compute (desired):       2
 - Compute (current):       0
Network:
 - Type:                    OVNKubernetes
 - Service CIDR:            172.30.0.0/16
 - Machine CIDR:            10.0.0.0/16
 - Pod CIDR:                10.128.0.0/14
 - Host Prefix:             /23
 - Subnets:                 subnet-453e99d40, subnet-666847ce827
EC2 Metadata Http Tokens:   optional
Role (STS) ARN:             arn:aws:iam::<aws_id>:role/mycluster-HCP-ROSA-Installer-Role
Support Role ARN:           arn:aws:iam::<aws_id>:role/mycluster-HCP-ROSA-Support-Role
Instance IAM Roles:
 - Worker:                  arn:aws:iam::<aws_id>:role/mycluster-HCP-ROSA-Worker-Role
Operator IAM Roles:
 - arn:aws:iam::<aws_id>:role/mycluster-kube-system-control-plane-operator
 - arn:aws:iam::<aws_id>:role/mycluster-openshift-cloud-network-config-controller-cloud-creden
 - arn:aws:iam::<aws_id>:role/mycluster-openshift-image-registry-installer-cloud-credentials
 - arn:aws:iam::<aws_id>:role/mycluster-openshift-ingress-operator-cloud-credentials
 - arn:aws:iam::<aws_id>:role/mycluster-openshift-cluster-csi-drivers-ebs-cloud-credentials
 - arn:aws:iam::<aws_id>:role/mycluster-kube-system-kms-provider
 - arn:aws:iam::<aws_id>:role/mycluster-kube-system-kube-controller-manager
 - arn:aws:iam::<aws_id>:role/mycluster-kube-system-capa-controller-manager
Managed Policies:           Yes
State:                      waiting (Waiting for user action)
Private:                    No
Delete Protection:          Disabled
Created:                    Jun 25 2024 13:36:37 UTC
User Workload Monitoring:   Enabled
Details Page:               https://console.redhat.com/openshift/details/s/Bvbok4O79q1Vg8
OIDC Endpoint URL:          https://oidc.op1.openshiftapps.com/vhufi5lap6vbl3jlq20e (Managed)
Audit Log Forwarding:       Disabled
External Authentication:    Disabled
Additional Principals:      arn:aws:iam::<aws_id>:role/additional-user-role
6.3.2. 在现有 Red Hat OpenShift Service on AWS 集群中添加额外的主体
您可以使用命令行界面(CLI)在集群中添加额外的主体。
流程
运行以下命令来编辑集群,并添加可以访问此集群端点的额外主体:
$ rosa edit cluster -c <cluster_name> --additional-allowed-principals <arn_string>您可以使用
arn:aws:iam::account_id:role/role_name批准特定角色。
6.4. 后续步骤
第 7 章 在带有出口零的 AWS 集群上创建 Red Hat OpenShift Service
在带有出口零的 AWS 上创建 Red Hat OpenShift Service 提供了一种方式,允许集群在本地区域中使用镜像 registry (如果集群无法访问互联网)来增强集群的稳定性和安全性。您的集群首先尝试从 Quay 拉取镜像,当它们没有达到时,它会从本地区域的镜像 registry 中拉取镜像。
具有出口零的所有公共和私有集群从集群本地区域的 Amazon Elastic Container Registry (ECR)获取红帽容器镜像,而不是从互联网上的不同端点和 registry 收集这些镜像。ECR 为 OpenShift 发行镜像和 Red Hat Operator 提供存储。所有对 ECR 的请求都会保存在 AWS 网络中,方法是通过集群中的 VPC 端点提供它们。
带有出口零的 Red Hat OpenShift Service on AWS 集群使用 AWS ECR 来置备集群,而无需公共互联网。因为所需的集群生命周期进程在 AWS 专用网络上发生,所以 AWS ECR 充当核心集群平台镜像的关键服务。如需有关 AWS ECR 的更多信息,请参阅 Amazon Elastic Container Registry。
您可以通过配置虚拟私有云(VPC)并在创建集群时使用- properties zero_egress:true 标志来创建不需要公共出口的完整集群。
请参阅升级 Red Hat OpenShift Service on AWS 集群 以使用出口零升级集群。
在受限网络环境中创建的集群可能无法在 AWS 上使用某些 Red Hat OpenShift Service,包括 {red-hat-lightspeed} 和 Telemetry。这些集群还可能会因为需要公共访问 registry 的工作负载(如 quay.io )遇到潜在的故障。当使用以出口零安装的集群时,您还可以从软件目录中安装红帽拥有的 Operator。有关红帽拥有的 Operator 的完整列表,请参阅 红帽生态系统目录。对于任何使用出口零安装的 Operator,只有默认 Operator 频道才会被镜像。
7.1. 网络环境术语表
虽然它在 Red Hat OpenShift Service on AWS 文档中使用,但 断开连接的环境 是一个广泛的术语,但可以引用具有不同互联网连接的环境。对于一个特定级别的互联网连接,有时可能会使用其他术语来代表,这些环境可能需要额外的、特殊的配置。这些网络类型与可完全访问互联网的"标准网络"不同。
下表描述了用于引用没有完全互联网连接的环境的不同术语:
| 术语 | 描述 |
|---|---|
| Air-gapped 网络 | 完全与外部网络隔离的环境或网络。 这种隔离取决于内部网络上的机器和外部网络的任何部分之间的物理分离或"空缺"。air-gapped 环境通常用于具有严格安全或监管要求的行业。 |
| 断开连接的环境 | 在一定级别上与外部网络隔离的环境或网络。 这种隔离可以通过在内部网络和外部网络上的计算机之间进行物理或逻辑分离来实现。无论与外部网络的隔离级别,在断开连接的环境中的集群都无法访问由红帽托管的公共服务,需要额外的设置来维护完整的集群功能。 |
| Restricted network | 与外部网络有限连接的环境或网络。 物理网络和外部网络上的机器之间可能存在物理连接,但网络流量会被其他配置的限制,如防火墙和代理。 |
先决条件
- 您有一个有足够权限的 AWS 帐户来创建 VPC、子网和其他所需的基础架构。
- 已安装 Terraform v1.4.0+ CLI。
- 已安装 ROSA v1.2.45+ CLI。
- 已使用所需凭证安装和配置 AWS CLI。
- 已安装 git CLI。
- 您已启用了必要的 ROSA CLI 防火墙规则和 Red Hat Hybrid Cloud Console 防火墙规则。
- 您可以在所有使用托管的 control plane 架构的 Red Hat OpenShift Service on AWS 上使用出口零;但是,红帽建议为每个 OpenShift Container Platform 版本使用最新的可用 z-stream 版本。
- 虽然您可以像常规集群一样安装和升级集群,但由于内部镜像 registry 在断开连接的环境中如何运作,但使用出口 0 的集群将无法完全使用所有平台组件,如镜像 registry。您可以在升级或安装集群时使用最新的 ROSA 版本恢复这些功能。
7.2. 设置环境变量
设置以下环境变量以简化资源创建。
流程
运行以下命令来设置环境变量:
$ export <variable_name>=<variable_value>您可以运行以下命令来确认您的变量已设置:
$ echo <variable_name>Expand 表 7.2. 为断开连接的 Red Hat OpenShift Service on AWS 集群推荐的变量 变量名称 变量值 注 AWS_ACCOUNT_ID$(AWS sts get-caller-identity --query Account --output text)您必须使用
rosa 登录登录到 AWS 帐户。CLUSTER_NAME您要集群的名称。
集群名称不能超过 26 个字符。
OIDC_IDOpenID Connect (OIDC)配置的 32 位 ID。
您可以通过运行
rosa create oidc-config来生成此 ID。OPERATOR_ROLES_PREFIXOperator 角色前缀。
如果要使 AWS 帐户角色使用与 Operator 角色相同的前缀,您可以在设置 Operator 角色前缀变量后运行
ACCOUNT_ROLES_PREFIX=$OPERATOR_ROLES_PREFIX。PRIVATE_SUBNET专用子网的 ID。
您必须将这个值包含在引号(")中,并使用逗号分隔子网 ID。
REGION您的 AWS 区域。
-
SUBNET_IDS所有子网的 ID。
您必须将这个值包含在引号(")中,并使用逗号分隔子网 ID。
7.3. 为 Red Hat OpenShift Service on AWS 集群创建虚拟私有云
您必须具有 Virtual Private Cloud (VPC)才能在 AWS 集群上创建 Red Hat OpenShift Service。要通过 VPC 端点从本地 ECR 镜像拉取镜像,您必须配置 privatelink 服务连接,并使用特定标签修改默认安全组。使用以下方法之一创建 VPC:
- 使用 ROSA 命令行界面(CLI)创建 VPC
- 使用 Terraform 模板创建 VPC
- 使用 AWS CLI 创建 VPC
- 在 AWS 控制台中手动创建 VPC 资源
7.3.1. 使用 ROSA CLI 创建 AWS VPC
rosa create network 命令在 ROSA CLI 的 v.1.2.48 或更高版本中提供。命令使用 AWS CloudFormation 创建 VPC 以及在 AWS 集群上安装 Red Hat OpenShift Service 所需的相关网络组件。CloudFormation 是一个原生 AWS 基础架构即代码工具,与 AWS CLI 兼容。
如果没有指定模板,CloudFormation 将使用以下参数来创建资源的默认模板:
| VPC 参数 | value |
|---|---|
| 可用区 | 1 |
| 区域 |
|
| VPC CIDR |
|
您可以创建和自定义 CloudFormation 模板,以用于 rosa create network 命令。如需有关默认 VPC 模板的信息,请参阅本节的其他资源。
先决条件
- 您已配置了 AWS 帐户
- 您已配置了您的红帽帐户
- 已安装 ROSA CLI 并将其配置为最新版本
验证
完成后,您会收到创建的资源概述:
INFO[0140] Resources created in stack:
INFO[0140] Resource: AttachGateway, Type: AWS::EC2::VPCGatewayAttachment, ID: <gateway_id>
INFO[0140] Resource: EC2VPCEndpoint, Type: AWS::EC2::VPCEndpoint, ID: <vpce_id>
INFO[0140] Resource: EcrApiVPCEndpoint, Type: AWS::EC2::VPCEndpoint, ID: <vpce_id>
INFO[0140] Resource: EcrDkrVPCEndpoint, Type: AWS::EC2::VPCEndpoint, ID: <vpce_id>
INFO[0140] Resource: ElasticIP1, Type: AWS::EC2::EIP, ID: <IP>
INFO[0140] Resource: ElasticIP2, Type: AWS::EC2::EIP, ID: <IP>
INFO[0140] Resource: InternetGateway, Type: AWS::EC2::InternetGateway, ID: igw-016e1a71b9812464e
INFO[0140] Resource: KMSVPCEndpoint, Type: AWS::EC2::VPCEndpoint, ID: <vpce_id>
INFO[0140] Resource: NATGateway1, Type: AWS::EC2::NatGateway, ID: <nat-gateway_id>
INFO[0140] Resource: PrivateRoute, Type: AWS::EC2::Route, ID: <route_id>
INFO[0140] Resource: PrivateRouteTable, Type: AWS::EC2::RouteTable, ID: <route_id>
INFO[0140] Resource: PrivateSubnetRouteTableAssociation1, Type: AWS::EC2::SubnetRouteTableAssociation, ID: <route_id>
INFO[0140] Resource: PublicRoute, Type: AWS::EC2::Route, ID: <route_id>
INFO[0140] Resource: PublicRouteTable, Type: AWS::EC2::RouteTable, ID: <route_id>
INFO[0140] Resource: PublicSubnetRouteTableAssociation1, Type: AWS::EC2::SubnetRouteTableAssociation, ID: <route_id>
INFO[0140] Resource: S3VPCEndpoint, Type: AWS::EC2::VPCEndpoint, ID: <vpce_id>
INFO[0140] Resource: STSVPCEndpoint, Type: AWS::EC2::VPCEndpoint, ID: <vpce_id>
INFO[0140] Resource: SecurityGroup, Type: AWS::EC2::SecurityGroup, ID: <security-group_id>
INFO[0140] Resource: SubnetPrivate1, Type: AWS::EC2::Subnet, ID: <private_subnet_id-1> \
1 INFO[0140] Resource: SubnetPublic1, Type: AWS::EC2::Subnet, ID: <public_subnet_id-1> \2 INFO[0140] Resource: VPC, Type: AWS::EC2::VPC, ID: <vpc_id> INFO[0140] Stack rosa-network-stack-5555 created \3
7.3.1.1. 标记子网
在使用 VPC 创建 Red Hat OpenShift Service on AWS 集群前,您必须标记 VPC 子网。自动服务 preflight 检查验证这些资源是否已正确标记。下表显示了如何标记您的资源:
| 资源 | 键 | value |
|---|---|---|
| 公共子网 |
|
|
| 专用子网 |
|
|
如果需要,您必须至少标记一个专用子网和一个公共子网。
在终端中标记您的资源:
对于公共子网,运行以下命令:
$ aws ec2 create-tags --resources <public_subnet_id> --region <aws_region> --tags Key=kubernetes.io/role/elb,Value=1对于专用子网,运行以下命令:
$ aws ec2 create-tags --resources <private_subnet_id> --region <aws_region> --tags Key=kubernetes.io/role/internal-elb,Value=1
验证
运行以下命令验证标签是否正确:
$ aws ec2 describe-tags --filters "Name=resource-id,Values=<subnet_id>"输出示例
TAGS    Name                    <subnet_id>        subnet  <prefix>-subnet-public1-us-east-1a
TAGS    kubernetes.io/role/elb  <subnet_id>        subnet  1
7.3.2. 使用 Terraform 创建虚拟私有云
Terraform 是一个工具,可让您使用已建立的模板创建各种资源。以下流程根据需要使用默认选项在 AWS 集群上创建 Red Hat OpenShift Service。有关使用 Terraform 的更多信息,请参阅其他资源。
Terraform 指令用于测试和演示目的。您自己的安装需要对 VPC 的一些修改才能自行使用。您还应确保使用此 Terraform 脚本时,它位于您要安装集群的同一区域。这些示例使用 us-east-2。
先决条件
- 您已在机器上安装 Terraform 版本 1.4.0 或更新版本。
- 您已在机器上安装了 Git。
流程
运行以下命令,打开 shell 提示符并克隆 Terraform VPC 存储库:
$ git clone https://github.com/openshift-cs/terraform-vpc-example运行以下命令来进入创建的目录:
$ cd terraform-vpc-example/zero-egress运行以下命令来启动 Terraform 文件:
$ terraform init在此过程完成后会显示确认初始化的消息。
要根据现有的 Terraform 模板构建 VPC Terraform 计划,请运行
plan命令。您必须包含 AWS 区域、可用区、CIDR 块和专用子网。您可以选择指定集群名称。terraform计划完成后,rosa-zero-egress.tfplan文件被添加到hypershift-tf目录中。有关更详细的选项,请参阅 Terraform VPC 存储库的 README 文件。$ terraform plan -out rosa-zero-egress.tfplan -var region=<aws_region> \1 -var 'availability_zones=["aws_region_1a","aws_region_1b","aws_region_1c"]'\2 -var vpc_cidr_block=10.0.0.0/16 \3 -var 'private_subnets=["10.0.0.0/24", "10.0.1.0/24", "10.0.2.0/24"]'4 运行以下命令应用此计划文件来构建 VPC:
$ terraform apply rosa-zero-egress.tfplan
7.3.2.1. 标记子网
在使用 VPC 创建 Red Hat OpenShift Service on AWS 集群前,您必须标记 VPC 子网。自动服务 preflight 检查验证这些资源是否已正确标记。下表显示了如何标记您的资源:
| 资源 | 键 | value |
|---|---|---|
| 公共子网 |
|
|
| 专用子网 |
|
|
如果需要,您必须至少标记一个专用子网和一个公共子网。
在终端中标记您的资源:
对于公共子网,运行以下命令:
$ aws ec2 create-tags --resources <public_subnet_id> --region <aws_region> --tags Key=kubernetes.io/role/elb,Value=1对于专用子网,运行以下命令:
$ aws ec2 create-tags --resources <private_subnet_id> --region <aws_region> --tags Key=kubernetes.io/role/internal-elb,Value=1
验证
运行以下命令验证标签是否正确:
$ aws ec2 describe-tags --filters "Name=resource-id,Values=<subnet_id>"输出示例
TAGS    Name                    <subnet_id>        subnet  <prefix>-subnet-public1-us-east-1a
TAGS    kubernetes.io/role/elb  <subnet_id>        subnet  1
7.3.3. 使用 AWS CLI 创建 VPC
您可以使用 AWS CLI 创建 VPC。有关使用此 CLI 的详情,请查看 AWS create-vpc 文档。
7.3.4. 手动创建 AWS Virtual Private Cloud
如果您选择手动创建 AWS Virtual Private Cloud (VPC)而不是使用 Terraform,请访问 AWS 控制台中的 VPC 页面。
您的 VPC 必须满足下表中显示的要求。
| 要求 | 详情 |
|---|---|
| VPC 名称 | 创建集群时,您需要具有特定的 VPC 名称和 ID。 |
| CIDR 范围 | 您的 VPC CIDR 范围应该与您的机器 CIDR 匹配。 |
| 可用区 | 您需要一个区域的可用区,并且需要三个用于多区的可用区。 |
| 公共子网 | 您必须有一个公共子网,其中包含公共集群的 NAT 网关。私有集群不需要公共子网。 |
| DNS 主机名和解析 | 您必须确保启用 DNS 主机名和解析。 |
7.3.4.1. 标记子网
在使用 VPC 创建 Red Hat OpenShift Service on AWS 集群前,您必须标记 VPC 子网。自动服务 preflight 检查验证这些资源是否已正确标记。下表显示了如何标记您的资源:
| 资源 | 键 | value |
|---|---|---|
| 公共子网 |
|
|
| 专用子网 |
|
|
如果需要,您必须至少标记一个专用子网和一个公共子网。
在终端中标记您的资源:
对于公共子网,运行以下命令:
$ aws ec2 create-tags --resources <public_subnet_id> --region <aws_region> --tags Key=kubernetes.io/role/elb,Value=1对于专用子网,运行以下命令:
$ aws ec2 create-tags --resources <private_subnet_id> --region <aws_region> --tags Key=kubernetes.io/role/internal-elb,Value=1
验证
运行以下命令验证标签是否正确:
$ aws ec2 describe-tags --filters "Name=resource-id,Values=<subnet_id>"输出示例
TAGS    Name                    <subnet_id>        subnet  <prefix>-subnet-public1-us-east-1a
TAGS    kubernetes.io/role/elb  <subnet_id>        subnet  1
7.4. 创建集群范围的 STS 角色和策略
在 AWS 集群上创建 Red Hat OpenShift Service 前,您必须创建所需的帐户范围的角色和策略。
Red Hat OpenShift Service on AWS 的特定 AWS 管理策略必须附加到每个角色。客户管理的策略不能与这些所需的帐户角色一起使用。有关 Red Hat OpenShift Service on AWS 集群的 AWS 管理策略的更多信息,请参阅 ROSA 的 AWS 受管策略。
先决条件
- 您已完成 Red Hat OpenShift Service on AWS 的 AWS 先决条件。
- 您有可用的 AWS 服务配额。
- 您已在 AWS 控制台中启用了 Red Hat OpenShift Service on AWS。
-
您已在安装主机上安装和配置了最新的 ROSA CLI (
rosa)。 - 已使用 ROSA CLI 登录您的红帽帐户。
流程
如果您的 AWS 帐户不存在它们,请创建所需的账户范围 STS 角色,并通过运行以下命令来附加策略:
$ rosa create account-roles --hosted-cp运行以下命令,确保 worker 角色具有正确的 AWS 策略:
$ aws iam attach-role-policy \
--role-name ManagedOpenShift-HCP-ROSA-Worker-Role \
--policy-arn "arn:aws:iam::aws:policy/AmazonEC2ContainerRegistryReadOnly"
--role-name ManagedOpenShift-HCP-ROSA-Worker-Role::This role 需要包含上一步中创建的前缀。可选:运行以下命令,将您的前缀设置为环境变量:
$ export ACCOUNT_ROLES_PREFIX=<account_role_prefix>运行以下命令,查看变量的值:
$ echo $ACCOUNT_ROLES_PREFIX例如:
ManagedOpenShift如需有关 AWS 上 Red Hat OpenShift Service 的 AWS 管理的 IAM 策略的更多信息,请参阅 ROSA 的 AWS 管理的 IAM 策略。
7.5. 创建 OpenID 连接配置
在 AWS 集群上创建 Red Hat OpenShift Service 时,您可以在创建集群前创建 OpenID Connect (OIDC)配置。此配置注册到 OpenShift Cluster Manager。
先决条件
- 您已完成 Red Hat OpenShift Service on AWS 的 AWS 先决条件。
-
您已在安装主机上安装和配置了最新的 ROSA 命令行界面(CLI) (
rosa)。
流程
要创建 OIDC 配置以及 AWS 资源,请运行以下命令:
$ rosa create oidc-config --mode=auto --yes此命令返回以下信息:
例如:
? Would you like to create a Managed (Red Hat hosted) OIDC Configuration Yes
I: Setting up managed OIDC configuration
I: To create Operator Roles for this OIDC Configuration, run the following command and remember to replace <user-defined> with a prefix of your choice:
	rosa create operator-roles --prefix <user-defined> --oidc-config-id 13cdr6b
If you are going to create a Hosted Control Plane cluster please include '--hosted-cp'
I: Creating OIDC provider using 'arn:aws:iam::4540112244:user/userName'
? Create the OIDC provider? Yes
I: Created OIDC provider with ARN 'arn:aws:iam::4540112244:oidc-provider/dvbwgdztaeq9o.cloudfront.net/13cdr6b'
在创建集群时,您必须提供 OIDC 配置 ID。CLI 输出为--
mode auto提供了此值,否则您必须根据awsCLI 输出用于-模式手动确定这些值。可选: 您可以将 OIDC 配置 ID 保存为稍后使用的变量。运行以下命令来保存变量:
$ export OIDC_ID=<oidc_config_id><oidc_config_id>-
在本例中,OIDC 配置 ID 是
13cdr6b。
运行以下命令,查看变量的值:
$ echo $OIDC_ID例如:
13cdr6b
验证
您可以列出与您的用户机构关联的集群可用的 OIDC 配置。运行以下命令:
$ rosa list oidc-config例如:
ID                                MANAGED  ISSUER URL                                                             SECRET ARN
2330dbs0n8m3chkkr25gkkcd8pnj3lk2  true     https://dvbwgdztaeq9o.cloudfront.net/2330dbs0n8m3chkkr25gkkcd8pnj3lk2
233hvnrjoqu14jltk6lhbhf2tj11f8un  false    https://oidc-r7u1.s3.us-east-1.amazonaws.com                           aws:secretsmanager:us-east-1:242819244:secret:rosa-private-key-oidc-r7u1-tM3MDN
7.6. 创建 Operator 角色和策略
在 AWS 集群上部署 Red Hat OpenShift Service 时,您必须创建 Operator IAM 角色。集群 Operator 使用 Operator 角色和策略获取执行集群操作所需的临时权限,如管理后端存储和对集群的外部访问权限。
先决条件
- 您已完成 Red Hat OpenShift Service on AWS 的 AWS 先决条件。
-
您已在安装主机上安装和配置了最新的 ROSA 命令行界面(CLI) (
rosa)。 - 您创建了集群范围的 AWS 角色。
流程
要创建 Operator 角色,请运行以下命令:
$ rosa create operator-roles --hosted-cp --prefix=$OPERATOR_ROLES_PREFIX --oidc-config-id=$OIDC_ID --installer-role-arn arn:aws:iam::$AWS_ACCOUNT_ID:role/${ACCOUNT_ROLES_PREFIX}-HCP-ROSA-Installer-Role以下分类提供了创建 Operator 角色的选项。
$ rosa create operator-roles --hosted-cp
	--prefix=$OPERATOR_ROLES_PREFIX
	--oidc-config-id=$OIDC_ID
	--installer-role-arn arn:aws:iam::$AWS_ACCOUNT_ID:role/$ACCOUNT_ROLES_PREFIX-HCP-ROSA-Installer-Role
其中:
--prefix=- 在创建这些 Operator 角色时,您必须提供一个前缀。如果不这样做,则会产生错误。如需有关 Operator 前缀的信息,请参阅本节的额外资源。
--oidc-config-id=- 这个值是您为 Red Hat OpenShift Service on AWS 创建的 OIDC 配置 ID。
--installer-role-arn- 这个值是您在创建 Red Hat OpenShift Service on AWS 帐户角色时创建的安装程序角色 ARN。
您必须包含
-hosted-cp参数,以便为 Red Hat OpenShift Service on AWS 集群创建正确的角色。此命令返回以下信息:例如:
? Role creation mode: auto
? Operator roles prefix: <pre-filled_prefix>
? OIDC Configuration ID: 23soa2bgvpek9kmes9s7os0a39i13qm4 | https://dvbwgdztaeq9o.cloudfront.net/23soa2bgvpek9kmes9s7os0a39i13qm4
? Create hosted control plane operator roles: Yes
W: More than one Installer role found
? Installer role ARN: arn:aws:iam::4540112244:role/<prefix>-HCP-ROSA-Installer-Role
? Permissions boundary ARN (optional):
I: Reusable OIDC Configuration detected. Validating trusted relationships to operator roles:
I: Creating roles using 'arn:aws:iam::4540112244:user/<userName>'
I: Created role '<prefix>-openshift-cluster-csi-drivers-ebs-cloud-credentials' with ARN 'arn:aws:iam::4540112244:role/<prefix>-openshift-cluster-csi-drivers-ebs-cloud-credentials'
I: Created role '<prefix>-openshift-cloud-network-config-controller-cloud-credenti' with ARN 'arn:aws:iam::4540112244:role/<prefix>-openshift-cloud-network-config-controller-cloud-credenti'
I: Created role '<prefix>-kube-system-kube-controller-manager' with ARN 'arn:aws:iam::4540112244:role/<prefix>-kube-system-kube-controller-manager'
I: Created role '<prefix>-kube-system-capa-controller-manager' with ARN 'arn:aws:iam::4540112244:role/<prefix>-kube-system-capa-controller-manager'
I: Created role '<prefix>-kube-system-control-plane-operator' with ARN 'arn:aws:iam::4540112244:role/<prefix>-kube-system-control-plane-operator'
I: Created role '<prefix>-kube-system-kms-provider' with ARN 'arn:aws:iam::4540112244:role/<prefix>-kube-system-kms-provider'
I: Created role '<prefix>-openshift-image-registry-installer-cloud-credentials' with ARN 'arn:aws:iam::4540112244:role/<prefix>-openshift-image-registry-installer-cloud-credentials'
I: Created role '<prefix>-openshift-ingress-operator-cloud-credentials' with ARN 'arn:aws:iam::4540112244:role/<prefix>-openshift-ingress-operator-cloud-credentials'
I: To create a cluster with these roles, run the following command:
	rosa create cluster --sts --oidc-config-id 23soa2bgvpek9kmes9s7os0a39i13qm4 --operator-roles-prefix <prefix> --hosted-cp
其中:
Operator 角色前缀- 此字段会预先填充您在初始创建命令中设置的前缀。
OIDC 配置 ID- 此字段要求您选择为 Red Hat OpenShift Service on AWS 集群创建的 OIDC 配置。
现在,Operator 角色已创建并可用于创建 Red Hat OpenShift Service on AWS 集群。
验证
您可以列出与 Red Hat OpenShift Service on AWS 帐户关联的 Operator 角色。运行以下命令:
$ rosa list operator-roles例如:
I: Fetching operator roles
ROLE PREFIX  AMOUNT IN BUNDLE
<prefix>      8
? Would you like to detail a specific prefix Yes
? Operator Role Prefix: <prefix>
ROLE NAME                                                         ROLE ARN                                                                                         VERSION  MANAGED
<prefix>-kube-system-capa-controller-manager                       arn:aws:iam::4540112244:role/<prefix>-kube-system-capa-controller-manager                       4.13     No
<prefix>-kube-system-control-plane-operator                        arn:aws:iam::4540112244:role/<prefix>-kube-system-control-plane-operator                        4.13     No
<prefix>-kube-system-kms-provider                                  arn:aws:iam::4540112244:role/<prefix>-kube-system-kms-provider                                  4.13     No
<prefix>-kube-system-kube-controller-manager                       arn:aws:iam::4540112244:role/<prefix>-kube-system-kube-controller-manager                       4.13     No
<prefix>-openshift-cloud-network-config-controller-cloud-credenti  arn:aws:iam::4540112244:role/<prefix>-openshift-cloud-network-config-controller-cloud-credenti  4.13     No
<prefix>-openshift-cluster-csi-drivers-ebs-cloud-credentials       arn:aws:iam::4540112244:role/<prefix>-openshift-cluster-csi-drivers-ebs-cloud-credentials       4.13     No
<prefix>-openshift-image-registry-installer-cloud-credentials      arn:aws:iam::4540112244:role/<prefix>-openshift-image-registry-installer-cloud-credentials      4.13     No
<prefix>-openshift-ingress-operator-cloud-credentials              arn:aws:iam::4540112244:role/<prefix>-openshift-ingress-operator-cloud-credentials              4.13     No
命令运行后,它会显示与 AWS 帐户关联的所有前缀,并记录与这个前缀关联的角色数量。如果您需要查看所有这些角色及其详情,请在详情提示符处输入"是",使这些角色以特定形式列出。
7.7. 使用 CLI 创建带有出口零的 Red Hat OpenShift Service on AWS 集群
使用 ROSA CLI ( rosa )创建集群时,您可以选择默认选项来快速创建集群。
先决条件
- 您已完成 Red Hat OpenShift Service on AWS 的 AWS 先决条件。
- 您有可用的 AWS 服务配额。
- 您已在 AWS 控制台中启用了 Red Hat OpenShift Service on AWS。
-
您已在安装主机上安装和配置了最新的 ROSA CLI (
rosa)。运行rosa 版本,以查看您当前安装的 ROSA CLI 版本。如果有更新的版本,CLI 提供了下载此升级的链接。 - 已使用 ROSA CLI 登录您的红帽帐户。
- 您已创建了 OIDC 配置。
- 您已确认 AWS Elastic Load Balancing (ELB)服务角色存在于 AWS 帐户中。
流程
使用以下命令之一在 AWS 集群上创建 Red Hat OpenShift Service:
注意在 AWS 集群上创建 Red Hat OpenShift Service 时,默认的无类别域间路由(CIDR)为
10.0.0.0/16。如果这与 VPC 子网的 CIDR 范围不匹配,请在以下命令中添加--machine-cidr <address_block>。要了解更多有关 Red Hat OpenShift Service on AWS 的默认 CIDR 范围,请参阅 CIDR 范围定义。如果您没有设置环境变量,请运行以下命令:
$ rosa create cluster --cluster-name=<cluster_name> \1 --mode=auto --hosted-cp [--private] \ --operator-roles-prefix <operator-role-prefix> \2 --oidc-config-id <id-of-oidc-configuration> \ --subnet-ids=<private-subnet-id> --region <region> \ --machine-cidr 10.0.0.0/16 --service-cidr 172.30.0.0/16 \ --pod-cidr 10.128.0.0/14 --host-prefix 23 \ --billing-account <root-acct-id> \3 --properties zero_egress:true- 1
- 指定集群的名称。如果集群名称超过 15 个字符,它将包含自动生成的域前缀,作为 openshiftapps.com 上置备的集群的子域。要自定义子域,请使用 the
-domain-prefix标志。域前缀不能超过 15 个字符,必须是唯一的,且在集群创建后无法更改。 - 2
- 默认情况下,特定于集群的 Operator 角色名称使用集群名称和随机 4 位哈希值作为前缀。您可以选择指定一个自定义前缀来替换角色名称中的 <
cluster_name>-<hash>。创建特定于集群的 Operator IAM 角色时会应用前缀。有关前缀的详情,请参阅关于自定义 Operator IAM 角色前缀。注意如果您在创建关联的集群范围的角色时指定了自定义 ARN 路径,则会自动检测到自定义路径。在以后的步骤中创建它们时,自定义路径会应用于特定于集群的 Operator 角色。
- 3
- 如果您的账单帐户与您的用户帐户不同,请添加此参数并指定负责所有计费的 AWS 帐户。
如果设置环境变量,请使用私有可用的 API 创建带有出口 0 的集群,该集群有一个单一的初始机器池,使用私有可用的 API,以及私有可用的 Ingress:
$ rosa create cluster --private --cluster-name=$CLUSTER_NAME \
    --mode=auto --hosted-cp --operator-roles-prefix=$OPERATOR_ROLES_PREFIX \
    --oidc-config-id=$OIDC_ID --subnet-ids=$SUBNET_IDS \
    --region $REGION --machine-cidr 10.0.0.0/16 --service-cidr 172.30.0.0/16 \
    --pod-cidr 10.128.0.0/14 --host-prefix 23 \
    --private --properties zero_egress:true
运行以下命令检查集群的状态:
$ rosa describe cluster --cluster=<cluster_name>在集群安装过程中,输出中会列出以下
State字段更改:-
待定(准备帐户) -
安装(进行中的DNS 设置) -
installing ready注意如果安装失败,或者
State字段在超过 10 分钟后没有变为ready,请检查安装故障排除文档以了解详细信息。如需更多信息,请参阅 故障排除安装。有关联系红帽支持以获取帮助的步骤,请参阅 获取对 Red Hat OpenShift Service on AWS 的支持。
-
通过观察 Red Hat OpenShift Service on AWS 安装程序日志来跟踪集群创建进度。要检查日志,请运行以下命令:
$ rosa logs install --cluster=<cluster_name> --watch \1 - 1
- 可选: 要在安装过程中监视新日志消息,请使用--
watch参数。
您可以使用外部 OpenID Connect (OIDC)身份提供程序创建 Red Hat OpenShift Service on AWS 集群来发布令牌以进行身份验证,替换内置的 OpenShift OAuth 服务器。虽然内置的 OpenShift OAuth 服务器支持与各种身份提供程序(包括外部 OIDC 身份提供程序)集成,但它仅限于 OAuth 服务器本身的功能。您可以直接将外部 OIDC 身份提供程序与 Red Hat OpenShift Service on AWS 集群集成,以便于机器到机器工作流(如 CLI),并提供使用内置 OpenShift OAuth 服务器时不可用的额外功能。
由于无法将现有 Red Hat OpenShift Service on AWS (类架构)集群升级到托管的 control plane 架构,所以必须创建新集群以使用 Red Hat OpenShift Service on AWS 功能。您还可以转换创建的集群以使用外部身份验证供应商来使用内部 OAuth2 服务器。您还必须创建新集群。
Red Hat OpenShift Service on AWS 集群只支持安全令牌服务(STS)身份验证。
进一步阅读
- 有关 Red Hat OpenShift Service on AWS 和 Red Hat OpenShift Service on AWS 的比较(经典架构),请参阅 比较架构模型 文档。
- 有关以自动 模式 使用 ROSA CLI 开始使用 Red Hat OpenShift Service on AWS 的信息, 请参阅 AWS 文档。
其他资源
有关支持的证书的完整列表,请参阅 "Understanding process and security for Red Hat OpenShift Service on AWS" 的 Compliance 部分。
8.1. Red Hat OpenShift Service on AWS 的先决条件
要创建 Red Hat OpenShift Service on AWS 集群,您必须完成以下步骤:
使用 ROSA CLI 中的 --external-auth-providers-enabled 标志来创建使用外部身份验证服务的集群。
在 AWS 集群上创建 Red Hat OpenShift Service 时,默认的无类别域间路由(CIDR)为 10.0.0.0/16。如果这与 VPC 子网的 CIDR 范围不匹配,请在以下命令中添加 --machine-cidr <address_block >。
流程
如果您使用
OIDC_ID、SUBNET_IDS和OPERATOR_ROLES_PREFIX变量准备您的环境,您可以在创建集群时继续使用这些变量。例如,运行以下命令:$ rosa create cluster --hosted-cp --subnet-ids=$SUBNET_IDS \ --oidc-config-id=$OIDC_ID --cluster-name=<cluster_name> \ --operator-roles-prefix=$OPERATOR_ROLES_PREFIX \ --external-auth-providers-enabled如果您没有设置环境变量,请运行以下命令:
$ rosa create cluster --cluster-name=<cluster_name> --sts --mode=auto \
    --hosted-cp --operator-roles-prefix <operator-role-prefix> \
    --oidc-config-id <ID-of-OIDC-configuration> \
    --external-auth-providers-enabled \
    --subnet-ids=<public-subnet-id>,<private-subnet-id>
验证
运行以下命令验证您的外部身份验证是否在集群详情中启用:
$ rosa describe cluster --cluster=<cluster_name>Name: rosa-ext-test Display Name: rosa-ext-test ID: <cluster_id> External ID: <cluster_ext_id> Control Plane: ROSA Service Hosted OpenShift Version: 4.20.0 Channel Group: stable DNS: <dns> AWS Account: <AWS_id> AWS Billing Account: <AWS_id> API URL: <ocm_api> Console URL: Region: us-east-1 Availability: - Control Plane: MultiAZ - Data Plane: SingleAZ Nodes: - Compute (desired): 2 - Compute (current): 0 Network: - Type: OVNKubernetes - Service CIDR: <service_cidr> - Machine CIDR: <machine_cidr> - Pod CIDR: <pod_cidr> - Host Prefix: /23 - Subnets: <subnet_ids> EC2 Metadata Http Tokens: optional Role (STS) ARN: arn:aws:iam::<AWS_id>:role/<account_roles_prefix>-HCP-ROSA-Installer-Role Support Role ARN: arn:aws:iam::<AWS_id>:role/<account_roles_prefix>-HCP-ROSA-Support-Role Instance IAM Roles: - Worker: arn:aws:iam::<AWS_id>:role/<account_roles_prefix>-HCP-ROSA-Worker-Role Operator IAM Roles: - arn:aws:iam::<AWS_id>:role/<operator_roles_prefix>-openshift-cloud-network-config-controller-clo - arn:aws:iam::<AWS_id>:role/<operator_roles_prefix>-kube-system-capa-controller-manager - arn:aws:iam::<AWS_id>:role/<operator_roles_prefix>-kube-system-control-plane-operator - arn:aws:iam::<AWS_id>:role/<operator_roles_prefix>-kube-system-kms-provider - arn:aws:iam::<AWS_id>:role/<operator_roles_prefix>-kube-system-kube-controller-manager - arn:aws:iam::<AWS_id>:role/<operator_roles_prefix>-openshift-image-registry-installer-cloud-cred - arn:aws:iam::<AWS_id>:role/<operator_roles_prefix>-openshift-ingress-operator-cloud-credentials - arn:aws:iam::<AWS_id>:role/<operator_roles_prefix>-openshift-cluster-csi-drivers-ebs-cloud-crede Managed Policies: Yes State: ready Private: No Created: Mar 29 2024 14:25:52 UTC User Workload Monitoring: Enabled Details Page: https://<url> OIDC Endpoint URL: https://<endpoint> (Managed) Audit Log Forwarding: Disabled External Authentication: Enabled1 - 1
External Authentication标志被启用,您现在可以创建外部身份验证供应商。
8.3. 创建外部身份验证供应商
在为外部身份验证供应商创建带有 enabled 选项的 Red Hat OpenShift Service on AWS 集群后,您必须使用 ROSA CLI 创建供应商。
与 ROSA CLI 中的 rosa create|delete|list idp[s] 命令类似,您无法编辑使用 rosa 创建 external-auth-provider 的现有身份提供程序。相反,您必须删除外部身份验证供应商并创建一个新供应商。
下表显示了您可以在创建外部身份验证供应商时使用的 CLI 标志:
| CLI 标记 | 描述 |
|---|---|
|
| 集群的名称或 ID。 |
|
| 用于引用外部身份验证提供程序的名称。 |
|
| 此字符串是用于将您的帐户与应用程序关联的客户端 secret。如果没有包含客户端 secret,这个命令会使用公共 OIDC OAuthClient。 |
|
| 这是以逗号分隔的令牌受众列表。 |
|
| 令牌签发者的 URL。 |
|
| 应该用于为集群身份构建用户名的声明名称。 |
|
| 应该用于为集群身份构造组名称的声明名称。 |
流程
要使用交互式命令行界面,请运行以下命令:
输入示例
$ rosa create external-auth-provider -c <cluster_name>I: Enabling interactive mode ? Name:1 ? Issuer audiences:2 ? The serving url of the token issuer:3 ? CA file path (optional):4 ? Claim mapping username:5 ? Claim mapping groups:6 ? Claim validation rule (optional):7 ? Console client id (optional):8 您可以使用以下命令包含创建外部身份验证供应商所需的 ID:
rosa create external-auth-provider --cluster=<cluster_id> \
    --name=<provider_name> --issuer-url=<issuing_url> \
    --issuer-audiences=<audience_id> \
    --claim-mapping-username-claim=email \
    --claim-mapping-groups-claim=groups \
    --console-client-id=<client_id_for_app_registration> \
    --console-client-secret=<client_secret>
输出示例
I: Successfully created an external authentication provider for cluster 'ext-auth-test'
8.3.1. 外部身份验证供应商示例
您可以使用以下外部身份验证供应商配置示例来设置您自己的配置。
Microsoft Entra ID 配置示例
您可以将 Microsoft Entra ID 用作外部提供者。您必须已经配置了一个 Microsoft Entra ID 服务器,然后才能将它用作外部提供者。如需更多信息,请参阅 Microsoft Entra ID 文档。
以下示例显示了配置了 Microsoft Entra ID 外部身份验证供应商:
流程
运行以下命令,创建一个使用 Microsoft Entra ID 的外部身份验证供应商:
注意您必须使用特定于 Microsoft Entra ID 服务器的值来设置自己的环境变量。
输入示例
$ rosa create external-auth-provider -c $CLUSTER_NAME \
    --claim-mapping-groups-claim groups \
    --claim-mapping-username-claim <authorized_user_name> \
    --console-client-id $CONSOLE_CLIENT_ID \
    --console-client-secret $CONSOLE_CLIENT_SECRET_VALUE \
    --issuer-audiences "$AUDIENCE_1" \
    --issuer-ca-file ca-bundle.crt --issuer-url $ISSUER_URL \
    --name m-entra-id
输出示例
I: Successfully created an external authentication provider for cluster 'ext-auth-test'. It can take a few minutes for the creation of an external authentication provider to become fully effective.运行以下命令,列出集群的外部身份验证供应商,以查看签发者 URL 或使用
rosa describe命令查看与此外部身份验证供应商相关的所有详情:运行以下命令,列出指定集群中的外部身份验证配置:
输入示例
$ rosa list external-auth-provider -c <cluster_name> \1 - 1
- 使用您要查看的外部身份验证供应商提供集群名称。
输出示例
NAME        ISSUER URL
m-entra-id  https://login.microsoftonline.com/<group_id>/v2.0
运行以下命令,显示指定集群中的外部身份验证配置:
输入示例
$ rosa describe external-auth-provider \
    -c <cluster_name> --name <name_of_external_authentication> \
1 2 输出示例
ID:                          ms-entra-id
Cluster ID:                  <cluster_id>
Issuer audiences:
                             - <audience_id>
Issuer Url:                  https://login.microsoftonline.com/<group_id>/v2.0
Claim mappings group:        groups
Claim mappings username:     email
Keycloak 配置示例
您可以使用 Keycloak 作为外部供应商。您必须已经配置了 Keycloak 服务器,然后才能将其用作外部供应商。如需更多信息,请参阅 Keycloak 文档。
流程
运行以下命令,创建一个使用 Keycloak 的外部身份验证供应商:
注意您必须使用特定于您的 Keycloak 服务器的值来设置自己的环境变量。
输入示例
$ rosa create external-auth-provider -c $CLUSTER_NAME \
--claim-mapping-groups-claim groups \
    --claim-mapping-username-claim <authorized_user_name> \
    --console-client-id $CONSOLE_CLIENT_ID \
    --console-client-secret $CONSOLE_CLIENT_SECRET_VALUE \
    --issuer-audiences "$AUDIENCE_1,$AUDIENCE_2" \
    --issuer-ca-file ca-bundle.crt --issuer-url $ISSUER_URL --name keycloak
输出示例
I: Successfully created an external authentication provider for cluster 'ext-auth-test'. It can take a few minutes for the creation of an external authentication provider to become fully effective.运行以下命令,列出集群的外部身份验证供应商,以查看签发者 URL 或使用
rosa describe命令查看与此外部身份验证供应商相关的所有详情:运行以下命令,列出指定集群中的外部身份验证配置:
输入示例
$ rosa list external-auth-provider -c <cluster_name>输出示例
NAME      ISSUER URL
keycloak  https://keycloak-keycloak.apps.<keycloak_id>.openshift.org/realms/master
运行以下命令,显示指定集群中的外部身份验证配置:
输入示例
$ rosa describe external-auth-provider \
    -c <cluster_name> --name <name_of_external_authentication>
输出示例
ID:                                    keycloak
Cluster ID:                            <cluster_id>
Issuer audiences:
                                       - <audience_id_1>
                                       - <audience_id_2>
Issuer Url:                            https://keycloak-keycloak.apps.<keycloak_id>.openshift.org/realms/master
Claim mappings group:                  groups
Claim mappings username:               <authorized_user_name>
Console client id:                     console-test
8.4. 为 Red Hat OpenShift Service on AWS 集群创建断镜凭证
作为 Red Hat OpenShift Service on AWS 集群所有者,您可以使用 breakfish 凭证来创建临时管理客户端凭证,以访问配置了自定义 OpenID Connect (OIDC)令牌签发者的集群。创建 breakfish 凭证会生成新的 cluster-admin kubeconfig 文件。kubeconfig 文件包含 CLI 用来将客户端连接到正确的集群和 API 服务器的集群信息。您可以使用新生成的 kubeconfig 文件来访问 Red Hat OpenShift Service on AWS 集群。
先决条件
- 您已创建了启用了外部身份验证的 Red Hat OpenShift Service on AWS 集群。如需更多信息,请参阅使用 外部身份验证供应商的 HCP 集群创建 Red Hat OpenShift Service on AWS。
- 您已创建了外部身份验证供应商。如需更多信息,请参阅创建外部身份验证供应商。
-
有
集群管理员权限的帐户。
流程
使用以下命令之一创建 breakfish 凭证:
要使用交互式命令接口以交互方式指定自定义设置来创建断镜凭证,请运行以下命令:
$ rosa create break-glass-credential -c <cluster_name> -i1 - 1
- 将 <cluster_name> 替换为集群的名称。
这个命令启动一个交互式 CLI 进程:
输出示例
I: Enabling interactive mode
? Username (optional):
1 ? Expiration duration (optional):2 I: Successfully created a break glass credential for cluster 'ac-hcp-test'.要为名为
mycluster的集群创建一个带有指定的值的 breakfish 凭证:$ rosa create break-glass-credential -c mycluster --username test-username --expiration 1h
运行以下命令,列出可用于名为
mycluster的集群的 breakfish 凭证 ID、状态和关联的用户:$ rosa list break-glass-credential -c mycluster输出示例
ID USERNAME STATUS 2a7jli9n4phe6c02ul7ti91djtv2o51d test-user issued注意您还可以通过在命令中添加
-o json参数来查看 JSON 输出中的凭证。要查看一个 breakfish 凭证的状态,请运行以下命令,将 <break_glass_credential_id> 替换为 breakfish 凭证 ID:
$ rosa describe break-glass-credential <break_glass_credential_id> -c <cluster_name>输出示例
ID:                                    2a7jli9n4phe6c02ul7ti91djtv2o51d
Username:                              test-user
Expire at:                             Dec 28 2026 10:23:05 EDT
Status:                                issued
以下是可能的
Status字段值列表:-
出版该分解器凭据已发布并可使用。 -
已过期的breakfish 凭证已过期,不再可以使用。 -
中断镜凭据未能创建失败。
在这种情况下,您会收到一个服务日志详细描述了失败。如需有关服务日志的更多信息,请参阅访问 Red Hat OpenShift Service on AWS 集群的服务日志。有关联系红帽支持以获取帮助的步骤,请参阅 获取支持。 -
waiting_revocationThe breakfish credential 当前正在撤销,这意味着它不能被使用。 -
已撤销了 breakfish 凭据已被撤销,无法再使用。
-
要检索
kubeconfig,请运行以下命令:创建
kubeconfigs目录:$ mkdir ~/kubeconfigs导出新生成的
kubeconfig文件,将 <cluster_name> 替换为集群的名称:$ export CLUSTER_NAME=<cluster_name> && export KUBECONFIG=~/kubeconfigs/break-glass-${CLUSTER_NAME}.kubeconfig查看
kubeconfig:$ rosa describe break-glass-credential <break_glass_credential_id> -c mycluster --kubeconfig输出示例
apiVersion: v1
clusters:
- cluster:
    server: <server_url>
  name: cluster
contexts:
- context:
    cluster: cluster
    namespace: default
    user: test-username
  name: admin
current-context: admin
kind: Config
preferences: {}
users:
- name: test-user
  user:
    client-certificate-data: <client-certificate-data>
1 client-key-data: <client-key-data>2
可选: 要保存
kubeconfig,请运行以下命令:$ rosa describe break-glass-credential <break_glass_credential_id> -c mycluster --kubeconfig > $KUBECONFIG
8.5. 使用中断镜凭证访问 Red Hat OpenShift Service on AWS 集群
使用 breakfish 凭证中的新 kubeconfig,获得对 Red Hat OpenShift Service on AWS 集群的临时管理员访问权限。
先决条件
- 您可以访问启用了外部身份验证的 Red Hat OpenShift Service on AWS 集群。如需更多信息,请参阅创建使用外部 OIDC 身份提供程序进行身份验证的 Red Hat OpenShift Service on AWS 集群。
-
已安装
oc和kubectlCLI。 -
您已配置了新的
kubeconfig。如需更多信息,请参阅为 AWS 集群上的 Red Hat OpenShift Service 创建中断凭证。
流程
访问集群的详情:
$ rosa describe break-glass-credential <break_glass_credential_id> -c <cluster_name> --kubeconfig > $KUBECONFIG列出集群中的节点:
$ oc get nodes输出示例
NAME                        STATUS   ROLES   AGE   VERSION
ip-10-0-0-27.ec2.internal   Ready    worker  8m    v1.28.7+f1b5f6c
ip-10-0-0-67.ec2.internal   Ready    worker  9m    v1.28.7+f1b5f6c
验证您是否具有正确的凭证:
$ kubectl auth whoami输出示例
ATTRIBUTE    VALUE
Username     system:customer-break-glass:test-user
Groups       [system:masters system:authenticated]
为外部 OIDC 供应商中定义的组应用
ClusterRoleBinding。ClusterRoleBinding将在 Microsoft Entra ID 中创建的rosa-hcp-admins组映射到 Red Hat OpenShift Service on AWS 集群中的组。$ oc apply -f - <<EOF apiVersion: rbac.authorization.k8s.io/v1 kind: ClusterRoleBinding metadata: name: rosa-hcp-admins roleRef: apiGroup: rbac.authorization.k8s.io kind: ClusterRole name: cluster-admin subjects: - apiGroup: rbac.authorization.k8s.io kind: Group name: f715c264-ab90-45d5-8a29-2e91a609a895 EOF输出示例
clusterrolebinding.rbac.authorization.k8s.io/rosa-hcp-admins created注意应用
ClusterRoleBinding后,配置了 Red Hat OpenShift Service on AWS 集群,并且rosaCLI 和 Red Hat Hybrid Cloud 控制台 通过外部 OpenID Connect (OIDC)供应商进行身份验证。现在,您可以开始分配角色并在集群中部署应用程序。
8.6. 撤销 Red Hat OpenShift Service on AWS 集群的中断图形凭证
您可以使用 revoke break-glass-credentials 命令撤销对您随时置备的任何中断镜凭据的访问。
先决条件
- 您已创建了一个断镜凭证。
- 您是集群所有者。
流程
运行以下命令,撤销 Red Hat OpenShift Service on AWS 集群的 breakfish 凭据。
重要运行此命令可撤销与集群相关的所有分组凭据的访问权限。
$ rosa revoke break-glass-credentials -c <cluster_name>1 - 1
- 将 <cluster_name> 替换为集群的名称。
输出示例
? Are you sure you want to revoke all the break glass credentials on cluster 'my-cluster'?: Yes
I: Successfully requested revocation for all break glass credentials from cluster 'my-cluster'
验证
吊销过程可能需要几分钟。您可以运行以下命令来验证集群的 breakfish 凭证是否已撤销:
列出所有 breakfish 凭证并检查每个问题的状态:
$ rosa list break-glass-credential -c <cluster_name>输出示例
ID                                USERNAME    STATUS
2330dbs0n8m3chkkr25gkkcd8pnj3lk2  test-user   awaiting_revocation
您还可以通过检查单个凭证来验证状态:
$ rosa describe break-glass-credential <break_glass_credential_id> -c <cluster_name>输出示例
ID:                                    2330dbs0n8m3chkkr25gkkcd8pnj3lk2
Username:                              test-user
Expire at:                             Dec 28 2026 10:23:05 EDT
Status:                                issued
Revoked at:                            Dec 27 2026 15:30:33 EDT
8.7. 删除外部身份验证供应商
使用 ROSA CLI 删除外部身份验证供应商。
流程
运行以下命令显示集群中的外部身份验证供应商:
$ rosa list external-auth-provider -c <cluster_name>输出示例
NAME        ISSUER URL
entra-test  https://login.microsoftonline.com/<group_id>/v2.0
运行以下命令来删除外部身份验证供应商:
$ rosa delete external-auth-provider <name_of_provider> -c <cluster_name>输出示例
? Are you sure you want to delete external authentication provider entra-test on cluster rosa-ext-test? Yes
I: Successfully deleted external authentication provider 'entra-test' from cluster 'rosa-ext-test'
验证
运行以下命令,查询集群中的任何外部身份验证供应商:
$ rosa list external-auth-provider -c <cluster_name>输出示例
E: there are no external authentication providers for this cluster
第 9 章 没有 CNI 插件的 Red Hat OpenShift Service on AWS 集群
您可以在创建 Red Hat OpenShift Service on AWS 集群时使用自己的 Container Network Interface (CNI)插件。您可以在没有 CNI 的情况下在 AWS 集群上创建 Red Hat OpenShift Service,并在集群创建后安装自己的 CNI 插件。
对于选择使用自己的 CNI 的客户,CNI 插件支持的责任属于与所选 CNI 供应商协调的客户。
Red Hat OpenShift Service on AWS 的默认插件是 OVN-Kubernetes 网络插件。此插件是 Red Hat OpenShift Service on AWS 唯一支持的 CNI 插件。
如果您选择将自己的 CNI 用于 Red Hat OpenShift Service on AWS 集群,则强烈建议您在创建集群时从插件厂商获取商业支持。红帽支持无法为选择使用自己的 CNI 的客户提供与 CNI 相关的问题,如 pod 到 pod 流量。红帽仍然为所有非CNI 问题提供支持。如果要红帽与 CNI 相关的支持,则必须使用默认 OVN-Kubernetes 网络插件安装集群。如需更多信息,请参阅 责任列表。
9.1.1. 先决条件
9.1.2. 创建集群范围的 STS 角色和策略
在 AWS 集群上创建 Red Hat OpenShift Service 前,您必须创建所需的帐户范围的角色和策略。
Red Hat OpenShift Service on AWS 的特定 AWS 管理策略必须附加到每个角色。客户管理的策略不能与这些所需的帐户角色一起使用。有关 Red Hat OpenShift Service on AWS 集群的 AWS 管理策略的更多信息,请参阅 ROSA 的 AWS 受管策略。
先决条件
- 您已完成 Red Hat OpenShift Service on AWS 的 AWS 先决条件。
- 您有可用的 AWS 服务配额。
- 您已在 AWS 控制台中启用了 Red Hat OpenShift Service on AWS。
-
您已在安装主机上安装和配置了最新的 ROSA CLI (
rosa)。 - 已使用 ROSA CLI 登录您的红帽帐户。
流程
如果您的 AWS 帐户不存在它们,请创建所需的账户范围 STS 角色,并通过运行以下命令来附加策略:
$ rosa create account-roles --hosted-cp可选:运行以下命令,将您的前缀设置为环境变量:
$ export ACCOUNT_ROLES_PREFIX=<account_role_prefix>运行以下命令,查看变量的值:
$ echo $ACCOUNT_ROLES_PREFIX例如:
ManagedOpenShift如需有关 AWS 上 Red Hat OpenShift Service 的 AWS 管理的 IAM 策略的更多信息,请参阅 ROSA 的 AWS 管理的 IAM 策略。
9.1.3. 创建 OpenID 连接配置
在 AWS 集群上创建 Red Hat OpenShift Service 时,您可以在创建集群前创建 OpenID Connect (OIDC)配置。此配置注册到 OpenShift Cluster Manager。
先决条件
- 您已完成 Red Hat OpenShift Service on AWS 的 AWS 先决条件。
-
您已在安装主机上安装和配置了最新的 ROSA 命令行界面(CLI) (
rosa)。
流程
要创建 OIDC 配置以及 AWS 资源,请运行以下命令:
$ rosa create oidc-config --mode=auto --yes此命令返回以下信息:
例如:
? Would you like to create a Managed (Red Hat hosted) OIDC Configuration Yes
I: Setting up managed OIDC configuration
I: To create Operator Roles for this OIDC Configuration, run the following command and remember to replace <user-defined> with a prefix of your choice:
	rosa create operator-roles --prefix <user-defined> --oidc-config-id 13cdr6b
If you are going to create a Hosted Control Plane cluster please include '--hosted-cp'
I: Creating OIDC provider using 'arn:aws:iam::4540112244:user/userName'
? Create the OIDC provider? Yes
I: Created OIDC provider with ARN 'arn:aws:iam::4540112244:oidc-provider/dvbwgdztaeq9o.cloudfront.net/13cdr6b'
在创建集群时,您必须提供 OIDC 配置 ID。CLI 输出为--
mode auto提供了此值,否则您必须根据awsCLI 输出用于-模式手动确定这些值。可选: 您可以将 OIDC 配置 ID 保存为稍后使用的变量。运行以下命令来保存变量:
$ export OIDC_ID=<oidc_config_id><oidc_config_id>-
在本例中,OIDC 配置 ID 是
13cdr6b。
运行以下命令,查看变量的值:
$ echo $OIDC_ID例如:
13cdr6b
验证
您可以列出与您的用户机构关联的集群可用的 OIDC 配置。运行以下命令:
$ rosa list oidc-config例如:
ID                                MANAGED  ISSUER URL                                                             SECRET ARN
2330dbs0n8m3chkkr25gkkcd8pnj3lk2  true     https://dvbwgdztaeq9o.cloudfront.net/2330dbs0n8m3chkkr25gkkcd8pnj3lk2
233hvnrjoqu14jltk6lhbhf2tj11f8un  false    https://oidc-r7u1.s3.us-east-1.amazonaws.com                           aws:secretsmanager:us-east-1:242819244:secret:rosa-private-key-oidc-r7u1-tM3MDN
9.1.4. 创建 Operator 角色和策略
在 AWS 集群上部署 Red Hat OpenShift Service 时,您必须创建 Operator IAM 角色。集群 Operator 使用 Operator 角色和策略获取执行集群操作所需的临时权限,如管理后端存储和对集群的外部访问权限。
先决条件
- 您已完成 Red Hat OpenShift Service on AWS 的 AWS 先决条件。
-
您已在安装主机上安装和配置了最新的 ROSA 命令行界面(CLI) (
rosa)。 - 您创建了集群范围的 AWS 角色。
流程
要创建 Operator 角色,请运行以下命令:
$ rosa create operator-roles --hosted-cp --prefix=$OPERATOR_ROLES_PREFIX --oidc-config-id=$OIDC_ID --installer-role-arn arn:aws:iam::$AWS_ACCOUNT_ID:role/${ACCOUNT_ROLES_PREFIX}-HCP-ROSA-Installer-Role以下分类提供了创建 Operator 角色的选项。
$ rosa create operator-roles --hosted-cp
	--prefix=$OPERATOR_ROLES_PREFIX
	--oidc-config-id=$OIDC_ID
	--installer-role-arn arn:aws:iam::$AWS_ACCOUNT_ID:role/$ACCOUNT_ROLES_PREFIX-HCP-ROSA-Installer-Role
其中:
--prefix=- 在创建这些 Operator 角色时,您必须提供一个前缀。如果不这样做,则会产生错误。如需有关 Operator 前缀的信息,请参阅本节的额外资源。
--oidc-config-id=- 这个值是您为 Red Hat OpenShift Service on AWS 创建的 OIDC 配置 ID。
--installer-role-arn- 这个值是您在创建 Red Hat OpenShift Service on AWS 帐户角色时创建的安装程序角色 ARN。
您必须包含
-hosted-cp参数,以便为 Red Hat OpenShift Service on AWS 集群创建正确的角色。此命令返回以下信息:例如:
? Role creation mode: auto
? Operator roles prefix: <pre-filled_prefix>
? OIDC Configuration ID: 23soa2bgvpek9kmes9s7os0a39i13qm4 | https://dvbwgdztaeq9o.cloudfront.net/23soa2bgvpek9kmes9s7os0a39i13qm4
? Create hosted control plane operator roles: Yes
W: More than one Installer role found
? Installer role ARN: arn:aws:iam::4540112244:role/<prefix>-HCP-ROSA-Installer-Role
? Permissions boundary ARN (optional):
I: Reusable OIDC Configuration detected. Validating trusted relationships to operator roles:
I: Creating roles using 'arn:aws:iam::4540112244:user/<userName>'
I: Created role '<prefix>-openshift-cluster-csi-drivers-ebs-cloud-credentials' with ARN 'arn:aws:iam::4540112244:role/<prefix>-openshift-cluster-csi-drivers-ebs-cloud-credentials'
I: Created role '<prefix>-openshift-cloud-network-config-controller-cloud-credenti' with ARN 'arn:aws:iam::4540112244:role/<prefix>-openshift-cloud-network-config-controller-cloud-credenti'
I: Created role '<prefix>-kube-system-kube-controller-manager' with ARN 'arn:aws:iam::4540112244:role/<prefix>-kube-system-kube-controller-manager'
I: Created role '<prefix>-kube-system-capa-controller-manager' with ARN 'arn:aws:iam::4540112244:role/<prefix>-kube-system-capa-controller-manager'
I: Created role '<prefix>-kube-system-control-plane-operator' with ARN 'arn:aws:iam::4540112244:role/<prefix>-kube-system-control-plane-operator'
I: Created role '<prefix>-kube-system-kms-provider' with ARN 'arn:aws:iam::4540112244:role/<prefix>-kube-system-kms-provider'
I: Created role '<prefix>-openshift-image-registry-installer-cloud-credentials' with ARN 'arn:aws:iam::4540112244:role/<prefix>-openshift-image-registry-installer-cloud-credentials'
I: Created role '<prefix>-openshift-ingress-operator-cloud-credentials' with ARN 'arn:aws:iam::4540112244:role/<prefix>-openshift-ingress-operator-cloud-credentials'
I: To create a cluster with these roles, run the following command:
	rosa create cluster --sts --oidc-config-id 23soa2bgvpek9kmes9s7os0a39i13qm4 --operator-roles-prefix <prefix> --hosted-cp
其中:
Operator 角色前缀- 此字段会预先填充您在初始创建命令中设置的前缀。
OIDC 配置 ID- 此字段要求您选择为 Red Hat OpenShift Service on AWS 集群创建的 OIDC 配置。
现在,Operator 角色已创建并可用于创建 Red Hat OpenShift Service on AWS 集群。
验证
您可以列出与 Red Hat OpenShift Service on AWS 帐户关联的 Operator 角色。运行以下命令:
$ rosa list operator-roles例如:
I: Fetching operator roles
ROLE PREFIX  AMOUNT IN BUNDLE
<prefix>      8
? Would you like to detail a specific prefix Yes
? Operator Role Prefix: <prefix>
ROLE NAME                                                         ROLE ARN                                                                                         VERSION  MANAGED
<prefix>-kube-system-capa-controller-manager                       arn:aws:iam::4540112244:role/<prefix>-kube-system-capa-controller-manager                       4.13     No
<prefix>-kube-system-control-plane-operator                        arn:aws:iam::4540112244:role/<prefix>-kube-system-control-plane-operator                        4.13     No
<prefix>-kube-system-kms-provider                                  arn:aws:iam::4540112244:role/<prefix>-kube-system-kms-provider                                  4.13     No
<prefix>-kube-system-kube-controller-manager                       arn:aws:iam::4540112244:role/<prefix>-kube-system-kube-controller-manager                       4.13     No
<prefix>-openshift-cloud-network-config-controller-cloud-credenti  arn:aws:iam::4540112244:role/<prefix>-openshift-cloud-network-config-controller-cloud-credenti  4.13     No
<prefix>-openshift-cluster-csi-drivers-ebs-cloud-credentials       arn:aws:iam::4540112244:role/<prefix>-openshift-cluster-csi-drivers-ebs-cloud-credentials       4.13     No
<prefix>-openshift-image-registry-installer-cloud-credentials      arn:aws:iam::4540112244:role/<prefix>-openshift-image-registry-installer-cloud-credentials      4.13     No
<prefix>-openshift-ingress-operator-cloud-credentials              arn:aws:iam::4540112244:role/<prefix>-openshift-ingress-operator-cloud-credentials              4.13     No
命令运行后,它会显示与 AWS 帐户关联的所有前缀,并记录与这个前缀关联的角色数量。如果您需要查看所有这些角色及其详情,请在详情提示符处输入"是",使这些角色以特定形式列出。
9.2. 创建集群
当使用 ROSA 命令行界面(CLI) rosa 创建集群时,您可以添加可选的 flag -no-cni 来创建没有 CNI 插件的集群。
先决条件
- 您已完成 Red Hat OpenShift Service on AWS 的 AWS 先决条件。
- 您有可用的 AWS 服务配额。
- 您已在 AWS 控制台中启用了 Red Hat OpenShift Service on AWS。
-
您已在安装主机上安装和配置了最新的 ROSA CLI (
rosa)。运行rosa 版本,以查看您当前安装的 ROSA CLI 版本。如果有更新的版本,CLI 提供了下载此升级的链接。 - 已使用 ROSA CLI 登录您的红帽帐户。
- 您已创建了 OIDC 配置。
- 您已确认 AWS Elastic Load Balancing (ELB)服务角色存在于 AWS 帐户中。
流程
您可以使用以下命令之一创建 Red Hat OpenShift Service on AWS 集群。
注意在 AWS 集群上创建 Red Hat OpenShift Service 时,默认的无类别域间路由(CIDR)为
10.0.0.0/16。如果这与 VPC 子网的 CIDR 范围不匹配,请在以下命令中添加--machine-cidr <address_block>。运行以下命令,使用单个初始机器池、公开可用的 API、公开可用的 Ingress 和没有 CNI 插件创建集群:
$ rosa create cluster --cluster-name=<cluster_name> \
    --sts --mode=auto --hosted-cp --operator-roles-prefix <operator-role-prefix> \
    --oidc-config-id <ID-of-OIDC-configuration> --subnet-ids=<public-subnet-id>,<private-subnet-id> --no-cni
运行以下命令,使用单个初始机器池、私有可用的 API、私有可用的 Ingress 和没有 CNI 插件创建集群:
$ rosa create cluster --private --cluster-name=<cluster_name> \
    --sts --mode=auto --hosted-cp --subnet-ids=<private-subnet-id> --no-cni
如果您使用
OIDC_ID、SUBNET_IDS和OPERATOR_ROLES_PREFIX变量准备您的环境,您可以在不使用 CNI 插件创建集群时继续使用这些变量。例如,运行以下命令:$ rosa create cluster --hosted-cp --subnet-ids=$SUBNET_IDS --oidc-config-id=$OIDC_ID --cluster-name=<cluster_name> --operator-roles-prefix=$OPERATOR_ROLES_PREFIX --no-cni
运行以下命令检查集群的状态:
$ rosa describe cluster --cluster=<cluster_name>重要当您第一次在达到
就绪状态后登录到集群时,节点仍会处于未就绪状态,直到您安装自己的 CNI 插件为止。CNI 安装后,节点将变为就绪。在集群安装过程中,输出中会列出以下
State字段更改:-
待定(准备帐户) -
安装(进行中的DNS 设置) -
installing ready注意如果安装失败,或者
State字段在超过 10 分钟后没有变为ready,请检查安装故障排除文档以了解详细信息。如需更多信息,请参阅 故障排除安装。如需联系红帽支持以获取帮助的步骤,请参阅 Red Hat OpenShift Service on AWS 支持。
-
通过观察 Red Hat OpenShift Service on AWS 安装程序日志来跟踪集群创建的进度。要检查日志,请运行以下命令:
$ rosa logs install --cluster=<cluster_name> --watch1 - 1
- 可选: 要在安装过程中监视新日志消息,请使用--
watch参数。
9.2.1. 没有 CNI 插件的集群的预期行为
虽然 Red Hat OpenShift Service on AWS 集群安装已完成,但在没有 CNI 插件的情况下集群无法运行。由于节点未就绪,工作负载无法部署。例如,Red Hat OpenShift Service on AWS 集群 Web 控制台不可用,因此您必须使用 OpenShift CLI (oc)来登录到集群。另外,其他 OpenShift 组件(如基于 HAProxy 的 Ingress Controller、镜像 registry 和基于 prometheus 的监控堆栈)没有运行。这是预期的行为,直到安装 CNI 供应商为止。
9.3. 后续步骤
-
安装 CNI 插件。然后,节点将从
未就绪状态更改为ready状态。
第 10 章 删除 Red Hat OpenShift Service on AWS 集群
如果要删除 Red Hat OpenShift Service on AWS 集群,您可以使用 Red Hat OpenShift Cluster Manager 或 ROSA 命令行界面(CLI) (rosa)。删除集群后,您还可以删除集群使用的 AWS Identity and Access Management (IAM)资源。
您可以使用 ROSA CLI 或 Red Hat OpenShift Cluster Manager 删除 Red Hat OpenShift Service on AWS 集群。
删除集群后,您可以使用 ROSA CLI 清理 AWS 帐户中特定于集群的 Identity and Access Management (IAM)资源。特定于集群的资源包括 Operator 角色和 OpenID Connect (OIDC)供应商。
集群删除必须在删除 IAM 资源前完成,因为集群删除和清理过程会用到这些资源。
如果安装了附加组件,集群删除需要更长的时间,因为在删除集群前卸载附加组件。时间量取决于附加组件的数量和大小。
先决条件
- 您已在 AWS 集群上安装了 Red Hat OpenShift Service。
- 您已在安装主机上安装和配置了最新的 ROSA CLI。
流程
运行以下命令,获取集群 ID、特定于集群 Operator 角色的 Amazon 资源名称(ARN)和 OIDC 供应商的端点 URL:
$ rosa describe cluster --cluster=<cluster_name>输出示例
Name:                       test_cluster
Domain Prefix:              test_cluster
Display Name:               test_cluster
ID:                         <cluster_id>
1 External ID: <external_id> Control Plane: ROSA Service Hosted OpenShift Version: 4.20.0 Channel Group: stable DNS: test_cluster.l3cn.p3.openshiftapps.com AWS Account: <AWS_id> AWS Billing Account: <AWS_id> API URL: https://api.test_cluster.l3cn.p3.openshiftapps.com:443 Console URL: Region: us-east-1 Availability: - Control Plane: MultiAZ - Data Plane: SingleAZ Nodes: - Compute (desired): 2 - Compute (current): 0 Network: - Type: OVNKubernetes - Service CIDR: 172.30.0.0/16 - Machine CIDR: 10.0.0.0/16 - Pod CIDR: 10.128.0.0/14 - Host Prefix: /23 - Subnets: <subnet_ids> EC2 Metadata Http Tokens: optional Role (STS) ARN: arn:aws:iam::<AWS_id>:role/test_cluster-HCP-ROSA-Installer-Role Support Role ARN: arn:aws:iam::<AWS_id>:role/test_cluster-HCP-ROSA-Support-Role Instance IAM Roles: - Worker: arn:aws:iam::<AWS_id>:role/test_cluster-HCP-ROSA-Worker-Role Operator IAM Roles:2 - arn:aws:iam::<AWS_id>:role/test_cluster-openshift-cloud-network-config-controller-cloud-crede - arn:aws:iam::<AWS_id>:role/test_cluster-openshift-image-registry-installer-cloud-credentials - arn:aws:iam::<AWS_id>:role/test_cluster-openshift-ingress-operator-cloud-credentials - arn:aws:iam::<AWS_id>:role/test_cluster-kube-system-kube-controller-manager - arn:aws:iam::<AWS_id>:role/test_cluster-kube-system-capa-controller-manager - arn:aws:iam::<AWS_id>:role/test_cluster-kube-system-control-plane-operator - arn:aws:iam::<AWS_id>:role/hcpcluster-kube-system-kms-provider - arn:aws:iam::<AWS_id>:role/test_cluster-openshift-cluster-csi-drivers-ebs-cloud-credentials Managed Policies: Yes State: ready Private: No Created: Apr 16 2024 20:32:06 UTC User Workload Monitoring: Enabled Details Page: https://console.redhat.com/openshift/details/s/<cluster_id> OIDC Endpoint URL: https://oidc.op1.openshiftapps.com/<cluster_id> (Managed)3 Audit Log Forwarding: Disabled External Authentication: Disabled重要删除集群后,您需要集群 ID 来使用 ROSA CLI 删除特定于集群的 STS 资源。
使用 OpenShift Cluster Manager 或 ROSA CLI 删除集群:
使用 OpenShift Cluster Manager 删除集群:
- 导航到 OpenShift Cluster Manager。
-
点击集群
 旁边的 Options 菜单并选择 Delete cluster。
- 在提示符处键入集群名称并点 Delete。
使用 ROSA CLI 删除集群:
运行以下命令,将 <
;cluster_name> 替换为集群的名称或 ID:$ rosa delete cluster --cluster=<cluster_name> --watch重要在删除 Operator 角色和 OIDC 供应商前,您必须等待集群删除完成。
运行以下命令来删除特定于集群的 Operator IAM 角色:
对于没有共享虚拟私有云(VPC)的集群:
$ rosa delete operator-roles --prefix <operator_role_prefix>对于具有共享 VPC 的集群:
$ rosa delete operator-roles --prefix <operator_role_prefix> --delete-hosted-shared-vpc-policies
运行以下命令来删除 OIDC 供应商:
$ rosa delete oidc-provider --oidc-config-id <oidc_config_id>
故障排除
- 确保 混合云控制台中 没有您的集群的附加组件。
- 确保 Amazon Web 控制台中删除了所有 AWS 资源和依赖项。
10.2. 删除帐户范围的 IAM 资源
删除依赖于帐户范围的 AWS Identity and Access Management (IAM)资源的所有 Red Hat OpenShift Service on AWS 集群后,您可以删除集群范围的资源。
如果您不再需要使用 Red Hat OpenShift Cluster Manager 在 AWS 集群上安装 Red Hat OpenShift Service,您也可以删除 OpenShift Cluster Manager 和用户 IAM 角色。
帐户范围的 IAM 角色和策略可能被同一 AWS 帐户中的其他 Red Hat OpenShift Service on AWS 使用。只有在其他集群不需要资源时,才删除这些资源。
如果要使用 OpenShift Cluster Manager 安装、管理和删除同一 AWS 帐户中的其他 Red Hat OpenShift Service on AWS 集群,则需要 OpenShift Cluster Manager 和用户 IAM 角色。只有您不再需要使用 OpenShift Cluster Manager 在帐户中安装 Red Hat OpenShift Service on AWS 集群时,才删除角色。有关在删除前删除这些角色,请参阅"修复集群 故障排除"中的修复集群。
10.2.1. 删除帐户范围的 IAM 角色和策略
本节提供了删除您为 Red Hat OpenShift Service on AWS 部署创建的账户范围的 IAM 角色和策略以及帐户范围内的 Operator 策略的步骤。只有在删除所有依赖于它们的 Red Hat OpenShift Service on AWS 集群后,才能删除集群范围的 AWS Identity and Access Management (IAM)角色和策略。
帐户范围的 IAM 角色和策略可能被同一 AWS 帐户中的其他 Red Hat OpenShift Service on AWS 使用。只有角色不再被其他集群需要时,才删除这些资源。
先决条件
- 您有要删除的帐户范围的 IAM 角色。
-
您已在安装主机上安装和配置了最新的 ROSA CLI (
rosa)。
流程
删除集群范围的角色:
使用 ROSA CLI 列出 AWS 帐户中的系统范围角色 (
rosa):$ rosa list account-roles输出示例
I: Fetching account roles
ROLE NAME                                 ROLE TYPE      ROLE ARN                                                                 OPENSHIFT VERSION  AWS Managed
ManagedOpenShift-HCP-ROSA-Installer-Role  Installer      arn:aws:iam::<aws_account_id>:role/ManagedOpenShift-HCP-ROSA-Installer-Role  4.20               Yes
ManagedOpenShift-HCP-ROSA-Support-Role    Support        arn:aws:iam::<aws_account_id>:role/ManagedOpenShift-HCP-ROSA-Support-Role    4.20               Yes
ManagedOpenShift-HCP-ROSA-Worker-Role     Worker         arn:aws:iam::<aws_account_id>:role/ManagedOpenShift-HCP-ROSA-Worker-Role     4.20               Yes
运行以下命令来删除集群范围的角色:
对于没有共享虚拟私有云(VPC)的集群:
$ rosa delete account-roles --prefix <prefix> --mode auto1 - 1
- 您必须包含
--<prefix>参数。将<prefix>替换为要删除的集群范围角色前缀。如果您在创建集群范围的角色时没有指定自定义前缀,请指定默认前缀ManagedOpenShift。
对于具有共享 VPC 的集群:
$ rosa delete account-roles --prefix <prefix> --delete-hosted-shared-vpc-policies --mode auto1 - 1
- 您必须包含
--<prefix>参数。将<prefix>替换为要删除的集群范围角色前缀。如果您在创建集群范围的角色时没有指定自定义前缀,请指定默认前缀ManagedOpenShift。
重要帐户范围的 IAM 角色可能被同一 AWS 帐户中的其他 Red Hat OpenShift Service on AWS 集群使用。只有角色不再被其他集群需要时,才删除这些资源。
输出示例
W: There are no classic account roles to be deleted
I: Deleting hosted CP account roles
? Delete the account role 'delete-rosa-HCP-ROSA-Installer-Role'? Yes
I: Deleting account role 'delete-rosa-HCP-ROSA-Installer-Role'
? Delete the account role 'delete-rosa-HCP-ROSA-Support-Role'? Yes
I: Deleting account role 'delete-rosa-HCP-ROSA-Support-Role'
? Delete the account role 'delete-rosa-HCP-ROSA-Worker-Role'? Yes
I: Deleting account role 'delete-rosa-HCP-ROSA-Worker-Role'
I: Successfully deleted the hosted CP account roles
删除账户范围内的 in-line 和 Operator 策略:
在 AWS IAM Console 的 Policies 页面中,根据您在创建帐户范围角色和策略时指定的前缀过滤策略列表。
注意如果您在创建集群范围的角色时没有指定自定义前缀,请搜索默认前缀
ManagedOpenShift。使用 AWS IAM 控制台删除集群范围的策略和 Operator 策略。有关使用 AWS IAM 控制台删除 IAM 策略的更多信息,请参阅 AWS 文档中的删除 IAM 策略。
重要帐户范围的和 Operator IAM 策略可能被同一 AWS 帐户中的其他 Red Hat OpenShift Service on AWS 集群使用。只有角色不再被其他集群需要时,才删除这些资源。
10.2.2. 取消链接和删除 OpenShift Cluster Manager 和用户 IAM 角色
当使用 Red Hat OpenShift Cluster Manager 在 AWS 集群上安装 Red Hat OpenShift Service 时,还需要创建 OpenShift Cluster Manager 和用户 Identity and Access Management (IAM)角色,该角色链接到您的红帽机构。删除集群后,您可以使用 ROSA CLI (rosa) 取消链接和删除角色。
如果要使用 OpenShift Cluster Manager 在同一个 AWS 帐户中安装和管理其他 Red Hat OpenShift Service on AWS 集群,则需要 OpenShift Cluster Manager 和用户 IAM 角色。只有在不再需要使用 OpenShift Cluster Manager 在 AWS 集群上安装 Red Hat OpenShift Service 时,才删除角色。
先决条件
- 您创建了 OpenShift Cluster Manager 和用户 IAM 角色,并将其链接到红帽机构。
-
您已在安装主机上安装和配置了最新的 ROSA CLI (
rosa)。 - 您在红帽机构中具有机构管理员特权。
流程
从您的红帽机构中取消链接 OpenShift Cluster Manager IAM 角色并删除角色:
列出 AWS 帐户中的 OpenShift Cluster Manager IAM 角色:
$ rosa list ocm-roles输出示例
I: Fetching ocm roles
ROLE NAME                                                     ROLE ARN                                                                                         LINKED  ADMIN  AWS Managed
ManagedOpenShift-OCM-Role-<red_hat_organization_external_id>  arn:aws:iam::<aws_account_id>:role/ManagedOpenShift-OCM-Role-<red_hat_organization_external_id>  Yes      Yes     Yes
如果您的 OpenShift Cluster Manager IAM 角色在上一命令的输出中被列为链接,请运行以下命令取消链接您的红帽机构中的角色:
$ rosa unlink ocm-role --role-arn <arn>1 - 1
- 将
<arn> 替换为 OpenShift Cluster Manager IAM 角色的 Amazon Resource Name (ARN)。ARN 在上一命令的输出中指定。在上例中,ARN 格式为arn:aws:iam::<aws_account_id>:role/ManagedOpenShift-OCM-Role-<red_hat_organization_external_id>。
输出示例
I: Unlinking OCM role
? Unlink the 'arn:aws:iam::<aws_account_id>:role/ManagedOpenShift-OCM-Role-<red_hat_organization_external_id>' role from organization '<red_hat_organization_id>'? Yes
I: Successfully unlinked role-arn 'arn:aws:iam::<aws_account_id>:role/ManagedOpenShift-OCM-Role-<red_hat_organization_external_id>' from organization account '<red_hat_organization_id>'
删除 OpenShift Cluster Manager IAM 角色和策略:
$ rosa delete ocm-role --role-arn <arn>输出示例
I: Deleting OCM role
? OCM Role ARN: arn:aws:iam::<aws_account_id>:role/ManagedOpenShift-OCM-Role-<red_hat_organization_external_id>
? Delete 'arn:aws:iam::<aws_account_id>:role/ManagedOpenShift-OCM-Role-<red_hat_organization_external_id>' ocm role? Yes
? OCM role deletion mode: auto
1 I: Successfully deleted the OCM role- 1
- 指定删除模式。您可以使用
auto模式自动删除 OpenShift Cluster Manager IAM 角色和策略。在手动模式中,ROSA CLI 会生成删除角色和策略所需的aws命令。manual模式允许您在手动运行aws命令前查看详情。
从您的红帽机构中取消链接用户 IAM 角色并删除角色:
列出 AWS 帐户中的用户 IAM 角色:
$ rosa list user-roles输出示例
I: Fetching user roles
ROLE NAME                                  ROLE ARN                                                                  LINKED
ManagedOpenShift-User-<ocm_user_name>-Role  arn:aws:iam::<aws_account_id>:role/ManagedOpenShift-User-<ocm_user_name>-Role  Yes
如果您的用户 IAM 角色在上一命令的输出中被列为链接,请取消链接您的红帽机构中的角色:
$ rosa unlink user-role --role-arn <arn>1 - 1
- 将
<arn> 替换为用户 IAM 角色的 Amazon Resource Name (ARN)。ARN 在上一命令的输出中指定。在上例中,ARN 格式为arn:aws:iam::<aws_account_id>:role/ManagedOpenShift-User-<ocm_user_name>-Role。
输出示例
I: Unlinking user role
? Unlink the 'arn:aws:iam::<aws_account_id>:role/ManagedOpenShift-User-<ocm_user_name>-Role' role from the current account '<ocm_user_account_id>'? Yes
I: Successfully unlinked role ARN 'arn:aws:iam::<aws_account_id>:role/ManagedOpenShift-User-<ocm_user_name>-Role' from account '<ocm_user_account_id>'
删除用户 IAM 角色:
$ rosa delete user-role --role-arn <arn>输出示例
I: Deleting user role
? User Role ARN: arn:aws:iam::<aws_account_id>:role/ManagedOpenShift-User-<ocm_user_name>-Role
? Delete the 'arn:aws:iam::<aws_account_id>:role/ManagedOpenShift-User-<ocm_user_name>-Role' role from the AWS account? Yes
? User role deletion mode: auto
1 I: Successfully deleted the user role- 1
- 指定删除模式。您可以使用
auto模式自动删除用户 IAM 角色。在手动模式中,ROSA CLI 生成删除角色所需的aws命令。manual模式允许您在手动运行aws命令前查看详情。
Legal Notice
Copyright © Red Hat
OpenShift documentation is licensed under the Apache License 2.0 (https://www.apache.org/licenses/LICENSE-2.0).
Modified versions must remove all Red Hat trademarks.
Portions adapted from https://github.com/kubernetes-incubator/service-catalog/ with modifications by Red Hat.
Red Hat, Red Hat Enterprise Linux, the Red Hat logo, the Shadowman logo, JBoss, OpenShift, Fedora, the Infinity logo, and RHCE are trademarks of Red Hat, Inc., registered in the United States and other countries.
Linux® is the registered trademark of Linus Torvalds in the United States and other countries.
Java® is a registered trademark of Oracle and/or its affiliates.
XFS® is a trademark of Silicon Graphics International Corp. or its subsidiaries in the United States and/or other countries.
MySQL® is a registered trademark of MySQL AB in the United States, the European Union and other countries.
Node.js® is an official trademark of the OpenJS Foundation.
The OpenStack® Word Mark and OpenStack logo are either registered trademarks/service marks or trademarks/service marks of the OpenStack Foundation, in the United States and other countries and are used with the OpenStack Foundation’s permission. We are not affiliated with, endorsed or sponsored by the OpenStack Foundation, or the OpenStack community.
All other trademarks are the property of their respective owners.