Chapter 4. Installer-provisioned postinstallation configuration
After successfully deploying an installer-provisioned cluster, consider the following postinstallation procedures.
4.1. Configuring NTP for disconnected clusters
OpenShift Container Platform installs the chrony Network Time Protocol (NTP) service on the cluster nodes.

OpenShift Container Platform nodes must agree on a date and time to run properly. When compute nodes retrieve the date and time from the NTP servers on the control plane nodes, it enables the installation and operation of clusters that are not connected to a routable network and thereby do not have access to a higher stratum NTP server.
Procedure
Install Butane on your installation host by using the following command:
$ sudo dnf -y install butaneCreate a Butane config,
99-master-chrony-conf-override.bu, including the contents of thechrony.conffile for the control plane nodes.NoteSee "Creating machine configs with Butane" for information about Butane.
Butane config example
variant: openshift
version: 4.18.0
metadata:
  name: 99-master-chrony-conf-override
  labels:
    machineconfiguration.openshift.io/role: master
storage:
  files:
    - path: /etc/chrony.conf
      mode: 0644
      overwrite: true
      contents:
        inline: |
          # Use public servers from the pool.ntp.org project.
          # Please consider joining the pool (https://www.pool.ntp.org/join.html).

          # The Machine Config Operator manages this file
          server openshift-master-0.<cluster-name>.<domain> iburst
1 server openshift-master-1.<cluster-name>.<domain> iburst server openshift-master-2.<cluster-name>.<domain> iburst stratumweight 0 driftfile /var/lib/chrony/drift rtcsync makestep 10 3 bindcmdaddress 127.0.0.1 bindcmdaddress ::1 keyfile /etc/chrony.keys commandkey 1 generatecommandkey noclientlog logchange 0.5 logdir /var/log/chrony # Configure the control plane nodes to serve as local NTP servers # for all compute nodes, even if they are not in sync with an # upstream NTP server. # Allow NTP client access from the local network. allow all # Serve time even if not synchronized to a time source. local stratum 3 orphan- 1
- You must replace
<cluster-name>with the name of the cluster and replace<domain>with the fully qualified domain name.
Use Butane to generate a
MachineConfigobject file,99-master-chrony-conf-override.yaml, containing the configuration to be delivered to the control plane nodes:$ butane 99-master-chrony-conf-override.bu -o 99-master-chrony-conf-override.yamlCreate a Butane config,
99-worker-chrony-conf-override.bu, including the contents of thechrony.conffile for the compute nodes that references the NTP servers on the control plane nodes.Butane config example
variant: openshift
version: 4.18.0
metadata:
  name: 99-worker-chrony-conf-override
  labels:
    machineconfiguration.openshift.io/role: worker
storage:
  files:
    - path: /etc/chrony.conf
      mode: 0644
      overwrite: true
      contents:
        inline: |
          # The Machine Config Operator manages this file.
          server openshift-master-0.<cluster-name>.<domain> iburst
1 server openshift-master-1.<cluster-name>.<domain> iburst server openshift-master-2.<cluster-name>.<domain> iburst stratumweight 0 driftfile /var/lib/chrony/drift rtcsync makestep 10 3 bindcmdaddress 127.0.0.1 bindcmdaddress ::1 keyfile /etc/chrony.keys commandkey 1 generatecommandkey noclientlog logchange 0.5 logdir /var/log/chrony- 1
- You must replace
<cluster-name>with the name of the cluster and replace<domain>with the fully qualified domain name.
Use Butane to generate a
MachineConfigobject file,99-worker-chrony-conf-override.yaml, containing the configuration to be delivered to the worker nodes:$ butane 99-worker-chrony-conf-override.bu -o 99-worker-chrony-conf-override.yaml
4.2. Enabling a provisioning network after installation
The assisted installer and installer-provisioned installation for bare metal clusters provide the ability to deploy a cluster without a provisioning network. This capability is for scenarios such as proof-of-concept clusters or deploying exclusively with Redfish virtual media when each node’s baseboard management controller is routable via the baremetal network.
You can enable a provisioning network after installation using the Cluster Baremetal Operator (CBO).
Prerequisites
- A dedicated physical network must exist, connected to all worker and control plane nodes.
- You must isolate the native, untagged physical network.
-
The network cannot have a DHCP server when the
provisioningNetworkconfiguration setting is set toManaged. -
You can omit the
provisioningInterfacesetting in OpenShift Container Platform 4.10 to use thebootMACAddressconfiguration setting.
Procedure
-
When setting the
provisioningInterfacesetting, first identify the provisioning interface name for the cluster nodes. For example,eth0oreno1. -
Enable the Preboot eXecution Environment (PXE) on the
provisioningnetwork interface of the cluster nodes. Retrieve the current state of the
provisioningnetwork and save it to a provisioning custom resource (CR) file:$ oc get provisioning -o yaml > enable-provisioning-nw.yamlModify the provisioning CR file:
$ vim ~/enable-provisioning-nw.yamlScroll down to the
provisioningNetworkconfiguration setting and change it fromDisabledtoManaged. Then, add theprovisioningIP,provisioningNetworkCIDR,provisioningDHCPRange,provisioningInterface, andwatchAllNameSpacesconfiguration settings after theprovisioningNetworksetting. Provide appropriate values for each setting.apiVersion: v1 items: - apiVersion: metal3.io/v1alpha1 kind: Provisioning metadata: name: provisioning-configuration spec: provisioningNetwork:1 provisioningIP:2 provisioningNetworkCIDR:3 provisioningDHCPRange:4 provisioningInterface:5 watchAllNameSpaces:6 - 1
- The
provisioningNetworkis one ofManaged,Unmanaged, orDisabled. When set toManaged, Metal3 manages the provisioning network and the CBO deploys the Metal3 pod with a configured DHCP server. When set toUnmanaged, the system administrator configures the DHCP server manually. - 2
- The
provisioningIPis the static IP address that the DHCP server and ironic use to provision the network. This static IP address must be within theprovisioningsubnet, and outside of the DHCP range. If you configure this setting, it must have a valid IP address even if theprovisioningnetwork isDisabled. The static IP address is bound to the metal3 pod. If the metal3 pod fails and moves to another server, the static IP address also moves to the new server. - 3
- The Classless Inter-Domain Routing (CIDR) address. If you configure this setting, it must have a valid CIDR address even if the
provisioningnetwork isDisabled. For example:192.168.0.1/24. - 4
- The DHCP range. This setting is only applicable to a
Managedprovisioning network. Omit this configuration setting if theprovisioningnetwork isDisabled. For example:192.168.0.64, 192.168.0.253. - 5
- The NIC name for the
provisioninginterface on cluster nodes. TheprovisioningInterfacesetting is only applicable toManagedandUnmanagedprovisioning networks. Omit theprovisioningInterfaceconfiguration setting if theprovisioningnetwork isDisabled. Omit theprovisioningInterfaceconfiguration setting to use thebootMACAddressconfiguration setting instead. - 6
- Set this setting to
trueif you want metal3 to watch namespaces other than the defaultopenshift-machine-apinamespace. The default value isfalse.
- Save the changes to the provisioning CR file.
Apply the provisioning CR file to the cluster:
$ oc apply -f enable-provisioning-nw.yaml
4.3. Creating a manifest object that includes a customized br-ex bridge
Consider using the default OVS br-ex bridge configuration if you require a standard environment with a single network interface controller (NIC) and standard OVS settings.
By default, OpenShift Container Platform automatically configures the Open vSwitch (OVS) br-ex bridge on bare-metal nodes. For advanced networking requirements, you can override the default behavior by creating a NodeNetworkConfigurationPolicy (NNCP) custom resource (CR) that includes an NMState configuration file.
The Kubernetes NMState Operator uses the NMState configuration file to create a customized br-ex bridge network configuration on each node in your cluster.
After creating the NodeNetworkConfigurationPolicy CR, copy content from the NMState configuration file that was created during cluster installation into the NNCP CR. An incomplete NNCP CR can result in loss of network connectivity, because the NNCP overrides all existing policies.
Consider using the customized br-ex bridge configuration for any of the following tasks:
-
You want to make postinstallation changes to the bridge, such as changing the Open vSwitch (OVS) or OVN-Kubernetes
br-exbridge network. The default OVSbr-exbridge mechanism does not support making postinstallation changes to the bridge. - You want to deploy the bridge on a different interface than the interface available on a host or server IP address.
-
You want to make advanced configurations to the bridge that are not possible with the default OVS
br-exbridge mechanism. Using the default mechanism for these configurations might result in the bridge failing to connect multiple network interfaces and facilitating data forwarding between the interfaces.
The following list of interface names are reserved and you cannot use the names with NMstate configurations:
-
br-ext -
br-int -
br-local -
br-nexthop -
br0 -
ext-vxlan -
ext -
genev_sys_* -
int -
k8s-* -
ovn-k8s-* -
patch-br-* -
tun0 -
vxlan_sys_*
Prerequisites
- You have installed the Kubernetes NMState Operator.
- You have identified the specific nodes where you want to apply the policy.
Procedure
Create a
NodeNetworkConfigurationPolicy(NNCP) CR and define a customizedbr-exbridge network configuration. Thebr-exNNCP CR must include the OVN-Kubernetes masquerade IP address and subnet of your network. The example NNCP CR includes default values in theipv4.address.ipandipv6.address.ipparameters. You can set the masquerade IP address in theipv4.address.ip,ipv6.address.ip, or both parameters.ImportantAs a post-installation task, you cannot change the primary IP address of the customized
br-exbridge. If you want to convert your single-stack cluster network to a dual-stack cluster network, you can add or change a secondary IPv6 address in the NNCP CR, but the existing primary IP address cannot be changed.apiVersion: nmstate.io/v1 kind: NodeNetworkConfigurationPolicy metadata: name: worker-0-br-ex spec: nodeSelector: kubernetes.io/hostname: worker-0 desiredState: interfaces: - name: enp2s0 type: ethernet state: up ipv4: enabled: false ipv6: enabled: false - name: br-ex type: ovs-bridge state: up ipv4: enabled: false dhcp: false ipv6: enabled: false dhcp: false bridge: options: mcast-snooping-enable: true port: - name: enp2s0 - name: br-ex - name: br-ex type: ovs-interface state: up copy-mac-from: enp2s0 ipv4: enabled: true dhcp: true auto-route-metric: 48 address: - ip: "169.254.0.2" prefix-length: 17 ipv6: enabled: true dhcp: true auto-route-metric: 48 address: - ip: "fd69::2" prefix-length: 112 # ...where:
metadata.name- Name of the policy.
interfaces.name- Name of the interface.
interfaces.type- The type of ethernet.
interfaces.state- The requested state for the interface after creation.
ipv4.enabled- Disables IPv4 and IPv6 in this example.
port.name- The node NIC to which the bridge is attached.
address.ip- Shows the default IPv4 and IPv6 IP addresses. Ensure that you set the masquerade IPv4 and IPv6 IP addresses of your network.
auto-route-metric-
Set the parameter to
48to ensure thebr-exdefault route always has the highest precedence (lowest metric). This configuration prevents routing conflicts with any other interfaces that are automatically configured by theNetworkManagerservice.
Next steps
-
Scaling compute nodes to apply the manifest object that includes a customized
br-exbridge to each compute node that exists in your cluster. For more information, see "Expanding the cluster" in the Additional resources section.
4.4. Services for a user-managed load balancer
To integrate your infrastructure with existing network standards or gain more control over traffic management in OpenShift Container Platform , configure services for a user-managed load balancer.
Configuring a user-managed load balancer depends on your vendor’s load balancer.
The information and examples in this section are for guideline purposes only. Consult the vendor documentation for more specific information about the vendor’s load balancer.
Red Hat supports the following services for a user-managed load balancer:
- Ingress Controller
- OpenShift API
- OpenShift MachineConfig API
You can choose whether you want to configure one or all of these services for a user-managed load balancer. Configuring only the Ingress Controller service is a common configuration option. To better understand each service, view the following diagrams:
Figure 4.1. Example network workflow that shows an Ingress Controller operating in an OpenShift Container Platform environment
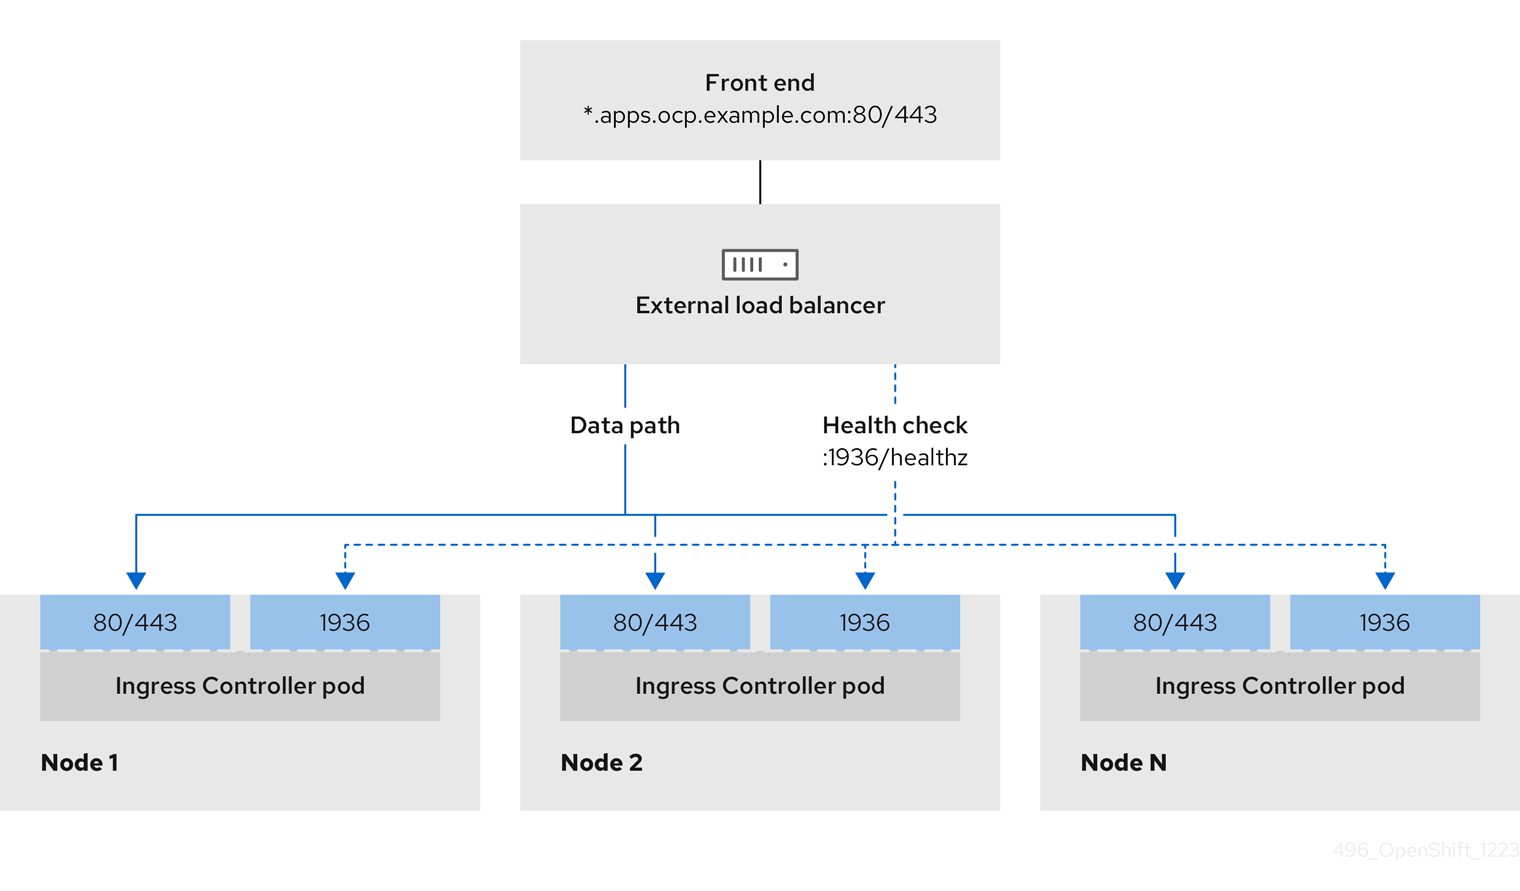
Figure 4.2. Example network workflow that shows an OpenShift API operating in an OpenShift Container Platform environment
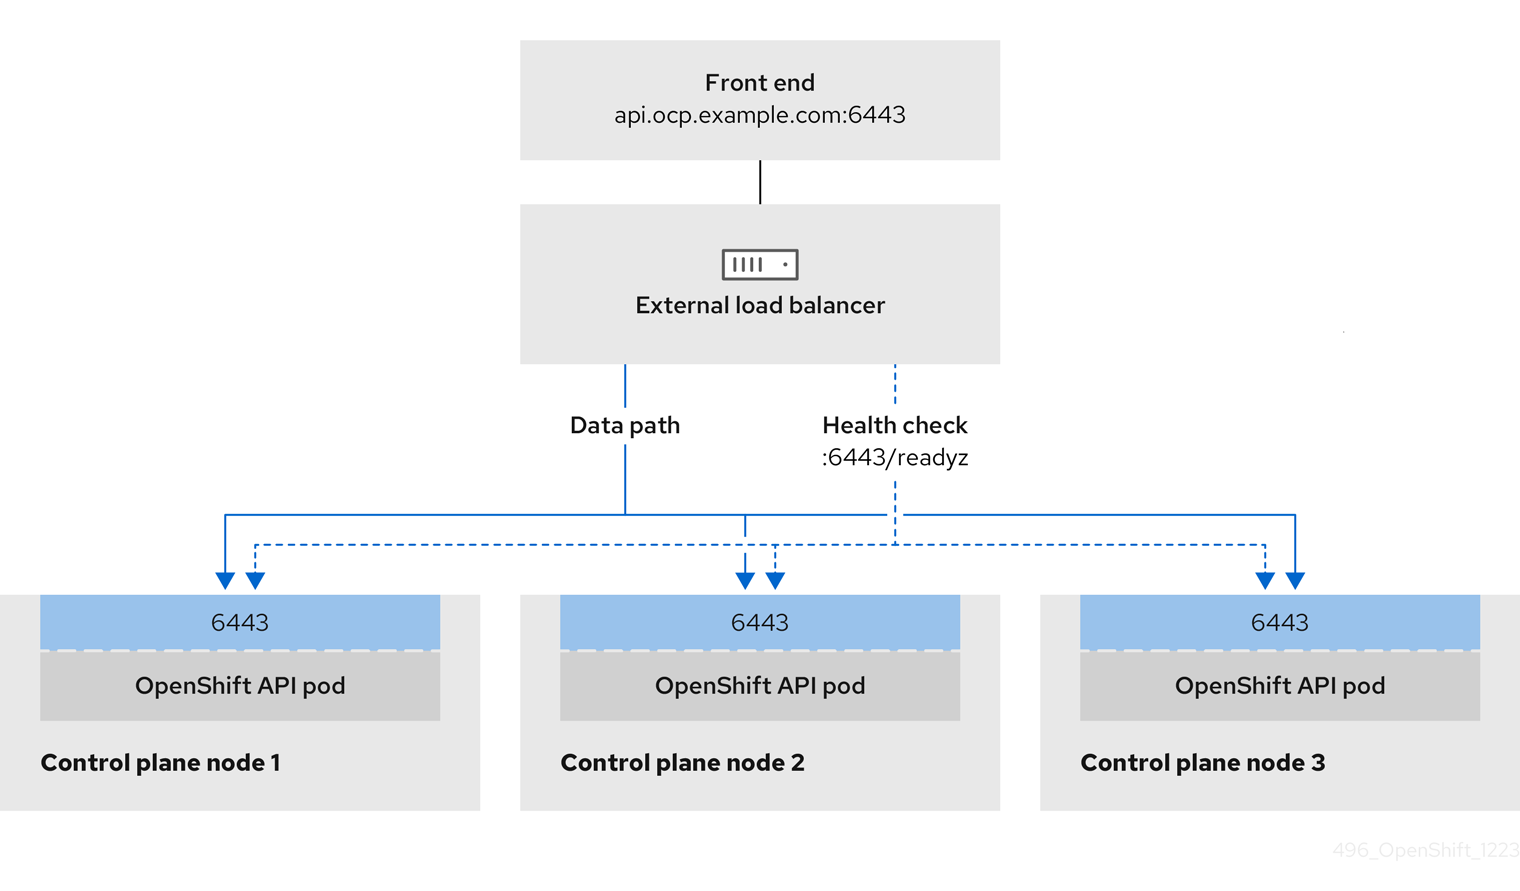
Figure 4.3. Example network workflow that shows an OpenShift MachineConfig API operating in an OpenShift Container Platform environment

The following configuration options are supported for user-managed load balancers:
- Use a node selector to map the Ingress Controller to a specific set of nodes. You must assign a static IP address to each node in this set, or configure each node to receive the same IP address from the Dynamic Host Configuration Protocol (DHCP). Infrastructure nodes commonly receive this type of configuration.
Target all IP addresses on a subnet. This configuration can reduce maintenance overhead, because you can create and destroy nodes within those networks without reconfiguring the load balancer targets. If you deploy your ingress pods by using a machine set on a smaller network, such as a
/27or/28, you can simplify your load balancer targets.TipYou can list all IP addresses that exist in a network by checking the machine config pool’s resources.
Before you configure a user-managed load balancer for your OpenShift Container Platform cluster, consider the following information:
- For a front-end IP address, you can use the same IP address for the front-end IP address, the Ingress Controller’s load balancer, and API load balancer. Check the vendor’s documentation for this capability.
For a back-end IP address, ensure that an IP address for an OpenShift Container Platform control plane node does not change during the lifetime of the user-managed load balancer. You can achieve this by completing one of the following actions:
- Assign a static IP address to each control plane node.
- Configure each node to receive the same IP address from the DHCP every time the node requests a DHCP lease. Depending on the vendor, the DHCP lease might be in the form of an IP reservation or a static DHCP assignment.
- Manually define each node that runs the Ingress Controller in the user-managed load balancer for the Ingress Controller back-end service. For example, if the Ingress Controller moves to an undefined node, a connection outage can occur.
4.4.1. Configuring a user-managed load balancer
To integrate your infrastructure with existing network standards or gain more control over traffic management in OpenShift Container Platform , use a user-managed load balancer in place of the default load balancer.
Before you configure a user-managed load balancer, ensure that you read the "Services for a user-managed load balancer" section.
Read the following prerequisites that apply to the service that you want to configure for your user-managed load balancer.
MetalLB, which runs on a cluster, functions as a user-managed load balancer.
Prerequisites
The following list details OpenShift API prerequisites:
- You defined a front-end IP address.
TCP ports 6443 and 22623 are exposed on the front-end IP address of your load balancer. Check the following items:
- Port 6443 provides access to the OpenShift API service.
- Port 22623 can provide ignition startup configurations to nodes.
- The front-end IP address and port 6443 are reachable by all users of your system with a location external to your OpenShift Container Platform cluster.
- The front-end IP address and port 22623 are reachable only by OpenShift Container Platform nodes.
- The load balancer backend can communicate with OpenShift Container Platform control plane nodes on port 6443 and 22623.
The following list details Ingress Controller prerequisites:
- You defined a front-end IP address.
- TCP port 443 and port 80 are exposed on the front-end IP address of your load balancer.
- The front-end IP address, port 80 and port 443 are reachable by all users of your system with a location external to your OpenShift Container Platform cluster.
- The front-end IP address, port 80 and port 443 are reachable by all nodes that operate in your OpenShift Container Platform cluster.
- The load balancer backend can communicate with OpenShift Container Platform nodes that run the Ingress Controller on ports 80, 443, and 1936.
The following list details prerequisites for health check URL specifications:
You can configure most load balancers by setting health check URLs that determine if a service is available or unavailable. OpenShift Container Platform provides these health checks for the OpenShift API, Machine Configuration API, and Ingress Controller backend services.
The following example shows a Kubernetes API health check specification for a backend service:
Path: HTTPS:6443/readyz
Healthy threshold: 2
Unhealthy threshold: 2
Timeout: 10
Interval: 10
The following example shows a Machine Config API health check specification for a backend service:
Path: HTTPS:22623/healthz
Healthy threshold: 2
Unhealthy threshold: 2
Timeout: 10
Interval: 10
The following example shows a Ingress Controller health check specification for a backend service:
Path: HTTP:1936/healthz/ready
Healthy threshold: 2
Unhealthy threshold: 2
Timeout: 5
Interval: 10
Procedure
Configure the HAProxy Ingress Controller, so that you can enable access to the cluster from your load balancer on ports 6443, 22623, 443, and 80. Depending on your needs, you can specify the IP address of a single subnet or IP addresses from multiple subnets in your HAProxy configuration.
Example HAProxy configuration with one listed subnet
# ...
listen my-cluster-api-6443
    bind 192.168.1.100:6443
    mode tcp
    balance roundrobin
  option httpchk
  http-check connect
  http-check send meth GET uri /readyz
  http-check expect status 200
    server my-cluster-master-2 192.168.1.101:6443 check inter 10s rise 2 fall 2
    server my-cluster-master-0 192.168.1.102:6443 check inter 10s rise 2 fall 2
    server my-cluster-master-1 192.168.1.103:6443 check inter 10s rise 2 fall 2

listen my-cluster-machine-config-api-22623
    bind 192.168.1.100:22623
    mode tcp
    balance roundrobin
  option httpchk
  http-check connect
  http-check send meth GET uri /healthz
  http-check expect status 200
    server my-cluster-master-2 192.168.1.101:22623 check inter 10s rise 2 fall 2
    server my-cluster-master-0 192.168.1.102:22623 check inter 10s rise 2 fall 2
    server my-cluster-master-1 192.168.1.103:22623 check inter 10s rise 2 fall 2

listen my-cluster-apps-443
    bind 192.168.1.100:443
    mode tcp
    balance roundrobin
  option httpchk
  http-check connect
  http-check send meth GET uri /healthz/ready
  http-check expect status 200
    server my-cluster-worker-0 192.168.1.111:443 check port 1936 inter 10s rise 2 fall 2
    server my-cluster-worker-1 192.168.1.112:443 check port 1936 inter 10s rise 2 fall 2
    server my-cluster-worker-2 192.168.1.113:443 check port 1936 inter 10s rise 2 fall 2

listen my-cluster-apps-80
   bind 192.168.1.100:80
   mode tcp
   balance roundrobin
  option httpchk
  http-check connect
  http-check send meth GET uri /healthz/ready
  http-check expect status 200
    server my-cluster-worker-0 192.168.1.111:80 check port 1936 inter 10s rise 2 fall 2
    server my-cluster-worker-1 192.168.1.112:80 check port 1936 inter 10s rise 2 fall 2
    server my-cluster-worker-2 192.168.1.113:80 check port 1936 inter 10s rise 2 fall 2
# ...
Example HAProxy configuration with multiple listed subnets
# ...
listen api-server-6443
    bind *:6443
    mode tcp
      server master-00 192.168.83.89:6443 check inter 1s
      server master-01 192.168.84.90:6443 check inter 1s
      server master-02 192.168.85.99:6443 check inter 1s
      server bootstrap 192.168.80.89:6443 check inter 1s

listen machine-config-server-22623
    bind *:22623
    mode tcp
      server master-00 192.168.83.89:22623 check inter 1s
      server master-01 192.168.84.90:22623 check inter 1s
      server master-02 192.168.85.99:22623 check inter 1s
      server bootstrap 192.168.80.89:22623 check inter 1s

listen ingress-router-80
    bind *:80
    mode tcp
    balance source
      server worker-00 192.168.83.100:80 check inter 1s
      server worker-01 192.168.83.101:80 check inter 1s

listen ingress-router-443
    bind *:443
    mode tcp
    balance source
      server worker-00 192.168.83.100:443 check inter 1s
      server worker-01 192.168.83.101:443 check inter 1s

listen ironic-api-6385
    bind *:6385
    mode tcp
    balance source
      server master-00 192.168.83.89:6385 check inter 1s
      server master-01 192.168.84.90:6385 check inter 1s
      server master-02 192.168.85.99:6385 check inter 1s
      server bootstrap 192.168.80.89:6385 check inter 1s

listen inspector-api-5050
    bind *:5050
    mode tcp
    balance source
      server master-00 192.168.83.89:5050 check inter 1s
      server master-01 192.168.84.90:5050 check inter 1s
      server master-02 192.168.85.99:5050 check inter 1s
      server bootstrap 192.168.80.89:5050 check inter 1s
# ...
Use the
curlCLI command to verify that the user-managed load balancer and its resources are operational:Verify that the cluster machine configuration API is accessible to the Kubernetes API server resource, by running the following command and observing the response:
$ curl https://<loadbalancer_ip_address>:6443/version --insecureIf the configuration is correct, you receive a JSON object in response:
{
  "major": "1",
  "minor": "11+",
  "gitVersion": "v1.11.0+ad103ed",
  "gitCommit": "ad103ed",
  "gitTreeState": "clean",
  "buildDate": "2019-01-09T06:44:10Z",
  "goVersion": "go1.10.3",
  "compiler": "gc",
  "platform": "linux/amd64"
}
Verify that the cluster machine configuration API is accessible to the Machine config server resource, by running the following command and observing the output:
$ curl -v https://<loadbalancer_ip_address>:22623/healthz --insecureIf the configuration is correct, the output from the command shows the following response:
HTTP/1.1 200 OK
Content-Length: 0
Verify that the controller is accessible to the Ingress Controller resource on port 80, by running the following command and observing the output:
$ curl -I -L -H "Host: console-openshift-console.apps.<cluster_name>.<base_domain>" http://<load_balancer_front_end_IP_address>If the configuration is correct, the output from the command shows the following response:
HTTP/1.1 302 Found
content-length: 0
location: https://console-openshift-console.apps.ocp4.private.opequon.net/
cache-control: no-cache
Verify that the controller is accessible to the Ingress Controller resource on port 443, by running the following command and observing the output:
$ curl -I -L --insecure --resolve console-openshift-console.apps.<cluster_name>.<base_domain>:443:<Load Balancer Front End IP Address> https://console-openshift-console.apps.<cluster_name>.<base_domain>If the configuration is correct, the output from the command shows the following response:
HTTP/1.1 200 OK
referrer-policy: strict-origin-when-cross-origin
set-cookie: csrf-token=UlYWOyQ62LWjw2h003xtYSKlh1a0Py2hhctw0WmV2YEdhJjFyQwWcGBsja261dGLgaYO0nxzVErhiXt6QepA7g==; Path=/; Secure; SameSite=Lax
x-content-type-options: nosniff
x-dns-prefetch-control: off
x-frame-options: DENY
x-xss-protection: 1; mode=block
date: Wed, 04 Oct 2023 16:29:38 GMT
content-type: text/html; charset=utf-8
set-cookie: 1e2670d92730b515ce3a1bb65da45062=1bf5e9573c9a2760c964ed1659cc1673; path=/; HttpOnly; Secure; SameSite=None
cache-control: private
Configure the DNS records for your cluster to target the front-end IP addresses of the user-managed load balancer. You must update records to your DNS server for the cluster API and applications over the load balancer. The following examples shows modified DNS records:
<load_balancer_ip_address>  A  api.<cluster_name>.<base_domain>
A record pointing to Load Balancer Front End
<load_balancer_ip_address> A apps.<cluster_name>.<base_domain> A record pointing to Load Balancer Front EndImportantDNS propagation might take some time for each DNS record to become available. Ensure that each DNS record propagates before validating each record.
For your OpenShift Container Platform cluster to use the user-managed load balancer, you must specify the following configuration in your cluster’s
install-config.yamlfile:# ... platform: loadBalancer: type: UserManaged apiVIPs: - <api_ip>1 ingressVIPs: - <ingress_ip>2 # ...where:
loadBalancer.type-
Set
UserManagedfor thetypeparameter to specify a user-managed load balancer for your cluster. The parameter defaults toOpenShiftManagedDefault, which denotes the default internal load balancer. For services defined in anopenshift-kni-infranamespace, a user-managed load balancer can deploy thecorednsservice to pods in your cluster but ignoreskeepalivedandhaproxyservices. loadBalancer.<api_ip>- Specifies a user-managed load balancer. Specify the user-managed load balancer’s public IP address, so that the Kubernetes API can communicate with the user-managed load balancer. Mandatory parameter.
loadBalancer.<ingress_ip>- Specifies a user-managed load balancer. Specify the user-managed load balancer’s public IP address, so that the user-managed load balancer can manage ingress traffic for your cluster. Mandatory parameter.
Verification
Use the
curlCLI command to verify that the user-managed load balancer and DNS record configuration are operational:Verify that you can access the cluster API, by running the following command and observing the output:
$ curl https://api.<cluster_name>.<base_domain>:6443/version --insecureIf the configuration is correct, you receive a JSON object in response:
{
  "major": "1",
  "minor": "11+",
  "gitVersion": "v1.11.0+ad103ed",
  "gitCommit": "ad103ed",
  "gitTreeState": "clean",
  "buildDate": "2019-01-09T06:44:10Z",
  "goVersion": "go1.10.3",
  "compiler": "gc",
  "platform": "linux/amd64"
  }
Verify that you can access the cluster machine configuration, by running the following command and observing the output:
$ curl -v https://api.<cluster_name>.<base_domain>:22623/healthz --insecureIf the configuration is correct, the output from the command shows the following response:
HTTP/1.1 200 OK
Content-Length: 0
Verify that you can access each cluster application on port 80, by running the following command and observing the output:
$ curl http://console-openshift-console.apps.<cluster_name>.<base_domain> -I -L --insecureIf the configuration is correct, the output from the command shows the following response:
HTTP/1.1 302 Found
content-length: 0
location: https://console-openshift-console.apps.<cluster-name>.<base domain>/
cache-control: no-cacheHTTP/1.1 200 OK
referrer-policy: strict-origin-when-cross-origin
set-cookie: csrf-token=39HoZgztDnzjJkq/JuLJMeoKNXlfiVv2YgZc09c3TBOBU4NI6kDXaJH1LdicNhN1UsQWzon4Dor9GWGfopaTEQ==; Path=/; Secure
x-content-type-options: nosniff
x-dns-prefetch-control: off
x-frame-options: DENY
x-xss-protection: 1; mode=block
date: Tue, 17 Nov 2020 08:42:10 GMT
content-type: text/html; charset=utf-8
set-cookie: 1e2670d92730b515ce3a1bb65da45062=9b714eb87e93cf34853e87a92d6894be; path=/; HttpOnly; Secure; SameSite=None
cache-control: private
Verify that you can access each cluster application on port 443, by running the following command and observing the output:
$ curl https://console-openshift-console.apps.<cluster_name>.<base_domain> -I -L --insecureIf the configuration is correct, the output from the command shows the following response:
HTTP/1.1 200 OK
referrer-policy: strict-origin-when-cross-origin
set-cookie: csrf-token=UlYWOyQ62LWjw2h003xtYSKlh1a0Py2hhctw0WmV2YEdhJjFyQwWcGBsja261dGLgaYO0nxzVErhiXt6QepA7g==; Path=/; Secure; SameSite=Lax
x-content-type-options: nosniff
x-dns-prefetch-control: off
x-frame-options: DENY
x-xss-protection: 1; mode=block
date: Wed, 04 Oct 2023 16:29:38 GMT
content-type: text/html; charset=utf-8
set-cookie: 1e2670d92730b515ce3a1bb65da45062=1bf5e9573c9a2760c964ed1659cc1673; path=/; HttpOnly; Secure; SameSite=None
cache-control: private
4.5. Configuration using the Bare Metal Operator
When deploying OpenShift Container Platform on bare-metal hosts, there are times when you need to make changes to the host either before or after provisioning. This can include inspecting the host’s hardware, firmware, and firmware details. It can also include formatting disks or changing modifiable firmware settings.
You can use the Bare Metal Operator (BMO) to provision, manage, and inspect bare-metal hosts in your cluster. The BMO can complete the following operations:
- Provision bare-metal hosts to the cluster with a specific image.
- Turn a host on or off.
- Inspect hardware details of the host and report them to the bare-metal host.
- Upgrade or downgrade a host’s firmware to a specific version.
- Inspect firmware and configure BIOS settings.
- Clean disk contents for the host before or after provisioning the host.
The BMO uses the following resources to complete these tasks:
-
BareMetalHost -
HostFirmwareSettings -
FirmwareSchema -
HostFirmwareComponents -
HostUpdatePolicy
The BMO maintains an inventory of the physical hosts in the cluster by mapping each bare-metal host to an instance of the BareMetalHost custom resource definition. Each BareMetalHost resource features hardware, software, and firmware details. The BMO continually inspects the bare-metal hosts in the cluster to ensure each BareMetalHost resource accurately details the components of the corresponding host.
The BMO also uses the HostFirmwareSettings resource, the FirmwareSchema resource, and the HostFirmwareComponents resource to detail firmware specifications and upgrade or downgrade firmware for the bare-metal host.
The BMO interfaces with bare-metal hosts in the cluster by using the Ironic API service. The Ironic service uses the Baseboard Management Controller (BMC) on the host to interface with the machine.
The BMO HostUpdatePolicy can enable or disable live updates to the firmware settings, BMC settings, or BIOS settings of a bare-metal host after provisioning the host. By default, the BMO disables live updates.
4.5.1. Bare Metal Operator architecture
The Bare Metal Operator (BMO) uses the following resources to provision, manage, and inspect bare-metal hosts in your cluster. The following diagram illustrates the architecture of these resources:

BareMetalHost
The BareMetalHost resource defines a physical host and its properties. When you provision a bare-metal host to the cluster, you must define a BareMetalHost resource for that host. For ongoing management of the host, you can inspect the information in the BareMetalHost resource or update this information.
The BareMetalHost resource features provisioning information such as the following:
- Deployment specifications such as the operating system boot image or the custom RAM disk
- Provisioning state
- Baseboard Management Controller (BMC) address
- Desired power state
The BareMetalHost resource features hardware information such as the following:
- Number of CPUs
- MAC address of a NIC
- Size of the host’s storage device
- Current power state
HostFirmwareSettings
You can use the HostFirmwareSettings resource to retrieve and manage the firmware settings for a host. When a host moves to the Available state, the Ironic service reads the host’s firmware settings and creates the HostFirmwareSettings resource. There is a one-to-one mapping between the BareMetalHost resource and the HostFirmwareSettings resource.
You can use the HostFirmwareSettings resource to inspect the firmware specifications for a host or to update a host’s firmware specifications.
You must adhere to the schema specific to the vendor firmware when you edit the spec field of the HostFirmwareSettings resource. This schema is defined in the read-only FirmwareSchema resource.
FirmwareSchema
Firmware settings vary among hardware vendors and host models. A FirmwareSchema resource is a read-only resource that contains the types and limits for each firmware setting on each host model. The data comes directly from the BMC by using the Ironic service. You can use the FirmwareSchema resource to identify valid values that you can specify in the spec field of the HostFirmwareSettings resource.
A FirmwareSchema resource can apply to many BareMetalHost resources if the schema is the same.
HostFirmwareComponents
Metal3 provides the HostFirmwareComponents resource, which describes BIOS and baseboard management controller (BMC) firmware versions. You can upgrade or downgrade the host’s firmware to a specific version by editing the spec field of the HostFirmwareComponents resource. This is useful when deploying with validated patterns that have been tested against specific firmware versions.
HostUpdatePolicy
The HostUpdatePolicy resource can enable or disable live updates to the firmware settings, BMC settings, or BIOS settings of bare-metal hosts. By default, the HostUpdatePolicy resource for each bare-metal host restricts updates to hosts during provisioning. You must modify the HostUpdatePolicy resource for a host when you want to update the firmware settings, BMC settings, or BIOS settings after provisioning the host.
4.5.2. About the BareMetalHost resource
Metal3 introduces the concept of the BareMetalHost resource, which defines a physical host and its properties. The BareMetalHost resource contains two sections:
-
The
BareMetalHostspec -
The
BareMetalHoststatus
4.5.2.1. The BareMetalHost spec
The spec section of the BareMetalHost resource defines the desired state of the host.
| Parameters | Description |
|---|---|
|
|
An interface to enable or disable automated cleaning during provisioning and de-provisioning. When set to |
|
The
|
|
| The MAC address of the NIC used for provisioning the host. |
|
|
The boot mode of the host. It defaults to |
|
|
A reference to another resource that is using the host. It could be empty if another resource is not currently using the host. For example, a |
|
| A human-provided string to help identify the host. |
|
| A boolean indicating whether the host provisioning and deprovisioning are managed externally. When set:
|
|
|
Contains information about the BIOS configuration of bare metal hosts. Currently,
|
|
The
|
|
| A reference to the secret containing the network configuration data and its namespace, so that it can be attached to the host before the host boots to set up the network. |
|
|
A boolean indicating whether the host should be powered on ( |
| (Optional) Contains the information about the RAID configuration for bare metal hosts. If not specified, it retains the current configuration. Note OpenShift Container Platform 4.18 supports hardware RAID on the installation drive for BMCs, including:
OpenShift Container Platform 4.18 does not support software RAID on the installation drive. See the following configuration settings:
You can set the
If you receive an error message indicating that the driver does not support RAID, set the |
|
The
|
4.5.2.2. The BareMetalHost status
The BareMetalHost status represents the host’s current state, and includes tested credentials, current hardware details, and other information.
| Parameters | Description |
|---|---|
|
| A reference to the secret and its namespace holding the last set of baseboard management controller (BMC) credentials the system was able to validate as working. |
|
| Details of the last error reported by the provisioning backend, if any. |
|
| Indicates the class of problem that has caused the host to enter an error state. The error types are:
|
|
The
|
| Contains BIOS firmware information. For example, the hardware vendor and version. |
|
The
|
| The host’s amount of memory in Mebibytes (MiB). |
|
The
|
|
Contains information about the host’s |
|
| The timestamp of the last time the status of the host was updated. |
|
| The status of the server. The status is one of the following:
|
|
| Boolean indicating whether the host is powered on. |
|
The
|
|
| A reference to the secret and its namespace holding the last set of BMC credentials that were sent to the provisioning backend. |
4.5.3. Getting the BareMetalHost resource
The BareMetalHost resource contains the properties of a physical host. You must get the BareMetalHost resource for a physical host to review its properties.
Procedure
Get the list of
BareMetalHostresources:$ oc get bmh -n openshift-machine-api -o yamlNoteYou can use
baremetalhostas the long form ofbmhwithoc getcommand.Get the list of hosts:
$ oc get bmh -n openshift-machine-apiGet the
BareMetalHostresource for a specific host:$ oc get bmh <host_name> -n openshift-machine-api -o yamlWhere
<host_name>is the name of the host.Example output
apiVersion: metal3.io/v1alpha1
kind: BareMetalHost
metadata:
  creationTimestamp: "2022-06-16T10:48:33Z"
  finalizers:
  - baremetalhost.metal3.io
  generation: 2
  name: openshift-worker-0
  namespace: openshift-machine-api
  resourceVersion: "30099"
  uid: 1513ae9b-e092-409d-be1b-ad08edeb1271
spec:
  automatedCleaningMode: metadata
  bmc:
    address: redfish://10.46.61.19:443/redfish/v1/Systems/1
    credentialsName: openshift-worker-0-bmc-secret
    disableCertificateVerification: true
  bootMACAddress: 48:df:37:c7:f7:b0
  bootMode: UEFI
  consumerRef:
    apiVersion: machine.openshift.io/v1beta1
    kind: Machine
    name: ocp-edge-958fk-worker-0-nrfcg
    namespace: openshift-machine-api
  customDeploy:
    method: install_coreos
  online: true
  rootDeviceHints:
    deviceName: /dev/disk/by-id/scsi-<serial_number>
  userData:
    name: worker-user-data-managed
    namespace: openshift-machine-api
status:
  errorCount: 0
  errorMessage: ""
  goodCredentials:
    credentials:
      name: openshift-worker-0-bmc-secret
      namespace: openshift-machine-api
    credentialsVersion: "16120"
  hardware:
    cpu:
      arch: x86_64
      clockMegahertz: 2300
      count: 64
      flags:
      - 3dnowprefetch
      - abm
      - acpi
      - adx
      - aes
      model: Intel(R) Xeon(R) Gold 5218 CPU @ 2.30GHz
    firmware:
      bios:
        date: 10/26/2020
        vendor: HPE
        version: U30
    hostname: openshift-worker-0
    nics:
    - mac: 48:df:37:c7:f7:b3
      model: 0x8086 0x1572
      name: ens1f3
    ramMebibytes: 262144
    storage:
    - hctl: "0:0:0:0"
      model: VK000960GWTTB
      name: /dev/disk/by-id/scsi-<serial_number>
      sizeBytes: 960197124096
      type: SSD
      vendor: ATA
    systemVendor:
      manufacturer: HPE
      productName: ProLiant DL380 Gen10 (868703-B21)
      serialNumber: CZ200606M3
  lastUpdated: "2022-06-16T11:41:42Z"
  operationalStatus: OK
  poweredOn: true
  provisioning:
    ID: 217baa14-cfcf-4196-b764-744e184a3413
    bootMode: UEFI
    customDeploy:
      method: install_coreos
    image:
      url: ""
    raid:
      hardwareRAIDVolumes: null
      softwareRAIDVolumes: []
    rootDeviceHints:
      deviceName: /dev/disk/by-id/scsi-<serial_number>
    state: provisioned
  triedCredentials:
    credentials:
      name: openshift-worker-0-bmc-secret
      namespace: openshift-machine-api
    credentialsVersion: "16120"
4.5.4. Editing a BareMetalHost resource
After you deploy an OpenShift Container Platform cluster on bare metal, you might need to edit a node’s BareMetalHost resource. Consider the following examples:
- You deploy a cluster with the Assisted Installer and need to add or edit the baseboard management controller (BMC) host name or IP address.
- You want to move a node from one cluster to another without deprovisioning it.
Prerequisites
-
Ensure the node is in the
Provisioned,ExternallyProvisioned, orAvailablestate.
Procedure
Get the list of nodes:
$ oc get bmh -n openshift-machine-apiBefore editing the node’s
BareMetalHostresource, detach the node from Ironic by running the following command:$ oc annotate baremetalhost <node_name> -n openshift-machine-api 'baremetalhost.metal3.io/detached=true'1 - 1
- Replace
<node_name>with the name of the node.
Edit the
BareMetalHostresource by running the following command:$ oc edit bmh <node_name> -n openshift-machine-apiReattach the node to Ironic by running the following command:
$ oc annotate baremetalhost <node_name> -n openshift-machine-api 'baremetalhost.metal3.io/detached'-
4.5.5. Troubleshooting latency when deleting a BareMetalHost resource
When the Bare Metal Operator (BMO) deletes a BareMetalHost resource, Ironic deprovisions the bare-metal host with a process called cleaning. When cleaning fails, Ironic retries the cleaning process three times, which is the source of the latency. The cleaning process might not succeed, causing the provisioning status of the bare-metal host to remain in the deleting state indefinitely. When this occurs, use the following procedure to disable the cleaning process.
Do not remove finalizers from the BareMetalHost resource.
Procedure
- If the cleaning process fails and restarts, wait for it to finish. This might take about 5 minutes.
-
If the provisioning status remains in the deleting state, disable the cleaning process by modifying the
BareMetalHostresource and setting theautomatedCleaningModefield todisabled.
See "Editing a BareMetalHost resource" for additional details.
4.5.6. Attaching a non-bootable ISO to a bare-metal node
You can attach a generic, non-bootable ISO virtual media image to a provisioned node by using the DataImage resource. After you apply the resource, the ISO image becomes accessible to the operating system after it has booted. This is useful for configuring a node after provisioning the operating system and before the node boots for the first time.
Prerequisites
- The node must use Redfish or drivers derived from it to support this feature.
-
The node must be in the
ProvisionedorExternallyProvisionedstate. -
The
namemust be the same as the name of the node defined in itsBareMetalHostresource. -
You have a valid
urlto the ISO image.
Procedure
Create a
DataImageresource:apiVersion: metal3.io/v1alpha1 kind: DataImage metadata: name: <node_name>1 spec: url: "http://dataimage.example.com/non-bootable.iso"2 Save the
DataImageresource to a file by running the following command:$ vim <node_name>-dataimage.yamlApply the
DataImageresource by running the following command:$ oc apply -f <node_name>-dataimage.yaml -n <node_namespace>1 - 1
- Replace
<node_namespace>so that the namespace matches the namespace for theBareMetalHostresource. For example,openshift-machine-api.
Reboot the node.
NoteTo reboot the node, attach the
reboot.metal3.ioannotation, or reset set theonlinestatus in theBareMetalHostresource. A forced reboot of the bare-metal node will change the state of the node toNotReadyfor awhile. For example, 5 minutes or more.View the
DataImageresource by running the following command:$ oc get dataimage <node_name> -n openshift-machine-api -o yamlExample output
apiVersion: v1
items:
- apiVersion: metal3.io/v1alpha1
  kind: DataImage
  metadata:
    annotations:
      kubectl.kubernetes.io/last-applied-configuration: |
        {"apiVersion":"metal3.io/v1alpha1","kind":"DataImage","metadata":{"annotations":{},"name":"bmh-node-1","namespace":"openshift-machine-api"},"spec":{"url":"http://dataimage.example.com/non-bootable.iso"}}
    creationTimestamp: "2024-06-10T12:00:00Z"
    finalizers:
    - dataimage.metal3.io
    generation: 1
    name: bmh-node-1
    namespace: openshift-machine-api
    ownerReferences:
    - apiVersion: metal3.io/v1alpha1
      blockOwnerDeletion: true
      controller: true
      kind: BareMetalHost
      name: bmh-node-1
      uid: 046cdf8e-0e97-485a-8866-e62d20e0f0b3
    resourceVersion: "21695581"
    uid: c5718f50-44b6-4a22-a6b7-71197e4b7b69
  spec:
    url: http://dataimage.example.com/non-bootable.iso
  status:
    attachedImage:
      url: http://dataimage.example.com/non-bootable.iso
    error:
      count: 0
      message: ""
    lastReconciled: "2024-06-10T12:05:00Z"
4.5.7. About the HostFirmwareSettings resource
You can use the HostFirmwareSettings resource to retrieve and manage the BIOS settings for a host. When a host moves to the Available state, Ironic reads the host’s BIOS settings and creates the HostFirmwareSettings resource. The resource contains the complete BIOS configuration returned from the baseboard management controller (BMC). Whereas, the firmware field in the BareMetalHost resource returns three vendor-independent fields, the HostFirmwareSettings resource typically comprises many BIOS settings of vendor-specific fields per host.
The HostFirmwareSettings resource contains two sections:
-
The
HostFirmwareSettingsspec. -
The
HostFirmwareSettingsstatus.
Reading and modifying firmware settings is only supported for drivers based on the vendor-independent Redfish protocol, Fujitsu iRMC or HP iLO.
4.5.7.1. The HostFirmwareSettings spec
The spec section of the HostFirmwareSettings resource defines the desired state of the host’s BIOS, and it is empty by default. Ironic uses the settings in the spec.settings section to update the baseboard management controller (BMC) when the host is in the Preparing state. Use the FirmwareSchema resource to ensure that you do not send invalid name/value pairs to hosts. See "About the FirmwareSchema resource" for additional details.
Example
spec:
  settings:
ProcTurboMode: Disabled- 1
- In the foregoing example, the
spec.settingssection contains a name/value pair that will set theProcTurboModeBIOS setting toDisabled.
Integer parameters listed in the status section appear as strings. For example, "1". When setting integers in the spec.settings section, the values should be set as integers without quotes. For example, 1.
4.5.7.2. The HostFirmwareSettings status
The status represents the current state of the host’s BIOS.
| Parameters | Description |
|---|---|
|
The
|
|
The
|
|
The |
4.5.8. Getting the HostFirmwareSettings resource
The HostFirmwareSettings resource contains the vendor-specific BIOS properties of a physical host. You must get the HostFirmwareSettings resource for a physical host to review its BIOS properties.
Procedure
Get the detailed list of
HostFirmwareSettingsresources by running the following command:$ oc get hfs -n openshift-machine-api -o yamlNoteYou can use
hostfirmwaresettingsas the long form ofhfswith theoc getcommand.Get the list of
HostFirmwareSettingsresources by running the following command:$ oc get hfs -n openshift-machine-apiGet the
HostFirmwareSettingsresource for a particular host by running the following command:$ oc get hfs <host_name> -n openshift-machine-api -o yamlWhere
<host_name>is the name of the host.
4.5.9. Editing the HostFirmwareSettings resource of a provisioned host
To make changes to the HostFirmwareSettings spec for a provisioned host, perform the following actions:
-
Edit the host
HostFirmwareSettingsresource. - Delete the host from the machine set.
- Scale down the machine set.
- Scale up the machine set to make the changes take effect.
You can only edit hosts when they are in the provisioned state, excluding read-only values. You cannot edit hosts in the externally provisioned state.
Procedure
Get the list of
HostFirmwareSettingsresources by running the following command:$ oc get hfs -n openshift-machine-apiEdit the host
HostFirmwareSettingsresource by running the following command:$ oc edit hfs <hostname> -n openshift-machine-apiWhere
<hostname>is the name of a provisioned host. TheHostFirmwareSettingsresource will open in the default editor for your terminal.Add name and value pairs to the
spec.settingssection by running the following command:Example
spec:
  settings:
    name: value
1 - 1
- Use the
FirmwareSchemaresource to identify the available settings for the host. You cannot set values that are read-only.
- Save the changes and exit the editor.
Get the host machine name by running the following command:
$ oc get bmh <hostname> -n openshift-machine nameWhere
<hostname>is the name of the host. The terminal displays the machine name under theCONSUMERfield.Annotate the machine to delete it from the machine set by running the following command:
$ oc annotate machine <machine_name> machine.openshift.io/delete-machine=true -n openshift-machine-apiWhere
<machine_name>is the name of the machine to delete.Get a list of nodes and count the number of worker nodes by running the following command:
$ oc get nodesGet the machine set by running the following command:
$ oc get machinesets -n openshift-machine-apiScale the machine set by running the following command:
$ oc scale machineset <machineset_name> -n openshift-machine-api --replicas=<n-1>Where
<machineset_name>is the name of the machine set and<n-1>is the decremented number of worker nodes.When the host enters the
Availablestate, scale up the machine set to make theHostFirmwareSettingsresource changes take effect by running the following command:$ oc scale machineset <machineset_name> -n openshift-machine-api --replicas=<n>Where
<machineset_name>is the name of the machine set and<n>is the number of worker nodes.
4.5.10. Performing a live update to the HostFirmwareSettings resource
You can perform a live update to the HostFirmareSettings resource after it has begun running workloads. Live updates do not trigger deprovisioning and reprovisioning the host.
Live updating a host is a Technology Preview feature only. Technology Preview features are not supported with Red Hat production service level agreements (SLAs) and might not be functionally complete. Red Hat does not recommend using them in production. These features provide early access to upcoming product features, enabling customers to test functionality and provide feedback during the development process.
For more information about the support scope of Red Hat Technology Preview features, see Technology Preview Features Support Scope.
Prerequisites
-
The
HostUpdatePolicyresource must the havefirmwareSettingsparameter set toonReboot.
Procedure
Update the
HostFirmwareSettingsresource by running the following command:$ oc patch hostfirmwaresettings <hostname> --type merge -p \1 '{"spec": {"settings": {"<name>": "<value>"}}}'2 NoteGet the
FirmwareSchemaresource to determine which settings the hardware supports and what settings and values you can update. You cannot update read-only values and you cannot update theFirmwareSchemaresource. You can also use theoc edit <hostname> hostfirmwaresettings -n openshift-machine-apicommand to update theHostFirmwareSettingsresource.Cordon and drain the node by running the following command:
$ oc drain <node_name> --force1 - 1
- Replace
<node_name>with the name of the node.
Power off the host for a period of 5 minutes by running the following command:
$ oc patch bmh <hostname> --type merge -p '{"spec": {"online": false}}'This step ensures that daemonsets or controllers can mark any infrastructure pods that might be running on the host as offline, while the remaining hosts handle incoming requests.
After 5 minutes, power on the host by running the following command:
$ oc patch bmh <hostname> --type merge -p '{"spec": {"online": true}}'The servicing operation commences and the Bare Metal Operator (BMO) sets the
operationalStatusparameter of theBareMetalHosttoservicing. The BMO updates theoperationalStatusparameter toOKafter updating the resource. If an error occurs, the BMO updates theoperationalStatusparameter toerrorand retries the operation.Once Ironic completes the update and the host powers up, uncordon the node by running the following command:
$ oc uncordon <node_name>
4.5.11. Verifying the HostFirmware Settings resource is valid
When the user edits the spec.settings section to make a change to the HostFirmwareSetting(HFS) resource, the Bare Metal Operator (BMO) validates the change against the FimwareSchema resource, which is a read-only resource. If the setting is invalid, the BMO will set the Type value of the status.Condition setting to False and also generate an event and store it in the HFS resource. Use the following procedure to verify that the resource is valid.
Procedure
Get a list of
HostFirmwareSettingresources:$ oc get hfs -n openshift-machine-apiVerify that the
HostFirmwareSettingsresource for a particular host is valid:$ oc describe hfs <host_name> -n openshift-machine-apiWhere
<host_name>is the name of the host.Example output
Events: Type Reason Age From Message ---- ------ ---- ---- ------- Normal ValidationFailed 2m49s metal3-hostfirmwaresettings-controller Invalid BIOS setting: Setting ProcTurboMode is invalid, unknown enumeration value - FooImportantIf the response returns
ValidationFailed, there is an error in the resource configuration and you must update the values to conform to theFirmwareSchemaresource.
4.5.12. About the FirmwareSchema resource
BIOS settings vary among hardware vendors and host models. A FirmwareSchema resource is a read-only resource that contains the types and limits for each BIOS setting on each host model. The data comes directly from the BMC through Ironic. The FirmwareSchema enables you to identify valid values you can specify in the spec field of the HostFirmwareSettings resource. The FirmwareSchema resource has a unique identifier derived from its settings and limits. Identical host models use the same FirmwareSchema identifier. It is likely that multiple instances of HostFirmwareSettings use the same FirmwareSchema.
| Parameters | Description |
|---|---|
|
The
|
4.5.13. Getting the FirmwareSchema resource
Each host model from each vendor has different BIOS settings. When editing the HostFirmwareSettings resource’s spec section, the name/value pairs you set must conform to that host’s firmware schema. To ensure you are setting valid name/value pairs, get the FirmwareSchema for the host and review it.
Procedure
Get the list of
FirmwareSchemaresource instances by running the following command:$ oc get firmwareschema -n openshift-machine-apiGet a particular
FirmwareSchemainstance by running the following command:$ oc get firmwareschema <instance_name> -n openshift-machine-api -o yamlWhere
<instance_name>is the name of the schema instance stated in theHostFirmwareSettingsresource (see Table 3).
4.5.14. About the HostFirmwareComponents resource
Metal3 provides the HostFirmwareComponents resource, which describes BIOS and baseboard management controller (BMC) firmware versions. The HostFirmwareComponents resource contains two sections:
-
The
HostFirmwareComponentsspec -
The
HostFirmwareComponentsstatus
4.5.14.1. HostFirmwareComponents spec
The spec section of the HostFirmwareComponents resource defines the desired state of the host’s BIOS and BMC versions.
| Parameters | Description |
|---|---|
|
The
|
4.5.14.2. HostFirmwareComponents status
The status section of the HostFirmwareComponents resource returns the current status of the host’s BIOS and BMC versions.
| Parameters | Description |
|---|---|
|
The
|
|
The
|
4.5.15. Getting the HostFirmwareComponents resource
The HostFirmwareComponents resource contains the specific firmware version of the BIOS and baseboard management controller (BMC) of a physical host. You must get the HostFirmwareComponents resource for a physical host to review the firmware version and status.
Procedure
Get the detailed list of
HostFirmwareComponentsresources by running the following command:$ oc get hostfirmwarecomponents -n openshift-machine-api -o yamlGet the list of
HostFirmwareComponentsresources by running the following command:$ oc get hostfirmwarecomponents -n openshift-machine-apiGet the
HostFirmwareComponentsresource for a particular host by running the following command:$ oc get hostfirmwarecomponents <host_name> -n openshift-machine-api -o yamlWhere
<host_name>is the name of the host.Example output
---
apiVersion: metal3.io/v1alpha1
kind: HostFirmwareComponents
metadata:
  creationTimestamp: 2024-04-25T20:32:06Z"
  generation: 1
  name: ostest-master-2
  namespace: openshift-machine-api
  ownerReferences:
  - apiVersion: metal3.io/v1alpha1
    blockOwnerDeletion: true
    controller: true
    kind: BareMetalHost
    name: ostest-master-2
    uid: 16022566-7850-4dc8-9e7d-f216211d4195
  resourceVersion: "2437"
  uid: 2038d63f-afc0-4413-8ffe-2f8e098d1f6c
spec:
  updates: []
status:
  components:
  - component: bios
    currentVersion: 1.0.0
    initialVersion: 1.0.0
  - component: bmc
    currentVersion: "1.00"
    initialVersion: "1.00"
  conditions:
  - lastTransitionTime: "2024-04-25T20:32:06Z"
    message: ""
    observedGeneration: 1
    reason: OK
    status: "True"
    type: Valid
  - lastTransitionTime: "2024-04-25T20:32:06Z"
    message: ""
    observedGeneration: 1
    reason: OK
    status: "False"
    type: ChangeDetected
  lastUpdated: "2024-04-25T20:32:06Z"
  updates: []
4.5.16. Editing the HostFirmwareComponents resource of a provisioned host
You can edit the HostFirmwareComponents resource of a provisioned host.
Procedure
Get the detailed list of
HostFirmwareComponentsresources by running the following command:$ oc get hostfirmwarecomponents -n openshift-machine-api -o yamlEdit the
HostFirmwareComponentsresource by running the following command:$ oc edit <hostname> hostfirmwarecomponents -n openshift-machine-api1 - 1
- Where
<hostname>is the name of the host. TheHostFirmwareComponentsresource will open in the default editor for your terminal.
Make the appropriate edits.
Example output
---
apiVersion: metal3.io/v1alpha1
kind: HostFirmwareComponents
metadata:
  creationTimestamp: 2024-04-25T20:32:06Z"
  generation: 1
  name: ostest-master-2
  namespace: openshift-machine-api
  ownerReferences:
  - apiVersion: metal3.io/v1alpha1
    blockOwnerDeletion: true
    controller: true
    kind: BareMetalHost
    name: ostest-master-2
    uid: 16022566-7850-4dc8-9e7d-f216211d4195
  resourceVersion: "2437"
  uid: 2038d63f-afc0-4413-8ffe-2f8e098d1f6c
spec:
  updates:
    - name: bios
1 url: https://myurl.with.firmware.for.bios2 - name: bmc3 url: https://myurl.with.firmware.for.bmc4 status: components: - component: bios currentVersion: 1.0.0 initialVersion: 1.0.0 - component: bmc currentVersion: "1.00" initialVersion: "1.00" conditions: - lastTransitionTime: "2024-04-25T20:32:06Z" message: "" observedGeneration: 1 reason: OK status: "True" type: Valid - lastTransitionTime: "2024-04-25T20:32:06Z" message: "" observedGeneration: 1 reason: OK status: "False" type: ChangeDetected lastUpdated: "2024-04-25T20:32:06Z"- 1
- To set a BIOS version, set the
nameattribute tobios. - 2
- To set a BIOS version, set the
urlattribute to the URL for the firmware version of the BIOS. - 3
- To set a BMC version, set the
nameattribute tobmc. - 4
- To set a BMC version, set the
urlattribute to the URL for the firmware version of the BMC.
- Save the changes and exit the editor.
Get the host machine name by running the following command:
$ oc get bmh <host_name> -n openshift-machine name1 - 1
- Where
<host_name>is the name of the host. The terminal displays the machine name under theCONSUMERfield.
Annotate the machine to delete it from the machine set by running the following command:
$ oc annotate machine <machine_name> machine.openshift.io/delete-machine=true -n openshift-machine-api1 - 1
- Where
<machine_name>is the name of the machine to delete.
Get a list of nodes and count the number of worker nodes by running the following command:
$ oc get nodesGet the machine set by running the following command:
$ oc get machinesets -n openshift-machine-apiScale down the machine set by running the following command:
$ oc scale machineset <machineset_name> -n openshift-machine-api --replicas=<n-1>1 - 1
- Where
<machineset_name>is the name of the machine set and<n-1>is the decremented number of worker nodes.
When the host enters the
Availablestate, scale up the machine set to make theHostFirmwareComponentsresource changes take effect by running the following command:$ oc scale machineset <machineset_name> -n openshift-machine-api --replicas=<n>1 - 1
- Where
<machineset_name>is the name of the machine set and<n>is the number of worker nodes.
4.5.17. Performing a live update to the HostFirmwareComponents resource
You can perform a live update to the HostFirmwareComponents resource on an already provisioned host. Live updates do not trigger deprovisioning and reprovisioning the host.
Live updating a host is a Technology Preview feature only. Technology Preview features are not supported with Red Hat production service level agreements (SLAs) and might not be functionally complete. Red Hat does not recommend using them in production. These features provide early access to upcoming product features, enabling customers to test functionality and provide feedback during the development process.
For more information about the support scope of Red Hat Technology Preview features, see Technology Preview Features Support Scope.
Do not perform live updates on production hosts. You can perform live updates to the BIOS for testing purposes. We do not recommend that you perform live updates to the BMC on OpenShift Container Platform 4.18 for test purposes, especially on earlier generation hardware.
Prerequisites
-
The
HostUpdatePolicyresource must have thefirmwareUpdatesparameter set toonReboot.
Procedure
Update the
HostFirmwareComponentsresource by running the following command:$ oc patch hostfirmwarecomponents <hostname> --type merge -p \1 '{"spec": {"updates": [{"component": "<type>", \2 "url": "<url>"}]}}'3 NoteYou can also use the
oc edit <hostname> hostfirmwarecomponents -n openshift-machine-apicommand to update the resource.Cordon and drain the node by running the following command:
$ oc drain <node_name> --force1 - 1
- Replace
<node_name>with the name of the node.
Power off the host for a period of 5 minutes by running the following command:
$ oc patch bmh <hostname> --type merge -p '{"spec": {"online": false}}'This step ensures that daemonsets or controllers mark any infrastructure pods that might be running on the node as offline, while the remaining nodes handle incoming requests.
After 5 minutes, power on the host by running the following command:
$ oc patch bmh <hostname> --type merge -p '{"spec": {"online": true}}'The servicing operation commences and the Bare Metal Operator (BMO) sets the
operationalStatusparameter of theBareMetalHosttoservicing. The BMO updates theoperationalStatusparameter toOKafter updating the resource. If an error occurs, the BMO updates theoperationalStatusparameter toerrorand retries the operation.Uncordon the node by running the following command:
$ oc uncordon <node_name>
4.5.18. About the HostUpdatePolicy resource
You can use the HostUpdatePolicy resource to enable or disable applying live updates to the firmware settings, BMC settings, or firmware settings of each bare-metal host. By default, the Operator disables live updates to already provisioned bare-metal hosts by default.
The HostUpdatePolicy spec
The spec section of the HostUpdatePolicy resource provides two settings:
firmwareSettings-
This setting corresponds to the
HostFirmwareSettingsresource. firmwareUpdates-
This setting corresponds to the
HostFirmwareComponentsresource.
When you set the value to onPreparing, you can only update the host during provisioning, which is the default setting. When you set the value to onReboot, you can update a provisioned host by applying the resource and rebooting the bare-metal host. Then, follow the procedure for editing the HostFirmwareSettings or HostFirmwareComponents resource.
Example HostUpdatePolicy resource
apiVersion: metal3.io/v1alpha1
kind: HostUpdatePolicy
metadata:
  name: <hostname>
  namespace: openshift-machine-api
spec:
  firmwareSettings: <setting>
firmwareUpdates: <setting>4.5.19. Setting the HostUpdatePolicy resource
By default, the HostUpdatePolicy disables live updates. To enable live updates, use the following procedure.
Setting the HostUpdatePolicy resource is a Technology Preview feature only. Technology Preview features are not supported with Red Hat production service level agreements (SLAs) and might not be functionally complete. Red Hat does not recommend using them in production. These features provide early access to upcoming product features, enabling customers to test functionality and provide feedback during the development process.
For more information about the support scope of Red Hat Technology Preview features, see Technology Preview Features Support Scope.
Procedure
Create the
HostUpdatePolicyresource by running the following command:$ vim hup.yamlYou can use any text editor you prefer.
Example HostUpdatePolicy resource
apiVersion: metal3.io/v1alpha1
kind: HostUpdatePolicy
metadata:
  name: <hostname>
1 namespace: openshift-machine-api spec: firmwareSettings: onReboot firmwareUpdates: onReboot- 1
- Replace
<hostname>with the name of the host.
-
Save the changes to the
hup.yamlfile. Apply the policy by running the following command:
$ oc apply -f hup.yaml