Chapter 6. Comparing cluster configurations
6.1. Understanding the cluster-compare plugin
The cluster-compare plugin is an OpenShift CLI (oc) plugin that compares a cluster configuration with a reference configuration. The plugin reports configuration differences while suppressing expected variations by using configurable validation rules and templates.
Use the cluster-compare plugin in development, production, and support scenarios to ensure cluster compliance with a reference configuration, and to quickly identify and troubleshoot relevant configuration differences.
6.1.1. Overview of the cluster-compare plugin
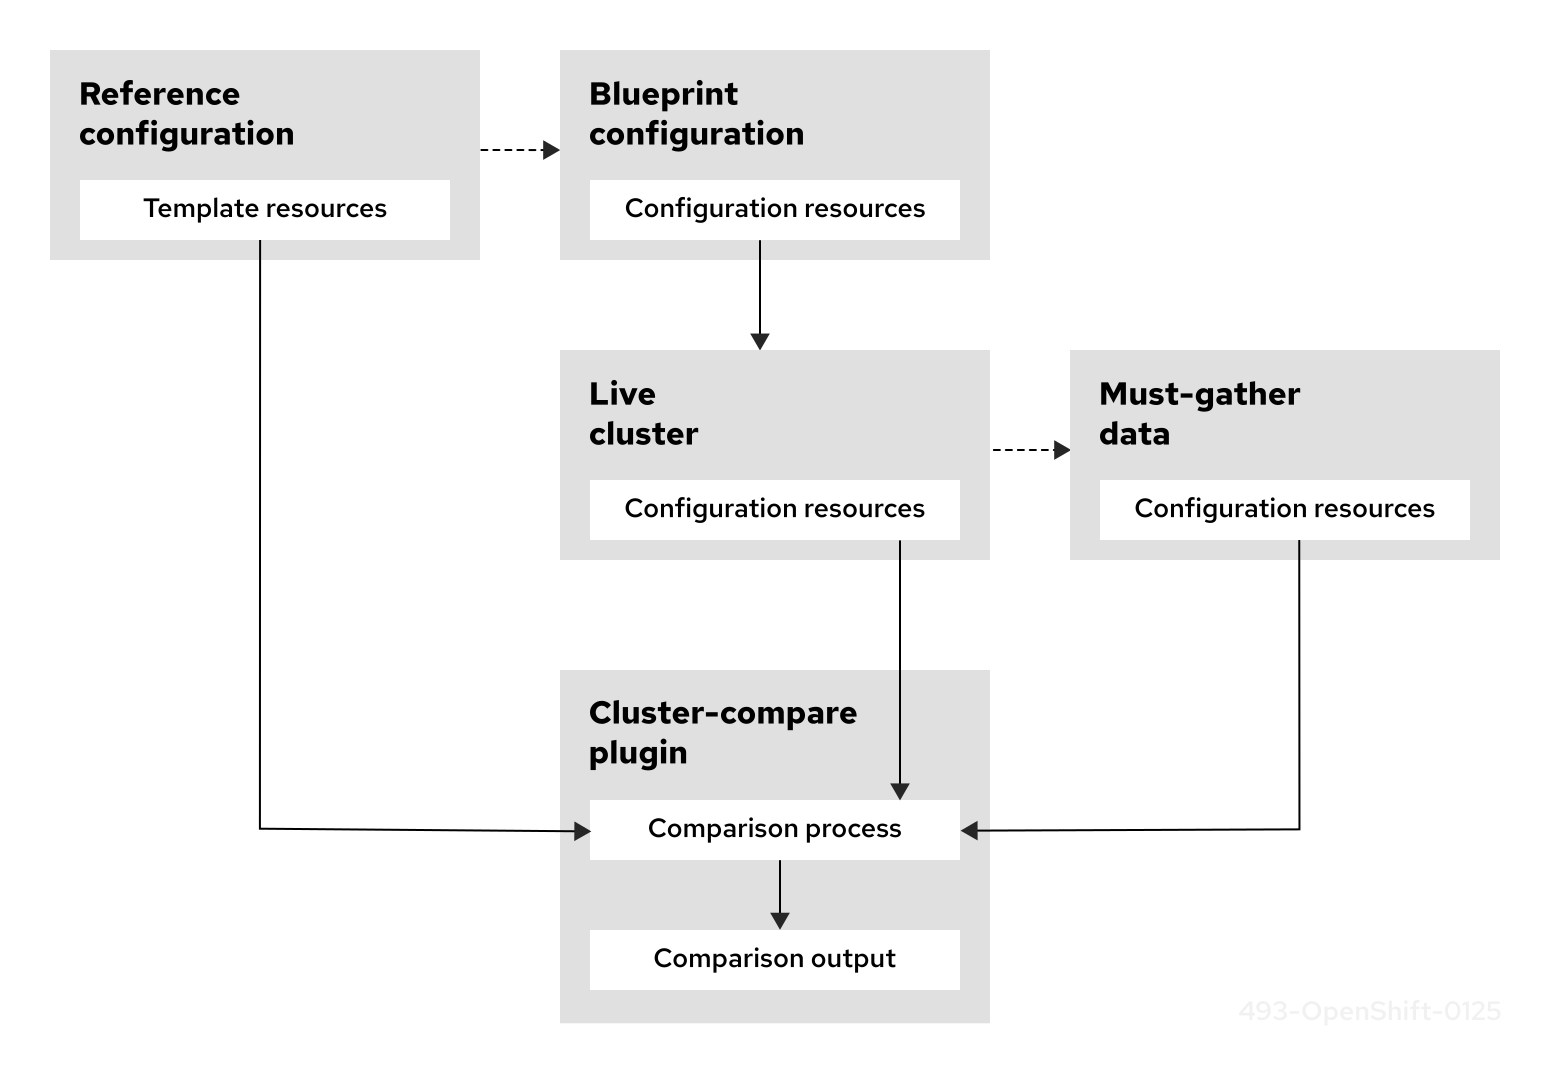
Clusters deployed at scale typically use a validated set of baseline custom resources (CRs) to configure clusters to meet use-case requirements and ensure consistency when deploying across different environments.
In live clusters, some variation from the validated set of CRs is expected. For example, configurations might differ because of variable substitution, optional components, or hardware-specific fields. This variation makes it difficult to accurately assess if a cluster is compliant with the baseline configuration.
Using the cluster-compare plugin with the oc command, you can compare the configuration from a live cluster with a reference configuration. A reference configuration represents the baseline configuration but uses the various plugin features to suppresses expected variation during a comparison. For example, you can apply validation rules, specify optional and required resources, and define relationships between resources. By reducing irrelevant differences, the plugin makes it easier to assess cluster compliance with baseline configurations, and across environments.
The ability to intelligently compare a configuration from a cluster with a reference configuration has the following example use-cases:
Production: Ensure compliance with a reference configuration across service updates, upgrades and changes to the reference configuration.
Development: Ensure compliance with a reference configuration in test pipelines.
Design: Compare configurations with a partner lab reference configuration to ensure consistency.
Support: Compare the reference configuration to must-gather data from a live cluster to troubleshoot configuration issues.
Figure 6.1. Cluster-compare plugin overview
6.1.2. Understanding a reference configuration
The cluster-compare plugin uses a reference configuration to validate a configuration from a live cluster. The reference configuration consists of a YAML file called metadata.yaml, which references a set of templates that represent the baseline configuration.
Example directory structure for a reference configuration
├── metadata.yaml
├── optional
│   ├── optionalTemplate1.yaml
│   └── optionalTemplate2.yaml
├── required
│   ├── requiredTemplate3.yaml
│   └── requiredTemplate4.yaml
└── baselineClusterResources
    ├── clusterResource1.yaml
    ├── clusterResource2.yaml
    ├── clusterResource3.yaml
    └── clusterResource4.yaml
During a comparison, the plugin matches each template to a configuration resource from the cluster. The plugin evaluates optional or required fields in the template using features such as Golang templating syntax and inline regular expression validation. The metadata.yaml file applies additional validation rules to decide whether a template is optional or required and assesses template dependency relationships.
Using these features, the plugin identifies relevant configuration differences between the cluster and the reference configuration. For example, the plugin can highlight mismatched field values, missing resources, extra resources, field type mismatches, or version discrepancies.
For further information about configuring a reference configuration, see "Creating a reference configuration".
6.2. Installing the cluster-compare plugin
You can extract the cluster-compare plugin from a container image in the Red Hat container catalog and use it as a plugin to the oc command.
6.2.1. Installing the cluster-compare plugin
Install the cluster-compare plugin to compare a reference configuration with a cluster configuration from a live cluster or must-gather data.
Prerequisites
-
You have installed the OpenShift CLI (
oc). -
You installed
podman. - You have access to the Red Hat container catalog.
Procedure
Log in to the Red Hat container catalog by running the following command:
$ podman login registry.redhat.ioCreate a container for the
cluster-compareimage by running the following command:$ podman create --name cca registry.redhat.io/openshift4/kube-compare-artifacts-rhel9:latestCopy the
cluster-compareplugin to a directory that is included in yourPATHenvironment variable by running the following command:$ podman cp cca:/usr/share/openshift/<arch>/kube-compare.<rhel_version> <directory_on_path>/kubectl-cluster_comparearchis the architecture for your machine. Valid values are:-
linux_amd64 -
linux_arm64 -
linux_ppc64le -
linux_s390x
-
-
<rhel_version>is the version of RHEL on your machine. Valid values arerhel8orrhel9. -
<directory_on_path>is the path to a directory included in yourPATHenvironment variable.
Verification
View the help for the plugin by running the following command:
$ oc cluster-compare -hExample output
Compare a known valid reference configuration and a set of specific cluster configuration CRs.

...

Usage:
  compare -r <Reference File>

Examples:
  # Compare a known valid reference configuration with a live cluster:
  kubectl cluster-compare -r ./reference/metadata.yaml

 ...
6.3. Using the cluster-compare plugin
You can use the cluster-compare plugin to compare a reference configuration with a configuration from a live cluster or must-gather data.
6.3.1. Using the cluster-compare plugin with a live cluster
You can use the cluster-compare plugin to compare a reference configuration with configuration custom resources (CRs) from a live cluster.
Validate live cluster configurations to ensure compliance with reference configurations during design, development, or testing scenarios.
Use the cluster-compare plugin with live clusters in non-production environments only. For production environments, use the plugin with must-gather data.
Prerequisites
-
You installed the OpenShift CLI (
oc). -
You have access to the cluster as a user with the
cluster-adminrole. -
You downloaded the
cluster-compareplugin and include it in yourPATHenvironment variable. - You have access to a reference configuration.
Procedure
Run the
cluster-compareplugin by using the following command:$ oc cluster-compare -r <path_to_reference_config>/metadata.yaml-rspecifies a path to themetadata.yamlfile of the reference configuration. You can specify a local directory or a URI.Example output
...

**********************************

Cluster CR: operator.openshift.io/v1_Console_cluster
1 Reference File: optional/console-disable/ConsoleOperatorDisable.yaml2 Diff Output: diff -u -N /tmp/MERGED-622469311/operator-openshift-io-v1_console_cluster /tmp/LIVE-2358803347/operator-openshift-io-v1_console_cluster /tmp/MERGED-622469311/operator-openshift-io-v1_console_cluster 2024-11-20 15:43:42.888633602 +0000 +++ /tmp/LIVE-2358803347/operator-openshift-io-v1_console_cluster 2024-11-20 15:43:42.888633602 +0000 @@ -4,5 +4,5 @@ name: cluster spec: logLevel: Normal - managementState: Removed3 + managementState: Managed operatorLogLevel: Normal ********************************** … Summary4 CRs with diffs: 5/495 CRs in reference missing from the cluster: 16 required-cluster-tuning: cluster-tuning: Missing CRs:7 - required/cluster-tuning/disabling-network-diagnostics/DisableSnoNetworkDiag.yaml No CRs are unmatched to reference CRs8 Metadata Hash: 512a9bf2e57fd5a5c44bbdea7abb3ffd7739d4a1f14ef9021f6793d5cdf868f09 No patched CRs10 - 1
- The CR under comparison. The plugin displays each CR with a difference from the corresponding template.
- 2
- The template matching with the CR for comparison.
- 3
- The output in Linux diff format shows the difference between the template and the cluster CR.
- 4
- After the plugin reports the line diffs for each CR, the summary of differences are reported.
- 5
- The number of CRs in the comparison with differences from the corresponding templates.
- 6
- The number of CRs represented in the reference configuration, but missing from the live cluster.
- 7
- The list of CRs represented in the reference configuration, but missing from the live cluster.
- 8
- The CRs that did not match to a corresponding template in the reference configuration.
- 9
- The metadata hash identifies the reference configuration.
- 10
- The list of patched CRs.
6.3.2. Using the cluster-compare plugin with must-gather data
You can use the cluster-compare plugin to compare a reference configuration with configuration custom resources (CRs) from must-gather data.
Validate cluster configurations by using must-gather data to troubleshoot configuration issues in production environments.
For production environments, use the cluster-compare plugin with must-gather data only.
-
You have access to
must-gatherdata from a target cluster. -
You installed the OpenShift CLI (
oc). -
You have downloaded the
cluster-compareplugin and included it in yourPATHenvironment variable. - You have access to a reference configuration.
Procedure
Compare the
must-gatherdata to a reference configuration by running the following command:$ oc cluster-compare -r <path_to_reference_config>/metadata.yaml -f "must-gather*/*/cluster-scoped-resources","must-gather*/*/namespaces" -R-
-rspecifies a path to themetadata.yamlfile of the reference configuration. You can specify a local directory or a URI. -
-fspecifies the path to themust-gatherdata directory. You can specify a local directory or a URI. This example restricts the comparison to the relevant cluster configuration directories. -Rsearches the target directories recursively.Example output
...

**********************************

Cluster CR: operator.openshift.io/v1_Console_cluster
1 Reference File: optional/console-disable/ConsoleOperatorDisable.yaml2 Diff Output: diff -u -N /tmp/MERGED-622469311/operator-openshift-io-v1_console_cluster /tmp/LIVE-2358803347/operator-openshift-io-v1_console_cluster /tmp/MERGED-622469311/operator-openshift-io-v1_console_cluster 2024-11-20 15:43:42.888633602 +0000 +++ /tmp/LIVE-2358803347/operator-openshift-io-v1_console_cluster 2024-11-20 15:43:42.888633602 +0000 @@ -4,5 +4,5 @@ name: cluster spec: logLevel: Normal - managementState: Removed3 + managementState: Managed operatorLogLevel: Normal ********************************** … Summary4 CRs with diffs: 5/495 CRs in reference missing from the cluster: 16 required-cluster-tuning: cluster-tuning: Missing CRs:7 - required/cluster-tuning/disabling-network-diagnostics/DisableSnoNetworkDiag.yaml No CRs are unmatched to reference CRs8 Metadata Hash: 512a9bf2e57fd5a5c44bbdea7abb3ffd7739d4a1f14ef9021f6793d5cdf868f09 No patched CRs10 - 1
- The CR under comparison. The plugin displays each CR with a difference from the corresponding template.
- 2
- The template matching with the CR for comparison.
- 3
- The output in Linux diff format shows the difference between the template and the cluster CR.
- 4
- After the plugin reports the line diffs for each CR, the summary of differences are reported.
- 5
- The number of CRs in the comparison with differences from the corresponding templates.
- 6
- The number of CRs represented in the reference configuration, but missing from the live cluster.
- 7
- The list of CRs represented in the reference configuration, but missing from the live cluster.
- 8
- The CRs that did not match to a corresponding template in the reference configuration.
- 9
- The metadata hash identifies the reference configuration.
- 10
- The list of patched CRs.
-
6.3.3. Reference cluster-compare plugin options
The following content describes the options for the cluster-compare plugin.
| Option | Description |
|---|---|
|
| When used with a live cluster, attempts to match all resources in the cluster that match a type in the reference configuration. When used with local files, attempts to match all resources in the local files that match a type in the reference configuration. |
|
|
Specify an integer value for the number of templates to process in parallel when comparing with resources from the live version. A larger number increases speed but also memory, I/O, and CPU usage during that period. The default value is |
|
| Specify the path to the user configuration file. |
|
| Specify a filename, directory, or URL for the configuration custom resources that you want to use for a comparison with a reference configuration. |
|
| Specify the path for templates that requires a patch. Note
You must use a file path for the target template that is relative to the |
|
| Display help information. |
|
|
Specify a path to process the |
|
|
Specify the output format. Options include |
|
| Specify a reason for generating the override. |
|
| Specify a path to a patch override file for the reference configuration. |
|
|
Processes the directory specified in |
|
|
Specify the path to the reference configuration |
|
|
Specify |
|
| Increases the verbosity of the plugin output. |
6.3.4. Example: Comparing a cluster with the telco core reference configuration
You can use the cluster-compare plugin to compare a reference configuration with a configuration from a live cluster or must-gather data.
This example compares a configuration from a live cluster with the telco core reference configuration. The telco core reference configuration is derived from the telco core reference design specifications (RDS). The telco core RDS is designed for clusters to support large scale telco applications including control plane and some centralized data plane functions.
The reference configuration is packaged in a container image with the telco core RDS.
For further examples of using the cluster-compare plugin with the telco core and telco RAN distributed unit (DU) profiles, see the "Additional resources" section.
Prerequisites
-
You have access to the cluster as a user with the
cluster-adminrole. -
You have credentials to access the
registry.redhat.iocontainer image registry. -
You installed the
cluster-compareplugin.
Procedure
Log on to the container image registry with your credentials by running the following command:
$ podman login registry.redhat.ioExtract the content from the
telco-core-rds-rhel9container image by running the following commands:$ mkdir -p ./out$ podman run -it registry.redhat.io/openshift4/openshift-telco-core-rds-rhel9:v4.18 | base64 -d | tar xv -C outYou can view the reference configuration in the
reference-crs-kube-compare/directory.out/telco-core-rds/configuration/reference-crs-kube-compare/ ├── metadata.yaml1 ├── optional2 │ ├── logging │ ├── networking │ ├── other │ └── tuning └── required3 ├── networking ├── other ├── performance ├── scheduling └── storageCompare the configuration for your cluster to the telco core reference configuration by running the following command:
$ oc cluster-compare -r out/telco-core-rds/configuration/reference-crs-kube-compare/metadata.yamlExample output
W1212 14:13:06.281590   36629 compare.go:425] Reference Contains Templates With Types (kind) Not Supported By Cluster: BFDProfile, BGPAdvertisement, BGPPeer, ClusterLogForwarder, Community, IPAddressPool, MetalLB, MultiNetworkPolicy, NMState, NUMAResourcesOperator, NUMAResourcesScheduler, NodeNetworkConfigurationPolicy, SriovNetwork, SriovNetworkNodePolicy, SriovOperatorConfig, StorageCluster

...

**********************************

Cluster CR: config.openshift.io/v1_OperatorHub_cluster
1 Reference File: required/other/operator-hub.yaml2 Diff Output: diff -u -N /tmp/MERGED-2801470219/config-openshift-io-v1_operatorhub_cluster /tmp/LIVE-2569768241/config-openshift-io-v1_operatorhub_cluster --- /tmp/MERGED-2801470219/config-openshift-io-v1_operatorhub_cluster 2024-12-12 14:13:22.898756462 +0000 +++ /tmp/LIVE-2569768241/config-openshift-io-v1_operatorhub_cluster 2024-12-12 14:13:22.898756462 +0000 @@ -1,6 +1,6 @@ apiVersion: config.openshift.io/v1 kind: OperatorHub metadata: + annotations:3 + include.release.openshift.io/hypershift: "true" name: cluster -spec: - disableAllDefaultSources: true ********************************** Summary4 CRs with diffs: 3/45 CRs in reference missing from the cluster: 226 other: other: Missing CRs:7 - optional/other/control-plane-load-kernel-modules.yaml - optional/other/worker-load-kernel-modules.yaml required-networking: networking-root: Missing CRs: - required/networking/nodeNetworkConfigurationPolicy.yaml networking-sriov: Missing CRs: - required/networking/sriov/sriovNetwork.yaml - required/networking/sriov/sriovNetworkNodePolicy.yaml - required/networking/sriov/SriovOperatorConfig.yaml - required/networking/sriov/SriovSubscription.yaml - required/networking/sriov/SriovSubscriptionNS.yaml - required/networking/sriov/SriovSubscriptionOperGroup.yaml required-other: scheduling: Missing CRs: - required/other/catalog-source.yaml - required/other/icsp.yaml required-performance: performance: Missing CRs: - required/performance/PerformanceProfile.yaml required-scheduling: scheduling: Missing CRs: - required/scheduling/nrop.yaml - required/scheduling/NROPSubscription.yaml - required/scheduling/NROPSubscriptionNS.yaml - required/scheduling/NROPSubscriptionOperGroup.yaml - required/scheduling/sched.yaml required-storage: storage-odf: Missing CRs: - required/storage/odf-external/01-rook-ceph-external-cluster-details.secret.yaml - required/storage/odf-external/02-ocs-external-storagecluster.yaml - required/storage/odf-external/odfNS.yaml - required/storage/odf-external/odfOperGroup.yaml - required/storage/odf-external/odfSubscription.yaml No CRs are unmatched to reference CRs8 Metadata Hash: fe41066bac56517be02053d436c815661c9fa35eec5922af25a1be359818f2979 No patched CRs10 - 1
- The CR under comparison. The plugin displays each CR with a difference from the corresponding template.
- 2
- The template matching with the CR for comparison.
- 3
- The output in Linux diff format shows the difference between the template and the cluster CR.
- 4
- After the plugin reports the line diffs for each CR, the summary of differences are reported.
- 5
- The number of CRs in the comparison with differences from the corresponding templates.
- 6
- The number of CRs represented in the reference configuration, but missing from the live cluster.
- 7
- The list of CRs represented in the reference configuration, but missing from the live cluster.
- 8
- The CRs that did not match to a corresponding template in the reference configuration.
- 9
- The metadata hash identifies the reference configuration.
- 10
- The list of patched CRs.
6.4. Creating a reference configuration
Configure a reference configuration to validate configuration resources from a cluster.
6.4.1. Structure of the metadata.yaml file
The metadata.yaml file provides a central configuration point to define and configure the templates in a reference configuration. The file features a hierarchy of parts and components. parts are groups of components and components are groups of templates. Under each component, you can configure template dependencies, validation rules, and add descriptive metadata.
Example metadata.yaml file
apiVersion: v2
parts:
- name: Part1
    components:
      - name: Component1
<component1_configuration>
  - name: Part2
      - name: Component2
<component2_configuration>6.4.2. Configuring template relationships
By defining relationships between templates in your reference configuration, you can support use-cases with complex dependencies. For example, you can configure a component to require specific templates, require one template from a group, or allow any template from a group, and so on.
Procedure
Create a
metadata.yamlfile to match your use case. Use the following structure as an example:Example metadata.yaml file
apiVersion: v2
parts:
  - name: Part1
    components:
      - name: Component1
        allOf:
1 - path: RequiredTemplate1.yaml - path: RequiredTemplate2.yaml - name: Component2 allOrNoneOf:2 - path: OptionalBlockTemplate1.yaml - path: OptionalBlockTemplate2.yaml - name: Component3 anyOf:3 - path: OptionalTemplate1.yaml - path: OptionalTemplate2.yaml - name: Component4 noneOf:4 - path: BannedTemplate1.yaml - path: BannedTemplate2.yaml - name: Component5 oneOf:5 - path: RequiredExclusiveTemplate1.yaml - path: RequiredExclusiveTemplate2.yaml - name: Component6 anyOneOf:6 - path: OptionalExclusiveTemplate1.yaml - path: OptionalExclusiveTemplate2.yaml #...- 1
- Specifies required templates.
- 2
- Specifies a group of templates that are either all required or all optional. If one corresponding custom resource (CR) is present in the cluster, then all corresponding CRs must be present in the cluster.
- 3
- Specifies optional templates.
- 4
- Specifies templates to exclude. If a corresponding CR is present in the cluster, the plugin returns a validation error.
- 5
- Specifies templates where only one can be present. If none, or more than one of the corresponding CRs are present in the cluster, the plugin returns a validation error .
- 6
- Specifies templates where only one can be present in the cluster. If more than one of the corresponding CRs are present in the cluster, the plugin returns a validation error.
6.4.3. Configuring expected variation in a template
You can handle variable content within a template by using Golang templating syntax. Using this syntax, you can configure validation logic that handles optional, required, and conditional content within the template.
-
The
cluster-compareplugin requires all templates to render as valid YAML. To avoid parsing errors for missing fields, use conditional templating syntax such as{{- if .spec.<optional_field> }}when implementing templating syntax. This conditional logic ensures templates process missing fields gracefully and maintains valid YAML formatting. - You can use the Golang templating syntax with custom and built-in functions for complex use cases. All Golang built-in functions are supported including the functions in the Sprig library.
Procedure
Create a
metadata.yamlfile to match your use case. Use the following structure as an example:apiVersion: v2 kind: Service metadata: name: frontend1 namespace: {{ .metadata.namespace }}2 labels: app: guestbook tier: frontend spec: {{- if and .spec.type (eq (.spec.type) "NodePort" "LoadBalancer") }} type: {{.spec.type }}3 {{- else }} type: should be NodePort or LoadBalancer {{- end }} ports: - port: 80 selector: app: guestbook {{- if .spec.selector.tier }}4 tier: frontend {{- end }}
6.4.4. Configuring the metadata.yaml file to exclude template fields
You can configure the metadata.yaml file to exclude fields from a comparison. Exclude fields that are irrelevant to a comparison, for example annotations or labels that are inconsequential to a cluster configuration.
You can configure exclusions in the metadata.yaml file in the following ways:
- Exclude all fields in a custom resource not specified in a template.
Exclude specific fields that you define using the
pathToKeyfield.NotepathToKeyis a dot separated path. Use quotes to escape key values featuring a period.
6.4.4.1. Excluding all fields not specified in a template
During the comparison process, the cluster-compare plugin renders a template by merging fields from the corresponding custom resource (CR). If you configure the ignore-unspecified-fields to true, all fields that are present in the CR, but not in the template, are excluded from the merge. Use this approach when you want to focus the comparison on the fields specified in the template only.
Procedure
Create a
metadata.yamlfile to match your use case. Use the following structure as an example:apiVersion: v2 parts: - name: Part1 components: - name: Namespace allOf: - path: namespace.yaml config: ignore-unspecified-fields: true1 #...- 1
- Specify
trueto exclude from the comparison all fields in a CR that are not explicitly configured in the correspondingnamespace.yamltemplate.
6.4.4.2. Excluding specific fields by setting default exclusion fields
You can exclude fields by defining a default value for fieldsToOmitRefs in the defaultOmitRef field. This default exclusion applies to all templates, unless overridden by the config.fieldsToOmitRefs field for a specific template.
Procedure
Create a
metadata.yamlfile to match your use case. Use the following structure as an example:Example metadata.yaml file
apiVersion: v2
parts:

#...

fieldsToOmit:
   defaultOmitRef: default
1 items: default: - pathToKey: a.custom.default."k8s.io"2
6.4.4.3. Excluding specific fields
You can specify fields to exclude by defining the path to the field, and then referencing the definition in the config section for a template.
Procedure
Create a
metadata.yamlfile to match your use case. Use the following structure as an example:Example metadata.yaml file
apiVersion: v2
parts:
  - name: Part1
    components:
      - name: Component1
        - path: deployment.yaml
          config:
            fieldsToOmitRefs:
              - deployments
1 #... fieldsToOmit: items: deployments: - pathToKey: spec.selector.matchLabels.k8s-app2 NoteSetting
fieldsToOmitRefsreplaces the default value.
6.4.4.4. Excluding specific fields by setting default exclusion groups
You can create default groups of fields to exclude. A group of exclusions can reference another group to avoid duplication when defining exclusions.
Procedure
Create a
metadata.yamlfile to match your use case. Use the following structure as an example:Example metadata.yaml file
apiVersion: v2
parts:

#...

fieldsToOmit:
   defaultOmitRef: default
   items:
    common:
      - pathToKey: metadata.annotations."kubernetes.io/metadata.name"
      - pathToKey: metadata.annotations."kubernetes.io/metadata.name"
      - pathToKey: metadata.annotations."kubectl.kubernetes.io/last-applied-configuration"
      - pathToKey: metadata.creationTimestamp
      - pathToKey: metadata.generation
      - pathToKey: spec.ownerReferences
      - pathToKey: metadata.ownerReferences
    default:
      - include: common
1 - pathToKey: status- 1
- The
commongroup is included in the default group.
6.4.5. Configuring inline validation for template fields
You can enable inline regular expressions to validate template fields, especially in scenarios where Golang templating syntax is difficult to maintain or overly complex. Using inline regular expressions simplifies templates, improves readability, and allows for more advanced validation logic.
The cluster-compare plugin provides two functions for inline validation:
-
regex: Validates content in a field using a regular expression. -
capturegroups: Enhances multi-line text comparisons by processing non-capture group text as exact matches, applying regular expression matching only within named capture groups, and ensuring consistency for repeated capture groups.
6.4.5.1. Configuring inline validation with the regex function
Use the regex inline function to validate fields using regular expressions.
Procedure
Create a
metadata.yamlfile to match your use case. Use the following structure as an example:apiVersion: v2 parts: - name: Part1 components: - name: Example allOf: - path: example.yaml config: perField: - pathToKey: spec.bigTextBlock1 inlineDiffFunc: regex2 Use a regular expression to validate the field in the associated template:
apiVersion: v1
kind: ConfigMap
metadata:
  namespace: dashboard
data:
  bigTextBlock: |-
    This is a big text block with some static content, like this line.
    It also has a place where (?<username>[a-z0-9]+) would put in their own name. (?<username>[a-z0-9]+) would put in their own name.
6.4.5.2. Configuring inline validation with the capturegroups function
Use the capturegroups inline function for more precise validation of fields featuring multi-line strings.
Procedure
Create a
metadata.yamlfile to match your use case. Use the following structure as an example:apiVersion: v2 parts: - name: Part1 components: - name: Example allOf: - path: example.yaml config: perField: - pathToKey: spec.bigTextBlock1 inlineDiffFunc: capturegroups2 Use a regular expression to validate the field in the associated template:
apiVersion: v1
kind: ConfigMap
metadata:
  namespace: dashboard
data:
  bigTextBlock: |-
    This static content outside of a capture group should match exactly.
    Here is a username capture group: (?<username>[a-z0-9]+).
    It should match this capture group: (?<username>[a-z0-9]+).
6.4.6. Configuring descriptions for the output
Each part, component, or template can include descriptions to provide additional context, instructions, or documentation links. These descriptions are helpful to convey why a specific template or structure is required.
Procedure
Create a
metadata.yamlfile to match your use case. Use the following structure as an example:apiVersion: v2 parts: - name: Part1 description: |- General text for every template under this part, unless overridden. components: - name: Component1 # With no description set, this inherits the description from the part above. OneOf: - path: Template1.yaml # This inherits the component description, if set. - path: Template2.yaml - path: Template3.yaml description: |- This template has special instructions that don't apply to the others. - name: Component2 description: |- This overrides the part text with something more specific. Multi-line text is supported, at all levels. allOf: - path: RequiredTemplate1.yaml - path: RequiredTemplate2.yaml description: |- Required for important reasons. - path: RequiredTemplate3.yaml
6.5. Performing advanced reference configuration customization
For scenarios where you want to allow temporary deviations from the reference design, you can apply more advanced customizations.
These customizations override the default matching process that the cluster-compare plugin uses during a comparison. Use caution when applying these advanced customizations as it can lead to unintended consequences, such as excluding consequential information from a cluster comparison.
Some advanced tasks to dynamically customize your reference configuration include the following:
- Manual matching: Configure a user configuration file to manually match a custom resource from the cluster to a template in the reference configuration.
-
Patching the reference: Patch a reference to configure a reference configuration by using a patch option with the
cluster-comparecommand.
6.5.1. Configuring manual matching between CRs and templates
In some cases, the cluster-compare plugin’s default matching might not work as expected. You can manually define how a custom resource (CR) maps to a template by using a user configuration file.
By default, the plugin maps a CR to a template based on the apiversion, kind, name, and namespace fields. However, multiple templates might match a single CR. For example, this can occur in the following scenarios:
-
Multiple templates exist with the same
apiversion,kind,name, andnamespacefields. -
Templates match any CR with a specific
apiversionandkind, regardless of itsnamespaceorname.
When a CR matches multiple templates, the plugin uses a tie-breaking mechanism that selects the template with the fewest differences. To explicitly control which template the plugin chooses, you can create a user configuration YAML file that defines manual matching rules. You can pass this configuration file to the cluster-compare command to enforce the required template selection.
Procedure
Create a user configuration file to define the manual matching criteria:
Example
user-config.yamlfilecorrelationSettings:1 manualCorrelation:2 correlationPairs:3 ptp.openshift.io/v1_PtpConfig_openshift-ptp_grandmaster: optional/ptp-config/PtpOperatorConfig.yaml4 ptp.openshift.io/v1_PtpOperatorConfig_openshift-ptp_default: optional/ptp-config/PtpOperatorConfig.yaml- 1
- The
correlationSettingssection contains the manual correlation settings. - 2
- The
manualCorrelationsection specifies that manual correlation is enabled. - 3
- The
correlationPairssection lists the CR and template pairs to manually match. - 4
- Specifies the CR and template pair to match. The CR specification uses the following format:
<apiversion>_<kind>_<namespace>_<name>. For cluster-scoped CRs that do not have a namespace, use the following format:<apiversion>_<kind>_<name>. The path to the template must be relative to themetadata.yamlfile.
Reference the user configuration file in a
cluster-comparecommand by running the following command:$ oc cluster-compare -r <path_to_reference_config>/metadata.yaml -c <path_to_user_config>/user-config.yaml1 - 1
- Specify the
user-config.yamlfile by using the-coption.
6.5.2. Patching a reference configuration
In certain scenarios, you might need to patch the reference configuration to handle expected deviations in a cluster configuration. The plugin applies the patch during the comparison process, modifying the specified resource fields as defined in the patch file.
For example, you might need to temporarily patch a template because a cluster uses a deprecated field that is out-of-date with the latest reference configuration. Patched files are reported in the comparison output summary.
You can create a patch file in two ways:
-
Use the
cluster-compareplugin to generate a patch YAML file. - Create your own patch file.
6.5.2.1. Using the cluster-compare plugin to generate a patch
You can use the cluster-compare plugin to generate a patch for specific template files. The plugin adjusts the template to ensure it matches with the cluster custom resource (CR). Any previously valid differences in the patched template are not reported. The plugin highlights the patched files in the output.
Procedure
Generate patches for templates by running the following command:
$ oc cluster-compare -r <path_to_reference_config>/metadata.yaml -o 'generate-patches' --override-reason "A valid reason for the override" --generate-override-for "<template1_path>" --generate-override-for "<template2_path>" > <path_to_patches_file>-
-rspecifies the path to the metadata.yaml file of the reference configuration. -
-ospecifies the output format. To generate a patch output, you must use thegenerate-patchesvalue. -
--override-reasondescribes the reason for the patch. --generate-override-forspecifies a path to the template that requires a patch.NoteYou must use a file path for the target template that is relative to the
metadata.yamlfile. For example, if the file path for themetadata.yamlfile is./compare/metadata.yaml, a relative file path for the template might beoptional/my-template.yaml.-
<path_to_patches_file>specifies the filename and path for your patch.
-
Optional: Review the patch file before applying to the reference configuration:
Example
patch-configfile- apiVersion: storage.k8s.io/v1 kind: StorageClass name: crc-csi-hostpath-provisioner patch: '{"provisioner":"kubevirt.io.hostpath-provisioner"}'1 reason: A valid reason for the override templatePath: optional/local-storage-operator/StorageClass.yaml2 type: mergepatch3 Apply the patch to the reference configuration by running the following command:
$ oc cluster-compare -r <referenceConfigurationDirectory> -p <path_to_patches_file>-
-rspecifies the path to the metadata.yaml file of the reference configuration. -pspecifies the path to the patch file.Example output
...

Cluster CR: storage.k8s.io/v1_StorageClass_crc-csi-hostpath-provisioner
Reference File: optional/local-storage-operator/StorageClass.yaml
Description: Component description
Diff Output: None
Patched with patch
Patch Reasons:
- A valid reason for the override

...

No CRs are unmatched to reference CRs
Metadata Hash: bb2165004c496b32e0c8509428fb99c653c3cf4fba41196ea6821bd05c3083ab
Cluster CRs with patches applied: 1
-
6.5.2.2. Creating a patch file manually
You can write a patch file to handle expected deviations in a cluster configuration.
Patches have three possible values for the type field:
-
mergepatch- Merges the JSON into the target template. Unspecified fields remain unchanged. -
rfc6902- Merges the JSON in the target template usingadd,remove,replace,move, andcopyoperations. Each operation targets a specific path. -
go-template- Defines a Golang template. The plugin renders the template using the cluster custom resource (CR) as input and generates either amergepatchorrfc6902patch for the target template.
The following example shows the same patch using all three different formats.
Procedure
Create a patch file to match your use case. Use the following structure as an example:
Example
patch-config- apiVersion: v11 kind: Namespace name: openshift-storage reason: known deviation templatePath: namespace.yaml type: mergepatch patch: '{"metadata":{"annotations":{"openshift.io/sa.scc.mcs":"s0:c29,c14","openshift.io/sa.scc.supplemental-groups":"1000840000/10000","openshift.io/sa.scc.uid-range":"1000840000/10000","reclaimspace.csiaddons.openshift.io/schedule":"@weekly","workload.openshift.io/allowed":null},"labels":{"kubernetes.io/metadata.name":"openshift-storage","olm.operatorgroup.uid/ffcf3f2d-3e37-4772-97bc-983cdfce128b":"","openshift.io/cluster-monitoring":"false","pod-security.kubernetes.io/audit":"privileged","pod-security.kubernetes.io/audit-version":"v1.24","pod-security.kubernetes.io/warn":"privileged","pod-security.kubernetes.io/warn-version":"v1.24","security.openshift.io/scc.podSecurityLabelSync":"true"}},"spec":{"finalizers":["kubernetes"]}}' - name: openshift-storage apiVersion: v1 kind: Namespace templatePath: namespace.yaml type: rfc6902 reason: known deviation patch: '[ {"op": "add", "path": "/metadata/annotations/openshift.io~1sa.scc.mcs", "value": "s0:c29,c14"}, {"op": "add", "path": "/metadata/annotations/openshift.io~1sa.scc.supplemental-groups", "value": "1000840000/10000"}, {"op": "add", "path": "/metadata/annotations/openshift.io~1sa.scc.uid-range", "value": "1000840000/10000"}, {"op": "add", "path": "/metadata/annotations/reclaimspace.csiaddons.openshift.io~1schedule", "value": "@weekly"}, {"op": "remove", "path": "/metadata/annotations/workload.openshift.io~1allowed"}, {"op": "add", "path": "/metadata/labels/kubernetes.io~1metadata.name", "value": "openshift-storage"}, {"op": "add", "path": "/metadata/labels/olm.operatorgroup.uid~1ffcf3f2d-3e37-4772-97bc-983cdfce128b", "value": ""}, {"op": "add", "path": "/metadata/labels/openshift.io~1cluster-monitoring", "value": "false"}, {"op": "add", "path": "/metadata/labels/pod-security.kubernetes.io~1audit", "value": "privileged"}, {"op": "add", "path": "/metadata/labels/pod-security.kubernetes.io~1audit-version", "value": "v1.24"}, {"op": "add", "path": "/metadata/labels/pod-security.kubernetes.io~1warn", "value": "privileged"}, {"op": "add", "path": "/metadata/labels/pod-security.kubernetes.io~1warn-version", "value": "v1.24"}, {"op": "add", "path": "/metadata/labels/security.openshift.io~1scc.podSecurityLabelSync", "value": "true"}, {"op": "add", "path": "/spec", "value": {"finalizers": ["kubernetes"]}} ]' - apiVersion: v1 kind: Namespace name: openshift-storage reason: "known deviation" templatePath: namespace.yaml type: go-template patch: | { "type": "rfc6902", "patch": '[ {"op": "add", "path": "/metadata/annotations/openshift.io~1sa.scc.mcs", "value": "s0:c29,c14"}, {"op": "add", "path": "/metadata/annotations/openshift.io~1sa.scc.supplemental-groups", "value": "1000840000/10000"}, {"op": "add", "path": "/metadata/annotations/openshift.io~1sa.scc.uid-range", "value": "1000840000/10000"}, {"op": "add", "path": "/metadata/annotations/reclaimspace.csiaddons.openshift.io~1schedule", "value": "@weekly"}, {"op": "remove", "path": "/metadata/annotations/workload.openshift.io~1allowed"}, {"op": "add", "path": "/metadata/labels/kubernetes.io~1metadata.name", "value": "openshift-storage"}, {"op": "add", "path": "/metadata/labels/olm.operatorgroup.uid~1ffcf3f2d-3e37-4772-97bc-983cdfce128b", "value": ""}, {"op": "add", "path": "/metadata/labels/openshift.io~1cluster-monitoring", "value": "false"}, {"op": "add", "path": "/metadata/labels/pod-security.kubernetes.io~1audit", "value": "privileged"}, {"op": "add", "path": "/metadata/labels/pod-security.kubernetes.io~1audit-version", "value": "v1.24"}, {"op": "add", "path": "/metadata/labels/pod-security.kubernetes.io~1warn", "value": "privileged"}, {"op": "add", "path": "/metadata/labels/pod-security.kubernetes.io~1warn-version", "value": "v1.24"}, {"op": "add", "path": "/metadata/labels/security.openshift.io~1scc.podSecurityLabelSync", "value": "true"}, {"op": "add", "path": "/spec", "value": {"finalizers": {{ .spec.finalizers | toJson }} }} ]' }- 1
- The patches uses the
kind,apiVersion,name, andnamespacefields to match the patch with the correct cluster CR.
Apply the patch to the reference configuration by running the following command:
$ oc cluster-compare -r <referenceConfigurationDirectory> -p <path_to_patches_file>-
-rspecifies the path to the metadata.yaml file of the reference configuration. pspecifies the path to the patch file.Example output
...

Cluster CR: storage.k8s.io/v1_StorageClass_crc-csi-hostpath-provisioner
Reference File: namespace.yaml
Description: Component description
Diff Output: None
Patched with patch
Patch Reasons:
- known deviation
- known deviation
- known deviation

...

No CRs are unmatched to reference CRs
Metadata Hash: bb2165004c496b32e0c8509428fb99c653c3cf4fba41196ea6821bd05c3083ab
Cluster CRs with patches applied: 1
-
6.6. Troubleshooting cluster comparisons
When using the cluster-compare plugin, you might see unexpected results, such as false positives or conflicts when multiple cluster custom resources (CRs) exist.
6.6.1. Troubleshooting false positives for missing resources
The plugin might report a missing resource even though the cluster custom resource (CR) is present in the cluster.
Procedure
-
Ensure you are using the latest version of the
cluster-compareplugin. For more information, see "Installing the cluster-compare plugin". - Ensure you are using the most up-to-date version of the reference configuration.
-
Ensure that template has the same
apiVersion,kind,name, andnamespacefields as the cluster CR.
6.6.2. Troubleshooting multiple template matches for the same CR
In some cases, more than one cluster CR can match a template because they feature the same apiVersion, namespace, and kind. The plugin’s default matching compares the CR that features the least differences.
You can optionally configure your reference configuration to avoid this situation.
Procedure
-
Ensure the templates feature distinct
apiVersion,namespace, andkindvalues to ensure no duplicate template matching. - Use a user configuration file to manually match a template to a CR. For more information, see "Configuring manual matching between CRs and templates".