Chapter 11. Storage
11.1. Storage configuration overview
You can configure a default storage class, storage profiles, Containerized Data Importer (CDI), data volumes (DVs), and automatic boot source updates.
11.1.1. Storage
The following storage configuration tasks are mandatory:
- Configure a default storage class
-
You must configure a default storage class for the cluster. Otherwise, OpenShift Virtualization cannot automatically import boot source images.
DataVolumeobjects (DVs) andPersistentVolumeClaimobjects (PVCs) that do not explicitly specify a storage class remain in thePendingstate until you set a default storage class. - Configure storage profiles
- You must configure storage profiles if your storage provider is not recognized by CDI. A storage profile provides recommended storage settings based on the associated storage class.
The following storage configuration tasks are optional:
- Reserve additional PVC space for file system overhead
- By default, 5.5% of a file system PVC is reserved for overhead, reducing the space available for VM disks by that amount. You can configure a different overhead value.
- Configure local storage by using the hostpath provisioner
- You can configure local storage for virtual machines by using the hostpath provisioner (HPP). When you install the OpenShift Virtualization Operator, the HPP Operator is automatically installed.
- Configure user permissions to clone data volumes between namespaces
- You can configure RBAC roles to enable users to clone data volumes between namespaces.
11.1.2. Containerized Data Importer
You can perform the following Containerized Data Importer (CDI) configuration tasks:
- Override the resource request limits of a namespace
- You can configure CDI to import, upload, and clone VM disks into namespaces that are subject to CPU and memory resource restrictions.
- Configure CDI scratch space
- CDI requires scratch space (temporary storage) to complete some operations, such as importing and uploading VM images. During this process, CDI provisions a scratch space PVC equal to the size of the PVC backing the destination data volume (DV).
11.1.3. Data volumes
You can perform the following data volume configuration tasks:
- Enable preallocation for data volumes
- CDI can preallocate disk space to improve write performance when creating data volumes. You can enable preallocation for specific data volumes.
- Manage data volume annotations
- Data volume annotations allow you to manage pod behavior. You can add one or more annotations to a data volume, which then propagates to the created importer pods.
11.1.4. Boot source updates
You can perform the following boot source update configuration task:
- Manage automatic boot source updates
- Boot sources can make virtual machine (VM) creation more accessible and efficient for users. If automatic boot source updates are enabled, CDI imports, polls, and updates the images so that they are ready to be cloned for new VMs. By default, CDI automatically updates Red Hat boot sources. You can enable automatic updates for custom boot sources.
11.2. Configuring storage profiles
A storage profile provides recommended storage settings based on the associated storage class. A storage profile is allocated for each storage class.
The Containerized Data Importer (CDI) recognizes a storage provider if it has been configured to identify and interact with the storage provider’s capabilities.
For recognized storage types, the CDI provides values that optimize the creation of PVCs. You can also configure automatic settings for the storage class by customizing the storage profile. If the CDI does not recognize your storage provider, you must configure storage profiles.
When using OpenShift Virtualization with Red Hat OpenShift Data Foundation, specify RBD block mode persistent volume claims (PVCs) when creating virtual machine disks. RBD block mode volumes are more efficient and provide better performance than Ceph FS or RBD filesystem-mode PVCs.
To specify RBD block mode PVCs, use the 'ocs-storagecluster-ceph-rbd' storage class and VolumeMode: Block.
11.2.1. Customizing the storage profile
You can specify default parameters by editing the StorageProfile object for the provisioner’s storage class. These default parameters only apply to the persistent volume claim (PVC) if they are not configured in the DataVolume object.
You cannot modify storage class parameters. To make changes, delete and re-create the storage class. You must then reapply any customizations that were previously made to the storage profile.
An empty status section in a storage profile indicates that a storage provisioner is not recognized by the Containerized Data Importer (CDI). Customizing a storage profile is necessary if you have a storage provisioner that is not recognized by CDI. In this case, the administrator sets appropriate values in the storage profile to ensure successful allocations.
If you are creating a snapshot of a VM, a warning appears if the storage class of the disk has more than one VolumeSnapshotClass associated with it. In this case, you must specify one volume snapshot class; otherwise, any disk that has more than one volume snapshot class is excluded from the snapshots list.
If you create a data volume and omit YAML attributes and these attributes are not defined in the storage profile, then the requested storage will not be allocated and the underlying persistent volume claim (PVC) will not be created.
Prerequisites
-
You have installed the OpenShift CLI (
oc). - Ensure that your planned configuration is supported by the storage class and its provider. Specifying an incompatible configuration in a storage profile causes volume provisioning to fail.
Procedure
Edit the storage profile. In this example, the provisioner is not recognized by CDI.
$ oc edit storageprofile <storage_class>Specify the
accessModesandvolumeModevalues you want to configure for the storage profile. For example:Example storage profile
apiVersion: cdi.kubevirt.io/v1beta1
kind: StorageProfile
metadata:
  name: <unknown_provisioner_class>
# ...
spec:
  claimPropertySets:
  - accessModes:
    - ReadWriteOnce
1 volumeMode: Filesystem2 status: provisioner: <unknown_provisioner> storageClass: <unknown_provisioner_class>
11.2.1.1. Specifying a volume snapshot class by using the web console
If you are creating a snapshot of a VM, a warning appears if the storage class of the disk has more than one volume snapshot class associated with it. In this case, you must specify one volume snapshot class; otherwise, any disk that has more than one volume snapshot class is excluded from the snapshots list.
You can specify the default volume snapshot class in the OpenShift Container Platform web console.
Procedure
- From the Virtualization focused view, select Storage.
- Click VolumeSnapshotClasses.
- Select a volume snapshot class from the list.
- Click the Annotations pencil icon.
-
Enter the following Key:
snapshot.storage.kubernetes.io/is-default-class. -
Enter the following Value:
true. - Click Save.
11.2.1.2. Specifying a volume snapshot class by using the CLI
If you are creating a snapshot of a VM, a warning appears if the storage class of the disk has more than one volume snapshot class associated with it. In this case, you must specify one volume snapshot class; otherwise, any disk that has more than one volume snapshot class is excluded from the snapshots list.
You can select which volume snapshot class to use by either:
-
Setting the
spec.snapshotClassfor the storage profile. - Setting a default volume snapshot class.
Prerequisites
-
You have installed the OpenShift CLI (
oc).
Procedure
Set the
VolumeSnapshotClassyou want to use. For example:apiVersion: cdi.kubevirt.io/v1beta1 kind: StorageProfile metadata: name: ocs-storagecluster-ceph-rbd-virtualization spec: snapshotClass: ocs-storagecluster-rbdplugin-snapclassAlternatively, set the default volume snapshot class by running the following command:
# oc patch VolumeSnapshotClass ocs-storagecluster-cephfsplugin-snapclass --type=merge -p '{"metadata":{"annotations":{"snapshot.storage.kubernetes.io/is-default-class":"true"}}}'
11.2.1.3. Viewing automatically created storage profiles
The system creates storage profiles for each storage class automatically.
Prerequisites
-
You have installed the OpenShift CLI (
oc).
Procedure
To view the list of storage profiles, run the following command:
$ oc get storageprofileTo fetch the details of a particular storage profile, run the following command:
$ oc describe storageprofile <name>Example storage profile details
Name: ocs-storagecluster-ceph-rbd-virtualization Namespace: Labels: app=containerized-data-importer app.kubernetes.io/component=storage app.kubernetes.io/managed-by=cdi-controller app.kubernetes.io/part-of=hyperconverged-cluster app.kubernetes.io/version=4.17.2 cdi.kubevirt.io= Annotations: <none> API Version: cdi.kubevirt.io/v1beta1 Kind: StorageProfile Metadata: Creation Timestamp: 2023-11-13T07:58:02Z Generation: 2 Owner References: API Version: cdi.kubevirt.io/v1beta1 Block Owner Deletion: true Controller: true Kind: CDI Name: cdi-kubevirt-hyperconverged UID: 2d6f169a-382c-4caf-b614-a640f2ef8abb Resource Version: 4186799537 UID: 14aef804-6688-4f2e-986b-0297fd3aaa68 Spec: Status: Claim Property Sets: accessModes: ReadWriteMany volumeMode: Block accessModes: ReadWriteOnce volumeMode: Block accessModes: ReadWriteOnce volumeMode: Filesystem Clone Strategy: csi-clone Data Import Cron Source Format: snapshot Provisioner: openshift-storage.rbd.csi.ceph.com Snapshot Class: ocs-storagecluster-rbdplugin-snapclass Storage Class: ocs-storagecluster-ceph-rbd-virtualization Events: <none>status.claimPropertySets-
Claim Property Setsis an ordered list ofAccessMode/VolumeModepairs, which describe the PVC modes that are used to provision VM disks. status.cloneStrategy-
The
Clone Strategyline indicates the clone strategy to be used. status.dataImportCronSourceFormat-
Data Import Cron Source Formatindicates whether golden images on this storage are stored as PVCs or volume snapshots.
11.2.1.4. Setting a default cloning strategy by using a storage profile
You can use storage profiles to set a default cloning method for a storage class by creating a cloning strategy. Setting cloning strategies can be helpful, for example, if your storage vendor supports only certain cloning methods. It also allows you to select a method that limits resource usage or maximizes performance.
Cloning strategies are specified by setting the cloneStrategy attribute in a storage profile to one of the following values:
-
snapshotis used by default when snapshots are configured. The Containerized Data Importer (CDI) will use the snapshot method if it recognizes the storage provider and the provider supports Container Storage Interface (CSI) snapshots. This cloning strategy uses a temporary volume snapshot to clone the volume. -
copyuses a source pod and a target pod to copy data from the source volume to the target volume. Host-assisted cloning is the least efficient method of cloning. -
csi-cloneuses the CSI clone API to efficiently clone an existing volume without using an interim volume snapshot. Unlikesnapshotorcopy, which are used by default if no storage profile is defined, CSI volume cloning is only used when you specify it in theStorageProfileobject for the provisioner’s storage class.
You can set clone strategies using the CLI without modifying the default claimPropertySets in your YAML spec section.
Example storage profile
apiVersion: cdi.kubevirt.io/v1beta1
kind: StorageProfile
metadata:
  name: <provisioner_class>
# ...
spec:
  claimPropertySets:
  - accessModes:
    - ReadWriteOnce
volumeMode: Filesystem
cloneStrategy: csi-clone
status:
  provisioner: <provisioner>
storageClass: <provisioner_class>11.3. Managing automatic boot source updates
You can manage automatic updates for the following boot sources:
Boot sources can make virtual machine (VM) creation more accessible and efficient for users. If automatic boot source updates are enabled, the Containerized Data Importer (CDI) imports, polls, and updates the images so that they are ready to be cloned for new VMs. By default, CDI automatically updates Red Hat boot sources.
11.3.1. Managing Red Hat boot source updates
You can opt out of automatic updates for all system-defined boot sources by disabling the enableCommonBootImageImport feature gate. If you disable this feature gate, all DataImportCron objects are deleted. This does not remove previously imported boot source objects that store operating system images, though administrators can delete them manually.
When the enableCommonBootImageImport feature gate is disabled, DataSource objects are reset so that they no longer point to the original boot source. An administrator can manually provide a boot source by creating a new persistent volume claim (PVC) or volume snapshot for the DataSource object, then populating it with an operating system image.
11.3.1.1. Managing automatic updates for all system-defined boot sources
Disabling automatic boot source imports and updates can lower resource usage. In disconnected environments, disabling automatic boot source updates prevents CDIDataImportCronOutdated alerts from filling up logs.
To disable automatic updates for all system-defined boot sources, turn off the enableCommonBootImageImport feature gate by setting the value to false. Setting this value to true re-enables the feature gate and turns automatic updates back on.
Custom boot sources are not affected by this setting.
Prerequisites
-
You have installed the OpenShift CLI (
oc).
Procedure
Toggle the feature gate for automatic boot source updates by editing the
HyperConvergedcustom resource (CR).To disable automatic boot source updates, set the
spec.featureGates.enableCommonBootImageImportfield in theHyperConvergedCR tofalse. For example:$ oc patch hyperconverged kubevirt-hyperconverged -n openshift-cnv \ --type json -p '[{"op": "replace", "path": \ "/spec/featureGates/enableCommonBootImageImport", \ "value": false}]'To re-enable automatic boot source updates, set the
spec.featureGates.enableCommonBootImageImportfield in theHyperConvergedCR totrue. For example:$ oc patch hyperconverged kubevirt-hyperconverged -n openshift-cnv \ --type json -p '[{"op": "replace", "path": \ "/spec/featureGates/enableCommonBootImageImport", \ "value": true}]'
11.3.2. Managing custom boot source updates
Custom boot sources that are not provided by OpenShift Virtualization are not controlled by the feature gate. You must manage them individually by editing the HyperConverged custom resource (CR).
You must configure a storage class. Otherwise, the cluster cannot receive automated updates for custom boot sources. See Defining a storage class for details.
11.3.2.1. Configuring the default and virt-default storage classes
A storage class determines how persistent storage is provisioned for workloads. In OpenShift Virtualization, the virt-default storage class takes precedence over the cluster default storage class and is used specifically for virtualization workloads. Only one storage class should be set as virt-default or cluster default at a time. If multiple storage classes are marked as default, the virt-default storage class overrides the cluster default. To ensure consistent behavior, configure only one storage class as the default for virtualization workloads.
Boot sources are created using the default storage class. When the default storage class changes, old boot sources are automatically updated using the new default storage class. If your cluster does not have a default storage class, you must define one.
If boot source images were stored as volume snapshots and both the cluster default and virt-default storage class have been unset, the volume snapshots are cleaned up and new data volumes will be created. However the newly created data volumes will not start importing until a default storage class is set.
Prerequisites
-
You have installed the OpenShift CLI (
oc).
Procedure
Patch the current virt-default or a cluster default storage class to false:
Identify all storage classes currently marked as virt-default by running the following command:
$ oc get sc -o json| jq '.items[].metadata|select(.annotations."storageclass.kubevirt.io/is-default-virt-class"=="true")|.name'For each storage class returned, remove the virt-default annotation by running the following command:
$ oc patch storageclass <storage_class_name> -p '{"metadata": {"annotations": {"storageclass.kubevirt.io/is-default-virt-class": "false"}}}'Identify all storage classes currently marked as cluster default by running the following command:
$ oc get sc -o json| jq '.items[].metadata|select(.annotations."storageclass.kubernetes.io/is-default-class"=="true")|.name'For each storage class returned, remove the cluster default annotation by running the following command:
$ oc patch storageclass <storage_class_name> -p '{"metadata": {"annotations": {"storageclass.kubernetes.io/is-default-class": "false"}}}'
Set a new default storage class:
Assign the virt-default role to a storage class by running the following command:
$ oc patch storageclass <storage_class_name> -p '{"metadata": {"annotations": {"storageclass.kubevirt.io/is-default-virt-class": "true"}}}'Alternatively, assign the cluster default role to a storage class by running the following command:
$ oc patch storageclass <storage_class_name> -p '{"metadata": {"annotations": {"storageclass.kubernetes.io/is-default-class": "true"}}}'
11.3.2.2. Configuring a storage class for boot source images
You can configure a specific storage class in the HyperConverged resource.
To ensure stable behavior and avoid unnecessary re-importing, you can specify the storageClassName in the dataImportCronTemplates section of the HyperConverged resource.
Prerequisites
-
You have installed the OpenShift CLI (
oc).
Procedure
Open the
HyperConvergedCR in your default editor by running the following command:$ oc edit hyperconverged kubevirt-hyperconverged -n openshift-cnvAdd the
dataImportCronTemplateto the spec section of theHyperConvergedresource and set thestorageClassName:apiVersion: hco.kubevirt.io/v1beta1 kind: HyperConverged metadata: name: kubevirt-hyperconverged spec: dataImportCronTemplates: - metadata: name: rhel9-image-cron spec: template: spec: storage: storageClassName: <storage_class> schedule: "0 */12 * * *" managedDataSource: <data_source> # ...-
spec.dataImportCronTemplates.spec.template.spec.storage.storageClassNamespecifies the storage class. -
spec.dataImportCronTemplates.spec.scheduleis a required field that specifies the schedule for the job in cron format. spec.dataImportCronTemplates.spec.managedDataSourceis a required field that specifies the data source to use.NoteFor the custom image to be detected as an available boot source, the value of the
spec.dataVolumeTemplates.spec.sourceRef.nameparameter in the VM template must match this value.
-
- Wait for the HyperConverged Operator (HCO) and Scheduling, Scale, and Performance (SSP) resources to complete reconciliation.
Delete any outdated
DataVolumeandVolumeSnapshotobjects from theopenshift-virtualization-os-imagesnamespace by running the following command.$ oc delete DataVolume,VolumeSnapshot -n openshift-virtualization-os-images --selector=cdi.kubevirt.io/dataImportCronWait for all
DataSourceobjects to reach a "Ready - True" status. Data sources can reference either a PersistentVolumeClaim (PVC) or a VolumeSnapshot. To check the expected source format, run the following command:$ oc get storageprofile <storage_class_name> -o json | jq .status.dataImportCronSourceFormat
11.3.2.3. Enabling automatic updates for custom boot sources
OpenShift Virtualization automatically updates system-defined boot sources by default, but does not automatically update custom boot sources. You must manually enable automatic updates by editing the HyperConverged custom resource (CR).
Prerequisites
- The cluster has a default storage class.
-
You have installed the OpenShift CLI (
oc).
Procedure
Open the
HyperConvergedCR in your default editor by running the following command:$ oc edit hyperconverged kubevirt-hyperconverged -n openshift-cnvEdit the
HyperConvergedCR, adding the appropriate template and boot source in thedataImportCronTemplatessection. For example:Example custom resource
apiVersion: hco.kubevirt.io/v1beta1 kind: HyperConverged metadata: name: kubevirt-hyperconverged spec: dataImportCronTemplates: - metadata: name: centos-stream9-image-cron annotations: cdi.kubevirt.io/storage.bind.immediate.requested: "true" spec: schedule: "0 */12 * * *" template: spec: source: registry: url: docker://quay.io/containerdisks/centos-stream:9 storage: resources: requests: storage: 30Gi garbageCollect: Outdated managedDataSource: centos-stream9-
spec.dataImportCronTemplates.metadata.annotationsspecifies a required annotation for storage classes withvolumeBindingModeset toWaitForFirstConsumer. -
spec.dataImportCronTemplates.spec.schedulespecifies the schedule for the job, specified in cron format. -
spec.dataImportCronTemplates.spec.template.spec.source.registryspecifies the registry source to use to create a data volume. Use the defaultpodpullMethodand notnodepullMethod, which is based on thenodedocker cache. Thenodedocker cache is useful when a registry image is available viaContainer.Image, but the CDI importer is not authorized to access it. -
spec.dataImportCronTemplates.spec.managedDataSourcespecifies the name of the managed data source. For the custom image to be detected as an available boot source, the name of the image’smanagedDataSourcemust match the name of the template’sDataSource, which is found underspec.dataVolumeTemplates.spec.sourceRef.namein the VM template YAML file.
-
- Save the file.
11.3.2.4. Enabling volume snapshot boot sources
Enable volume snapshot boot sources by setting the parameter in the StorageProfile associated with the storage class that stores operating system base images. Although DataImportCron was originally designed to maintain only PVC sources, VolumeSnapshot sources scale better than PVC sources for certain storage types.
Use volume snapshots on a storage profile that is proven to scale better when cloning from a single snapshot.
Prerequisites
- You must have access to a volume snapshot with the operating system image.
- The storage must support snapshotting.
-
You have installed the OpenShift CLI (
oc).
Procedure
Open the storage profile object that corresponds to the storage class used to provision boot sources by running the following command:
$ oc edit storageprofile <storage_class>-
Review the
dataImportCronSourceFormatspecification of theStorageProfileto confirm whether or not the VM is using PVC or volume snapshot by default. Edit the storage profile, if needed, by updating the
dataImportCronSourceFormatspecification tosnapshot.Example storage profile
apiVersion: cdi.kubevirt.io/v1beta1
kind: StorageProfile
metadata:
# ...
spec:
  dataImportCronSourceFormat: snapshot
Verification
Open the storage profile object that corresponds to the storage class used to provision boot sources.
$ oc get storageprofile <storage_class> -oyaml-
Confirm that the
dataImportCronSourceFormatspecification of theStorageProfileis set to 'snapshot', and that anyDataSourceobjects that theDataImportCronpoints to now reference volume snapshots.
You can now use these boot sources to create virtual machines.
11.3.3. Disabling automatic updates for a single boot source
You can disable automatic updates for an individual boot source, whether it is custom or system-defined, by editing the HyperConverged custom resource (CR).
Prerequisites
-
You have installed the OpenShift CLI (
oc).
Procedure
Open the
HyperConvergedCR in your default editor by running the following command:$ oc edit hyperconverged kubevirt-hyperconverged -n openshift-cnvDisable automatic updates for an individual boot source by editing the
spec.dataImportCronTemplatesfield.- Custom boot source
-
Remove the boot source from the
spec.dataImportCronTemplatesfield. Automatic updates are disabled for custom boot sources by default.
-
Remove the boot source from the
- System-defined boot source
Add the boot source to
spec.dataImportCronTemplates.NoteAutomatic updates are enabled by default for system-defined boot sources, but these boot sources are not listed in the CR unless you add them.
Set the value of the
dataimportcrontemplate.kubevirt.io/enableannotation to'false'.For example:
apiVersion: hco.kubevirt.io/v1beta1
kind: HyperConverged
metadata:
  name: kubevirt-hyperconverged
spec:
  dataImportCronTemplates:
  - metadata:
      annotations:
        dataimportcrontemplate.kubevirt.io/enable: 'false'
      name: rhel8-image-cron
# ...
- Save the file.
11.3.4. Verifying the status of a boot source
You can determine if a boot source is system-defined or custom by viewing the HyperConverged custom resource (CR).
Prerequisites
-
You have installed the OpenShift CLI (
oc).
Procedure
View the contents of the
HyperConvergedCR by running the following command:$ oc get hyperconverged kubevirt-hyperconverged -n openshift-cnv -o yamlExample output
apiVersion: hco.kubevirt.io/v1beta1 kind: HyperConverged metadata: name: kubevirt-hyperconverged spec: # ... status: # ... dataImportCronTemplates: - metadata: annotations: cdi.kubevirt.io/storage.bind.immediate.requested: "true" name: centos-9-image-cron spec: garbageCollect: Outdated managedDataSource: centos-stream9 schedule: 55 8/12 * * * template: metadata: {} spec: source: registry: url: docker://quay.io/containerdisks/centos-stream:9 storage: resources: requests: storage: 30Gi status: {} status: commonTemplate: true # ... - metadata: annotations: cdi.kubevirt.io/storage.bind.immediate.requested: "true" name: user-defined-dic spec: garbageCollect: Outdated managedDataSource: user-defined-centos-stream9 schedule: 55 8/12 * * * template: metadata: {} spec: source: registry: pullMethod: node url: docker://quay.io/containerdisks/centos-stream:9 storage: resources: requests: storage: 30Gi status: {} status: {} # ...-
status.dataImportCronTemplates.status.commonTemplatespecifies a system-defined boot source. -
status.dataImportCronTemplates.statusspecifies a custom boot source.
-
Verify the status of the boot source by reviewing the
status.dataImportCronTemplates.statusfield.-
If the field contains
commonTemplate: true, it is a system-defined boot source. -
If the
status.dataImportCronTemplates.statusfield has the value{}, it is a custom boot source.
-
If the field contains
11.4. Reserving PVC space for file system overhead
When you create a DataVolume custom resource (CR) for a virtual machine (VM) by setting the spec.storage.volumeMode attribute to Filesystem, OpenShift Virtualization automatically accounts for file system overhead.
If you specify the storage type by using the spec.pvc attribute in the DataVolume CR, OpenShift Virtualization does not add any file system overhead and the requested size is passed directly to Kubernetes.
The default file system overhead value is 6%. For example, if you request a 10 GiB disk and the spec.storage.volumeMode attribute is set to FileSystem, Kubernetes provisions a PVC of approximately 10.6 GiB so that the VM has the full 10 GiB of space available.
| Requested virtual disk size | Calculated overhead (6%) | Total PVC space provisioned |
|---|---|---|
| 10 GiB | 0.6 GiB | 10.6 GiB |
| 100 GiB | 6 GiB | 106 GiB |
You can change the default file system overhead value by editing the HyperConverged CR.
11.4.1. Overriding the default file system overhead value
Change the amount of persistent volume claim (PVC) space that the OpenShift Virtualization reserves for file system overhead by editing the spec.filesystemOverhead attribute of the HCO object.
Prerequisites
-
Install the OpenShift CLI (
oc).
Procedure
Open the
HCOobject for editing by running the following command:$ oc edit hyperconverged kubevirt-hyperconverged -n openshift-cnvEdit the
spec.filesystemOverheadfields, populating them with your chosen values:# ... spec: filesystemOverhead: global: "<new_global_value>" storageClass: <storage_class_name>: "<new_value_for_this_storage_class>"-
spec.filesystemOverhead.globalspecifies the default file system overhead percentage used for any storage classes that do not already have a set value. For example,global: "0.07"reserves 7% of the PVC for file system overhead. -
spec.filesystemOverhead.storageClassspecifies the file system overhead percentage for the specified storage class. For example,mystorageclass: "0.04"changes the default overhead value for PVCs in themystorageclassstorage class to 4%.
-
-
Save and exit the editor to update the
HCOobject.
Verification
View the
CDIConfigstatus and verify your changes by running one of the following commands:To generally verify changes to
CDIConfig:$ oc get cdiconfig -o yamlTo view your specific changes to
CDIConfig:$ oc get cdiconfig -o jsonpath='{.items..status.filesystemOverhead}'
11.5. Configuring local storage by using the hostpath provisioner
You can configure local storage for virtual machines by using the hostpath provisioner (HPP).
When you install the OpenShift Virtualization Operator, the Hostpath Provisioner Operator is automatically installed. HPP is a local storage provisioner designed for OpenShift Virtualization that is created by the Hostpath Provisioner Operator. To use HPP, you create an HPP custom resource (CR) with a basic storage pool.
11.5.1. Creating a hostpath provisioner with a basic storage pool
You configure a hostpath provisioner (HPP) with a basic storage pool by creating an HPP custom resource (CR) with a storagePools stanza. The storage pool specifies the name and path used by the CSI driver.
Do not create storage pools in the same partition as the operating system. Otherwise, the operating system partition might become filled to capacity, which will impact performance or cause the node to become unstable or unusable.
Prerequisites
-
The directories specified in
spec.storagePools.pathmust have read/write access. -
You have installed the OpenShift CLI (
oc).
Procedure
Create an
hpp_cr.yamlfile with astoragePoolsstanza as in the following example:apiVersion: hostpathprovisioner.kubevirt.io/v1beta1 kind: HostPathProvisioner metadata: name: hostpath-provisioner spec: imagePullPolicy: IfNotPresent storagePools:1 - name: any_name path: "/var/myvolumes"2 workload: nodeSelector: kubernetes.io/os: linux- Save the file and exit.
Create the HPP by running the following command:
$ oc create -f hpp_cr.yaml
11.5.1.1. About creating storage classes
When you create a storage class, you set parameters that affect the dynamic provisioning of persistent volumes (PVs) that belong to that storage class. You cannot update a StorageClass object’s parameters after you create it.
In order to use the hostpath provisioner (HPP) you must create an associated storage class for the CSI driver with the storagePools stanza.
Virtual machines use data volumes that are based on local PVs. Local PVs are bound to specific nodes. While the disk image is prepared for consumption by the virtual machine, it is possible that the virtual machine cannot be scheduled to the node where the local storage PV was previously pinned.
To solve this problem, use the Kubernetes pod scheduler to bind the persistent volume claim (PVC) to a PV on the correct node. By using the StorageClass value with volumeBindingMode parameter set to WaitForFirstConsumer, the binding and provisioning of the PV is delayed until a pod is created using the PVC.
11.5.1.2. Creating a storage class for the CSI driver with the storagePools stanza
To use the hostpath provisioner (HPP) you must create an associated storage class for the Container Storage Interface (CSI) driver.
When you create a storage class, you set parameters that affect the dynamic provisioning of persistent volumes (PVs) that belong to that storage class. You cannot update a StorageClass object’s parameters after you create it.
Virtual machines use data volumes that are based on local PVs. Local PVs are bound to specific nodes. While a disk image is prepared for consumption by the virtual machine, it is possible that the virtual machine cannot be scheduled to the node where the local storage PV was previously pinned.
To solve this problem, use the Kubernetes pod scheduler to bind the persistent volume claim (PVC) to a PV on the correct node. By using the StorageClass value with volumeBindingMode parameter set to WaitForFirstConsumer, the binding and provisioning of the PV is delayed until a pod is created using the PVC.
Procedure
Create a
storageclass_csi.yamlfile to define the storage class:apiVersion: storage.k8s.io/v1 kind: StorageClass metadata: name: hostpath-csi provisioner: kubevirt.io.hostpath-provisioner reclaimPolicy: Delete1 volumeBindingMode: WaitForFirstConsumer2 parameters: storagePool: my-storage-pool3 -
reclaimPolicydefines whether the underlying storage is deleted or retained when a user deletes a PVC. The two possiblereclaimPolicyvalues areDeleteandRetain. If you do not specify a value, the default value isDelete. -
volumeBindingModedefines the timing of PV creation. TheWaitForFirstConsumerconfiguration in this example means that PV creation is delayed until a pod is scheduled to a specific node. -
parameters.storagePooldefines the name of the storage pool defined in the HPP custom resource (CR).
-
- Save the file and exit.
Create the
StorageClassobject by running the following command:$ oc create -f storageclass_csi.yaml
11.5.2. About storage pools created with PVC templates
If you have a single, large persistent volume (PV), you can create a storage pool by defining a PVC template in the hostpath provisioner (HPP) custom resource (CR).
A storage pool created with a PVC template can contain multiple HPP volumes. Splitting a PV into smaller volumes provides greater flexibility for data allocation.
The PVC template is based on the spec stanza of the PersistentVolumeClaim object:
Example PersistentVolumeClaim object
apiVersion: v1
kind: PersistentVolumeClaim
metadata:
  name: iso-pvc
spec:
  volumeMode: Block
  storageClassName: my-storage-class
  accessModes:
  - ReadWriteOnce
  resources:
    requests:
      storage: 5Gi
The spec.volumeMode value is only required for block volume mode PVs.
You define a storage pool using a pvcTemplate specification in the HPP CR. The Operator creates a PVC from the pvcTemplate specification for each node containing the HPP CSI driver. The PVC created from the PVC template consumes the single large PV, allowing the HPP to create smaller dynamic volumes.
You can combine basic storage pools with storage pools created from PVC templates.
11.5.2.1. Creating a storage pool with a PVC template
You can create a storage pool for multiple hostpath provisioner (HPP) volumes by specifying a PVC template in the HPP custom resource (CR).
Do not create storage pools in the same partition as the operating system. Otherwise, the operating system partition might become filled to capacity, which will impact performance or cause the node to become unstable or unusable.
Prerequisites
-
The directories specified in
spec.storagePools.pathmust have read/write access. -
You have installed the OpenShift CLI (
oc).
Procedure
Create an
hpp_pvc_template_pool.yamlfile for the HPP CR that specifies a persistent volume (PVC) template in thestoragePoolsstanza according to the following example:apiVersion: hostpathprovisioner.kubevirt.io/v1beta1 kind: HostPathProvisioner metadata: name: hostpath-provisioner spec: imagePullPolicy: IfNotPresent storagePools:1 - name: my-storage-pool path: "/var/myvolumes"2 pvcTemplate: volumeMode: Block3 storageClassName: my-storage-class4 accessModes: - ReadWriteOnce resources: requests: storage: 5Gi5 workload: nodeSelector: kubernetes.io/os: linux- 1 1
- The
storagePoolsstanza is an array that can contain both basic and PVC template storage pools. - 2 2
- Specify the storage pool directories under this node path.
- 3 3
- Optional: The
volumeModeparameter can be eitherBlockorFilesystemas long as it matches the provisioned volume format. If no value is specified, the default isFilesystem. If thevolumeModeisBlock, the mounting pod creates an XFS file system on the block volume before mounting it. - 4
- If the
storageClassNameparameter is omitted, the default storage class is used to create PVCs. If you omitstorageClassName, ensure that the HPP storage class is not the default storage class. - 5
- You can specify statically or dynamically provisioned storage. In either case, ensure the requested storage size is appropriate for the volume you want to virtually divide or the PVC cannot be bound to the large PV. If the storage class you are using uses dynamically provisioned storage, pick an allocation size that matches the size of a typical request.
- Save the file and exit.
Create the HPP with a storage pool by running the following command:
$ oc create -f hpp_pvc_template_pool.yaml
11.6. Enabling user permissions to clone data volumes across namespaces
The isolating nature of namespaces means that users cannot by default clone resources between namespaces.
To enable a user to clone a virtual machine to another namespace, a user with the cluster-admin role must create a new cluster role. Bind this cluster role to a user to enable them to clone virtual machines to the destination namespace.
11.6.1. Creating RBAC resources for cloning data volumes
Create a new cluster role that enables permissions for all actions for the datavolumes resource.
Prerequisites
-
You have installed the OpenShift CLI (
oc). - You must have cluster admin privileges.
If you are a non-admin user that is an administrator for both the source and target namespaces, you can create a Role instead of a ClusterRole where appropriate.
Procedure
Create a
ClusterRolemanifest:apiVersion: rbac.authorization.k8s.io/v1 kind: ClusterRole metadata: name: <datavolume_cloner> rules: - apiGroups: ["cdi.kubevirt.io"] resources: ["datavolumes/source"] verbs: ["*"] # ...where:
<datavolume_cloner>- Specifies a unique name for the cluster role.
Create the cluster role in the cluster:
$ oc create -f <datavolume_cloner.yaml>where:
<datavolume_cloner.yaml>-
Specifies the file name of the
ClusterRolemanifest created in the previous step.
Create a
RoleBindingmanifest that applies to both the source and destination namespaces and references the cluster role created in the previous step.apiVersion: rbac.authorization.k8s.io/v1 kind: RoleBinding metadata: name: <allow_clone_to_user> namespace: <source_namespace> subjects: - kind: ServiceAccount name: default namespace: <destination_namespace> roleRef: kind: ClusterRole name: datavolume-cloner apiGroup: rbac.authorization.k8s.io-
metadata.namespecifies a unique name for the role binding. -
metadata.namespacespecifies the namespace for the source data volume. -
subjects.namespacespecifies the namespace to which the data volume is cloned. -
roleRef.namespecifies the name of the cluster role created in the previous step.
-
Create the role binding in the cluster:
$ oc create -f <datavolume_cloner.yaml>where:
<datavolume_cloner.yaml>-
Specifies the file name of the
RoleBindingmanifest created in the previous step.
11.7. Configuring CDI to override CPU and memory quotas
You can configure the Containerized Data Importer (CDI) to import, upload, and clone virtual machine disks into namespaces that are subject to CPU and memory resource restrictions.
11.7.1. About CPU and memory quotas in a namespace
A resource quota, defined by the ResourceQuota object, imposes restrictions on a namespace that limit the total amount of compute resources that can be consumed by resources within that namespace.
The HyperConverged custom resource (CR) defines the user configuration for the Containerized Data Importer (CDI). The CPU and memory request and limit values are set to a default value of 0. This ensures that pods created by CDI that do not specify compute resource requirements are given the default values and are allowed to run in a namespace that is restricted with a quota.
11.7.2. Overriding CPU and memory defaults
Modify the default settings for CPU and memory requests and limits for your use case by adding the spec.resourceRequirements.storageWorkloads stanza to the HyperConverged custom resource (CR).
Prerequisites
-
Install the OpenShift CLI (
oc).
Procedure
Edit the
HyperConvergedCR by running the following command:$ oc edit hyperconverged kubevirt-hyperconverged -n openshift-cnvAdd the
spec.resourceRequirements.storageWorkloadsstanza to the CR, setting the values based on your use case. For example:apiVersion: hco.kubevirt.io/v1beta1 kind: HyperConverged metadata: name: kubevirt-hyperconverged spec: resourceRequirements: storageWorkloads: limits: cpu: "500m" memory: "2Gi" requests: cpu: "250m" memory: "1Gi"-
Save and exit the editor to update the
HyperConvergedCR.
11.8. Preparing CDI scratch space
To support image import and processing, configure the Containerized Data Importer (CDI) scratch space and the required storage class so that CDI can temporarily store and convert virtual machine (VM) images.
11.8.1. About scratch space
The Containerized Data Importer (CDI) requires scratch space (temporary storage) to complete some operations, such as importing and uploading virtual machine images. During this process, CDI provisions a scratch space PVC equal to the size of the PVC backing the destination data volume (DV). The scratch space PVC is deleted after the operation completes or aborts.
You can define the storage class that is used to bind the scratch space PVC in the spec.scratchSpaceStorageClass field of the HyperConverged custom resource.
If the defined storage class does not match a storage class in the cluster, then the default storage class defined for the cluster is used. If there is no default storage class defined in the cluster, the storage class used to provision the original DV or PVC is used.
CDI requires requesting scratch space with a file volume mode, regardless of the PVC backing the origin data volume. If the origin PVC is backed by block volume mode, you must define a storage class capable of provisioning file volume mode PVCs.
Manual provisioning
If there are no storage classes, CDI uses any PVCs in the project that match the size requirements for the image. If there are no PVCs that match these requirements, the CDI import pod remains in a Pending state until an appropriate PVC is made available or until a timeout function kills the pod.
11.8.2. CDI operations that require scratch space
To import and process virtual machine (VM) images, the Containerized Data Importer (CDI) uses scratch space as temporary storage during specific operations such as registry imports and image uploads.
| Type | Reason |
|---|---|
| Registry imports | CDI must download the image to a scratch space and extract the layers to find the image file. The image file is then passed to QEMU-IMG for conversion to a raw disk. |
| Upload image | QEMU-IMG does not accept input from STDIN. Instead, the image to upload is saved in scratch space before it can be passed to QEMU-IMG for conversion. |
| HTTP imports of archived images | QEMU-IMG does not know how to handle the archive formats CDI supports. Instead, the image is unarchived and saved into scratch space before it is passed to QEMU-IMG. |
| HTTP imports of authenticated images | QEMU-IMG inadequately handles authentication. Instead, the image is saved to scratch space and authenticated before it is passed to QEMU-IMG. |
| HTTP imports of custom certificates | QEMU-IMG inadequately handles custom certificates of HTTPS endpoints. Instead, CDI downloads the image to scratch space before passing the file to QEMU-IMG. |
11.8.3. Defining a storage class
You can define the storage class that the Containerized Data Importer (CDI) uses when allocating scratch space by adding the spec.scratchSpaceStorageClass field to the HyperConverged custom resource (CR).
Prerequisites
-
Install the OpenShift CLI (
oc).
Procedure
Edit the
HyperConvergedCR by running the following command:$ oc edit hyperconverged kubevirt-hyperconverged -n openshift-cnvAdd the
spec.scratchSpaceStorageClassfield to the CR, setting the value to the name of a storage class that exists in the cluster:apiVersion: hco.kubevirt.io/v1beta1 kind: HyperConverged metadata: name: kubevirt-hyperconverged spec: scratchSpaceStorageClass: "<storage_class>"1 - 1
- If you do not specify a storage class, CDI uses the storage class of the persistent volume claim that is being populated.
-
Save and exit your default editor to update the
HyperConvergedCR.
11.8.4. CDI supported operations matrix
This matrix shows the supported CDI operations for content types against endpoints, and which of these operations requires scratch space.
| Content types | HTTP | HTTPS | HTTP basic auth | Registry | Upload |
|---|---|---|---|---|---|
| KubeVirt (QCOW2) |
✓ QCOW2 |
✓ QCOW2** |
✓ QCOW2 |
✓ QCOW2* |
✓ QCOW2* |
| KubeVirt (RAW) |
✓ RAW |
✓ RAW |
✓ RAW |
✓ RAW* |
✓ RAW* |
✓ Supported operation
□ Unsupported operation
* Requires scratch space
** Requires scratch space if a custom certificate authority is required
11.9. Using preallocation for data volumes
The Containerized Data Importer can preallocate disk space to improve write performance when creating data volumes.
You can enable preallocation for specific data volumes.
11.9.1. About preallocation
The Containerized Data Importer (CDI) can use the QEMU preallocate mode for data volumes to improve write performance. You can use preallocation mode for importing and uploading operations and when creating blank data volumes.
If preallocation is enabled, CDI uses the better preallocation method depending on the underlying file system and device type:
fallocate-
If the file system supports it, CDI uses the operating system’s
fallocatecall to preallocate space by using theposix_fallocatefunction, which allocates blocks and marks them as uninitialized. full-
If
fallocatemode cannot be used,fullmode allocates space for the image by writing data to the underlying storage. Depending on the storage location, all the empty allocated space might be zeroed.
11.9.2. Enabling preallocation for a data volume
You can enable preallocation for specific data volumes by including the spec.preallocation field in the data volume manifest. You can enable preallocation mode in either the web console or by using the OpenShift CLI (oc).
Preallocation mode is supported for all CDI source types.
Procedure
Specify the
spec.preallocationfield in the data volume manifest:apiVersion: cdi.kubevirt.io/v1beta1 kind: DataVolume metadata: name: preallocated-datavolume spec: source:1 registry: url: <image_url>2 storage: resources: requests: storage: 1Gi preallocation: true # ...
11.10. Managing data volume annotations
Data volume (DV) annotations allow you to manage pod behavior. You can add one or more annotations to a data volume, which then propagates to the created importer pods.
11.10.1. Example: Data volume annotations
This example shows how you can configure data volume (DV) annotations to control which network the importer pod uses. The v1.multus-cni.io/default-network: bridge-network annotation causes the pod to use the multus network named bridge-network as its default network. If you want the importer pod to use both the default network from the cluster and the secondary multus network, use the k8s.v1.cni.cncf.io/networks: <network_name> annotation.
Multus network annotation example
apiVersion: cdi.kubevirt.io/v1beta1
kind: DataVolume
metadata:
  name: datavolume-example
  annotations:
    v1.multus-cni.io/default-network: bridge-network
# ...- 1
- Multus network annotation
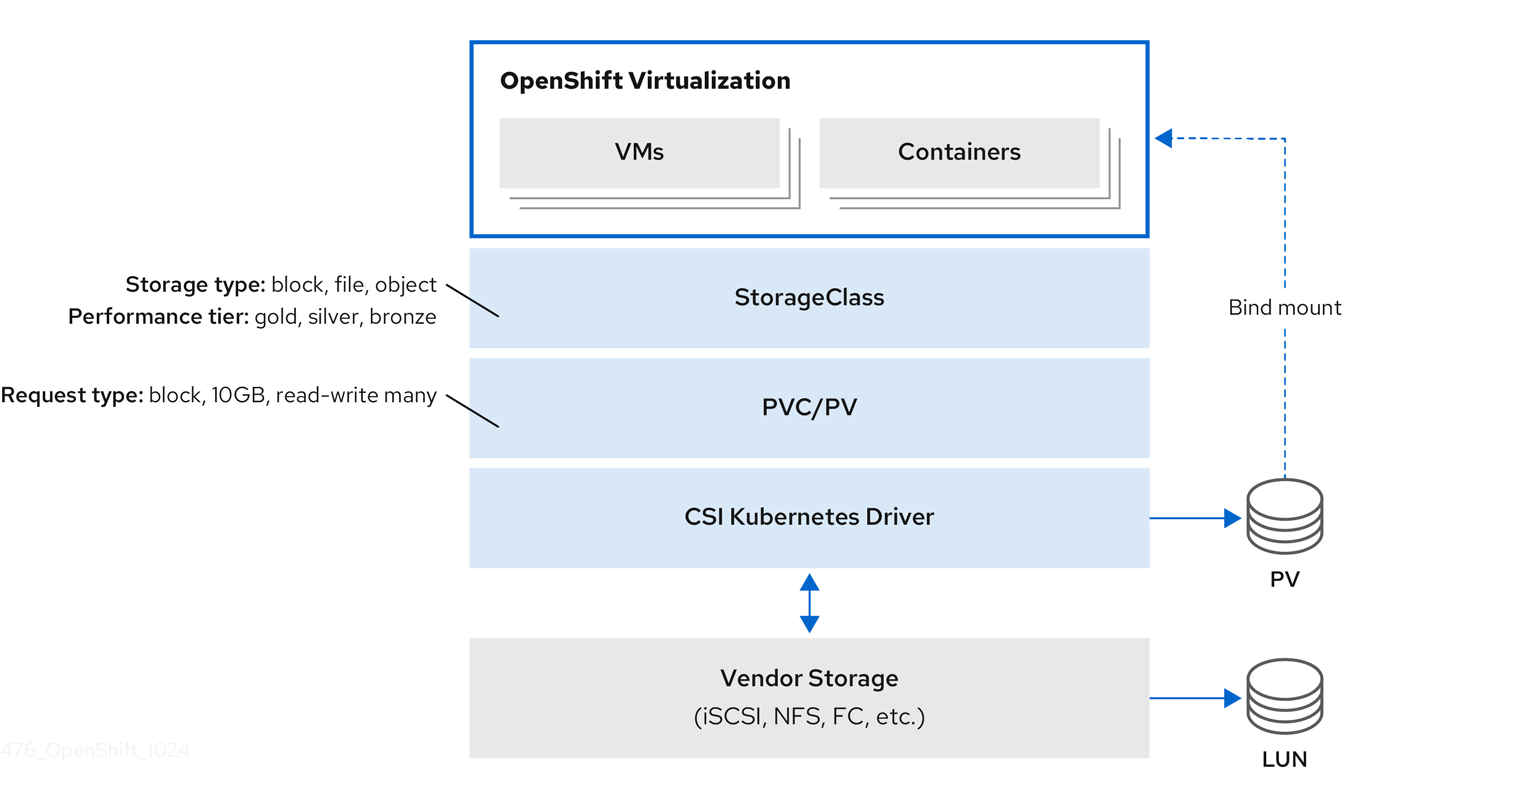
11.11. Understanding virtual machine storage with the CSI paradigm
Virtual machines (VMs) in OpenShift Virtualization use PersistentVolume (PV) and PersistentVolumeClaim (PVC) paradigms to manage storage. This ensures seamless integration with the Container Storage Interface (CSI).
11.11.1. Virtual machine CSI storage overview
OpenShift Virtualization integrates with the Container Storage Interface (CSI) to manage virtual machine (VM) storage.
Storage classes define storage capabilities such as performance tiers and types. PersistentVolumeClaims (PVCs) request storage resources, which bind to PersistentVolumes (PVs). CSI drivers connect Kubernetes to vendor storage backends, including iSCSI, NFS, and Fibre Channel.
A VM can start even if its PVC is already mounted by another pod. This behavior follows Kubernetes PVC access semantics and can lead to data corruption if multiple writers access the same volume.