Chapter 8. Liquids: Developer Portal
Learn what liquid formatting tags are and how they work in the 3scale system, including the different elements of the markup, the connections between them, and short examples of how to use them in your Developer Portal. Find the complete list of liquid tags, drops, and filters available here
8.1. What are liquids?
Liquid is a simple programming language used for displaying and processing most of the data from the 3scale system available for API providers. Liquid was originally developed by Shopify and is used in many other CMS engines throughout the web. In the 3scale platform, it is used to expose server-side data to your API developers, greatly extending the usefulness of the CMS while maintaining a high level of security.
8.1.1. Pros and cons
Liquids are mainly used to fetch and display server-side data on your Developer Portal pages. However there is much more power in liquids than just this. They serve very well for:
- Altering the DOM and content of a page based on server-side data
- Adding logic to pages, layouts, and partials
- Manipulating the email templates sent to developers
There are some use cases where liquids don’t provide the best solution to the problem, mostly situations where you need to use dynamic data such as input from the user or the page URL.
Some general advice is to use them as the primary way to add logic to the page, but then if you find it impossible or overly complicated, switch to JavaScript (or add them to it, as liquids also work well with JS).
8.2. How to use liquids
Liquid markup is divided into two types: logic tags and output tags. The logic tags, marked as MISSING, are conditional liquid statements that include standard programming language elements such as the "if" clause, loops, etc.
{% if current_user %}           <!-- if the user is logged in -->
  <a href="/logout">Logout</a>  <!-- show the logout link -->
{% else %}                      <!-- if the user is not logged in -->
  <a href="/login">Login</a>    <!-- display the login link -->
{% endif %}
Output tags, marked as '{{ }}', are used to display the value of the tag between the curly braces.
{{ current_user.username }} <!-- display the logged-in user's username value -->For documentation on logic tags, please refer to the Shopify tutorial. The full reference of the 3scale liquid output tags can be found both on this page as well as in your Admin Portal under Help > Liquid Reference.
8.2.1. Liquid drops, tags, and their meanings
In the 3scale CMS, you will have access to three types of liquid markup:
-
liquid drops (e.g.
{{ current_account.name }}) -
liquid tags (e.g.
{% content %}) -
filters (e.g.
{{ form.errors.description | error_class }})
You can find a complete list of liquid tags, drops, and filters available here
As you can see, they’re almost the same as the logic and output tags, and they work very similarly. Liquid drops are the most basic structure, and you will be using them most of the time. They give access to certain values stored in the system such as the name of the user and the ID of the application. They’re handled by the interpreter in the same way as any other output tags.
On the other hand, liquid tags are a type of logic tag that renders or accesses certain parts of the system for further customization – for example, to render content in the layout or customize email templates.
Filters, as the name suggests, enable the option of filtering results from the drops, converting values, grouping by some key, etc. There is a group of standard liquids filters, which you can find on the Shopify website) and a group of special 3scale internal filters, which are listed on the reference page.
8.2.2. The context
The context describes which variables (drops) are available to use on the current page. The basic set includes the following variables:
- provider
- urls
- current_user
- current_account
- today
These variables are available on every page throughout the CMS (except for email templates). However, most of the built-in pages will have some additional variables available. For example, the edit user form will have a user variable exposed (instead of current user – on edit user page, the identity of the user is already known). To check which variables are available on the current page, there is a special tag: {% debug:help %}. It adds the list of all the top-level variables available to use as a comment in the source of the page.
8.2.3. Hierarchy
The direct consequence of the context is that the liquid drops are organized in a hierarchical structure. The available set of variables only gives you the list of the top level drops that are available. Using them, you can get access to elements much deeper inside the hierarchy. For example, if you would like to show the username of the logged-in user, you would write {{ current_user.username }}.
Displaying lower level drops is a little bit more complicated. Assume that you would like to display the name of the only application for a user. Looking at the reference guide, you can see that the method "applications" is a part of the account drop. This means that applications is an array of single-application tags. If your users are allowed to have more than one application, then you would have to iterate through them using the logic tags. Otherwise, you can refer to the first (and only) application on the account. The code to display this would look like this: {{ current_account.applications.first.name }}.
8.3. Usage of liquids in the CMS
8.3.1. Enabling Liquids
Liquid markup processing is enabled by default for all partials and email templates. Enabling them on layouts is done by simply checking the checkbox right under the system_name input field. However, to enable them on pages, you’ll have to go to the advanced options section of the page.
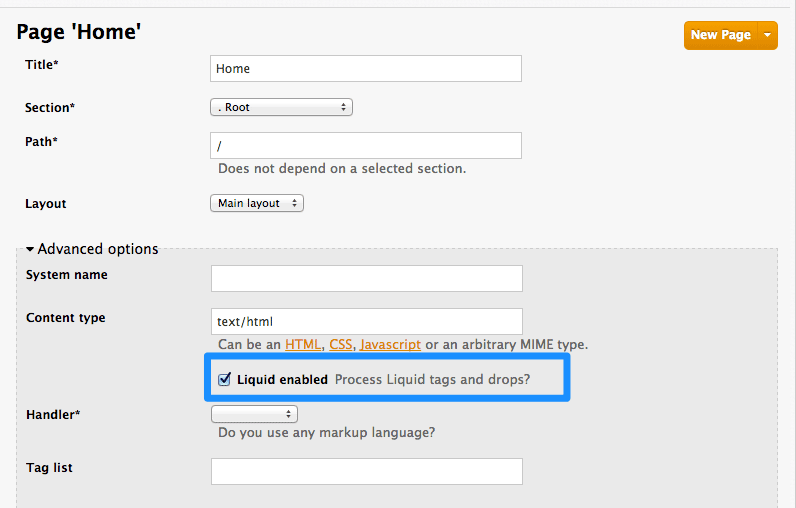
Just expand the Advanced options section and mark the Liquid enabled checkbox. From now on, all the liquid markup will be processed by the internal engine, and the CMS built-in editor will also add code highlighting for liquid.
8.3.2. Different use on pages, partials, and layouts
The use of liquids usually differs slightly between pages, which are single-use elements and partials/layouts, which are the reusable elements of your portal. This means that instead of using multiple layouts or partials with small changes for use on different pages, you can add some logic liquid tags inside and alter the layout depending on the page the user is on.
<!-- if we are inside '/documentation' URL -->
<li class="{% if request.request_uri contains "/documentation" %}active{% endif %}"><!-- add the active class to the menu item -->
  <a href="/documentation">Documentation</a>
</li>
8.3.3. Use with CSS/JS
Liquid markup doesn’t just work with HTML, you can easily combine it with CSS and/or JavaScript code for even more control. To enable liquid in a stylesheet or JS, create them as a page and follow the same steps as if you were enabling it for a normal page. Having done that, you’ll be able to add some conditional markup in CSS or use the server-side data in JavaScript. Just remember to set the content type of the page as CSS or JS.
8.4. Usage of liquids in email templates
8.4.1. Differences from CMS
As previously mentioned, liquid tags can also be used to customize the email templates sent to your users. All the general rules for writing liquid mentioned before also apply to the email templates, with some exceptions:
-
There is no commonly shared list of variables that are available on every template. Instead, you’ll have to do some testing using the previously mentioned
{% debug:help %}tag. Since emails are by nature different from web pages, you will have limited or no access to some tags. For example,
{{ request.request_uri }}will not make sense anymore, as an email does not have a URL.<!--samples-->
8.5. Troubleshooting
8.5.1. Debugging
If something is not working as intended (but saved correctly) check that:
- All the tags are closed correctly
- You’re referring to variables available on the current page
- You’re not trying to access an array – for example current_account.applications is an array of applications
- The logic is correct
8.5.2. Typical errors and ways to solve them
-
If the document cannot be saved due to a liquid error, it’s usually because some tags or drops were not closed correctly. Check that all your
{% %}and{{ }}tags were properly closed and that the logic expressions (if, for, etc.) are terminated correctly (with endif, enfor, etc.) Normally if this is the case, an error will be displayed at the top of the page above the editor with a descriptive error message. -
If everything saved correctly and you don’t see any effect, check that you’re not referring to an empty element and you’re not using a logic tag to display content. (
{% %}will never render any content, besides usage in tags which is already an alias of a more complex set of tags and drops.) - If instead of what you wanted to see only a # is displayed, it means that you’ve tried to display an element that is an array. Check the section on the liquid hierarchy in this article (link).
8.5.3. Answers on the forum
If you still have a problem, try looking for an answer on our forum or ask a question yourself.