Chapter 5. Mirroring Ceph block devices
As a storage administrator, you can add another layer of redundancy to Ceph block devices by mirroring data images between Red Hat Ceph Storage clusters. Understanding and using Ceph block device mirroring can provide you protection against data loss, such as a site failure. There are two configurations for mirroring Ceph block devices, one-way mirroring or two-way mirroring, and you can configure mirroring on pools and individual images.
5.1. Prerequisites
- A minimum of two healthy running Red Hat Ceph Storage clusters.
- Network connectivity between the two storage clusters.
- Access to a Ceph client node for each Red Hat Ceph Storage cluster.
5.2. Ceph block device mirroring
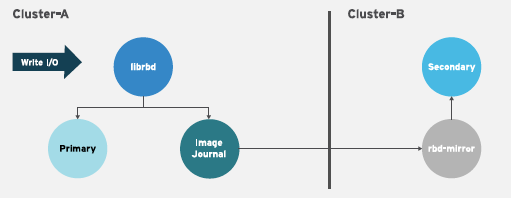
RADOS Block Device (RBD) mirroring is a process of asynchronous replication of Ceph block device images between two or more Ceph storage clusters. By locating a Ceph storage cluster in different geographic locations, RBD Mirroring can help you recover from a site disaster. Journal-based Ceph block device mirroring ensures point-in-time consistent replicas of all changes to an image, including reads and writes, block device resizing, snapshots, clones and flattening.
RBD mirroring uses exclusive locks and the journaling feature to record all modifications to an image in the order in which they occur. This ensures that a crash-consistent mirror of an image is available.
The CRUSH hierarchies supporting primary and secondary pools that mirror block device images must have the same capacity and performance characteristics, and must have adequate bandwidth to ensure mirroring without excess latency. For example, if you have X MB/s average write throughput to images in the primary storage cluster, the network must support N * X throughput in the network connection to the secondary site plus a safety factor of Y% to mirror N images.
The rbd-mirror daemon is responsible for synchronizing images from one Ceph storage cluster to another Ceph storage cluster by pulling changes from the remote primary image and writes those changes to the local, non-primary image. The rbd-mirror daemon can run either on a single Ceph storage cluster for one-way mirroring or on two Ceph storage clusters for two-way mirroring that participate in the mirroring relationship.
For RBD mirroring to work, either using one-way or two-way replication, a couple of assumptions are made:
- A pool with the same name exists on both storage clusters.
- A pool contains journal-enabled images you want to mirror.
In one-way or two-way replication, each instance of rbd-mirror must be able to connect to the other Ceph storage cluster simultaneously. Additionally, the network must have sufficient bandwidth between the two data center sites to handle mirroring.
One-way Replication
One-way mirroring implies that a primary image or pool of images in one storage cluster gets replicated to a secondary storage cluster. One-way mirroring also supports replicating to multiple secondary storage clusters.
On the secondary storage cluster, the image is the non-primary replicate; that is, Ceph clients cannot write to the image. When data is mirrored from a primary storage cluster to a secondary storage cluster, the rbd-mirror runs ONLY on the secondary storage cluster.
For one-way mirroring to work, a couple of assumptions are made:
- You have two Ceph storage clusters and you want to replicate images from a primary storage cluster to a secondary storage cluster.
-
The secondary storage cluster has a Ceph client node attached to it running the
rbd-mirrordaemon. Therbd-mirrordaemon will connect to the primary storage cluster to sync images to the secondary storage cluster.
Two-way Replication
Two-way replication adds an rbd-mirror daemon on the primary cluster so images can be demoted on it and promoted on the secondary cluster. Changes can then be made to the images on the secondary cluster and they will be replicated in the reverse direction, from secondary to primary. Both clusters must have rbd-mirror running to allow promoting and demoting images on either cluster. Currently, two-way replication is only supported between two sites.
For two-way mirroring to work, a couple of assumptions are made:
- You have two storage clusters and you want to be able to replicate images between them in either direction.
-
Both storage clusters have a client node attached to them running the
rbd-mirrordaemon. Therbd-mirrordaemon running on the secondary storage cluster will connect to the primary storage cluster to synchronize images to secondary, and therbd-mirrordaemon running on the primary storage cluster will connect to the secondary storage cluster to synchronize images to primary.

As of Red Hat Ceph Storage 4, running multiple active rbd-mirror daemons in a single cluster is supported.
Mirroring Modes
Mirroring is configured on a per-pool basis with mirror peering storage clusters. Ceph supports two mirroring modes, depending on the type of images in the pool.
- Pool Mode
- All images in a pool with the journaling feature enabled are mirrored.
- Image Mode
- Only a specific subset of images within a pool are mirrored. You must enable mirroring for each image separately.
Image States
Whether or not an image can be modified depends on its state:
- Images in the primary state can be modified.
- Images in the non-primary state cannot be modified.
Images are automatically promoted to primary when mirroring is first enabled on an image. The promotion can happen:
- Implicitly by enabling mirroring in pool mode.
- Explicitly by enabling mirroring of a specific image.
It is possible to demote primary images and promote non-primary images.
Additional Resources
- See the Image promotion and demotion section of the Red Hat Ceph Storage Block Device Guide for more details.
5.3. Configuring one-way mirroring using Ansible
This procedure uses ceph-ansible to configure one-way replication of images on a primary storage cluster known as site-a, to a secondary storage cluster known as site-b. In the following examples, data is the name of the pool that contains the images to be mirrored.
Prerequisites
- Two running Red Hat Ceph Storage clusters.
- A Ceph client node.
- A pool with the same name exists on both clusters.
- Images within the pool must have exclusive-lock and journaling enabled for journal-based mirroring.
When using one-way replication, you can mirror to multiple secondary storage clusters.
Procedure
On the cluster where the images originate, enable the exclusive-lock and journaling features on an image.
For new images, use the
--image-featureoption:Syntax
rbd create IMAGE_NAME --size MEGABYTES --pool POOL_NAME --image-feature FEATURE[,FEATURE]Example
[root@rbd-client ~]# rbd create image1 --size 1024 --pool data --image-feature exclusive-lock,journalingFor existing images, use the
rbd feature enablecommand:Syntax
rbd feature enable POOL_NAME/IMAGE_NAME FEATURE_NAMEExample
[root@rbd-client ~]# rbd feature enable data/image1 exclusive-lock,journalingTo enable exclusive-lock and journaling on all new images by default, add the following setting to the Ceph configuration file:
rbd_default_features = 125
In the
site-acluster, complete the following steps:On a monitor node, create the user that the
rbd-mirrordaemon will use to connect to the cluster. The example creates asite-auser and outputs the key to a file namedsite-a.client.site-a.keyring:Syntax
ceph auth get-or-create client.CLUSTER_NAME mon 'profile rbd' osd 'profile rbd pool=data' -o /etc/ceph/CLUSTER_NAME.client.USER_NAME.keyringExample
[root@mon ~]# ceph auth get-or-create client.site-a mon 'profile rbd' osd 'profile rbd pool=data' -o /etc/ceph/site-a.client.site-a.keyring-
Copy the Ceph configuration file and the newly created key file from the monitor node to the
site-bmonitor and client nodes. -
Rename the Ceph configuration file from
ceph.confto CLUSTER-NAME.conf. In these examples, the file is/etc/ceph/site-a.conf.
In the
site-bcluster, complete the following steps:-
On the Ansible administration node, add an
[rbdmirrors]group in the Ansible inventory file. The usual inventory file is/etc/ansible/hosts. Under the
[rbdmirrors]group, add the name of thesite-bclient node on which therbd-mirrordaemon will run. The daemon will pull image changes fromsite-atosite-b.[rbdmirrors] ceph-clientNavigate to the
/usr/share/ceph-ansible/directory:[root@admin ~]# cd /usr/share/ceph-ansibleCreate a new
rbdmirrors.ymlfile by copyinggroup_vars/rbdmirrors.yml.sampletogroup_vars/rbdmirrors.yml:[root@admin ceph-ansible]# cp group_vars/rbdmirrors.yml.sample group_vars/rbdmirrors.yml-
Open the
group_vars/rbdmirrors.ymlfile for editing. Set
ceph_rbd_mirror_configuretotrue. Setceph_rbd_mirror_poolto the pool in which you want to mirror images. In these examples,datais the name of the pool.ceph_rbd_mirror_configure: true ceph_rbd_mirror_pool: "data"By default,
ceph-ansibleconfigures mirroring using pool mode, which mirrors all images in a pool. Enable image mode where only images that have mirroring explicitly enabled are mirrored. To enable image mode, setceph_rbd_mirror_modetoimage:ceph_rbd_mirror_mode: imageSet a name for the cluster that
rbd-mirrorwill pull from. In these examples, the other cluster issite-a.ceph_rbd_mirror_remote_cluster: "site-a"On the Ansible administration node, set the user name of the key using
ceph_rbd_mirror_remote_user. Use the same name you used when you created the key. In these examples the user is namedclient.site-a.ceph_rbd_mirror_remote_user: "client.site-a"As the ceph-ansible user, run the Ansible playbook:
Bare-metal deployments:
[user@admin ceph-ansible]$ ansible-playbook site.yml --limit rbdmirrors -i hostsContainer deployments:
[ansible@admin ceph-ansible]$ ansible-playbook site-container.yml --limit rbdmirrors -i hosts
-
On the Ansible administration node, add an
Explicitly enable mirroring on the desired images in both
site-aandsite-bclusters:Syntax
Journal-based mirroring:
rbd mirror image enable POOL/IMAGESnapshot-based mirroring:
rbd mirror image enable POOL/IMAGE snapshotExample
[root@mon ~]# rbd mirror image enable data/image1 [root@mon ~]# rbd mirror image enable data/image1 snapshotNoteRepeat this step whenever you want to mirror new image to peer cluster.
Verify the mirroring status. Run the following command from a Ceph Monitor node in the
site-bcluster:Example
Journal-based mirroring:
[root@mon ~]# rbd mirror image status data/image1
image1:
  global_id:   7d486c3f-d5a1-4bee-ae53-6c4f1e0c8eac
  state:       up+replaying
1 description: replaying, master_position=[object_number=3, tag_tid=1, entry_tid=3], mirror_position=[object_number=3, tag_tid=1, entry_tid=3], entries_behind_master=0 last_update: 2019-04-22 13:19:27Snapshot-based mirroring:
[root@mon ~]# rbd mirror image status data/image1
image1:
  global_id:   06acc9e6-a63d-4aa1-bd0d-4f3a79b0ae33
  state:       up+replaying
1 description: replaying, {"bytes_per_second":0.0,"bytes_per_snapshot":0.0,"local_snapshot_timestamp":1642689843,"remote_snapshot_timestamp":1642689843,"replay_state":"idle"} service: admin on ceph-rbd2-vasi-43-5hwia4-node2 last_update: 2022-01-20 12:41:57NoteBased on the connection between the sites, mirroring can take a long time to sync the images.
5.4. Configuring two-way mirroring using Ansible
This procedure uses ceph-ansible to configure two-way replication so images can be mirrored in either direction between two clusters known as site-a and site-b. In the following examples, data is the name of the pool that contains the images to be mirrored.
Two-way mirroring does not allow simultaneous writes to be made to the same image on either cluster. Images are promoted on one cluster and demoted on another. Depending on their status, they will mirror in one direction or the other.
Prerequisites
- Two running Red Hat Ceph Storage clusters.
- Each cluster has a client node.
- A pool with the same name exists on both clusters.
- Images within the pool must have exclusive-lock and journaling enabled for journal-based mirroring.
Procedure
On the cluster where the images originate, enable the exclusive-lock and journaling features on an image.
For new images, use the
--image-featureoption:Syntax
rbd create IMAGE_NAME --size MEGABYTES --pool POOL_NAME --image-feature FEATURE[,FEATURE]Example
[root@rbd-client ~]# rbd create image1 --size 1024 --pool data --image-feature exclusive-lock,journalingFor existing images, use the
rbd feature enablecommand:Syntax
rbd feature enable POOL_NAME/IMAGE_NAME FEATURE_NAMEExample
[root@rbd-client ~]# rbd feature enable data/image1 exclusive-lock,journalingTo enable exclusive-lock and journaling on all new images by default, add the following setting to the Ceph configuration file:
rbd_default_features = 125
In the
site-acluster, complete the following steps:On a monitor node, create the user the
rbd-mirrordaemon will use to connect to the cluster. The example creates asite-auser and outputs the key to a file namedsite-a.client.site-a.keyring, and the Ceph configuration file is/etc/ceph/site-a.conf.Syntax
ceph auth get-or-create client.PRIMARY_CLUSTER_NAME mon 'profile rbd' osd 'profile rbd pool=data' -o /etc/ceph/PRIMARY_CLUSTER_NAME.client.USER_NAME.keyring -c /etc/ceph/PRIMARY_CLUSTER_NAME.confExample
[root@mon ~]# ceph auth get-or-create client.site-a mon 'profile rbd' osd 'profile rbd pool=data' -o /etc/ceph/site-a.client.site-a.keyring -c /etc/ceph/site-a.confCopy the keyring to the
site-bcluster. Copy the file to the client node in thesite-bcluster that therbd-daemonwill run on. Save the file to/etc/ceph/site-a.client.site-a.keyring:Syntax
scp /etc/ceph/PRIMARY_CLUSTER_NAME.client.USER_NAME.keyring root@SECONDARY_CLIENT_NODE_NAME:/etc/ceph/PRIMARY_CLUSTER_NAME.client.USER_NAME.keyringExample
[root@mon ~]# scp /etc/ceph/site-a.client.site-a.keyring root@client.site-b:/etc/ceph/site-a.client.site-a.keyringCopy the Ceph configuration file from the monitor node to the
site-bmonitor node and client nodes. The Ceph configuration file in this example is/etc/ceph/site-a.conf.Syntax
scp /etc/ceph/PRIMARY_CLUSTER_NAME.conf root@SECONDARY_MONITOR_NODE_NAME:/etc/ceph/PRIMARY_CLUSTER_NAME.conf
scp /etc/ceph/PRIMARY_CLUSTER_NAME.conf user@SECONDARY_CLIENT_NODE_NAME:/etc/ceph/PRIMARY_CLUSTER_NAME.conf
Example
[root@mon ~]# scp /etc/ceph/site-a.conf root@mon.site-b:/etc/ceph/site-a.conf
[root@mon ~]# scp /etc/ceph/site-a.conf user@client.site-b:/etc/ceph/site-a.conf
In the
site-bcluster, complete the following steps:-
Configure mirroring from
site-atosite-b. On the Ansible administration node, add an[rbdmirrors]group in the Ansible inventory file, usually/usr/share/ceph-ansible/hosts. Under the
[rbdmirrors]group, add the name of asite-bclient node that therbd-mirrordaemon will run on. This daemon pulls image changes fromsite-atosite-b.Example
[rbdmirrors]
client.site-b
Navigate to the
/usr/share/ceph-ansible/directory:[root@admin ~]$ cd /usr/share/ceph-ansibleCreate a new
rbdmirrors.ymlfile by copyinggroup_vars/rbdmirrors.yml.sampletogroup_vars/rbdmirrors.yml:[root@admin ceph-ansible]# cp group_vars/rbdmirrors.yml.sample group_vars/rbdmirrors.yml-
Open for editing the
group_vars/rbdmirrors.ymlfile. Set
ceph_rbd_mirror_configuretotrue, and setceph_rbd_mirror_poolto the pool you want to mirror images in. In these examples,datais the name of the pool.ceph_rbd_mirror_configure: true ceph_rbd_mirror_pool: "data"By default,
ceph-ansibleconfigures mirroring using pool mode, which mirrors all images in a pool. Enable image mode where only images that have mirroring explicitly enabled are mirrored. To enable image mode, setceph_rbd_mirror_modetoimage:ceph_rbd_mirror_mode: imageSet a name for the cluster that
rbd-mirrorin thegroup_vars/rbdmirrors.ymlfile. In these examples, the other cluster issite-a.ceph_rbd_mirror_remote_cluster: "site-a"On the Ansible administration node, set the user name of the key using
ceph_rbd_mirror_remote_userin thegroup_vars/rbdmirrors.ymlfile. Use the same name you used when you created the key. In these examples the user is namedclient.site-a.ceph_rbd_mirror_remote_user: "client.site-a"As the ansible user, run the Ansible playbook:
Bare-metal deployments:
[user@admin ceph-ansible]$ ansible-playbook site.yml --limit rbdmirrors -i hostsContainer deployments:
[user@admin ceph-ansible]$ ansible-playbook site-container.yml --limit rbdmirrors -i hosts
-
Configure mirroring from
Verify the mirroring status. Run the following command from a Ceph Monitor node on the
site-bcluster:Example
Journal-based mirroring:
[root@mon ~]# rbd mirror image status data/image1
image1:
  global_id:   7d486c3f-d5a1-4bee-ae53-6c4f1e0c8eac
  state:       up+replaying
1 description: replaying, master_position=[object_number=3, tag_tid=1, entry_tid=3], mirror_position=[object_number=3, tag_tid=1, entry_tid=3], entries_behind_master=0 last_update: 2021-04-22 13:19:27Snapshot-based mirroring:
[root@mon ~]# rbd mirror image status data/image1
image1:
  global_id:   06acc9e6-a63d-4aa1-bd0d-4f3a79b0ae33
  state:       up+replaying
1 description: replaying, {"bytes_per_second":0.0,"bytes_per_snapshot":0.0,"local_snapshot_timestamp":1642689843,"remote_snapshot_timestamp":1642689843,"replay_state":"idle"} service: admin on ceph-rbd2-vasi-43-5hwia4-node2 last_update: 2022-01-20 12:41:57NoteBased on the connection between the sites, mirroring can take a long time to sync the images.
In the
site-bcluster, complete the following steps. The steps are largely the same as above:On a monitor node, create the user the
rbd-mirrordaemon will use to connect to the cluster. The example creates asite-buser and outputs the key to a file namedsite-b.client.site-b.keyring, and the Ceph configuration file is/etc/ceph/site-b.conf.Syntax
ceph auth get-or-create client.SECONDARY_CLUSTER_NAME mon 'profile rbd' osd 'profile rbd pool=data' -o /etc/ceph/SECONDARY_CLUSTER_NAME.client.USER_NAME.keyring -c /etc/ceph/SECONDARY_CLUSTER_NAME.confExample
[root@mon ~]# ceph auth get-or-create client.site-b mon 'profile rbd' osd 'profile rbd pool=data' -o /etc/ceph/site-b.client.site-b.keyring -c /etc/ceph/site-b.confCopy the keyring to the
site-acluster. Copy the file to the client node in thesite-acluster that therbd-daemonwill run on. Save the file to/etc/ceph/site-b.client.site-b.keyring:Syntax
scp /etc/ceph/SECONDARY_CLUSTER_NAME.client.USER_NAME.keyring root@PRIMARY_CLIENT_NODE_NAME:/etc/ceph/SECONDARY_CLUSTER_NAME.client.USER_NAME.keyringExample
[root@mon ~]# scp /etc/ceph/site-b.client.site-b.keyring root@client.site-a:/etc/ceph/site-b.client.site-b.keyringCopy the Ceph configuration file from the monitor node to the
site-amonitor node and client nodes. The Ceph configuration file in this example is/etc/ceph/site-b.conf.Syntax
scp /etc/ceph/SECONDARY_CLUSTER_NAME.conf root@PRIMARY_MONITOR_NODE_NAME:/etc/ceph/SECONDARY_CLUSTER_NAME.conf
scp /etc/ceph/SECONDARY_CLUSTER_NAME.conf user@PRIMARY_CLIENT_NODE_NAME:/etc/ceph/SECONDARY_CLUSTER_NAME.conf
Example
[root@mon ~]# scp /etc/ceph/site-b.conf root@mon.site-a:/etc/ceph/site-b.conf
[root@mon ~]# scp /etc/ceph/site-b.conf user@client.site-a:/etc/ceph/site-b.conf
In the
site-acluster, complete the following steps:-
Configure mirroring from
site-btosite-a. On the Ansible administration node, add an[rbdmirrors]group in the Ansible inventory file, usually/usr/share/ceph-ansible/hosts. Under the
[rbdmirrors]group, add the name of asite-aclient node that therbd-mirrordaemon will run on. This daemon pulls image changes fromsite-btosite-a.Example
[rbdmirrors]
client.site-a
Navigate to the
/usr/share/ceph-ansible/directory:[root@admin ~]# cd /usr/share/ceph-ansibleCreate a new
rbdmirrors.ymlfile by copyinggroup_vars/rbdmirrors.yml.sampletogroup_vars/rbdmirrors.yml:[root@admin ceph-ansible]# cp group_vars/rbdmirrors.yml.sample group_vars/rbdmirrors.yml-
Open for editing the
group_vars/rbdmirrors.ymlfile. Set
ceph_rbd_mirror_configuretotrue, and setceph_rbd_mirror_poolto the pool you want to mirror images in. In these examples,datais the name of the pool.ceph_rbd_mirror_configure: true ceph_rbd_mirror_pool: "data"By default,
ceph-ansibleconfigures mirroring using pool mode which mirrors all images in a pool. Enable image mode where only images that have mirroring explicitly enabled are mirrored. To enable image mode, setceph_rbd_mirror_modetoimage:ceph_rbd_mirror_mode: imageOn the Ansible administration node, set a name for the cluster that
rbd-mirrorin thegroup_vars/rbdmirrors.ymlfile. Following the examples, the other cluster is namedsite-b.ceph_rbd_mirror_remote_cluster: "site-b"On the Ansible administration node, set the user name of the key using
ceph_rbd_mirror_remote_useringroup_vars/rbdmirrors.ymlfile. In these examples the user is namedclient.site-b.ceph_rbd_mirror_remote_user: "client.site-b"As the Ansible user on the administration node, run the Ansible playbook:
Bare-metal deployments:
[user@admin ceph-ansible]$ ansible-playbook site.yml --limit rbdmirrors -i hostsContainer deployments:
[user@admin ceph-ansible]$ ansible-playbook site-container.yml --limit rbdmirrors -i hosts
-
Configure mirroring from
Explicitly enable mirroring on the desired images in both
site-aandsite-bclusters:Syntax
Journal-based mirroring:
rbd mirror image enable POOL/IMAGESnapshot-based mirroring:
rbd mirror image enable POOL/IMAGE snapshotExample
[root@mon ~]# rbd mirror image enable data/image1 [root@mon ~]# rbd mirror image enable data/image1 snapshotNoteRepeat this step whenever you want to mirror new image to peer cluster.
Verify the mirroring status. Run the following command from the client node on the
site-acluster:Example
Journal-based mirroring:
[root@mon ~]# rbd mirror image status data/image1
image1:
  global_id:   08027096-d267-47f8-b52e-59de1353a034
  state:       up+stopped
1 description: local image is primary last_update: 2021-04-16 15:45:31Snapshot-based mirroring:
[root@mon ~]# rbd mirror image status data/image1
image1:
  global_id:   47fd1aae-5f19-4193-a5df-562b5c644ea7
  state:       up+stopped
1 description: local image is primary service: admin on ceph-rbd1-vasi-43-5hwia4-node2 last_update: 2022-01-20 12:42:54 peer_sites: name: rbd-mirror.site-b state: up+replaying description: replaying, {"bytes_per_second":0.0,"bytes_per_snapshot":0.0,"local_snapshot_timestamp":1642693094,"remote_snapshot_timestamp":1642693094,"replay_state":"idle"} last_update: 2022-01-20 12:42:59 snapshots: 5 .mirror.primary.47fd1aae-5f19-4193-a5df-562b5c644ea7.dda146c6-5f21-4e75-ba93-660f6e57e301 (peer_uuids:[bfd09289-c9c9-40c8-b2d3-ead9b6a99a45])
5.5. Configuring one-way mirroring using the command-line interface
This procedure configures one-way replication of a pool from the primary storage cluster to a secondary storage cluster.
When using one-way replication you can mirror to multiple secondary storage clusters.
Examples in this section will distinguish between two storage clusters by referring to the primary storage cluster with the primary images as site-a, and the secondary storage cluster you are replicating the images to, as site-b. The pool name used in these examples is called data.
Prerequisites
- A minimum of two healthy and running Red Hat Ceph Storage clusters.
- Root-level access to a Ceph client node for each storage cluster.
- A CephX user with administrator-level capabilities.
- Images within the pool must have exclusive-lock and journaling enabled for journal-based mirroring.
Procedure
Install the
rbd-mirrorpackage on the client node connected to thesite-bstorage cluster:Red Hat Enterprise Linux 7
[root@rbd-client ~]# yum install rbd-mirrorRed Hat Enterprise Linux 8
[root@rbd-client ~]# dnf install rbd-mirrorNoteThe package is provided by the Red Hat Ceph Storage Tools repository.
Enable the exclusive-lock, and journaling features on an image.
For new images, use the
--image-featureoption:Syntax
rbd create IMAGE_NAME --size MEGABYTES --pool POOL_NAME --image-feature FEATURE [,FEATURE]Example
[root@rbd-client ~]# rbd create image1 --size 1024 --pool data --image-feature exclusive-lock,journalingFor existing images, use the
rbd feature enablecommand:Syntax
rbd feature enable POOL_NAME/IMAGE_NAME FEATURE [,FEATURE]Example
[root@rbd-client ~]# rbd feature enable data/image1 exclusive-lock,journalingTo enable exclusive-lock and journaling on all new images by default, add the following setting to the Ceph configuration file:
rbd_default_features = 125
Choose the mirroring mode, either pool or image mode.
ImportantUse image mode for snapshot-based mirroring.
Enabling pool mode:
Syntax
rbd mirror pool enable POOL_NAME MODEExample
[root@rbd-client ~]# rbd mirror pool enable data poolThis example enables mirroring of the whole pool named
data.Enabling image mode:
Syntax
rbd mirror pool enable POOL_NAME MODEExample
[root@rbd-client ~]# rbd mirror pool enable data imageThis example enables image mode mirroring on the pool named
data.Verify that mirroring has been successfully enabled:
Syntax
rbd mirror pool info POOL_NAMEExample
[root@rbd-client ~]# rbd mirror pool info data
Mode: image
Site Name: 94cbd9ca-7f9a-441a-ad4b-52a33f9b7148

Peer Sites: none
In the
site-acluster, complete the following steps:On the Ceph client node, create a user:
Syntax
ceph auth get-or-create client.PRIMARY_CLUSTER_NAME mon 'profile rbd-mirror' osd 'profile rbd' -o /etc/ceph/ceph.PRIMARY_CLUSTER_NAME.keyringExample
[root@rbd-client-site-a ~]# ceph auth get-or-create client.rbd-mirror.site-a mon 'profile rbd-mirror' osd 'profile rbd' -o /etc/ceph/ceph.client.rbd-mirror.site-a.keyringCopy keyring to
site-bcluster:Syntax
scp /etc/ceph/ceph.PRIMARY_CLUSTER_NAME.keyring root@SECONDARY_CLUSTER:_PATH_Example
[root@rbd-client-site-a ~]# scp /etc/ceph/ceph.client.rbd-mirror.site-a.keyring root@rbd-client-site-b:/etc/ceph/On a Ceph client node, bootstrap the storage cluster peers.
Register the storage cluster peer to the pool:
Syntax
rbd mirror pool peer bootstrap create --site-name LOCAL_SITE_NAME POOL_NAME > PATH_TO_BOOTSTRAP_TOKENExample
[root@rbd-client-site-a ~]# rbd mirror pool peer bootstrap create --site-name rbd-mirror.site-a data > /root/bootstrap_token_rbd-mirror.site-aNoteThis example bootstrap command creates the
client.rbd-mirror-peerCeph user.Copy the bootstrap token file to the
site-bstorage cluster.Syntax
scp PATH_TO_BOOTSTRAP_TOKEN root@SECONDARY_CLUSTER:/root/Example
[root@rbd-client-site-a ~]# scp /root/bootstrap_token_site-a root@ceph-rbd2:/root/
In the
site-bcluster, complete the following steps:On the client node, create a user:
Syntax
ceph auth get-or-create client.SECONDARY_CLUSTER_NAME mon 'profile rbd-mirror' osd 'profile rbd' -o /etc/ceph/ceph.SECONDARY_CLUSTER_NAME.keyringExample
[root@rbd-client-site-b ~]# ceph auth get-or-create client.rbd-mirror.site-b mon 'profile rbd-mirror' osd 'profile rbd' -o /etc/ceph/ceph.client.rbd-mirror.site-b.keyringCopy keyring to the
site-acluster, the Ceph client node:Syntax
scp /etc/ceph/ceph.SECONDARY_CLUSTER_NAME.keyring root@PRIMARY_CLUSTER:_PATH_Example
[root@rbd-client-site-b ~]# scp /etc/ceph/ceph.client.rbd-mirror.site-b.keyring root@rbd-client-site-a:/etc/ceph/Import the bootstrap token:
Syntax
rbd mirror pool peer bootstrap import --site-name LOCAL_SITE_NAME --direction rx-only POOL_NAME PATH_TO_BOOTSTRAP_TOKENExample
[root@rbd-client-site-b ~]# rbd mirror pool peer bootstrap import --site-name rbd-mirror.site-b --direction rx-only data /root/bootstrap_token_rbd-mirror.site-aNoteFor one-way RBD mirroring, you must use the
--direction rx-onlyargument, as two-way mirroring is the default when bootstrapping peers.Enable and start the
rbd-mirrordaemon on client node:Syntax
systemctl enable ceph-rbd-mirror.target
systemctl enable ceph-rbd-mirror@rbd-mirror.CLIENT_ID
systemctl start ceph-rbd-mirror@rbd-mirror.CLIENT_ID
Replace
CLIENT_IDwith the Ceph user created earlier.Example
[root@rbd-client-site-b ~]# systemctl enable ceph-rbd-mirror.target
[root@rbd-client-site-b ~]# systemctl enable ceph-rbd-mirror@rbd-mirror.site-a
[root@rbd-client-site-b ~]# systemctl start ceph-rbd-mirror@rbd-mirror.site-a
ImportantEach
rbd-mirrordaemon must have a unique Client ID.To verify the mirroring status, run the following command from a Ceph Monitor node in the
site-aandsite-bclusters:Syntax
rbd mirror image status POOL_NAME/IMAGE_NAMEExample
Journal-based mirroring:
[root@mon-site-a ~]# rbd mirror image status data/image1
image1:
  global_id:   08027096-d267-47f8-b52e-59de1353a034
  state:       up+stopped
1 description: local image is primary last_update: 2021-04-22 13:45:31Snapshot-based mirroring:
[root@mon-site-a ~]# rbd mirror image status data/image1
image1:
  global_id:   47fd1aae-5f19-4193-a5df-562b5c644ea7
  state:       up+stopped
1 description: local image is primary service: admin on ceph-rbd1-vasi-43-5hwia4-node2 last_update: 2022-01-20 12:42:54 peer_sites: name: rbd-mirror.site-b state: up+replaying description: replaying, {"bytes_per_second":0.0,"bytes_per_snapshot":0.0,"local_snapshot_timestamp":1642693094,"remote_snapshot_timestamp":1642693094,"replay_state":"idle"} last_update: 2022-01-20 12:42:59 snapshots: 5 .mirror.primary.47fd1aae-5f19-4193-a5df-562b5c644ea7.dda146c6-5f21-4e75-ba93-660f6e57e301 (peer_uuids:[bfd09289-c9c9-40c8-b2d3-ead9b6a99a45])Example
Journal-based mirroring:
[root@mon-site-b ~]# rbd mirror image status data/image1
image1:
  global_id:   7d486c3f-d5a1-4bee-ae53-6c4f1e0c8eac
  state:       up+replaying
1 description: replaying, master_position=[object_number=3, tag_tid=1, entry_tid=3], mirror_position=[object_number=3, tag_tid=1, entry_tid=3], entries_behind_master=0 last_update: 2021-04-22 14:19:27Snapshot-based mirroring:
[root@mon-site-b ~]# rbd mirror image status data/image1
image1:
  global_id:   06acc9e6-a63d-4aa1-bd0d-4f3a79b0ae33
  state:       up+replaying
1 description: replaying, {"bytes_per_second":0.0,"bytes_per_snapshot":0.0,"local_snapshot_timestamp":1642689843,"remote_snapshot_timestamp":1642689843,"replay_state":"idle"} service: admin on ceph-rbd2-vasi-43-5hwia4-node2 last_update: 2022-01-20 12:41:57NoteDepending on the connection between the sites, mirroring can take a long time to sync the images.
Additional Resources
- See the Ceph block device mirroring section in the Red Hat Ceph Storage Block Device Guide for more details.
- See the User Management section in the Red Hat Ceph Storage Administration Guide for more details on Ceph users.
5.6. Configuring two-way mirroring using the command-line interface
This procedure configures two-way replication of a pool between the primary storage cluster, and a secondary storage cluster.
When using two-way replication you can only mirror between two storage clusters.
Examples in this section will distinguish between two storage clusters by referring to the primary storage cluster with the primary images as site-a, and the secondary storage cluster you are replicating the images to, as site-b. The pool name used in these examples is called data.
Prerequisites
- A minimum of two healthy and running Red Hat Ceph Storage clusters.
- Root-level access to a Ceph client node for each storage cluster.
- A CephX user with administrator-level capabilities.
- Images within the pool must have exclusive-lock and journaling enabled for journal-based mirroring.
Procedure
Install the
rbd-mirrorpackage on the client node connected to thesite-astorage cluster, and the client node connected to thesite-bstorage cluster:Red Hat Enterprise Linux 7
[root@rbd-client ~]# yum install rbd-mirrorRed Hat Enterprise Linux 8
[root@rbd-client ~]# dnf install rbd-mirrorNoteThe package is provided by the Red Hat Ceph Storage Tools repository.
Enable the exclusive-lock, and journaling features on an image.
For new images, use the
--image-featureoption:Syntax
rbd create IMAGE_NAME --size MEGABYTES --pool POOL_NAME --image-feature FEATURE [,FEATURE]Example
[root@rbd-client ~]# rbd create image1 --size 1024 --pool data --image-feature exclusive-lock,journalingFor existing images, use the
rbd feature enablecommand:Syntax
rbd feature enable POOL_NAME/IMAGE_NAME FEATURE [,FEATURE]Example
[root@rbd-client ~]# rbd feature enable data/image1 exclusive-lock,journalingTo enable exclusive-lock and journaling on all new images by default, add the following setting to the Ceph configuration file:
rbd_default_features = 125
Choose the mirroring mode, either pool or image mode.
ImportantUse image mode for snapshot-based mirroring.
Enabling pool mode:
Syntax
rbd mirror pool enable POOL_NAME MODEExample
[root@rbd-client ~]# rbd mirror pool enable data poolThis example enables mirroring of the whole pool named
data.Enabling image mode:
Syntax
rbd mirror pool enable POOL_NAME MODEExample
[root@rbd-client ~]# rbd mirror pool enable data imageThis example enables image mode mirroring on the pool named
data.Verify that mirroring has been successfully enabled:
Syntax
rbd mirror pool info POOL_NAMEExample
[root@rbd-client ~]# rbd mirror pool info data
Mode: image
Site Name: 94cbd9ca-7f9a-441a-ad4b-52a33f9b7148

Peer Sites: none
In the
site-acluster, complete the following steps:On the Ceph client node, create a user:
Syntax
ceph auth get-or-create client.PRIMARY_CLUSTER_NAME mon 'profile rbd-mirror' osd 'profile rbd' -o /etc/ceph/ceph.PRIMARY_CLUSTER_NAME.keyringExample
[root@rbd-client-site-a ~]# ceph auth get-or-create client.rbd-mirror.site-a mon 'profile rbd-mirror' osd 'profile rbd' -o /etc/ceph/ceph.client.rbd-mirror.site-a.keyringCopy keyring to
site-bcluster:Syntax
scp /etc/ceph/ceph.PRIMARY_CLUSTER_NAME.keyring root@SECONDARY_CLUSTER:_PATH_Example
[root@rbd-client-site-a ~]# scp /etc/ceph/ceph.client.rbd-mirror.site-a.keyring root@rbd-client-site-b:/etc/ceph/On a Ceph client node, bootstrap the storage cluster peers.
Register the storage cluster peer to the pool:
Syntax
rbd mirror pool peer bootstrap create --site-name LOCAL_SITE_NAME POOL_NAME > PATH_TO_BOOTSTRAP_TOKENExample
[root@rbd-client-site-a ~]# rbd mirror pool peer bootstrap create --site-name rbd-mirror.site-a data > /root/bootstrap_token_rbd-mirror.site-aNoteThis example bootstrap command creates the
client.rbd-mirror-peerCeph user.Copy the bootstrap token file to the
site-bstorage cluster.Syntax
scp PATH_TO_BOOTSTRAP_TOKEN root@SECONDARY_CLUSTER:/root/Example
[root@rbd-client-site-a ~]# scp /root/bootstrap_token_site-a root@ceph-rbd2:/root/
In the
site-bcluster, complete the following steps:On the client node, create a user:
Syntax
ceph auth get-or-create client.SECONDARY_CLUSTER_NAME mon 'profile rbd-mirror' osd 'profile rbd' -o /etc/ceph/ceph.SECONDARY_CLUSTER_NAME.keyringExample
[root@rbd-client-site-b ~]# ceph auth get-or-create client.rbd-mirror.site-b mon 'profile rbd-mirror' osd 'profile rbd' -o /etc/ceph/ceph.client.rbd-mirror.site-b.keyringCopy keyring to the
site-acluster, the Ceph client node:Syntax
scp /etc/ceph/ceph.SECONDARY_CLUSTER_NAME.keyring root@PRIMARY_CLUSTER:_PATH_Example
[root@rbd-client-site-b ~]# scp /etc/ceph/ceph.client.rbd-mirror.site-b.keyring root@rbd-client-site-a:/etc/ceph/Import the bootstrap token:
Syntax
rbd mirror pool peer bootstrap import --site-name LOCAL_SITE_NAME --direction rx-tx POOL_NAME PATH_TO_BOOTSTRAP_TOKENExample
[root@rbd-client-site-b ~]# rbd mirror pool peer bootstrap import --site-name rbd-mirror.site-b --direction rx-tx data /root/bootstrap_token_rbd-mirror.site-aNoteThe
--directionargument is optional, as two-way mirroring is the default when bootstrapping peers.
Enable and start the
rbd-mirrordaemon on the primary and secondary client nodes:Syntax
systemctl enable ceph-rbd-mirror.target
systemctl enable ceph-rbd-mirror@rbd-mirror.CLIENT_ID
systemctl start ceph-rbd-mirror@rbd-mirror.CLIENT_ID
Replace
CLIENT_IDwith the Ceph user created earlier.Example
[root@rbd-client-site-a ~]# systemctl enable ceph-rbd-mirror.target
[root@rbd-client-site-a ~]# systemctl enable ceph-rbd-mirror@rbd-mirror.site-a
[root@rbd-client-site-a ~]# systemctl start ceph-rbd-mirror@rbd-mirror.site-a
[root@rbd-client-site-a ~]# systemctl enable ceph-rbd-mirror@rbd-mirror.site-b
[root@rbd-client-site-a ~]# systemctl start ceph-rbd-mirror@rbd-mirror.site-b
In the above example, users are enabled in the primary cluster
site-aExample
[root@rbd-client-site-b ~]# systemctl enable ceph-rbd-mirror.target
[root@rbd-client-site-b ~]# systemctl enable ceph-rbd-mirror@rbd-mirror.site-a
[root@rbd-client-site-b ~]# systemctl start ceph-rbd-mirror@rbd-mirror.site-a
[root@rbd-client-site-b ~]# systemctl enable ceph-rbd-mirror@rbd-mirror.site-b
[root@rbd-client-site-b ~]# systemctl start ceph-rbd-mirror@rbd-mirror.site-b
In the above example, users are enabled in the secondary cluster
site-bImportantEach
rbd-mirrordaemon must have a unique Client ID.To verify the mirroring status, run the following command from a Ceph Monitor node in the
site-aandsite-bclusters:Syntax
rbd mirror image status POOL_NAME/IMAGE_NAMEExample
Journal-based mirroring:
[root@mon-site-a ~]# rbd mirror image status data/image1
image1:
  global_id:   08027096-d267-47f8-b52e-59de1353a034
  state:       up+stopped
1 description: local image is primary last_update: 2021-04-22 13:45:31Snapshot-based mirroring:
[root@mon-site-a ~]# rbd mirror image status data/image1
image1:
  global_id:   47fd1aae-5f19-4193-a5df-562b5c644ea7
  state:       up+stopped
1 description: local image is primary service: admin on ceph-rbd1-vasi-43-5hwia4-node2 last_update: 2022-01-20 12:42:54 peer_sites: name: rbd-mirror.site-b state: up+replaying description: replaying, {"bytes_per_second":0.0,"bytes_per_snapshot":0.0,"local_snapshot_timestamp":1642693094,"remote_snapshot_timestamp":1642693094,"replay_state":"idle"} last_update: 2022-01-20 12:42:59 snapshots: 5 .mirror.primary.47fd1aae-5f19-4193-a5df-562b5c644ea7.dda146c6-5f21-4e75-ba93-660f6e57e301 (peer_uuids:[bfd09289-c9c9-40c8-b2d3-ead9b6a99a45])Example
Journal-based mirroring:
[root@mon-site-b ~]# rbd mirror image status data/image1
image1:
  global_id:   7d486c3f-d5a1-4bee-ae53-6c4f1e0c8eac
  state:       up+replaying
1 description: replaying, master_position=[object_number=3, tag_tid=1, entry_tid=3], mirror_position=[object_number=3, tag_tid=1, entry_tid=3], entries_behind_master=0 last_update: 2021-04-22 14:19:27Snapshot-based mirroring:
[root@mon-site-b ~]# rbd mirror image status data/image1
image1:
  global_id:   06acc9e6-a63d-4aa1-bd0d-4f3a79b0ae33
  state:       up+replaying
1 description: replaying, {"bytes_per_second":0.0,"bytes_per_snapshot":0.0,"local_snapshot_timestamp":1642689843,"remote_snapshot_timestamp":1642689843,"replay_state":"idle"} service: admin on ceph-rbd2-vasi-43-5hwia4-node2 last_update: 2022-01-20 12:41:57NoteDepending on the connection between the sites, mirroring can take a long time to sync the images.
Additional Resources
- See the Ceph block device mirroring section in the Red Hat Ceph Storage Block Device Guide for more details.
- See the User Management section in the Red Hat Ceph Storage Administration Guide for more details on Ceph users.
5.7. Administration for mirroring Ceph block devices
As a storage administrator, you can do various tasks to help you manage the Ceph block device mirroring environment. You can do the following tasks:
- Viewing information about storage cluster peers.
- Add or remove a storage cluster peer.
- Getting mirroring status for a pool or image.
- Enabling mirroring on a pool or image.
- Disabling mirroring on a pool or image.
- Delaying block device replication.
- Promoting and demoting an image.
5.7.1. Prerequisites
- A minimum of two healthy running Red Hat Ceph Storage cluster.
- Root-level access to the Ceph client nodes.
- A one-way or two-way Ceph block device mirroring relationship.
5.7.2. Viewing information about peers
View information about storage cluster peers.
Prerequisites
- A running Red Hat Ceph Storage cluster.
- Root-level access to the node.
Procedure
To view information about the peers:
Syntax
rbd mirror pool info POOL_NAMEExample
[root@rbd-client ~]# rbd mirror pool info data
Mode: pool
Site Name: site-a

Peer Sites:

UUID: 950ddadf-f995-47b7-9416-b9bb233f66e3
Name: site-b
Mirror UUID: 4696cd9d-1466-4f98-a97a-3748b6b722b3
Direction: rx-tx
Client: client.site-b
5.7.3. Enabling mirroring on a pool
Enable mirroring on a pool by running the following commands on both peer clusters.
Prerequisites
- A running Red Hat Ceph Storage cluster.
- Root-level access to the node.
Procedure
To enable mirroring on a pool:
Syntax
rbd mirror pool enable POOL_NAME MODEExample
[root@rbd-client ~]# rbd mirror pool enable data poolThis example enables mirroring of the whole pool named
data.Example
[root@rbd-client ~]# rbd mirror pool enable data imageThis example enables image mode mirroring on the pool named
data.
Additional Resources
- See the Mirroring Ceph block devices section in the Red Hat Ceph Storage Block Device Guide for details.
5.7.4. Disabling mirroring on a pool
Before disabling mirroring, remove the peer clusters.
When you disable mirroring on a pool, you also disable it on any images within the pool for which mirroring was enabled separately in image mode.
Prerequisites
- A running Red Hat Ceph Storage cluster.
- Root-level access to the node.
Procedure
To disable mirroring on a pool:
Syntax
rbd mirror pool disable POOL_NAMEExample
[root@rbd-client ~]# rbd mirror pool disable dataThis example disables mirroring of a pool named
data.
Additional Resources
- See the Configuring image one-way mirroring section in the Red Hat Ceph Storage Block Device Guide for details.
- See the Removing a storage cluster peer section in the Red Hat Ceph Storage Block Device Guide for details.
5.7.5. Enabling image mirroring
Enable mirroring on the whole pool in image mode on both peer storage clusters.
Prerequisites
- A running Red Hat Ceph Storage cluster.
- Root-level access to the node.
Procedure
Enable mirroring for a specific image within the pool:
Syntax
rbd mirror image enable POOL_NAME/IMAGE_NAMEExample
[root@rbd-client ~]# rbd mirror image enable data/image2This example enables mirroring for the
image2image in thedatapool.
Additional Resources
- See the Enabling mirroring on a pool section in the Red Hat Ceph Storage Block Device Guide for details.
5.7.6. Disabling image mirroring
Disable the mirror for images.
Prerequisites
- A running Red Hat Ceph Storage cluster.
- Root-level access to the node.
Procedure
To disable mirroring for a specific image:
Syntax
rbd mirror image disable POOL_NAME/IMAGE_NAMEExample
[root@rbd-client ~]# rbd mirror image disable data/image2This example disables mirroring of the
image2image in thedatapool.
5.7.7. Image promotion and demotion
Promote or demote an image.
Do not force promote non-primary images that are still syncing, because the images will not be valid after the promotion.
Prerequisites
- A running Red Hat Ceph Storage cluster.
- Root-level access to the node.
Procedure
To demote an image to non-primary:
Syntax
rbd mirror image demote POOL_NAME/IMAGE_NAMEExample
[root@rbd-client ~]# rbd mirror image demote data/image2This example demotes the
image2image in thedatapool.To promote an image to primary:
Syntax
rbd mirror image promote POOL_NAME/IMAGE_NAMEExample
[root@rbd-client ~]# rbd mirror image promote data/image2This example promotes
image2in thedatapool.Depending on which type of mirroring you are using, see either Recovering from a disaster with one-way mirroring or Recovering from a disaster with two-way mirroring for details.
Use the
--forceoption to force promote a non-primary image:Syntax
rbd mirror image promote --force POOL_NAME/IMAGE_NAMEExample
[root@rbd-client ~]# rbd mirror image promote --force data/image2Use forced promotion when the demotion cannot be propagated to the peer Ceph storage cluster. For example, because of cluster failure or communication outage.
Additional Resources
- See the Failover after a non-orderly shutdown section in the Red Hat Ceph Storage Block Device Guide for details.
5.7.8. Image resynchronization
Re-synchronize an image. In case of an inconsistent state between the two peer clusters, the rbd-mirror daemon does not attempt to mirror the image that is causing the inconsistency.
Prerequisites
- A running Red Hat Ceph Storage cluster.
- Root-level access to the node.
Procedure
To request a resynchronization to the primary image:
Syntax
rbd mirror image resync POOL_NAME/IMAGE_NAMEExample
[root@rbd-client ~]# rbd mirror image resync data/image2This example requests resynchronization of
image2in thedatapool.
Additional Resources
- To recover from an inconsistent state because of a disaster, see either Recovering from a disaster with one-way mirroring or Recovering from a disaster with two-way mirroring for details.
5.7.9. Adding a storage cluster peer
Add a storage cluster peer for the rbd-mirror daemon to discover its peer storage cluster. For example, to add the site-a storage cluster as a peer to the site-b storage cluster, then follow this procedure from the client node in the site-b storage cluster.
Prerequisites
- A running Red Hat Ceph Storage cluster.
- Root-level access to the node.
Procedure
Register the peer to the pool:
Syntax
rbd --cluster CLUSTER_NAME mirror pool peer add POOL_NAME PEER_CLIENT_NAME@PEER_CLUSTER_NAME -n CLIENT_NAMEExample
[root@rbd-client ~]# rbd --cluster site-b mirror pool peer add data client.site-a@site-a -n client.site-b
5.7.10. Removing a storage cluster peer
Remove a storage cluster peer by specifying the peer UUID.
Prerequisites
- A running Red Hat Ceph Storage cluster.
- Root-level access to the node.
Procedure
Specify the pool name and the peer Universally Unique Identifier (UUID).
Syntax
rbd mirror pool peer remove POOL_NAME PEER_UUIDExample
[root@rbd-client ~]# rbd mirror pool peer remove data 7e90b4ce-e36d-4f07-8cbc-42050896825dTipTo view the peer UUID, use the
rbd mirror pool infocommand.
5.7.11. Getting mirroring status for a pool
Get the mirror status for a pool.
Prerequisites
- A running Red Hat Ceph Storage cluster.
- Root-level access to the node.
Procedure
To get the mirroring pool summary:
Syntax
rbd mirror pool status POOL_NAMEExample
[root@rbd-client ~]# rbd mirror pool status data health: OK images: 1 totalTipTo output status details for every mirroring image in a pool, use the
--verboseoption.
5.7.12. Getting mirroring status for a single image
Get the mirror status for an image.
Prerequisites
- A running Red Hat Ceph Storage cluster.
- Root-level access to the node.
Procedure
To get the status of a mirrored image:
Syntax
rbd mirror image status POOL_NAME/IMAGE_NAMEExample
[root@rbd-client ~]# rbd mirror image status data/image2
image2:
  global_id:   703c4082-100d-44be-a54a-52e6052435a5
  state:       up+replaying
  description: replaying, master_position=[object_number=0, tag_tid=3, entry_tid=0], mirror_position=[object_number=0, tag_tid=3, entry_tid=0], entries_behind_master=0
  last_update: 2019-04-23 13:39:15
This example gets the status of the
image2image in thedatapool.
5.7.13. Delaying block device replication
Whether you are using one- or two-way replication, you can delay replication between RADOS Block Device (RBD) mirroring images. You might want to implement delayed replication if you want a window of cushion time in case an unwanted change to the primary image needs to be reverted before being replicated to the secondary image.
To implement delayed replication, the rbd-mirror daemon within the destination storage cluster should set the rbd_mirroring_replay_delay = MINIMUM_DELAY_IN_SECONDS configuration option. This setting can either be applied globally within the ceph.conf file utilized by the rbd-mirror daemons, or on an individual image basis.
Prerequisites
- A running Red Hat Ceph Storage cluster.
- Root-level access to the node.
Procedure
To utilize delayed replication for a specific image, on the primary image, run the following
rbdCLI command:Syntax
rbd image-meta set POOL_NAME/IMAGE_NAME conf_rbd_mirroring_replay_delay MINIMUM_DELAY_IN_SECONDSExample
[root@rbd-client ~]# rbd image-meta set vms/vm-1 conf_rbd_mirroring_replay_delay 600This example sets a 10 minute minimum replication delay on image
vm-1in thevmspool.
5.7.14. Asynchronous updates and Ceph block device mirroring
When updating a storage cluster using Ceph block device mirroring with an asynchronous update, follow the update instruction in the Red Hat Ceph Storage Installation Guide. Once updating is done, restart the Ceph block device instances.
There is no required order for restarting the instances. Red Hat recommends restarting the instance pointing to the pool with primary images followed by the instance pointing to the mirrored pool.
5.7.15. Creating an image mirror-snapshot
Create an image mirror-snapshot when it is required to mirror the changed contents of an RBD image when using snapshot-based mirroring.
Prerequisites
- A minimum of two healthy running Red Hat Ceph Storage clusters.
- Root-level access to the Ceph client nodes for the Red Hat Ceph Storage clusters.
- A CephX user with administrator-level capabilities.
- Access to the Red Hat Ceph Storage cluster where a snapshot mirror will be created.
By default only 3 image mirror-snapshots can be created per image. The most recent image mirror-snapshot is automatically removed if the limit is reached. If required, the limit can be overridden through the rbd_mirroring_max_mirroring_snapshots configuration. Image mirror-snapshots are automatically deleted when the image is removed or when mirroring is disabled.
Procedure
To create an image-mirror snapshot:
Syntax
rbd --cluster CLUSTER_NAME mirror image snapshot POOL_NAME/IMAGE_NAMEExample
root@rbd-client ~]# rbd --cluster site-a mirror image snapshot data/image1
Additional Resources
- See the Mirroring Ceph block devices section in the Red Hat Ceph Storage Block Device Guide for details.
5.7.16. Scheduling mirror-snapshots
Mirror-snapshots can be automatically created when mirror-snapshot schedules are defined. The mirror-snapshot can be scheduled globally, per-pool or per-image levels. Multiple mirror-snapshot schedules can be defined at any level but only the most specific snapshot schedules that match an individual mirrored image will run.
Additional Resources
- See the Mirroring Ceph block devices section in the Red Hat Ceph Storage Block Device Guide for details.
5.7.17. Creating a mirror-snapshot schedule
Create a mirror-snapshot schedule.
Prerequisites
- A minimum of two healthy running Red Hat Ceph Storage clusters.
- Root-level access to the Ceph client nodes for the Red Hat Ceph Storage clusters.
- A CephX user with administrator-level capabilities.
- Access to the Red Hat Ceph Storage cluster where a snapshot mirror will be created.
Procedure
To create a mirror-snapshot schedule:
Syntax
rbd mirror snapshot schedule add --pool POOL_NAME --image IMAGE_NAME INTERVAL START_TIMEThe interval can be specified in days, hours, or minutes using d, h, or m suffix respectively. The optional START_TIME can be specified using the ISO 8601 time format.
Example
Scheduling at image level:
[root@rbd-client ~]# rbd mirror snapshot schedule add --pool data --image image1 6hScheduling at pool level:
[root@rbd-client ~]# rbd mirror snapshot schedule add --pool data 24h 14:00:00-05:00Scheduling at global level:
[root@rbd-client ~]# rbd mirror snapshot schedule add 48h
Additional Resources
- See the Mirroring Ceph block devices section in the Red Hat Ceph Storage Block Device Guide for details.
5.7.18. Listing all snapshot schedules at a specific level
List all snapshot schedules at a specific level.
Prerequisites
- A minimum of two healthy running Red Hat Ceph Storage clusters.
- Root-level access to the Ceph client nodes for the Red Hat Ceph Storage clusters.
- A CephX user with administrator-level capabilities.
- Access to the Red Hat Ceph Storage cluster where a snapshot mirror will be created.
Procedure
To list all snapshot schedules for a specific global, pool or image level, with an optional pool or image name:
Syntax
rbd --cluster site-a mirror snapshot schedule ls --pool POOL_NAME --recursiveAdditionally, the
`--recursiveoption can be specified to list all schedules at the specified level as shown below:Example
[root@rbd-client ~]# rbd --cluster site-a mirror snapshot schedule ls --pool data --recursive
POOL        NAMESPACE IMAGE  SCHEDULE
data         -         -      every 1d starting at 14:00:00-05:00
data         -        image1   every 6h
Additional Resources
- See the Mirroring Ceph block devices section in the Red Hat Ceph Storage Block Device Guide for details.
5.7.19. Removing a mirror-snapshot schedule
Remove a mirror-snapshot schedule.
Prerequisites
- A minimum of two healthy running Red Hat Ceph Storage clusters.
- Root-level access to the Ceph client nodes for the Red Hat Ceph Storage clusters.
- A CephX user with administrator-level capabilities.
- Access to the Red Hat Ceph Storage cluster where a snapshot mirror will be created.
Procedure
To remove a mirror-snapshot schedule:
Syntax
rbd --cluster CLUSTER_NAME mirror snapshot schedule remove POOL_NAME/IMAGE_NAME INTERVAL START_TIMEThe interval can be specified in days, hours, or minutes using d, h, m suffix respectively. The optional START_TIME can be specified using the ISO 8601 time format.
Example
[root@rbd-client ~]# rbd --cluster site-a mirror snapshot schedule remove data/image1 6hExample
[root@rbd-client ~]# rbd --cluster site-a mirror snapshot schedule remove data/image1 24h 14:00:00-05:00
Additional Resources
- See the Mirroring Ceph block devices section in the Red Hat Ceph Storage Block Device Guide for details.
5.7.20. Viewing the status for the next snapshots to be created
View the status for the next snapshots to be created for snapshot-based mirroring RBD images.
Prerequisites
- A minimum of two healthy running Red Hat Ceph Storage clusters.
- Root-level access to the Ceph client nodes for the Red Hat Ceph Storage clusters.
- A CephX user with administrator-level capabilities.
- Access to the Red Hat Ceph Storage cluster where a snapshot mirror will be created.
Procedure
To view the status for the next snapshots to be created:
Syntax
rbd --cluster site-a mirror snapshot schedule status POOL_NAME/IMAGE_NAMEExample
[root@rbd-client ~]# rbd --cluster site-a mirror snapshot schedule status
SCHEDULE    TIME       IMAGE
2020-02-26 18:00:00 data/image1
Additional Resources
- See the Mirroring Ceph block devices section in the Red Hat Ceph Storage Block Device Guide for details.
5.8. Recover from a disaster
As a storage administrator, you can be prepared for eventual hardware failure by knowing how to recover the data from another storage cluster where mirroring was configured.
In the examples, the primary storage cluster is known as the site-a, and the secondary storage cluster is known as the site-b. Additionally, the storage clusters both have a data pool with two images, image1 and image2.
5.8.1. Prerequisites
- A running Red Hat Ceph Storage cluster.
- One-way or two-way mirroring was configured.
5.8.2. Disaster recovery
Asynchronous replication of block data between two or more Red Hat Ceph Storage clusters reduces downtime and prevents data loss in the event of a significant data center failure. These failures have a widespread impact, also referred as a large blast radius, and can be caused by impacts to the power grid and natural disasters.
Customer data needs to be protected during these scenarios. Volumes must be replicated with consistency and efficiency and also within Recovery Point Objective (RPO) and Recovery Time Objective (RTO) targets. This solution is called a Wide Area Network- Disaster Recovery (WAN-DR).
In such scenarios it is hard to restore the primary system and the data center. The quickest way to recover is to failover the applications to an alternate Red Hat Ceph Storage cluster (disaster recovery site) and make the cluster operational with the latest copy of the data available. The solutions that are used to recover from these failure scenarios are guided by the application:
- Recovery Point Objective (RPO): The amount of data loss, an application tolerate in the worst case.
- Recovery Time Objective (RTO): The time taken to get the application back on line with the latest copy of the data available.
Additional Resources
- See the Mirroring Ceph block devices section in the Red Hat Ceph Storage Block Device Guide for details.
- See the Encryption in transit section in the Red Hat Ceph Storage Data Security and Hardening Guide to know more about data transmission over the wire in an encrypted state.
5.8.3. Recover from a disaster with one-way mirroring
To recover from a disaster when using one-way mirroring use the following procedures. They show how to fail over to the secondary cluster after the primary cluster terminates, and how to fail back. The shutdown can be orderly or non-orderly.
One-way mirroring supports multiple secondary sites. If you are using additional secondary clusters, choose one of the secondary clusters to fail over to. Synchronize from the same cluster during fail back.
5.8.4. Recover from a disaster with two-way mirroring
To recover from a disaster when using two-way mirroring use the following procedures. They show how to fail over to the mirrored data on the secondary cluster after the primary cluster terminates, and how to failback. The shutdown can be orderly or non-orderly.
Additional Resources
- For details on demoting, promoting, and resyncing images, see the Configure mirroring on a image section in the Red Hat Ceph Storage Block Device Guide.
5.8.5. Failover after an orderly shutdown
Failover to the secondary storage cluster after an orderly shutdown.
Prerequisites
- Minimum of two running Red Hat Ceph Storage clusters.
- Root-level access to the node.
- Pool mirroring or image mirroring configured with one-way mirroring.
Procedure
- Stop all clients that use the primary image. This step depends on which clients use the image. For example, detach volumes from any OpenStack instances that use the image.
Demote the primary images located on the
site-acluster by running the following commands on a monitor node in thesite-acluster:Syntax
rbd mirror image demote POOL_NAME/IMAGE_NAMEExample
[root@rbd-client ~]# rbd mirror image demote data/image1
[root@rbd-client ~]# rbd mirror image demote data/image2
Promote the non-primary images located on the
site-bcluster by running the following commands on a monitor node in thesite-bcluster:Syntax
rbd mirror image promote POOL_NAME/IMAGE_NAMEExample
[root@rbd-client ~]# rbd mirror image promote data/image1
[root@rbd-client ~]# rbd mirror image promote data/image2
After some time, check the status of the images from a monitor node in the
site-bcluster. They should show a state ofup+stoppedand be listed as primary:[root@rbd-client ~]# rbd mirror image status data/image1 image1: global_id: 08027096-d267-47f8-b52e-59de1353a034 state: up+stopped description: local image is primary last_update: 2019-04-17 16:04:37 [root@rbd-client ~]# rbd mirror image status data/image2 image2: global_id: 596f41bc-874b-4cd4-aefe-4929578cc834 state: up+stopped description: local image is primary last_update: 2019-04-17 16:04:37- Resume the access to the images. This step depends on which clients use the image.
Additional Resources
- See the Block Storage and Volumes chapter in the Red Hat OpenStack Platform Storage Guide.
5.8.6. Failover after a non-orderly shutdown
Failover to secondary storage cluster after a non-orderly shutdown.
Prerequisites
- Minimum of two running Red Hat Ceph Storage clusters.
- Root-level access to the node.
- Pool mirroring or image mirroring configured with one-way mirroring.
Procedure
- Verify that the primary storage cluster is down.
- Stop all clients that use the primary image. This step depends on which clients use the image. For example, detach volumes from any OpenStack instances that use the image.
Promote the non-primary images from a Ceph Monitor node in the
site-bstorage cluster. Use the--forceoption, because the demotion cannot be propagated to thesite-astorage cluster:Syntax
rbd mirror image promote --force POOL_NAME/IMAGE_NAMEExample
[root@rbd-client ~]# rbd mirror image promote --force data/image1
[root@rbd-client ~]# rbd mirror image promote --force data/image2
Check the status of the images from a Ceph Monitor node in the
site-bstorage cluster. They should show a state ofup+stopping_replayand the description should sayforce promoted:Example
[root@rbd-client ~]# rbd mirror image status data/image1
image1:
  global_id:   08027096-d267-47f8-b52e-59de1353a034
  state:       up+stopping_replay
  description: force promoted
  last_update: 2019-04-17 13:25:06
[root@rbd-client ~]# rbd mirror image status data/image2
image2:
  global_id:   596f41bc-874b-4cd4-aefe-4929578cc834
  state:       up+stopping_replay
  description: force promoted
  last_update: 2019-04-17 13:25:06
Additional Resources
- See the Block Storage and Volumes chapter in the Red Hat OpenStack Platform Storage Guide.
5.8.7. Prepare for fail back
If two storage clusters were originally configured only for one-way mirroring, in order to fail back, configure the primary storage cluster for mirroring in order to replicate the images in the opposite direction.
Prerequisites
- A running Red Hat Ceph Storage cluster.
- Root-level access to the node.
Procedure
On the client node of the
site-astorage cluster, install therbd-mirrorpackage:[root@rbd-client ~]# yum install rbd-mirrorNoteThe package is provided by the Red Hat Ceph Storage Tools repository.
On the client node of the
site-astorage cluster, specify the storage cluster name by adding theCLUSTERoption to the/etc/sysconfig/cephfile:CLUSTER=site-bCopy the
site-bCeph configuration file and keyring file from thesite-bCeph Monitor node to thesite-aCeph Monitor and client nodes:Syntax
scp /etc/ceph/ceph.conf USER@SITE_A_MON_NODE_NAME:/etc/ceph/site-b.conf scp /etc/ceph/site-b.client.site-b.keyring root@SITE_A_MON_NODE_NAME:/etc/ceph/ scp /etc/ceph/ceph.conf user@SITE_A_CLIENT_NODE_NAME:/etc/ceph/site-b.conf scp /etc/ceph/site-b.client.site-b.keyring user@SITE_A_CLIENT_NODE_NAME:/etc/ceph/NoteThe
scpcommands that transfer the Ceph configuration file from thesite-bCeph Monitor node to thesite-aCeph Monitor and client nodes renames the file tosite-a.conf. The keyring file name stays the same.Copy the
site-akeyring file from thesite-aCeph Monitor node to thesite-aclient node:Syntax
scp /etc/ceph/site-a.client.site-a.keyring <user>@SITE_A_CLIENT_HOST_NAME:/etc/ceph/Enable and start the
rbd-mirrordaemon on thesite-aclient node:Syntax
systemctl enable ceph-rbd-mirror.target
systemctl enable ceph-rbd-mirror@CLIENT_ID
systemctl start ceph-rbd-mirror@CLIENT_ID
Change
CLIENT_IDto the Ceph Storage cluster user that therbd-mirrordaemon will use. The user must have the appropriatecephxaccess to the storage cluster.Example
[root@rbd-client ~]# systemctl enable ceph-rbd-mirror.target
[root@rbd-client ~]# systemctl enable ceph-rbd-mirror@site-a
[root@rbd-client ~]# systemctl start ceph-rbd-mirror@site-a
From the client node on the
site-acluster, add thesite-bcluster as a peer:Example
[root@rbd-client ~]# rbd --cluster site-a mirror pool peer add data client.site-b@site-b -n client.site-aIf you are using multiple secondary storage clusters, only the secondary storage cluster chosen to fail over to, and fail back from, must be added.
From a monitor node in the
site-astorage cluster, verify thesite-bstorage cluster was successfully added as a peer:Syntax
rbd mirror pool info POOL_NAMEExample
[root@rbd-client ~]# rbd mirror pool info data
Mode: image
Site Name: site-a

Peer Sites:

UUID: 950ddadf-f995-47b7-9416-b9bb233f66e3
Name: site-b
Mirror UUID: 4696cd9d-1466-4f98-a97a-3748b6b722b3
Direction: rx-tx
Client: client.site-b
Additional Resources
- For detailed information, see the User Management chapter in the Red Hat Ceph Storage Administration Guide.
5.8.7.1. Fail back to the primary storage cluster
When the formerly primary storage cluster recovers, fail back to the primary storage cluster.
Prerequisites
- Minimum of two running Red Hat Ceph Storage clusters.
- Root-level access to the node.
- Pool mirroring or image mirroring configured with one-way mirroring.
Procedure
Check the status of the images from a monitor node in the
site-bcluster again. They should show a state ofup-stoppedand the description should saylocal image is primary:Example
[root@rbd-client ~]# rbd mirror image status data/image1
image1:
  global_id:   08027096-d267-47f8-b52e-59de1353a034
  state:       up+stopped
  description: local image is primary
  last_update: 2019-04-22 17:37:48
[root@rbd-client ~]# rbd mirror image status data/image2
image2:
  global_id:   08027096-d267-47f8-b52e-59de1353a034
  state:       up+stopped
  description: local image is primary
  last_update: 2019-04-22 17:38:18
From a Ceph Monitor node on the
site-astorage cluster determine if the images are still primary:Syntax
rbd info POOL_NAME/IMAGE_NAMEExample
[root@rbd-client ~]# rbd info data/image1
[root@rbd-client ~]# rbd info data/image2
In the output from the commands, look for
mirroring primary: trueormirroring primary: false, to determine the state.Demote any images that are listed as primary by running a command like the following from a Ceph Monitor node in the
site-astorage cluster:Syntax
rbd mirror image demote POOL_NAME/IMAGE_NAMEExample
[root@rbd-client ~]# rbd mirror image demote data/image1Resynchronize the images ONLY if there was a non-orderly shutdown. Run the following commands on a monitor node in the
site-astorage cluster to resynchronize the images fromsite-btosite-a:Syntax
rbd mirror image resync POOL_NAME/IMAGE_NAMEExample
[root@rbd-client ~]# rbd mirror image resync data/image1
Flagged image for resync from primary
[root@rbd-client ~]# rbd mirror image resync data/image2
Flagged image for resync from primary
After some time, ensure resynchronization of the images is complete by verifying they are in the
up+replayingstate. Check their state by running the following commands on a monitor node in thesite-astorage cluster:Syntax
rbd mirror image status POOL_NAME/IMAGE_NAMEExample
[root@rbd-client ~]# rbd mirror image status data/image1
[root@rbd-client ~]# rbd mirror image status data/image2
Demote the images on the
site-bstorage cluster by running the following commands on a Ceph Monitor node in thesite-bstorage cluster:Syntax
rbd mirror image demote POOL_NAME/IMAGE_NAMEExample
[root@rbd-client ~]# rbd mirror image demote data/image1 [root@rbd-client ~]# rbd mirror image demote data/image2NoteIf there are multiple secondary storage clusters, this only needs to be done from the secondary storage cluster where it was promoted.
Promote the formerly primary images located on the
site-astorage cluster by running the following commands on a Ceph Monitor node in thesite-astorage cluster:Syntax
rbd mirror image promote POOL_NAME/IMAGE_NAMEExample
[root@rbd-client ~]# rbd mirror image promote data/image1
[root@rbd-client ~]# rbd mirror image promote data/image2
Check the status of the images from a Ceph Monitor node in the
site-astorage cluster. They should show a status ofup+stoppedand the description should saylocal image is primary:Syntax
rbd mirror image status POOL_NAME/IMAGE_NAMEExample
[root@rbd-client ~]# rbd mirror image status data/image1
image1:
  global_id:   08027096-d267-47f8-b52e-59de1353a034
  state:       up+stopped
  description: local image is primary
  last_update: 2019-04-22 11:14:51
[root@rbd-client ~]# rbd mirror image status data/image2
image2:
  global_id:   596f41bc-874b-4cd4-aefe-4929578cc834
  state:       up+stopped
  description: local image is primary
  last_update: 2019-04-22 11:14:51
5.8.8. Remove two-way mirroring
After fail back is complete, you can remove two-way mirroring and disable the Ceph block device mirroring service.
Prerequisites
- A running Red Hat Ceph Storage cluster.
- Root-level access to the node.
Procedure
Remove the
site-bstorage cluster as a peer from thesite-astorage cluster:Example
[root@rbd-client ~]# rbd mirror pool peer remove data client.remote@remote --cluster local
[root@rbd-client ~]# rbd --cluster site-a mirror pool peer remove data client.site-b@site-b -n client.site-a
Stop and disable the
rbd-mirrordaemon on thesite-aclient:Syntax
systemctl stop ceph-rbd-mirror@CLIENT_ID
systemctl disable ceph-rbd-mirror@CLIENT_ID
systemctl disable ceph-rbd-mirror.target
Example
[root@rbd-client ~]# systemctl stop ceph-rbd-mirror@site-a
[root@rbd-client ~]# systemctl disable ceph-rbd-mirror@site-a
[root@rbd-client ~]# systemctl disable ceph-rbd-mirror.target