Chapter 7. The Ceph iSCSI Gateway (Limited Availability)
As a storage administrator, you can install and configure an iSCSI gateway for the Red Hat Ceph Storage cluster. With Ceph’s iSCSI gateway you can effectively run a fully integrated block-storage infrastructure with all features and benefits of a conventional Storage Area Network (SAN).
This technology is Limited Availability. See the Deprecated functionality chapter for additional information.
SCSI persistent reservations are not supported. Mapping multiple iSCSI initiators to an RBD image is supported, if using a cluster aware file system or clustering software that does not rely on SCSI persistent reservations. For example, VMware vSphere environments using ATS is supported, but using Microsoft’s clustering server (MSCS) is not supported.
7.1. Introduction to the Ceph iSCSI gateway
Traditionally, block-level access to a Ceph storage cluster has been limited to QEMU and librbd, which is a key enabler for adoption within OpenStack environments. Block-level access to the Ceph storage cluster can now take advantage of the iSCSI standard to provide data storage.
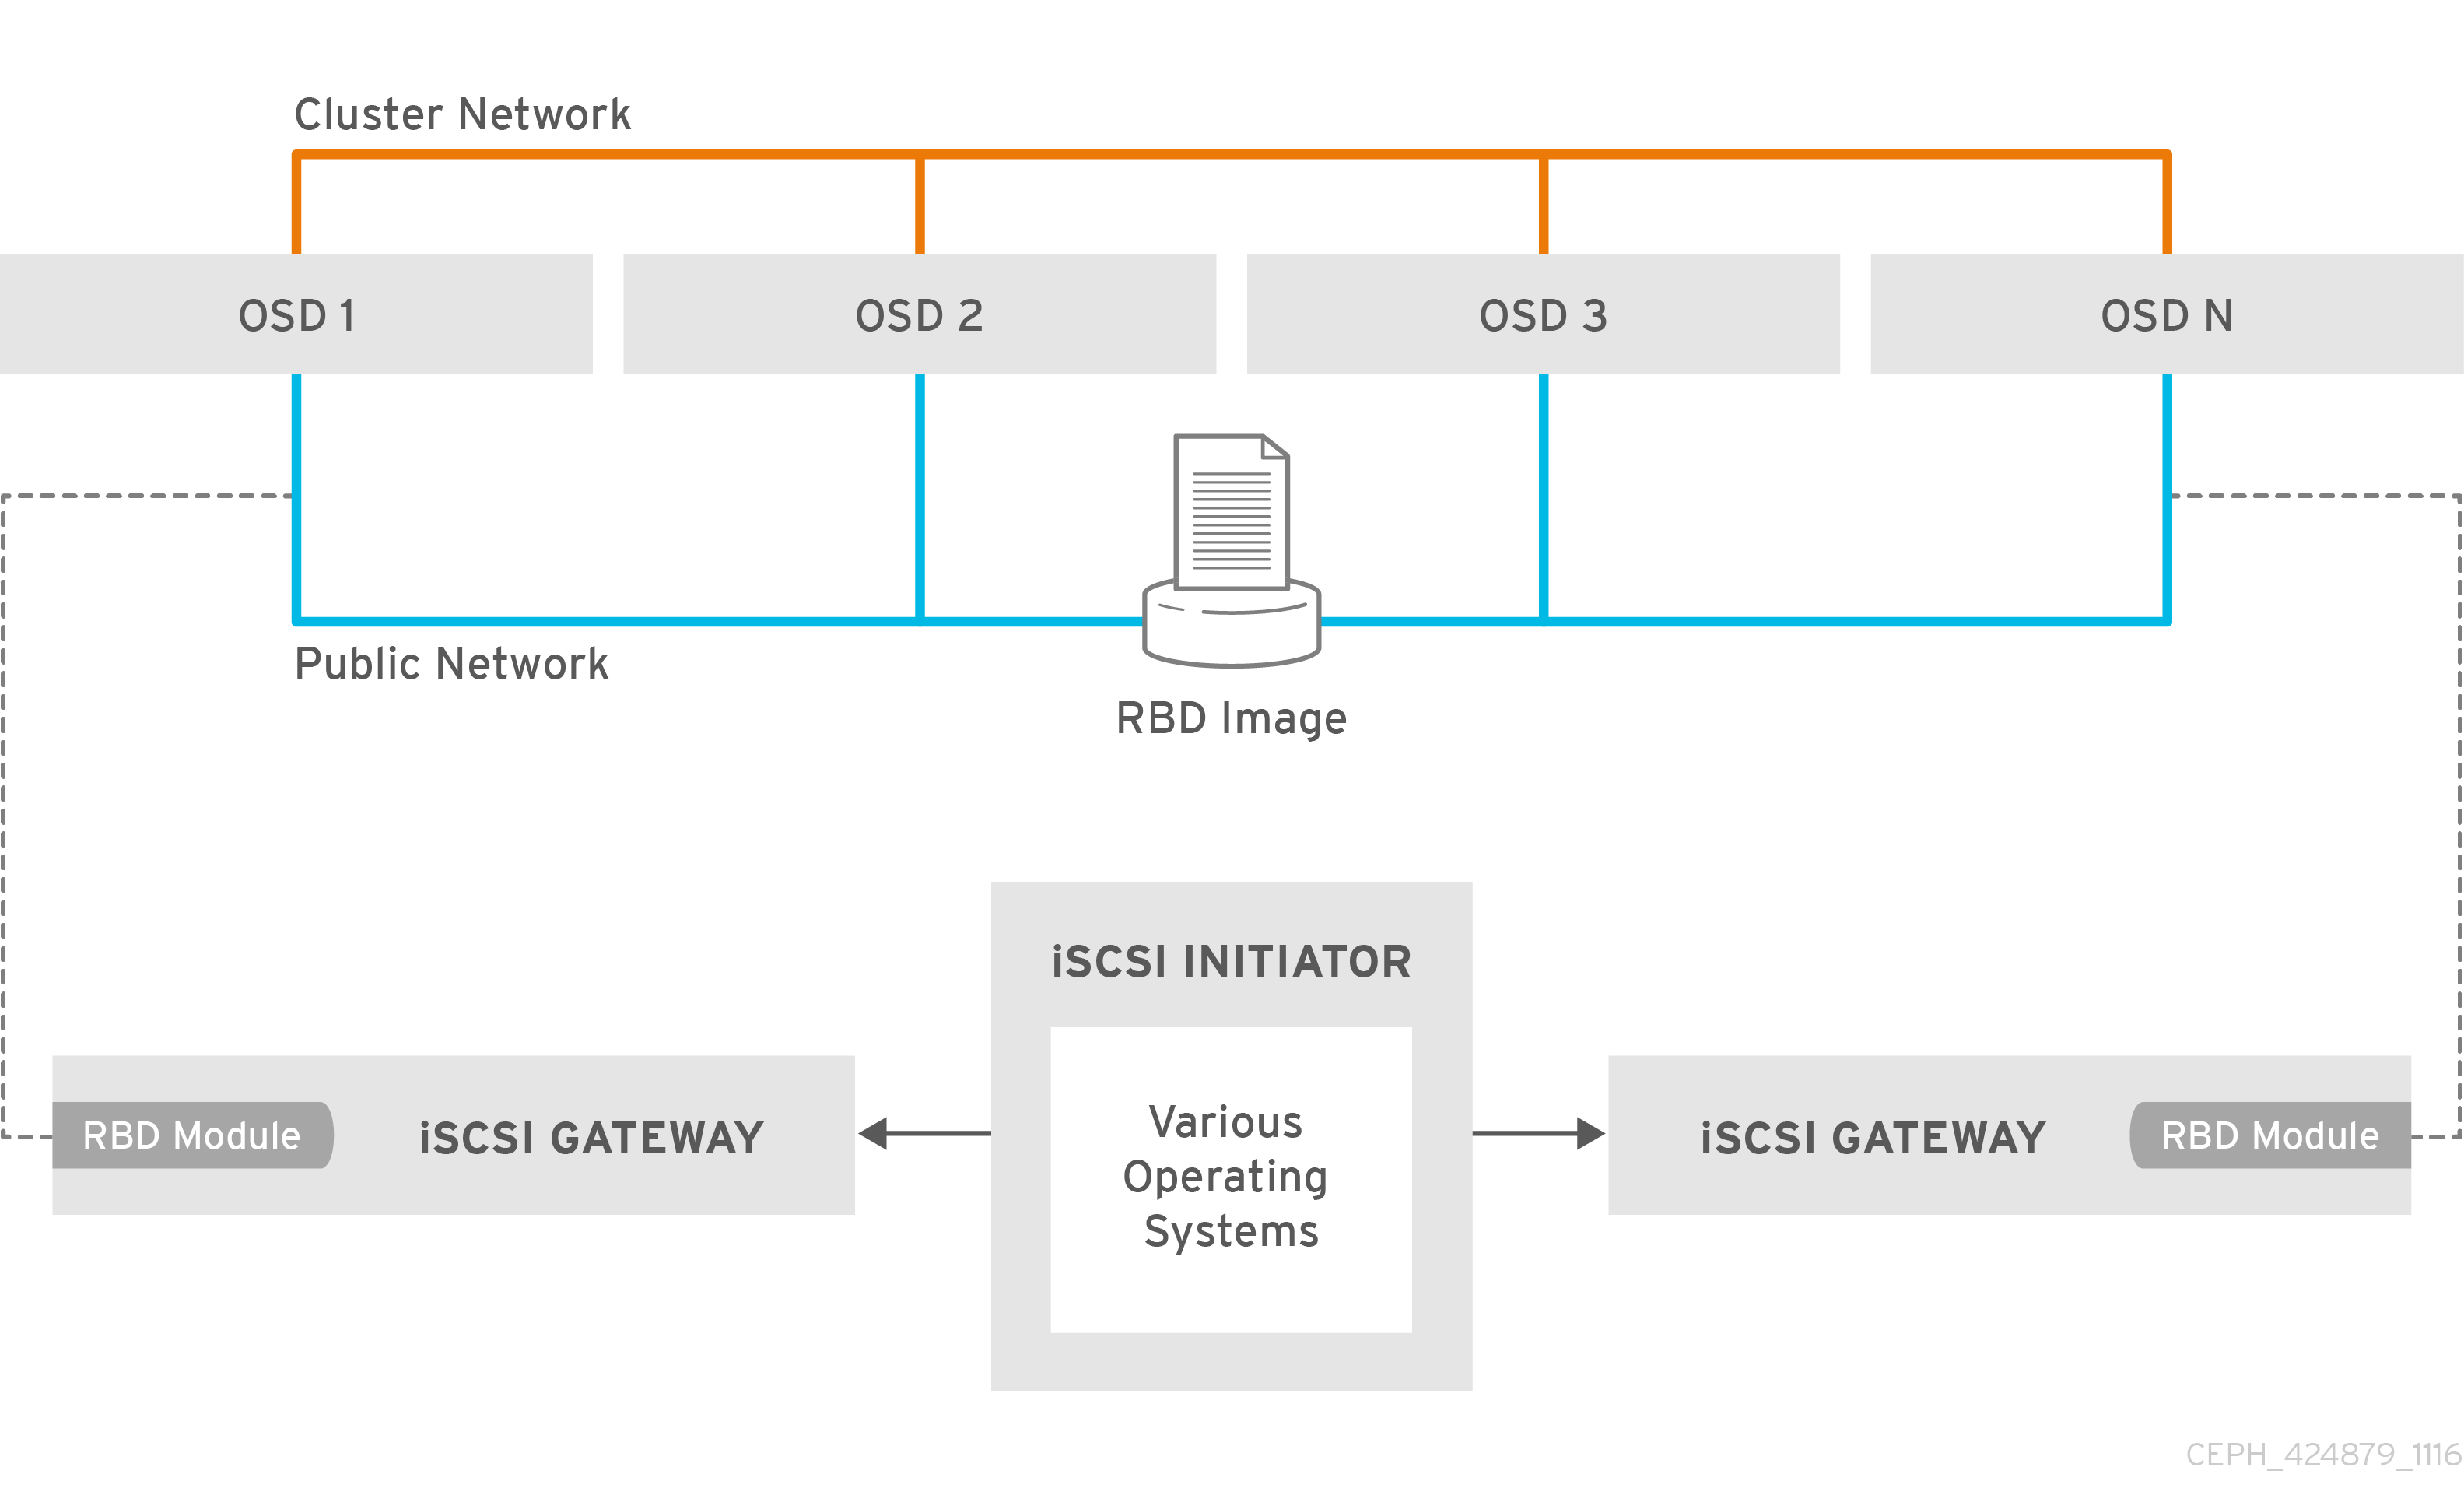
The iSCSI gateway integrates Red Hat Ceph Storage with the iSCSI standard to provide a highly available (HA) iSCSI target that exports RADOS Block Device (RBD) images as SCSI disks. The iSCSI protocol allows clients, known as initiators, to send SCSI commands to SCSI storage devices, known as targets, over a TCP/IP network. This allows for heterogeneous clients, such as Microsoft Windows, to access the Red Hat Ceph Storage cluster.
Figure 7.1. Ceph iSCSI Gateway HA Design
7.2. Requirements for the iSCSI target
The Red Hat Ceph Storage Highly Available (HA) iSCSI gateway solution has requirements for the number of gateway nodes, memory capacity, and timer settings to detect down OSDs.
Required Number of Nodes
Install a minimum of two iSCSI gateway nodes. To increase resiliency and I/O handling, install up to four iSCSI gateway nodes.
Memory Requirements
The memory footprint of the RBD images can grow to a large size. Each RBD image mapped on the iSCSI gateway nodes uses roughly 90 MB of memory. Ensure the iSCSI gateway nodes have enough memory to support each mapped RBD image.
Detecting Down OSDs
There are no specific iSCSI gateway options for the Ceph Monitors or OSDs, but it is important to lower the default timers for detecting down OSDs to reduce the possibility of initiator timeouts. Follow the instructions in Lowering timer settings for detecting down OSDs to reduce the possibility of initiator timeouts.
Additional Resources
- See the Red Hat Ceph Storage Hardware Selection Guide for more information.
7.3. Installing the iSCSI gateway
As a storage administrator, before you can utilize the benefits of the Ceph iSCSI gateway, you must install the required software packages. You can install the Ceph iSCSI gateway by using the Ansible deployment tool, or by using the command-line interface.
Each iSCSI gateway runs the Linux I/O target kernel subsystem (LIO) to provide iSCSI protocol support. LIO utilizes a user-space passthrough (TCMU) to interact with the Ceph librbd library to expose RBD images to iSCSI clients. With the Ceph iSCSI gateway you can effectively run a fully integrated block-storage infrastructure with all features and benefits of a conventional Storage Area Network (SAN).
7.3.1. Prerequisites
- Red Hat Enterprise Linux 8 or 7.7 or higher.
- A running Red Hat Ceph Storage 4 or higher cluster.
7.3.2. Installing the Ceph iSCSI gateway using Ansible
Use the Ansible utility to install packages and set up the daemons for the Ceph iSCSI gateway.
Prerequisites
-
The Ansible administration node with the
ceph-ansiblepackage installed.
Procedure
- On the iSCSI gateway nodes, enable the Red Hat Ceph Storage 4 Tools repository. For details, see the Enabling the Red Hat Ceph Storage Repositories section in the Red Hat Ceph Storage Installation Guide.
On the Ansible administration node, add an entry in
/etc/ansible/hostsfile for the gateway group. If you colocate the iSCSI gateway with an OSD node, add the OSD node to the[iscsigws]section.[iscsigws] ceph-igw-1 ceph-igw-2-
Ansible places a file in the
/usr/share/ceph-ansible/group_vars/directory callediscsigws.yml.sample. Create a copy of theiscsigws.yml.samplefile named itiscsigws.yml. -
Open the
iscsigws.ymlfile for editing. Uncomment the
trusted_ip_listoption and update the values accordingly, using IPv4 or IPv6 addresses.Example
Adding two gateways with the IPv4 addresses of 10.172.19.21 and 10.172.19.22, configure
trusted_ip_listlike this:trusted_ip_list: 10.172.19.21,10.172.19.22Optionally, review the Ansible variables and descriptions in the iSCSI Gateway Variables section and update
iscsigws.ymlas needed.WarningGateway configuration changes are only supported from one gateway at a time. Attempting to run changes concurrently through multiple gateways might lead to configuration instability and inconsistency.
WarningAnsible installs the
ceph-iscsipackage, creates, and updates the/etc/ceph/iscsi-gateway.cfgfile based on settings in thegroup_vars/iscsigws.ymlfile when theansible-playbookcommand is used. If you have previously installed theceph-iscsipackage using the command-line interface described in Installing the iSCSI gateway using the command-line interface, copy the existing settings from theiscsi-gateway.cfgfile to thegroup_vars/iscsigws.ymlfile.On the Ansible administration node, execute the Ansible playbook.
Bare-metal deployments:
[admin@ansible ~]$ cd /usr/share/ceph-ansible
[admin@ansible ceph-ansible]$ ansible-playbook site.yml -i hosts
Container deployments:
[admin@ansible ~]$ cd /usr/share/ceph-ansible [admin@ansible ceph-ansible]$ ansible-playbook site-container.yml -i hostsWarningOn stand-alone iSCSI gateway nodes, verify that the correct Red Hat Ceph Storage 4 software repositories are enabled. If they are unavailable, Ansible might install incorrect packages.
To create targets, LUNs, and clients, use the
gwcliutility or the Red Hat Ceph Storage Dashboard.ImportantDo not use the
targetcliutility to change the configuration, this will result in the following issues: ALUA misconfiguration and path failover problems. There is the potential to corrupt data, to have mismatched configuration across iSCSI gateways, and to have mismatched WWN information, which will lead to client pathing problems.
Additional Resources
-
See the Sample
iscsigws.ymlfile to view the full sample file. - Configuring the iSCSI target using the command-line interface
- Creating iSCSI targets
7.3.3. Installing the Ceph iSCSI gateway using the command-line interface
The Ceph iSCSI gateway is the iSCSI target node and also a Ceph client node. The Ceph iSCSI gateway can be a standalone node or be colocated on a Ceph Object Store Disk (OSD) node. Complete the following steps to install the Ceph iSCSI gateway.
Prerequisites
- Red Hat Enterprise Linux 8 or 7.7 and later
- A Red Hat Ceph Storage 4 cluster or later
On all Ceph Monitor nodes in the storage cluster, restart the
ceph-monservice, as therootuser:Syntax
systemctl restart ceph-mon@MONITOR_HOST_NAMEExample
[root@mon ~]# systemctl restart ceph-mon@monitor1-
If the Ceph iSCSI gateway is not colocated on an OSD node, copy the Ceph configuration files, located in the
/etc/ceph/directory, from a running Ceph node in the storage cluster to the all iSCSI Gateway nodes. The Ceph configuration files must exist on the iSCSI gateway nodes under/etc/ceph/. - On all Ceph iSCSI gateway nodes, enable the Ceph Tools repository. For details see the Enabling the Red Hat Ceph Storage Repositories section in the Installation Guide.
- On all Ceph iSCSI gateway nodes, install and configure the Ceph command-line interface. For details, see the Installing the Ceph Command Line Interface chapter in the Red Hat Ceph Storage 4 Installation Guide.
- If needed, open TCP ports 3260 and 5000 on the firewall on all Ceph iSCSI nodes.
- Create a new or use an existing RADOS Block Device (RBD).
Procedure
On all Ceph iSCSI gateway nodes, install the
ceph-iscsiandtcmu-runnerpackages:[root@iscsigw ~]# yum install ceph-iscsi tcmu-runnerImportantIf previous versions of these packages exist, remove them before installing the newer versions. You must install these newer versions from a Red Hat Ceph Storage repository.
Optionally, on all Ceph iSCSI gateway nodes, install and configure the OpenSSL utility, if needed.
Install the
opensslpackage:[root@iscsigw ~]# yum install opensslOn the primary iSCSI gateway node, create a directory to hold the SSL keys:
[root@iscsigw ~]# mkdir ~/ssl-keys
[root@iscsigw ~]# cd ~/ssl-keys
On the primary iSCSI gateway node, create the certificate and key files. Enter the environmental information when prompted.
[root@iscsigw ~]# openssl req -newkey rsa:2048 -nodes -keyout iscsi-gateway.key -x509 -days 365 -out iscsi-gateway.crtOn the primary iSCSI gateway node, create a PEM file:
[root@iscsigw ~]# cat iscsi-gateway.crt iscsi-gateway.key > iscsi-gateway.pemOn the primary iSCSI gateway node, create a public key:
[root@iscsigw ~]# openssl x509 -inform pem -in iscsi-gateway.pem -pubkey -noout > iscsi-gateway-pub.key-
From the primary iSCSI gateway node, copy the
iscsi-gateway.crt,iscsi-gateway.pem,iscsi-gateway-pub.key, andiscsi-gateway.keyfiles to the/etc/ceph/directory on the other iSCSI gateway nodes.
Create a configuration file on a Ceph iSCSI gateway node, and then copy it to all iSCSI gateway nodes.
Create a file named
iscsi-gateway.cfgin the/etc/ceph/directory:[root@iscsigw ~]# touch /etc/ceph/iscsi-gateway.cfgEdit the
iscsi-gateway.cfgfile and add the following lines:Syntax
[config]
cluster_name = CLUSTER_NAME
gateway_keyring = CLIENT_KEYRING
api_secure = false
trusted_ip_list = IP_ADDR,IP_ADDR
Example
[config] cluster_name = ceph gateway_keyring = ceph.client.admin.keyring api_secure = false trusted_ip_list = 192.168.0.10,192.168.0.11-
Copy the
iscsi-gateway.cfgfile to all iSCSI gateway nodes. Note that the file must be identical on all iSCSI gateway nodes.
On all Ceph iSCSI gateway nodes, enable and start the API services:
[root@iscsigw ~]# systemctl enable rbd-target-api [root@iscsigw ~]# systemctl start rbd-target-api [root@iscsigw ~]# systemctl enable rbd-target-gw [root@iscsigw ~]# systemctl start rbd-target-gw- Next, configure targets, LUNs, and clients. See the Configuring the iSCSI target using the command-line interface section for details.
Additional Resources
- See the iSCSI Gateway variables section for more details on the options.
- Creating iSCSI targets
7.3.4. Additional Resources
- See Appendix B, iSCSI Gateway Variables for more information on Ceph iSCSI gateway Anisble variables.
7.4. Configuring the iSCSI target
As a storage administrator, you can configure targets, LUNs, and clients, using the gwcli command-line utility. You can also optimize performance of the iSCSI target, use the gwcli reconfigure subcommand.
Red Hat does not support managing Ceph block device images exported by the Ceph iSCSI gateway tools, such as gwcli and ceph-ansible. Also, using the rbd command to rename or remove RBD images exported by the Ceph iSCSI gateway, can result in an unstable storage cluster.
Before removing RBD images from the iSCSI gateway configuration, follow the standard procedures for removing a storage device from the operating system. For details, see the Removing a storage device chapter in the Storage Administration Guide for Red Hat Enterprise Linux 7 or the System Design Guide for Red Hat Enterprise Linux 8.
7.4.1. Prerequisites
- Installation of the Ceph iSCSI gateway software.
7.4.2. Configuring the iSCSI target using the command-line interface
The Ceph iSCSI gateway is the iSCSI target node and also a Ceph client node. Configure the Ceph iSCSI gateway either on a standalone node, or colocate it with a Ceph Object Storage Device (OSD) node.
Do not adjust other options using the gwcli reconfigure subcommand unless specified in this document or Red Hat Support has instructed you to do so.
Prerequisites
- Installation of the Ceph iSCSI gateway software.
Procedure
Start the iSCSI gateway command-line interface:
[root@iscsigw ~]# gwcliCreate the iSCSI gateways using either IPv4 or IPv6 addresses:
Syntax
>/iscsi-targets create iqn.2003-01.com.redhat.iscsi-gw:_target_name_
> goto gateways
> create ISCSI_GW_NAME IP_ADDR_OF_GW
> create ISCSI_GW_NAME IP_ADDR_OF_GW
Example
>/iscsi-targets create iqn.2003-01.com.redhat.iscsi-gw:ceph-igw > goto gateways > create ceph-gw-1 10.172.19.21 > create ceph-gw-2 10.172.19.22NoteYou cannot use a mix of IPv4 and IPv6 addresses.
Add a Ceph block device:
Syntax
> cd /disks
>/disks/ create POOL_NAME image=IMAGE_NAME size=IMAGE_SIZE_m|g|t
Example
> cd /disks >/disks/ create rbd image=disk_1 size=50gNoteDo not use any periods (
.) in the pool or image name.Create a client:
Syntax
> goto hosts
> create iqn.1994-05.com.redhat:_client_name_
> auth use username=USER_NAME password=PASSWORD
Example
> goto hosts > create iqn.1994-05.com.redhat:rh7-client > auth username=iscsiuser1 password=temp12345678ImportantRed Hat does not support mixing clients, some with Challenge Handshake Authentication Protocol (CHAP) enabled and some CHAP disabled. All clients must have either CHAP enabled or have CHAP disabled. The default behavior is to only authenticate an initiator by its initiator name.
If initiators are failing to log into the target, the CHAP authentication might not be configured correctly for some initiators, for example:
o- hosts ................................ [Hosts: 2: Auth: MISCONFIG]Use the following command at the
hostslevel to reset all the CHAP authentication:/> goto hosts /iscsi-target...csi-igw/hosts> auth nochap ok ok /iscsi-target...csi-igw/hosts> ls o- hosts ................................ [Hosts: 2: Auth: None] o- iqn.2005-03.com.ceph:esx ........... [Auth: None, Disks: 4(310G)] o- iqn.1994-05.com.redhat:rh7-client .. [Auth: None, Disks: 0(0.00Y)]Add disks to a client:
Syntax
>/iscsi-target..eph-igw/hosts
> cd iqn.1994-05.com.redhat:_CLIENT_NAME_
> disk add POOL_NAME/IMAGE_NAME
Example
>/iscsi-target..eph-igw/hosts
> cd iqn.1994-05.com.redhat:rh7-client
> disk add rbd/disk_1
To confirm that the API is using SSL correctly, search the
rbd-target-apilog file, located at/var/log/rbd-target-api.logor/var/log/rbd-target/rbd-target-api.log, forhttps, for example:Aug 01 17:27:42 test-node.example.com python[1879]: * Running on https://0.0.0.0:5000/Verifying that the Ceph ISCSI gateways are working:
/> goto gateways
/iscsi-target...-igw/gateways> ls
o- gateways ............................ [Up: 2/2, Portals: 2]
  o- ceph-gw-1  ........................ [ 10.172.19.21 (UP)]
  o- ceph-gw-2  ........................ [ 10.172.19.22 (UP)]
If the status is
UNKNOWN, check for network issues and any misconfigurations. If using a firewall, verify that the appropriate TCP port is open. Verify that the iSCSI gateway is listed in thetrusted_ip_listoption. Verify that therbd-target-apiservice is running on the iSCSI gateway node.Optionally, reconfigure the
max_data_area_mboption:Syntax
>/disks/ reconfigure POOL_NAME/IMAGE_NAME max_data_area_mb NEW_BUFFER_SIZEExample
>/disks/ reconfigure rbd/disk_1 max_data_area_mb 64NoteThe
max_data_area_mboption controls the amount of memory in megabytes that each image can use to pass SCSI command data between the iSCSI target and the Ceph cluster. If this value is too small, it can result in excessive queue full retries which will affect performance. If the value is too large, it can result in one disk using too much of the system memory, which can cause allocation failures for other subsystems. The default value for themax_data_area_mboption is8.- Configure an iSCSI initiator.
Additional Resources
- See Installing the iSCSI gateway for details.
- See Configuring the iSCSI initiator section for more information.
7.4.3. Optimize the performance of the iSCSI Target
There are many settings that control how the iSCSI Target transfers data over the network. These settings can be used to optimize the performance of the iSCSI gateway.
Only change these settings if instructed to by Red Hat Support or as specified in this document.
The gwcli reconfigure subcommand controls the settings that are used to optimize the performance of the iSCSI gateway.
Settings that affect the performance of the iSCSI target
-
max_data_area_mb -
cmdsn_depth -
immediate_data -
initial_r2t -
max_outstanding_r2t -
first_burst_length -
max_burst_length -
max_recv_data_segment_length -
max_xmit_data_segment_length
Additional Resources
-
Information about
max_data_area_mb, including an example showing how to adjust it usinggwcli reconfigure, is in the section Configuring the iSCSI Target using the Command Line Interface.
7.4.4. Lowering timer settings for detecting down OSDs
Sometimes it is necessary to lower the timer settings for detecting down OSDs. For example, when using Red Hat Ceph Storage as an iSCSI gateway, you can reduce the possibility of initiator timeouts by lowering the timer settings for detecting down OSDs.
Prerequisites
- A running Red Hat Ceph Storage cluster.
- Access to the Ansible administration node.
Procedure
Configure Ansible to use the new timer settings.
On the Ansible administration node, add a
ceph_conf_overridessection in thegroup_vars/all.ymlfile that looks like this, or edit any existingceph_conf_overridessection as follows:ceph_conf_overrides: osd: osd_client_watch_timeout: 15 osd_heartbeat_grace: 20 osd_heartbeat_interval: 5The above settings will be added to the
ceph.confconfiguration files on the OSD nodes when the Ansible playbook runs.Change to the
ceph-ansibledirectory:[admin@ansible ~]$ cd /usr/share/ceph-ansibleUse Ansible to update the
ceph.conffile and restart the OSD daemons on all the OSD nodes. On the Ansible admin node, run the following command:Bare-metal Deployments
[admin@ansible ceph-ansible]$ ansible-playbook site.yml --limit osdsContainer Deployments
[admin@ansible ceph-ansible]$ ansible-playbook site-container.yml --limit osds -i hosts
Verify the timer settings are the same as set in
ceph_conf_overrides:Syntax
ceph daemon osd.OSD_ID config get osd_client_watch_timeout
ceph daemon osd.OSD_ID config get osd_heartbeat_grace
ceph daemon osd.OSD_ID config get osd_heartbeat_interval
Example
[root@osd ~]# ceph daemon osd.0 config get osd_client_watch_timeout
{
    "osd_client_watch_timeout": "15"
}

[root@osd ~]#  ceph daemon osd.0 config get osd_heartbeat_grace
{
    "osd_heartbeat_grace": "20"
}

[root@osd ~]# ceph daemon osd.0 config get osd_heartbeat_interval
{
    "osd_heartbeat_interval": "5"
}
Optional: If you cannot restart the OSD daemons immediately, you can do online updates from Ceph Monitor nodes, or update all Ceph OSD nodes directly. Once you are able to restart the OSD daemons, use Ansible as described above to add the new timer settings into
ceph.confso that the settings persist across reboots.To do an online update of OSD timer settings from a Ceph Monitor node:
Syntax
ceph tell osd.OSD_ID injectargs '--osd_client_watch_timeout 15'
ceph tell osd.OSD_ID injectargs '--osd_heartbeat_grace 20'
ceph tell osd.OSD_ID injectargs '--osd_heartbeat_interval 5'
Example
[root@mon ~]# ceph tell osd.0 injectargs '--osd_client_watch_timeout 15'
[root@mon ~]# ceph tell osd.0 injectargs '--osd_heartbeat_grace 20'
[root@mon ~]# ceph tell osd.0 injectargs '--osd_heartbeat_interval 5'
To do an online update of OSD timer settings from an Ceph OSD node:
Syntax
ceph daemon osd.OSD_ID config set osd_client_watch_timeout 15
ceph daemon osd.OSD_ID config set osd_heartbeat_grace 20
ceph daemon osd.OSD_ID config set osd_heartbeat_interval 5
Example
[root@osd ~]# ceph daemon osd.0 config set osd_client_watch_timeout 15
[root@osd ~]# ceph daemon osd.0 config set osd_heartbeat_grace 20
[root@osd ~]# ceph daemon osd.0 config set osd_heartbeat_interval 5
Additional Resources
- For more information about using Red Hat Ceph Storage as an iSCSI gateway, see The Ceph iSCSI gateway in the Red Hat Ceph Storage Block Device Guide.
7.4.5. Configuring iSCSI host groups using the command-line interface
The Ceph iSCSI gateway can configure host groups for managing multiple servers that share the same disk configuration. iSCSI host groups creates a logical grouping of hosts and the disks that each host in the group has access to.
The sharing of disk devices to multiple hosts must use a cluster-aware file system.
Prerequisites
- Installation of the Ceph iSCSI gateway software.
- Root-level access to the Ceph iSCSI gateway node.
Procedure
Start the iSCSI gateway command-line interface:
[root@iscsigw ~]# gwcliCreate a new host group:
Syntax
cd iscsi-targets/
cd IQN/host-groups
create group_name=GROUP_NAME
Example
/> cd iscsi-targets/
/iscsi-targets> cd iqn.2003-01.com.redhat.iscsi-gw:ceph-igw/host-groups/
/iscsi-target.../host-groups> create group_name=igw_grp01
Add a host to the host group:
Syntax
cd GROUP_NAME
host add client_iqn=CLIENT_IQN
Example
> cd igw_grp01
/iscsi-target.../host-groups/igw_grp01> host add client_iqn=iqn.1994-05.com.redhat:rh8-client
Repeat this step to add additional hosts to the group.
Add a disk to the host group:
Syntax
cd /disks/
/disks> create pool=POOL image=IMAGE_NAME size=SIZE
cd /IQN/host-groups/GROUP_NAME
disk add POOL/IMAGE_NAME
Example
> cd /disks/
/disks> create pool=rbd image=rbdimage size=1G
/> cd iscsi-targets/iqn.2003-01.com.redhat.iscsi-gw:ceph-igw/host-groups/igw_grp01/
/iscsi-target...s/igw_grp01> disk add rbd/rbdimage
Repeat this step to add additional disks to the group.
7.4.6. Additional Resources
- For details on configuring iSCSI targets using the Red Hat Ceph Storage Dashboard, see the Creating iSCSI targets section in the Red Hat Ceph Storage Dashboard Guide.
7.5. Configuring the iSCSI initiator
You can configure the iSCSI initiator to connect to the Ceph iSCSI gateway on the following platforms.
7.5.1. Configuring the iSCSI initiator for Red Hat Enterprise Linux
Prerequisites
- Red Hat Enterprise Linux 7.7 or higher.
-
Package
iscsi-initiator-utils-6.2.0.873-35or newer must be installed. -
Package
device-mapper-multipath-0.4.9-99or newer must be installed.
Procedure
Install the iSCSI initiator and multipath tools:
[root@rhel ~]# yum install iscsi-initiator-utils [root@rhel ~]# yum install device-mapper-multipath-
Set the initiator name by editing the
/etc/iscsi/initiatorname.iscsifile. Note that the initiator name must match the initiator name that was used during the initial setup using thegwclicommand. Configure multipath I/O.
Create the default
/etc/multipath.conffile and enable themultipathdservice:[root@rhel ~]# mpathconf --enable --with_multipathd yUpdate the
/etc/multipath.conffile as follows:devices { device { vendor "LIO-ORG" product "TCMU device" hardware_handler "1 alua" path_grouping_policy "failover" path_selector "queue-length 0" failback 60 path_checker tur prio alua prio_args exclusive_pref_bit fast_io_fail_tmo 25 no_path_retry queue } }Restart the
multipathdservice:[root@rhel ~]# systemctl reload multipathd
Set up CHAP and iSCSI discovery and login.
Provide a CHAP user name and password by updating the
/etc/iscsi/iscsid.conffile accordingly, for example:node.session.auth.authmethod = CHAP node.session.auth.username = user node.session.auth.password = passwordDiscover the target portals:
Syntax
iscsiadm -m discovery -t st -p IP_ADDRLog in to target:
Syntax
iscsiadm -m node -T TARGET -l
View the multipath I/O configuration. The
multipathddaemon sets up devices automatically based on the settings in themultipath.conffile.Use the
multipathcommand to show devices setup in a failover configuration with a priority group for each path, for example:Example
[root@rhel ~]# multipath -ll
mpathbt (360014059ca317516a69465c883a29603) dm-1 LIO-ORG,TCMU device
size=1.0G features='0' hwhandler='1 alua' wp=rw
|-+- policy='queue-length 0' prio=50 status=active
| `- 28:0:0:1 sde  8:64  active ready running
`-+- policy='queue-length 0' prio=10 status=enabled
  `- 29:0:0:1 sdc  8:32  active ready running
The
multipath -lloutputpriovalue indicates the ALUA state, whereprio=50indicates it is the path to the owning iSCSI gateway in the ALUA Active-Optimized state andprio=10indicates it is an Active-non-Optimized path. Thestatusfield indicates which path is being used, whereactiveindicates the currently used path, andenabledindicates the failover path, if theactivefails.To match the device name, for example,
sdein themultipath -lloutput, to the iSCSI gateway:Example
[root@rhel ~]# iscsiadm -m session -P 3The
Persistent Portalvalue is the IP address assigned to the iSCSI gateway listed in thegwcliutility.
7.5.2. Configuring the iSCSI initiator for Red Hat Virtualization
Prerequisites
- Red Hat Virtualization 4.1
- Configured MPIO devices on all Red Hat Virtualization nodes
-
The
iscsi-initiator-utils-6.2.0.873-35package or newer -
The
device-mapper-multipath-0.4.9-99package or newer
Procedure
Configure multipath I/O.
Update the
/etc/multipath/conf.d/DEVICE_NAME.conffile as follows:devices { device { vendor "LIO-ORG" product "TCMU device" hardware_handler "1 alua" path_grouping_policy "failover" path_selector "queue-length 0" failback 60 path_checker tur prio alua prio_args exclusive_pref_bit fast_io_fail_tmo 25 no_path_retry queue } }Restart the
multipathdservice:[root@rhv ~]# systemctl reload multipathd
- Click the Storage resource tab to list the existing storage domains.
- Click the New Domain button to open the New Domain window.
- Enter the Name of the new storage domain.
- Use the Data Center drop-down menu to select an data center.
- Use the drop-down menus to select the Domain Function and the Storage Type. The storage domain types that are not compatible with the chosen domain function are not available.
- Select an active host in the Use Host field. If this is not the first data domain in a data center, you must select the data center’s SPM host.
The New Domain window automatically displays known targets with unused LUNs when iSCSI is selected as the storage type. If the target that you are adding storage from is not listed then you can use target discovery to find it, otherwise proceed to the next step.
- Click Discover Targets to enable target discovery options. When targets have been discovered and logged in to, the New Domain window automatically displays targets with LUNs unused by the environment. Note that LUNs external to the environment are also displayed. You can use the Discover Targets options to add LUNs on many targets, or multiple paths to the same LUNs.
- Enter the fully qualified domain name or IP address of the iSCSI host in the Address field.
-
Enter the port to connect to the host on when browsing for targets in the Port field. The default is
3260. - If the Challenge Handshake Authentication Protocol (CHAP) is being used to secure the storage, select the User Authentication check box. Enter the CHAP user name and CHAP password.
- Click the Discover button.
Select the target to use from the discovery results and click the Login button. Alternatively, click the Login All to log in to all of the discovered targets.
ImportantIf more than one path access is required, ensure to discover and log in to the target through all the required paths. Modifying a storage domain to add additional paths is currently not supported.
- Click the + button next to the desired target. This will expand the entry and display all unused LUNs attached to the target.
- Select the check box for each LUN that you are using to create the storage domain.
Optionally, you can configure the advanced parameters.
- Click Advanced Parameters.
- Enter a percentage value into the Warning Low Space Indicator field. If the free space available on the storage domain is below this percentage, warning messages are displayed to the user and logged.
- Enter a GB value into the Critical Space Action Blocker field. If the free space available on the storage domain is below this value, error messages are displayed to the user and logged, and any new action that consumes space, even temporarily, will be blocked.
-
Select the Wipe After Delete check box to enable the
wipe after deleteoption. You can edit this option after creating the domain, but doing so does not change thewipe after deleteproperty of disks that already exist. - Select the Discard After Delete check box to enable the discard after delete option. You can edit this option after creating the domain. This option is only available to block storage domains.
- Click OK to create the storage domain and close the window.
7.5.3. Configuring the iSCSI initiator for Microsoft Windows
Prerequisites
- Microsoft Windows Server 2016
Procedure
Install the iSCSI initiator and configure discovery and setup.
- Install the iSCSI initiator driver and MPIO tools.
- Launch the MPIO program, click the Discover Multi-Paths tab, check the Add support for iSCSI devices box, and click Add.
- Reboot the MPIO program.
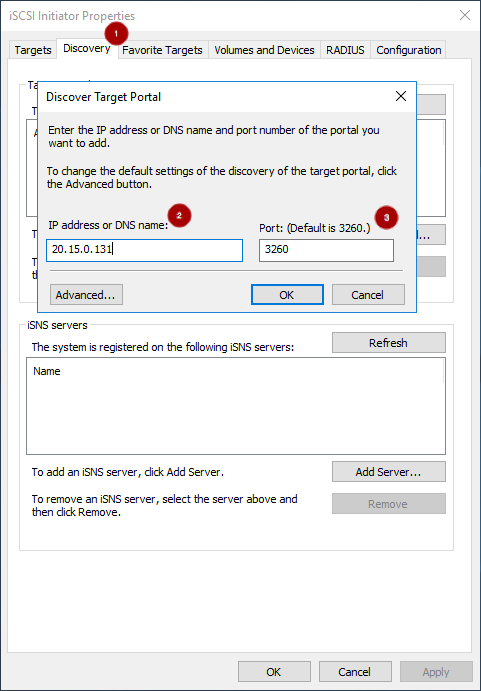
On the iSCSI Initiator Properties window, on the Discovery tab
 , add a target portal. Enter the IP address or DNS name
 and Port
 of the Ceph iSCSI gateway:
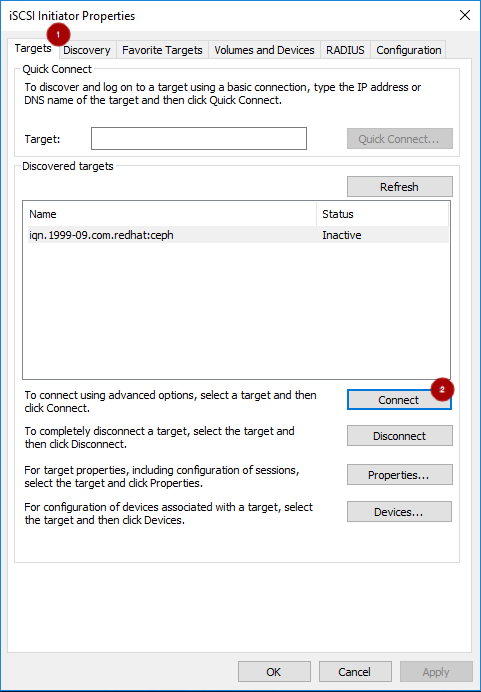
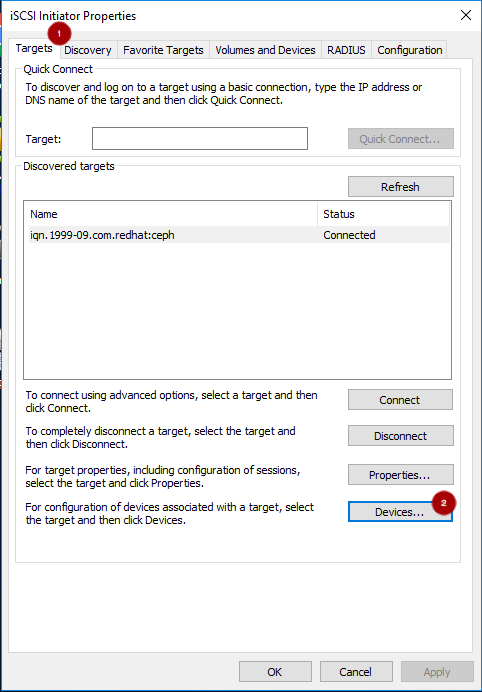
On the Targets tab
, select the target and click Connect
:
On the Connect To Target window, select the Enable multi-path option
, and click the Advanced button
:

Under the Connect using section, select a Target portal IP
. Select Enable CHAP login on
and enter the Name and Target secret values
from the Ceph iSCSI client credentials section, and click OK  :
:
 Important
Windows Server 2016 does not accept a CHAP secret less than 12 bytes.
- Repeat the previous two steps for each target portal defined when setting up the iSCSI gateway.
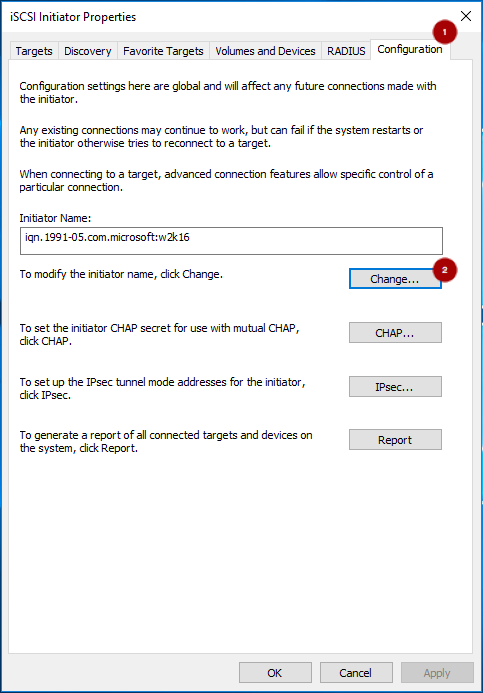
If the initiator name is different than the initiator name used during the initial setup, rename the initiator name. From iSCSI Initiator Properties window, on the Configuration tab
, click the Change button
to rename the initiator name.
Set up
multipathI/O. In PowerShell, use thePDORemovePeriodcommand to set the MPIO load balancing policy and thempclaimcommand to set the load balancing policy. The iSCSI Initiator Tool configures the remaining options.NoteRed Hat recommends increasing the
PDORemovePeriodoption to 120 seconds from PowerShell. You might need to adjust this value based on the application. When all paths are down, and 120 seconds expires, the operating system starts failing I/O requests.Set-MPIOSetting -NewPDORemovePeriod 120Set the failover policy
mpclaim.exe -l -m 1Verify the failover policy
mpclaim -s -m
MSDSM-wide Load Balance Policy: Fail Over Only
Using the iSCSI Initiator tool, from the Targets tab
click on the Devices… button
:
From the Devices window, select a disk
and click the MPIO… button
:

The Device Details window displays the paths to each target portal. The Load Balancing Policy Fail Over Only must be selected.

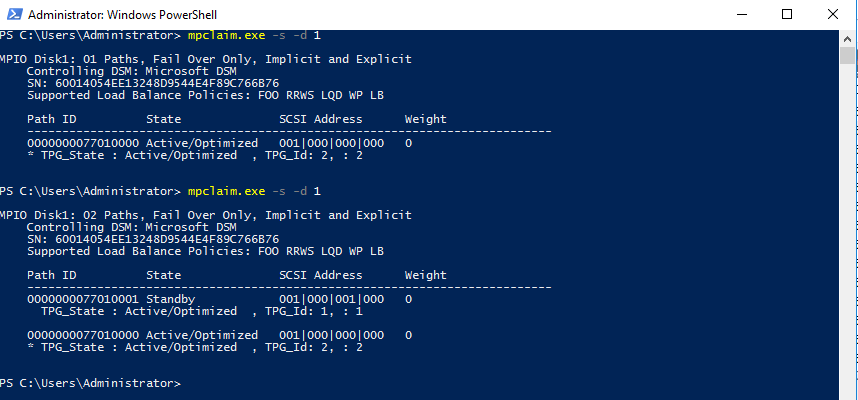
View the
multipathconfiguration from the PowerShell:mpclaim -s -d MPIO_DISK_IDReplace MPIO_DISK_ID with the appropriate disk identifier.
NoteThere is one Active/Optimized path which is the path to the iSCSI gateway node that owns the LUN, and there is an Active/Unoptimized path for each other iSCSI gateway node.
Optionally, tune the settings. Consider using the following registry settings:
Windows Disk Timeout
Key
HKEY_LOCAL_MACHINE\System\CurrentControlSet\Services\DiskValue
TimeOutValue = 65Microsoft iSCSI Initiator Driver
Key
HKEY_LOCAL_MACHINE\\SYSTEM\CurrentControlSet\Control\Class\{4D36E97B-E325-11CE-BFC1-08002BE10318}\<Instance_Number>\ParametersValues
LinkDownTime = 25
SRBTimeoutDelta = 15
7.5.4. Configuring the iSCSI initiator for VMware ESXi
Prerequisites
- See the iSCSI Gateway (IGW) section in the Customer Portal Knowledgebase article for supported VMware ESXi versions.
- Access to the VMware Host Client.
-
Root access to VMware ESXi host to execute the
esxclicommand.
Procedure
Disable
HardwareAcceleratedMove(XCOPY):> esxcli system settings advanced set --int-value 0 --option /DataMover/HardwareAcceleratedMoveEnable the iSCSI software. From the Navigator pane, click Storage
. Select the Adapters tab
. Click on Configure iSCSI
:

Verify the initiator name in the Name & alias section
.

If the initiator name is different than the initiator name used when creating the client during the initial setup using
gwcli, change the initiator name: From the VMware ESX host, use theseesxclicommands.Get the adapter name for the iSCSI software:
> esxcli iscsi adapter list
> Adapter  Driver     State   UID            Description
> -------  ---------  ------  -------------  ----------------------
> vmhba64  iscsi_vmk  online  iscsi.vmhba64  iSCSI Software Adapter
Set the initiator name:
Syntax
> esxcli iscsi adapter set -A ADAPTOR_NAME -n INITIATOR_NAMEExample
> esxcli iscsi adapter set -A vmhba64 -n iqn.1994-05.com.redhat:rh7-client
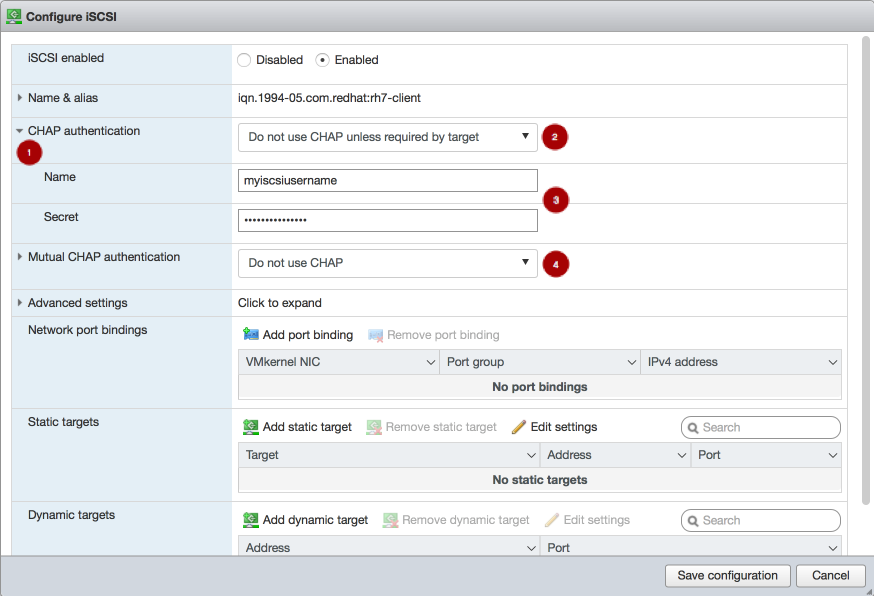
Configure CHAP. Expand the CHAP authentication section
. Select “Do not use CHAP unless required by target”
. Enter the CHAP Name and Secret
credentials that were used in the initial setup. Verify the Mutual CHAP authentication section
has “Do not use CHAP” selected.
 Warning
Due to a bug in the VMware Host Client, the CHAP settings are not used initially. On the Ceph iSCSI gateway node, the kernel logs include the following errors as an indication of this bug:
> kernel: CHAP user or password not set for Initiator ACL
> kernel: Security negotiation failed.
> kernel: iSCSI Login negotiation failed.
To work around this bug, configure the CHAP settings using the
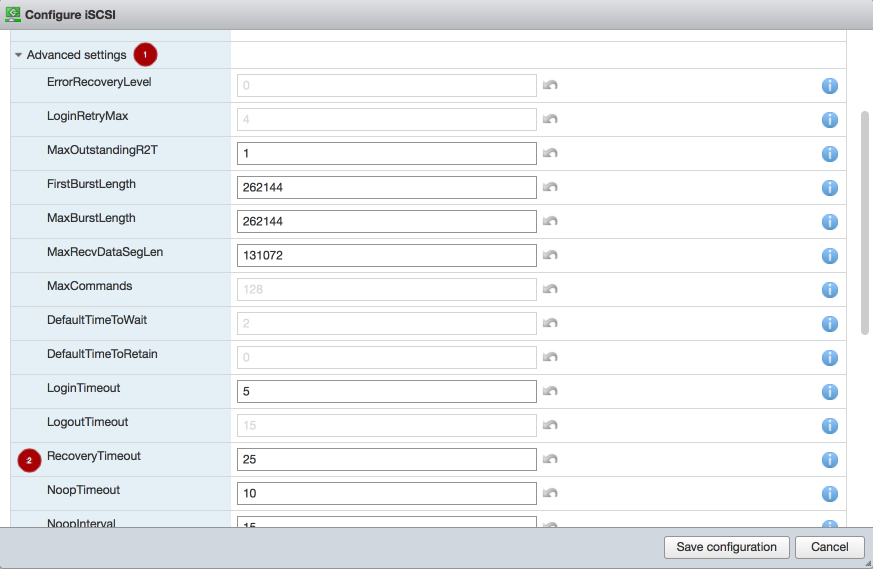
esxclicommand. Theauthnameargument is the Name in the vSphere Web Client:> esxcli iscsi adapter auth chap set --direction=uni --authname=myiscsiusername --secret=myiscsipassword --level=discouraged -A vmhba64Configure the iSCSI settings. Expand Advanced settings
. Set the RecoveryTimeout value to 25
.
Set the discovery address. In the Dynamic targets section
, click Add dynamic target
. Under Address
add an IP addresses for one of the Ceph iSCSI gateways. Only one IP address needs to be added. Finally, click the Save configuration button
. From the main interface, on the Devices tab, you will see the RBD image.
 Note
NoteLUN is configured automatically, using the ALUA SATP and MRU PSP. Do not use other SATPs and PSPs. You can verify this by the
esxclicommand:Syntax
esxcli storage nmp path list -d eui.DEVICE_IDReplace DEVICE_ID with the appropriate device identifier.
Verify that multipathing has been set up correctly.
List the devices:
Example
> esxcli storage nmp device list | grep iSCSI
   Device Display Name: LIO-ORG iSCSI Disk (naa.6001405f8d087846e7b4f0e9e3acd44b)
   Device Display Name: LIO-ORG iSCSI Disk (naa.6001405057360ba9b4c434daa3c6770c)
Get the multipath information for the Ceph iSCSI disk from the previous step:
Example
> esxcli storage nmp path list -d naa.6001405f8d087846e7b4f0e9e3acd44b

iqn.2005-03.com.ceph:esx1-00023d000001,iqn.2003-01.com.redhat.iscsi-gw:iscsi-igw,t,1-naa.6001405f8d087846e7b4f0e9e3acd44b
   Runtime Name: vmhba64:C0:T0:L0
   Device: naa.6001405f8d087846e7b4f0e9e3acd44b
   Device Display Name: LIO-ORG iSCSI Disk (naa.6001405f8d087846e7b4f0e9e3acd44b)
   Group State: active
   Array Priority: 0
   Storage Array Type Path Config: {TPG_id=1,TPG_state=AO,RTP_id=1,RTP_health=UP}
   Path Selection Policy Path Config: {current path; rank: 0}

iqn.2005-03.com.ceph:esx1-00023d000002,iqn.2003-01.com.redhat.iscsi-gw:iscsi-igw,t,2-naa.6001405f8d087846e7b4f0e9e3acd44b
   Runtime Name: vmhba64:C1:T0:L0
   Device: naa.6001405f8d087846e7b4f0e9e3acd44b
   Device Display Name: LIO-ORG iSCSI Disk (naa.6001405f8d087846e7b4f0e9e3acd44b)
   Group State: active unoptimized
   Array Priority: 0
   Storage Array Type Path Config: {TPG_id=2,TPG_state=ANO,RTP_id=2,RTP_health=UP}
   Path Selection Policy Path Config: {non-current path; rank: 0}
From the example output, each path has an iSCSI or SCSI name with the following parts:
Initiator name =
iqn.2005-03.com.ceph:esx1ISID =00023d000002Target name =iqn.2003-01.com.redhat.iscsi-gw:iscsi-igwTarget port group =2Device id =naa.6001405f8d087846e7b4f0e9e3acd44bThe
Group Statevalue ofactiveindicates this is the Active-Optimized path to the iSCSI gateway. Thegwclicommand lists theactiveas the iSCSI gateway owner. The rest of the paths have theGroup Statevalue ofunoptimizedand are the failover path, if theactivepath goes into adeadstate.
To match all paths to their respective iSCSI gateways:
Example
> esxcli iscsi session connection list
vmhba64,iqn.2003-01.com.redhat.iscsi-gw:iscsi-igw,00023d000001,0
   Adapter: vmhba64
   Target: iqn.2003-01.com.redhat.iscsi-gw:iscsi-igw
   ISID: 00023d000001
   CID: 0
   DataDigest: NONE
   HeaderDigest: NONE
   IFMarker: false
   IFMarkerInterval: 0
   MaxRecvDataSegmentLength: 131072
   MaxTransmitDataSegmentLength: 262144
   OFMarker: false
   OFMarkerInterval: 0
   ConnectionAddress: 10.172.19.21
   RemoteAddress: 10.172.19.21
   LocalAddress: 10.172.19.11
   SessionCreateTime: 08/16/18 04:20:06
   ConnectionCreateTime: 08/16/18 04:20:06
   ConnectionStartTime: 08/16/18 04:30:45
   State: logged_in

vmhba64,iqn.2003-01.com.redhat.iscsi-gw:iscsi-igw,00023d000002,0
   Adapter: vmhba64
   Target: iqn.2003-01.com.redhat.iscsi-gw:iscsi-igw
   ISID: 00023d000002
   CID: 0
   DataDigest: NONE
   HeaderDigest: NONE
   IFMarker: false
   IFMarkerInterval: 0
   MaxRecvDataSegmentLength: 131072
   MaxTransmitDataSegmentLength: 262144
   OFMarker: false
   OFMarkerInterval: 0
   ConnectionAddress: 10.172.19.22
   RemoteAddress: 10.172.19.22
   LocalAddress: 10.172.19.12
   SessionCreateTime: 08/16/18 04:20:06
   ConnectionCreateTime: 08/16/18 04:20:06
   ConnectionStartTime: 08/16/18 04:30:41
   State: logged_in
Match the path name with the
ISIDvalue, and theRemoteAddressvalue is the IP address of the owning iSCSI gateway.
7.6. Managing iSCSI services
The ceph-iscsi package installs the configuration management logic, and the rbd-target-gw and rbd-target-api systemd services.
The rbd-target-api service restores the Linux iSCSI target state at startup, and responds to ceph-iscsi REST API calls from tools like gwcli and Red Hat Ceph Storage Dashboard. The rbd-target-gw service provides metrics using the Prometheus plug-in.
The rbd-target-api service assumes it is the only user of the Linux kernel’s target layer. Do not use the target service installed with the targetcli package when using rbd-target-api. Ansible automatically disables the targetcli target service during the Ceph iSCSI gateway installation.
Procedure
To start the services:
# systemctl start rbd-target-api
# systemctl start rbd-target-gw
To restart the services:
# systemctl restart rbd-target-api
# systemctl restart rbd-target-gw
To reload the services:
# systemctl reload rbd-target-api
# systemctl reload rbd-target-gw
The
reloadrequest forcesrbd-target-apito reread the configuration and apply it to the current running environment. This is normally not required, because changes are deployed in parallel from Ansible to all iSCSI gateway nodes.To stop the services:
# systemctl stop rbd-target-api
# systemctl stop rbd-target-gw
The
stoprequest closes the gateway’s portal interfaces, dropping connections to clients and wipes the current Linux iSCSI target configuration from the kernel. This returns the iSCSI gateway to a clean state. When clients are disconnected, active I/O is rescheduled to the other iSCSI gateways by the client side multipathing layer.
7.7. Adding more iSCSI gateways
As a storage administrator, you can expand the initial two iSCSI gateways to four iSCSI gateways by using the gwcli command-line tool or the Red Hat Ceph Storage Dashboard. Adding more iSCSI gateways provides you more flexibility when using load-balancing and failover options, along with providing more redundancy.
7.7.1. Prerequisites
- A running Red Hat Ceph Storage 4 cluster
- Spare nodes or existing OSD nodes
-
rootpermissions
7.7.2. Using Ansible to add more iSCSI gateways
You can using the Ansible automation utility to add more iSCSI gateways. This procedure expands the default installation of two iSCSI gateways to four iSCSI gateways. You can configure the iSCSI gateway on a standalone node or it can be collocated with existing OSD nodes.
Prerequisites
- Red Hat Enterprise Linux 7.7 or later.
- A running Red Hat Ceph Storage cluster.
- Installation of the iSCSI gateway software.
-
Having
adminuser access on the Ansible administration node. -
Having
rootuser access on the new nodes.
Procedure
On the new iSCSI gateway nodes, enable the Red Hat Ceph Storage Tools repository:
Red Hat Enterprise Linux 7
[root@iscsigw ~]# subscription-manager repos --enable=rhel-7-server-rhceph-4-tools-rpmsRed Hat Enterprise Linux 8
[root@iscsigw ~]# subscription-manager repos --enable=rhceph-4-tools-for-rhel-8-x86_64-rpmsInstall the
ceph-iscsi-configpackage:[root@iscsigw ~]# yum install ceph-iscsi-configAppend to the list in
/etc/ansible/hostsfile for the gateway group:Example
[iscsigws] ... ceph-igw-3 ceph-igw-4NoteIf colocating the iSCSI gateway with an OSD node, add the OSD node to the
[iscsigws]section.Change to the
ceph-ansibledirectory:[admin@ansible ~]$ cd /usr/share/ceph-ansibleOn the Ansible administration node, run the appropriate Ansible playbook:
Bare-metal deployments:
[admin@ansible ceph-ansible]$ ansible-playbook site.yml -i hostsContainer deployments:
[admin@ansible ceph-ansible]$ ansible-playbook site-container.yml -i hosts
ImportantProviding IP addresses for the
gateway_ip_listoption is required. You cannot use a mix of IPv4 and IPv6 addresses.- From the iSCSI initiators, re-login to use the newly added iSCSI gateways.
Additional Resources
- See the Configure the iSCSI Initiator for more details on using an iSCSI Initiator.
- See the Enabling the Red Hat Ceph Storage Repositories section in the Red Hat Ceph Storage Installation Guide for more details.
7.7.3. Using gwcli to add more iSCSI gateways
You can use the gwcli command-line tool to add more iSCSI gateways. This procedure expands the default of two iSCSI gateways to four iSCSI gateways.
Prerequisites
- Red Hat Enterprise Linux 7.7 or later.
- A running Red Hat Ceph Storage cluster.
- Installation of the iSCSI gateway software.
-
Having
rootuser access to the new nodes or OSD nodes.
Procedure
-
If the Ceph iSCSI gateway is not colocated on an OSD node, copy the Ceph configuration files, located in the
/etc/ceph/directory, from a running Ceph node in the storage cluster to the new iSCSI Gateway node. The Ceph configuration files must exist on the iSCSI gateway node under the/etc/ceph/directory. - Install and configure the Ceph command-line interface.
On the new iSCSI gateway nodes, enable the Red Hat Ceph Storage Tools repository:
Red Hat Enterprise Linux 7
[root@iscsigw ~]# subscription-manager repos --enable=rhel-7-server-rhceph-4-tools-rpmsRed Hat Enterprise Linux 8
[root@iscsigw ~]# subscription-manager repos --enable=rhceph-4-tools-for-rhel-8-x86_64-rpmsInstall the
ceph-iscsi, andtcmu-runnerpackages:Red Hat Enterprise Linux 7
[root@iscsigw ~]# yum install ceph-iscsi tcmu-runnerRed Hat Enterprise Linux 8
[root@iscsigw ~]# dnf install ceph-iscsi tcmu-runnerIf needed, install the
opensslpackage:Red Hat Enterprise Linux 7
[root@iscsigw ~]# yum install opensslRed Hat Enterprise Linux 8
[root@iscsigw ~]# dnf install openssl
On one of the existing iSCSI gateway nodes, edit the
/etc/ceph/iscsi-gateway.cfgfile and append thetrusted_ip_listoption with the new IP addresses for the new iSCSI gateway nodes. For example:[config] ... trusted_ip_list = 10.172.19.21,10.172.19.22,10.172.19.23,10.172.19.24Copy the updated
/etc/ceph/iscsi-gateway.cfgfile to all the iSCSI gateway nodes.ImportantThe
iscsi-gateway.cfgfile must be identical on all iSCSI gateway nodes.-
Optionally, if using SSL, also copy the
~/ssl-keys/iscsi-gateway.crt,~/ssl-keys/iscsi-gateway.pem,~/ssl-keys/iscsi-gateway-pub.key, and~/ssl-keys/iscsi-gateway.keyfiles from one of the existing iSCSI gateway nodes to the/etc/ceph/directory on the new iSCSI gateway nodes. Enable and start the API service on the new iSCSI gateway nodes:
[root@iscsigw ~]# systemctl enable rbd-target-api
[root@iscsigw ~]# systemctl start rbd-target-api
Start the iSCSI gateway command-line interface:
[root@iscsigw ~]# gwcliCreating the iSCSI gateways using either IPv4 or IPv6 addresses:
Syntax
>/iscsi-target create iqn.2003-01.com.redhat.iscsi-gw:_TARGET_NAME_
> goto gateways
> create ISCSI_GW_NAME IP_ADDR_OF_GW
> create ISCSI_GW_NAME IP_ADDR_OF_GW
Example
>/iscsi-target create iqn.2003-01.com.redhat.iscsi-gw:ceph-igw > goto gateways > create ceph-gw-3 10.172.19.23 > create ceph-gw-4 10.172.19.24ImportantYou cannot use a mix of IPv4 and IPv6 addresses.
- From the iSCSI initiators, re-login to use the newly added iSCSI gateways.
Additional Resources
- See Configure the iSCSI Initiator for more details on using an iSCSI Initiator.
- For details, see the Installing the Ceph Command Line Interface chapter in the Red Hat Ceph Storage Installation Guide.
7.8. Verifying that the initiator is connected to the iSCSI target
After installing the iSCSI gateway and configuring the iSCSI target and an initiator, verify that the initiator is properly connected to the iSCSI target.
Prerequisites
- Installation of the Ceph iSCSI gateway software.
- Configured the iSCSI target.
- Configured the iSCSI initiator.
Procedure
Start the iSCSI gateway command-line interface:
[root@iscsigw ~]# gwcliVerify that the initiator is connected the iSCSI target:
/> goto hosts
/iscsi-target...csi-igw/hosts> ls
o- hosts .............................. [Hosts: 1: Auth: None]
  o- iqn.1994-05.com.redhat:rh7-client  [LOGGED-IN, Auth: None, Disks: 0(0.00Y)]
The initiator status is
LOGGED-INif it is connected.Verify that LUNs are balanced across iSCSI gateways:
/> goto hosts
/iscsi-target...csi-igw/hosts> ls
o- hosts ................................. [Hosts: 2: Auth: None]
  o- iqn.2005-03.com.ceph:esx ............ [Auth: None, Disks: 4(310G)]
  | o- lun 0 ............................. [rbd.disk_1(100G), Owner: ceph-gw-1]
  | o- lun 1 ............................. [rbd.disk_2(10G), Owner: ceph-gw-2]
When creating a disk, the disk is assigned an iSCSI gateway as its
Ownerbased on what gateways have the lowest number of mapped LUNs. If this number is balanced, gateways are assigned based on a round robin allocation. Currently, the balancing of LUNs is not dynamic and cannot be selected by the user.When the initiator is logged into the target, and the
multipathlayer is in a optimized state, the initiator’s operating systemmultipathutilities report the path to theOwnergateway as being in ALUA Active-Optimized (AO) state. Themultipathutilities report the other paths as being in the ALUA Active-non-Optimized (ANO) state.If the AO path fails, one of the other iSCSI gateways is used. The ordering for the failover gateway depends on the initiator’s
multipathlayer, where normally, the order is based on which path was discovered first.
7.9. Upgrading the Ceph iSCSI gateway using Ansible
Upgrading the Red Hat Ceph Storage iSCSI gateways can be done by using an Ansible playbook designed for rolling upgrades.
Prerequisites
- A running Ceph iSCSI gateway.
- A running Red Hat Ceph Storage cluster.
- Admin-level access to all nodes in the storage cluster.
You can run the upgrade procedure as an administrative user or as root. If you want to run it as root, make sure that you have ssh set up for use with Ansible.
Procedure
-
Verify that the correct iSCSI gateway nodes are listed in the Ansible inventory file (
/etc/ansible/hosts). Run the rolling upgrade playbook:
[admin@ansible ceph-ansible]$ ansible-playbook rolling_update.ymlRun the appropriate playbook to finish the upgrade:
Bare-metal deployments
[admin@ansible ceph-ansible]$ ansible-playbook site.yml --limit iscsigws -i hostsContainer deployments
[admin@ansible ceph-ansible]$ ansible-playbook site-container.yml --limit iscsigws -i hosts
Additional Resources
7.10. Upgrading the Ceph iSCSI gateway using the command-line interface
Upgrading the Red Hat Ceph Storage iSCSI gateways can be done in a rolling fashion, by upgrading one bare-metal iSCSI gateway node at a time.
Do not upgrade the iSCSI gateway while upgrading and restarting Ceph OSDs. Wait until the OSD upgrades are finished and the storage cluster is in an active+clean state.
Prerequisites
- A running Ceph iSCSI gateway.
- A running Red Hat Ceph Storage cluster.
-
Having
rootaccess to the iSCSI gateway node.
Procedure
Update the iSCSI gateway packages:
[root@iscsigw ~]# yum update ceph-iscsiStop the iSCSI gateway daemons:
[root@iscsigw ~]# systemctl stop rbd-target-api
[root@iscsigw ~]# systemctl stop rbd-target-gw
Verify that the iSCSI gateway daemons stopped cleanly:
[root@iscsigw ~]# systemctl status rbd-target-gw-
If the
rbd-target-gwservice successfully stops, then skip to step 4. If the
rbd-target-gwservice fails to stop, then do the following steps:If the
targetclipackage is not install, then install thetargetclipackage:[root@iscsigw ~]# yum install targetcliCheck for existing target objects:
[root@iscsigw ~]# targetcli lsExample
o- / ............................................................. [...]
o- backstores .................................................... [...]
| o- user:rbd ..................................... [Storage Objects: 0]
o- iscsi .................................................. [Targets: 0]
If the
backstoresandStorage Objectsare empty, then the iSCSI target has been shutdown cleanly and you can skip to step 4.If you have still have target objects, use the following command to force remove all target objects:
[root@iscsigw ~]# targetcli clearconfig confirm=TrueWarningIf multiple services are using the iSCSI target, use
targetcliin interactive mode to delete those specific objects.
-
If the
Update the
tcmu-runnerpackage:[root@iscsigw ~]# yum update tcmu-runnerStop the
tcmu-runnerservice:[root@iscsigw ~]# systemctl stop tcmu-runnerRestart the iSCSI gateway services in the following order:
[root@iscsigw ~]# systemctl start tcmu-runner
[root@iscsigw ~]# systemctl start rbd-target-gw
[root@iscsigw ~]# systemctl start rbd-target-api
7.11. Monitoring the iSCSI gateways
Red Hat Ceph Storage cluster now incorporates a generic metric gathering framework within the OSDs and MGRs to provide built-in monitoring. The metrics are generated within the Red Hat Ceph Storage cluster and there is no need to access client nodes to scrape metrics. To monitor the performance of RBD images, Ceph has a built-in MGR Prometheus exporter module to translate individual RADOS object metrics into aggregated RBD image metrics for Input/Output(I/O) operations per second, throughput, and latency. The Ceph iSCSI gateway also provides a Prometheus exporter for Linux-IO (LIO) level performance metrics, supporting monitoring and visualization tools like Grafana. These metrics include the information about defined Target Portal Groups (TPGs) and mapped Logical Unit Numbers (LUNs), per LUN state and the number of Input Output operations per second (IOPS), read bytes and write bytes per LUN per client. By default, the Prometheus exporter is enabled. You can change the default settings by using the following options in the iscsi-gateway.cfg:
Example
[config]

prometheus_exporter = True
prometheus_port = 9287
prometheus_host = xx.xx.xx.xxx
The gwtop tool used for Ceph iSCSI gateway environments to monitor performance of exported Ceph block device (RBD) images is deprecated.
7.12. Removing the iSCSI configuration
To remove the iSCSI configuration, use the gwcli utility to remove hosts and disks, and the Ansible purge-iscsi-gateways.yml playbook to remove the iSCSI target configuration.
Using the purge-iscsi-gateways.yml playbook is a destructive action against the iSCSI gateway environment.
An attempt to use purge-iscsi-gateways.yml fails if RBD images have snapshots or clones and are exported through the Ceph iSCSI gateway.
Prerequisites
Disconnect all iSCSI initiators:
Red Hat Enterprise Linux initiators:
Syntax
iscsiadm -m node -T TARGET_NAME --logoutReplace
TARGET_NAMEwith the configured iSCSI target name, for example:Example
# iscsiadm -m node -T iqn.2003-01.com.redhat.iscsi-gw:ceph-igw --logout
Logging out of session [sid: 1, target: iqn.2003-01.com.redhat.iscsi-gw:iscsi-igw, portal: 10.172.19.21,3260]
Logging out of session [sid: 2, target: iqn.2003-01.com.redhat.iscsi-gw:iscsi-igw, portal: 10.172.19.22,3260]
Logout of [sid: 1, target: iqn.2003-01.com.redhat.iscsi-gw:iscsi-igw, portal: 10.172.19.21,3260] successful.
Logout of [sid: 2, target: iqn.2003-01.com.redhat.iscsi-gw:iscsi-igw, portal: 10.172.19.22,3260] successful.
Windows initiators:
See the Microsoft documentation for more details.
VMware ESXi initiators:
See the VMware documentation for more details.
Procedure
Run the iSCSI gateway command line utility:
[root@iscsigw ~]# gwcliRemove the hosts:
Syntax
/> cd /iscsi-target/iqn.2003-01.com.redhat.iscsi-gw:$TARGET_NAME/hosts
/> /iscsi-target...TARGET_NAME/hosts> delete CLIENT_NAME
Replace
TARGET_NAMEwith the configured iSCSI target name, and replaceCLIENT_NAMEwith iSCSI initiator name, for example:Example
/> cd /iscsi-target/iqn.2003-01.com.redhat.iscsi-gw:ceph-igw/hosts
/> /iscsi-target...eph-igw/hosts> delete iqn.1994-05.com.redhat:rh7-client
Remove the disks:
Syntax
/> cd /disks/
/disks> delete POOL_NAME.IMAGE_NAME
Replace
POOL_NAMEwith the name of the pool and theIMAGE_NAMEwith the name of the image.Example
/> cd /disks/
/disks> delete rbd.disk_1
As a root user, for the containerized deployment ensure all the Red Hat Ceph Storage tools and repositories are enabled on the iSCSI gateway nodes:
Red Hat Enterprise Linux 7
[root@admin ~]# subscription-manager repos --enable=rhel-7-server-rpms
[root@admin ~]# subscription-manager repos --enable=rhel-7-server-extras-rpms
[root@admin ~]# subscription-manager repos --enable=rhel-7-server-rhceph-4-tools-rpms --enable=rhel-7-server-ansible-2.9-rpms
Red Hat Enterprise Linux 8
[root@admin ~]# subscription-manager repos --enable=rhel-8-for-x86_64-baseos-rpms [root@admin ~]# subscription-manager repos --enable=rhel-8-for-x86_64-appstream-rpms [root@admin ~]# subscription-manager repos --enable=rhceph-4-tools-for-rhel-8-x86_64-rpms --enable=ansible-2.9-for-rhel-8-x86_64-rpmsNoteFor bare-metal deployment, the Ceph tools are enabled with client install.
On each of the iSCSI gateway nodes, install the
ceph-commonandceph-iscsipackages:Red Hat Enterprise Linux 7
[root@admin ~]# yum install -y ceph-common
[root@admin ~]# yum install -y ceph-iscsi
Red Hat Enterprise Linux 8
[root@admin ~]# dnf install -y ceph-common [root@admin ~]# dnf install -y ceph-iscsi-
Run the
yum history listcommand and get the transaction ID of theceph-iscsiinstallation. Switch to Ansible user:
Example
[root@admin ~]# su ansibleNavigate to the
/usr/share/ceph-ansible/directory:Example
[ansible@admin ~]# cd /usr/share/ceph-ansibleAs the ansible user, run the iSCSI gateway purge Ansible playbook:
[ansible@admin ceph-ansible]$ ansible-playbook purge-iscsi-gateways.ymlEnter the type of purge when prompted:
lio- In this mode the Linux iSCSI target configuration is purged on all iSCSI gateways that are defined. Disks that were created are left untouched within the Ceph storage cluster.
all-
When
allis chosen, the Linux iSCSI target configuration is removed together with all RBD images that were defined within the iSCSI gateway environment, other unrelated RBD images will not be removed. Be sure to choose the correct mode because this operation deletes data.
Example
[ansible@rh7-iscsi-client ceph-ansible]$ ansible-playbook purge-iscsi-gateways.yml
Which configuration elements should be purged? (all, lio or abort) [abort]: all


PLAY [Confirm removal of the iSCSI gateway configuration] *********************


GATHERING FACTS ***************************************************************
ok: [localhost]


TASK: [Exit playbook if user aborted the purge] *******************************
skipping: [localhost]


TASK: [set_fact ] *************************************************************
ok: [localhost]


PLAY [Removing the gateway configuration] *************************************


GATHERING FACTS ***************************************************************
ok: [ceph-igw-1]
ok: [ceph-igw-2]


TASK: [igw_purge | purging the gateway configuration] *************************
changed: [ceph-igw-1]
changed: [ceph-igw-2]


TASK: [igw_purge | deleting configured rbd devices] ***************************
changed: [ceph-igw-1]
changed: [ceph-igw-2]


PLAY RECAP ********************************************************************
ceph-igw-1                 : ok=3    changed=2    unreachable=0    failed=0
ceph-igw-2                 : ok=3    changed=2    unreachable=0    failed=0
localhost                  : ok=2    changed=0    unreachable=0    failed=0
Check if the active containers are removed:
Red Hat Enterprise Linux 7
[root@admin ~]# docker psRed Hat Enterprise Linux 8
[root@admin ~]# podman psThe Ceph iSCSI container IDs are removed.
Optional: Remove the
ceph-iscsipackage:Syntax
yum history undo TRANSACTION_IDExample
[root@admin ~]# yum history undo 4WarningDo not remove the
ceph-commonpackages. This removes the contents of/etc/cephand renders the daemons on that node unable to start.
7.13. Additional Resources
- For details on managing iSCSI gateway using the Red Hat Ceph Storage Dashboard, see the iSCSI functions section in the Dashboard Guide for Red Hat Ceph Storage 4