Chapter 3. Configuring log files in Directory Server
Directory Server records events to log files. Use these files to troubleshoot, monitor, and analyze the directory activity.
In Directory Server, you can enable or disable logging, configure the log level, define logging policies, compress log files, and perform other operations.
3.1. Types of log files in Directory Server
Directory Server has the following log file types that are stored the /var/log/dirsrv/slapd-instance_name/ directory:
- Access log (access). Enabled by default
- Contains information on client connections and connection attempts to the Directory Server instance. Note that because the access log is buffered, you can notice a discrepancy between when the event occurs on the server and the time the event is recorded in the log.
- Error log (error). Enabled by default
- Contains detailed messages of errors and events that the directory experiences during normal operations.
If Directory Server fails to write messages to the error log file, the server sends an error message to the syslog service and exits.
- Audit log (audit). Disabled by default
-
Records changes made to each database and to the server configuration. If you enable audit logging, Directory Server records only successful operations to the
auditlog file. - Audit fail log (audit-failure). Disabled by default
-
Records failed change operations. With the default settings, Directory Server writes failed operations to the same file as the audit log. To write failed operations to a separate file, set a path to this file in the
nsslapd-auditfaillogconfiguration attribute. For details, see nsslapd-auditfaillog section. - Security log (security). Enabled by default
- Records authentication events, authorization issues, DoS/TCP attacks, and other security events.
For more detailed information about Directory Server log files, see Log files reference.
3.2. Displaying log files
You can display Directory Server log files using the command line or the web console.
3.2.1. Displaying log files using the command line
Use the utilities included in Red Hat Enterprise Linux, such as less, more, and cat, to view the log files.
Prerequisites
- You enabled logging as described in Enabling or disabling logging using the command line.
Procedure
To display the log files, use the following commands:
# less /var/log/dirsrv/slapd-instance_name/access
# less /var/log/dirsrv/slapd-instance_name/errors
# less /var/log/dirsrv/slapd-instance_name/audit
# less /var/log/dirsrv/slapd-instance_name/access
# less /var/log/dirsrv/slapd-instance_name/security
Note that by default the audit log and the audit fail log write operations to the same file.
To display the locations of log files, use the command:
# dsconf -D "cn=Directory Manager" instance_name config get nsslapd-accesslog nsslapd-errorlog nsslapd-auditlog nsslapd-auditfaillog nsslapd-securitylog

nsslapd-accesslog: /var/log/dirsrv/slapd-instance_name/access
nsslapd-errorlog: /var/log/dirsrv/slapd-instance_name/errors
nsslapd-auditlog: /var/log/dirsrv/slapd-instance_name/audit
nsslapd-auditfaillog: /var/log/dirsrv/slapd-instance_name/auditfail
nsslapd-securitylog: /var/log/dirsrv/slapd-instance_name/security
If you have not enabled logging for a specified log type, Directory Server does not create the corresponding log file.
3.2.2. Displaying log files using the web console
To view Directory Server log files use the tab of the web console.
Prerequisites
- You are logged in to the web console.
Procedure
- Select the instance.
-
Navigate to
. In the list of log types, select the log you want to display:
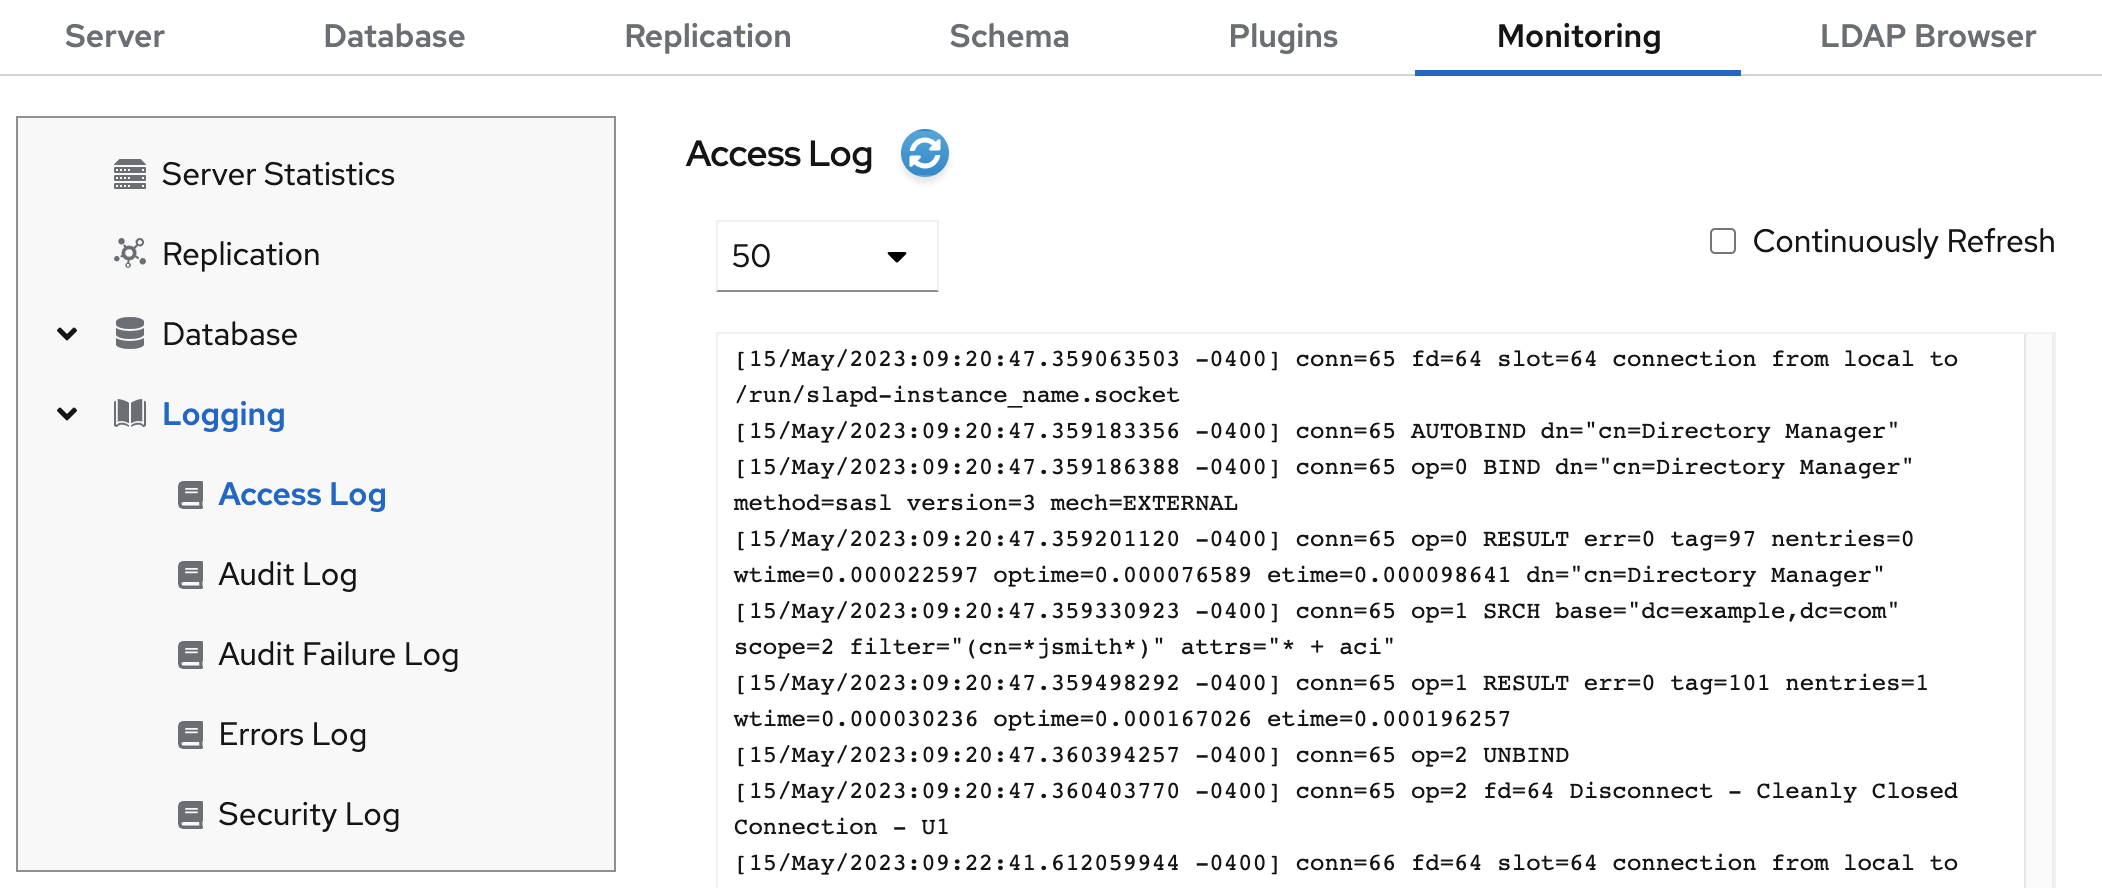
Optional: Apply the following settings to the log viewer:
- Set the number of records to display.
- Enable automatic display of new log entries by selecting Continuously Refresh.
- Click the button to apply the changes.
3.3. Enabling or disabling logging
By default, Directory Server enables access, error, security logging, and disables audit and audit fail logging.
- IMPORTANT
- Every 2000 accesses to the directory increases the access log file by approximately 1 MB. However, before disabling the access logging, consider that this information can help to troubleshoot problems.
3.3.1. Enabling or disabling logging using the command line
Use the dsconf config replace command to modify the following attributes in the cn=config DN entry that manage the Directory Server logging feature:
-
nsslapd-accesslog-logging-enabled(access log) -
nsslapd-errorlog-logging-enabled(error log) -
nsslapd-auditlog-logging-enabled(audit log) -
nsslapd-auditfaillog-logging-enabled(audit fail log) -
nsslapd-securitylog-logging-enabled(security log)
Procedure
To enable logging, set the corresponding attribute value to
on. For example, use the following command to enable the audit logging:# dsconf -D "cn=Directory Manager" instance_name config replace nsslapd-auditlog-logging-enabled=onNoteMake sure that the
nsslapd-auditlogattribute contains a valid path and a filename of the log file. Otherwise, you cannot enable the logging.To disable logging, set the corresponding attribute to
off. For example, use the following command to disable the error logging:# dsconf -D "cn=Directory Manager" instance_name config replace nsslapd-errorlog-logging-enabled=offWhen you disable logging, Directory Server stops to record new events to a log file. However, the log file remains in the
/var/log/dirsrv/slapd-instance_name/directory.
Verification
Check if the log directory now contains the log files:
# ls -la /var/log/dirsrv/slapd-instance_name/

-rw-------. 1 dirsrv dirsrv  14388 Nov 29 05:23 access
-rw-------. 1 dirsrv dirsrv 121554 Nov 12 05:57 audit
-rw-------. 1 dirsrv dirsrv    880 Nov 20 11:53 errors
-rw-------. 1 dirsrv dirsrv   3509 Nov 29 05:23 security
3.3.2. Enabling or disabling logging using the web console
To enable or disable logging for an instance use the tab in the web console.
Prerequisites
- You are logged in to the web console.
Procedure
- Select the instance.
-
Navigate to
. -
Select the log type you want to configure, for example,
Access Log. - Enable or disable the logging for the selected log type.
Optional: Configure additional settings, such as the log level, the log rotation policy, and the log buffering.
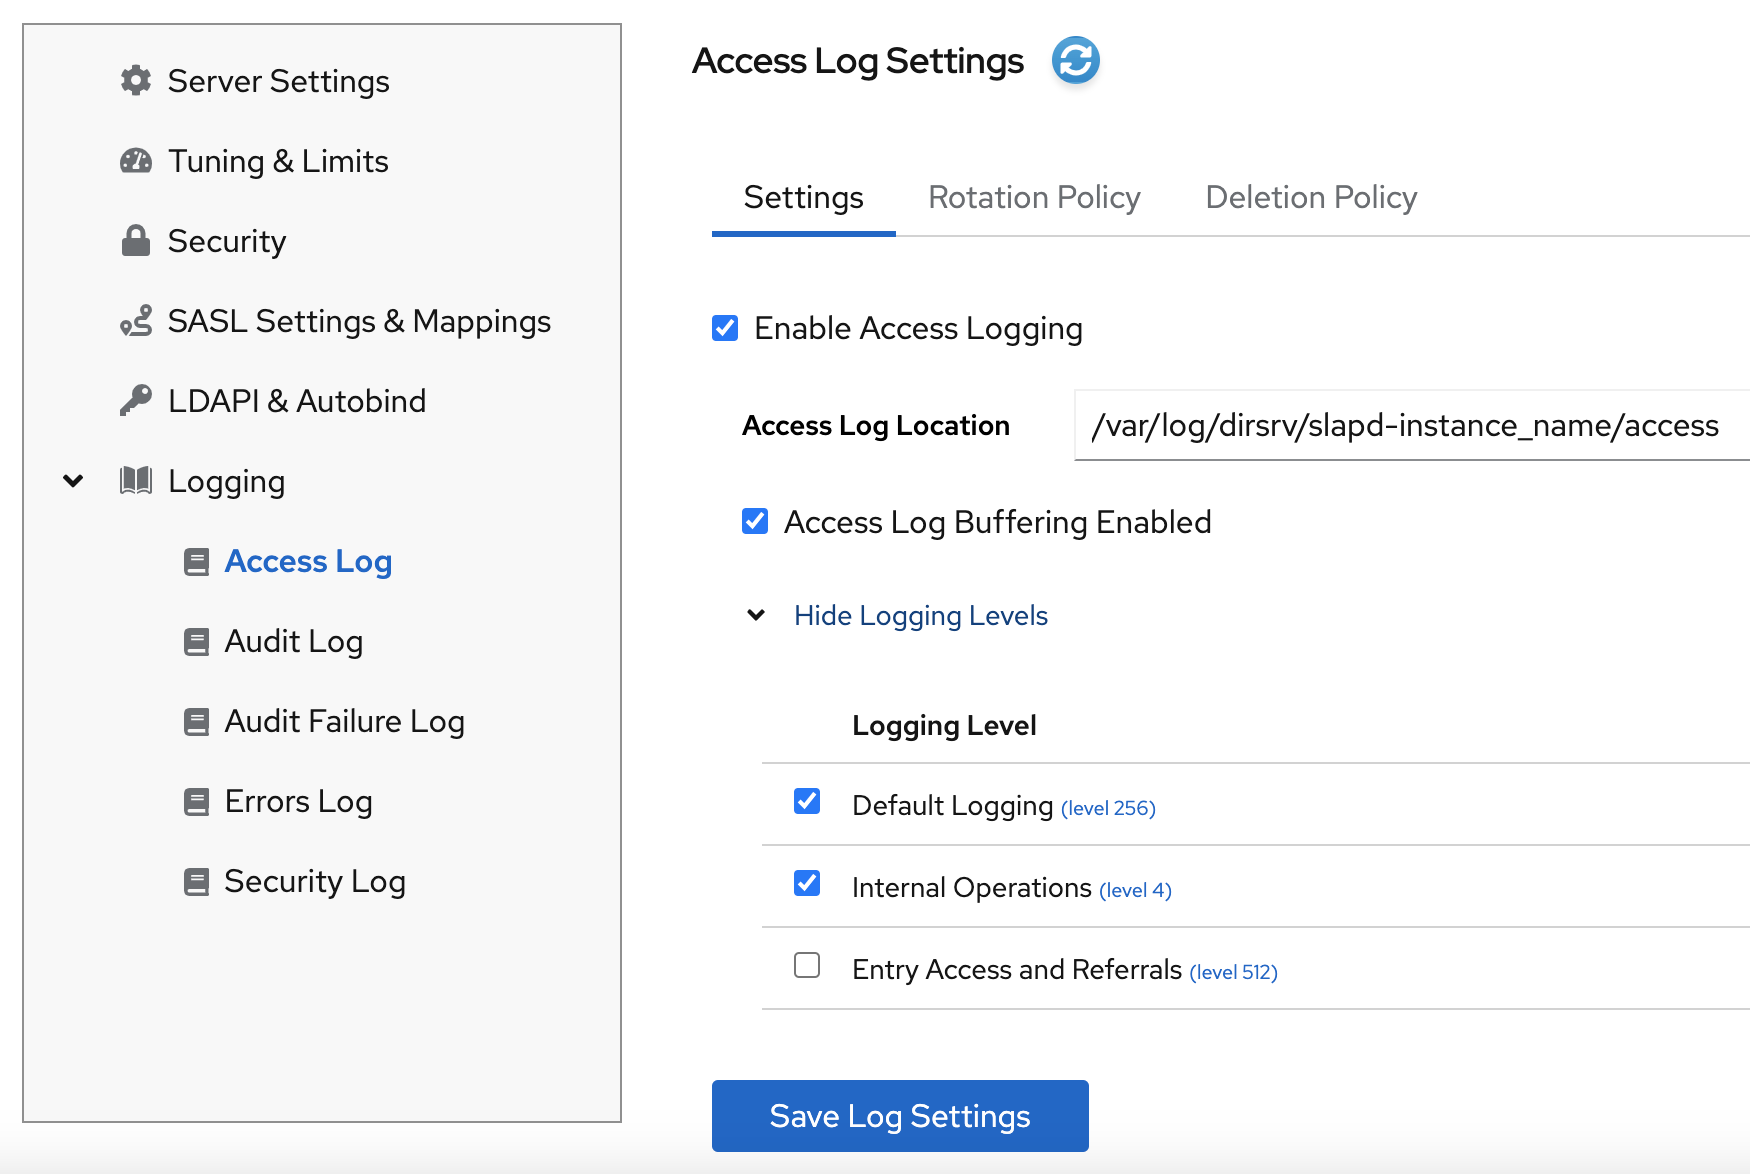
- Click the button to apply the changes.
Verification
-
Navigate to
and see if Directory Server now logs the events.
3.4. Defining a log rotation policy
Directory Server periodically rotates the current log file and creates a new one. However, you can change the default behavior by setting a rotation policy using the command line or the web console.
You can manage the following rotation settings:
- Maximum number of logs
-
Sets the maximum number of log files to keep. When the number of files is reached, Directory Server deletes the oldest log file before creating the new one. By default, it is
10for the access log, and1for other logs. - Maximum log size (in MB)
-
Sets the maximum size of a log file in megabytes before it is rotated. By default, it is
100MB for all logs. - Create new log every
- Sets the maximum age of a log file. By default, Directory Server rotates all logs every week.
- Time of day
- Set the time when the log file is rotated. This setting is not enabled by default for all logs.
- Access mode
-
The access mode sets the file permissions on newly created log files. By default, it is
600for all logs.
3.4.1. Configuring a log rotation policy using the command line
You can use the dsconf config replace command to modify the following attributes in the cn=config DN entry that manage rotation policies:
| access log | error log | audit log | audit fail log | security log | |
|---|---|---|---|---|---|
| Maximum number of logs | nsslapd-accesslog-maxlogsperdir | nsslapd-errorlog-maxlogsperdir | nsslapd-auditlog-maxlogsperdir | nsslapd-auditfaillog-maxlogsperdir | nsslapd-securitylog-maxlogsperdir |
| Maximum log size (in MB) | nsslapd-accesslog-maxlogsize | nsslapd-errorlog-maxlogsize | nsslapd-auditlog-maxlogsize | nsslapd-auditfaillog-maxlogsize | nsslapd-securitylog-maxlogsize |
| Create new log every | nsslapd-accesslog-logrotationtime, nsslapd-accesslog-logrotationtimeunit | nsslapd-errorlog-logrotationtime, nsslapd-errorlog-logrotationtimeunit | nsslapd-auditlog-logrotationtime, nsslapd-auditlog-logrotationtimeunit | nsslapd-auditfaillog-logrotationtime, nsslapd-auditfaillog-logrotationtimeunit | nsslapd-securitylog-logrotationtime, nsslapd-securitylog-logrotationtimeunit |
| Time of day | nsslapd-accesslog-logrotationsynchour, nsslapd-accesslog-logrotationsyncmin | nsslapd-errorlog-logrotationsynchour, nsslapd-errorlog-logrotationsyncmin | nsslapd-auditlog-logrotationsynchour, nsslapd-auditlog-logrotationsyncmin | nsslapd-auditfaillog-logrotationsynchour, nsslapd-auditfaillog-logrotationsyncmin | nsslapd-securitylog-logrotationsynchour, nsslapd-securitylog-logrotationsyncmin |
| Access mode | nsslapd-accesslog-mode | nsslapd-errorlog-mode | nsslapd-auditlog-mode | nsslapd-auditfaillog-mode | nsslapd-securitylog-mode |
Procedure
To configure the error log to use access mode 600, to keep maximum 2 logs, and to rotate log files with a 100 MB size or every 5 days, enter:
# dsconf -D "cn=Directory Manager" instance_name config replace nsslapd-errorlog-mode=600 nsslapd-errorlog-maxlogsperdir=2 nsslapd-errorlog-maxlogsize=100 nsslapd-errorlog-logrotationtime=5 nsslapd-errorlog-logrotationtimeunit=dayFor more details about rotation policy attributes, see corresponding sections in Core server configuration attributes description.
3.4.2. Configuring a log rotation policy using the web console
To periodically archive the current log file and create a new one, set a log file rotation policy by using the web console.
Prerequisites
- You are logged in to the web console.
Procedure
- Select the instance.
Navigate to
and select the log type, for example, Error Log.The Error Log Settings page opens.
- Click the Rotation Policy tab.
Configure rotation policy parameters. For example, set maximum 3 log files, the log size maximum 110 MB, and creation of a new log file every 3 days.
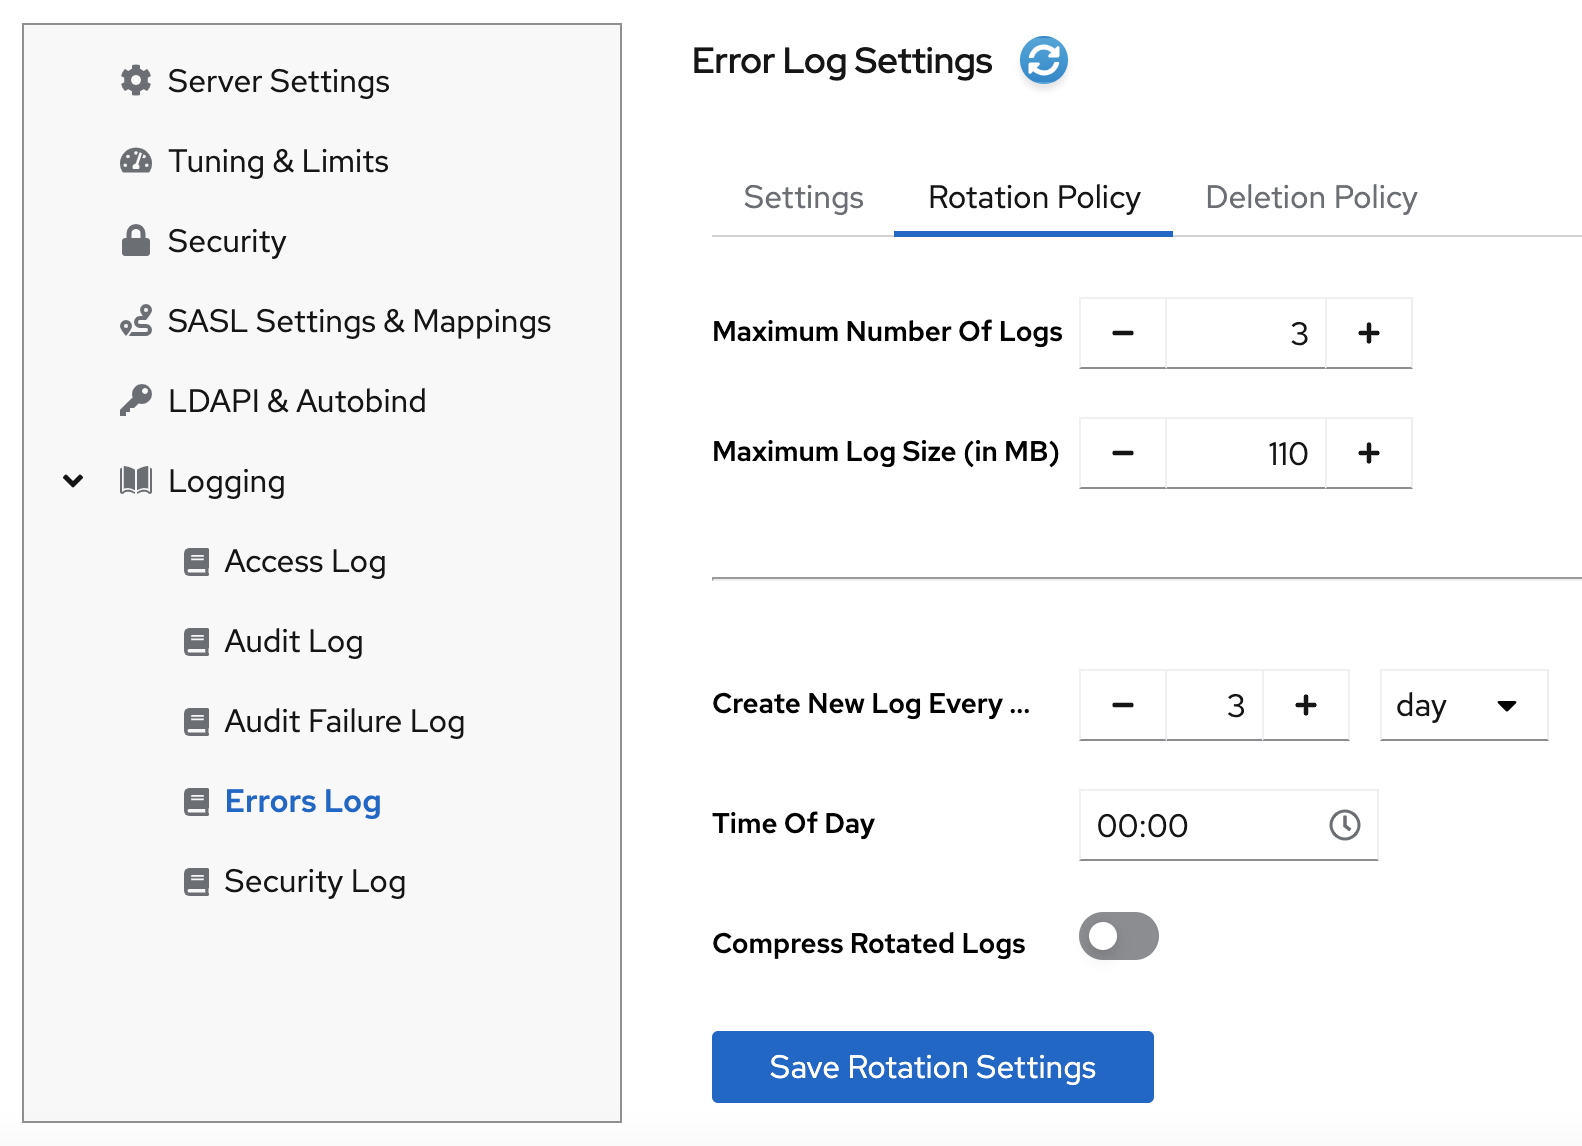
- Click the button to apply changes.
3.5. Defining a log deletion policy
Directory Server automatically deletes old archived log files if you set a deletion policy.
You can only set a log file deletion policy if you have a log file rotation policy set. Directory Server applies the deletion policy at the time of log rotation.
You can set the following configuration attributes to manage the log file deletion policy:
- Log archive exceeds (in MB)
- If the size of a log file of one type exceeds the configured value, the oldest log file of this type is automatically deleted.
- Free disk space (in MB)
- When the free disk space reaches this value, the oldest archived log file is automatically deleted.
- Log file is older than
- When a log file is older than the configured time, it is automatically deleted.
3.5.1. Configuring a log deletion policy using the command line
You can use the dsconf config replace command to modify the following attributes in the cn=config DN entry that manage deletion policies:
| access log | error log | audit log | audit fail log | security log | |
|---|---|---|---|---|---|
| Log archive exceeds (in MB) | nsslapd-accesslog-logmaxdiskspace | nsslapd-errorlog-logmaxdiskspace | nsslapd-auditlog-logmaxdiskspace | nsslapd-auditfaillog-logmaxdiskspace | nsslapd-securitylog-logmaxdiskspace |
| Free disk space (in MB) | nsslapd-accesslog-logminfreediskspace | nsslapd-errorlog-logminfreediskspace | nsslapd-auditlog-logminfreediskspace | nsslapd-auditfaillog-logminfreediskspace | nsslapd-securitylog-logminfreediskspace |
| Log file is older than | nsslapd-accesslog-logexpirationtime, nsslapd-accesslog-logexpirationtimeunit | nsslapd-errorlog-logexpirationtime, nsslapd-errorlog-logexpirationtimeunit | nsslapd-auditlog-logexpirationtime, nsslapd-auditlog-logexpirationtimeunit | nsslapd-auditfaillog-logexpirationtime, nsslapd-auditfaillog-logexpirationtimeunit | nsslapd-securitylog-logexpirationtime, nsslapd-securitylog-logexpirationtimeunit |
Procedure
For example, to auto-delete the oldest access log file if the total size of all access log files exceeds 500 MB, enter:
# dsconf -D "cn=Directory Manager" instance_name config replace nsslapd-accesslog-logmaxdiskspace=500For more details about deletion policy attributes, see corresponding sections in Core server configuration attributes description.
3.5.2. Configuring a log deletion policy using the web console
To automatically delete old archived log files, set a log deletion policy by using the web console.
Prerequisites
- You are logged in to the web console.
Procedure
- Select the instance.
-
Navigate to
and select the log type, for example, Access Log. The Access Log Settings page opens. - Click the Deletion Policy tab.
Configure deletion policy parameters. For example, set maximum archive size to 600 MB and the log file age to 3 weeks.

- Click the button to apply changes.
3.6. Manual log file rotation
You can rotate log files manually only if you did not configure an automatic log file rotation or deletion policies.
Procedure
Stop the instance:
# dsctl instance_name stop-
Go to the log files directory. By default, Directory Server stores access, error, audit, audit fail log, and security files in the
/var/log/dirsrv/slapd-instance/directory. - Move or rename the log file you want to rotate to make it available for future reference.
Start the instance:
# dsctl instance_name restart
3.7. Configuring log levels
To manage how detailed logs are, and therefore the amount of information that is logged, you can specify log levels for access logging and error logging.
Changing the default log level can lead to very large log files. Red Hat recommends that you do not change the default logging values without being asked to do so by Red Hat technical support.
3.7.1. Configuring log levels using the command line
You can adjust log levels by setting the following configuration attributes:
-
nsslapd-accesslog-levelfor the access log -
nsslapd-errorlog-levelfor the error log
Use the dsconf config replace command to modify the log level attributes. The attribute values are additive: for example, if you set a log level value of 12, it includes levels 8 and 4.
Prerequisites
- You enabled access and error logging.
Procedure
To enable Logging internal access operations (4) and Logging for connections, operations, and results (256) for the access log, set the
nsslapd-accesslog-levelattribute to 260 (4 + 256) with the following command:# dsconf -D "cn=Directory Manager" instance_name config replace nsslapd-accesslog-level=260To enable Search filter logging (32) and Config file processing (64) log levels for the error log, set the
nsslapd-errorlog-levelattribute to 96 (32 + 64) with the following command:# dsconf -D "cn=Directory Manager" instance_name config replace nsslapd-errorlog-level=96
Verification
When you set the access log level to Logging internal access operations (4), do the following to see if Directory Server started to log internal access events:
Restart the instance to trigger internal events by command:
# dsctl instance_name restart
Instance "instance_name" has been restarted
View the access log file and find internal operation records:
# cat /var/log/dirsrv/slapd-instance_name/access
...
[08/Nov/2022:16:29:05.556977401 -0500] conn=2 (Internal) op=1(1)(1) SRCH base="cn=config,cn=WritersData,cn=ldbm database,cn=plugins,cn=config" scope=1 filter="objectclass=vlvsearch" attrs=ALL
[08/Nov/2022:16:29:05.557250374 -0500] conn=2 (Internal) op=1(1)(1) RESULT err=0 tag=48 nentries=0 wtime=0.000016828 optime=0.000274854 etime=0.000288952
...
3.7.2. Configuring log levels using the web console
To manage how detailed logs are, specify log levels for access logging and error logging.
Prerequisites
- You are logged in to the web console.
- You enabled access and error logging.
Procedure
- Select the instance.
-
Navigate to
. -
Select the log type, for example,
Access Log. Click the button to see all available log levels for the log type.
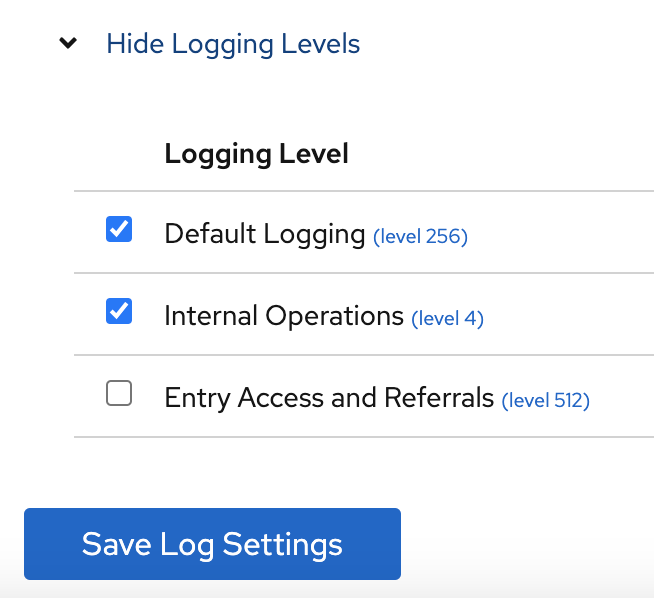
-
Select log levels, for example,
Default LoggingandInternal Operationslevels. - Click the button to apply changes.
Verification
To see if Directory Server started to log internal access events, do the following:
- Restart the instance by clicking button and then selecting . Directory Server restarts the instance and generates internal events.
-
Navigate to
. Refresh access log and view recorded internal events:
[08/Nov/2022:17:04:17.035502206 -0500] conn=6 (Internal) op=1(2)(1) SRCH base="cn=config,cn=Example database,cn=ldbm database,cn=plugins,cn=config" scope=1 filter="objectclass=vlvsearch" attrs=ALL
[08/Nov/2022:17:04:17.035579829 -0500] conn=6 (Internal) op=1(2)(1) RESULT err=0 tag=48 nentries=0 wtime=0.000004563 optime=0.000078000 etime=0.000081911
3.8. Configuring logging for plug-ins
By default, Directory Server does not log internal events which plug-ins initiate. To debug plug-in operations, you can enable access and audit logging for all plug-ins, or for specific plug-ins.
3.8.1. Configuring logging for all plug-ins
Use nsslapd-plugin-logging attribute to configure logging for all plug-ins.
Procedure
To enable access and audit logging for all plug-ins, use the following command:
# dsconf -D "cn=Directory Manager" instance_name config replace nsslapd-plugin-logging=on
3.8.2. Configuring logging for a specific plugin
Use nsslapd-logAccess and nsslapd-logAudit attributes to configure logging for a plug-in.
Prerequisites
-
The
nsslapd-accesslogattribute contains valid path and the filename for the access log file. -
The
nsslapd-auditlogattribute contains valid path and the filename for the audit log file.
Procedure
To enable access and audit logging for a specific plug-in, modify
nsslapd-logAccessandnsslapd-logAuditattributes using the LDAP interface:# ldapmodify -D "cn=Directory Manager" -W -x -H ldap://server.example.com:389 dn: cn=MemberOf Plugin,cn=plugins,cn=config changetype: modify replace: nsslapd-logAccess nsslapd-logAccess: on dn: cn=MemberOf Plugin,cn=plugins,cn=config changetype: modify replace: nsslapd-logAudit nsslapd-logAudit: on
3.9. Logging statistics per search operation
During some search operations, especially with filters such as (cn=user*), the time the server spends for receiving the tasks and then sending the result back (etime) can be very long.
Expanding the access log with information related to indexes used during search operation helps to diagnose why etime value is resource expensive.
Use the nsslapd-statlog-level attribute to enable collecting statistics, such as a number of index lookups (database read operations) and overall duration of index lookups for each search operation, with minimal impact on the server.
Prerequisites
- You enabled access logging.
Procedure
Enable search operation metrics:
# dsconf -D "cn=Directory Manager" instance_name config replace nsslapd-statlog-level=1Restart the instance:
# dsctl instance_name restart
Verification
Perform a search operation:
# ldapsearch -D "cn=Directory Manager" -H ldap://server.example.com -b "dc=example,dc=com" -s sub -x "cn=user*"View the access log file and find the search statistics records:
# cat /var/log/dirsrv/slapd-instance_name/access
...
[16/Nov/2022:11:34:11.834135997 +0100] conn=1 op=73 SRCH base="dc=example,dc=com" scope=2 filter="(cn=user)"* attrs=ALL
[16/Nov/2022:11:34:11.835750508 +0100] conn=1 op=73 STAT read index: attribute=objectclass key(eq)=referral --> count 0
[16/Nov/2022:11:34:11.836648697 +0100] conn=1 op=73 STAT read index: attribute=cn key(sub)=er_ --> count 25
[16/Nov/2022:11:34:11.837538489 +0100] conn=1 op=73 STAT read index: attribute=cn key(sub)=ser --> count 25
[16/Nov/2022:11:34:11.838814948 +0100] conn=1 op=73 STAT read index: attribute=cn key(sub)=use --> count 25
[16/Nov/2022:11:34:11.841241531 +0100] conn=1 op=73 STAT read index: attribute=cn key(sub)=^us --> count 25
[16/Nov/2022:11:34:11.842230318 +0100] conn=1 op=73 STAT read index: duration 0.000010276
[16/Nov/2022:11:34:11.843185322 +0100] conn=1 op=73 RESULT err=0 tag=101 nentries=24 wtime=0.000078414 optime=0.001614101 etime=0.001690742
...
3.10. Compressing log files
To save disc space, you can enable log file compression that compresses archived logs into .gzip files.
Use the dsconf config replace command to modify the following attributes that manage log file compression:
-
nsslapd-accesslog-compress(access log) -
nsslapd-errorlog-compress(error log) -
nsslapd-auditlog-compress(audit log) -
nsslapd-auditfaillog-compress(audit fail log) -
nsslapd-securitylog-compress(security log)
By default, Directory Server compresses only archived security log files.
Procedure
To enable log file compression, run:
# dsconf -D "cn=Directory Manager" instance_name config replace nsslapd-accesslog-compress=on nsslapd-errorlog-compress=onThe command enables compression for access and error logs.
To disable log file compression, run:
# dsconf -D "cn=Directory Manager" instance_name config replace nsslapd-accesslog-compress=offThe command disables compression for the access log.
Verification
Check that the log file directory contains compressed logs files:
# ls /var/log/dirsrv/slapd-instance_name/
3.11. Disabling log buffering for debugging purposes
For debugging purposes, you can disable log buffering, which is enabled by default for the access, audit, and audit fail logs. With log buffering disabled, Directory Server writes log entries directly to the disk.
Do not disable access logging in a normal operating environment. When you disable the buffering of an active log, Directory Server performance decreases, especially under heavy load.
3.11.1. Disabling log buffering using the command line
Use the dsconf utility to disable Directory Server log buffering. When log buffering is disabled, Directory Server writes log entries directly to the disk.
The following procedure disables the access log buffering.
Procedure
To disable the access log buffering, enter:
# dsconf <instance_name> config replace nsslapd-accesslog-logbuffering=offNoteBoth the audit and audit fail logs use the
nsslapd-auditlog-logbufferingattribute for the buffering configuration. Therefore, when you setnsslapd-auditlog-logbufferingtooff, buffering for both logs is disabled.
Verification
Display the access log in continuous mode:
# tail -f /var/log/dirsrv/slapd-<instance_name>/access- Perform actions in the directory, such as searches.
- Monitor the access log. Log entries appear without delay at the moment when users perform actions in the directory.
3.11.2. Disabling log buffering using the web console
Use the web console to disable Directory Server log buffering. When log buffering is disabled, Directory Server writes log entries directly to the disk.
The following procedure disables the access log buffering.
Procedure
-
Navigate to
. -
Deselect
Access Log Buffering Enabled. - Click .
To disable the audit fail log buffering, disable buffering for the the audit log on the
Verification
-
Navigate to
. -
Select
Continuously Refresh. - Perform actions in the directory, such as searches.
- Monitor the access log. Log entries appear without delay at the moment when users perform actions in the directory.