Chapter 14. Installing Red Hat Enterprise Linux 6 as a Xen guest on Red Hat Enterprise Linux 5
14.1. Installing Red Hat Enterprise Linux 6 as a Xen para-virtualized guest on Red Hat Enterprise Linux 5
Important
14.1.1. Using virt-install
virt-install command. For instructions on virt-manager, see the procedure in Section 14.1.2, “Using virt-manager”.
virt-install tool. This method installs Red Hat Enterprise Linux 6 from a remote server hosting the network installation tree. The installation instructions presented in this section are similar to installing from the minimal installation live CD-ROM.
Procedure 14.1. Creating a Xen para-virtualized Red Hat Enterprise Linux 6 guest with virt-install
Create the guest with the
virt-installcommandIn this example, the name of the guest is rhel6pv-64, the disk image file is rhel6pv-64.img and a local mirror of the Red Hat Enterprise Linux 6 installation tree is http://example.com/installation_tree/RHEL6-x86/.Replace these values with values for your system and network, and use the following commands to create the guest:virt-install --name=rhel6pv-64 \ --disk path=/var/lib/xen/images/rhel6pv-64.img,size=6,sparse=false \ --graphics spice --paravirt --vcpus=2 --ram=2048 \ --location=http://example.com/installation_tree/RHEL6-x86/
# virt-install --name=rhel6pv-64 \
--disk path=/var/lib/xen/images/rhel6pv-64.img,size=6,sparse=false \
--graphics spice --paravirt --vcpus=2 --ram=2048 \
--location=http://example.com/installation_tree/RHEL6-x86/
Copy to Clipboard Copied! Toggle word wrap Toggle overflow Note
Red Hat Enterprise Linux can be installed without a graphical interface or manual input. Use a Kickstart file to automate the installation process. This example extends the previous example with a Kickstart file, located athttp://example.com/kickstart/ks.cfg, to fully automate the installation.virt-install --name=rhel6pv-64 \ --disk path=/var/lib/xen/images/rhel6pv-64.img,size=6,sparse=false \ --graphics spice --paravirt --vcpus=2 --ram=2048 \ --location=http://example.com/installation_tree/RHEL6-x86/ \ -x "ks=http://example.com/kickstart/ks.cfg"
# virt-install --name=rhel6pv-64 \
--disk path=/var/lib/xen/images/rhel6pv-64.img,size=6,sparse=false \
--graphics spice --paravirt --vcpus=2 --ram=2048 \
--location=http://example.com/installation_tree/RHEL6-x86/ \
-x "ks=http://example.com/kickstart/ks.cfg"
Copy to Clipboard Copied! Toggle word wrap Toggle overflow The graphical console opens showing the initial boot phase of the guest.Install Red Hat Enterprise Linux 6
After your guest has completed its initial boot, the standard installation process for Red Hat Enterprise Linux 6 starts.See the Red Hat Enterprise Linux 6 Installation Guide for more information on installing Red Hat Enterprise Linux 6.
14.1.2. Using virt-manager
Procedure 14.2. Creating a Xen virtualized Red Hat Enterprise Linux 6 guest with virt-manager
Open virt-manager
Startvirt-manager. Launch the application from the menu and submenu. Alternatively, run thevirt-managercommand as root.Select the hypervisor
Select the Xen hypervisor connection. Note that presently the KVM hypervisor is namedqemu.If you have not already done so, connect to a hypervisor. Open the File menu and select the Add Connection... option. See the Red Hat Enterprise Linux Virtualization Administration Guide for further details about adding a remote connection.Start the new virtual machine wizard
Once a hypervisor connection is selected the New button becomes available. Clicking the New button starts the virtual machine creation wizard, which explains the steps that follow.Figure 14.1. The virtual machine creation wizard
Click to continue.Name the virtual machine
Provide a name for your virtualized guest. The following punctuation and whitespace characters are permitted: '_', '.' and '-' characters.Figure 14.2. The virtual machine creation wizard
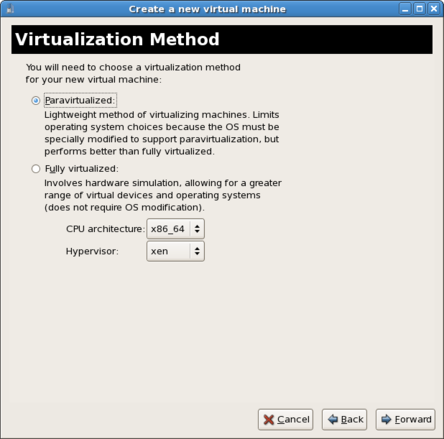
Click to continue.Select the virtualization method
Select the appropriate virtualization method. The following example uses Para-virtualization.Figure 14.3. The virtual machine creation wizard
Click to continue.Select the installation method and type
Select the appropriate installation method. In this example, use the Network install tree method.Set the OS Type and OS Variant. In this case, we set OS Type to Linux and OS Variant to Red Hat Enterprise Linux 6.Figure 14.4. The virtual machine creation wizard
Click to continue.Locate installation media
Enter the location of the installation tree.Figure 14.5. The virtual machine creation wizard
Click to continue.Storage setup
Important
Xen file-based images should be stored in the/var/lib/xen/images/directory. Any other location may require additional configuration for SELinux. See the Red Hat Enterprise Linux 6 Virtualization Administration Guide for more information on configuring SELinux.Assign a physical storage device (Block device) or a file-based image (File). Assign sufficient space for your virtualized guest and any applications the guest requires.Figure 14.6. The virtual machine creation wizard
Click to continue.Note
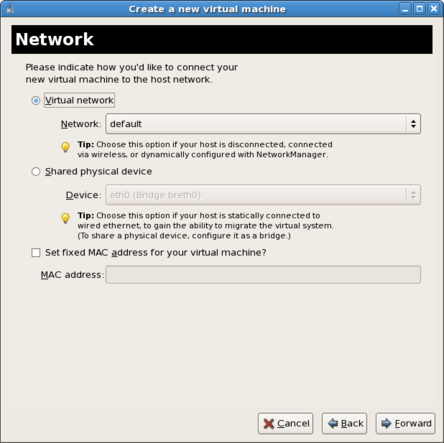
Live and offline migrations require guests to be installed on shared network storage. For information on setting up shared storage for guests, see the Red Hat Enterprise Linux 6 Virtualization Administration Guide chapter on Storage Pools.Network setup
Select either Virtual network or Shared physical device.The virtual network option uses Network Address Translation (NAT) to share the default network device with the virtualized guest.The shared physical device option uses a network bridge to give the virtualized guest full access to a network device.Figure 14.7. The virtual machine creation wizard
Click to continue.Memory and CPU allocation
The Memory and CPU Allocation window displays. Choose appropriate values for the virtualized CPUs and RAM allocation. These values affect the host's and guest's performance.Virtualized guests require sufficient physical memory (RAM) to run efficiently and effectively. Choose a memory value which suits your guest operating system and application requirements. Remember, Xen guests use physical RAM. Running too many guests or leaving insufficient memory for the host system results in significant usage of virtual memory and swapping. Virtual memory is significantly slower which causes degraded system performance and responsiveness. Ensure that you allocate sufficient memory for all guests and the host to operate effectively.Assign sufficient virtual CPUs for the virtualized guest. If the guest runs a multithreaded application, assign the number of virtualized CPUs the guest will require to run efficiently. Do not assign more virtual CPUs than there are physical processors (or hyper-threads) available on the host system. It is possible to over-allocate virtual processors, however, over-allocating vCPUs has a significant, negative effect on Xen guest and host performance.Figure 14.8. The virtual machine creation wizard
Click to continue.Verify and start guest installation
Verify the configuration.Figure 14.9. The virtual machine creation wizard
Click to start the guest installation procedure.Installing Red Hat Enterprise Linux
Complete the Red Hat Enterprise Linux installation sequence. See the Red Hat Enterprise Linux 6 Installation Guide for detailed installation instructions.


