Chapter 5. Setting up an IPsec VPN
Configure and manage a secure Virtual Private Network (VPN) by using the Libreswan implementation of the IPsec protocol suite to create encrypted tunnels for secure data transmission over the internet.
IPsec tunnels ensure the confidentiality and integrity of data in transit. Common use cases include connecting branch offices to headquarters or providing remote users with secure access to a corporate network.
RHEL provides different options to configure Libreswan:
- Manually edit the Libreswan configuration files for granular control over advanced options.
-
Use the
vpnRHEL system role to automate the process of creating Libreswan VPN configurations.
Libreswan does not use terms such as "client" and "server". Instead, IPsec refers to endpoints as "left" and "right". This design often enables you to use the same configuration on both hosts because Libreswan dynamically determines which role to adopt. As a convention, administrators typically use "left" for the local host and "right" for the remote host.
Libreswan is the only supported VPN technology in RHEL.
IPsec relies on standardized protocols, such as Internet Key Exchange (IKE), to ensure that different systems can communicate effectively. However, in practice, minor differences in how vendors implement these standards can lead to compatibility problems. If you encounter such interoperability issues when connecting Libreswan to a third-party IPsec peer, contact Red Hat Support.
5.1. Components in an IPsec VPN
Before setting up an IPsec VPN, it is important to understand its main components: Internet Key Exchange (IKE) for authentication and negotiation, and IPsec for data encryption and transport.
IKE is the protocol two endpoints use to authenticate each other and negotiate connection rules, including encryption algorithms. Libreswan implements IKE in a daemon called pluto.
IPsec is the part of the protocol that actually encrypts and transports data according to the policy agreed upon during the IKE negotiation. The Linux kernel implements the IPsec protocol suite.
5.2. Libreswan authentication methods
Select the appropriate authentication method to establish a secure VPN connection based on your security needs and network environment.
Libreswan supports the following authentication methods:
- Pre-Shared key
- The Pre-Shared Key (PSK) method involves both endpoints by using the same secret to authenticate each other. PSKs offer simplicity and broad compatibility, making them suitable for small-scale deployments. However, managing PSKs is risky if the key is reused or not rotated frequently. For security, PSKs should consist of more than 64 random characters and must meet FIPS strength requirements if your host operates in FIPS mode.
- Raw RSA key
- This method uses an RSA public and private key pair on each peer for mutual identification. Raw RSA keys provide stronger security than PSKs and are ideal for environments where a full certificate infrastructure is not required.
- X.509 certificates
- This method uses X.509 certificates issued by a trusted Certificate Authority (CA). Each peer proves its identity by using its certificate and private key, which the other peer verifies against the trusted CA. While providing the highest level of security and scalability for large enterprises, this method is more complex as it requires deploying and maintaining a public key infrastructure (PKI).
- NULL authentication
- This method provides only encryption with no authentication between peers. Because it does not verify the identity of the remote endpoint, NULL authentication is insecure and offers no protection against man-in-the-middle attacks.
- Protection against quantum computers
- While not a standalone authentication method, Libreswan offers Post-quantum Pre-shared Keys (PPKs) to protect modern IKEv2 connections from future attacks by quantum computers. This feature is necessary because neither the older IKEv1 protocol nor standard IKEv2 is inherently quantum-resistant on its own. A PPK adds another layer of security on top of the primary authentication method, and its security relies on using a cryptographically strong key that has been distributed securely through an external communication channel.
5.3. Installing Libreswan
Before you can set a VPN through the Libreswan IPsec/IKE implementation, you must install the corresponding packages, start the ipsec service, and allow the service in your firewall.
Prerequisites
-
The
AppStreamrepository is enabled.
Procedure
Install the
libreswanpackages:# yum install libreswanIf you are re-installing Libreswan, remove its old database files and create a new database:
# systemctl stop ipsec
# rm /etc/ipsec.d/*db
# ipsec initnss
Start the
ipsecservice, and enable the service to be started automatically on boot:# systemctl enable ipsec --nowConfigure the firewall to allow 500 and 4500/UDP ports for the IKE, ESP, and AH protocols by adding the
ipsecservice:# firewall-cmd --add-service="ipsec" # firewall-cmd --runtime-to-permanent
5.4. Creating a host-to-host VPN
You can configure Libreswan to create a host-to-host IPsec VPN between two hosts referred to as left and right using authentication by raw RSA keys.
Prerequisites
-
Libreswan is installed and the
ipsecservice is started on each node.
Procedure
Generate a raw RSA key pair on each host:
# ipsec newhostkeyThe previous step returned the generated key’s
ckaid. Use thatckaidwith the following command on left, for example:# ipsec showhostkey --left --ckaid 2d3ea57b61c9419dfd6cf43a1eb6cb306c0e857dThe output of the previous command generated the
leftrsasigkey=line required for the configuration. Do the same on the second host (right):# ipsec showhostkey --right --ckaid a9e1f6ce9ecd3608c24e8f701318383f41798f03In the
/etc/ipsec.d/directory, create a newmy_host-to-host.conffile. Write the RSA host keys from the output of theipsec showhostkeycommands in the previous step to the new file. For example:conn mytunnel leftid=@west left=192.1.2.23 leftrsasigkey=0sAQOrlo+hOafUZDlCQmXFrje/oZm [...] W2n417C/4urYHQkCvuIQ== rightid=@east right=192.1.2.45 rightrsasigkey=0sAQO3fwC6nSSGgt64DWiYZzuHbc4 [...] D/v8t5YTQ== authby=rsasigAfter importing keys, restart the
ipsecservice:# systemctl restart ipsecLoad the connection:
# ipsec auto --add mytunnelEstablish the tunnel:
# ipsec auto --up mytunnelTo automatically start the tunnel when the
ipsecservice is started, add the following line to the connection definition:auto=start- If you use this host in a network with DHCP or Stateless Address Autoconfiguration (SLAAC), the connection can be vulnerable to being redirected. For details and mitigation steps, see Assigning a VPN connection to a dedicated routing table to prevent the connection from bypassing the tunnel.
5.5. Configuring a site-to-site VPN
To create a site-to-site IPsec VPN, by joining two networks, an IPsec tunnel between the two hosts is created. The hosts thus act as the end points, which are configured to permit traffic from one or more subnets to pass through. Therefore you can think of the host as gateways to the remote portion of the network.
The configuration of the site-to-site VPN only differs from the host-to-host VPN in that one or more networks or subnets must be specified in the configuration file.
Prerequisites
- A host-to-host VPN is already configured.
Procedure
Copy the file with the configuration of your host-to-host VPN to a new file, for example:
# cp /etc/ipsec.d/my_host-to-host.conf /etc/ipsec.d/my_site-to-site.confAdd the subnet configuration to the file created in the previous step, for example:
conn mysubnet also=mytunnel leftsubnet=192.0.1.0/24 rightsubnet=192.0.2.0/24 auto=start conn mysubnet6 also=mytunnel leftsubnet=2001:db8:0:1::/64 rightsubnet=2001:db8:0:2::/64 auto=start # the following part of the configuration file is the same for both host-to-host and site-to-site connections: conn mytunnel leftid=@west left=192.1.2.23 leftrsasigkey=0sAQOrlo+hOafUZDlCQmXFrje/oZm [...] W2n417C/4urYHQkCvuIQ== rightid=@east right=192.1.2.45 rightrsasigkey=0sAQO3fwC6nSSGgt64DWiYZzuHbc4 [...] D/v8t5YTQ== authby=rsasig- If you use this host in a network with DHCP or Stateless Address Autoconfiguration (SLAAC), the connection can be vulnerable to being redirected. For details and mitigation steps, see Assigning a VPN connection to a dedicated routing table to prevent the connection from bypassing the tunnel.
5.6. Configuring a remote access VPN
Road warriors are traveling users with mobile clients and a dynamically assigned IP address. The mobile clients authenticate using X.509 certificates.
The following example shows configuration for IKEv2, and it avoids using the IKEv1 XAUTH protocol.
On the server:
conn roadwarriors
    ikev2=insist
    # support (roaming) MOBIKE clients (RFC 4555)
    mobike=yes
    fragmentation=yes
    left=1.2.3.4
    # if access to the LAN is given, enable this, otherwise use 0.0.0.0/0
    # leftsubnet=10.10.0.0/16
    leftsubnet=0.0.0.0/0
    leftcert=gw.example.com
    leftid=%fromcert
    leftxauthserver=yes
    leftmodecfgserver=yes
    right=%any
    # trust our own Certificate Agency
    rightca=%same
    # pick an IP address pool to assign to remote users
    # 100.64.0.0/16 prevents RFC1918 clashes when remote users are behind NAT
    rightaddresspool=100.64.13.100-100.64.13.254
    # if you want remote clients to use some local DNS zones and servers
    modecfgdns="1.2.3.4, 5.6.7.8"
    modecfgdomains="internal.company.com, corp"
    rightxauthclient=yes
    rightmodecfgclient=yes
    authby=rsasig
    # Optional: Run the client X.509 ID through pam to allow or deny client
    # pam-authorize=yes
    # load connection, do not initiate
    auto=add
    # kill vanished roadwarriors
    dpddelay=1m
    dpdtimeout=5m
    dpdaction=clear
On the mobile client, the road warrior’s device, use a slight variation of the previous configuration:
conn to-vpn-server
    ikev2=insist
    # pick up our dynamic IP
    left=%defaultroute
    leftsubnet=0.0.0.0/0
    leftcert=myname.example.com
    leftid=%fromcert
    leftmodecfgclient=yes
    # right can also be a DNS hostname
    right=1.2.3.4
    # if access to the remote LAN is required, enable this, otherwise use 0.0.0.0/0
    # rightsubnet=10.10.0.0/16
    rightsubnet=0.0.0.0/0
    fragmentation=yes
    # trust our own Certificate Agency
    rightca=%same
    authby=rsasig
    # allow narrowing to the server’s suggested assigned IP and remote subnet
    narrowing=yes
    # support (roaming) MOBIKE clients (RFC 4555)
    mobike=yes
    # initiate connection
auto=startIf you use this host in a network with DHCP or Stateless Address Autoconfiguration (SLAAC), the connection can be vulnerable to being redirected. For details and mitigation steps, see Assigning a VPN connection to a dedicated routing table to prevent the connection from bypassing the tunnel.
5.7. Configuring a mesh VPN
An IPsec mesh creates a fully interconnected network where every server can communicate securely and directly with every other server. This is ideal for distributed database clusters or high-availability environments that span multiple data centers or cloud providers.
The mesh VPN network can be configured in two ways:
- To require IPsec.
- To prefer IPsec but allow a fallback to clear-text communication.
Authentication between the nodes can be based on X.509 certificates or on DNS Security Extensions (DNSSEC).
You can use any regular IKEv2 authentication method for opportunistic IPsec, because these connections are regular Libreswan configurations, except for the opportunistic IPsec that is defined by right=%opportunisticgroup entry. A common authentication method is for hosts to authenticate each other based on X.509 certificates using a commonly shared certification authority (CA). Cloud deployments typically issue certificates for each node in the cloud as part of the standard procedure.
Do not use PreSharedKey (PSK) authentication because one compromised host would result in the group PSK secret being compromised as well.
You can use NULL authentication to deploy encryption between nodes without authentication, which protects only against passive attackers.
The following procedure uses X.509 certificates. You can generate these certificates by using any kind of CA management system, such as the Dogtag Certificate System. Dogtag assumes that the certificates for each node are available in the PKCS #12 format (.p12 files), which contain the private key, the node certificate, and the Root CA certificate used to validate other nodes' X.509 certificates.
Each node has an identical configuration with the exception of its X.509 certificate. This allows for adding new nodes without reconfiguring any of the existing nodes in the network. The PKCS #12 files require a "friendly name", for which we use the name "node" so that the configuration files referencing the friendly name can be identical for all nodes.
Prerequisites
-
Libreswan is installed, and the
ipsecservice is started on each node. A new NSS database is initialized.
If you already have an old NSS database, remove the old database files:
# systemctl stop ipsec
# rm /etc/ipsec.d/*db
You can initialize a new database with the following command:
# ipsec initnss
Procedure
On each node, import PKCS #12 files. This step requires the password used to generate the PKCS #12 files:
# ipsec import nodeXXX.p12Create the following three connection definitions for the
IPsec required(private),IPsec optional(private-or-clear), andNo IPsec(clear) profiles:# cat /etc/ipsec.d/mesh.conf conn clear auto=ondemand type=passthrough authby=never left=%defaultroute right=%group conn private auto=ondemand type=transport authby=rsasig failureshunt=drop negotiationshunt=drop ikev2=insist left=%defaultroute leftcert=nodeXXXX leftid=%fromcert rightid=%fromcert right=%opportunisticgroup conn private-or-clear auto=ondemand type=transport authby=rsasig failureshunt=passthrough negotiationshunt=passthrough # left left=%defaultroute leftcert=nodeXXXX leftid=%fromcert leftrsasigkey=%cert # right rightrsasigkey=%cert rightid=%fromcert right=%opportunisticgroupwhere:
auto=<option>Specifies how Libreswan handles connection initiation. Valid options:
-
ondemand: Initiates a connection automatically when the kernel receives the first packet that matches a trap XFRM policy. Use this option for opportunistic IPsec or for connections that do not need to be active continuously. -
add: Prepares the connection and accepts incoming connection requests. To initiate the connection from the local peer, use theipsec auto --upcommand. -
start: Automatically activates the connection when the Libreswan service starts.
-
leftid=%fromcertandrightid=%fromcert- Configures Libreswan to retrieve the identity from the distinguished name (DN) field of the certificate.
leftcert="<server_certificate_nickname>"- Specifies the nickname of the server’s certificate used in the NSS database.
Add the IP address of the network to the corresponding category. For example, if all nodes reside in the
10.15.0.0/16network, and all nodes must use IPsec encryption:# echo "10.15.0.0/16" >> /etc/ipsec.d/policies/privateTo allow certain nodes, for example,
10.15.34.0/24, to work with and without IPsec, add those nodes to the private-or-clear group:# echo "10.15.34.0/24" >> /etc/ipsec.d/policies/private-or-clearTo define a host, for example,
10.15.1.2, which is not capable of IPsec into the clear group, use:# echo "10.15.1.2/32" >> /etc/ipsec.d/policies/clearYou can create the files in the
/etc/ipsec.d/policiesdirectory from a template for each new node, or you can provision them by using Puppet or Ansible.Note that every node has the same list of exceptions or different traffic flow expectations. Two nodes, therefore, might not be able to communicate because one requires IPsec and the other cannot use IPsec.
Restart the node to add it to the configured mesh:
# systemctl restart ipsec- If you use this host in a network with DHCP or Stateless Address Autoconfiguration (SLAAC), the connection can be vulnerable to being redirected. For details and mitigation steps, see Assigning a VPN connection to a dedicated routing table to prevent the connection from bypassing the tunnel.
Verification
Open an IPsec tunnel by using the
pingcommand:# ping <nodeYYY>Display the NSS database with the imported certification:
# certutil -L -d sql:/etc/ipsec.d

Certificate Nickname    Trust Attributes
                        SSL,S/MIME,JAR/XPI

west                    u,u,u
ca                      CT,,
See which tunnels are open on the node:
# ipsec trafficstatus
006 #2: "private#10.15.0.0/16"[1] ...<nodeYYY>, type=ESP, add_time=1691399301, inBytes=512, outBytes=512, maxBytes=2^63B, id='C=US, ST=NC, O=Example Organization, CN=east'
5.8. Deploying a FIPS-compliant IPsec VPN
RHEL in Federal Information Processing Standard (FIPS) mode exclusively uses validated cryptographic modules, automatically disabling legacy protocols and ciphers. Enabling FIPS mode is often a requirement for federal compliance and enhances system security.
The Libreswan IPsec implementation provided by RHEL is fully FIPS-compliant. When the system is in FIPS mode, Libreswan automatically uses the certified cryptographic modules without requiring any additional configuration, regardless of whether Libreswan is installed on a new FIPS-enabled system or when FIPS mode is activated on a system with an existing Libreswan VPN.
Prerequisites
-
The
AppStreamrepository is enabled.
Procedure
Install the
libreswanpackages:# yum install libreswanIf you are re-installing Libreswan, remove its old NSS database:
# systemctl stop ipsec
# rm /etc/ipsec.d/*db
Start the
ipsecservice, and enable the service to be started automatically on boot:# systemctl enable ipsec --nowConfigure the firewall to allow
500and4500UDP ports for the IKE, ESP, and AH protocols by adding theipsecservice:# firewall-cmd --add-service="ipsec" # firewall-cmd --runtime-to-permanentSwitch the system to FIPS mode:
# fips-mode-setup --enableRestart your system to allow the kernel to switch to FIPS mode:
# reboot
Verification
Confirm Libreswan is running in FIPS mode:
# ipsec whack --fipsstatus
000 FIPS mode enabled
Alternatively, check entries for the
ipsecunit in thesystemdjournal:$ journalctl -u ipsec ... Jan 22 11:26:50 localhost.localdomain pluto[3076]: FIPS Product: YES Jan 22 11:26:50 localhost.localdomain pluto[3076]: FIPS Kernel: YES Jan 22 11:26:50 localhost.localdomain pluto[3076]: FIPS Mode: YESTo see the available algorithms in FIPS mode:
# ipsec pluto --selftest 2>&1 | head -11
FIPS Product: YES
FIPS Kernel: YES
FIPS Mode: YES
NSS DB directory: sql:/etc/ipsec.d
Initializing NSS
Opening NSS database "sql:/etc/ipsec.d" read-only
NSS initialized
NSS crypto library initialized
FIPS HMAC integrity support [enabled]
FIPS mode enabled for pluto daemon
NSS library is running in FIPS mode
FIPS HMAC integrity verification self-test passed
To query disabled algorithms in FIPS mode:
# ipsec pluto --selftest 2>&1 | grep disabled
Encryption algorithm CAMELLIA_CTR disabled; not FIPS compliant
Encryption algorithm CAMELLIA_CBC disabled; not FIPS compliant
Encryption algorithm SERPENT_CBC disabled; not FIPS compliant
Encryption algorithm TWOFISH_CBC disabled; not FIPS compliant
Encryption algorithm TWOFISH_SSH disabled; not FIPS compliant
Encryption algorithm NULL disabled; not FIPS compliant
Encryption algorithm CHACHA20_POLY1305 disabled; not FIPS compliant
Hash algorithm MD5 disabled; not FIPS compliant
PRF algorithm HMAC_MD5 disabled; not FIPS compliant
PRF algorithm AES_XCBC disabled; not FIPS compliant
Integrity algorithm HMAC_MD5_96 disabled; not FIPS compliant
Integrity algorithm HMAC_SHA2_256_TRUNCBUG disabled; not FIPS compliant
Integrity algorithm AES_XCBC_96 disabled; not FIPS compliant
DH algorithm MODP1024 disabled; not FIPS compliant
DH algorithm MODP1536 disabled; not FIPS compliant
DH algorithm DH31 disabled; not FIPS compliant
To list all allowed algorithms and ciphers in FIPS mode:
# ipsec pluto --selftest 2>&1 | grep ESP | grep FIPS | sed "s/^.*FIPS//"
{256,192,*128}  aes_ccm, aes_ccm_c
{256,192,*128}  aes_ccm_b
{256,192,*128}  aes_ccm_a
[*192]  3des
{256,192,*128}  aes_gcm, aes_gcm_c
{256,192,*128}  aes_gcm_b
{256,192,*128}  aes_gcm_a
{256,192,*128}  aesctr
{256,192,*128}  aes
{256,192,*128}  aes_gmac
sha, sha1, sha1_96, hmac_sha1
sha512, sha2_512, sha2_512_256, hmac_sha2_512
sha384, sha2_384, sha2_384_192, hmac_sha2_384
sha2, sha256, sha2_256, sha2_256_128, hmac_sha2_256
aes_cmac
null
null, dh0
dh14
dh15
dh16
dh17
dh18
ecp_256, ecp256
ecp_384, ecp384
ecp_521, ecp521
5.9. Protecting the IPsec NSS database by a password
By default, only the root user can access the IPsec Network Security Services (NSS) database in the /etc/ipsec.d/ directory. You can additionally protect the database with a password. This is required if you run RHEL in Federal Information Processing Standard (FIPS) mode.
In the previous releases of RHEL up to version 6.6, you had to protect the IPsec NSS database with a password to meet the FIPS 140-2 requirements because the NSS cryptographic libraries were certified for the FIPS 140-2 Level 2 standard. In RHEL 8, NIST certified NSS to Level 1 of this standard, and this status does not require password protection for the database.
Prerequisites
-
The
/etc/ipsec.d/directory contains NSS database files.
Procedure
Enable password protection for the
NSSdatabase for Libreswan:# certutil -N -d sql:/etc/ipsec.d Enter Password or Pin for "NSS Certificate DB": Enter a password which will be used to encrypt your keys. The password should be at least 8 characters long, and should contain at least one non-alphabetic character. Enter new password:Create the
/etc/ipsec.d/nsspasswordfile that contains the password you have set in the previous step, for example:# cat /etc/ipsec.d/nsspassword NSS Certificate DB:_<password>_The
nsspasswordfile use the following syntax:<token_1>:<password1> <token_2>:<password2>The default NSS software token is
NSS Certificate DB. If your system is running in FIPS mode, the name of the token isNSS FIPS 140-2 Certificate DB.Depending on your scenario, either start or restart the
ipsecservice after you finish thensspasswordfile:# systemctl restart ipsec
Verification
Check that the
ipsecservice is running after you have added a non-empty password to its NSS database:# systemctl status ipsec ● ipsec.service - Internet Key Exchange (IKE) Protocol Daemon for IPsec Loaded: loaded (/usr/lib/systemd/system/ipsec.service; enabled; vendor preset: disable> Active: active (running)...Check that the
Journallog contains entries that confirm a successful initialization:# journalctl -u ipsec ... pluto[6214]: Initializing NSS using read-write database "sql:/etc/ipsec.d" pluto[6214]: NSS Password from file "/etc/ipsec.d/nsspassword" for token "NSS Certificate DB" with length 20 passed to NSS pluto[6214]: NSS crypto library initialized ...
5.10. Configuring TCP fallback for an IPsec VPN connection
Standard IPsec VPNs can fail on restrictive networks that block the UDP and Encapsulating Security Payload (ESP) protocols. To ensure connectivity in such environments, Libreswan can encapsulate all VPN traffic within a TCP connection.
Encapsulating VPN packets within TCP can reduce throughput and increase latency. For this reason, use TCP encapsulation only as a fallback option or if UDP-based connections are consistently blocked in your environment.
Prerequisites
- The IPsec connection is configured.
Procedure
Edit the
/etc/ipsec.conffile, and make the following changes in theconfig setupsection:Configure Libreswan to listen on a TCP port:
listen-tcp=yesBy default, Libreswan listens on port 4500. If you want to use a different port, enter:
tcp-remoteport=<port_number>Decide whether TCP should be used as a fallback option if UDP is not available or permanent:
As a fallback option, enter:
enable-tcp=fallback
retransmit-timeout=5s
By default, Libreswan waits 60 seconds after a failed attempt to connect by using UDP before retrying the connection over TCP. Lowering the
retransmit-timeoutvalue shortens the delay, enabling the fallback protocol to initiate more quickly.As a permanent replacement for UDP, enter:
enable-tcp=yes
Restart the
ipsecservice:# systemctl restart ipsecIf you configured a TCP port other than the default 4500, open the port in the firewall:
# firewall-cmd --permanent --add-port=<tcp_port>/tcp # firewall-cmd --reload- Repeat the procedure on the peers that use this gateway.
5.11. Configuring automatic detection and usage of ESP hardware offload to accelerate an IPsec connection
Offloading Encapsulating Security Payload (ESP) to the hardware accelerates IPsec connections over Ethernet. By default, Libreswan detects and enables hardware support. In case that the feature was disabled or explicitly enabled, you can switch back to automatic detection.
Prerequisites
- The network card supports ESP hardware offload.
- The network driver supports ESP hardware offload.
- The IPsec connection is configured and works.
Procedure
-
Edit the Libreswan configuration file in the
/etc/ipsec.d/directory of the connection that should use automatic detection of ESP hardware offload support. -
Ensure the
nic-offloadparameter is not set in the connection’s settings. If you removed
nic-offload, restart theipsecservice:# systemctl restart ipsec
Verification
Display the
tx_ipsecandrx_ipseccounters of the Ethernet device the IPsec connection uses:# ethtool -S enp1s0 | grep -E "_ipsec" tx_ipsec: 10 rx_ipsec: 10Send traffic through the IPsec tunnel. For example, ping a remote IP address:
# ping -c 5 remote_ip_addressDisplay the
tx_ipsecandrx_ipseccounters of the Ethernet device again:# ethtool -S enp1s0 | grep -E "_ipsec" tx_ipsec: 15 rx_ipsec: 15If the counter values have increased, ESP hardware offload works.
5.12. Configuring ESP hardware offload on a bond to accelerate an IPsec connection
Offloading Encapsulating Security Payload (ESP) to the hardware accelerates IPsec connections. If you use a network bond for fail-over reasons, the requirements and the procedure to configure ESP hardware offload are different from those using a regular Ethernet device. For example, in this scenario, you enable the offload support on the bond, and the kernel applies the settings to the ports of the bond.
Prerequisites
-
All network cards in the bond support ESP hardware offload. Use the
ethtool -k <interface_name> | grep "esp-hw-offload"command to verify whether each bond port supports this feature. - The bond is configured and works.
-
The bond uses the
active-backupmode. The bonding driver does not support any other modes for this feature. - The IPsec connection is configured and works.
Procedure
Enable ESP hardware offload support on the network bond:
# nmcli connection modify bond0 ethtool.feature-esp-hw-offload onThis command enables ESP hardware offload support on the
bond0connection.Reactivate the
bond0connection:# nmcli connection up bond0Edit the Libreswan configuration file in the
/etc/ipsec.d/directory of the connection that should use ESP hardware offload, and append thenic-offload=yesstatement to the connection entry:conn example ... nic-offload=yesRestart the
ipsecservice:# systemctl restart ipsec
Verification
The verification methods depend on various aspects, such as the kernel version and driver. For example, certain drivers provide counters, but their names can vary. See the documentation of your network driver for details.
The following verification steps work for the ixgbe driver on Red Hat Enterprise Linux 8:
Display the active port of the bond:
# grep "Currently Active Slave" /proc/net/bonding/bond0
Currently Active Slave: enp1s0
Display the
tx_ipsecandrx_ipseccounters of the active port:# ethtool -S enp1s0 | grep -E "_ipsec" tx_ipsec: 10 rx_ipsec: 10Send traffic through the IPsec tunnel. For example, ping a remote IP address:
# ping -c 5 remote_ip_addressDisplay the
tx_ipsecandrx_ipseccounters of the active port again:# ethtool -S enp1s0 | grep -E "_ipsec" tx_ipsec: 15 rx_ipsec: 15If the counter values have increased, ESP hardware offload works.
5.13. Configuring IPsec VPN connections by using RHEL system roles
Configure IPsec VPN connections to establish encrypted tunnels over untrusted networks and ensure the integrity of data in transit. By using the RHEL system roles, you can automate the setup for use cases, such as connecting branch offices to headquarters.
The vpn RHEL system role can only create VPN configurations that use pre-shared keys (PSKs) or certificates to authenticate peers to each other.
5.13.1. Configuring an IPsec host-to-host VPN with PSK authentication by using the vpn RHEL system role
A host-to-host VPN establishes an encrypted connection between two devices, allowing applications to communicate safely over an insecure network. By using the vpn RHEL system role, you can automate the process of creating IPsec host-to-host connections.
For authentication, a pre-shared key (PSK) is a straightforward method that uses a single, shared secret known only to the two peers. This approach is simple to configure and ideal for basic setups where ease of deployment is a priority. However, you must keep the key strictly confidential. An attacker with access to the key can compromise the connection.
Prerequisites
- You have prepared the control node and the managed nodes.
-
The account you use to connect to the managed nodes has
sudopermissions for these nodes.
Procedure
Create a playbook file, for example,
~/playbook.yml, with the following content:--- - name: Configuring VPN hosts: managed-node-01.example.com, managed-node-02.example.com tasks: - name: IPsec VPN with PSK authentication ansible.builtin.include_role: name: redhat.rhel_system_roles.vpn vars: vpn_connections: - hosts: managed-node-01.example.com: managed-node-02.example.com: auth_method: psk auto: start vpn_manage_firewall: true vpn_manage_selinux: trueThe settings specified in the example playbook include the following:
hosts: <list>Defines a YAML dictionary with the peers between which you want to configure a VPN. If an entry is not an Ansible managed node, you must specify its fully-qualified domain name (FQDN) or IP address in the
hostnameparameter, for example:... - hosts: ... external-host.example.com: hostname: 192.0.2.1The role configures the VPN connection on each managed node. The connections are named
<peer_A>-to-<peer_B>, for example,managed-node-01.example.com-to-managed-node-02.example.com. Note that the role cannot configure Libreswan on external (unmanaged) nodes. You must manually create the configuration on these peers.auth_method: psk-
Enables PSK authentication between the peers. The role uses
opensslon the control node to create the PSK. auto: <startup_method>-
Specifies the startup method of the connection. Valid values are
add,ondemand,start, andignore. For details, see theipsec.conf(5)man page on a system with Libreswan installed. The default value of this variable is null, which means no automatic startup operation. vpn_manage_firewall: true-
Defines that the role opens the required ports in the
firewalldservice on the managed nodes. vpn_manage_selinux: true- Defines that the role sets the required SELinux port type on the IPsec ports.
For details about all variables used in the playbook, see the
/usr/share/ansible/roles/rhel-system-roles.vpn/README.mdfile on the control node.Validate the playbook syntax:
$ ansible-playbook --syntax-check ~/playbook.ymlNote that this command only validates the syntax and does not protect against a wrong but valid configuration.
Run the playbook:
$ ansible-playbook ~/playbook.yml
Verification
Confirm that the connections are successfully started, for example:
# ansible managed-node-01.example.com -m shell -a 'ipsec trafficstatus | grep "managed-node-01.example.com-to-managed-node-02.example.com"'
...
006 #3: "managed-node-01.example.com-to-managed-node-02.example.com", type=ESP, add_time=1741857153, inBytes=38622, outBytes=324626, maxBytes=2^63B, id='@managed-node-02.example.com'
Note that this command only succeeds if the VPN connection is active. If you set the
autovariable in the playbook to a value other thanstart, you might need to manually activate the connection on the managed nodes first.
Use the vpn RHEL system role to automate the process of creating an IPsec host-to-host VPN. To enhance security by minimizing the risk of control messages being intercepted or disrupted, configure separate connections for both the data traffic and the control traffic.
A host-to-host VPN establishes a direct, secure, and encrypted connection between two devices, allowing applications to communicate safely over an insecure network, such as the internet.
For authentication, a pre-shared key (PSK) is a straightforward method that uses a single, shared secret known only to the two peers. This approach is simple to configure and ideal for basic setups where ease of deployment is a priority. However, you must keep the key strictly confidential. An attacker with access to the key can compromise the connection.
Prerequisites
- You have prepared the control node and the managed nodes.
-
The account you use to connect to the managed nodes has
sudopermissions for these nodes.
Procedure
Create a playbook file, for example,
~/playbook.yml, with the following content:--- - name: Configuring VPN hosts: managed-node-01.example.com, managed-node-02.example.com tasks: - name: IPsec VPN with PSK authentication ansible.builtin.include_role: name: redhat.rhel_system_roles.vpn vars: vpn_connections: - name: control_plane_vpn hosts: managed-node-01.example.com: hostname: 203.0.113.1 # IP address for the control plane managed-node-02.example.com: hostname: 198.51.100.2 # IP address for the control plane auth_method: psk auto: start - name: data_plane_vpn hosts: managed-node-01.example.com: hostname: 10.0.0.1 # IP address for the data plane managed-node-02.example.com: hostname: 172.16.0.2 # IP address for the data plane auth_method: psk auto: start vpn_manage_firewall: true vpn_manage_selinux: trueThe settings specified in the example playbook include the following:
hosts: <list>Defines a YAML dictionary with the hosts between which you want to configure a VPN. The connections are named
<name>-<IP_address_A>-to-<IP_address_B>, for examplecontrol_plane_vpn-203.0.113.1-to-198.51.100.2.The role configures the VPN connection on each managed node. Note that the role cannot configure Libreswan on external (unmanaged) nodes. You must manually create the configuration on these hosts.
auth_method: psk-
Enables PSK authentication between the hosts. The role uses
opensslon the control node to create the pre-shared key. auto: <startup_method>-
Specifies the startup method of the connection. Valid values are
add,ondemand,start, andignore. For details, see theipsec.conf(5)man page on a system with Libreswan installed. The default value of this variable is null, which means no automatic startup operation. vpn_manage_firewall: true-
Defines that the role opens the required ports in the
firewalldservice on the managed nodes. vpn_manage_selinux: true- Defines that the role sets the required SELinux port type on the IPsec ports.
For details about all variables used in the playbook, see the
/usr/share/ansible/roles/rhel-system-roles.vpn/README.mdfile on the control node.Validate the playbook syntax:
$ ansible-playbook --syntax-check ~/playbook.ymlNote that this command only validates the syntax and does not protect against a wrong but valid configuration.
Run the playbook:
$ ansible-playbook ~/playbook.yml
Verification
Confirm that the connections are successfully started, for example:
# ansible managed-node-01.example.com -m shell -a 'ipsec trafficstatus | grep "control_plane_vpn-203.0.113.1-to-198.51.100.2"'
...
006 #3: "control_plane_vpn-203.0.113.1-to-198.51.100.2", type=ESP, add_time=1741860073, inBytes=0, outBytes=0, maxBytes=2^63B, id='198.51.100.2'
Note that this command only succeeds if the VPN connection is active. If you set the
autovariable in the playbook to a value other thanstart, you might need to manually activate the connection on the managed nodes first.
5.13.3. Configuring an IPsec site-to-site VPN with PSK authentication by using the vpn RHEL system role
A site-to-site VPN establishes an encrypted tunnel between two distinct networks, seamlessly linking them across an insecure public network. By using the vpn RHEL system role, you can automate the process of creating IPsec site-to-site VPN connections.
A site-to-site VPN enables devices in a branch office to access resources at a corporate headquarters just as if they were all part of the same local network.
For authentication, a pre-shared key (PSK) is a straightforward method that uses a single, shared secret known only to the two peers. This approach is simple to configure and ideal for basic setups where ease of deployment is a priority. However, you must keep the key strictly confidential. An attacker with access to the key can compromise the connection.
Prerequisites
- You have prepared the control node and the managed nodes.
-
The account you use to connect to the managed nodes has
sudopermissions for these nodes.
Procedure
Create a playbook file, for example,
~/playbook.yml, with the following content:--- - name: Configuring VPN hosts: managed-node-01.example.com, managed-node-02.example.com tasks: - name: IPsec VPN with PSK authentication ansible.builtin.include_role: name: redhat.rhel_system_roles.vpn vars: vpn_connections: - hosts: managed-node-01.example.com: subnets: - 192.0.2.0/24 managed-node-02.example.com: subnets: - 198.51.100.0/24 - 203.0.113.0/24 auth_method: psk auto: start vpn_manage_firewall: true vpn_manage_selinux: trueThe settings specified in the example playbook include the following:
hosts: <list>Defines a YAML dictionary with the gateways between which you want to configure a VPN. If an entry is not an Ansible-managed node, you must specify its fully-qualified domain name (FQDN) or IP address in the
hostnameparameter, for example:... - hosts: ... external-host.example.com: hostname: 192.0.2.1The role configures the VPN connection on each managed node. The connections are named
<gateway_A>-to-<gateway_B>, for example,managed-node-01.example.com-to-managed-node-02.example.com. Note that the role cannot configure Libreswan on external (unmanaged) nodes. You must manually create the configuration on these peers.subnets: <yaml_list_of_subnets>- Defines subnets in classless inter-domain routing (CIDR) format that are connected through the tunnel.
auth_method: psk-
Enables PSK authentication between the peers. The role uses
opensslon the control node to create the PSK. auto: <startup_method>-
Specifies the startup method of the connection. Valid values are
add,ondemand,start, andignore. For details, see theipsec.conf(5)man page on a system with Libreswan installed. The default value of this variable is null, which means no automatic startup operation. vpn_manage_firewall: true-
Defines that the role opens the required ports in the
firewalldservice on the managed nodes. vpn_manage_selinux: true- Defines that the role sets the required SELinux port type on the IPsec ports.
For details about all variables used in the playbook, see the
/usr/share/ansible/roles/rhel-system-roles.vpn/README.mdfile on the control node.Validate the playbook syntax:
$ ansible-playbook --syntax-check ~/playbook.ymlNote that this command only validates the syntax and does not protect against a wrong but valid configuration.
Run the playbook:
$ ansible-playbook ~/playbook.yml
Verification
Confirm that the connections are successfully started, for example:
# ansible managed-node-01.example.com -m shell -a 'ipsec trafficstatus | grep "managed-node-01.example.com-to-managed-node-02.example.com"'
...
006 #3: "managed-node-01.example.com-to-managed-node-02.example.com", type=ESP, add_time=1741857153, inBytes=38622, outBytes=324626, maxBytes=2^63B, id='@managed-node-02.example.com'
Note that this command only succeeds if the VPN connection is active. If you set the
autovariable in the playbook to a value other thanstart, you might need to manually activate the connection on the managed nodes first.
5.13.4. Configuring an IPsec mesh VPN with certificate-based authentication by using the vpn RHEL system role
An IPsec mesh creates a fully interconnected network where every server can communicate securely and directly with every other server. By using the vpn RHEL system role, you can automate configuring a VPN mesh with certificate-based authentication among managed nodes.
An IPsec mesh is ideal for distributed database clusters or high-availability environments that span multiple data centers or cloud providers. Establishing a direct, encrypted tunnel between each pair of servers ensures secure communication without a central bottleneck.
For authentication, using digital certificates managed by a Certificate Authority (CA) offers a highly secure and scalable solution. Each host in the mesh presents a certificate signed by a trusted CA. This method provides strong, verifiable authentication and simplifies user management. Access can be granted or revoked centrally at the CA, and Libreswan enforces this by checking each certificate against a certificate revocation list (CRL), denying access if a certificate appears on the list.
Prerequisites
- You have prepared the control node and the managed nodes.
-
The account you use to connect to the managed nodes has
sudopermissions for these nodes. You prepared a PKCS #12 file for each managed node:
Each file contains:
- The private key of the server
- The server certificate
- The CA certificate
- If required, intermediate certificates
-
The files are named
<managed_node_name_as_in_the_inventory>.p12. - The files are stored in the same directory as the playbook.
The server certificate contains the following fields:
-
Extended Key Usage (EKU) is set to
TLS Web Server Authentication. - Common Name (CN) or Subject Alternative Name (SAN) is set to the fully-qualified domain name (FQDN) of the host.
- X509v3 CRL distribution points contain URLs to Certificate Revocation Lists (CRLs).
-
Extended Key Usage (EKU) is set to
Procedure
Edit the
~/inventoryfile, and append thecert_namevariable:managed-node-01.example.com cert_name=managed-node-01.example.com managed-node-02.example.com cert_name=managed-node-02.example.com managed-node-03.example.com cert_name=managed-node-03.example.comSet the
cert_namevariable to the value of the common name (CN) field used in the certificate for each host. Typically, the CN field is set to the fully-qualified domain name (FQDN).Store your sensitive variables in an encrypted file:
Create the vault:
$ ansible-vault create ~/vault.yml
New Vault password: <vault_password>
Confirm New Vault password: <vault_password>
After the
ansible-vault createcommand opens an editor, enter the sensitive data in the<key>: <value>format:pkcs12_pwd: <password>- Save the changes, and close the editor. Ansible encrypts the data in the vault.
Create a playbook file, for example,
~/playbook.yml, with the following content:- name: Configuring VPN hosts: managed-node-01.example.com, managed-node-02.example.com, managed-node-03.example.com vars_files: - ~/vault.yml tasks: - name: Install LibreSwan ansible.builtin.package: name: libreswan state: present - name: Identify the path to IPsec NSS database ansible.builtin.set_fact: nss_db_dir: "{{ '/etc/ipsec.d/' if ansible_distribution in ['CentOS', 'RedHat'] and ansible_distribution_major_version is version('8', '=') else '/var/lib/ipsec/nss/' }}" - name: Locate IPsec NSS database files ansible.builtin.find: paths: "{{ nss_db_dir }}" patterns: "*.db" register: db_files - name: Initialize IPsec NSS database if not initialized ansible.builtin.command: cmd: ipsec initnss when: db_files.matched == 0 - name: Copy PKCS #12 file to the managed node ansible.builtin.copy: src: "~/{{ inventory_hostname }}.p12" dest: "/etc/ipsec.d/{{ inventory_hostname }}.p12" mode: 0600 - name: Import PKCS #12 file in IPsec NSS database ansible.builtin.shell: cmd: 'pk12util -d {{ nss_db_dir }} -i /etc/ipsec.d/{{ inventory_hostname }}.p12 -W "{{ pkcs12_pwd }}"' - name: Remove PKCS #12 file ansible.builtin.file: path: "/etc/ipsec.d/{{ inventory_hostname }}.p12" state: absent - name: Opportunistic mesh IPsec VPN with certificate-based authentication ansible.builtin.include_role: name: redhat.rhel_system_roles.vpn vars: vpn_connections: - opportunistic: true auth_method: cert policies: - policy: private cidr: default - policy: private cidr: 192.0.2.0/24 - policy: clear cidr: 192.0.2.1/32 vpn_manage_firewall: true vpn_manage_selinux: trueThe settings specified in the example playbook include the following:
opportunistic: true-
Enables an opportunistic mesh among multiple hosts. The
policiesvariable defines for which subnets and hosts traffic must or can be encrypted and which of them should continue using plain text connections. auth_method: cert- Enables certificate-based authentication. This requires that you specify the nickname of each managed node’s certificate in the inventory.
policies: <list_of_policies>Defines the Libreswan policies in YAML list format.
The default policy is
private-or-clear. To change it toprivate, the above playbook contains an according policy for the defaultcidrentry.To prevent a loss of the SSH connection during the execution of the playbook if the Ansible control node is in the same IP subnet as the managed nodes, add a
clearpolicy for the control node’s IP address. For example, if the mesh should be configured for the192.0.2.0/24subnet and the control node uses the IP address192.0.2.1, you require aclearpolicy for192.0.2.1/32as shown in the playbook.For details about policies, see the
ipsec.conf(5)man page on a system with Libreswan installed.vpn_manage_firewall: true-
Defines that the role opens the required ports in the
firewalldservice on the managed nodes. vpn_manage_selinux: true- Defines that the role sets the required SELinux port type on the IPsec ports.
For details about all variables used in the playbook, see the
/usr/share/ansible/roles/rhel-system-roles.vpn/README.mdfile on the control node.Validate the playbook syntax:
$ ansible-playbook --ask-vault-pass --syntax-check ~/playbook.ymlNote that this command only validates the syntax and does not protect against a wrong but valid configuration.
Run the playbook:
$ ansible-playbook --ask-vault-pass ~/playbook.yml
Verification
On a node in the mesh, ping another node to activate the connection:
[root@managed-node-01]# ping managed-node-02.example.comConfirm that the connection is active:
[root@managed-node-01]# ipsec trafficstatus
006 #2: "private#192.0.2.0/24"[1] ...192.0.2.2, type=ESP, add_time=1741938929, inBytes=372408, outBytes=545728, maxBytes=2^63B, id='CN=managed-node-02.example.com'
5.14. Enabling legacy ciphers and algorithms in Libreswan
Enable legacy ciphers and algorithms in Libreswan for backward compatibility with other IPsec peers. This overrides the RHEL system-wide cryptographic policies which, by default, enforce strong encryption ciphers and algorithms for IPsec and Internet Key Exchange (IKE).
The RHEL system-wide cryptographic policies create a special connection called %default. This connection sets the default values for the keyexchange, esp, and ike parameters.
Prerequisites
- Libreswan is installed.
Procedure
To override the defaults set by the RHEL system-wide cryptographic policies, add the
keyexchange,esp, andikeparameters to your connection configuration and set them to the values you require. For example:conn <connection_name> ikev2=no ike=aes-sha2,aes-sha1;modp2048 esp=aes-sha2,aes-sha1 ...Restart the
ipsecservice:# systemctl restart ipsec
5.15. Troubleshooting IPsec configurations
Diagnosing IPsec configuration failures can be challenging, because issues can be caused by mismatched settings, firewall rules, and kernel-level errors. The following information provides a systematic approach to resolving common problems with IPsec VPN connections.
5.15.1. Basic connection issues
Problems with VPN connections often occur due to mismatched configurations between the endpoints.
To confirm that an IPsec connection is established, enter:
# ipsec trafficstatus
006 #8: "vpn.example.com"[1] 192.0.2.1, type=ESP, add_time=1595296930, inBytes=5999, outBytes=3231, id='@vpn.example.com', lease=198.51.100.1/32
For a successful connection, the command shows an entry with the connection’s name and details. If the output is empty, the tunnel is not established.
5.15.3. Mismatched Configurations
VPN connections fail if the endpoints are not configured with matching Internet Key Exchange (IKE) versions, algorithms, IP address ranges, or pre-shared keys (PSK). If you identify a mismatch, you must align the settings on both endpoints to resolve the issue.
- Remote Peer Not Running IKE/IPsec
If the connection was refused, an ICMP error is displayed:
# ipsec auto --up vpn.example.com ... 000 "vpn.example.com"[1] 192.0.2.2 #16: ERROR: asynchronous network error report on wlp2s0 (192.0.2.2:500), complainant 198.51.100.1: Connection refused [errno 111, origin ICMP type 3 code 3 (not authenticated)]- Mismatched IKE Algorithms
The connection fails with a
NO_PROPOSAL_CHOSENnotification during the initial setup:# ipsec auto --up vpn.example.com ... 003 "vpn.example.com"[1] 193.110.157.148 #3: dropping unexpected IKE_SA_INIT message containing NO_PROPOSAL_CHOSEN notification; message payloads: N; missing payloads: SA,KE,Ni- Mismatched IPsec Algorithms
The connection fails with a
NO_PROPOSAL_CHOSENerror after the initial exchange:# ipsec auto --up vpn.example.com ... 182 "vpn.example.com"[1] 193.110.157.148 #5: STATE_PARENT_I2: sent v2I2, expected v2R2 {auth=IKEv2 cipher=AES_GCM_16_256 integ=n/a prf=HMAC_SHA2_256 group=MODP2048} 002 "vpn.example.com"[1] 193.110.157.148 #6: IKE_AUTH response contained the error notification NO_PROPOSAL_CHOSEN- Mismatched IP Address Ranges (IKEv2)
The remote peer responds with a
TS_UNACCEPTABLEerror:# ipsec auto --up vpn.example.com ... 1v2 "vpn.example.com" #1: STATE_PARENT_I2: sent v2I2, expected v2R2 {auth=IKEv2 cipher=AES_GCM_16_256 integ=n/a prf=HMAC_SHA2_512 group=MODP2048} 002 "vpn.example.com" #2: IKE_AUTH response contained the error notification TS_UNACCEPTABLE- Mismatched IP Address Ranges (IKEv1)
The connection times out during quick mode, with a message indicating the peer did not accept the proposal:
# ipsec auto --up vpn.example.com ... 031 "vpn.example.com" #2: STATE_QUICK_I1: 60 second timeout exceeded after 0 retransmits. No acceptable response to our first Quick Mode message: perhaps peer likes no proposal- Mismatched PSK (IKEv2)
The peer rejects the connection with an
AUTHENTICATION_FAILEDerror:# ipsec auto --up vpn.example.com ... 003 "vpn.example.com" #1: received Hash Payload does not match computed value 223 "vpn.example.com" #1: sending notification INVALID_HASH_INFORMATION to 192.0.2.23:500- Mismatched PSK (IKEv1)
The hash payload does not match, making the IKE message unreadable and resulting in an
INVALID_HASH_INFORMATIONerror:# ipsec auto --up vpn.example.com ... 002 "vpn.example.com" #1: IKE SA authentication request rejected by peer: AUTHENTICATION_FAILED
5.15.4. MTU issues
Diagnose intermittent IPsec connection failures caused by Maximum Transmission Unit (MTU) issues. Encryption increases packet size, leading to fragmentation and lost data when packets exceed the network’s MTU, often seen with larger data transfers.
A common symptom is that small packets, for example pings, work correctly, but larger packets, such as an SSH session, freeze after the login. To fix the problem, lower the MTU for the tunnel by adding the mtu=1400 option to the configuration file.
5.15.5. NAT conflicts
Resolve NAT conflicts that occur when an IPsec host also acts as a NAT router. Incorrect NAT application can translate source IP addresses before encryption, causing packets to be sent unencrypted over the network.
For example, if the source IP address of the packet is translated by a masquerade rule before IPsec encryption is applied, the packet’s source no longer matches the IPsec policy, and Libreswan sends it unencrypted over the network.
To solve this problem, add a firewall rule that excludes traffic between the IPsec subnets from NAT. This rule should be inserted at the beginning of the POSTROUTING chain to ensure it is processed before the general NAT rule.
Example 5.1. Solution by using the nftables framework
The following example uses nftables to set up a basic NAT environment that excludes traffic between the 192.0.2.0/24 and 198.51.100.0/24 subnets from address translation:
# nft add table ip nat
# nft add chain ip nat postrouting { type nat hook postrouting priority 100 \; }
# nft add rule ip nat postrouting ip saddr 192.0.2.0/24 ip daddr 198.51.100.0/24 return
5.15.6. Kernel-level IPsec issues
Troubleshoot kernel-level IPsec issues when a VPN tunnel appears established but no traffic flows. In this case, inspect the kernel’s IPsec state to check if the tunnel policies and cryptographic keys were correctly installed.
This process involves checking two components:
- The Security Policy Database (SPD): The rule that instructs the kernel what traffic to encrypt.
- The Security Association Database (SAD): The keys that instruct the kernel how to encrypt that traffic.
First, check if the correct policy exists in the SPD:
# ip xfrm policy
src 192.0.2.1/32 dst 10.0.0.0/8
	dir out priority 666 ptype main
	tmpl src 198.51.100.13 dst 203.0.113.22
		proto esp reqid 16417 mode tunnel
The output should contain the policies matching your leftsubnet and rightsubnet parameters with both in and out directions. If you do not see a policy for your traffic, Libreswan failed to create the kernel rule, and traffic is not encrypted.
If the policy exists, check if it has a corresponding set of keys in the SAD:
# ip xfrm state
src 203.0.113.22 dst 198.51.100.13
	proto esp spi 0xa78b3fdb reqid 16417 mode tunnel
	auth-trunc hmac(sha1) 0x3763cd3b... 96
enc cbc(aes) 0xd9dba399...This command displays private cryptographic keys. Do not share this output, because attackers can use it to decrypt your VPN traffic.
If a policy exists but you see no corresponding state with the same reqid, it typically means the Internet Key Exchange (IKE) negotiation failed. The two VPN endpoints could not agree on a set of keys.
For more detailed diagnostics, use the -s option with either of the commands. This option adds traffic counters, which can help you identify if the kernel processes packets by a specific rule.
5.15.7. Kernel IPsec subsystem bugs
A defect in the kernel’s IPsec subsystem can cause it to lose sync with the IKE daemon. This can lead to discrepancies between negotiated security associations and actual IPsec policy enforcement, disrupting secure network communication.
To check for kernel-level errors, display the transform (XFRM) statistics:
# cat /proc/net/xfrm_stat
If any of the counters in the output, such as XfrmInError, show a nonzero value, it indicates a problem with the kernel subsystem. In this case, open a support case, and attach the output of the command along with the corresponding IKE logs.
5.15.8. Displaying Libreswan logs
Display Libreswan logs to diagnose and troubleshoot IPsec service events and issues. Access the journal for the ipsec service to gain insights into connection status and potential problems.
To display the journal, enter:
# journalctl -xeu ipsec
If the default logging level does not provide enough details, enable comprehensive debug logging by adding the following settings to the config setup section in the /etc/ipsec.conf file:
plutodebug=all
logfile=/var/log/pluto.log
Because debug logging can produce many entries, redirecting the messages to a dedicated log file can prevent the journald and systemd services from rate-limiting the messages.
5.16. Configuring a VPN connection with control-center
If you use Red Hat Enterprise Linux with a graphical interface, you can configure a VPN connection in the GNOME control-center.
Prerequisites
-
The
NetworkManager-libreswan-gnomepackage is installed.
Procedure
-
Press the Super key, type
Settings, and press Enter to open thecontrol-centerapplication. -
Select the
Networkentry on the left. - Click the + icon.
-
Select
VPN. Select the
Identitymenu entry to see the basic configuration options:General
Gateway- The name orIPaddress of the remote VPN gateway.Authentication
Type-
IKEv2 (Certificate)- client is authenticated by certificate. It is more secure (default). IKEv1 (XAUTH)- client is authenticated by user name and password, or a pre-shared key (PSK).The following configuration settings are available under the
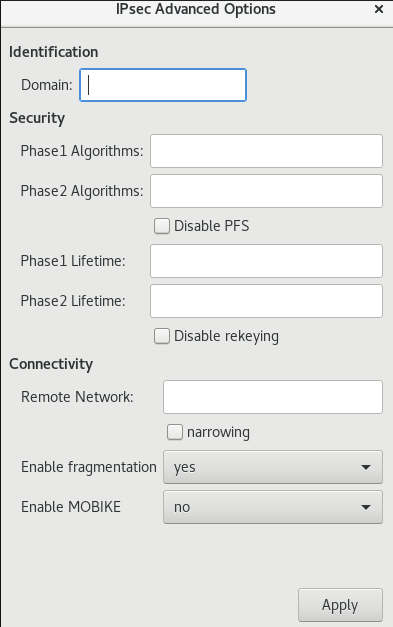
Advancedsection:Figure 5.1. Advanced options of a VPN connection
 Warning
When configuring an IPsec-based VPN connection using the
gnome-control-centerapplication, theAdvanceddialog displays the configuration, but it does not allow any changes. As a consequence, users cannot change any advanced IPsec options. Use thenm-connection-editorornmclitools instead to perform configuration of the advanced properties.Identification
Domain- If required, enter the Domain Name.Security
-
Phase1 Algorithms- corresponds to theikeLibreswan parameter - enter the algorithms to be used to authenticate and set up an encrypted channel. Phase2 Algorithms- corresponds to theespLibreswan parameter - enter the algorithms to be used for theIPsecnegotiations.Check the
Disable PFSfield to turn off Perfect Forward Secrecy (PFS) to ensure compatibility with old servers that do not support PFS.-
Phase1 Lifetime- corresponds to theikelifetimeLibreswan parameter - how long the key used to encrypt the traffic will be valid. Phase2 Lifetime- corresponds to thesalifetimeLibreswan parameter - how long a particular instance of a connection should last before expiring.Note that the encryption key should be changed from time to time for security reasons.
Remote network- corresponds to therightsubnetLibreswan parameter - the destination private remote network that should be reached through the VPN.Check the
narrowingfield to enable narrowing. Note that it is only effective in IKEv2 negotiation.-
Enable fragmentation- corresponds to thefragmentationLibreswan parameter - whether or not to allow IKE fragmentation. Valid values areyes(default) orno. -
Enable Mobike- corresponds to themobikeLibreswan parameter - whether or not to allow Mobility and Multihoming Protocol (MOBIKE, RFC 4555) to enable a connection to migrate its endpoint without needing to restart the connection from scratch. This is used on mobile devices that switch between wired, wireless, or mobile data connections. The values areno(default) oryes.
-
Select the menu entry:
IPv4 Method
-
Automatic (DHCP)- Choose this option if the network you are connecting to uses aDHCPserver to assign dynamicIPaddresses. -
Link-Local Only- Choose this option if the network you are connecting to does not have aDHCPserver and you do not want to assignIPaddresses manually. Random addresses will be assigned as per RFC 3927 with prefix169.254/16. -
Manual- Choose this option if you want to assignIPaddresses manually. Disable-IPv4is disabled for this connection.DNS
In the
DNSsection, whenAutomaticisON, switch it toOFFto enter the IP address of a DNS server you want to use separating the IPs by comma.Routes
Note that in the
Routessection, whenAutomaticisON, routes from DHCP are used, but you can also add additional static routes. WhenOFF, only static routes are used.-
Address- Enter theIPaddress of a remote network or host. -
Netmask- The netmask or prefix length of theIPaddress entered above. -
Gateway- TheIPaddress of the gateway leading to the remote network or host entered above. Metric- A network cost, a preference value to give to this route. Lower values will be preferred over higher values.Use this connection only for resources on its network
Select this check box to prevent the connection from becoming the default route. Selecting this option means that only traffic specifically destined for routes learned automatically over the connection or entered here manually is routed over the connection.
-
To configure
IPv6settings in aVPNconnection, select the menu entry:IPv6 Method
-
Automatic- Choose this option to useIPv6Stateless Address AutoConfiguration (SLAAC) to create an automatic, stateless configuration based on the hardware address and Router Advertisements (RA). -
Automatic, DHCP only- Choose this option to not use RA, but request information fromDHCPv6directly to create a stateful configuration. -
Link-Local Only- Choose this option if the network you are connecting to does not have aDHCPserver and you do not want to assignIPaddresses manually. Random addresses will be assigned as per RFC 4862 with prefixFE80::0. -
Manual- Choose this option if you want to assignIPaddresses manually. Disable-IPv6is disabled for this connection.Note that
DNS,Routes,Use this connection only for resources on its networkare common toIPv4settings.
-
-
Once you have finished editing the
VPNconnection, click the button to customize the configuration or the button to save it for the existing one. -
Switch the profile to
ONto activate theVPNconnection. - If you use this host in a network with DHCP or Stateless Address Autoconfiguration (SLAAC), the connection can be vulnerable to being redirected. For details and mitigation steps, see Assigning a VPN connection to a dedicated routing table to prevent the connection from bypassing the tunnel.
5.17. Configuring a VPN connection using nm-connection-editor
If you use Red Hat Enterprise Linux with a graphical interface, you can configure a VPN connection in the nm-connection-editor application.
Prerequisites
-
The
NetworkManager-libreswan-gnomepackage is installed. If you configure an Internet Key Exchange version 2 (IKEv2) connection:
- The certificate is imported into the IPsec network security services (NSS) database.
- The nickname of the certificate in the NSS database is known.
Procedure
Open a terminal, and enter:
$ nm-connection-editor- Click the button to add a new connection.
-
Select the
IPsec based VPNconnection type, and click . On the
VPNtab:Enter the host name or IP address of the VPN gateway into the
Gatewayfield, and select an authentication type. Based on the authentication type, you must enter different additional information:-
IKEv2 (Certifiate)authenticates the client by using a certificate, which is more secure. This setting requires the nickname of the certificate in the IPsec NSS database IKEv1 (XAUTH)authenticates the user by using a user name and password (pre-shared key). This setting requires that you enter the following values:- User name
- Password
- Group name
- Secret
-
If the remote server specifies a local identifier for the IKE exchange, enter the exact string in the
Remote IDfield. If the remote server runs Libreswan, this value is set in the server’sleftidparameter.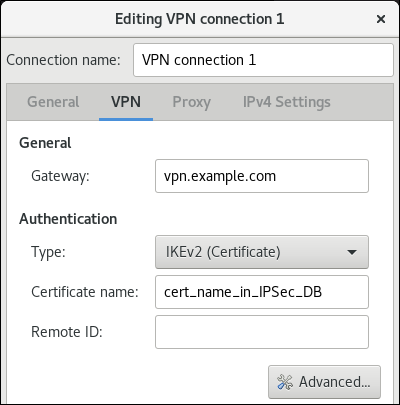
Optional: Configure additional settings by clicking the button. You can configure the following settings:
Identification
-
Domain- If required, enter the domain name.
-
Security
-
Phase1 Algorithmscorresponds to theikeLibreswan parameter. Enter the algorithms to be used to authenticate and set up an encrypted channel. Phase2 Algorithmscorresponds to theespLibreswan parameter. Enter the algorithms to be used for theIPsecnegotiations.Check the
Disable PFSfield to turn off Perfect Forward Secrecy (PFS) to ensure compatibility with old servers that do not support PFS.-
Phase1 Lifetimecorresponds to theikelifetimeLibreswan parameter. This parameter defines how long the key used to encrypt the traffic is valid. -
Phase2 Lifetimecorresponds to thesalifetimeLibreswan parameter. This parameter defines how long a security association is valid.
-
Connectivity
Remote networkcorresponds to therightsubnetLibreswan parameter and defines the destination private remote network that should be reached through the VPN.Check the
narrowingfield to enable narrowing. Note that it is only effective in the IKEv2 negotiation.-
Enable fragmentationcorresponds to thefragmentationLibreswan parameter and defines whether or not to allow IKE fragmentation. Valid values areyes(default) orno. -
Enable Mobikecorresponds to themobikeLibreswan parameter. The parameter defines whether or not to allow Mobility and Multihoming Protocol (MOBIKE) (RFC 4555) to enable a connection to migrate its endpoint without needing to restart the connection from scratch. This is used on mobile devices that switch between wired, wireless or mobile data connections. The values areno(default) oryes.
On the
IPv4 Settingstab, select the IP assignment method and, optionally, set additional static addresses, DNS servers, search domains, and routes.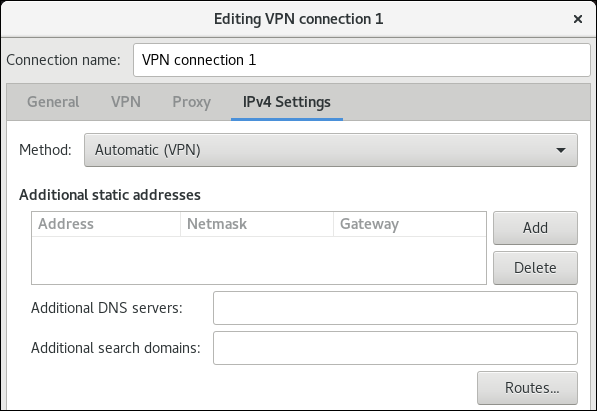
- Save the connection.
-
Close
nm-connection-editor. If you use this host in a network with DHCP or Stateless Address Autoconfiguration (SLAAC), the connection can be vulnerable to being redirected. For details and mitigation steps, see Assigning a VPN connection to a dedicated routing table to prevent the connection from bypassing the tunnel.
NoteWhen you add a new connection by clicking the button, NetworkManager creates a new configuration file for that connection and then opens the same dialog that is used for editing an existing connection. The difference between these dialogs is that an existing connection profile has a Details menu entry.
5.18. Assigning a VPN connection to a dedicated routing table to prevent the connection from bypassing the tunnel
To protect your VPN connection from traffic redirection attacks, assign it to a dedicated routing table. This prevents malicious network servers from bypassing the secure tunnel and compromising data integrity.
Both a DHCP server and Stateless Address Autoconfiguration (SLAAC) can add routes to a client’s routing table. For example, a malicious DHCP server can use this feature to force a host with VPN connection to redirect traffic through a physical interface instead of the VPN tunnel. This vulnerability is also known as TunnelVision and described in the CVE-2024-3661 vulnerability article.
To mitigate this vulnerability, you can assign the VPN connection to a dedicated routing table. This prevents the DHCP configuration or SLAAC from manipulating routing decisions for network packets intended for the VPN tunnel.
Follow the steps if at least one of the conditions applies to your environment:
- At least one network interface uses DHCP or SLAAC.
- Your network does not use mechanisms, such as DHCP snooping, that prevent a rogue DHCP server.
Routing the entire traffic through the VPN prevents the host from accessing local network resources.
Prerequisites
- You use NetworkManager 1.40.16-18 or later.
Procedure
- Decide which routing table you want to use. The following steps use table 75. By default, RHEL does not use the tables 1-254, and you can use any of them.
Configure the VPN connection profile to place the VPN routes in a dedicated routing table:
# nmcli connection modify <vpn_connection_profile> ipv4.route-table 75 ipv6.route-table 75Set a low priority value for the table you used in the previous command:
# nmcli connection modify <vpn_connection_profile> ipv4.routing-rules "priority 32345 from all table 75" ipv6.routing-rules "priority 32345 from all table 75"The priority value can be any value between 1 and 32766. The lower the value, the higher the priority.
Reconnect the VPN connection:
# nmcli connection down <vpn_connection_profile>
# nmcli connection up <vpn_connection_profile>
Verification
Display the IPv4 routes in table 75:
# ip route show table 75
...
192.0.2.0/24 via 192.0.2.254 dev vpn_device proto static metric 50
default dev vpn_device proto static scope link metric 50
The output confirms that both the route to the remote network and the default gateway are assigned to routing table 75 and, therefore, all traffic is routed through the tunnel. If you set
ipv4.never-default truein the VPN connection profile, a default route is not created and, therefore, not visible in this output.Display the IPv6 routes in table 75:
# ip -6 route show table 75
...
2001:db8:1::/64 dev vpn_device proto kernel metric 50 pref medium
default dev vpn_device proto static metric 50 pref medium
The output confirms that both the route to the remote network and the default gateway are assigned to routing table 75 and, therefore, all traffic is routed through the tunnel. If you set
ipv6.never-default truein the VPN connection profile, a default route is not created and, therefore, not visible in this output.