Chapter 7. Using and configuring firewalld
A firewall is a way to protect machines from any unwanted traffic from outside. It enables users to control incoming network traffic on host machines by defining a set of firewall rules. These rules are used to sort the incoming traffic and either block it or allow it through.
firewalld is a firewall service daemon that provides a dynamic, customizable firewall with a D-Bus interface. Being dynamic, it enables creating, changing, and deleting rules without the necessity of restarting the firewall daemon each time the rules are changed.
You can use firewalld to configure packet filtering required by the majority of typical cases. If firewalld does not cover your scenario, or you want to have complete control of rules, use the nftables framework.
firewalld uses the concepts of zones, policies, and services to simplify traffic management. Zones logically separate a network. Network interfaces and sources can be assigned to a zone. Policies are used to deny or allow traffic flowing between zones. Firewall services are predefined rules that cover all necessary settings to allow incoming traffic for a specific service, and they apply within a zone.
Services use one or more ports or addresses for network communication. Firewalls filter communication based on ports. To allow network traffic for a service, its ports must be open. firewalld blocks all traffic on ports that are not explicitly set as open. Some zones, such as trusted, allow all traffic by default.
firewalld maintains separate runtime and permanent configurations. This allows runtime-only changes. The runtime configuration does not persist after firewalld reload or restart. At startup, it is populated from the permanent configuration.
Note that firewalld with nftables back end does not support passing custom nftables rules to firewalld, using the --direct option.
7.1. When to use firewalld, nftables, or iptables
On RHEL 8, you can use the following packet-filtering utilities depending on your scenario:
-
firewalld: Thefirewalldutility simplifies firewall configuration for common use cases. -
nftables: Use thenftablesutility to set up complex and performance-critical firewalls, such as for a whole network. -
iptables: Theiptablesutility on Red Hat Enterprise Linux uses thenf_tableskernel API instead of thelegacyback end. Thenf_tablesAPI provides backward compatibility so that scripts that useiptablescommands still work on Red Hat Enterprise Linux. For new firewall scripts, usenftables.
To prevent the different firewall-related services (firewalld, nftables, or iptables) from influencing each other, run only one of them on a RHEL host, and disable the other services.
7.2. Firewall zones
You can use the firewalld utility to separate networks into different zones according to the level of trust that you have with the interfaces and traffic within that network. A connection can only be part of one zone, but you can use that zone for many network connections.
firewalld follows strict principles in regards to zones:
- Traffic ingresses only one zone.
- Traffic egresses only one zone.
- A zone defines a level of trust.
- Intrazone traffic (within the same zone) is allowed by default.
- Interzone traffic (from zone to zone) is denied by default.
Principles 4 and 5 are a consequence of principle 3.
Principle 4 is configurable through the zone option --remove-forward. Principle 5 is configurable by adding new policies.
NetworkManager notifies firewalld of the zone of an interface. You can assign zones to interfaces with the following utilities:
-
NetworkManager -
firewall-configutility -
firewall-cmdutility - The RHEL web console
The RHEL web console, firewall-config, and firewall-cmd can only edit the appropriate NetworkManager configuration files. If you change the zone of the interface using the web console, firewall-cmd, or firewall-config, the request is forwarded to NetworkManager and is not handled by firewalld.
The /usr/lib/firewalld/zones/ directory stores the predefined zones, and you can instantly apply them to any available network interface. These files are copied to the /etc/firewalld/zones/ directory only after they are modified. The default settings of the predefined zones are as follows:
block-
Suitable for: Any incoming network connections are rejected with an icmp-host-prohibited message for
IPv4and icmp6-adm-prohibited forIPv6. - Accepts: Only network connections initiated from within the system.
-
Suitable for: Any incoming network connections are rejected with an icmp-host-prohibited message for
dmz- Suitable for: Computers in your DMZ that are publicly-accessible with limited access to your internal network.
- Accepts: Only selected incoming connections.
dropSuitable for: Any incoming network packets are dropped without any notification.
- Accepts: Only outgoing network connections.
external- Suitable for: External networks with masquerading enabled, especially for routers. Situations when you do not trust the other computers on the network.
- Accepts: Only selected incoming connections.
home- Suitable for: Home environment where you mostly trust the other computers on the network.
- Accepts: Only selected incoming connections.
internal- Suitable for: Internal networks where you mostly trust the other computers on the network.
- Accepts: Only selected incoming connections.
public- Suitable for: Public areas where you do not trust other computers on the network.
- Accepts: Only selected incoming connections.
trusted- Accepts: All network connections.
workSuitable for: Work environment where you mostly trust the other computers on the network.
- Accepts: Only selected incoming connections.
One of these zones is set as the default zone. When interface connections are added to NetworkManager, they are assigned to the default zone. On installation, the default zone in firewalld is the public zone. You can change the default zone.
Make network zone names self-explanatory to help users understand them quickly.
To avoid any security problems, review the default zone configuration and disable any unnecessary services according to your needs and risk assessments.
7.3. Firewall policies
The firewall policies specify the desired security state of your network. They outline rules and actions to take for different types of traffic.
Typically, the policies contain rules for the following types of traffic:
- Incoming traffic
- Outgoing traffic
- Forward traffic
- Specific services and applications
- Network address translations (NAT)
Firewall policies use the concept of firewall zones. Each zone is associated with a specific set of firewall rules that determine the traffic allowed. Policies apply firewall rules in a stateful, unidirectional manner. This means you only consider one direction of the traffic. The traffic return path is implicitly allowed due to stateful filtering of firewalld.
Policies are associated with an ingress zone and an egress zone. The ingress zone is where the traffic originated (received). The egress zone is where the traffic leaves (sent).
The firewall rules defined in a policy can reference the firewall zones to apply consistent configurations across multiple network interfaces.
7.4. Firewall rules
You can use the firewall rules to implement specific configurations for allowing or blocking network traffic. As a result, you can control the flow of network traffic to protect your system from security threats.
Firewall rules typically define certain criteria based on various attributes. The attributes can be as:
- Source IP addresses
- Destination IP addresses
- Transfer Protocols (TCP, UDP, …)
- Ports
- Network interfaces
The firewalld utility organizes the firewall rules into zones (such as public, internal, and others) and policies. Each zone has its own set of rules that determine the level of traffic freedom for network interfaces associated with a particular zone.
7.5. Firewall direct rules
The firewalld service provides multiple ways with which to configure rules, including regular rules and direct rules.
One difference between these is how each method interacts with the underlying backend (iptables or nftables).
The direct rules are advanced, low-level rules that allow direct interaction with iptables. They bypass the structured zone-based management of firewalld to give you more control. You manually define the direct rules with the firewall-cmd command by using the raw iptables syntax. For example, firewall-cmd --direct --add-rule ipv4 filter INPUT 0 -s 198.51.100.1 -j DROP. This command adds an iptables rule to drop traffic from the 198.51.100.1 source IP address.
However, using the direct rules also has its drawbacks. Especially when nftables is your primary firewall backend. For example:
-
The direct rules are harder to maintain and can conflict with
nftablesbasedfirewalldconfigurations. -
The direct rules do not support advanced features that you can find in
nftablessuch as raw expressions and stateful objects. -
Direct rules are not future-proof. The
iptablescomponent is deprecated and will eventually be removed from RHEL.
For the previous reasons, you might consider replacing firewalld direct rules with nftables. Review the knowledgebase solution How to replace firewalld direct rules with nftables? to see more details.
7.6. Predefined firewalld services
Predefined firewalld services offer an abstraction layer for low-level firewall rules. They map common network services, such as SSH or HTTP, to their specific ports and protocols, simplifying firewall management and reducing errors by using a named service instead of manual configuration.
To see available predefined services:
# firewall-cmd --get-services
RH-Satellite-6 RH-Satellite-6-capsule afp amanda-client amanda-k5-client amqp amqps apcupsd audit ausweisapp2 bacula bacula-client bareos-director bareos-filedaemon bareos-storage bb bgp bitcoin bitcoin-rpc bitcoin-testnet bitcoin-testnet-rpc bittorrent-lsd ceph ceph-exporter ceph-mon cfengine checkmk-agent cockpit collectd condor-collector cratedb ctdb dds...
To further inspect a particular predefined service:
# sudo firewall-cmd --info-service=RH-Satellite-6
RH-Satellite-6
  ports: 5000/tcp 5646-5647/tcp 5671/tcp 8000/tcp 8080/tcp 9090/tcp
  protocols:
  source-ports:
  modules:
  destination:
  includes: foreman
  helpers:
The example output shows that the
RH-Satellite-6predefined service listens on ports 5000/tcp 5646-5647/tcp 5671/tcp 8000/tcp 8080/tcp 9090/tcp. Additionally,RH-Satellite-6inherits rules from another predefined service. In this caseforeman.
Each predefined service is stored as an XML file with the same name in the /usr/lib/firewalld/services/ directory.
7.7. Working with firewalld zones
Zones represent a concept to manage incoming traffic more transparently. Network interfaces and source addresses are assigned to zones. You manage firewall rules for each zone independently, which enables you to define complex firewall settings and apply them to the traffic.
7.7.1. Customizing firewall settings for a specific zone to enhance security
To strengthen network security, modify the firewalld settings by associating a specific network interface or connection with a particular firewall zone. By defining granular rules for a zone, you can control inbound and outbound traffic according to your security needs.
For example, you can achieve the following benefits:
- Protection of sensitive data
- Prevention of unauthorized access
- Mitigation of potential network threats
Prerequisites
-
The
firewalldservice is running.
Procedure
List the available firewall zones:
# firewall-cmd --get-zonesThe
firewall-cmd --get-zonescommand displays all zones that are available on the system, but it does not show any details for particular zones. To see more detailed information for all zones, use thefirewall-cmd --list-all-zonescommand.- Choose the zone you want to use for this configuration.
Modify firewall settings for the chosen zone. For example, to allow the
SSHservice and remove theftpservice:# firewall-cmd --add-service=ssh --zone=<your_chosen_zone> # firewall-cmd --remove-service=ftp --zone=<same_chosen_zone>Assign a network interface to the firewall zone:
List the available network interfaces:
# firewall-cmd --get-active-zonesActivity of a zone is determined by the presence of network interfaces or source address ranges that match its configuration. The default zone is active for unclassified traffic but is not always active if no traffic matches its rules.
Assign a network interface to the chosen zone:
# firewall-cmd --zone=<your_chosen_zone> --change-interface=<interface_name> --permanentAssigning a network interface to a zone is more suitable for applying consistent firewall settings to all traffic on a particular interface (physical or virtual).
The
firewall-cmdcommand, when used with the--permanentoption, often involves updating NetworkManager connection profiles to make changes to the firewall configuration permanent. This integration betweenfirewalldand NetworkManager ensures consistent network and firewall settings.
Verification
Display the updated settings for your chosen zone:
# firewall-cmd --zone=<your_chosen_zone> --list-allThe command output displays all zone settings including the assigned services, network interface, and network connections (sources).
7.7.2. Changing the default zone
If an interface is not assigned to a specific zone, it is assigned to the default zone. After each restart of the firewalld service, firewalld loads the settings for the default zone and makes it active. Settings for all other zones are preserved and ready to be used.
Typically, zones are assigned to interfaces by NetworkManager according to the connection.zone setting in NetworkManager connection profiles. Also, after a reboot NetworkManager manages assignments for "activating" those zones.
Prerequisites
-
The
firewalldservice is running.
Procedure
Display the current default zone:
# firewall-cmd --get-default-zoneSet the new default zone:
# firewall-cmd --set-default-zone <zone_name>NoteFollowing this procedure, the setting is a permanent setting, even without the
--permanentoption.
7.7.3. Assigning a network interface to a zone
It is possible to define different sets of rules for different zones and then change the settings quickly by changing the zone for the interface that is being used. With multiple interfaces, a specific zone can be set for each of them to distinguish traffic that is coming through them.
Procedure
List the active zones and the interfaces assigned to them:
# firewall-cmd --get-active-zonesAssign the interface to a different zone:
# firewall-cmd --zone=zone_name --change-interface=interface_name --permanent
7.7.4. Adding a source
To route incoming traffic into a specific zone, add the source to that zone. The source can be an IP address or an IP mask in the classless inter-domain routing (CIDR) notation.
In case you add multiple zones with an overlapping network range, they are ordered alphanumerically by zone name and only the first one is considered.
To set the source in the current zone:
# firewall-cmd --add-source=<source>To set the source IP address for a specific zone:
# firewall-cmd --zone=zone-name --add-source=<source>
The following procedure allows all incoming traffic from 192.168.2.15 in the trusted zone:
Procedure
List all available zones:
# firewall-cmd --get-zonesAdd the source IP to the trusted zone in the permanent mode:
# firewall-cmd --zone=trusted --add-source=192.168.2.15Make the new settings persistent:
# firewall-cmd --runtime-to-permanent
7.7.5. Removing a source
When you remove a source from a firewalld zone, its traffic is no longer directed by that source’s rules. Instead, it falls back to the rules of the interface’s zone or the default zone.
Procedure
List allowed sources for the required zone:
# firewall-cmd --zone=zone-name --list-sourcesRemove the source from the zone permanently:
# firewall-cmd --zone=zone-name --remove-source=<source>Make the new settings persistent:
# firewall-cmd --runtime-to-permanent
7.7.6. Assigning a zone to a connection by using nmcli
You can add a firewalld zone to a NetworkManager connection using the nmcli utility.
Procedure
Assign the zone to the
NetworkManagerconnection profile:# nmcli connection modify profile connection.zone zone_nameActivate the connection:
# nmcli connection up profile
7.7.7. Manually assigning a zone to a network connection in an ifcfg file
When the connection is managed by NetworkManager, it must be aware of a zone that it uses. For every network connection profile, a zone can be specified, which provides the flexibility of various firewall settings according to the location of the computer with portable devices. Thus, zones and settings can be specified for different locations, such as company or home.
Procedure
To set a zone for a connection, edit the
/etc/sysconfig/network-scripts/ifcfg-connection_namefile and add a line that assigns a zone to this connection:ZONE=zone_name
7.7.8. Creating a new zone
To use custom zones, create a new zone and use it just like a predefined zone. New zones require the --permanent option, otherwise the command does not work.
Prerequisites
-
The
firewalldservice is running.
Procedure
Create a new zone:
# firewall-cmd --permanent --new-zone=zone-nameMake the new zone usable:
# firewall-cmd --reloadThe command applies recent changes to the firewall configuration without interrupting network services that are already running.
Verification
Check if the new zone is added to your permanent settings:
# firewall-cmd --get-zones --permanent
7.7.9. Enabling zones by using the web console
You can apply predefined and existing firewall zones on a particular interface or a range of IP addresses through the RHEL web console.
Prerequisites
- You have installed the RHEL 8 web console.
- You have enabled the cockpit service.
Your user account is allowed to log in to the web console.
For instructions, see Installing and enabling the web console.
- You enabled administrative access in the web console.
-
The
firewalldservice is running.
Procedure
Log in to the RHEL 8 web console.
For details, see Logging in to the web console.
- Click Networking.
Click the button.
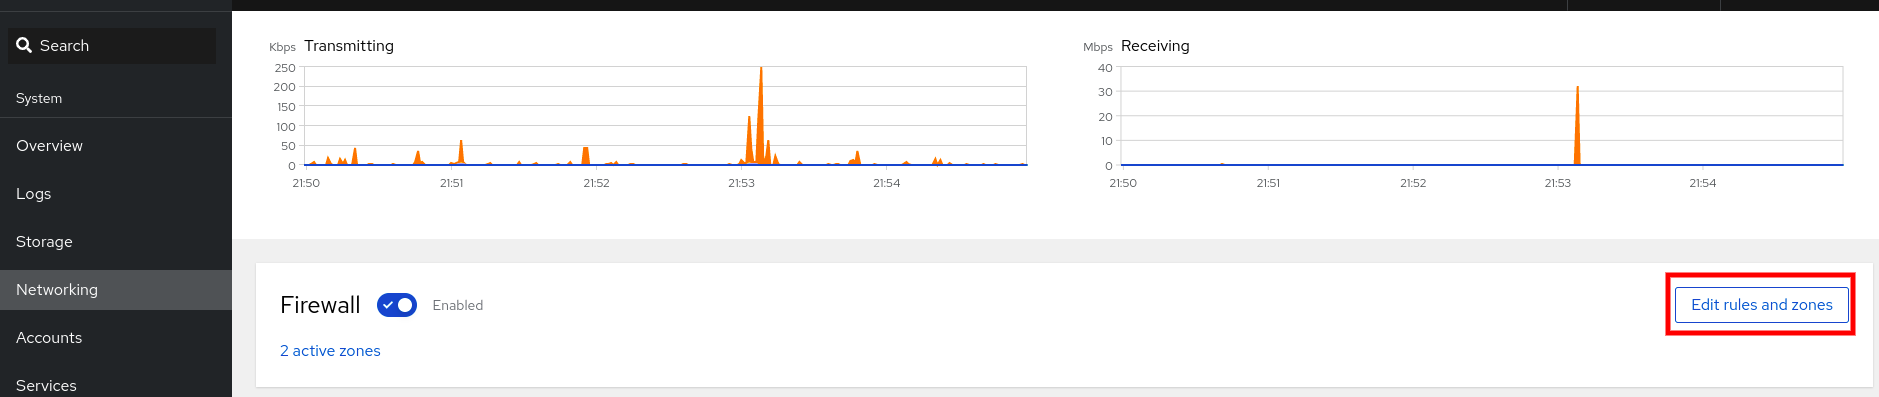
If you do not see the button, log in to the web console with the administrator privileges.
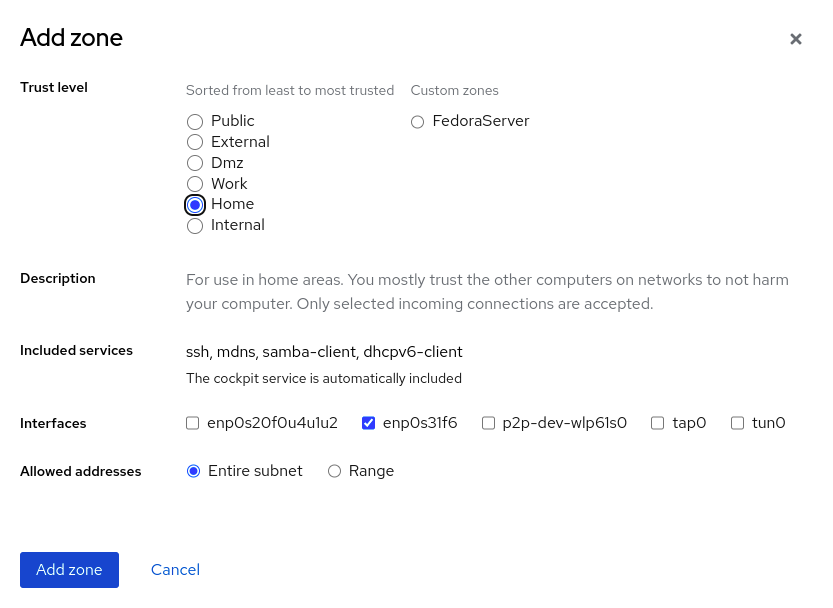
- In the Firewall section, click Add new zone.
In the Add zone dialog box, select a zone from the Trust level options.
The web console displays all zones predefined in the
firewalldservice.- In the Interfaces part, select an interface or interfaces to which you want to apply the selected zone.
In the Allowed Addresses part, you can select whether the zone is applied to:
- the whole subnet
a range of IP addresses in the following format:
- 192.168.1.0
- 192.168.1.0/24
- 192.168.1.0/24, 192.168.1.0
Click the button.
Verification
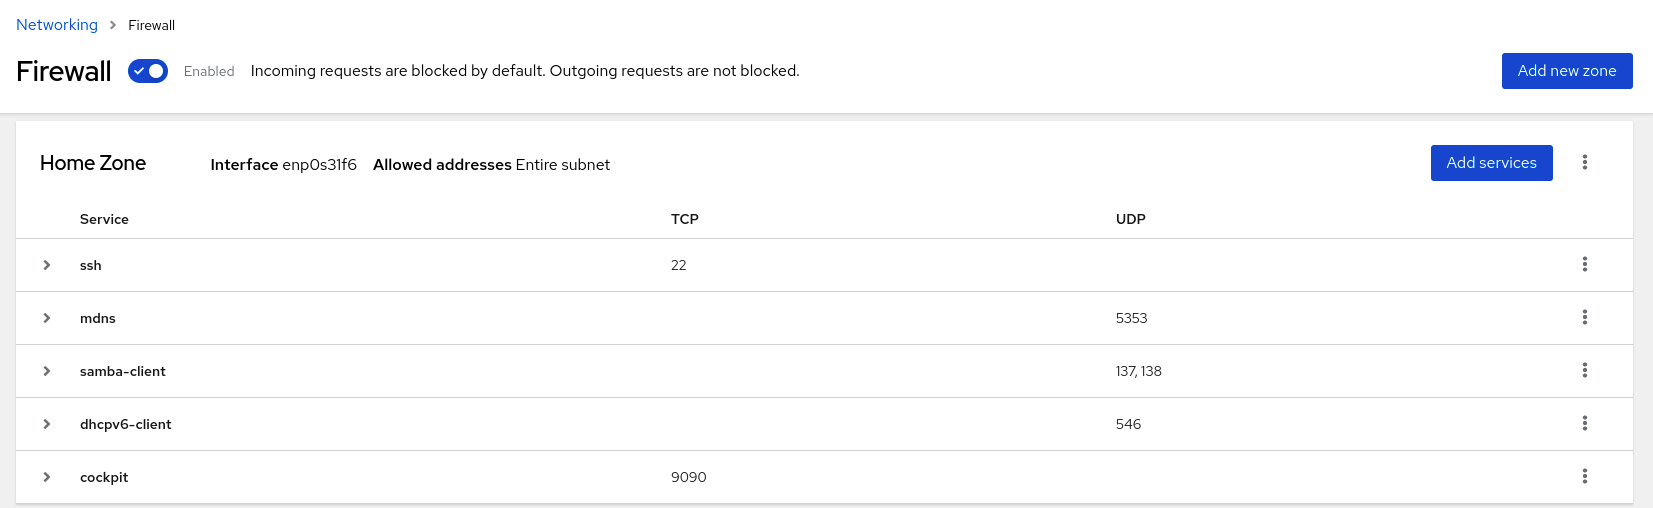
Check the configuration in the Firewall section:
7.7.10. Disabling zones by using the web console
You can remove a firewall zone from your firewall configuration by using the web console.
Prerequisites
- You have installed the RHEL 8 web console.
- You have enabled the cockpit service.
Your user account is allowed to log in to the web console.
For instructions, see Installing and enabling the web console.
- You enabled administrative access in the web console.
-
The
firewalldservice is running.
Procedure
Log in to the RHEL 8 web console.
For details, see Logging in to the web console.
- Click Networking.
Click the button.
If you do not see the button, log in to the web console with the administrator privileges.
Click the Options icon at the zone you want to remove.
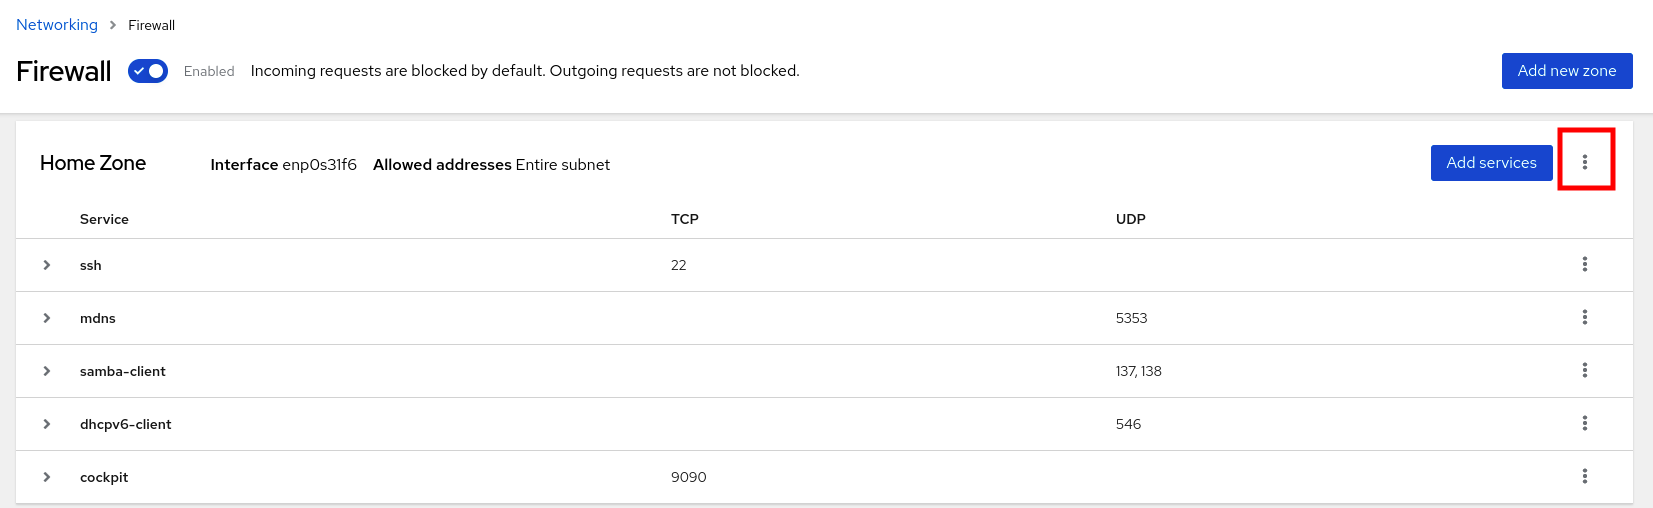
- Click Delete.
7.7.11. Using zone targets to set default behavior for incoming traffic
For every zone, you can set a default behavior that handles incoming traffic that is not further specified. Such behavior is defined by setting the target of the zone.
-
ACCEPT: Accepts all incoming packets except those disallowed by specific rules. -
REJECT: Rejects all incoming packets except those allowed by specific rules. Whenfirewalldrejects packets, the source machine is informed about the rejection. -
DROP: Drops all incoming packets except those allowed by specific rules. Whenfirewallddrops packets, the source machine is not informed about the packet drop. -
default: Similar behavior as forREJECT, but with special meanings in certain scenarios.
Prerequisites
-
The
firewalldservice is running.
Procedure
List the information for the specific zone to see the default target:
# firewall-cmd --zone=zone-name --list-allSet a new target in the zone:
# firewall-cmd --permanent --zone=zone-name --set-target=<default|ACCEPT|REJECT|DROP>
7.7.12. Configuring dynamic updates for allowlisting with IP sets
You can make near real-time updates to flexibly allow specific IP addresses or ranges in the IP sets even in unpredictable conditions.
These updates can be triggered by various events, such as detection of security threats or changes in the network behavior. Typically, such a solution leverages automation to reduce manual effort and improve security by responding quickly to the situation.
Prerequisites
-
The
firewalldservice is running.
Procedure
Create an IP set with a meaningful name:
# firewall-cmd --permanent --new-ipset=allowlist --type=hash:ipThe new IP set called
allowlistcontains IP addresses that you want your firewall to allow.Add a dynamic update to the IP set:
# firewall-cmd --permanent --ipset=allowlist --add-entry=198.51.100.10This configuration updates the
allowlistIP set with a newly added IP address that is allowed to pass network traffic by your firewall.Create a firewall rule that references the previously created IP set:
# firewall-cmd --permanent --zone=public --add-source=ipset:allowlistWithout this rule, the IP set would not have any impact on network traffic. The default firewall policy would prevail.
Reload the firewall configuration to apply the changes:
# firewall-cmd --reload
Verification
List all IP sets:
# firewall-cmd --get-ipsets
allowlist
List the active rules:
# firewall-cmd --list-all
public (active)
  target: default
  icmp-block-inversion: no
  interfaces: enp0s1
  sources: ipset:allowlist
  services: cockpit dhcpv6-client ssh
  ports:
  protocols:
  ...
The
sourcessection of the command-line output provides insights to what origins of traffic (hostnames, interfaces, IP sets, subnets, and others) are permitted or denied access to a particular firewall zone. In this case, the IP addresses contained in theallowlistIP set are allowed to pass traffic through the firewall for thepubliczone.Explore the contents of your IP set:
# cat /etc/firewalld/ipsets/allowlist.xml
<?xml version="1.0" encoding="utf-8"?>
<ipset type="hash:ip">
  <entry>198.51.100.10</entry>
</ipset>
Next steps
-
Use a script or a security utility to fetch your threat intelligence feeds and update
allowlistaccordingly in an automated fashion.
7.8. Controlling network traffic using firewalld
The firewalld package installs a large number of predefined service files and you can add more or customize them. You can then use these service definitions to open or close ports for services without knowing the protocol and port numbers they use.
7.8.1. Controlling traffic with predefined services using the CLI
The most straightforward method to control traffic is to add a predefined service to firewalld. This opens all necessary ports and modifies other settings according to the service definition file.
Prerequisites
-
The
firewalldservice is running.
Procedure
Check that the service in
firewalldis not already allowed:# firewall-cmd --list-services ssh dhcpv6-clientThe command lists the services that are enabled in the default zone.
List all predefined services in
firewalld:# firewall-cmd --get-services RH-Satellite-6 amanda-client amanda-k5-client bacula bacula-client bitcoin bitcoin-rpc bitcoin-testnet bitcoin-testnet-rpc ceph ceph-mon cfengine condor-collector ctdb dhcp dhcpv6 dhcpv6-client dns docker-registry ...The command displays a list of available services for the default zone.
Add the service to the list of services that
firewalldallows:# firewall-cmd --add-service=<service_name>The command adds the specified service to the default zone.
Make the new settings persistent:
# firewall-cmd --runtime-to-permanentThe command applies these runtime changes to the permanent configuration of the firewall. By default, it applies these changes to the configuration of the default zone.
Verification
List all permanent firewall rules:
# firewall-cmd --list-all --permanent
public
  target: default
  icmp-block-inversion: no
  interfaces:
  sources:
  services: cockpit dhcpv6-client ssh
  ports:
  protocols:
  forward: no
  masquerade: no
  forward-ports:
  source-ports:
  icmp-blocks:
  rich rules:
The command displays complete configuration with the permanent firewall rules of the default firewall zone (
public).Check the validity of the permanent configuration of the
firewalldservice.# firewall-cmd --check-config successIf the permanent configuration is invalid, the command returns an error with further details:
# firewall-cmd --check-config
Error: INVALID_PROTOCOL: 'public.xml': 'tcpx' not from {'tcp'|'udp'|'sctp'|'dccp'}
You can also manually inspect the permanent configuration files to verify the settings. The main configuration file is
/etc/firewalld/firewalld.conf. The zone-specific configuration files are in the/etc/firewalld/zones/directory and the policies are in the/etc/firewalld/policies/directory.
7.8.2. Enabling services on the firewall by using the web console
By default, services are added to the default firewall zone. If you use more firewall zones on more network interfaces, you must select a zone first and then add the service with port.
The RHEL web console displays predefined firewalld services and you can add them to active firewall zones.
The RHEL 8 web console configures the firewalld service.
The web console does not allow generic firewalld rules that are not listed in the web console.
Prerequisites
- You have installed the RHEL 8 web console.
- You have enabled the cockpit service.
Your user account is allowed to log in to the web console.
For instructions, see Installing and enabling the web console.
- You enabled administrative access in the web console.
-
The
firewalldservice is running.
Procedure
Log in to the RHEL 8 web console.
For details, see Logging in to the web console.
- Click Networking.
Click the button.
If you do not see the button, log in to the web console with the administrator privileges.
In the Firewall section, select a zone for which you want to add the service and click Add Services.

- In the Add Services dialog box, find the service you want to enable in the firewall.
Enable services according to your scenario:
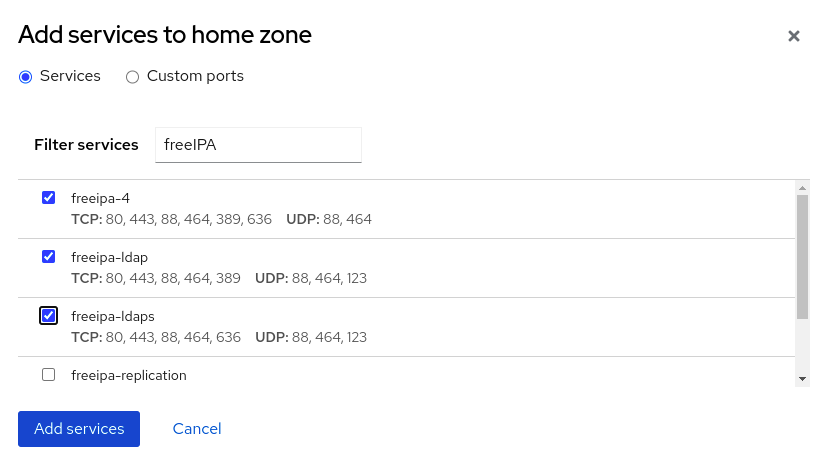
- Click Add Services.
7.8.3. Configuring custom ports by using the web console
You can add custom ports for services through the RHEL web console.
Prerequisites
- You have installed the RHEL 8 web console.
- You have enabled the cockpit service.
Your user account is allowed to log in to the web console.
For instructions, see Installing and enabling the web console.
-
The
firewalldservice is running.
Procedure
Log in to the RHEL 8 web console.
For details, see Logging in to the web console.
- Click Networking.
Click the button.
If you do not see the button, log in to the web console with the administrative privileges.
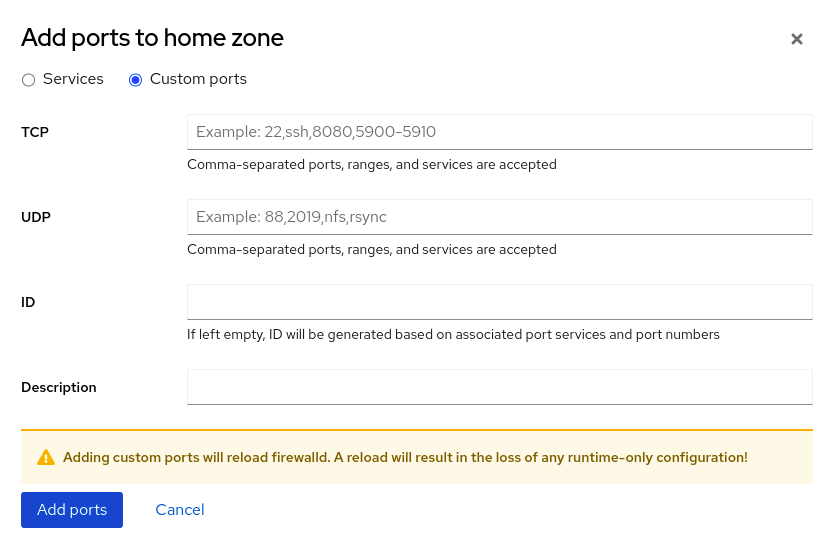
In the Firewall section, select a zone for which you want to configure a custom port and click Add Services.
- In the Add services dialog box, click the radio button.
In the TCP and UDP fields, add ports according to examples. You can add ports in the following formats:
- Port numbers such as 22
- Range of port numbers such as 5900-5910
- Aliases such as nfs, rsync
NoteYou can add multiple values into each field. You must separate values with a comma and without a space, for example: 8080,8081,http
After adding the port number in the TCP field, the UDP field, or both, verify the service name in the Name field.
The Name field displays the name of the service for which this port is reserved. You can rewrite the name if you are sure that this port is free to use and no server requires it to communicate on this port.
- In the Name field, add a name for the service including defined ports.
Click the button.
Verification
To verify the settings, go to the Firewall page and find the service in the list of zone’s Services.
7.9. Filtering forwarded traffic between zones
firewalld enables you to control the flow of network data between different firewalld zones. By defining rules and policies, you can manage how traffic is allowed or blocked when it moves between these zones.
The policy objects feature provides forward and output filtering in firewalld. You can use firewalld to filter traffic between different zones to allow access to locally hosted VMs to connect the host.
7.9.1. The relationship between policy objects and zones
Policy objects allow the user to attach firewalld’s primitives such as services, ports, and rich rules to the policy. You can apply the policy objects to traffic that passes between zones in a stateful and unidirectional manner.
# firewall-cmd --permanent --new-policy myOutputPolicy

# firewall-cmd --permanent --policy myOutputPolicy --add-ingress-zone HOST

# firewall-cmd --permanent --policy myOutputPolicy --add-egress-zone ANY
HOST and ANY are the symbolic zones used in the ingress and egress zone lists.
-
The
HOSTsymbolic zone allows policies for the traffic originating from or has a destination to the host running firewalld. -
The
ANYsymbolic zone applies policy to all the current and future zones.ANYsymbolic zone acts as a wildcard for all zones.
7.9.2. Using priorities to sort policies
Multiple policies can apply to the same set of traffic, therefore, priorities should be used to create an order of precedence for the policies that may be applied.
Procedure
Set a priority to sort the policies:
# firewall-cmd --permanent --policy mypolicy --set-priority -500In the above example -500 is a lower priority value but has higher precedence. Thus, -500 will execute before -100.
Lower numerical priority values have higher precedence and are applied first.
7.9.3. Using policy objects to filter traffic between locally hosted containers and a network physically connected to the host
The policy objects feature enables users to filter traffic between Podman and firewalld zones.
Red Hat recommends blocking all traffic by default and opening the selective services needed for the Podman utility.
Procedure
Create a new firewall policy:
# firewall-cmd --permanent --new-policy podmanToAnyBlock all traffic from Podman to other zones and allow only necessary services on Podman:
# firewall-cmd --permanent --policy podmanToAny --set-target REJECT
# firewall-cmd --permanent --policy podmanToAny --add-service dhcp
# firewall-cmd --permanent --policy podmanToAny --add-service dns
# firewall-cmd --permanent --policy podmanToAny --add-service https
Create a new Podman zone:
# firewall-cmd --permanent --new-zone=podmanDefine the ingress zone for the policy:
# firewall-cmd --permanent --policy podmanToHost --add-ingress-zone podmanDefine the egress zone for all other zones:
# firewall-cmd --permanent --policy podmanToHost --add-egress-zone ANYSetting the egress zone to ANY means that you filter from Podman to other zones. If you want to filter to the host, then set the egress zone to HOST.
Restart the firewalld service:
# systemctl restart firewalld
Verification
Verify the Podman firewall policy to other zones:
# firewall-cmd --info-policy podmanToAny
podmanToAny (active)
  ...
  target: REJECT
  ingress-zones: podman
  egress-zones: ANY
  services: dhcp dns https
  ...
7.9.4. Setting the default target of policy objects
You can specify --set-target options for policies.
The following targets are available:
-
ACCEPT- accepts the packet -
DROP- drops the unwanted packets -
REJECT- rejects unwanted packets with an ICMP reply -
CONTINUE(default) - packets will be subject to rules in following policies and zones.
Procedure
Set the default target:
# firewall-cmd --permanent --policy mypolicy --set-target CONTINUE
Verification
Verify information about the policy
# firewall-cmd --info-policy mypolicy
7.10. Configuring NAT by using firewalld
With firewalld, you can configure the masquerading, destination NAT (DNAT), and redirect NAT types. With NAT, you can modify the source or destination IP address.
7.10.1. Network address translation types
If you require network address translation (NAT) in your network, it is important to understand the NAT types.
These are the different NAT types:
- Masquerading
Use this NAT type to change the source IP address of packets. For example, Internet Service Providers (ISPs) do not route private IP ranges, such as
10.0.0.0/8. If you use private IP ranges in your network and users should be able to reach servers on the internet, map the source IP address of packets from these ranges to a public IP address.Masquerading automatically uses the IP address of the outgoing interface. Therefore, use masquerading if the outgoing interface uses a dynamic IP address.
- Destination NAT (DNAT)
- Use this NAT type to rewrite the destination address and port of incoming packets. For example, if your web server uses an IP address from a private IP range and is, therefore, not directly accessible from the internet, you can set a DNAT rule on the router to redirect incoming traffic to this server.
- Redirect
- This type is a special case of DNAT that redirects packets to a different port on the local machine. For example, if a service runs on a different port than its standard port, you can redirect incoming traffic from the standard port to this specific port.
7.10.2. Configuring IP address masquerading
You can enable IP masquerading on your system. IP masquerading hides individual machines behind a gateway when accessing the internet.
Procedure
To check if IP masquerading is enabled (for example, for the
externalzone), enter the following command asroot:# firewall-cmd --zone=external --query-masqueradeThe command prints
yeswith exit status0if enabled. It printsnowith exit status1otherwise. Ifzoneis omitted, the default zone will be used.To enable IP masquerading, enter the following command as
root:# firewall-cmd --zone=external --add-masquerade-
To make this setting persistent, pass the
--permanentoption to the command. To disable IP masquerading, enter the following command as
root:# firewall-cmd --zone=external --remove-masqueradeTo make this setting permanent, pass the
--permanentoption to the command.
7.10.3. Using DNAT to forward incoming HTTP traffic
You can use destination network address translation (DNAT) to direct incoming traffic from one destination address and port to another. Typically, this is useful for redirecting incoming requests from an external network interface to specific internal servers or services.
Prerequisites
-
The
firewalldservice is running.
Procedure
Forward incoming HTTP traffic:
# firewall-cmd --zone=public --add-forward-port=port=80:proto=tcp:toaddr=198.51.100.10:toport=8080 --permanentThe previous command defines a DNAT rule with the following settings:
-
--zone=public- The firewall zone for which you configure the DNAT rule. You can adjust this to whatever zone you need. -
--add-forward-port- The option that indicates you are adding a port-forwarding rule. -
port=80- The external destination port. -
proto=tcp- The protocol indicating that you forward TCP traffic. -
toaddr=198.51.100.10- The destination IP address. -
toport=8080- The destination port of the internal server. -
--permanent- The option that makes the DNAT rule persistent across reboots.
-
Reload the firewall configuration to apply the changes:
# firewall-cmd --reload
Verification
Verify the DNAT rule for the firewall zone that you used:
# firewall-cmd --list-forward-ports --zone=public
port=80:proto=tcp:toport=8080:toaddr=198.51.100.10
Alternatively, view the corresponding XML configuration file:
# cat /etc/firewalld/zones/public.xml
<?xml version="1.0" encoding="utf-8"?>
<zone>
  <short>Public</short>
  <description>For use in public areas. You do not trust the other computers on networks to not harm your computer. Only selected incoming connections are accepted.</description>
  <service name="ssh"/>
  <service name="dhcpv6-client"/>
  <service name="cockpit"/>
  <forward-port port="80" protocol="tcp" to-port="8080" to-addr="198.51.100.10"/>
  <forward/>
</zone>
7.10.4. Redirecting traffic from a non-standard port to make the web service accessible on a standard port
You can use the redirect mechanism to make the web service that internally runs on a non-standard port accessible without requiring users to specify the port in the URL.
If you use redirect, the URLs are simpler and provide better browsing experience, while a non-standard port is still used internally or for specific requirements.
Prerequisites
-
The
firewalldservice is running.
Procedure
Create the NAT redirect rule:
# firewall-cmd --zone=public --add-forward-port=port=<standard_port>:proto=tcp:toport=<non_standard_port> --permanentThe previous command defines the NAT redirect rule with the following settings:
-
--zone=public- The firewall zone, for which you configure the rule. You can adjust this to whatever zone you need. -
--add-forward-port=port=<non_standard_port>- The option that indicates you are adding a port-forwarding (redirecting) rule with source port on which you initially receive the incoming traffic. -
proto=tcp- The protocol indicating that you redirect TCP traffic. -
toport=<standard_port>- The destination port, to which the incoming traffic should be redirected after being received on the source port. -
--permanent- The option that makes the rule persist across reboots.
-
Reload the firewall configuration to apply the changes:
# firewall-cmd --reload
Verification
Verify the redirect rule for the firewall zone that you used:
# firewall-cmd --list-forward-ports
port=8080:proto=tcp:toport=80:toaddr=
Alternatively, view the corresponding XML configuration file:
# cat /etc/firewalld/zones/public.xml
<?xml version="1.0" encoding="utf-8"?>
<zone>
  <short>Public</short>
  <description>For use in public areas. You do not trust the other computers on networks to not harm your computer. Only selected incoming connections are accepted.</description>
  <service name="ssh"/>
  <service name="dhcpv6-client"/>
  <service name="cockpit"/>
  <forward-port port="8080" protocol="tcp" to-port="80"/>
  <forward/>
</zone>
7.11. Prioritizing rich rules
Rich rules provide a more advanced and flexible way to define firewall rules. Rich rules are particularly useful where services, ports, and so on are not enough to express complex firewall rules.
Concepts behind rich rules:
- granularity and flexibility
- You can define detailed conditions for network traffic based on more specific criteria.
- rule structure
A rich rule consists of a family (IPv4 or IPv6), followed by conditions and actions.
rule family="ipv4|ipv6" [conditions] [actions]- conditions
- They allow rich rules to apply only when certain criteria are met.
- actions
- You can define what happens to network traffic that matches the conditions.
- combining multiple conditions
- You can create more specific and complex filtering.
- hierarchical control and reusability
- You can combine rich rules with other firewall mechanisms such as zones or services.
By default, rich rules are organized based on their rule action. For example, deny rules have precedence over allow rules. The priority parameter in rich rules provides administrators fine-grained control over rich rules and their execution order. When using the priority parameter, rules are sorted first by their priority values in ascending order. When more rules have the same priority, their order is determined by the rule action, and if the action is also the same, the order may be undefined.
7.11.1. How the priority parameter organizes rules into different chains
You can set the priority parameter in a rich rule to any number between -32768 and 32767, and lower numerical values have higher precedence.
The firewalld service organizes rules based on their priority value into different chains:
-
Priority lower than 0: the rule is redirected into a chain with the
_presuffix. -
Priority higher than 0: the rule is redirected into a chain with the
_postsuffix. -
Priority equals 0: based on the action, the rule is redirected into a chain with the
_log,_deny, or_allowthe action.
Inside these sub-chains, firewalld sorts the rules based on their priority value.
7.11.2. Setting the priority of a rich rule
You can use the priority parameter to log all traffic that is not allowed or denied by other rules. For example, you can use this feature to flag unexpected traffic.
Procedure
Add a rich rule with a very low precedence to log all traffic that has not been matched by other rules:
# firewall-cmd --add-rich-rule='rule priority=32767 log prefix="UNEXPECTED: " limit value="5/m"'The command additionally limits the number of log entries to
5per minute.
Verification
Display the
nftablesrule that the command in the previous step created:# nft list chain inet firewalld filter_IN_public_post table inet firewalld { chain filter_IN_public_post { log prefix "UNEXPECTED: " limit rate 5/minute } }
7.12. Enabling traffic forwarding between different interfaces or sources within a firewalld zone
Intra-zone forwarding is a firewalld feature that enables traffic forwarding between interfaces or sources within a firewalld zone.
7.12.1. The difference between intra-zone forwarding and zones with the default target set to ACCEPT
With intra-zone forwarding enabled, the traffic within a single firewalld zone can flow from one interface or source to another interface or source. The zone specifies the trust level of interfaces and sources. If the trust level is the same, the traffic stays inside the same zone.
Enabling intra-zone forwarding in the default zone of firewalld, applies only to the interfaces and sources added to the current default zone.
firewalld uses different zones to manage incoming and outgoing traffic. Each zone has its own set of rules and behaviors. For example, the trusted zone allows all forwarded traffic by default.
Other zones can have different default behaviors. In standard zones, forwarded traffic is typically dropped by default when the target of the zone is set to default.
To control how the traffic is forwarded between different interfaces or sources within a zone, make sure you understand and configure the target of the zone accordingly.
7.12.2. Using intra-zone forwarding to forward traffic between an Ethernet and Wi-Fi network
You can use intra-zone forwarding to forward traffic between interfaces and sources within the same firewalld zone.
This feature brings the following benefits:
-
Seamless connectivity between wired and wireless devices (you can forward traffic between an Ethernet network connected to
enp1s0and a Wi-Fi network connected towlp0s20) - Support for flexible work environments
- Shared resources that are accessible and used by multiple devices or users within a network (such as printers, databases, network-attached storage, and others)
- Efficient internal networking (such as smooth communication, reduced latency, resource accessibility, and others)
You can enable this functionality for individual firewalld zones.
Procedure
Enable packet forwarding in the kernel:
# echo "net.ipv4.ip_forward=1" > /etc/sysctl.d/95-IPv4-forwarding.conf
# sysctl -p /etc/sysctl.d/95-IPv4-forwarding.conf
Ensure that interfaces between which you want to enable intra-zone forwarding are assigned only to the
internalzone:# firewall-cmd --get-active-zonesIf the interface is currently assigned to a zone other than
internal, reassign it:# firewall-cmd --zone=internal --change-interface=interface_name --permanentAdd the
enp1s0andwlp0s20interfaces to theinternalzone:# firewall-cmd --zone=internal --add-interface=enp1s0 --add-interface=wlp0s20Enable intra-zone forwarding:
# firewall-cmd --zone=internal --add-forward
Verification
-
Log in to a host that is on the same network as the
enp1s0interface of the host on which you enabled zone forwarding. Start an echo service with
ncatto test connectivity:# ncat -e /usr/bin/cat -l 12345-
Log in to a host that is in the same network as the
wlp0s20interface. Connect to the echo server running on the host that is in the same network as the
enp1s0:# ncat <other_host> 12345- Type something and press . Verify the text is sent back.
7.13. Configuring firewalld by using RHEL system roles
RHEL system roles is a set of contents for the Ansible automation utility. This content together with the Ansible automation utility provides a consistent configuration interface to remotely manage multiple systems at once.
The rhel-system-roles package contains the rhel-system-roles.firewall RHEL system role. This role was introduced for automated configurations of the firewalld service.
With the firewall RHEL system role you can configure many different firewalld parameters, for example:
- Zones
- The services for which packets should be allowed
- Granting, rejection, or dropping of traffic access to ports
- Forwarding of ports or port ranges for a zone
7.13.1. Resetting the firewalld settings by using the firewall RHEL system role
The firewall RHEL system role supports automating a reset of firewalld settings to their defaults. This efficiently removes insecure or unintentional firewall rules and simplifies management.
Prerequisites
- You have prepared the control node and the managed nodes.
-
The account you use to connect to the managed nodes has
sudopermissions for these nodes.
Procedure
Create a playbook file, for example,
~/playbook.yml, with the following content:--- - name: Reset firewalld example hosts: managed-node-01.example.com tasks: - name: Reset firewalld ansible.builtin.include_role: name: redhat.rhel_system_roles.firewall vars: firewall: - previous: replacedThe settings specified in the example playbook include the following:
previous: replacedRemoves all existing user-defined settings and resets the
firewalldsettings to defaults. If you combine theprevious:replacedparameter with other settings, thefirewallrole removes all existing settings before applying new ones.For details about all variables used in the playbook, see the
/usr/share/ansible/roles/rhel-system-roles.firewall/README.mdfile on the control node.
Validate the playbook syntax:
$ ansible-playbook --syntax-check ~/playbook.ymlNote that this command only validates the syntax and does not protect against a wrong but valid configuration.
Run the playbook:
$ ansible-playbook ~/playbook.yml
Verification
Run this command on the control node to remotely check that all firewall configuration on your managed node was reset to its default values:
# ansible managed-node-01.example.com -m ansible.builtin.command -a 'firewall-cmd --list-all-zones'
7.13.2. Forwarding incoming traffic in firewalld from one local port to a different local port by using the firewall RHEL system role
You can use the firewall RHEL system role to remotely configure forwarding of incoming traffic from one local port to a different local port.
For example, if you have an environment where multiple services co-exist on the same machine and need the same default port, there are likely to become port conflicts. These conflicts can disrupt services and cause downtime. With the firewall RHEL system role, you can efficiently forward traffic to alternative ports to ensure that your services can run simultaneously without modification to their configuration.
Prerequisites
- You have prepared the control node and the managed nodes.
-
The account you use to connect to the managed nodes has
sudopermissions for these nodes.
Procedure
Create a playbook file, for example,
~/playbook.yml, with the following content:--- - name: Configure firewalld hosts: managed-node-01.example.com tasks: - name: Forward incoming traffic on port 8080 to 443 ansible.builtin.include_role: name: redhat.rhel_system_roles.firewall vars: firewall: - forward_port: 8080/tcp;443; state: enabled runtime: true permanent: trueThe settings specified in the example playbook include the following:
forward_port: 8080/tcp;443- Traffic coming to the local port 8080 using the TCP protocol is forwarded to port 443.
runtime: trueEnables changes in the runtime configuration. The default is set to
true.For details about all variables used in the playbook, see the
/usr/share/ansible/roles/rhel-system-roles.firewall/README.mdfile on the control node.
Validate the playbook syntax:
$ ansible-playbook --syntax-check ~/playbook.ymlNote that this command only validates the syntax and does not protect against a wrong but valid configuration.
Run the playbook:
$ ansible-playbook ~/playbook.yml
Verification
On the control node, run the following command to remotely check the forwarded-ports on your managed node:
# ansible managed-node-01.example.com -m ansible.builtin.command -a 'firewall-cmd --list-forward-ports'
managed-node-01.example.com | CHANGED | rc=0 >>
port=8080:proto=tcp:toport=443:toaddr=
7.13.3. Configuring a firewalld DMZ zone by using the firewall RHEL system role
You can use the firewall RHEL system role to configure a zone to allow certain traffic. For example, you can configure that the dmz zone with the enp1s0 interface allows HTTPS traffic to enable external users to access your web servers.
Prerequisites
- You have prepared the control node and the managed nodes.
-
The account you use to connect to the managed nodes has
sudopermissions for these nodes.
Procedure
Create a playbook file, for example,
~/playbook.yml, with the following content:--- - name: Configure firewalld hosts: managed-node-01.example.com tasks: - name: Creating a DMZ with access to HTTPS port and masquerading for hosts in DMZ ansible.builtin.include_role: name: redhat.rhel_system_roles.firewall vars: firewall: - zone: dmz interface: enp1s0 service: https state: enabled runtime: true permanent: trueFor details about all variables used in the playbook, see the
/usr/share/ansible/roles/rhel-system-roles.firewall/README.mdfile on the control node.Validate the playbook syntax:
$ ansible-playbook --syntax-check ~/playbook.ymlNote that this command only validates the syntax and does not protect against a wrong but valid configuration.
Run the playbook:
$ ansible-playbook ~/playbook.yml
Verification
On the control node, run the following command to remotely check the information about the
dmzzone on your managed node:# ansible managed-node-01.example.com -m ansible.builtin.command -a 'firewall-cmd --zone=dmz --list-all' managed-node-01.example.com | CHANGED | rc=0 >> dmz (active) target: default icmp-block-inversion: no interfaces: enp1s0 sources: services: https ssh ports: protocols: forward: no masquerade: no forward-ports: source-ports: icmp-blocks: