Chapter 5. Connecting to virtual machines
To interact with a virtual machine (VM) in RHEL 9, you need to connect to it by doing one of the following:
- When using the web console interface, use the Virtual Machines pane in the web console interface. For more information, see Interacting with virtual machines by using the web console.
- If you need to interact with a VM graphical display without using the web console, use the Virt Viewer application. For details, see Opening a virtual machine graphical console by using Virt Viewer.
- When a graphical display is not possible or not necessary, use an SSH terminal connection.
- When the virtual machine is not reachable from your system by using a network, use the virsh console.
If the VMs to which you are connecting are on a remote host rather than a local one, you can optionally configure your system for more convenient access to remote hosts.
5.1. Interacting with virtual machines by using the web console
To interact with a virtual machine (VM) in the RHEL 9 web console, you need to connect to the VM’s console. These include both graphical and serial consoles.
- To interact with the VM’s graphical interface in the web console, use the graphical console.
- To interact with the VM’s graphical interface in a remote viewer, use the graphical console in remote viewers.
- To interact with the VM’s CLI in the web console, use the serial console.
5.1.1. Viewing the virtual machine graphical console in the web console
By using the virtual machine (VM) console interface, you can view the graphical output of a selected VM in the RHEL 9 web console.
Prerequisites
- You have installed the RHEL 9 web console.
- You have enabled the cockpit service.
Your user account is allowed to log in to the web console.
For instructions, see Installing and enabling the web console.
- The web console VM plug-in is installed on your system.
- Ensure that both the host and the VM support a graphical interface.
Procedure
Log in to the RHEL 9 web console.
For details, see Logging in to the web console.
In the interface, click the VM whose graphical console you want to view.
A new page opens with an Overview and a Console section for the VM.
Select in the console drop down menu.
The VNC console appears below the menu in the web interface.
The graphical console appears in the web interface.
Click
You can now interact with the VM console by using the mouse and keyboard in the same manner you interact with a real machine. The display in the VM console reflects the activities being performed on the VM.
The host on which the web console is running may intercept specific key combinations, such as Ctrl+Alt+Del, preventing them from being sent to the VM.
To send such key combinations, click the menu and select the key sequence to send.
For example, to send the Ctrl+Alt+Del combination to the VM, click the and select the menu entry.
Troubleshooting
- If clicking in the graphical console does not have any effect, expand the console to full screen. This is a known issue with the mouse cursor offset.
5.1.2. Viewing the graphical console in a remote viewer by using the web console
By using the web console interface, you can display the graphical console of a selected virtual machine (VM) in a remote viewer, such as Virt Viewer.
You can launch Virt Viewer from within the web console. Other VNC remote viewers can be launched manually.
Prerequisites
- You have installed the RHEL 9 web console.
- You have enabled the cockpit service.
Your user account is allowed to log in to the web console.
For instructions, see Installing and enabling the web console.
- The web console VM plug-in is installed on your system.
- Ensure that both the host and the VM support a graphical interface.
Before you can view the graphical console in Virt Viewer, you must install Virt Viewer on the machine to which the web console is connected.
Click .
The virt viewer,
.vv, file downloads.- Open the file to launch Virt Viewer.
Remote Viewer is available on most operating systems. However, some browser extensions and plug-ins do not allow the web console to open Virt Viewer.
Procedure
Log in to the RHEL 9 web console.
For details, see Logging in to the web console.
In the interface, click the VM whose graphical console you want to view.
A new page opens with an Overview and a Console section for the VM.
Select in the console drop down menu.
Click .
The graphical console opens in Virt Viewer.
You can interact with the VM console by using the mouse and keyboard in the same manner in which you interact with a real machine. The display in the VM console reflects the activities being performed on the VM.
The server on which the web console is running can intercept specific key combinations, such as Ctrl+Alt+Del, preventing them from being sent to the VM.
To send such key combinations, click the menu and select the key sequence to send.
For example, to send the Ctrl+Alt+Del combination to the VM, click the menu and select the menu entry.
Troubleshooting
- If clicking in the graphical console does not have any effect, expand the console to full screen. This is a known issue with the mouse cursor offset.
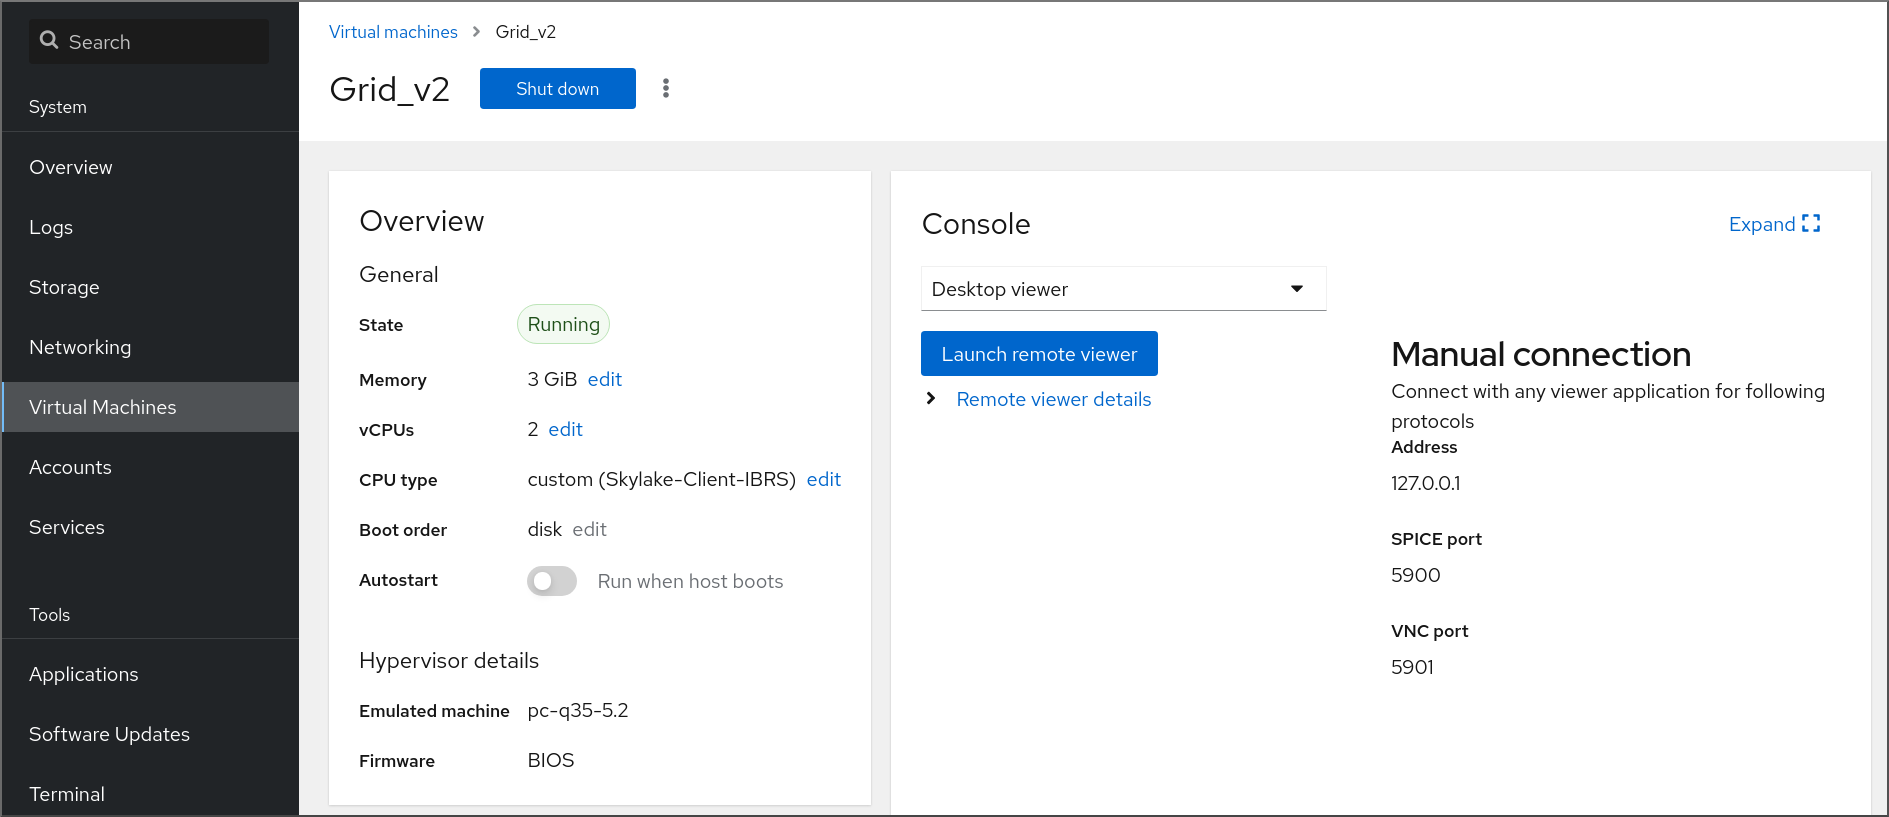
If launching the Remote Viewer in the web console does not work or is not optimal, you can manually connect with any viewer application by using the following protocols:
-
Address - The default address is
127.0.0.1. You can modify thevnc_listenparameter in/etc/libvirt/qemu.confto change it to the host’s IP address. - VNC port - 5901
-
Address - The default address is
5.1.3. Viewing the virtual machine serial console in the web console
You can view the serial console of a selected virtual machine (VM) in the RHEL 9 web console. This is useful when the host machine or the VM is not configured with a graphical interface.
For more information about the serial console, see Opening a virtual machine serial console.
Prerequisites
- You have installed the RHEL 9 web console.
- You have enabled the cockpit service.
Your user account is allowed to log in to the web console.
For instructions, see Installing and enabling the web console.
- The web console VM plug-in is installed on your system.
Procedure
Log in to the RHEL 9 web console.
For details, see Logging in to the web console.
In the pane, click the VM whose serial console you want to view.
A new page opens with an Overview and a Console section for the VM.
Select in the console drop down menu.
The graphical console appears in the web interface.

You can disconnect and reconnect the serial console from the VM.
- To disconnect the serial console from the VM, click .
- To reconnect the serial console to the VM, click .
5.1.4. Replacing the SPICE remote display protocol with VNC in the web console
The support for the SPICE remote display protocol has been removed on RHEL 9 hosts. If you have a virtual machine (VM) that is configured to use the SPICE protocol, you can replace the SPICE protocol with the VNC protocol by using the web console. Otherwise, the VM fails to start.
However, certain SPICE devices, such as audio and USB passthrough, will be removed from the VM because they do not have a suitable replacement in the VNC protocol. For more information, see Considerations in adopting RHEL 9.
By default, RHEL 8 VMs are configured to use the SPICE protocol. On a RHEL 9 host, these VMs fail to start, if you do not switch from SPICE to VNC.
Prerequisites
- The web console VM plug-in is installed on your system.
- You have an existing VM that is configured to use the SPICE remote display protocol and is already shut-down.
Procedure
In the Virtual Machines interface of the web console, click the Menu button of the VM that is configured to use the SPICE protocol.
A drop down menu opens with controls for various VM operations.
Click .
The Replace SPICE devices dialog opens.
NoteIf you have multiple existing VMs that use the SPICE protocol, they are listed in this dialog. Here, you can select multiple VMs to convert from using SPICE to VNC in a single step.
Click .
A confirmation of the successful operation appears.
Verification
- Click the button to start the VM.
Open the VM overview interface.
If a
VNC consoleoption displays in the Console pane of the interface, the conversion has been successful.
5.2. Opening a virtual machine graphical console by using Virt Viewer
To connect to a graphical console of a KVM virtual machine (VM) and open it in the Virt Viewer desktop application, follow the procedure below.
Prerequisites
- Your system, as well as the VM you are connecting to, must support graphical displays.
- If the target VM is located on a remote host, connection and root access privileges to the host are needed.
- Optional: If the target VM is located on a remote host, set up your libvirt and SSH for more convenient access to remote hosts.
Procedure
To connect to a local VM, use the following command and replace guest-name with the name of the VM you want to connect to:
# virt-viewer guest-nameTo connect to a remote VM, use the
virt-viewercommand with the SSH protocol. For example, the following command connects as root to a VM called guest-name, located on remote system 192.0.2.1. The connection also requires root authentication for 192.0.2.1.# virt-viewer --direct --connect qemu+ssh://root@192.0.2.1/system guest-name root@192.0.2.1's password:
Verification
If the connection works correctly, the VM display is shown in the Virt Viewer window.
You can interact with the VM console by using the mouse and keyboard in the same manner you interact with a real machine. The display in the VM console reflects the activities being performed on the VM.
Troubleshooting
- If clicking in the graphical console does not have any effect, expand the console to full screen. This is a known issue with the mouse cursor offset.
5.3. Connecting to a virtual machine by using SSH
To interact with the terminal of a virtual machine (VM) by using the SSH connection protocol, follow the procedure below.
Prerequisites
- You have network connection and root access privileges to the target VM.
- If the target VM is located on a remote host, you also have connection and root access privileges to that host.
Your VM network assigns IP addresses by
dnsmasqgenerated bylibvirt. This is the case for example inlibvirtNAT networks.Notably, if your VM is using one of the following network configurations, you cannot connect to the VM by using SSH:
-
hostdevinterfaces - Direct interfaces
- Bridge interaces
-
The
libvirt-nsscomponent is installed and enabled on the VM’s host. If it is not, do the following:Install the
libvirt-nsspackage:# dnf install libvirt-nssEdit the
/etc/nsswitch.conffile and addlibvirt_guestto thehostsline:... passwd: compat shadow: compat group: compat hosts: files libvirt_guest dns ...
Procedure
When connecting to a remote VM, SSH into its physical host first. The following example demonstrates connecting to a host machine
192.0.2.1by using its root credentials:# ssh root@192.0.2.1 root@192.0.2.1's password: Last login: Mon Sep 24 12:05:36 2021 root~#Use the VM’s name and user access credentials to connect to it. For example, the following connects to the
testguest1VM by using its root credentials:# ssh root@testguest1 root@testguest1's password: Last login: Wed Sep 12 12:05:36 2018 root~]#
Troubleshooting
If you do not know the VM’s name, you can list all VMs available on the host by using the
virsh list --allcommand:# virsh list --all Id Name State ---------------------------------------------------- 2 testguest1 running - testguest2 shut off
5.4. Opening a virtual machine serial console
By using the virsh console command, it is possible to connect to the serial console of a virtual machine (VM).
This is useful when the VM:
- Does not provide VNC protocols, and thus does not offer video display for GUI tools.
- Does not have a network connection, and thus cannot be interacted with using SSH.
Prerequisites
The GRUB boot loader on your host must be configured to use serial console. To verify, check that the
/etc/default/grubfile on your host contains theGRUB_TERMINAL=serialparameter.$ sudo grep GRUB_TERMINAL /etc/default/grub GRUB_TERMINAL=serialThe VM must have a serial console device configured, such as
console type='pty'. To verify, do the following:# virsh dumpxml vm-name | grep console <console type='pty' tty='/dev/pts/2'> </console>The VM must have the serial console configured in its kernel command line. To verify this, the
cat /proc/cmdlinecommand output on the VM should include console=<console-name>, where <console-name> is architecture-specific:-
For AMD64 and Intel 64:
ttyS0 For ARM 64:
ttyAMA0NoteThe following commands in this procedure use
ttyS0.# cat /proc/cmdline BOOT_IMAGE=/vmlinuz-3.10.0-948.el7.x86_64 root=/dev/mapper/rhel-root ro console=tty0 console=ttyS0,9600n8 rd.lvm.lv=rhel/root rd.lvm.lv=rhel/swap rhgbIf the serial console is not set up properly on a VM, using virsh console to connect to the VM connects you to an unresponsive guest console. However, you can still exit the unresponsive console by using the Ctrl+] shortcut.
To set up serial console on the VM, do the following:
On the VM, enable the
console=ttyS0kernel option:# grubby --update-kernel=ALL --args="console=ttyS0"Clear the kernel options that might prevent your changes from taking effect.
# grub2-editenv - unset kernelopts- Reboot the VM.
-
For AMD64 and Intel 64:
The
serial-getty@<console-name>service must be enabled. For example, on AMD64 and Intel 64:# systemctl status serial-getty@ttyS0.service ○ serial-getty@ttyS0.service - Serial Getty on ttyS0 Loaded: loaded (/usr/lib/systemd/system/serial-getty@.service; enabled; preset: enabled)
Procedure
On your host system, use the
virsh consolecommand. The following example connects to the guest1 VM, if the libvirt driver supports safe console handling:# virsh console guest1 --safe Connected to domain 'guest1' Escape character is ^] Subscription-name Kernel 3.10.0-948.el7.x86_64 on an x86_64 localhost login:- You can interact with the virsh console in the same way as with a standard command-line interface.
5.5. Setting up easier access to remote virtualization hosts
When managing VMs on a remote host system by using libvirt utilities, it is recommended to use the -c qemu+ssh://root@hostname/system syntax. For example, to use the virsh list command as root on the 192.0.2.1 host:
# virsh -c qemu+ssh://root@192.0.2.1/system list
root@192.0.2.1's password:

Id   Name              State
---------------------------------
1    remote-guest      running
However, you can remove the need to specify the connection details in full by modifying your SSH and libvirt configuration. For example:
# virsh -c remote-host list
root@192.0.2.1's password:

Id   Name              State
---------------------------------
1    remote-guest      running
To enable this improvement, follow the instructions below.
Procedure
Edit the
~/.ssh/configfile with the following details, where host-alias is a shortened name associated with a specific remote host and an alias for root@192.0.2.1, and hosturl is the URL address of the host :# vi ~/.ssh/config Host example-host-alias User root Hostname 192.0.2.1Edit the
/etc/libvirt/libvirt.conffile with the following details, the example-qemu-host-alias is a host alias that QEMU and libvirt utilities will associate forqemu+ssh://192.0.2.1/systemwith the intended host example-host-alias :# vi /etc/libvirt/libvirt.conf uri_aliases = [ "example-qemu-host-alias=qemu+ssh://example-host-alias/system", ]
Verification
Confirm that you can manage remote VMs by using libvirt-based utilities on the local system with an added
-c qemu-host-aliasparameter. This automatically performs the commands over SSH on the remote host.For example, verify that the following lists VMs on the 192.0.2.1 remote host, the connection to which was set up as example-qemu-host-alias in the previous steps:
# virsh -c example-qemu-host-alias list root@192.0.2.1's password: Id Name State ---------------------------------------- 1 example-remote-guest runningNoteIn addition to
virsh, the-c(or--connect) option and the remote host access configuration described above can be used by the following utilities:
Next steps
If you want to use libvirt utilities exclusively on a single remote host, you can also set a specific connection as the default target for libvirt-based utilities. However, this is not recommended if you also want to manage VMs on your local host or on different remote hosts.
You can edit the
/etc/libvirt/libvirt.conffile and set the value of theuri_defaultparameter to example-qemu-host-alias as a default libvirt target.# These can be used in cases when no URI is supplied by the application # (@uri_default also prevents probing of the hypervisor driver). # uri_default = "example-qemu-host-alias"As a result, all libvirt-based commands will automatically be performed on the specified remote host.
$ virsh list
root@192.0.2.1's password:

Id   Name              State
---------------------------------
1   example-remote-guest      running
When connecting to a remote host, you can avoid providing the root password to the remote system. To do so, use one or more of the following methods:
- Set up key-based SSH access to the remote host
- Use SSH connection multiplexing to connect to the remote system **Logging in to IdM in the Web UI: Using a Kerberos ticket
-
The
-c(or--connect) option can be used to run thevirt-install,
virt-viewer, and virsh commands on a remote host.
5.6. Replacing the SPICE remote display protocol with VNC by using the command line
The support for the SPICE remote display protocol has been removed on RHEL 9 hosts. If you have a virtual machine (VM) that is configured to use the SPICE protocol, you can replace the SPICE protocol with the VNC protocol by using the command line. Otherwise, the VM fails to start.
However, certain SPICE devices, such as audio and USB passthrough, will be removed from the VM because they do not have a suitable replacement in the VNC protocol. For more information, see Considerations in adopting RHEL 9.
By default, RHEL 8 VMs are configured to use the SPICE protocol. On a RHEL 9 host, these VMs fail to start, if you do not switch from SPICE to VNC.
Prerequisites
- You have an existing VM that is configured to use the SPICE remote display protocol and is already shut-down.
Procedure
On the host, run the following command, and replace `<vm-name>` with the name of the VM that you want to convert to VNC.
# virt-xml <vm-name> --edit --convert-to-vnc

Domain 'vm-name' defined successfully
Verification
Inspect the configuration of the VM you converted, and make sure the graphics type is listed as
vnc.# virsh dumpxml -xml <vm-name> | grep "graphics" <graphics type='vnc' port='5900' autoport='yes' listen='127.0.0.1'>
5.7. Configuring VNC passwords
To manage access to the graphical output of a virtual machine (VM), you can configure a password for the VNC console of the VM.
With a VNC password configured on a VM, users of the VMs must enter the password when attempting to view or interact with the VNC graphical console of the VMs, for example by using the virt-viewer utility.
VNC passwords are not a sufficient measure for ensuring the security of a VM environment. For details, see QEMU documentation on VNC security.
In addition, the VNC password is saved in plain text in the configuration of the VM, so for the password to be effective, the user must not be able to display the VM configuration.
Prerequisites
The VM that you want to protect with a VNC password has VNC graphics configured.
To ensure that this is the case, use the
virsh dumpxmlcommand as follows:# virsh dumpxml <vm-name> | grep graphics <graphics type='vnc' ports='-1' autoport=yes listen=127.0.0.1> </graphics>
Procedure
Open the configuration of the VM that you want to assign a VNC password to.
# virsh edit <vm-name>On the
<graphics>line of the configuration, add thepasswdattribute and the password string. The password must be 8 characters or fewer.<graphics type='vnc' ports='-1' autoport=yes listen=127.0.0.1 passwd='<password>'>Optional: In addition, define a date and time when the password will expire.
<graphics type='vnc' ports='-1' autoport=yes listen=127.0.0.1 passwd='<password>' passwdValidTo='2025-02-01T15:30:00'>In this example, the password will expire on February 1st 2025, at 15:30 UTC.
- Save the configuration.
Verification
Start the modified VM.
# virsh start <vm-name>Open a graphical console of the VM, for example by using the
virt-viewerutility:# virt-viewer <vm-name>If the VNC password has been configured properly, a dialogue window appears that requests you to enter the password.