Chapter 3. Creating virtual machines
To create a virtual machine (VM) in RHEL 9, use the command line or the RHEL 9 web console.
3.1. Creating virtual machines by using the command line
To create a virtual machine (VM) on your RHEL 9 by using the command line, use the virt-install utility.
Prerequisites
- Virtualization is enabled on your host system.
- You have a sufficient amount of system resources to allocate to your VMs, such as disk space, RAM, or CPUs. The recommended values might vary significantly depending on the intended tasks and workload of the VMs.
An operating system (OS) installation source is available locally or on a network. This can be one of the following:
- An ISO image of an installation medium
A disk image of an existing VM installation
WarningInstalling from a host CD-ROM or DVD-ROM device is not possible in RHEL 9. If you select a CD-ROM or DVD-ROM as the installation source when using any VM installation method available in RHEL 9, the installation will fail. For more information, see the Red Hat Knowledgebase solution RHEL 7 or higher can’t install guest OS from CD/DVD-ROM.
Also note that Red Hat provides support only for a limited set of guest operating systems.
- Optional: A Kickstart file can be provided for faster and easier configuration of the installation.
Procedure
To create a VM and start its OS installation, use the virt-install command, along with the following mandatory arguments:
-
--name: the name of the new machine -
--memory: the amount of allocated memory -
--vcpus: the number of allocated virtual CPUs -
--disk: the type and size of the allocated storage -
--cdromor--location: the type and location of the OS installation source --osinfo: the OS type and version that you intend to installNoteTo list all available values for the
--osinfoargument, run thevirt-install --osinfo listcommand.For more details, install the
libosinfo-binpackage and run theosinfo-query oscommand.
Based on the chosen installation method, the necessary options and values can vary. See the commands below for examples:
The following command creates a VM named demo-guest1 that installs the Windows 10 OS from an ISO image locally stored in the /home/username/Downloads/Win10install.iso file. This VM is also allocated with 2048 MiB of RAM and 2 vCPUs, and an 80 GiB qcow2 virtual disk is automatically configured for the VM.
virt-install \
    --name demo-guest1 --memory 2048 \
    --vcpus 2 --disk size=80 --osinfo win10 \
    --cdrom /home/username/Downloads/Win10install.iso
# virt-install \ --name demo-guest1 --memory 2048 \ --vcpus 2 --disk size=80 --osinfo win10 \ --cdrom /home/username/Downloads/Win10install.isoCopy to Clipboard Copied! Toggle word wrap Toggle overflow The following command creates a VM named demo-guest2 that uses the /home/username/Downloads/rhel9.iso image to run a RHEL 9 OS from a live CD. No disk space is assigned to this VM, so changes made during the session will not be preserved. In addition, the VM is allocated with 4096 MiB of RAM and 4 vCPUs.
virt-install \
    --name demo-guest2 --memory 4096 --vcpus 4 \
    --disk none --livecd --osinfo rhel9.0 \
    --cdrom /home/username/Downloads/rhel9.iso
# virt-install \ --name demo-guest2 --memory 4096 --vcpus 4 \ --disk none --livecd --osinfo rhel9.0 \ --cdrom /home/username/Downloads/rhel9.isoCopy to Clipboard Copied! Toggle word wrap Toggle overflow The following command creates a RHEL 9 VM named demo-guest3 that connects to an existing disk image, /home/username/backup/disk.qcow2. This is similar to physically moving a hard drive between machines, so the OS and data available to demo-guest3 are determined by how the image was handled previously. In addition, this VM is allocated with 2048 MiB of RAM and 2 vCPUs.
virt-install \
    --name demo-guest3 --memory 2048 --vcpus 2 \
    --os-info rhel9.0 --import \
    --disk /home/username/backup/disk.qcow2
# virt-install \ --name demo-guest3 --memory 2048 --vcpus 2 \ --os-info rhel9.0 --import \ --disk /home/username/backup/disk.qcow2Copy to Clipboard Copied! Toggle word wrap Toggle overflow The following command creates a VM named demo-guest4 that installs from the
http://example.com/OS-installURL. For the installation to start successfully, the URL must contain a working OS installation tree. In addition, the OS is automatically configured by using the /home/username/ks.cfg kickstart file. This VM is also allocated with 2048 MiB of RAM, 2 vCPUs, and a 160 GiB qcow2 virtual disk.virt-install \ --name demo-guest4 --memory 2048 --vcpus 2 --disk size=160 \ --osinfo rhel9.0 --location http://example.com/OS-install \ --initrd-inject /home/username/ks.cfg --extra-args="inst.ks=file:/ks.cfg console=tty0 console=ttyS0,115200n8"# virt-install \ --name demo-guest4 --memory 2048 --vcpus 2 --disk size=160 \ --osinfo rhel9.0 --location http://example.com/OS-install \ --initrd-inject /home/username/ks.cfg --extra-args="inst.ks=file:/ks.cfg console=tty0 console=ttyS0,115200n8"Copy to Clipboard Copied! Toggle word wrap Toggle overflow In addition, if you want to host demo-guest4 on an RHEL 9 on an ARM 64 host, include the following lines to ensure that the kickstart file installs the
kernel-64kpackage:%packages -kernel kernel-64k %end
%packages -kernel kernel-64k %endCopy to Clipboard Copied! Toggle word wrap Toggle overflow The following command creates a VM named demo-guest5 that installs from a
RHEL9.isoimage file in text-only mode, without graphics. It connects the guest console to the serial console. The VM has 16384 MiB of memory, 16 vCPUs, and 280 GiB disk. This kind of installation is useful when connecting to a host over a slow network link.virt-install \ --name demo-guest5 --memory 16384 --vcpus 16 --disk size=280 \ --osinfo rhel9.0 --location RHEL9.iso \ --graphics none --extra-args='console=ttyS0'# virt-install \ --name demo-guest5 --memory 16384 --vcpus 16 --disk size=280 \ --osinfo rhel9.0 --location RHEL9.iso \ --graphics none --extra-args='console=ttyS0'Copy to Clipboard Copied! Toggle word wrap Toggle overflow The following command creates a VM named demo-guest6, which has the same configuration as demo-guest5, but resides on the 192.0.2.1 remote host.
virt-install \
    --connect qemu+ssh://root@192.0.2.1/system --name demo-guest6 --memory 16384 \
    --vcpus 16 --disk size=280 --osinfo rhel9.0 --location RHEL9.iso \
    --graphics none --extra-args='console=ttyS0'
# virt-install \ --connect qemu+ssh://root@192.0.2.1/system --name demo-guest6 --memory 16384 \ --vcpus 16 --disk size=280 --osinfo rhel9.0 --location RHEL9.iso \ --graphics none --extra-args='console=ttyS0'Copy to Clipboard Copied! Toggle word wrap Toggle overflow The following command creates a VM named demo-guest-7, which has the same configuration as demo-guest5, but for its storage, it uses an IBM Z DASD mediated device
mdev_30820a6f_b1a5_4503_91ca_0c10ba12345a_0_0_29a8, and assigns it device number1111.virt-install \ --name demo-guest7 --memory 16384 --vcpus 16 --disk size=280 \ --osinfo rhel9.0 --location RHEL9.iso --graphics none \ --disk none --hostdev mdev_30820a6f_b1a5_4503_91ca_0c10ba12345a_0_0_29a8,address.type=ccw,address.cssid=0xfe,address.ssid=0x0,address.devno=0x1111,boot-order=1 \ --extra-args 'rd.dasd=0.0.1111'# virt-install \ --name demo-guest7 --memory 16384 --vcpus 16 --disk size=280 \ --osinfo rhel9.0 --location RHEL9.iso --graphics none \ --disk none --hostdev mdev_30820a6f_b1a5_4503_91ca_0c10ba12345a_0_0_29a8,address.type=ccw,address.cssid=0xfe,address.ssid=0x0,address.devno=0x1111,boot-order=1 \ --extra-args 'rd.dasd=0.0.1111'Copy to Clipboard Copied! Toggle word wrap Toggle overflow Note that the name of the mediated device available for installation can be retrieved by using the
virsh nodedev-list --cap mdevcommand.
Verification
- If the VM is created successfully, a virt-viewer window opens with a graphical console of the VM and starts the guest OS installation.
Troubleshooting
If
virt-installfails with acannot find default networkerror:Ensure that the
libvirt-daemon-config-networkpackage is installed:{PackageManagerCommand} info libvirt-daemon-config-network# {PackageManagerCommand} info libvirt-daemon-config-network Installed Packages Name : libvirt-daemon-config-network [...]Copy to Clipboard Copied! Toggle word wrap Toggle overflow Verify that the
libvirtdefault network is active and configured to start automatically:virsh net-list --all
# virsh net-list --all
 Name      State    Autostart   Persistent
--------------------------------------------
 default   active   yes         yes
Copy to Clipboard Copied! Toggle word wrap Toggle overflow If it is not, activate the default network and set it to auto-start:
virsh net-autostart default
virsh net-start default
# virsh net-autostart default
Network default marked as autostarted

# virsh net-start default
Network default started
Copy to Clipboard Copied! Toggle word wrap Toggle overflow If activating the default network fails with the following error, the
libvirt-daemon-config-networkpackage has not been installed correctly.error: failed to get network 'default' error: Network not found: no network with matching name 'default'
error: failed to get network 'default' error: Network not found: no network with matching name 'default'Copy to Clipboard Copied! Toggle word wrap Toggle overflow To fix this, re-install
libvirt-daemon-config-network:{PackageManagerCommand} reinstall libvirt-daemon-config-network# {PackageManagerCommand} reinstall libvirt-daemon-config-networkCopy to Clipboard Copied! Toggle word wrap Toggle overflow If activating the default network fails with an error similar to the following, a conflict has occurred between the default network’s subnet and an existing interface on the host.
error: Failed to start network default
error: internal error: Network is already in use by interface ens2
error: Failed to start network default
error: internal error: Network is already in use by interface ens2
Copy to Clipboard Copied! Toggle word wrap Toggle overflow To fix this, use the
virsh net-edit defaultcommand and change the192.0.2.*values in the configuration to a subnet not already in use on the host.
3.2. Creating virtual machines and installing guest operating systems by using the web console
To manage virtual machines (VMs) in a GUI on a RHEL 9 host, use the web console. The following sections provide information about how to use the RHEL 9 web console to create VMs and install guest operating systems on them.
3.2.1. Creating virtual machines by using the web console
To create a virtual machine (VM) on a host machine to which your RHEL 9 web console is connected, use the instructions below.
Prerequisites
- You have installed the RHEL 9 web console.
- You have enabled the cockpit service.
Your user account is allowed to log in to the web console.
For instructions, see Installing and enabling the web console.
- Virtualization is enabled on your host system.
- The web console VM plug-in is installed on your host system.
- You have a sufficient amount of system resources to allocate to your VMs, such as disk space, RAM, or CPUs. The recommended values might vary significantly depending on the intended tasks and workload of the VMs.
Procedure
In the Virtual Machines interface of the web console, click .
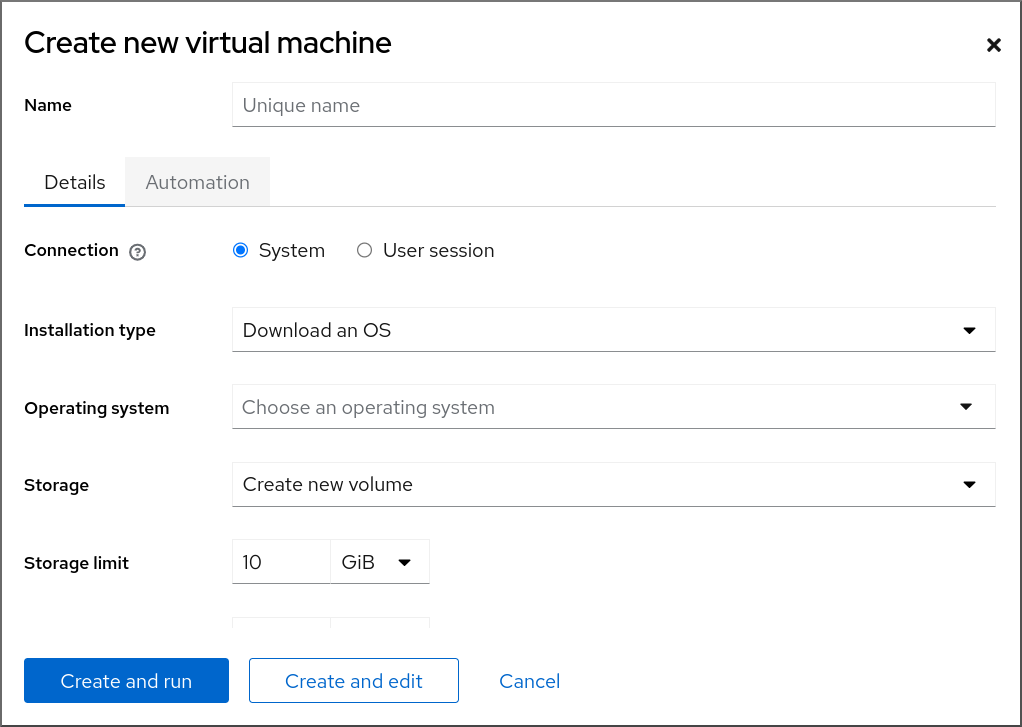
The Create new virtual machine dialog appears.
Enter the basic configuration of the VM you want to create.
- Name - The name of the VM.
- Connection - The level of privileges granted to the session. For more details, expand the associated dialog box in the web console.
- Installation type - The installation can use a local installation medium, a URL, a PXE network boot, a cloud base image, or download an operating system from a limited set of operating systems.
Operating system - The guest operating system running on the VM. Note that Red Hat provides support only for a limited set of guest operating systems.
NoteTo download and install Red Hat Enterprise Linux directly from web console, you must add an offline token in the Offline token field.
- Storage - The type of storage.
- Storage Limit - The amount of storage space.
- Memory - The amount of memory.
Create the VM:
- If you want the VM to automatically install the operating system, click .
- If you want to edit the VM before the operating system is installed, click .
3.2.2. Creating virtual machines by importing disk images by using the web console
You can create a virtual machine (VM) by importing a disk image of an existing VM installation in the RHEL 9 web console.
Prerequisites
- You have installed the RHEL 9 web console.
- You have enabled the cockpit service.
Your user account is allowed to log in to the web console.
For instructions, see Installing and enabling the web console.
- The web console VM plug-in is installed on your system.
- You have a sufficient amount of system resources to allocate to your VMs, such as disk space, RAM, or CPUs. The recommended values can vary significantly depending on the intended tasks and workload of the VMs.
- You have downloaded a disk image of an existing VM installation.
Procedure
In the Virtual Machines interface of the web console, click .
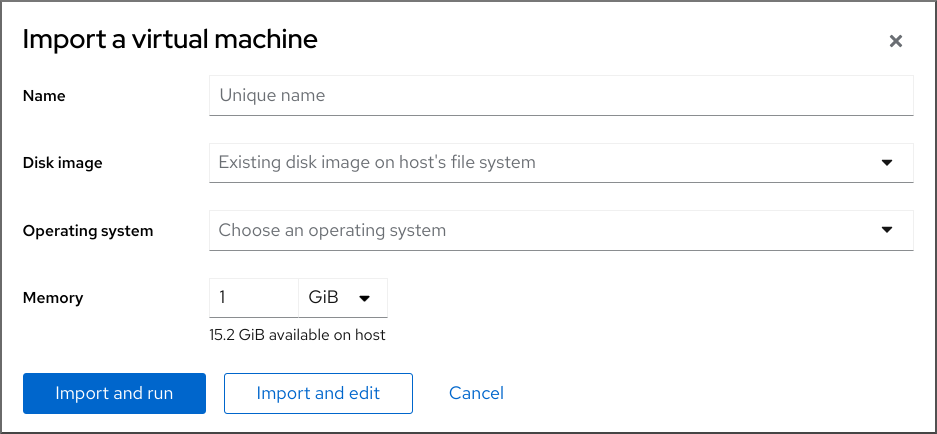
The Import a virtual machine dialog appears.
Enter the basic configuration of the VM you want to create:
- Name - The name of the VM.
- Disk image - The path to the existing disk image of a VM on the host system.
- Operating system - The operating system running on a VM disk. Note that Red Hat provides support only for a limited set of guest operating systems.
- Memory - The amount of memory to allocate for use by the VM.
Import the VM:
- To install the operating system on the VM without additional edits to the VM settings, click .
- To edit the VM settings before the installation of the operating system, click .
3.2.3. Installing guest operating systems by using the web console
When a virtual machine (VM) boots for the first time, you must install an operating system on the VM.
If you click or while creating a new VM, the installation routine for the operating system starts automatically when the VM is created.
Prerequisites
- You have installed the RHEL 9 web console.
- You have enabled the cockpit service.
Your user account is allowed to log in to the web console.
For instructions, see Installing and enabling the web console.
- The web console VM plug-in is installed on your host system.
Procedure
Log in to the RHEL 9 web console.
For details, see Logging in to the web console.
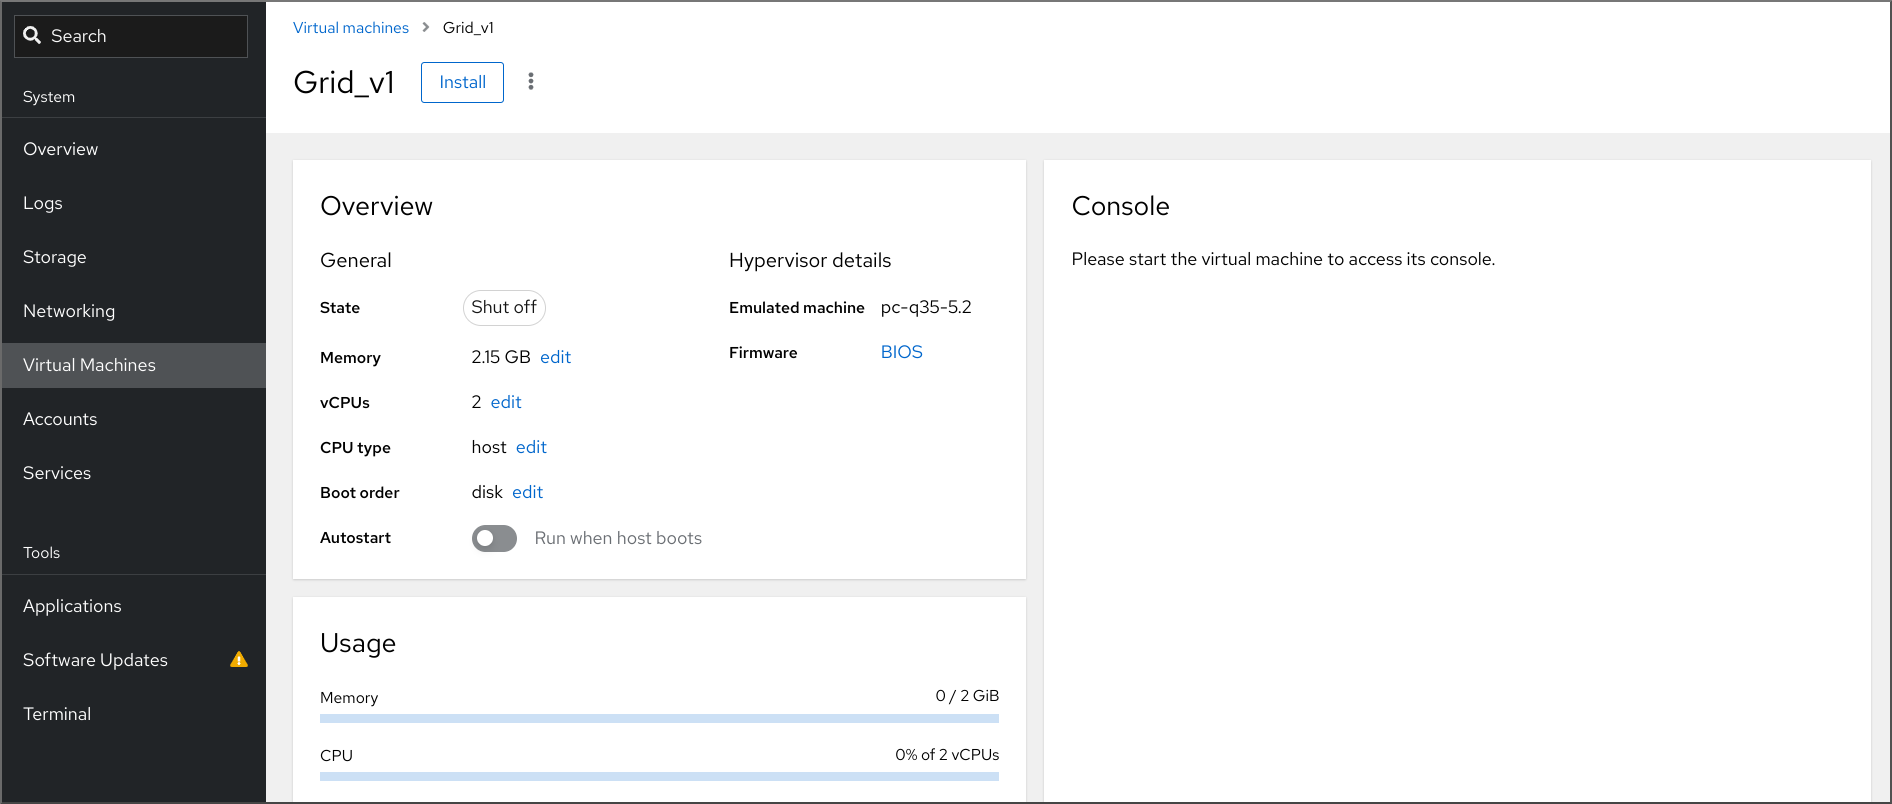
In the Virtual Machines interface, click the VM on which you want to install a guest OS.
A new page opens with basic information about the selected VM and controls for managing various aspects of the VM.
Optional: Change the firmware.
NoteYou can change the firmware only if you selected or while creating a new VM and if the OS is not already installed on the VM.
+ .. Click the firmware.
- In the Change Firmware window, select the required firmware.
- Click .
Click .
The installation routine of the operating system runs in the VM console.
Troubleshooting
- If the installation routine fails, delete and recreate the VM before starting the installation again.
3.2.4. Creating virtual machines with cloud image authentication by using the web console
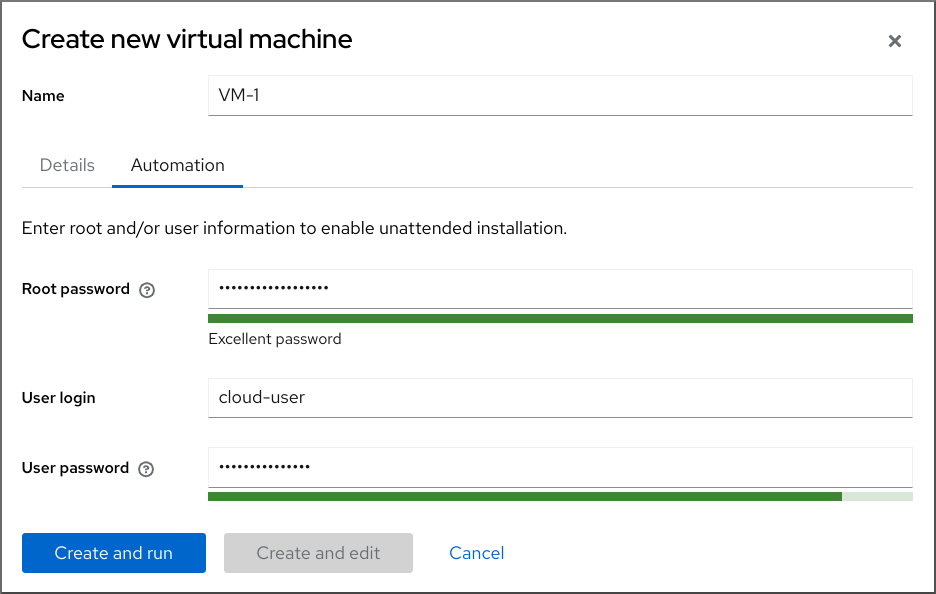
By default, distro cloud images have no login accounts. However, by using the RHEL web console, you can now create a virtual machine (VM) and specify the root and user account login credentials, which are then passed to cloud-init.
Prerequisites
- You have installed the RHEL 9 web console.
- You have enabled the cockpit service.
Your user account is allowed to log in to the web console.
For instructions, see Installing and enabling the web console.
- The web console VM plug-in is installed on your system.
- Virtualization is enabled on your host system.
- You have a sufficient amount of system resources to allocate to your VMs, such as disk space, RAM, or CPUs. The recommended values may vary significantly depending on the intended tasks and workload of the VMs.
Procedure
Log in to the RHEL 9 web console.
For details, see Logging in to the web console.
In the interface of the web console, click .
The Create new virtual machine dialog appears.
- In the Name field, enter a name for the VM.
On the Details tab, in the Installation type field, select Cloud base image.
- In the Installation source field, set the path to the image file on your host system.
Enter the configuration for the VM that you want to create.
- Operating system - The VM’s operating system. Note that Red Hat provides support only for a limited set of guest operating systems.
- Storage - The type of storage with which to configure the VM.
- Storage Limit - The amount of storage space with which to configure the VM.
- Memory - The amount of memory with which to configure the VM.
Click on the Automation tab.
Set your cloud authentication credentials.
- Root password - Enter a root password for your VM. Leave the field blank if you do not wish to set a root password.
- User login - Enter a cloud-init user login. Leave this field blank if you do not wish to create a user account.
User password - Enter a password. Leave this field blank if you do not wish to create a user account.
Click .
The VM is created.


