Chapter 4. Managing the subsystem configuration
Low-level configuration of Red Hat Single Sign-On is done by editing the standalone.xml, standalone-ha.xml, or domain.xml file in your distribution. The location of this file depends on your operating mode.
While there are endless settings you can configure here, this section will focus on configuration of the keycloak-server subsystem. No matter which configuration file you are using, configuration of the keycloak-server subsystem is the same.
The keycloak-server subsystem is typically declared toward the end of the file like this:
<subsystem xmlns="urn:jboss:domain:keycloak-server:1.2">
   <web-context>auth</web-context>
   ...
</subsystem>
Note that anything changed in this subsystem will not take effect until the server is rebooted.
4.1. Configure SPI providers
The specifics of each configuration setting is discussed elsewhere in context with that setting. However, it is useful to understand the format used to declare settings on SPI providers.
Red Hat Single Sign-On is a highly modular system that allows great flexibility. There are more than 50 service provider interfaces (SPIs), and you are allowed to swap out implementations of each SPI. An implementation of an SPI is known as a provider.
All elements in an SPI declaration are optional, but a full SPI declaration looks like this:
<spi name="myspi">
    <default-provider>myprovider</default-provider>
    <properties>
        <property name="spi-foo" value="spi-bar"/>
    </properties>
    <provider name="myprovider" enabled="true">
        <properties>
            <property name="foo" value="bar"/>
        </properties>
    </provider>
    <provider name="mysecondprovider" enabled="true">
        <properties>
            <property name="foo" value="foo"/>
        </properties>
    </provider>
</spi>
Here we have two providers defined for the SPI myspi. The default-provider is listed as myprovider. However, it is up to the SPI to decide how it will treat this setting. Some SPIs allow more than one provider and some do not. So default-provider can help the SPI to choose.
The SPI properties can be used to specify SPI-specific configuration properties. As an example, the user, client and role SPIs allow the configuration of storage provider timeouts in milliseconds through the storageProviderTimeout property, as follows:
<spi name="user">
    <properties>
        <property name="storageProviderTimeout" value="10000"/>
    </properties>
</spi>
Also notice that each provider defines its own set of configuration properties. The fact that both providers above have a property called foo is just a coincidence.
The type of each property value is interpreted by the provider. However, there is one exception. Consider the jpa provider for the eventsStore SPI:
<spi name="eventsStore">
<provider name="jpa" enabled="true">
<properties>
<property name="exclude-events" value="["EVENT1",
"EVENT2"]"/>
</properties>
</provider>
</spi>
We see that the value begins and ends with square brackets. That means that the value will be passed to the provider as a list. In this example, the system will pass the provider a list with two element values EVENT1 and EVENT2. To add more values to the list, just separate each list element with a comma. Unfortunately, you do need to escape the quotes surrounding each list element with ".
Follow the steps in Server Developer Guide for more details on custom providers and the configuration of providers.
4.2. Starting the JBoss EAP CLI
Besides editing the configuration by hand, you also have the option of changing the configuration by issuing commands via the jboss-cli tool. CLI allows you to configure servers locally or remotely. And it is especially useful when combined with scripting.
To start the JBoss EAP CLI, you need to run jboss-cli.
Linux/Unix
$ .../bin/jboss-cli.sh
Windows
> ...\bin\jboss-cli.bat
This will bring you to a prompt like this:
Prompt
[disconnected /]
If you wish to execute commands on a running server, you will first execute the connect command.
connect
[disconnected /] connect
connect
[standalone@localhost:9990 /]
You may be thinking to yourself, "I didn’t enter in any username or password!". If you run jboss-cli on the same machine as your running standalone server or domain controller and your account has appropriate file permissions, you do not have to setup or enter in an admin username and password. See the JBoss EAP Configuration Guide for more details on how to make things more secure if you are uncomfortable with that setup.
4.3. CLI embedded mode
If you do happen to be on the same machine as your standalone server and you want to issue commands while the server is not active, you can embed the server into CLI and make changes in a special mode that disallows incoming requests. To do this, first execute the embed-server command with the config file you wish to change.
embed-server
[disconnected /] embed-server --server-config=standalone.xml
[standalone@embedded /]
4.4. Using CLI GUI mode
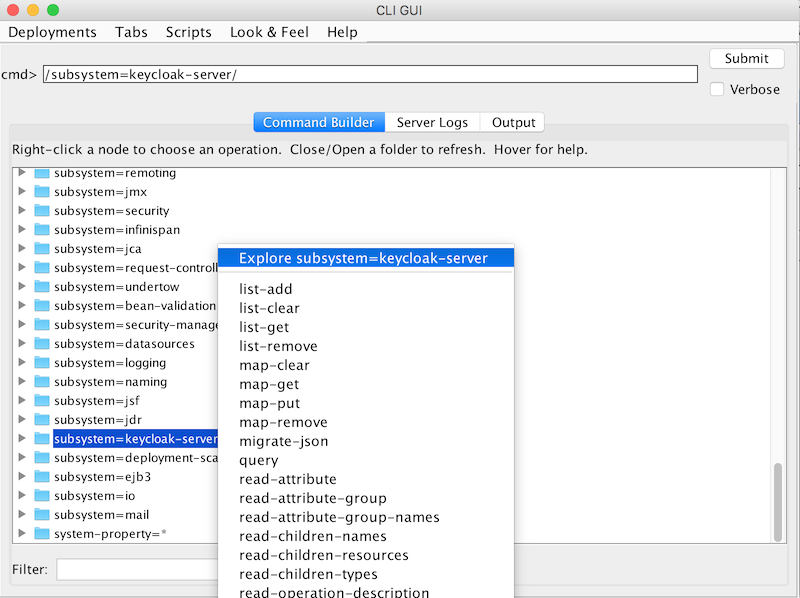
The CLI can also run in GUI mode. GUI mode launches a Swing application that allows you to graphically view and edit the entire management model of a running server. GUI mode is especially useful when you need help formatting your CLI commands and learning about the options available. The GUI can also retrieve server logs from a local or remote server.
Procedure
Start the CLI in GUI mode
$ .../bin/jboss-cli.sh --gui
Note: to connect to a remote server, you pass the
--connectoption as well. Use the --help option for more details.-
Scroll down to find the node
subsystem=keycloak-server. Right-click the node and select
Explore subsystem=keycloak-server.A new tab displays only the keycloak-server subsystem.
keycloak-server subsystem
4.5. CLI scripting
The CLI has extensive scripting capabilities. A script is just a text file with CLI commands in it. Consider a simple script that turns off theme and template caching.
turn-off-caching.cli
/subsystem=keycloak-server/theme=defaults/:write-attribute(name=cacheThemes,value=false)
/subsystem=keycloak-server/theme=defaults/:write-attribute(name=cacheTemplates,value=false)
To execute the script, you can follow the Scripts menu in CLI GUI, or execute the script from the command line as follows:
$ .../bin/jboss-cli.sh --file=turn-off-caching.cli
4.6. CLI recipes
Here are some configuration tasks and how to perform them with CLI commands. Note that in all but the first example, we use the wildcard path ** to mean you should substitute or the path to the keycloak-server subsystem.
For standalone, this just means:
** = /subsystem=keycloak-server
For domain mode, this would mean something like:
** = /profile=auth-server-clustered/subsystem=keycloak-server
4.6.1. Changing the web context of the server
/subsystem=keycloak-server/:write-attribute(name=web-context,value=myContext)
4.6.2. Setting the global default theme
**/theme=defaults/:write-attribute(name=default,value=myTheme)
4.6.3. Adding a new SPI and a provider
**/spi=mySPI/:add
**/spi=mySPI/provider=myProvider/:add(enabled=true)
4.6.4. Disabling a provider
**/spi=mySPI/provider=myProvider/:write-attribute(name=enabled,value=false)
4.6.5. Changing the default provider for an SPI
**/spi=mySPI/:write-attribute(name=default-provider,value=myProvider)
4.6.6. Adding or changing a single property value for an SPI
**/spi=mySPI/:map-put(name=properties, key=storageProviderTimeout, value=10000)
4.6.7. Removing a single property from an SPI
**/spi=mySPI/:map-remove(name=properties, key=storageProviderTimeout)
4.6.8. Configuring the dblock SPI
**/spi=dblock/:add(default-provider=jpa)
**/spi=dblock/provider=jpa/:add(properties={lockWaitTimeout => "900"},enabled=true)
4.6.9. Adding or changing a single property value for a provider
**/spi=dblock/provider=jpa/:map-put(name=properties,key=lockWaitTimeout,value=3)
4.6.10. Removing a single property from a provider
**/spi=dblock/provider=jpa/:map-remove(name=properties,key=lockRecheckTime)
4.6.11. Setting values on a provider property of type List
**/spi=eventsStore/provider=jpa/:map-put(name=properties,key=exclude-events,value=[EVENT1,EVENT2])