Chapter 11. Red Hat Single Sign-On Operator
The Red Hat Single Sign-On Operator automates Red Hat Single Sign-On administration in Openshift. You use this Operator to create custom resources (CRs), which automate administrative tasks. For example, instead of creating a client or a user in the Red Hat Single Sign-On admin console, you can create custom resources to perform those tasks. A custom resource is a YAML file that defines the parameters for the administrative task.
You can create custom resources to perform the following tasks:
After you create custom resources for realms, clients, and users, you can manage them by using the Red Hat Single Sign-On admin console or as custom resources using the oc command. However, you cannot use both methods, because the Operator performs a one way sync for custom resources that you modify. For example, if you modify a realm custom resource, the changes show up in the admin console. However, if you modify the realm using the admin console, those changes have no effect on the custom resource.
Begin using the Operator by Installing the Red Hat Single Sign-On Operator on a cluster.
11.1. Installing the Red Hat Single Sign-On Operator on a cluster
To install the Red Hat Single Sign-On Operator, you can use:
11.1.1. Installing using the Operator Lifecycle Manager
Prerequisites
- You have cluster-admin permission or an equivalent level of permissions granted by an administrator.
Procedure
Perform this procedure on an OpenShift cluster.
- Open the OpenShift Container Platform web console.
-
In the left column, click
Operators, OperatorHub. Search for Red Hat Single Sign-On Operator.
OperatorHub tab in OpenShift
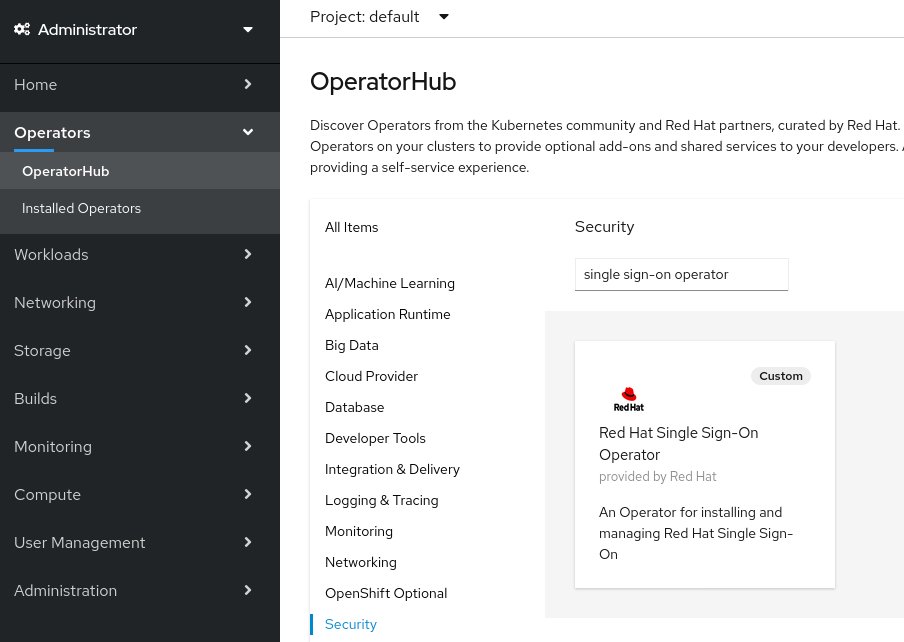
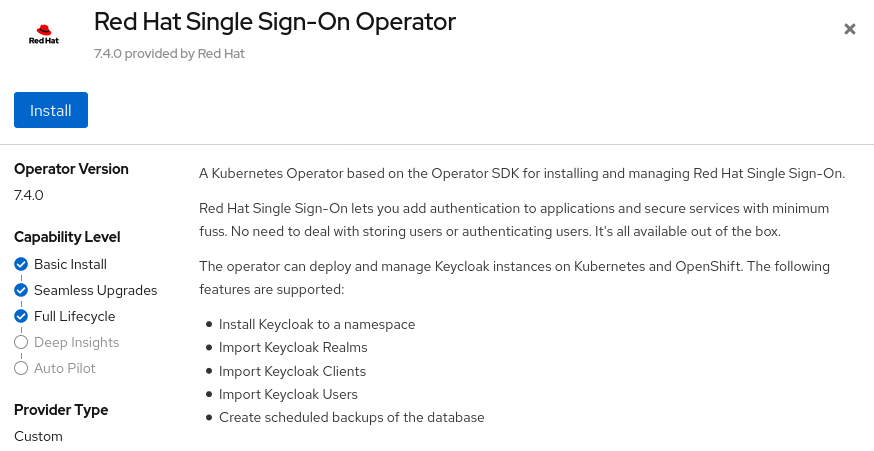
Click the Red Hat Single Sign-On Operator icon.
An Install page opens.
Operator Install page on OpenShift
-
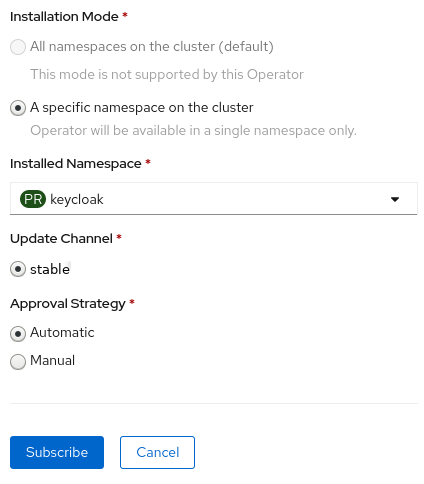
Click
Install. Select a namespace and click Subscribe.
Be sure you are on the
stablechannel.Namespace selection in OpenShift
The Operator starts installing.
Additional resources
- When the Operator installation completes, you are ready to create your first custom resource. See Red Hat Single Sign-On installation using a custom resource.
- For more information on OpenShift Operators, see the OpenShift Operators guide.
11.1.2. Installing from the command line
You can install the Red Hat Single Sign-On Operator from the command line.
Prerequisites
- You have cluster-admin permission or an equivalent level of permissions granted by an administrator.
Procedure
Create a project.
$ oc new-project <namespace>
Create a file named
rhsso-operator-olm.yamlto define a YAML group and a subscription operator.Update the
targetNamespacesto thenamespacefor RH-SSO.apiVersion: operators.coreos.com/v1 kind: OperatorGroup metadata: name: rhsso-operator-group spec: targetNamespaces: - <namespace> # change this to the namespace you will use for RH-SSO --- apiVersion: operators.coreos.com/v1alpha1 kind: Subscription metadata: name: rhsso-operator spec: channel: stable installPlanApproval: Manual name: rhsso-operator source: redhat-operators sourceNamespace: openshift-marketplace # Here you can specify a specific Operator version, otherwise it will use the latest # startingCSV: rhsso-operator.7.6.0-opr-001
Install the operator group and subscription.
$ oc apply -f rhsso-operator-olm.yaml
Approve the install plan and fill in the appropriate
namespace.oc patch installplan $(oc get ip -n <namespace> -o=jsonpath='{.items[?(@.spec.approved==false)].metadata.name}') -n <namespace> --type merge --patch '{"spec":{"approved":true}}'Verify the operator is running.
$ oc get pods
NAME                              READY   STATUS    RESTARTS   AGE
rhsso-operator-558876f75c-m25mt   1/1     Running   0          28s
Additional resources
- When the Operator installation completes, you are ready to create your first custom resource. See Red Hat Single Sign-On installation using a custom resource.
- For more information on OpenShift Operators, see the OpenShift Operators guide.
11.2. Using the Red Hat Single Sign-On Operator in production environment
- The usage of embedded DB is not supported in a production environment.
- Backup CRD is deprecated and not supported in a production environment.
-
The
podDisruptionBudgetfield in the Keycloak CR is deprecated and will be ignored when the Operator is deployed on Kubernetes version 1.25 and higher. -
We fully support using the rest of the CRDs in production, despite the
v1alpha1version. We do not plan to make any breaking changes in this CRDs version.
11.3. Installing Red Hat Single Sign-On using a custom resource
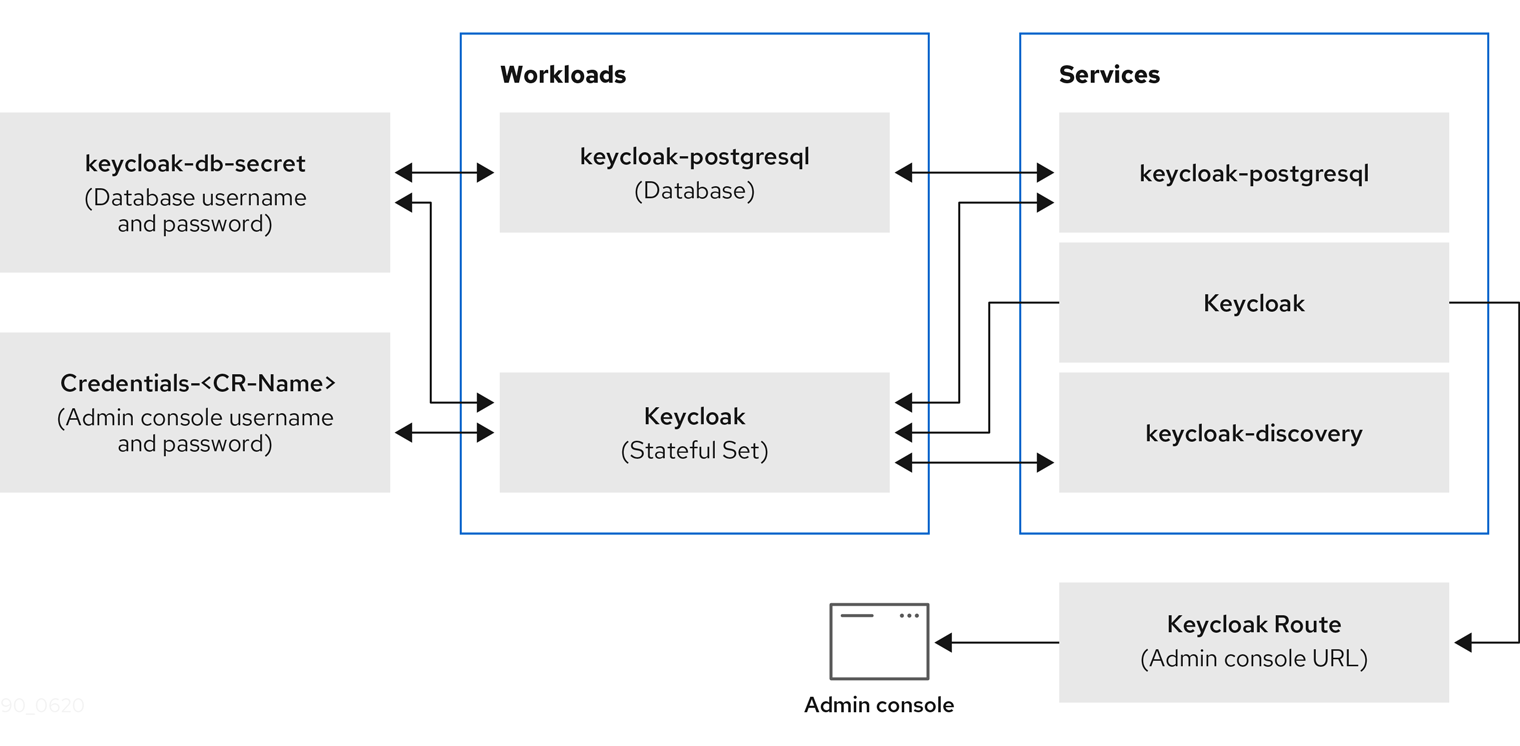
You can use the Operator to automate the installation of Red Hat Single Sign-On by creating a Keycloak custom resource. When you use a custom resource to install Red Hat Single Sign-On, you create the components and services that are described here and illustrated in the graphic that follows.
-
keycloak-db-secret- Stores properties such as the database username, password, and external address (if you connect to an external database) -
credentials-<CR-Name>- Admin username and password to log into the Red Hat Single Sign-On admin console (the<CR-Name>is based on theKeycloakcustom resource name) -
keycloak- Keycloak deployment specification that is implemented as a StatefulSet with high availability support -
keycloak-postgresql- Starts a PostgreSQL database installation -
keycloak-discoveryService - PerformsJDBC_PINGdiscovery -
keycloakService - Connects to Red Hat Single Sign-On through HTTPS (HTTP is not supported) -
keycloak-postgresqlService - Connects an internal and external, if used, database instance -
keycloakRoute - The URL for accessing the Red Hat Single Sign-On admin console from OpenShift
How Operator components and services interact
11.3.1. The Keycloak custom resource
The Keycloak custom resource is a YAML file that defines the parameters for installation. This file contains three properties.
-
instances- controls the number of instances running in high availability mode. -
externalAccess- if theenabledisTrue, the Operator creates a route for OpenShift for the Red Hat Single Sign-On cluster. You can sethostto override the automatically chosen host name for Route -
externalDatabase- in order to connect to an externally hosted database. That topic is covered in the external database section of this guide. Setting it to false should be used only for testing purposes and will install an embedded PostgreSQL database. Be aware that externalDatabase:false is NOT supported in production environments.
Example YAML file for a Keycloak custom resource
apiVersion: keycloak.org/v1alpha1
kind: Keycloak
metadata:
  name: example-sso
  labels:
    app: sso
spec:
  instances: 1
  externalAccess:
    enabled: True
You can update the YAML file and the changes appear in the Red Hat Single Sign-On admin console, however changes to the admin console do not update the custom resource.
11.3.2. Creating a Keycloak custom resource on OpenShift
On OpenShift, you use the custom resource to create a route, which is the URL of the admin console, and find the secret, which holds the username and password for the admin console.
Prerequisites
- You have a YAML file for this custom resource.
- You have cluster-admin permission or an equivalent level of permissions granted by an administrator.
Procedure
Create a route using your YAML file:
oc create -f <filename>.yaml -n <namespace>. For example:$ oc create -f sso.yaml -n sso keycloak.keycloak.org/example-sso created
A route is created in OpenShift.
- Log into the OpenShift web console.
Select
Networking,Routesand search for Keycloak.Routes screen in OpenShift web console

On the screen with the Keycloak route, click the URL under
Location.The Red Hat Single Sign-On admin console login screen appears.
Admin console login screen
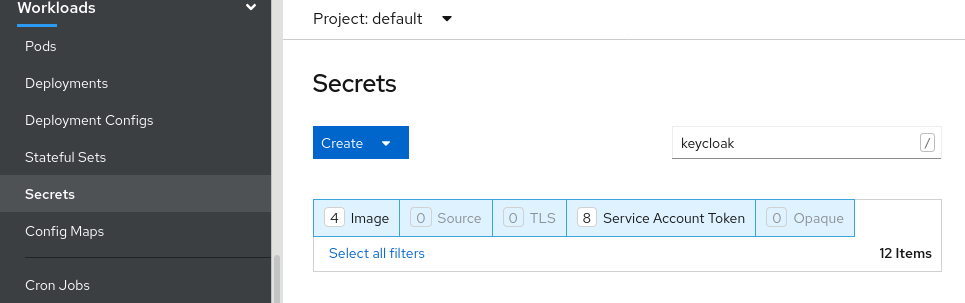
Locate the username and password for the admin console in the OpenShift web console; under
Workloads, clickSecretsand search for Keycloak.Secrets screen in OpenShift web console
Enter the username and password into the admin console login screen.
Admin console login screen
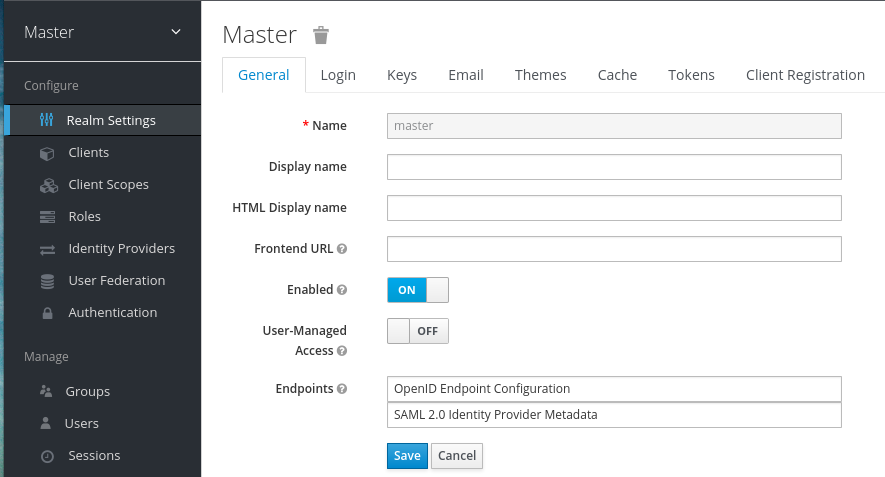
You are now logged into an instance of Red Hat Single Sign-On that was installed by a Keycloak custom resource. You are ready to create custom resources for realms, clients, and users.
Red Hat Single Sign-On master realm
Check the status of the custom resource:
$ oc describe keycloak <CR-name>
Results
After the Operator processes the custom resource, view the status with this command:
$ oc describe keycloak <CR-name>
Keycloak custom resource Status
Name:         example-keycloak
Namespace:    keycloak
Labels:       app=sso
Annotations:  <none>
API Version:  keycloak.org/v1alpha1
Kind:         Keycloak
Spec:
  External Access:
    Enabled:  true
  Instances:  1
Status:
  Credential Secret:  credential-example-keycloak
  Internal URL:       https://<External URL to the deployed instance>
  Message:
  Phase:              reconciling
  Ready:              true
  Secondary Resources:
    Deployment:
      keycloak-postgresql
    Persistent Volume Claim:
      keycloak-postgresql-claim
    Prometheus Rule:
      keycloak
    Route:
      keycloak
    Secret:
      credential-example-keycloak
      keycloak-db-secret
    Service:
      keycloak-postgresql
      keycloak
      keycloak-discovery
    Service Monitor:
      keycloak
    Stateful Set:
      keycloak
  Version:
Events:
Additional resources
- Once the installation of Red Hat Single Sign-On completes, you are ready to create a realm custom resource.
- An external database is the supported option and needs to be enabled in the Keycloak custom resource. You can disable this option only for testing and enable it when you switch to a production environment. See Connecting to an external database.
11.4. Creating a realm custom resource
You can use the Operator to create realms in Red Hat Single Sign-On as defined by a custom resource. You define the properties of the realm custom resource in a YAML file.
You can only create or delete realms by creating or deleting the YAML file, and changes appear in the Red Hat Single Sign-On admin console. However changes to the admin console are not reflected back and updates of the CR after the realm is created are not supported.
Example YAML file for a Realm custom resource
apiVersion: keycloak.org/v1alpha1
kind: KeycloakRealm
metadata:
  name: test
  labels:
    app: sso
spec:
  realm:
    id: "basic"
    realm: "basic"
    enabled: True
    displayName: "Basic Realm"
  instanceSelector:
    matchLabels:
      app: sso
Prerequisites
- You have a YAML file for this custom resource.
-
In the YAML file, the
appunderinstanceSelectormatches the label of a Keycloak custom resource. Matching these values ensures that you create the realm in the right instance of Red Hat Single Sign-On. - You have cluster-admin permission or an equivalent level of permissions granted by an administrator.
Procedure
Use this command on the YAML file that you created:
oc create -f <realm-name>.yaml. For example:$ oc create -f initial_realm.yaml keycloak.keycloak.org/test created
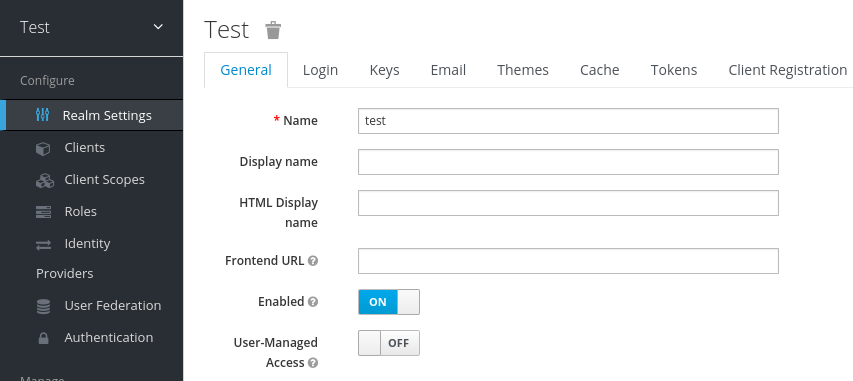
- Log into the admin console for the related instance of Red Hat Single Sign-On.
Click Select Realm and locate the realm that you created.
The new realm opens.
Admin console master realm
Results
After the Operator processes the custom resource, view the status with this command:
$ oc describe keycloak <CR-name>
Realm custom resource status
Name:         example-keycloakrealm
Namespace:    keycloak
Labels:       app=sso
Annotations:  <none>
API Version:  keycloak.org/v1alpha1
Kind:         KeycloakRealm
Metadata:
  Creation Timestamp:  2019-12-03T09:46:02Z
  Finalizers:
    realm.cleanup
  Generation:        1
  Resource Version:  804596
  Self Link:         /apis/keycloak.org/v1alpha1/namespaces/keycloak/keycloakrealms/example-keycloakrealm
  UID:               b7b2f883-15b1-11ea-91e6-02cb885627a6
Spec:
  Instance Selector:
    Match Labels:
      App: sso
  Realm:
    Display Name:  Basic Realm
    Enabled:       true
    Id:            basic
    Realm:         basic
Status:
  Login URL:
  Message:
  Phase:      reconciling
  Ready:      true
Events:       <none>
Additional resources
- When the realm creation completes, you are ready to create a client custom resource.
11.5. Creating a client custom resource
You can use the Operator to create clients in Red Hat Single Sign-On as defined by a custom resource. You define the properties of the realm in a YAML file.
You can update the YAML file and changes appear in the Red Hat Single Sign-On admin console, however changes to the admin console do not update the custom resource.
Example YAML file for a Client custom resource
apiVersion: keycloak.org/v1alpha1
kind: KeycloakClient
metadata:
  name: example-client
  labels:
    app: sso
spec:
  realmSelector:
     matchLabels:
      app: <matching labels for KeycloakRealm custom resource>
  client:
    # auto-generated if not supplied
    #id: 123
    clientId: client-secret
    secret: client-secret
    # ...
    # other properties of Keycloak Client
Prerequisites
- You have a YAML file for this custom resource.
- You have cluster-admin permission or an equivalent level of permissions granted by an administrator.
Procedure
Use this command on the YAML file that you created:
oc create -f <client-name>.yaml. For example:$ oc create -f initial_client.yaml keycloak.keycloak.org/example-client created
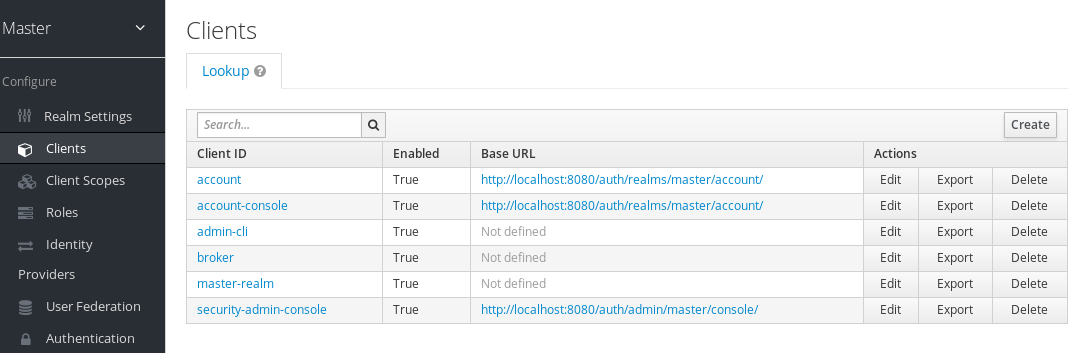
- Log into the Red Hat Single Sign-On admin console for the related instance of Red Hat Single Sign-On.
Click Clients.
The new client appears in the list of clients.
Results
After a client is created, the Operator creates a Secret containing the Client ID and the client’s secret using the following naming pattern: keycloak-client-secret-<custom resource name>. For example:
Client’s Secret
apiVersion: v1
data:
  CLIENT_ID: <base64 encoded Client ID>
  CLIENT_SECRET: <base64 encoded Client Secret>
kind: Secret
After the Operator processes the custom resource, view the status with this command:
$ oc describe keycloak <CR-name>
Client custom resource Status
Name:         client-secret
Namespace:    keycloak
Labels:       app=sso
API Version:  keycloak.org/v1alpha1
Kind:         KeycloakClient
Spec:
  Client:
    Client Authenticator Type:     client-secret
    Client Id:                     client-secret
    Id:                            keycloak-client-secret
  Realm Selector:
    Match Labels:
      App:  sso
Status:
  Message:
  Phase:    reconciling
  Ready:    true
  Secondary Resources:
    Secret:
      keycloak-client-secret-client-secret
Events:  <none>
Additional resources
- When the client creation completes, you are ready to create a user custom resource.
11.6. Creating a user custom resource
You can use the Operator to create users in Red Hat Single Sign-On as defined by a custom resource. You define the properties of the user custom resource in a YAML file.
You can update properties in the YAML file and changes appear in the Red Hat Single Sign-On admin console, however changes to the admin console do not update the custom resource.
Be aware that the same applies for the credentials. If the credentials field is defined, a user’s credentials will always match the value set in the CR. In other words, if a user changes password via the Account Console, the Operator will reset it in order to match the value set in the CR.
Example YAML file for a user custom resource
apiVersion: keycloak.org/v1alpha1
kind: KeycloakUser
metadata:
  name: example-user
spec:
  user:
    username: "realm_user"
    firstName: "John"
    lastName: "Doe"
    email: "user@example.com"
    enabled: True
    emailVerified: False
    credentials:
      - type: "password"
        value: "12345"
    realmRoles:
      - "offline_access"
    clientRoles:
      account:
        - "manage-account"
      realm-management:
        - "manage-users"
  realmSelector:
    matchLabels:
      app: sso
Prerequisites
- You have a YAML file for this custom resource.
-
The
realmSelectormatches the labels of an existing realm custom resource. - You have cluster-admin permission or an equivalent level of permissions granted by an administrator.
Procedure
Use this command on the YAML file that you created:
oc create -f <user_cr>.yaml. For example:$ oc create -f initial_user.yaml keycloak.keycloak.org/example-user created
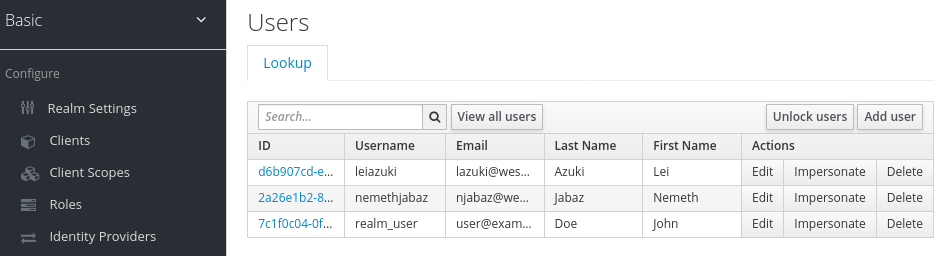
- Log into the admin console for the related instance of Red Hat Single Sign-On.
- Click Users.
Search for the user that you defined in the YAML file.
You may need to switch to a different realm to find the user.
Results
After a user is created, the Operator creates a Secret using the following naming pattern: credential-<realm name>-<username>-<namespace>, containing the username and, if it has been specified in the CR credentials attribute, the password.
Here’s an example:
KeycloakUser Secret
kind: Secret
apiVersion: v1
data:
  password: <base64 encoded password>
  username: <base64 encoded username>
type: Opaque
Once the Operator processes the custom resource, view the status with this command:
$ oc describe keycloak <CR-name>
User custom resource Status
Name:         example-realm-user
Namespace:    keycloak
Labels:       app=sso
API Version:  keycloak.org/v1alpha1
Kind:         KeycloakUser
Spec:
  Realm Selector:
    Match Labels:
      App: sso
  User:
    Email:           realm_user@redhat.com
    Credentials:
      Type:          password
      Value:         <user password>
    Email Verified:  false
    Enabled:         true
    First Name:      John
    Last Name:       Doe
    Username:        realm_user
Status:
  Message:
  Phase:    reconciled
Events:     <none>
Additional resources
- If you have an external database, you can modify the Keycloak custom resource to support it. See Connecting to an external database.
- To back up your database using custom resources, see schedule database backups.
11.7. Connecting to an external database
You can use the Operator to connect to an external PostgreSQL database by creating a keycloak-db-secret YAML file and setting Keycloak CR externalDatabase property to enabled. Note that values are Base64 encoded.
Example YAML file for keycloak-db-secret
apiVersion: v1
kind: Secret
metadata:
    name: keycloak-db-secret
    namespace: keycloak
stringData:
    POSTGRES_DATABASE: <Database Name>
    POSTGRES_EXTERNAL_ADDRESS: <External Database URL (resolvable by K8s)>
    POSTGRES_EXTERNAL_PORT: <External Database Port>
    POSTGRES_PASSWORD: <Database Password>
    # Required for AWS Backup functionality
    POSTGRES_SUPERUSER: "true"
    POSTGRES_USERNAME: <Database Username>
    SSLMODE: <TLS configuration for the Database connection>
type: Opaque
The following properties set the hostname or IP address and port of the database.
-
POSTGRES_EXTERNAL_ADDRESS- hostname of the external database. If you only have an IP for your database instead of a hostname, then create a Service and corresponding EndpointSlice or Endpoint to provide a hostname. -
POSTGRES_EXTERNAL_PORT- (Optional) A database port.
The other properties work in the same way for a hosted or external database. Set them as follows:
-
POSTGRES_DATABASE- Database name to be used. -
POSTGRES_USERNAME- Database username -
POSTGRES_PASSWORD- Database password -
POSTGRES_SUPERUSER- Indicates whether backups should run as super user. Typicallytrue. -
SSLMODE- Indicates whether to use TLS on the connection to the external PostgreSQL database. Check the possible values
When SSLMODE is enabled, the operator searches for a secret called keycloak-db-ssl-cert-secret containing the root.crt that has been used by the PostgreSQL database. Creating the secret is optional and the secret is used only when you want to verify the Database’s certificate (for example SSLMODE: verify-ca). Here is an example :
Example YAML file for TLS Secret to be used by the operator.
apiVersion: v1
kind: Secret
metadata:
  name: keycloak-db-ssl-cert-secret
  namespace: keycloak
type: Opaque
data:
  root.crt: {root.crt base64}
The Operator will create a Service named keycloak-postgresql. This Service is configured by the Operator to expose the external database based on the content of POSTGRES_EXTERNAL_ADDRESS. Red Hat Single Sign-On uses this Service to connect to the Database, which means it does not connect to the Database directly but rather through this Service.
The Keycloak custom resource requires updates to enable external database support.
Example YAML file for Keycloak custom resource that supports an external database
apiVersion: keycloak.org/v1alpha1
kind: Keycloak
metadata:
  labels:
      app: sso
  name: example-keycloak
  namespace: keycloak
spec:
  externalDatabase:
    enabled: true
  instances: 1
Prerequisites
-
You have a YAML file for
keycloak-db-secret. -
You have modified the Keycloak custom resource to set
externalDatabasetotrue. - You have cluster-admin permission or an equivalent level of permissions granted by an administrator.
Procedure
Locate the secret for your PostgreSQL database:
oc get secret <secret_for_db> -o yaml. For example:$ oc get secret keycloak-db-secret -o yaml apiVersion: v1 data POSTGRES_DATABASE: cm9vdA== POSTGRES_EXTERNAL_ADDRESS: MTcyLjE3LjAuMw== POSTGRES_EXTERNAL_PORT: NTQzMg==
The
POSTGRES_EXTERNAL_ADDRESSis in Base64 format.Decode the value for the secret:
echo "<encoded_secret>" | base64 -decode. For example:$ echo "MTcyLjE3LjAuMw==" | base64 -decode 192.0.2.3
Confirm that the decoded value matches the IP address for your database:
$ oc get pods -o wide
NAME                        READY  STATUS    RESTARTS   AGE   IP
keycloak-0                  1/1    Running   0          13m   192.0.2.0
keycloak-postgresql-c8vv27m 1/1    Running   0          24m   192.0.2.3
Confirm that
keycloak-postgresqlappears in a list of running services:$ oc get svc NAME TYPE CLUSTER-IP EXTERNAL-IP PORT(S) AGE keycloak ClusterIP 203.0.113.0 <none> 8443/TCP 27m keycloak-discovery ClusterIP None <none> 8080/TCP 27m keycloak-postgresql ClusterIP 203.0.113.1 <none> 5432/TCP 27m
The
keycloak-postgresqlservice sends requests to a set of IP addresses in the backend. These IP addresses are called endpoints.View the endpoints used by the
keycloak-postgresqlservice to confirm that they use the IP addresses for your database:$ oc get endpoints keycloak-postgresql NAME ENDPOINTS AGE keycloak-postgresql 192.0.2.3.5432 27m
Confirm that Red Hat Single Sign-On is running with the external database. This example shows that everything is running:
$ oc get pods
NAME                        READY  STATUS    RESTARTS   AGE   IP
keycloak-0                  1/1    Running   0          26m   192.0.2.0
keycloak-postgresql-c8vv27m 1/1    Running   0          36m   192.0.2.3
11.8. Connecting to an external Red Hat Single Sign-On
This operator can also be used to partially manage an external Red Hat Single Sign-On instance. In it’s current state, it will only be able to create clients.
To do this, you’ll need to create unmanaged versions of the Keycloak and KeycloakRealm CRDs to use for targeting and configuration.
Example YAML file for external-keycloak
apiVersion: keycloak.org/v1alpha1
kind: Keycloak
metadata:
  name: external-ref
  labels:
    app: external-sso
spec:
  unmanaged: true
  external:
    enabled: true
    url: https://some.external.url
In order to authenticate against this keycloak, the operator infers the secret name from the CRD by prefixing the CRD name with credential-.
Example YAML file for credential-external-ref
apiVersion: v1
kind: Secret
metadata:
  name: credential-external-ref
type: Opaque
data:
  ADMIN_USERNAME: YWRtaW4=
  ADMIN_PASSWORD: cGFzcw==
Example YAML file for external-realm
apiVersion: keycloak.org/v1alpha1
kind: KeycloakRealm
metadata:
  name: external-realm
  labels:
    app: external-sso
spec:
  unmanaged: true
  realm:
    id: "basic"
    realm: "basic"
  instanceSelector:
    matchLabels:
      app: external-sso
You can now use the realm reference in your client as usual, and it will create the client on the external Red Hat Single Sign-On instance.
11.9. Scheduling database backups
Backup CR is deprecated and could be removed in future releases.
You can use the Operator to schedule automatic backups of the database as defined by custom resources. The custom resource triggers a backup job and reports back its status.
You can use Operator to create a backup job that performs a one-time backup to a local Persistent Volume.
Example YAML file for a Backup custom resource
apiVersion: keycloak.org/v1alpha1
kind: KeycloakBackup
metadata:
  name: test-backup
Prerequisites
- You have a YAML file for this custom resource.
-
You have a
PersistentVolumewith aclaimRefto reserve it only for aPersistentVolumeClaimcreated by the Red Hat Single Sign-On Operator.
Procedure
Create a backup job:
oc create -f <backup_crname>. For example:$ oc create -f one-time-backup.yaml keycloak.keycloak.org/test-backup
The Operator creates a
PersistentVolumeClaimwith the following naming scheme:Keycloak-backup-<CR-name>.View a list of volumes:
$ oc get pvc
NAME                          STATUS   VOLUME
keycloak-backup-test-backup   Bound    pvc-e242-ew022d5-093q-3134n-41-adff
keycloak-postresql-claim      Bound    pvc-e242-vs29202-9bcd7-093q-31-zadj
View a list of backup jobs:
$ oc get jobs
NAME           COMPLETIONS     DURATION     AGE
test-backup    0/1             6s           6s
View the list of executed backup jobs:
$ oc get pods
NAME                               READY    STATUS       RESTARTS    AGE
test-backup-5b4rf                  0/1      Completed    0           24s
keycloak-0                         1/1      Running      0           52m
keycloak-postgresql-c824c6-vv27m   1/1      Running      0           71m
View the log of your completed backup job:
$ oc logs test-backup-5b4rf
==> Component data dump completed
.
.
.
.
Additional resources
- For more details on persistent volumes, see Understanding persistent storage.
11.10. Installing extensions and themes
You can use the operator to install extensions and themes that you need for your company or organization. The extension or theme can be anything that Red Hat Single Sign-On can consume. For example, you can add a metrics extension. You add the extension or theme to the Keycloak custom resource.
Example YAML file for a Keycloak custom resource
apiVersion: keycloak.org/v1alpha1
kind: Keycloak
metadata:
  name: example-keycloak
  labels:
   app: sso
spec:
  instances: 1
  extensions:
   - <url_for_extension_or_theme>
  externalAccess:
    enabled: True
You can package and deploy themes in the same way as any other extensions. See Deploying Themes manual entry for more information.
Prerequisites
- You have a YAML file for the Keycloak custom resource.
- You have cluster-admin permission or an equivalent level of permissions granted by an administrator.
Procedure
-
Edit the YAML file for the Keycloak custom resource:
oc edit <CR-name> -
Add a line called
extensions:after theinstancesline. - Add a URL to a JAR file for your custom extension or theme.
- Save the file.
The Operator downloads the extension or theme and installs it.
11.11. Command options for managing custom resources
After you create a custom request, you can edit it or delete using the oc command.
-
To edit a custom request, use this command:
oc edit <CR-name> -
To delete a custom request, use this command:
oc delete <CR-name>
For example, to edit a realm custom request named test-realm, use this command:
$ oc edit test-realm
A window opens where you can make changes.
You can update the Keycloak CR YAML file and changes will be applied to the deployment.
Updates to the other resources are limited:
Keycloak Realm CR only supports basic creation and deletion without sync options. Keycloak User and Client CRs support unidirectional updates (changes to the CR are reflected in Keycloak but changes done in Keycloak are not updated in the CR).
11.12. Upgrade strategy
You can configure how the operator performs Red Hat Single Sign-On upgrades. You can choose from the following upgrade strategies.
-
recreate: This is the default strategy. The operator removes all Red Hat Single Sign-On replicas, optionally creates a backup and then creates the replicas based on a newer Red Hat Single Sign-On image. This strategy is suitable for major upgrades as a single Red Hat Single Sign-On version is accessing the underlying database. The downside is Red Hat Single Sign-On needs to be shut down during the upgrade. -
rolling: The operator removes one replica at a time and creates it again based on a newer Red Hat Single Sign-On image. This ensures a zero-downtime upgrade but is more suitable for minor version upgrades that do not require database migration since the database is accessed by multiple Red Hat Single Sign-On versions concurrently. Automatic backups are not supported with this strategy.
Example YAML file for a Keycloak custom resource
apiVersion: keycloak.org/v1alpha1
kind: Keycloak
metadata:
  name: example-keycloak
  labels:
   app: sso
spec:
  instances: 2
  migration:
    strategy: recreate
    backups:
      enabled: True
  externalAccess:
    enabled: True
Due to a bug introduced in a previous version of the Operator, Selector field on the Red Hat Single Sign-On StatefulSet might be misconfigured depending on your configuration. If such state is detected by the Operator and you are using the recreate strategy, it will delete and recreate the StatefulSet with the correct Selector field. This is required as the Selector field is immutable.
As a "delete" operation can have potentially dangerous side effects in very rare cases, for example when you have added custom functionality unknown to the Operator to the StatefulSet definition, you can instead delete the StatefulSet manually.