12.2. Adding External Providers
12.2.1. Adding a Red Hat Satellite Instance for Host Provisioning
Procedure 12.1. Adding a Satellite Instance for Host Provisioning
- Select the External Providers entry in the tree pane.
- Click to open the Add Provider window.
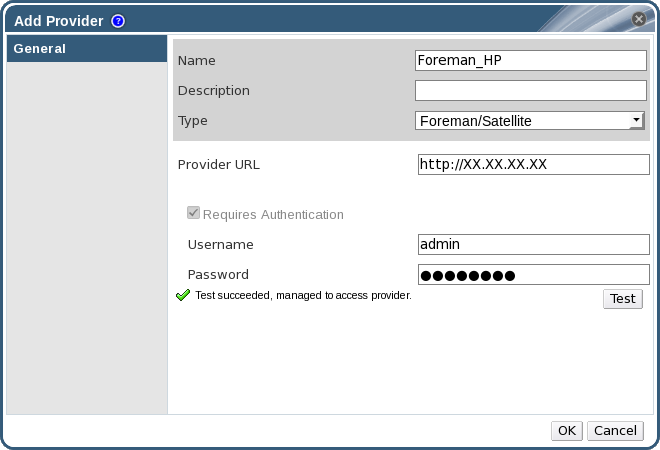
Figure 12.1. The Add Provider Window
- Enter a Name and Description.
- From the Type list, ensure that Foreman/Satellite is selected.
- Enter the URL or fully qualified domain name of the machine on which the Satellite instance is installed in the Provider URL text field. You do not need to specify a port number.
Important
IP addresses cannot be used to add a Satellite instance. - Enter the Username and Password for the Satellite instance. You must use the same user name and password as you would use to log in to the Satellite provisioning portal.
- Test the credentials:
- Click Test to test whether you can authenticate successfully with the Satellite instance using the provided credentials.
- If the Satellite instance uses SSL, the Import provider certificates window opens; click OK to import the certificate that the Satellite instance provides.
Important
You must import the certificate that the Satellite instance provides to ensure the Manager can communicate with the instance.
- Click .
12.2.2. Adding an OpenStack Image (Glance) Instance for Image Management
Procedure 12.2. Adding an OpenStack Image (Glance) Instance for Image Management
- Select the External Providers entry in the tree pane.
- Click to open the Add Provider window.
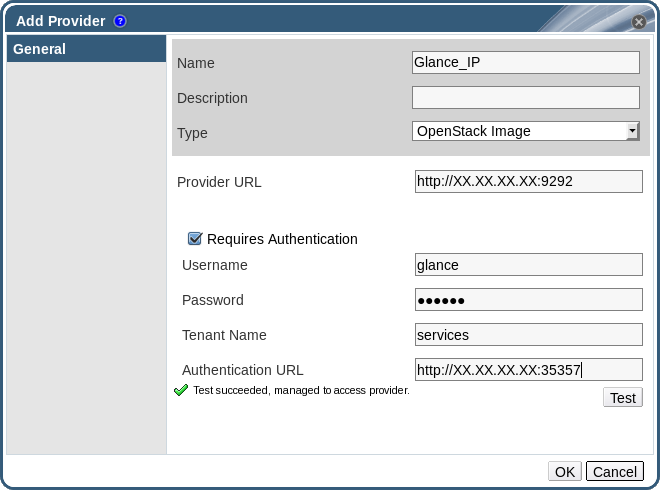
Figure 12.2. The Add Provider Window
- Enter a Name and Description.
- From the Type list, select OpenStack Image.
- Enter the URL or fully qualified domain name of the machine on which the OpenStack Image instance is installed in the Provider URL text field.
- Optionally, select the Requires Authentication check box and enter the Username, Password, Tenant Name, and Authentication URL for the OpenStack Image instance. You must use the user name and password for the OpenStack Image user registered in Keystone, the tenant of which the OpenStack Image instance is a member, and the URL and port of the Keystone server.
- Test the credentials:
- Click Test to test whether you can authenticate successfully with the OpenStack Image instance using the provided credentials.
- If the OpenStack Image instance uses SSL, the Import provider certificates window opens; click OK to import the certificate that the OpenStack Image instance provides.
Important
You must import the certificate that the OpenStack Image instance provides to ensure the Manager can communicate with the instance.
- Click .
12.2.3. Adding an OpenStack Networking (Neutron) Instance for Network Provisioning
Important
Procedure 12.3. Adding an OpenStack Networking (Neutron) Instance for Network Provisioning
- Select the External Providers entry in the tree pane.
- Click to open the Add Provider window.
Figure 12.3. The Add Provider Window
- Enter a Name and Description.
- From the Type list, select OpenStack Networking.
- Ensure that Open vSwitch is selected in the Networking Plugin field.
- Enter the URL or fully qualified domain name of the machine on which the OpenStack Networking instance is installed in the Provider URL text field, followed by the port number. The Read Only check box is selected by default. This prevents users from modifying the OpenStack Networking instance.
Important
You must leave the Read Only check box selected for your setup to be supported by Red Hat. - Optionally, select the Requires Authentication check box and enter the Username, Password, Tenant Name, and Authentication URL for the OpenStack Networking instance. You must use the user name and password for the OpenStack Networking user registered in Keystone, the tenant of which the OpenStack Networking instance is a member, and the URL and port of the Keystone server.
- Test the credentials:
- Click Test to test whether you can authenticate successfully with the OpenStack Networking instance using the provided credentials.
- If the OpenStack Networking instance uses SSL, the Import provider certificates window opens; click OK to import the certificate that the OpenStack Networking instance provides to ensure the Manager can communicate with the instance.
Warning
The following steps are provided only as a Technology Preview. Red Hat Virtualization only supports preconfigured neutron hosts. - Click the Agent Configuration tab.
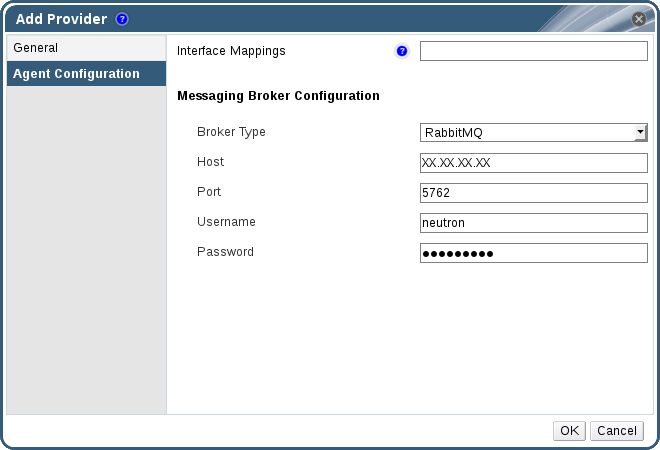
Figure 12.4. The Agent Configuration Tab
- Enter a comma-separated list of interface mappings for the Open vSwitch agent in the Interface Mappings field.
- Select the message broker type that the OpenStack Networking instance uses from the Broker Type list.
- Enter the URL or fully qualified domain name of the host on which the message broker is hosted in the Host field.
- Enter the Port by which to connect to the message broker. This port number will be 5762 by default if the message broker is not configured to use SSL, and 5761 if it is configured to use SSL.
- Enter the Username and Password of the OpenStack Networking user registered in the message broker instance.
- Click .
12.2.4. Adding an OpenStack Volume (Cinder) Instance for Storage Management
Important
Procedure 12.4. Adding an OpenStack Volume (Cinder) Instance for Storage Management
- Select the External Providers entry in the tree pane.
- Click to open the Add Provider window.
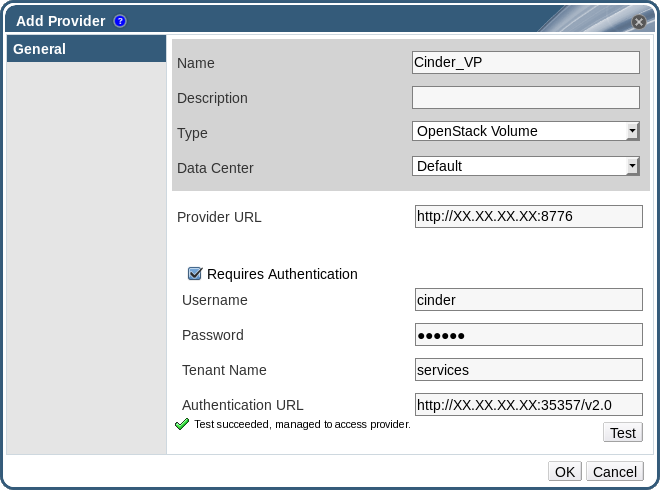
Figure 12.5. The Add Provider Window
- Enter a Name and Description.
- From the Type list, select OpenStack Volume.
- Select the Data Center to which OpenStack Volume storage volumes will be attached.
- Enter the URL or fully qualified domain name of the machine on which the OpenStack Volume instance is installed, followed by the port number, in the Provider URL text field.
- Optionally, select the Requires Authentication check box and enter the Username, Password, Tenant Name, and Authentication URL for the OpenStack Volume instance. You must use the user name and password for the OpenStack Volume user registered in Keystone, the tenant of which the OpenStack Volume instance is a member, and the URL, port, and API version of the Keystone server.
- Click Test to test whether you can authenticate successfully with the OpenStack Volume instance using the provided credentials.
- Click .
- If client Ceph authentication (cephx) is enabled, you must also complete the following steps. The cephx protocol is enabled by default.
- On your Ceph server, create a new secret key for the
client.cinderuser using theceph auth get-or-createcommand. See Cephx Config Reference for more information on cephx, and Managing Users for more information on creating keys for new users. If a key already exists for theclient.cinderuser, retrieve it using the same command. - In the Administration Portal, select the newly-created Cinder external provider from the Providers list.
- Click the Authentication Keys sub-tab.
- Click .
- Enter the secret key in the Value field.
- Copy the automatically-generated UUID, or enter an existing UUID in the text field.
- On your Cinder server, add the UUID from the previous step and the
cinderuser to/etc/cinder/cinder.conf:rbd_secret_uuid = UUID rbd_user = cinder
rbd_secret_uuid = UUID rbd_user = cinderCopy to Clipboard Copied! Toggle word wrap Toggle overflow
12.2.5. Adding a VMware Instance as a Virtual Machine Provider
Note
Procedure 12.5. Adding a VMware vCenter Instance as a Virtual Machine Provider
- Select the External Providers entry in the tree pane.
- Click to open the Add Provider window.
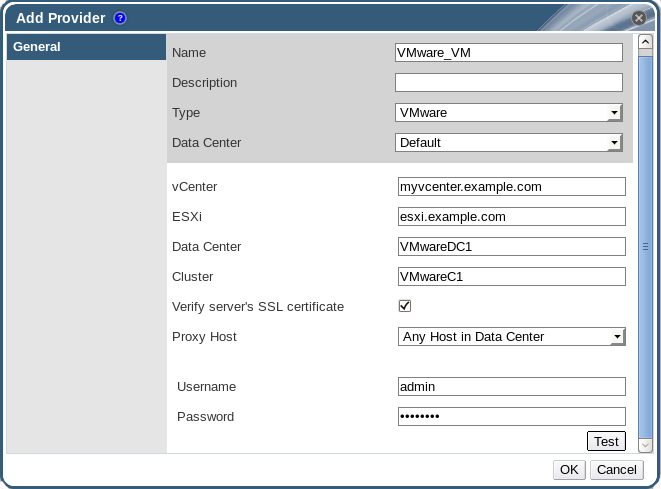
Figure 12.6. The Add Provider Window
- Enter a Name and Description.
- From the Type list, select VMware.
- Select the Data Center into which VMware virtual machines will be imported, or select Any Data Center to instead specify the destination data center during individual import operations (using the function in the Virtual Machines tab).
- Enter the IP address or fully qualified domain name of the VMware vCenter instance in the vCenter field.
- Enter the IP address or fully qualified domain name of the host from which the virtual machines will be imported in the ESXi field.
- Enter the name of the data center in which the specified ESXi host resides in the Data Center field.
- If you have exchanged the SSL certificate between the ESXi host and the Manager, leave Verify server's SSL certificate checked to verify the ESXi host's certificate. If not, uncheck the option.
- Select a host in the chosen data center with virt-v2v installed to serve as the Proxy Host during virtual machine import operations. This host must also be able to connect to the network of the VMware vCenter external provider. If you selected Any Data Center above, you cannot choose the host here, but instead can specify a host during individual import operations (using the function in the Virtual Machines tab).
- Enter the Username and Password for the VMware vCenter instance. The user must have access to the VMware data center and ESXi host on which the virtual machines reside.
- Test the credentials:
- Click Test to test whether you can authenticate successfully with the VMware vCenter instance using the provided credentials.
- If the VMware vCenter instance uses SSL, the Import provider certificates window opens; click OK to import the certificate that the VMware vCenter instance provides.
Important
You must import the certificate that the VMware vCenter instance provides to ensure the Manager can communicate with the instance.
- Click .
12.2.6. Adding a Xen Host as a Virtual Machine Provider
Note
Procedure 12.6. Adding a Xen Instance as a Virtual Machine Provider
- Enable public key authentication between the proxy host and the Xen host:
- Log in to the proxy host and generate SSH keys for the
vdsmuser.sudo -u vdsm ssh-keygen
# sudo -u vdsm ssh-keygenCopy to Clipboard Copied! Toggle word wrap Toggle overflow - Copy the
vdsmuser's public key to the Xen host. The proxy host'sknown_hostsfile will also be updated to include the host key of the Xen host.sudo -u vdsm ssh-copy-id root@xenhost.example.com
# sudo -u vdsm ssh-copy-id root@xenhost.example.comCopy to Clipboard Copied! Toggle word wrap Toggle overflow - Log in to the Xen host to verify that the login works correctly.
sudo -u vdsm ssh root@xenhost.example.com
# sudo -u vdsm ssh root@xenhost.example.comCopy to Clipboard Copied! Toggle word wrap Toggle overflow
- Select the External Providers entry in the tree pane.
- Click to open the Add Provider window.
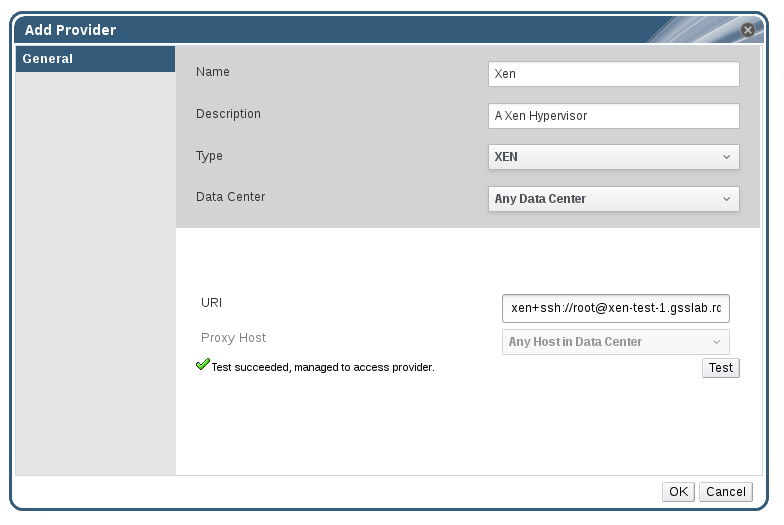
Figure 12.7. The Add Provider Window
- Enter a Name and Description.
- From the Type list, select XEN.
- Select the Data Center into which Xen virtual machines will be imported, or select Any Data Center to specify the destination data center during individual import operations (using the function in the Virtual Machines tab).
- Enter the URI in the field.
- Select a host in the chosen data center with virt-v2v installed to serve as the Proxy Host during virtual machine import operations. This host must also be able to connect to the network of the Xen external provider. If you selected Any Data Center above, you cannot choose the host here, but instead can specify a host during individual import operations (using the function in the Virtual Machines tab).
- Click Test to test whether you can authenticate successfully with the Xen host.
- Click .
12.2.7. Adding a KVM Host as a Virtual Machine Provider
Procedure 12.7. Adding a KVM Host as a Virtual Machine Provider
- Enable public key authentication between the proxy host and the KVM host:
- Log in to the proxy host and generate SSH keys for the
vdsmuser.sudo -u vdsm ssh-keygen
# sudo -u vdsm ssh-keygenCopy to Clipboard Copied! Toggle word wrap Toggle overflow - Copy the
vdsmuser's public key to the KVM host. The proxy host'sknown_hostsfile will also be updated to include the host key of the KVM host.sudo -u vdsm ssh-copy-id root@kvmhost.example.com
# sudo -u vdsm ssh-copy-id root@kvmhost.example.comCopy to Clipboard Copied! Toggle word wrap Toggle overflow - Log in to the KVM host to verify that the login works correctly.
sudo -u vdsm ssh root@kvmhost.example.com
# sudo -u vdsm ssh root@kvmhost.example.comCopy to Clipboard Copied! Toggle word wrap Toggle overflow
- Select the External Providers entry in the tree pane.
- Click to open the Add Provider window.
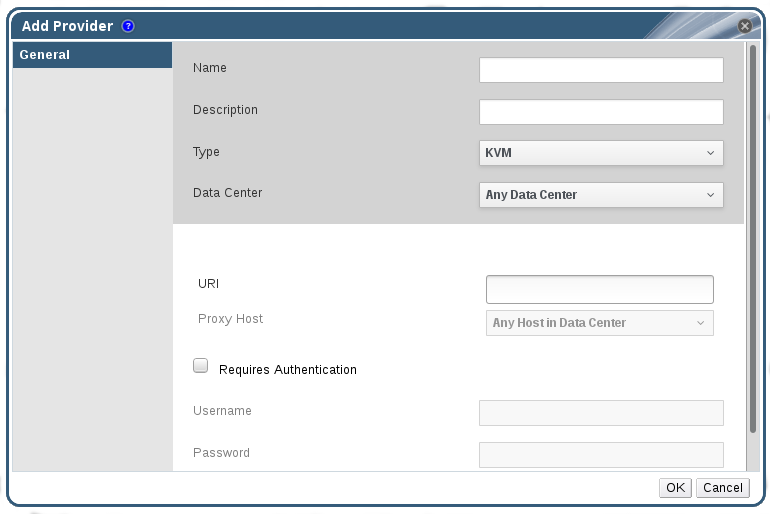
Figure 12.8. The Add Provider Window
- Enter a Name and Description.
- From the Type list, select KVM.
- Select the Data Center into which KVM virtual machines will be imported, or select Any Data Center to specify the destination data center during individual import operations (using the function in the Virtual Machines tab).
- Enter the URI in the field.
- Select a host in the chosen data center to serve as the Proxy Host during virtual machine import operations. This host must also be able to connect to the network of the KVM external provider. If you selected Any Data Center in the Data Center field above, you cannot choose the host here. The field is greyed out and shows Any Host in Data Center. Instead you can specify a host during individual import operations (using the function in the Virtual Machines tab).
- Optionally, select the Requires Authentication check box and enter the Username and Password for the KVM host. The user must have access to the KVM host on which the virtual machines reside.
- Click Test to test whether you can authenticate successfully with the KVM host using the provided credentials.
- Click .
12.2.8. Adding an External Network Provider
Procedure 12.8. Adding an External Network Provider for Network Provisioning
- Select the External Providers entry in the tree pane.
- Click .
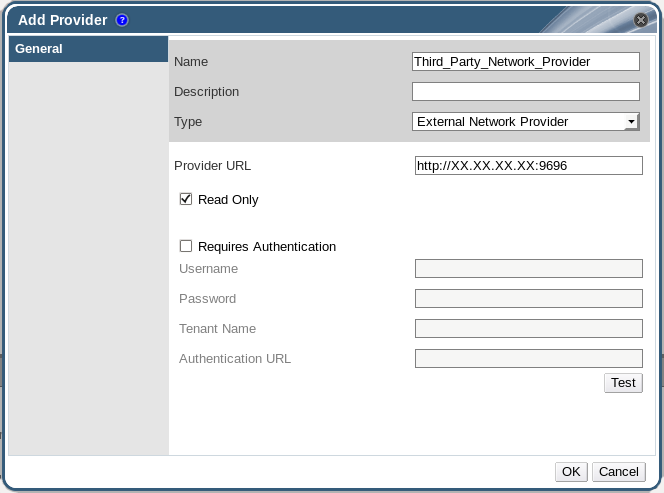
Figure 12.9. The Add Provider Window
- Enter a Name and Description.
- From the Type list, select External Network Provider.
- Enter the URL or fully qualified domain name of the machine on which the external network provider is installed in the Provider URL text field, followed by the port number. The Read-Only check box is selected by default. This prevents users from modifying the external network provider.
Important
You must leave the Read-Only check box selected for your setup to be supported by Red Hat. - Optionally, select the Requires Authentication check box and enter the Username, Password, Tenant Name, and Authentication URL for the external network provider.
- Test the credentials:
- Click Test to test whether you can authenticate successfully with the external network provider using the provided credentials.
- If the external network provider uses SSL, the Import provider certificates window opens; click OK to import the certificate that the external network provider provides to ensure the Manager can communicate with the instance.
- Click .
12.2.9. Adding Open Virtual Network (OVN) as an External Network Provider
Important
- Install the OVN virtual interface driver on any hosts to which you want to add OVN networks. The virtual interface driver connects vNICs to the appropriate OVS bridge and OVN logical network.
- Install the OVN provider, a proxy used by the Manager to interact with OVN. The OVN provider can be installed on any machine, but must be able to communicate with the OVN central server and the Manager.
- Add the OVN provider to Red Hat Virtualization as an external network provider.
Prerequisites
- The following packages are required by the OVN virtual interface driver and must be available on the hosts:
- openvswitch-ovn-host
- openvswitch
- openvswitch-ovn-common
- python-openvswitch
- The following packages are required by the OVN provider and must be available on the provider machine:
- openvswitch-ovn-central
- openvswitch
- openvswitch-ovn-common
- python-openvswitch
Procedure 12.9. Adding Open Virtual Network (OVN) as an External Network Provider
- Install and configure the OVN virtual interface driver on any hosts to which you want to add OVN networks.
- Install the driver:
- On a RHEL host:
yum install ovirt-provider-ovn-driver
# yum install ovirt-provider-ovn-driverCopy to Clipboard Copied! Toggle word wrap Toggle overflow - On Red Hat Virtualization Host (RHVH), the RPM must be manually built and installed:
git clone https://gerrit.ovirt.org/ovirt-provider-ovn
cd ovirt-provider-ovn
make rpm
cd
yum install rpmbuild/RPMS/noarch/ovirt-provider-ovn-driver-version.noarch.rpm
# git clone https://gerrit.ovirt.org/ovirt-provider-ovn
# cd ovirt-provider-ovn
# make rpm
# cd
# yum install rpmbuild/RPMS/noarch/ovirt-provider-ovn-driver-version.noarch.rpm
Copy to Clipboard Copied! Toggle word wrap Toggle overflow
- Start and enable the service:
systemctl start ovn-controller
systemctl enable ovn-controller
# systemctl start ovn-controller
# systemctl enable ovn-controller
Copy to Clipboard Copied! Toggle word wrap Toggle overflow - Configure the service:
vdsm-tool ovn-config OVN_central_server_IP local_OVN_tunneling_IP
# vdsm-tool ovn-config OVN_central_server_IP local_OVN_tunneling_IPCopy to Clipboard Copied! Toggle word wrap Toggle overflow The local IP address used for OVN tunneling must be reachable by the OVN central server and by other hosts using OVN. It can be theovirtmgmtinterface on the host. - Open port 6081 in the firewall. This can be done either manually or by adding
ovn-host-firewall-serviceto the appropriate zone:firewall-cmd --zone=ZoneName --add-service=ovn-host-firewall-service --permanent firewall-cmd --reload
# firewall-cmd --zone=ZoneName --add-service=ovn-host-firewall-service --permanent
# firewall-cmd --reload
Copy to Clipboard Copied! Toggle word wrap Toggle overflow
- Install and configure the OVN provider.
- Install the provider:
- If you are installing the provider on the same machine as the Manager:
yum install ovirt-provider-ovn
# yum install ovirt-provider-ovnCopy to Clipboard Copied! Toggle word wrap Toggle overflow - If you are not installing the provider on the same machine as the Manager, the RPM must be manually built and installed:
git clone https://gerrit.ovirt.org/ovirt-provider-ovn
cd ovirt-provider-ovn
make rpm
cd
yum install rpmbuild/RPMS/noarch/ovirt-provider-ovn-version.noarch.rpm
# git clone https://gerrit.ovirt.org/ovirt-provider-ovn
# cd ovirt-provider-ovn
# make rpm
# cd
# yum install rpmbuild/RPMS/noarch/ovirt-provider-ovn-version.noarch.rpm
Copy to Clipboard Copied! Toggle word wrap Toggle overflow
- If you are not installing the provider on the same machine as the OVN central server, add the following entry to the
/etc/ovirt-provider-ovn/ovirt-provider-ovn.conffile:ovn-remote=tcp:OVN_central_server_IP:6641
ovn-remote=tcp:OVN_central_server_IP:6641Copy to Clipboard Copied! Toggle word wrap Toggle overflow - Open ports 9696, 6641, and 6642 in the firewall to allow communication between the OVN provider, the OVN central server, and the Manager. This can be done either manually or by adding the
ovirt-provider-ovnandovirt-provider-ovn-centralservices to the appropriate zone:firewall-cmd --zone=ZoneName --add-service=ovirt-provider-ovn --permanent firewall-cmd --zone=ZoneName --add-service=ovirt-provider-ovn-central --permanent firewall-cmd --reload
# firewall-cmd --zone=ZoneName --add-service=ovirt-provider-ovn --permanent
# firewall-cmd --zone=ZoneName --add-service=ovirt-provider-ovn-central --permanent
# firewall-cmd --reload
Copy to Clipboard Copied! Toggle word wrap Toggle overflow - Start and enable the service:
systemctl start ovirt-provider-ovn
systemctl enable ovirt-provider-ovn
# systemctl start ovirt-provider-ovn
# systemctl enable ovirt-provider-ovn
Copy to Clipboard Copied! Toggle word wrap Toggle overflow - Configure the OVN central server to listen to requests from ports 6642 and 6641:
ovn-sbctl set-connection ptcp:6642
ovn-nbctl set-connection ptcp:6641
# ovn-sbctl set-connection ptcp:6642
# ovn-nbctl set-connection ptcp:6641
Copy to Clipboard Copied! Toggle word wrap Toggle overflow
- In the Administration Portal, select the External Providers entry in the tree pane.
- Click .
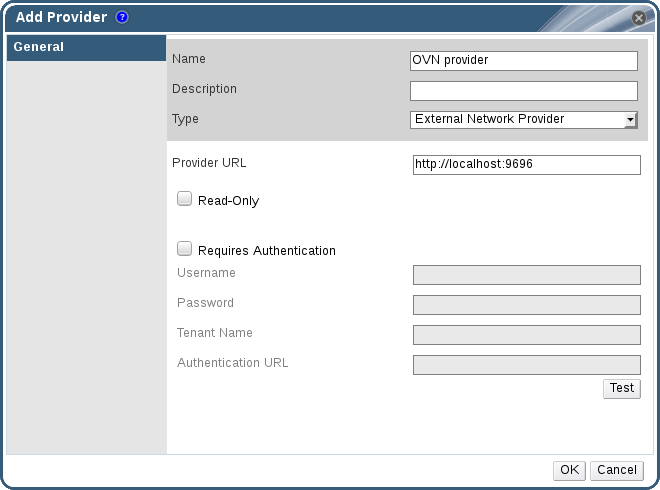
Figure 12.10. The Add Provider Window
- Enter a Name and Description.
- From the Type list, select External Network Provider.
- Enter the URL or fully qualified domain name of the OVN provider in the Provider URL text field, followed by the port number. If the OVN provider and the OVN central server are on separate machines, this is the URL of the provider machine, not the central server. If the OVN provider is on the same machine as the Manager, the URL can remain the default
http://localhost:9696. - Clear the Read-Only check box to allow creating new OVN networks from the Red Hat Virtualization Manager.
- Clear the Requires Authentication check box. Authentication and SSL are currently not supported for OVN external network providers.
- Click .
12.2.10. Add Provider General Settings Explained
|
Setting
|
Explanation
|
|---|---|
|
Name
|
A name to represent the provider in the Manager.
|
|
Description
|
A plain text, human-readable description of the provider.
|
|
Type
|
The type of external provider. Changing this setting alters the available fields for configuring the provider.
Foreman/Satellite
OpenStack Image
OpenStack Networking
OpenStack Volume
VMware
Xen
KVM
External Network Provider
|
|
Test
|
Allows users to test the specified credentials. This button is available to all provider types.
|
12.2.11. Add Provider Agent Configuration Settings Explained
|
Setting
|
Explanation
|
|---|---|
|
Interface Mappings
|
A comma-separated list of mappings in the format of label:interface.
|
|
Broker Type
|
The message broker type that the OpenStack Networking instance uses. Select RabbitMQ or Qpid.
|
|
Host
|
The URL or fully qualified domain name of the machine on which the message broker is installed.
|
|
Port
|
The remote port by which a connection with the above host is to be made. By default, this port is 5762 if SSL is not enabled on the host, and 5761 if SSL is enabled.
|
|
Username
|
A user name for authenticating the OpenStack Networking instance with the above message broker. By default, this user name is
neutron.
|
|
Password
|
The password against which the above user name is to be authenticated.
|
