Este contenido no está disponible en el idioma seleccionado.
Chapter 16. File and Print Servers
This chapter guides you through the installation and configuration of Samba, an open source implementation of the Server Message Block (SMB) and common Internet file system (CIFS) protocol, and vsftpd, the primary FTP server shipped with Red Hat Enterprise Linux. Additionally, it explains how to use the Print Settings tool to configure printers.
16.1. Samba
Samba implements the Server Message Block (SMB) protocol in Red Hat Enterprise Linux. The SMB protocol is used to access resources on a server, such as file shares and shared printers. Additionally, Samba implements the Distributed Computing Environment Remote Procedure Call (DCE RPC) protocol used by Microsoft Windows.
You can run Samba as:
- An Active Directory (AD) or NT4 domain member
- A standalone server
An NT4 Primary Domain Controller (PDC) or Backup Domain Controller (BDC)
NoteRed Hat supports these modes only in existing installations with Windows versions which support NT4 domains. Red Hat recommends not setting up a new Samba NT4 domain, because Microsoft operating systems later than Windows 7 and Windows Server 2008 R2 do not support NT4 domains.
Independently of the installation mode, you can optionally share directories and printers. This enables Samba to act as a file and print server.
Red Hat does not support running Samba as an AD domain controller (DC).
16.1.1. The Samba Services
Samba provides the following services:
smbdThis service provides file sharing and printing services using the SMB protocol. Additionally, the service is responsible for resource locking and for authenticating connecting users. The
smbsystemdservice starts and stops thesmbddaemon.To use the
smbdservice, install the samba package.nmbdThis service provides host name and IP resolution using the NetBIOS over IPv4 protocol. Additionally to the name resolution, the
nmbdservice enables browsing the SMB network to locate domains, work groups, hosts, file shares, and printers. For this, the service either reports this information directly to the broadcasting client or forwards it to a local or master browser. Thenmbsystemdservice starts and stops thenmbddaemon.Note that modern SMB networks use DNS to resolve clients and IP addresses.
To use the
nmbdservice, install the samba package.winbinddThe
winbinddservice provides an interface for the Name Service Switch (NSS) to use AD or NT4 domain users and groups on the local system. This enables, for example, domain users to authenticate to services hosted on a Samba server or to other local services. Thewinbindsystemdservice starts and stops thewinbindddaemon.If you set up Samba as a domain member,
winbinddmust be started before thesmbdservice. Otherwise, domain users and groups are not available to the local system.To use the
winbinddservice, install the samba-winbind package.ImportantRed Hat only supports running Samba as a server with the
winbinddservice to provide domain users and groups to the local system. Due to certain limitations, such as missing Windows access control list (ACL) support and NT LAN Manager (NTLM) fallback, use of the System Security Services Daemon (SSSD) with Samba is currently not supported for these use cases. For further details, see the Red Hat Knowledgebase article What is the support status for Samba file server running on IdM clients or directly enrolled AD clients where SSSD is used as the client daemon.
16.1.2. Verifying the smb.conf File by Using the testparm Utility
The testparm utility verifies that the Samba configuration in the /etc/samba/smb.conf file is correct. The utility detects invalid parameters and values, but also incorrect settings, such as for ID mapping. If testparm reports no problem, the Samba services will successfully load the /etc/samba/smb.conf file. Note that testparm cannot verify that the configured services will be available or work as expected.
Red Hat recommends that you verify the /etc/samba/smb.conf file by using testparm after each modification of this file.
To verify the /etc/samba/smb.conf file, run the testparm utility as the root user. If testparm reports incorrect parameters, values, or other errors in the configuration, fix the problem and run the utility again.
Example 16.1. Using testparm
The following output reports a non-existent parameter and an incorrect ID mapping configuration:
~]# testparm
Load smb config files from /etc/samba/smb.conf
rlimit_max: increasing rlimit_max (1024) to minimum Windows limit (16384)
Unknown parameter encountered: "log levell"
Processing section "[example_share]"
Loaded services file OK.
ERROR: The idmap range for the domain * (tdb) overlaps with the range of DOMAIN (ad)!

Server role: ROLE_DOMAIN_MEMBER

Press enter to see a dump of your service definitions

# Global parameters
[global]
	...

[example_share]
	...
16.1.3. Understanding the Samba Security Modes
The security parameter in the [global] section in the /etc/samba/smb.conf file manages how Samba authenticates users that are connecting to the service. Depending on the mode you install Samba in, the parameter must be set to different values:
On an AD domain member, set
security=ads.In this mode, Samba uses Kerberos to authenticate AD users.
For details about setting up Samba as a domain member, see Section 16.1.5, “Setting up Samba as a Domain Member”.
On a standalone server, set
security=user.In this mode, Samba uses a local database to authenticate connecting users.
For details about setting up Samba as a standalone server, see Section 16.1.4, “Setting up Samba as a Standalone Server”.
On an NT4 PDC or BDC, set
security=user.In this mode, Samba authenticates users to a local or LDAP database.
On an NT4 domain member, set
security=domain.In this mode, Samba authenticates connecting users to an NT4 PDC or BDC. You cannot use this mode on AD domain members.
For details about setting up Samba as a domain member, see Section 16.1.5, “Setting up Samba as a Domain Member”.
For further details, see the description of the security parameter in the smb.conf(5) man page.
16.1.4. Setting up Samba as a Standalone Server
In certain situations, administrators want to set up a Samba server that is not a member of a domain. In this installation mode, Samba authenticates users to a local database instead of to a central DC. Additionally, you can enable guest access to allow users to connect to one or multiple services without authentication.
16.1.4.1. Setting up the Server Configuration for the Standalone Server
To set up Samba as a standalone server:
Setting up Samba as a Standalone Server
Install the samba package:
~]# yum install sambaEdit the
/etc/samba/smb.conffile and set the following parameters:[global] workgroup = Example-WG netbios name = Server security = user log file = /var/log/samba/%m.log log level = 1This configuration defines a standalone server named
Serverwithin theExample-WGwork group. Additionally, this configuration enables logging on a minimal level (1) and log files will be stored in the/var/log/samba/directory. Samba will expand the%mmacro in thelog fileparameter to the NetBIOS name of connecting clients. This enables individual log files for each client.For further details, see the parameter descriptions in the smb.conf(5) man page.
Configure file or printer sharing. See:
Verify the
/etc/samba/smb.conffile:~]# testparmFor details, see Section 16.1.2, “Verifying the
smb.confFile by Using thetestparmUtility”.- If you set up shares that require authentication, create the user accounts. For details, see Section 16.1.4.2, “Creating and Enabling Local User Accounts”.
Open the required ports and reload the firewall configuration by using the
firewall-cmdutility:~]# firewall-cmd --permanent --add-port={139/tcp,445/tcp} ~]# firewall-cmd --reloadStart the
smbservice:~]# systemctl start smbOptionally, enable the
smbservice to start automatically when the system boots:~]# systemctl enable smb
16.1.4.2. Creating and Enabling Local User Accounts
To enable users to authenticate when they connect to a share, you must create the accounts on the Samba host both in the operating system and in the Samba database. Samba requires the operating system account to validate the Access Control Lists (ACL) on file system objects and the Samba account to authenticate connecting users.
If you use the passdb backend = tdbsam default setting, Samba stores user accounts in the /var/lib/samba/private/passdb.tdb database.
For example, to create the example Samba user:
Creating a Samba User
Create the operating system account:
~]# useradd -M -s /sbin/nologin exampleThe previous command adds the
exampleaccount without creating a home directory. If the account is only used to authenticate to Samba, assign the/sbin/nologincommand as shell to prevent the account from logging in locally.Set a password to the operating system account to enable it:
~]# passwd example
Enter new UNIX password: password
Retype new UNIX password: password
passwd: password updated successfully
Samba does not use the password set on the operating system account to authenticate. However, you need to set a password to enable the account. If an account is disabled, Samba denies access if this user connects.
Add the user to the Samba database and set a password to the account:
~]# smbpasswd -a example
New SMB password: password
Retype new SMB password: password
Added user example.
Use this password to authenticate when using this account to connect to a Samba share.
Enable the Samba account:
~]# smbpasswd -e example
Enabled user example.
16.1.5. Setting up Samba as a Domain Member
Administrators running an AD or NT4 domain often want to use Samba to join their Red Hat Enterprise Linux server as a member to the domain. This enables you to:
- Access domain resources on other domain members
-
Authenticate domain users to local services, such as
sshd - Share directories and printers hosted on the server to act as a file and print server
16.1.5.1. Joining a Domain
To join a Red Hat Enterprise Linux system to a domain:
Joining a Red Hat Enterprise Linux System to a Domain
Install the following packages:
~]# yum install realmd oddjob-mkhomedir oddjob samba-winbind-clients \
    samba-winbind samba-common-tools
To share directories or printers on the domain member, install the samba package:
~]# yum install sambaIf you join an AD, additionally install the samba-winbind-krb5-locator package:
~]# yum install samba-winbind-krb5-locatorThis plug-in enables Kerberos to locate the Key Distribution Center (KDC) based on AD sites using DNS service records.
Optionally, rename the existing
/etc/samba/smb.confSamba configuration file:~]# mv /etc/samba/smb.conf /etc/samba/smb.conf.oldJoin the domain. For example, to join a domain named
ad.example.com~]# realm join --membership-software=samba --client-software=winbind ad.example.comUsing the previous command, the
realmutility automatically:-
Creates a
/etc/samba/smb.conffile for a membership in thead.example.comdomain -
Adds the
winbindmodule for user and group lookups to the/etc/nsswitch.conffile -
Updates the Pluggable Authentication Module (PAM) configuration files in the
/etc/pam.d/directory Starts the
winbindservice and enables the service to start when the system bootsFor further details about the
realmutility, see the realm(8) man page and the corresponding section in the Red Hat Windows Integration Guide.
-
Creates a
-
Optionally, set an alternative ID mapping back end or customized ID mapping settings in the
/etc/samba/smb.conffile. For details, see Section 16.1.5.3, “Understanding ID Mapping”. - Optionally, verify the configuration. See Section 16.1.5.2, “Verifying That Samba Was Correctly Joined As a Domain Member”.
Verify that the
winbinddis running:~]# systemctl status winbindImportantTo enable Samba to query domain user and group information, the
winbinddservice must be running before you startsmbd.If you installed the samba package to share directories and printers, start the
smbdservice:~]# systemctl start smb
16.1.5.2. Verifying That Samba Was Correctly Joined As a Domain Member
After you joined a Red Hat Enterprise Linux as a domain member, you can run different tests to verify that the join succeeded. See:
Verifying That the Operating System Can Retrieve Domain User Accounts and Groups
Use the getent utility to verify that the operating system can retrieve domain users and groups. For example:
To query the
administratoraccount in theADdomain:~]# getent passwd AD\\administrator AD\administrator:*:10000:10000::/home/administrator@AD:/bin/bashTo query the members of the
Domain Usersgroup in theADdomain:~]# getent group "AD\\Domain Users" AD\domain users:x:10000:user
If the command works correctly, verify that you can use domain users and groups when you set permissions on files and directories. For example, to set the owner of the /srv/samba/example.txt file to AD\administrator and the group to AD\Domain Users:
~]# chown "AD\administrator":"AD\Domain Users" /srv/samba/example.txtVerifying If AD Domain Users Can Obtain a Kerberos Ticket
In an AD environment, users can obtain a Kerberos ticket from the DC. For example, to verify if the administrator user can obtain a Kerberos ticket:
To use the kinit and klist utilities, install the krb5-workstation package on the Samba domain member.
Obtaining a Kerberos Ticket
Obtain a ticket for the
administrator@AD.EXAMPLE.COMprincipal:~]# kinit administrator@AD.EXAMPLE.COMDisplay the cached Kerberos ticket:
~]# klist
Ticket cache: KEYRING:persistent:0:0
Default principal: administrator@AD.EXAMPLE.COM

Valid starting    Expires       Service principal
11.09.2017 14:46:21 12.09.2017 00:46:21 krbtgt/AD.EXAMPLE.COM@AD.EXAMPLE.COM
	renew until 18.09.2017 14:46:19
Listing the Available Domains
To list all domains available through the winbindd service, enter:
~]# wbinfo --all-domainsIf Samba was successfully joined as a domain member, the command displays the built-in and local host name, as well as the domain Samba is a member of including trusted domains.
Example 16.2. Displaying the Available Domains
~]# wbinfo --all-domains
BUILTIN
SAMBA-SERVER
AD
16.1.5.3. Understanding ID Mapping
Windows domains distinguish users and groups by unique Security Identifiers (SID). However, Linux requires unique UIDs and GIDs for each user and group. If you run Samba as a domain member, the winbindd service is responsible for providing information about domain users and groups to the operating system.
To enable the winbindd service to provide unique IDs for users and groups to Linux, you must configure ID mapping in the /etc/samba/smb.conf file for:
- The local database (default domain)
- The AD or NT4 domain the Samba server is a member of
- Each trusted domain from which users must be able to access resources on this Samba server
16.1.5.3.1. Planning ID Ranges
Regardless of whether you store the Linux UIDs and GIDs in AD or if you configure Samba to generate them, each domain configuration requires a unique ID range that must not overlap with any of the other domains.
If you set overlapping ID ranges, Samba fails to work correctly.
Example 16.3. Unique ID Ranges
The following shows non-overlapping ID mapping ranges for the default (*), AD-DOM, and the TRUST-DOM domains.
[global]
...
idmap config * : backend = tdb
idmap config * : range = 10000-999999

idmap config AD-DOM:backend = rid
idmap config AD-DOM:range = 2000000-2999999

idmap config TRUST-DOM:backend = rid
idmap config TRUST-DOM:range = 4000000-4999999You can only assign one range per domain. Therefore, leave enough space between the domains ranges. This enables you to extend the range later if your domain grows.
If you later assign a different range to a domain, the ownership of files and directories previously created by these users and groups will be lost.
16.1.5.3.2. The * Default Domain
In a domain environment, you add one ID mapping configuration for each of the following:
- The domain the Samba server is a member of
- Each trusted domain that should be able to access the Samba server
However, for all other objects, Samba assigns IDs from the default domain. This includes:
- Local Samba users and groups
-
Samba built-in accounts and groups, such as
BUILTIN\Administrators
You must configure the default domain as described in this section to enable Samba to operate correctly.
The default domain back end must be writable to permanently store the assigned IDs.
For the default domain, you can use one of the following back ends:
tdbWhen you configure the default domain to use the
tdbback end, set an ID range that is big enough to include objects that will be created in the future and that are not part of a defined domain ID mapping configuration.For example, set the following in the
[global]section in the/etc/samba/smb.conffile:idmap config * : backend = tdb idmap config * : range = 10000-999999For further details, see Section 16.1.5.4.1, “Using the
tdbID Mapping Back End”.autoridWhen you configure the default domain to use the
autoridback end, adding additional ID mapping configurations for domains is optional.For example, set the following in the
[global]section in the/etc/samba/smb.conffile:idmap config * : backend = autorid idmap config * : range = 10000-999999For further details, see Configuring the
autoridBack End.
16.1.5.4. The Different ID Mapping Back Ends
Samba provides different ID mapping back ends for specific configurations. The most frequently used back ends are:
| Back End | Use Case |
|---|---|
|
|
The |
|
| AD domains only |
|
| AD and NT4 domains |
|
|
AD, NT4, and the |
The following sections describe the benefits, recommended scenarios where to use the back end, and how to configure it.
16.1.5.4.1. Using the tdb ID Mapping Back End
The winbindd service uses the writable tdb ID mapping back end by default to store Security Identifier (SID), UID, and GID mapping tables. This includes local users, groups, and built-in principals.
Use this back end only for the * default domain. For example:
idmap config * : backend = tdb
idmap config * : range = 10000-999999
For further details about the * default domain, see Section 16.1.5.3.2, “The * Default Domain”.
16.1.5.4.2. Using the ad ID Mapping Back End
The ad ID mapping back end implements a read-only API to read account and group information from AD. This provides the following benefits:
- All user and group settings are stored centrally in AD.
- User and group IDs are consistent on all Samba servers that use this back end.
- The IDs are not stored in a local database which can corrupt, and therefore file ownerships cannot be lost.
The ad back end reads the following attributes from AD:
| AD Attribute Name | Object Type | Mapped to |
|---|---|---|
|
| User and group | User or group name, depending on the object |
|
| User | User ID (UID) |
|
| Group | Group ID (GID) |
|
| User | Path to the shell of the user |
|
| User | Path to the home directory of the user |
|
| User | Primary group ID |
[a]
Samba only reads this attribute if you set idmap config DOMAIN:unix_nss_info = yes.
[b]
Samba only reads this attribute if you set idmap config DOMAIN:unix_primary_group = yes.
| ||
Prerequisites of the ad Back End
To use the ad ID mapping back end:
-
Both users and groups must have unique IDs set in AD, and the IDs must be within the range configured in the
/etc/samba/smb.conffile. Objects whose IDs are outside of the range will not be available on the Samba server. -
Users and groups must have all required attributes set in AD. If required attributes are missing, the user or group will not be available on the Samba server. The required attributes depend on your configuration. See Table 16.2, “Attributes the
adBack End Reads from User and Group Objects”.
Configuring the ad Back End
To configure a Samba AD member to use the ad ID mapping back end:
Configuring the ad Back End on a Domain Member
Edit the
[global]section in the/etc/samba/smb.conffile:Add an ID mapping configuration for the default domain (
*) if it does not exist. For example:idmap config * : backend = tdb idmap config * : range = 10000-999999For further details about the default domain configuration, see Section 16.1.5.3.2, “The
*Default Domain”.Enable the
adID mapping back end for the AD domain:idmap config DOMAIN : backend = adSet the range of IDs that is assigned to users and groups in the AD domain. For example:
idmap config DOMAIN : range = 2000000-2999999ImportantThe range must not overlap with any other domain configuration on this server. Additionally, the range must be set big enough to include all IDs assigned in the future. For further details, see Section 16.1.5.3.1, “Planning ID Ranges”.
Set that Samba uses the RFC 2307 schema when reading attributes from AD:
idmap config DOMAIN : schema_mode = rfc2307To enable Samba to read the login shell and the path to the users home directory from the corresponding AD attribute, set:
idmap config DOMAIN : unix_nss_info = yesAlternatively, you can set a uniform domain-wide home directory path and login shell that is applied to all users. For example:
template shell = /bin/bash
template homedir = /home/%U
For details about variable substitution, see the VARIABLE SUBSTITUTIONS section in the smb.conf(5) man page.
By default, Samba uses the
primaryGroupIDattribute of a user object as the user’s primary group on Linux. Alternatively, you can configure Samba to use the value set in thegidNumberattribute instead:idmap config DOMAIN : unix_primary_group = yes
Verify the
/etc/samba/smb.conffile:~]# testparmFor details, see Section 16.1.2, “Verifying the
smb.confFile by Using thetestparmUtility”.Reload the Samba configuration:
~]# smbcontrol all reload-config- Verify that the settings work as expected. See the section called “Verifying That the Operating System Can Retrieve Domain User Accounts and Groups”.
For further details, see the smb.conf(5) and idmap_ad(8) man pages.
16.1.5.4.3. Using the rid ID Mapping Back End
Samba can use the relative identifier (RID) of a Windows SID to generate an ID on Red Hat Enterprise Linux.
The RID is the last part of a SID. For example, if the SID of a user is S-1-5-21-5421822485-1151247151-421485315-30014, then 30014 is the corresponding RID. For details, how Samba calculates the local ID, see the idmap_rid(8) man page.
The rid ID mapping back end implements a read-only API to calculate account and group information based on an algorithmic mapping scheme for AD and NT4 domains. When you configure the back end, you must set the lowest and highest RID in the idmap config DOMAIN : range parameter. Samba will not map users or groups with a lower or higher RID than set in this parameter.
As a read-only back end, rid cannot assign new IDs, such as for BUILTIN groups. Therefore, do not use this back end for the * default domain.
Benefits
- All domain users and groups that have an RID within the configured range are automatically available on the domain member.
- You do not need to manually assign IDs, home directories, and login shells.
Drawbacks
- All domain users get the same login shell and home directory assigned. However, you can use variables.
-
User and group IDs are only the same across Samba domain members if all use the
ridback end with the same ID range settings. - You cannot exclude individual users or groups from being available on the domain member. Only users and groups outside of the configured range are excluded.
-
Based on the formulas the
winbinddservice uses to calculate the IDs, duplicate IDs can occur in multi-domain environments if objects in different domains have the same RID.
Configuring the rid Back End
To configure a Samba domain member to use the rid ID mapping back end:
Configuring the rid Back End on a Domain Member
Edit the
[global]section in the/etc/samba/smb.conffile:Add an ID mapping configuration for the default domain (
*) if it does not exist. For example:idmap config * : backend = tdb idmap config * : range = 10000-999999For further details about the default domain configuration, see Section 16.1.5.3.2, “The
*Default Domain”.Enable the
ridID mapping back end for the domain:idmap config DOMAIN : backend = ridSet a range that is big enough to include all RIDs that will be assigned in the future. For example:
idmap config DOMAIN : range = 2000000-2999999Samba ignores users and groups whose RIDs in this domain are not within the range.
ImportantThe range must not overlap with any other domain configuration on this server. For further details, see Section 16.1.5.3.1, “Planning ID Ranges”.
Set a shell and home directory path that will be assigned to all mapped users. For example:
template shell = /bin/bash
template homedir = /home/%U
For details about variable substitution, see the VARIABLE SUBSTITUTIONS section in the smb.conf(5) man page.
Verify the
/etc/samba/smb.conffile:~]# testparmFor details, see Section 16.1.2, “Verifying the
smb.confFile by Using thetestparmUtility”.Reload the Samba configuration:
~]# smbcontrol all reload-config- Verify that the settings work as expected. See the section called “Verifying That the Operating System Can Retrieve Domain User Accounts and Groups”.
16.1.5.4.4. Using the autorid ID Mapping Back End
The autorid back end works similar to the rid ID mapping back end, but can automatically assign IDs for different domains. This enables you to use the autorid back end in the following situations:
-
Only for the
*default domain. -
For the
*default domain and additional domains, without the need to create ID mapping configurations for each of the additional domains. - Only for specific domains.
Benefits
- All domain users and groups whose calculated UID and GID is within the configured range are automatically available on the domain member.
- You do not need to manually assign IDs, home directories, and login shells.
- No duplicate IDs, even if multiple objects in a multi-domain environment have the same RID.
Drawbacks
- User and group IDs are not the same across Samba domain members.
- All domain users get the same login shell and home directory assigned. However, you can use variables.
- You cannot exclude individual users or groups from being available on the domain member. Only users and groups whose calculated UID or GID is outside of the configured range are excluded.
Configuring the autorid Back End
To configure a Samba domain member to use the autorid ID mapping back end for the * default domain:
If you use autorid for the default domain, adding additional ID mapping configuration for domains is optional.
Configuring the autorid Back End on a Domain Member
Edit the
[global]section in the/etc/samba/smb.conffile:Enable the
autoridID mapping back end for the*default domain:idmap config * : backend = autoridSet a range that is big enough to assign IDs for all existing and future objects. For example:
idmap config * : range = 10000-999999Samba ignores users and groups whose calculated IDs in this domain are not within the range. For details about how the back end calculated IDs, see the THE MAPPING FORMULAS section in the idmap_autorid(8) man page.
WarningAfter you set the range and Samba starts using it, you can only increase the upper limit of the range. Any other change to the range can result in new ID assignments, and thus in loosing file ownerships.
Optionally, set a range size. For example:
idmap config * : rangesize = 200000Samba assigns this number of continuous IDs for each domain’s object until all IDs from the range set in the
idmap config * : rangeparameter are taken. For further details, see therangesizeparameter description in the idmap_autorid(8) man page.Set a shell and home directory path that will be assigned to all mapped users. For example:
template shell = /bin/bash
template homedir = /home/%U
For details about variable substitution, see the VARIABLE SUBSTITUTIONS section in the smb.conf(5) man page.
Optionally, add additional ID mapping configuration for domains. If no configuration for an individual domain is available, Samba calculates the ID using the
autoridback end settings in the previously configured*default domain.ImportantIf you configure additional back ends for individual domains, the ranges for all ID mapping configuration must not overlap. For further details, see Section 16.1.5.3.1, “Planning ID Ranges”.
Verify the
/etc/samba/smb.conffile:~]# testparmFor details, see Section 16.1.2, “Verifying the
smb.confFile by Using thetestparmUtility”.Reload the Samba configuration:
~]# smbcontrol all reload-config- Verify that the settings work as expected. See the section called “Verifying That the Operating System Can Retrieve Domain User Accounts and Groups”.
16.1.7. Setting up a Samba Print Server
If you set up Samba as a print server, clients in your network can use Samba to print. Additionally, Windows clients can, if configured, download the driver from the Samba server.
Before you can share a printer, set up Samba:
16.1.7.1. The Samba spoolssd Service
The Samba spoolssd is a service that is integrated into the smbd service. Enable spoolssd in the Samba configuration to significantly increase the performance on print servers with a high number of jobs or printers.
Without spoolssd, Samba forks the smbd process and initializes the printcap cache for each print job. In case of a large number of printers, the smbd service can become unresponsive for multiple seconds while the cache is initialized. The spoolssd service enables you to start pre-forked smbd processes that are processing print jobs without any delays. The main spoolssd smbd process uses a low amount of memory, and forks and terminates child processes.
To enable the spoolssd service:
Enabling the spoolssd Service
Edit the
[global]section in the/etc/samba/smb.conffile:Add the following parameters:
rpc_server:spoolss = external
rpc_daemon:spoolssd = fork
Optionally, you can set the following parameters:
Expand Parameter Default Description spoolssd:prefork_min_children
5
Minimum number of child processes
spoolssd:prefork_max_children
25
Maximum number of child processes
spoolssd:prefork_spawn_rate
5
Samba forks the number of new child processes set in this parameter, up to the value set in
spoolssd:prefork_max_children, if a new connection is establishedspoolssd:prefork_max_allowed_clients
100
Number of clients, a child process serves
spoolssd:prefork_child_min_life
60
Minimum lifetime of a child process in seconds. 60 seconds is the minimum.
Verify the
/etc/samba/smb.conffile:~]# testparmFor details, see Section 16.1.2, “Verifying the
smb.confFile by Using thetestparmUtility”.Restart the
smbservice:~]# systemctl restart smb
After you restarted the service, Samba automatically starts smbd child processes:
~]# ps axf
...
30903 smbd
30912 \_ smbd
30913   \_ smbd
30914   \_ smbd
30915   \_ smbd
...
16.1.7.2. Enabling Print Server Support in Samba
To enable the print server support:
Enabling Print Server Support in Samba
On the Samba server, set up CUPS and add the printer to the CUPS back end. For details, see Section 16.3, “Print Settings”.
NoteSamba can only forward the print jobs to CUPS if CUPS is installed locally on the Samba print server.
Edit the
/etc/samba/smb.conffile:If you want to enable the
spoolssdservice, add the following parameters to the[global]section:rpc_server:spoolss = external rpc_daemon:spoolssd = forkFor further details, see Section 16.1.7.1, “The Samba
spoolssdService”.To configure the printing back end, add the
[printers]section:[printers] comment = All Printers path = /var/tmp/ printable = yes create mask = 0600ImportantThe
printersshare name is hard-coded and cannot be changed.
Verify the
/etc/samba/smb.conffile:~]# testparmFor details, see Section 16.1.2, “Verifying the
smb.confFile by Using thetestparmUtility”.Open the required ports and reload the firewall configuration using the
firewall-cmdutility:~]# firewall-cmd --permanent --add-service=samba ~]# firewall-cmd --reloadRestart the
smbservice:~]# systemctl restart smb
After restarting the service, Samba automatically shares all printers that are configured in the CUPS back end. If you want to manually share only specific printers, see Section 16.1.7.3, “Manually Sharing Specific Printers”.
16.1.7.3. Manually Sharing Specific Printers
If you configured Samba as a print server, by default, Samba shares all printers that are configured in the CUPS back end. To share only specific printers:
Manually Sharing a Specific Printer
Edit the
/etc/samba/smb.conffile:In the
[global]section, disable automatic printer sharing by setting:load printers = noAdd a section for each printer you want to share. For example, to share the printer named
examplein the CUPS back end asExample-Printerin Samba, add the following section:[Example-Printer] path = /var/tmp/ printable = yes printer name = exampleYou do not need individual spool directories for each printer. You can set the same spool directory in the
pathparameter for the printer as you set in the[printers]section.
Verify the
/etc/samba/smb.conffile:~]# testparmFor details, see Section 16.1.2, “Verifying the
smb.confFile by Using thetestparmUtility”.Reload the Samba configuration:
~]# smbcontrol all reload-config
16.1.7.4. Setting up Automatic Printer Driver Downloads for Windows Clients
If you are running a Samba print server for Windows clients, you can upload drivers and preconfigure printers. If a user connects to a printer, Windows automatically downloads and installs the driver locally on the client. The user does not require local administrator permissions for the installation. Additionally, Windows applies preconfigured driver settings, such as the number of trays.
Before setting up automatic printer driver download, must configure Samba as a print server and share a printer. For details, see Section 16.1.7, “Setting up a Samba Print Server”.
16.1.7.4.1. Basic Information about Printer Drivers
This section provides general information about printer drivers.
Supported Driver Model Version
Samba only supports the printer driver model version 3 which is supported in Windows 2000 and later, and Windows Server 2000 and later. Samba does not support the driver model version 4, introduced in Windows 8 and Windows Server 2012. However, these and later Windows versions also support version 3 drivers.
Package-aware Drivers
Samba does not support package-aware drivers.
Preparing a Printer Driver for Being Uploaded
Before you can upload a driver to a Samba print server:
- Unpack the driver if it is provided in a compressed format.
Some drivers require to start a setup application that installs the driver locally on a Windows host. In certain situations, the installer extracts the individual files into the operating system’s temporary folder during the setup runs. To use the driver files for uploading:
- Start the installer.
- Copy the files from the temporary folder to a new location.
- Cancel the installation.
Ask your printer manufacturer for drivers that support uploading to a print server.
Providing 32-bit and 64-bit Drivers for a Printer to a Client
To provide the driver for a printer for both 32-bit and 64-bit Windows clients, you must upload a driver with exactly the same name for both architectures. For example, if you are uploading the 32-bit driver named Example PostScript and the 64-bit driver named Example PostScript (v1.0), the names do not match. Consequently, you can only assign one of the drivers to a printer and the driver will not be available for both architectures.
16.1.7.4.2. Enabling Users to Upload and Preconfigure Drivers
To be able to upload and preconfigure printer drivers, a user or a group needs to have the SePrintOperatorPrivilege privilege granted. A user must be added into the printadmin group. Red Hat Enterprise Linux creates this group automatically when you install the samba package. The printadmin group gets assigned the lowest available dynamic system GID that is lower than 1000.
To grant the SePrintOperatorPrivilege privilege to the printadmin group:
~]# net rpc rights grant "printadmin" SePrintOperatorPrivilege \
    -U "DOMAIN\administrator"
Enter DOMAIN\administrator's password:
Successfully granted rights.
In a domain environment, grant SePrintOperatorPrivilege to a domain group. This enables you to centrally manage the privilege by updating a user’s group membership.
To list all users and groups having SePrintOperatorPrivilege granted:
~]# net rpc rights list privileges SePrintOperatorPrivilege \
    -U "DOMAIN\administrator"
Enter administrator's password:
SePrintOperatorPrivilege:
 BUILTIN\Administrators
DOMAIN\printadmin16.1.7.4.4. Creating a GPO to Enable Clients to Trust the Samba Print Server
For security reasons, recent Windows operating systems prevent clients from downloading non-package-aware printer drivers from an untrusted server. If your print server is a member in an AD, you can create a Group Policy Object (GPO) in your domain to trust the Samba server.
To create GPOs, the Windows computer you are using must have the Windows Remote Server Administration Tools (RSAT) installed. For details, see your Windows documentation.
Creating a GPO to Enable Clients to Trust the Samba Print Server
-
Log into a Windows computer using an account that is allowed to edit group policies, such as the AD domain
Administratoruser. - Open the Group Policy Management Console.
Right-click to your AD domain and select
Create a GPO in this domain, and Link it here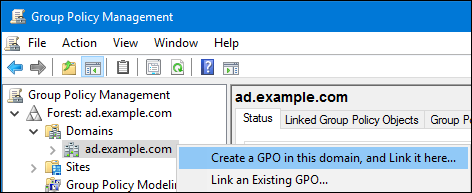
-
Enter a name for the GPO, such as
Legacy printer Driver Policyand click . The new GPO will be displayed under the domain entry. -
Right-click to the newly-created GPO and select
Editto open the Group Policy Management Editor. Navigate to
. 
On the right side of the window, double-click
Point and Print Restrictionto edit the policy:Enable the policy and set the following options:
-
Select
Users can only point and print to these serversand enter the fully-qualified domain name (FQDN) of the Samba print server to the field next to this option. In both check boxes under
Security Prompts, selectDo not show warning or elevation prompt.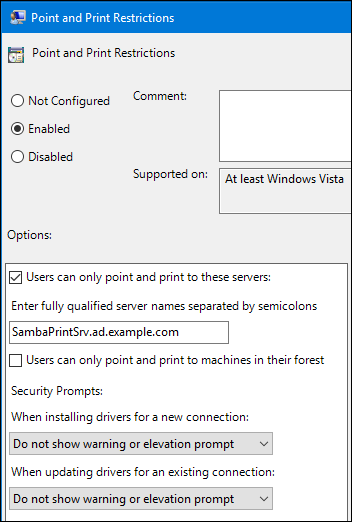
-
Select
- Click .
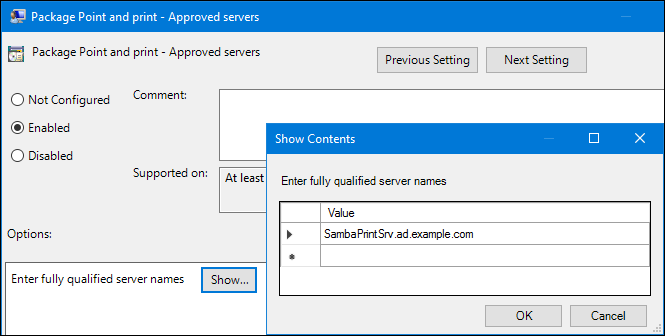
Double-click
Package Point and Print - Approved serversto edit the policy:- Enable the policy and click the button.
Enter the FQDN of the Samba print server.
-
Close both the
Show Contentsand policy properties window by clicking .
- Close the Group Policy Management Editor.
- Close the Group Policy Management Console.
After the Windows domain members applied the group policy, printer drivers are automatically downloaded from the Samba server when a user connects to a printer.
For further details about using group policies, see your Windows documentation.
16.1.7.4.5. Uploading Drivers and Preconfiguring Printers
Use the Print Management application on a Windows client to upload drivers and preconfigure printers hosted on the Samba print server. For further details, see your Windows documentation.
16.1.8. Tuning the Performance of a Samba Server
This section describes what settings can improve the performance of Samba in certain situations, and which settings can have a negative performance impact.
16.1.8.1. Setting the SMB Protocol Version
Each new SMB version adds features and improves the performance of the protocol. The recent Windows and Windows Server operating systems always supports the latest protocol version. If Samba also uses the latest protocol version, Windows clients connecting to Samba benefit from the performance improvements. In Samba, the default value of the server max protocol is set to the latest supported stable SMB protocol version.
To always have the latest stable SMB protocol version enabled, do not set the server max protocol parameter. If you set the parameter manually, you will need to modify the setting with each new version of the SMB protocol, to have the latest protocol version enabled.
To unset, remove the server max protocol parameter from the [global] section in the /etc/samba/smb.conf file.
16.1.8.3. Settings That Can Have a Negative Performance Impact
By default, the kernel in Red Hat Enterprise Linux is tuned for high network performance. For example, the kernel uses an auto-tuning mechanism for buffer sizes. Setting the socket options parameter in the /etc/samba/smb.conf file overrides these kernel settings. As a result, setting this parameter decreases the Samba network performance in most cases.
To use the optimized settings from the Kernel, remove the socket options parameter from the [global] section in the /etc/samba/smb.conf.
16.1.9. Frequently Used Samba Command-line Utilities
This section describes frequently used commands when working with a Samba server.
16.1.9.1. Using the net Utility
The net utility enables you to perform several administration tasks on a Samba server. This section describes the most frequently used subcommands of the net utility.
For further details, see the net(8) man page.
16.1.9.1.1. Using the net ads join and net rpc join Commands
Using the join subcommand of the net utility, you can join Samba to an AD or NT4 domain. To join the domain, you must create the /etc/samba/smb.conf file manually, and optionally update additional configurations, such as PAM.
Red Hat recommends using the realm utility to join a domain. The realm utility automatically updates all involved configuration files. For details, see Section 16.1.5.1, “Joining a Domain”.
To join a domain using the net command:
Joining a Domain Using the net Command
Manually create the
/etc/samba/smb.conffile with the following settings:For an AD domain member:
[global]
workgroup = domain_name
security = ads
passdb backend = tdbsam
realm = AD_REALM
For an NT4 domain member:
[global]
workgroup = domain_name
security = user
passdb backend = tdbsam
-
Add an ID mapping configuration for the
*default domain and for the domain you want to join to the[global]section in the/etc/samba/smb.conf. For details, see Section 16.1.5.3, “Understanding ID Mapping”. Verify the
/etc/samba/smb.conffile:~]# testparmFor details, see Section 16.1.2, “Verifying the
smb.confFile by Using thetestparmUtility”.Join the domain as the domain administrator:
To join an AD domain:
~]# net ads join -U "DOMAINpass:quotes[administrator]"To join an NT4 domain:
~]# net rpc join -U "DOMAINpass:quotes[administrator]"
Append the
winbindsource to thepasswdandgroupdatabase entry in the/etc/nsswitch.conffile:passwd: files winbind group: files winbindEnable and start the
winbindservice:~]# systemctl enable winbind ~]# systemctl start winbindOptionally, configure PAM using the
authconfutility.For details, see the Using Pluggable Authentication Modules (PAM) section in the Red Hat System-Level Authentication Guide.
Optionally for AD environments, configure the Kerberos client.
For details, see the Configuring a Kerberos Client section in the Red Hat System-Level Authentication Guide.
16.1.9.1.2. Using the net rpc rights Command
In Windows, you can assign privileges to accounts and groups to perform special operations, such as setting ACLs on a share or upload printer drivers. On a Samba server, you can use the net rpc rights command to manage privileges.
Listing Privileges
To list all available privileges and their owners, use the net rpc rights list command. For example:
net rpc rights list -U "DOMAINpass:attributes[{blank}]administrator"
Enter DOMAINpass:attributes[{blank}]administrator's password:
   SeMachineAccountPrivilege Add machines to domain
   SeTakeOwnershipPrivilege Take ownership of files or other objects
       SeBackupPrivilege Back up files and directories
      SeRestorePrivilege Restore files and directories
   SeRemoteShutdownPrivilege Force shutdown from a remote system
   SePrintOperatorPrivilege Manage printers
      SeAddUsersPrivilege Add users and groups to the domain
    SeDiskOperatorPrivilege Manage disk shares
      SeSecurityPrivilege System security
Granting Privileges
To grant a privilege to an account or group, use the net rpc rights grant command.
For example, grant the SePrintOperatorPrivilege privilege to the DOMAIN\printadmin group:
~]# net rpc rights grant "DOMAIN\printadmin" SePrintOperatorPrivilege \
    -U "DOMAIN\administrator"
Enter DOMAIN\administrator's password:
Successfully granted rights.
Revoking Privileges
To revoke a privilege from an account or group, use the net rpc rights revoke.
For example, to revoke the SePrintOperatorPrivilege privilege from the DOMAIN\printadmin group:
~]# net rpc rights remoke "DOMAIN\printadmin" SePrintOperatorPrivilege \
    -U "DOMAIN\administrator"
Enter DOMAIN\administrator's password:
Successfully revoked rights.16.1.9.1.4. Using the net user Command
The net user command enables you to perform the following actions on an AD DC or NT4 PDC:
- List all user accounts
- Add users
- Remove Users
Specifying a connection method, such as ads for AD domains or rpc for NT4 domains, is only required when you list domain user accounts. Other user-related subcommands can auto-detect the connection method.
Pass the -U user_name parameter to the command to specify a user that is allowed to perform the requested action.
Listing Domain User Accounts
To list all users in an AD domain:
~]# net ads user -U "DOMAIN\administrator"To list all users in an NT4 domain:
~]# net rpc user -U "DOMAIN\administrator"Adding a User Account to the Domain
On a Samba domain member, you can use the net user add command to add a user account to the domain.
For example, add the user account to the domain:
Adding a User Account to the Domain
Add the account:
~]# net user add user password -U "DOMAIN\administrator"
User user added
Optionally, use the remote procedure call (RPC) shell to enable the account on the AD DC or NT4 PDC. For example:
~]# net rpc shell -U DOMAIN\administrator -S DC_or_PDC_name
Talking to domain DOMAIN (S-1-5-21-1424831554-512457234-5642315751)

net rpc> user edit disabled user no
Set user's disabled flag from [yes] to [no]

net rpc> exit
Deleting a User Account from the Domain
On a Samba domain member, you can use the net user delete command to remove a user account from the domain.
For example, to remove the user account from the domain:
~]# net user delete user -U "DOMAIN\administrator"
User user deleted16.1.9.2. Using the rpcclient Utility
The rpcclient utility enables you to manually execute client-side Microsoft Remote Procedure Call (MS-RPC) functions on a local or remote SMB server. However, most of the features are integrated into separate utilities provided by Samba. Use rpcclient only for testing MS-PRC functions.
For example, you can use the utility to:
Manage the printer Spool Subsystem (SPOOLSS).
Example 16.9. Assigning a Driver to a Printer
~]# rpcclient server_name -U "DOMAINpass:quotes[administrator]" \
    -c 'setdriver "printer_name" "driver_name"'
Enter DOMAINpass:quotes[administrator]s password:
Successfully set printer_name to driver driver_name.
Retrieve information about an SMB server.
Example 16.10. Listing all File Shares and Shared Printers
~]# rpcclient server_name -U "DOMAINpass:quotes[administrator]" -c 'netshareenum'
Enter DOMAINpass:quotes[administrator]s password:
netname: Example_Share
	remark:
	path:  C:\srv\samba\example_share\
	password:
netname: Example_Printer
	remark:
	path:  C:\var\spool\samba\
	password:
Perform actions using the Security Account Manager Remote (SAMR) protocol.
Example 16.11. Listing Users on an SMB Server
~]# rpcclient server_name -U "DOMAINpass:quotes[administrator]" -c 'enumdomusers'
Enter DOMAINpass:quotes[administrator]s password:
user:[user1] rid:[0x3e8]
user:[user2] rid:[0x3e9]
If you run the command against a standalone server or a domain member, it lists the users in the local database. Running the command against an AD DC or NT4 PDC lists the domain users.
For a complete list of supported subcommands, see COMMANDS section in the rpcclient(1) man page.
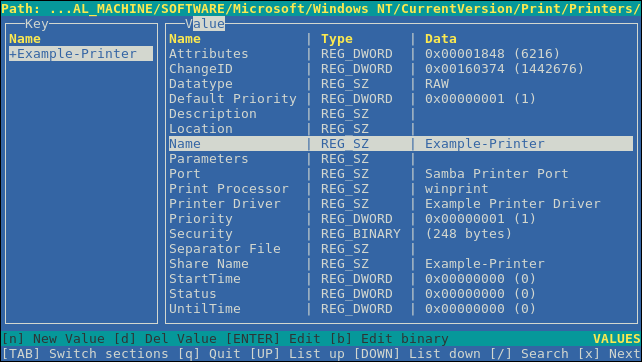
16.1.9.3. Using the samba-regedit Application
Certain settings, such as printer configurations, are stored in the registry on the Samba server. You can use the ncurses-based samba-regedit application to edit the registry of a Samba server.
To start the application, enter:
~]# samba-regeditUse the following keys:
- Cursor up and cursor down: Navigate through the registry tree and the values.
- Enter: Opens a key or edits a value.
-
Tab: Switches between the
KeyandValuepane. - Ctrl+C: Closes the application.
16.1.9.4. Using the smbcacls Utility
See Section 16.1.6.3, “Managing ACLs on an SMB Share Using smbcacls”.
16.1.9.5. Using the smbclient Utility
The smbclient utility enables you to access file shares on an SMB server, similarly to a command-line FTP client. You can use it, for example, to upload and download files to and from a share.
For example, to authenticate to the example share hosted on server using the DOMAIN\user account:
~]# smbclient -U "DOMAIN\user" //server/example
Enter domain\user's password:
Domain=[SERVER] OS=[Windows 6.1] Server=[Samba 4.6.2]
smb: \>
After smbclient connected successfully to the share, the utility enters the interactive mode and shows the following prompt:
smb: \>To display all available commands in the interactive shell, enter:
smb: \> helpTo display the help for a specific command, enter:
smb: \> help command_nameFor further details and descriptions of the commands available in the interactive shell, see the smbclient(1) man page.
16.1.9.5.1. Using smbclient in Interactive Mode
If you use smbclient without the -c parameter, the utility enters the interactive mode.
The following procedure shows how to connect to an SMB share and download a file from a subdirectory:
Downloading a File from an SMB Share Using smbclient
Connect to the share:
~]# smbclient -U "DOMAINpass:quotes[user_name]" //server_name/share_nameChange into the
/example/directory:smb: \> cd /example/List the files in the directory:
smb: \example\> ls
 .          D     0 Mon Sep 1 10:00:00 2017
 ..          D     0 Mon Sep 1 10:00:00 2017
 example.txt     N  1048576 Mon Sep 1 10:00:00 2017

     9950208 blocks of size 1024. 8247144 blocks available
Download the
example.txtfile:smb: \example\> get example.txt getting file \directory\subdirectory\example.txt of size 1048576 as example.txt (511975,0 KiloBytes/sec) (average 170666,7 KiloBytes/sec)Disconnect from the share:
smb: \example\> exit
16.1.9.5.2. Using smbclient in Scripting Mode
If you pass the -c commands parameter to smbclient, you can automatically execute the commands on the remote SMB share. This enables you to use smbclient in scripts.
The following command shows how to connect to an SMB share and download a file from a subdirectory:
~]# smbclient -U DOMAINpass:quotes[user_name] //server_name/share_name \
    -c "cd /example/ ; get example.txt ; exit"
16.1.9.6. Using the smbcontrol Utility
The smbcontrol utility enables you to send command messages to the smbd, nmbd, winbindd, or all of these services. These control messages instruct the service, for example, to reload its configuration.
Example 16.12. Reloading the Configuration of the smbd, nmbd, and winbindd Service
For example, to reload the configuration of the smbd, nmbd, winbindd, send the reload-config message-type to the all destination:
~]# smbcontrol all reload-configFor further details and a list of available command message types, see the smbcontrol(1) man page.
16.1.9.7. Using the smbpasswd Utility
The smbpasswd utility manages user accounts and passwords in the local Samba database.
If you run the command as a user, smbpasswd changes the Samba password of the user. For example:
[user@server ~]$ smbpasswd
New SMB password:
Retype new SMB password:
If you run smbpasswd as the root user, you can use the utility, for example, to:
Create a new user:
[root@server ~]# smbpasswd -a user_name New SMB password: Retype new SMB password: Added user user_name.NoteBefore you can add a user to the Samba database, you must create the account in the local operating system. See Section 4.3.1, “Adding a New User”
Enable a Samba user:
[root@server ~]# smbpasswd -e user_name
Enabled user user_name.
Disable a Samba user:
[root@server ~]# smbpasswd -x user_name
Disabled user user_name.
Delete a user:
[root@server ~]# smbpasswd -x user_name
Deleted user user_name.
For further details, see the smbpasswd(8) man page.
16.1.9.8. Using the smbstatus Utility
The smbstatus utility reports on:
-
Connections per PID of each
smbddaemon to the Samba server. This report includes the user name, primary group, SMB protocol version, encryption, and signing information. -
Connections per Samba share. This report includes the PID of the
smbddaemon, the IP of the connecting machine, the time stamp when the connection was established, encryption, and signing information. - A list of locked files. The report entries include further details, such as opportunistic lock (oplock) types
Example 16.13. Output of the smbstatus Utility
~]# smbstatus

Samba version 4.6.2
PID Username       Group        Machine              Protocol Version Encryption Signing
-----------------------------------------------------------------------------------------------------------------------------
963 DOMAIN\administrator DOMAIN\domain users client-pc (ipv4:192.0.2.1:57786) SMB3_02      -      AES-128-CMAC

Service pid Machine  Connected at         Encryption Signing:
-------------------------------------------------------------------------------
example 969 192.0.2.1 Mo Sep 1 10:00:00 2017 CEST -      AES-128-CMAC

Locked files:
Pid Uid  DenyMode  Access  R/W   Oplock   SharePath      Name   Time
------------------------------------------------------------------------------------------------------------
969 10000 DENY_WRITE 0x120089 RDONLY LEASE(RWH) /srv/samba/example file.txt Mon Sep 1 10:00:00 2017
For further details, see the smbstatus(1) man page.
16.1.9.9. Using the smbtar Utility
The smbtar utility backs up the content of an SMB share or a subdirectory of it and stores the content in a tar archive. Alternatively, you can write the content to a tape device.
For example, to back up the content of the demo directory on the //server/example/ share and store the content in the /root/example.tar archive:
~]# smbtar -s server -x example -u user_name -p password -t /root/example.tarFor further details, see the smbtar(1) man page.
16.1.9.10. Using the testparm Utility
See Section 16.1.2, “Verifying the smb.conf File by Using the testparm Utility”.
16.1.9.11. Using the wbinfo Utility
The wbinfo utility queries and returns information created and used by the winbindd service.
The winbindd service must be configured and running to use wbinfo.
You can use wbinfo, for example, to:
List domain users:
~]# wbinfo -u
AD\administrator
AD\guest
...
List domain groups:
~]# wbinfo -g
AD\domain computers
AD\domain admins
AD\domain users
...
Display the SID of a user:
~]# wbinfo --name-to-sid="AD\administrator"
S-1-5-21-1762709870-351891212-3141221786-500 SID_USER (1)
Display information about domains and trusts:
~]# wbinfo --trusted-domains --verbose
Domain Name  DNS Domain      Trust Type Transitive In  Out
BUILTIN               None    Yes     Yes Yes
server               None    Yes     Yes Yes
DOMAIN1    domain1.example.com  None    Yes     Yes Yes
DOMAIN2    domain2.example.com  External  No     Yes Yes
For further details, see the wbinfo(1) man page.
16.1.10. Additional Resources
The Red Hat Samba packages include manual pages for all Samba commands and configuration files the package installs. For example, to display the man page of the
/etc/samba/smb.conffile that explains all configuration parameters you can set in this file:~]# man 5 smb.conf-
/usr/share/docs/samba-version/: Contains general documentation, example scripts, and LDAP schema files, provided by the Samba project. - Red Hat Cluster Storage Administration Guide: Provides information about setting up Samba and the Clustered Trivial Database (CDTB) to share directories stored on an GlusterFS volume.
- The An active/active Samba Server in a Red Hat High Availability Cluster chapter in the Red Hat Enterprise Linux High Availability Add-on Administration guide describes how to up a Samba high-availability installation.
- For details about mounting an SMB share on Red Hat Enterprise Linux, see the corresponding section in the Red Hat Storage Administration Guide.
16.2. FTP
The File Transfer Protocol (FTP) is one of the oldest and most commonly used protocols found on the Internet today. Its purpose is to reliably transfer files between computer hosts on a network without requiring the user to log directly in to the remote host or to have knowledge of how to use the remote system. It allows users to access files on remote systems using a standard set of simple commands.
This section outlines the basics of the FTP protocol and introduces vsftpd, which is the preferred FTP server in Red Hat Enterprise Linux.
16.2.1. The File Transfer Protocol
FTP uses a client-server architecture to transfer files using the TCP network protocol. Because FTP is a rather old protocol, it uses unencrypted user name and password authentication. For this reason, it is considered an insecure protocol and should not be used unless absolutely necessary. However, because FTP is so prevalent on the Internet, it is often required for sharing files to the public. System administrators, therefore, should be aware of FTP's unique characteristics.
This section describes how to configure vsftpd to establish connections secured by TLS and how to secure an FTP server with the help of SELinux. A good substitute for FTP is sftp from the OpenSSH suite of tools. For information about configuring OpenSSH and about the SSH protocol in general, refer to Chapter 12, OpenSSH.
Unlike most protocols used on the Internet, FTP requires multiple network ports to work properly. When an FTP client application initiates a connection to an FTP server, it opens port 21 on the server — known as the command port. This port is used to issue all commands to the server. Any data requested from the server is returned to the client via a data port. The port number for data connections, and the way in which data connections are initialized, vary depending upon whether the client requests the data in active or passive mode.
The following defines these modes:
- active mode
-
Active mode is the original method used by the
FTPprotocol for transferring data to the client application. When an active-mode data transfer is initiated by theFTPclient, the server opens a connection from port 20 on the server to theIPaddress and a random, unprivileged port (greater than 1024) specified by the client. This arrangement means that the client machine must be allowed to accept connections over any port above 1024. With the growth of insecure networks, such as the Internet, the use of firewalls for protecting client machines is now prevalent. Because these client-side firewalls often deny incoming connections from active-modeFTPservers, passive mode was devised. - passive mode
Passive mode, like active mode, is initiated by the
FTPclient application. When requesting data from the server, theFTPclient indicates it wants to access the data in passive mode and the server provides theIPaddress and a random, unprivileged port (greater than 1024) on the server. The client then connects to that port on the server to download the requested information.While passive mode does resolve issues for client-side firewall interference with data connections, it can complicate administration of the server-side firewall. You can reduce the number of open ports on a server by limiting the range of unprivileged ports on the
FTPserver. This also simplifies the process of configuring firewall rules for the server.
16.2.2. The vsftpd Server
The Very Secure FTP Daemon (vsftpd) is designed from the ground up to be fast, stable, and, most importantly, secure. vsftpd is the only stand-alone FTP server distributed with Red Hat Enterprise Linux, due to its ability to handle large numbers of connections efficiently and securely.
The security model used by vsftpd has three primary aspects:
- Strong separation of privileged and non-privileged processes — Separate processes handle different tasks, and each of these processes runs with the minimal privileges required for the task.
-
Tasks requiring elevated privileges are handled by processes with the minimal privilege necessary — By taking advantage of compatibilities found in the
libcaplibrary, tasks that usually require full root privileges can be executed more safely from a less privileged process. -
Most processes run in a
chrootjail — Whenever possible, processes are change-rooted to the directory being shared; this directory is then considered achrootjail. For example, if the/var/ftp/directory is the primary shared directory,vsftpdreassigns/var/ftp/to the new root directory, known as/. This disallows any potential malicious hacker activities for any directories not contained in the new root directory.
Use of these security practices has the following effect on how vsftpd deals with requests:
-
The parent process runs with the least privileges required — The parent process dynamically calculates the level of privileges it requires to minimize the level of risk. Child processes handle direct interaction with the
FTPclients and run with as close to no privileges as possible. -
All operations requiring elevated privileges are handled by a small parent process — Much like the Apache
HTTPServer,vsftpdlaunches unprivileged child processes to handle incoming connections. This allows the privileged, parent process to be as small as possible and handle relatively few tasks. - All requests from unprivileged child processes are distrusted by the parent process — Communication with child processes is received over a socket, and the validity of any information from child processes is checked before being acted on.
-
Most interactions with
FTPclients are handled by unprivileged child processes in achrootjail — Because these child processes are unprivileged and only have access to the directory being shared, any crashed processes only allow the attacker access to the shared files.
16.2.2.1. Starting and Stopping vsftpd
To start the vsftpd service in the current session, type the following at a shell prompt as root:
~]# systemctl start vsftpd.service
To stop the service in the current session, type as root:
~]# systemctl stop vsftpd.service
To restart the vsftpd service, run the following command as root:
~]# systemctl restart vsftpd.service
This command stops and immediately starts the vsftpd service, which is the most efficient way to make configuration changes take effect after editing the configuration file for this FTP server. Alternatively, you can use the following command to restart the vsftpd service only if it is already running:
~]# systemctl try-restart vsftpd.service
By default, the vsftpd service does not start automatically at boot time. To configure the vsftpd service to start at boot time, type the following at a shell prompt as root:
~]# systemctl enable vsftpd.service
Created symlink from /etc/systemd/system/multi-user.target.wants/vsftpd.service to /usr/lib/systemd/system/vsftpd.service.
For more information on how to manage system services in Red Hat Enterprise Linux 7, see Chapter 10, Managing Services with systemd.
16.2.2.2. Starting Multiple Copies of vsftpd
Sometimes, one computer is used to serve multiple FTP domains. This is a technique called multihoming. One way to multihome using vsftpd is by running multiple copies of the daemon, each with its own configuration file.
To do this, first assign all relevant IP addresses to network devices or alias network devices on the system. For more information about configuring network devices, device aliases, and additional information about network configuration scripts, see the Red Hat Enterprise Linux 7 Networking Guide.
Next, the DNS server for the FTP domains must be configured to reference the correct machine. For information about BIND, the DNS protocol implementation used in Red Hat Enterprise Linux, and its configuration files, see the Red Hat Enterprise Linux 7 Networking Guide.
For vsftpd to answer requests on different IP addresses, multiple copies of the daemon must be running. To facilitate launching multiple instances of the vsftpd daemon, a special systemd service unit (vsftpd@.service) for launching vsftpd as an instantiated service is supplied in the vsftpd package.
In order to make use of this service unit, a separate vsftpd configuration file for each required instance of the FTP server must be created and placed in the /etc/vsftpd/ directory. Note that each of these configuration files must have a unique name (such as /etc/vsftpd/vsftpd-site-2.conf) and must be readable and writable only by the root user.
Within each configuration file for each FTP server listening on an IPv4 network, the following directive must be unique:
listen_address=N.N.N.N
Replace N.N.N.N with a unique IP address for the FTP site being served. If the site is using IPv6, use the listen_address6 directive instead.
Once there are multiple configuration files present in the /etc/vsftpd/ directory, individual instances of the vsftpd daemon can be started by executing the following command as root:
~]# systemctl start vsftpd@configuration-file-name.service
In the above command, replace configuration-file-name with the unique name of the requested server’s configuration file, such as vsftpd-site-2. Note that the configuration file’s .conf extension should not be included in the command.
If you want to start several instances of the vsftpd daemon at once, you can make use of a systemd target unit file (vsftpd.target), which is supplied in the vsftpd package. This systemd target causes an independent vsftpd daemon to be launched for each available vsftpd configuration file in the /etc/vsftpd/ directory. Execute the following command as root to enable the target:
~]# systemctl enable vsftpd.target
Created symlink from /etc/systemd/system/multi-user.target.wants/vsftpd.target to /usr/lib/systemd/system/vsftpd.target.
The above command configures the systemd service manager to launch the vsftpd service (along with the configured vsftpd server instances) at boot time. To start the service immediately, without rebooting the system, execute the following command as root:
~]# systemctl start vsftpd.targetSee Section 10.3, “Working with systemd Targets” for more information on how to use systemd targets to manage services.
Other directives to consider altering on a per-server basis are:
-
anon_root -
local_root -
vsftpd_log_file -
xferlog_file
16.2.2.3. Encrypting vsftpd Connections Using TLS
In order to counter the inherently insecure nature of FTP, which transmits user names, passwords, and data without encryption by default, the vsftpd daemon can be configured to utilize the TLS protocol to authenticate connections and encrypt all transfers. Note that an FTP client that supports TLS is needed to communicate with vsftpd with TLS enabled.
SSL (Secure Sockets Layer) is the name of an older implementation of the security protocol. The new versions are called TLS (Transport Layer Security). Only the newer versions (TLS) should be used as SSL suffers from serious security vulnerabilities. The documentation included with the vsftpd server, as well as the configuration directives used in the vsftpd.conf file, use the SSL name when referring to security-related matters, but TLS is supported and used by default when the ssl_enable directive is set to YES.
Set the ssl_enable configuration directive in the vsftpd.conf file to YES to turn on TLS support. The default settings of other TLS-related directives that become automatically active when the ssl_enable option is enabled provide for a reasonably well-configured TLS set up. This includes, among other things, the requirement to only use the TLS v1 protocol for all connections (the use of the insecure SSL protocol versions is disabled by default) or forcing all non-anonymous logins to use TLS for sending passwords and data transfers.
Example 16.14. Configuring vsftpd to Use TLS
In this example, the configuration directives explicitly disable the older SSL versions of the security protocol in the vsftpd.conf file:
ssl_enable=YES
ssl_tlsv1=YES
ssl_sslv2=NO
ssl_sslv3=NO
Restart the vsftpd service after you modify its configuration:
~]# systemctl restart vsftpd.service
See the vsftpd.conf(5) manual page for other TLS-related configuration directives for fine-tuning the use of TLS by vsftpd.
16.2.2.4. SELinux Policy for vsftpd
The SELinux policy governing the vsftpd daemon (as well as other ftpd processes), defines a mandatory access control, which, by default, is based on least access required. In order to allow the FTP daemon to access specific files or directories, appropriate labels need to be assigned to them.
For example, in order to be able to share files anonymously, the public_content_t label must be assigned to the files and directories to be shared. You can do this using the chcon command as root:
~]# chcon -R -t public_content_t /path/to/directory
In the above command, replace /path/to/directory with the path to the directory to which you want to assign the label. Similarly, if you want to set up a directory for uploading files, you need to assign that particular directory the public_content_rw_t label. In addition to that, the allow_ftpd_anon_write SELinux Boolean option must be set to 1. Use the setsebool command as root to do that:
~]# setsebool -P allow_ftpd_anon_write=1
If you want local users to be able to access their home directories through FTP, which is the default setting on Red Hat Enterprise Linux 7, the ftp_home_dir Boolean option needs to be set to 1. If vsftpd is to be allowed to run in standalone mode, which is also enabled by default on Red Hat Enterprise Linux 7, the ftpd_is_daemon option needs to be set to 1 as well.
See the ftpd_selinux(8) manual page for more information, including examples of other useful labels and Boolean options, on how to configure the SELinux policy pertaining to FTP. Also, see the Red Hat Enterprise Linux 7 SELinux User’s and Administrator’s Guide for more detailed information about SELinux in general.
16.2.3. Additional Resources
For more information about vsftpd, see the following resources.
16.2.3.1. Installed Documentation
-
The
/usr/share/doc/vsftpd-version-number/directory — Replace version-number with the installed version of the vsftpd package. This directory contains aREADMEfile with basic information about the software. TheTUNINGfile contains basic performance-tuning tips and theSECURITY/directory contains information about the security model employed byvsftpd. vsftpd-related manual pages — There are a number of manual pages for the daemon and the configuration files. The following lists some of the more important manual pages.- Server Applications
{blank}-
vsftpd(8) — Describes available command-line options for
vsftpd.
-
vsftpd(8) — Describes available command-line options for
- Configuration Files
{blank}-
vsftpd.conf(5) — Contains a detailed list of options available within the configuration file for
vsftpd. -
hosts_access(5) — Describes the format and options available within the
TCPwrappers configuration files:hosts.allowandhosts.deny.
-
vsftpd.conf(5) — Contains a detailed list of options available within the configuration file for
- Interaction with SELinux
{blank}-
ftpd_selinux(8) — Contains a description of the SELinux policy governing
ftpdprocesses as well as an explanation of the way SELinux labels need to be assigned and Booleans set.
-
ftpd_selinux(8) — Contains a description of the SELinux policy governing
16.2.3.2. Online Documentation
- About vsftpd and FTP in General
{blank}-
http://vsftpd.beasts.org/ — The
vsftpdproject page is a great place to locate the latest documentation and to contact the author of the software. -
http://slacksite.com/other/ftp.html — This website provides a concise explanation of the differences between active and passive-mode
FTP.
-
http://vsftpd.beasts.org/ — The
- Red Hat Enterprise Linux Documentation
{blank}-
Red Hat Enterprise Linux 7 Networking Guide — The Networking Guide for Red Hat Enterprise Linux 7 documents relevant information regarding the configuration and administration of network interfaces, networks, and network services in this system. It provides an introduction to the
hostnamectlutility and explains how to use it to view and set host names on the command line, both locally and remotely. -
Red Hat Enterprise Linux 7 SELinux User’s and Administrator’s Guide — The SELinux User’s and Administrator’s Guide for Red Hat Enterprise Linux 7 describes the basic principles of SELinux and documents in detail how to configure and use SELinux with various services such as the Apache HTTP Server, Postfix, PostgreSQL, or OpenShift. It explains how to configure SELinux access permissions for system services managed by
systemd. - Red Hat Enterprise Linux 7 Security Guide — The Security Guide for Red Hat Enterprise Linux 7 assists users and administrators in learning the processes and practices of securing their workstations and servers against local and remote intrusion, exploitation, and malicious activity. It also explains how to secure critical system services.
-
Red Hat Enterprise Linux 7 Networking Guide — The Networking Guide for Red Hat Enterprise Linux 7 documents relevant information regarding the configuration and administration of network interfaces, networks, and network services in this system. It provides an introduction to the
- Relevant RFC Documents
{blank}-
RFC 0959 — The original Request for Comments (RFC) of the
FTPprotocol from the IETF. -
RFC 1123 — The small
FTP-related section extends and clarifies RFC 0959. -
RFC 2228 —
FTPsecurity extensions. vsftpd implements the small subset needed to support TLS and SSL connections. -
RFC 2389 — Proposes
FEATandOPTScommands. -
RFC 2428 —
IPv6support.
-
RFC 0959 — The original Request for Comments (RFC) of the
16.3. Print Settings
The Print Settings tool serves for printer configuring, maintenance of printer configuration files, print spool directories and print filters, and printer classes management.
The tool is based on the Common Unix Printing System (CUPS). If you upgraded the system from a previous Red Hat Enterprise Linux version that used CUPS, the upgrade process preserved the configured printers.
The cupsd.conf man page documents configuration of a CUPS server. It includes directives for enabling SSL support. However, CUPS does not allow control of the protocol versions used. Due to the vulnerability described in Resolution for POODLE SSLv3.0 vulnerability (CVE-2014-3566) for components that do not allow SSLv3 to be disabled via configuration settings, Red Hat recommends that you do not rely on this for security. It is recommend that you use stunnel to provide a secure tunnel and disable SSLv3. For more information on using stunnel, see the Red Hat Enterprise Linux 7 Security Guide.
For ad-hoc secure connections to a remote system’s Print Settings tool, use X11 forwarding over SSH as described in Section 12.4.1, “X11 Forwarding”.
You can perform the same and additional operations on printers directly from the CUPS web application or command line. To access the application, in a web browser, go to http://localhost:631/. For CUPS manuals refer to the links on the Home tab of the web site.
16.3.1. Starting the Print Settings Configuration Tool
With the Print Settings configuration tool you can perform various operations on existing printers and set up new printers. You can also use CUPS directly (go to http://localhost:631/ to access the CUPS web application).
To start the Print Settings tool from the command line, type system-config-printer at a shell prompt. The Print Settings tool appears. Alternatively, if using the GNOME desktop, press the Super key to enter the Activities Overview, type Print Settings and then press Enter. The Print Settings tool appears. The Super key appears in a variety of guises, depending on the keyboard and other hardware, but often as either the Windows or Command key, and typically to the left of the Spacebar.
The Print Settings window depicted in Figure 16.1, “Print Settings window” appears.
Figure 16.1. Print Settings window
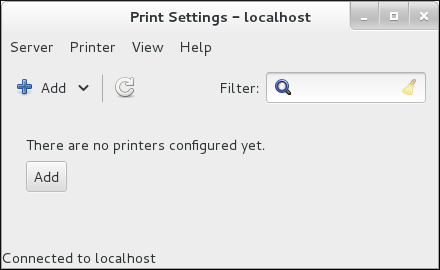
16.3.2. Starting Printer Setup
Printer setup process varies depending on the printer queue type.
If you are setting up a local printer connected with USB, the printer is discovered and added automatically. You will be prompted to confirm the packages to be installed and provide an administrator or the root user password. Local printers connected with other port types and network printers need to be set up manually.
Follow this procedure to start a manual printer setup:
- Start the Print Settings tool (refer to Section 16.3.1, “Starting the Print Settings Configuration Tool”).
-
Go to
. -
In the
Authenticatedialog box, enter an administrator orrootuser password. If this is the first time you have configured a remote printer you will be prompted to authorize an adjustment to the firewall. - Select the printer connection type and provide its details in the area on the right.
16.3.3. Adding a Local Printer
Follow this procedure to add a local printer connected with other than a serial port:
-
Open the
Addprinter dialog (refer to Section 16.3.2, “Starting Printer Setup”). -
If the device does not appear automatically, select the port to which the printer is connected in the list on the left (such as
Serial Port #1orLPT #1). On the right, enter the connection properties:
- for
Other -
URI(for example file:/dev/lp0) - for
Serial Port Baud Rate
Parity
Data Bits
Flow Control
Figure 16.2. Adding a local printer
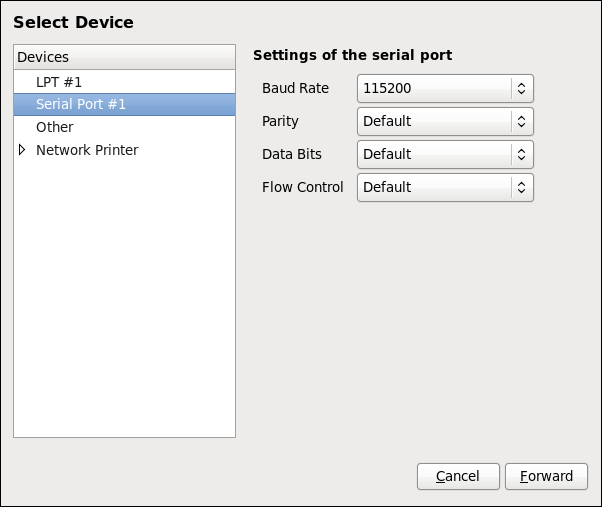
- for
- Click .
- Select the printer model. See Section 16.3.8, “Selecting the Printer Model and Finishing” for details.
16.3.4. Adding an AppSocket/HP JetDirect printer
Follow this procedure to add an AppSocket/HP JetDirect printer:
-
Open the
New Printerdialog (refer to Section 16.3.1, “Starting the Print Settings Configuration Tool”). -
In the list on the left, select
. On the right, enter the connection settings:
Hostname-
Printer host name or
IPaddress. Port NumberPrinter port listening for print jobs (
9100by default).Figure 16.3. Adding a JetDirect printer

- Click .
- Select the printer model. See Section 16.3.8, “Selecting the Printer Model and Finishing” for details.
16.3.5. Adding an IPP Printer
An IPP printer is a printer attached to a different system on the same TCP/IP network. The system this printer is attached to may either be running CUPS or simply configured to use IPP.
If a firewall is enabled on the printer server, then the firewall must be configured to allow incoming TCP connections on port 631. Note that the CUPS browsing protocol allows client machines to discover shared CUPS queues automatically. To enable this, the firewall on the client machine must be configured to allow incoming UDP packets on port 631.
Follow this procedure to add an IPP printer:
-
Open the
New Printerdialog (refer to Section 16.3.2, “Starting Printer Setup”). -
In the list of devices on the left, select Network Printer and
Internet Printing Protocol (ipp)orInternet Printing Protocol (https). On the right, enter the connection settings:
Host-
The host name of the
IPPprinter. QueueThe queue name to be given to the new queue (if the box is left empty, a name based on the device node will be used).
Figure 16.4. Adding an IPP printer
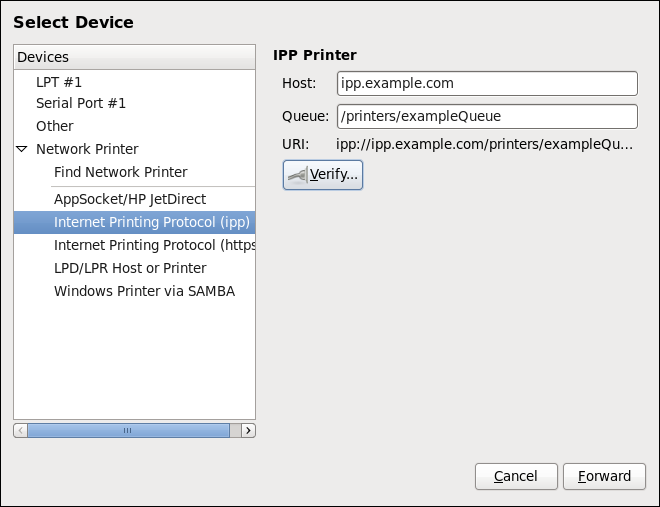
- Click to continue.
- Select the printer model. See Section 16.3.8, “Selecting the Printer Model and Finishing” for details.
16.3.6. Adding an LPD/LPR Host or Printer
Follow this procedure to add an LPD/LPR host or printer:
-
Open the
New Printerdialog (refer to Section 16.3.2, “Starting Printer Setup”). -
In the list of devices on the left, select
. On the right, enter the connection settings:
HostThe host name of the LPD/LPR printer or host.
Optionally, click to find queues on the LPD host.
QueueThe queue name to be given to the new queue (if the box is left empty, a name based on the device node will be used).
Figure 16.5. Adding an LPD/LPR printer
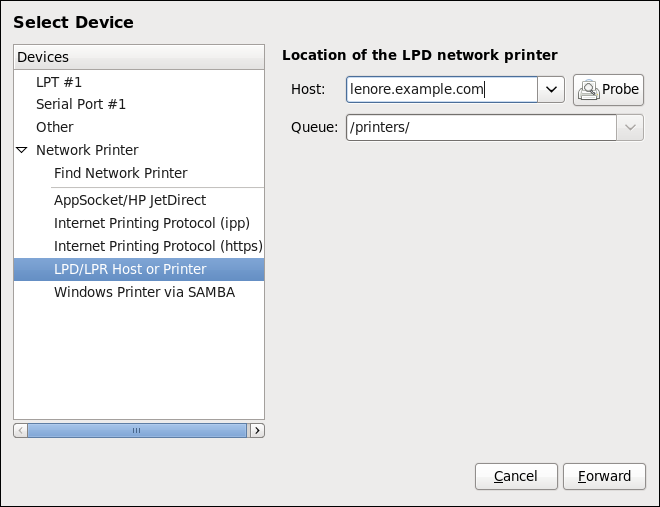
- Click to continue.
- Select the printer model. See Section 16.3.8, “Selecting the Printer Model and Finishing” for details.
16.3.7. Adding a Samba (SMB) printer
Follow this procedure to add a Samba printer:
Note that in order to add a Samba printer, you need to have the samba-client package installed. You can do so by running, as root:
yum install samba-clientFor more information on installing packages with Yum, refer to Section 9.2.4, “Installing Packages”.
-
Open the
New Printerdialog (refer to Section 16.3.2, “Starting Printer Setup”). -
In the list on the left, select
. Enter the SMB address in the
smb://field. Use the format computer name/printer share. In Figure 16.6, “Adding a SMB printer”, the computer name isdellboxand the printer share isr2.Figure 16.6. Adding a SMB printer
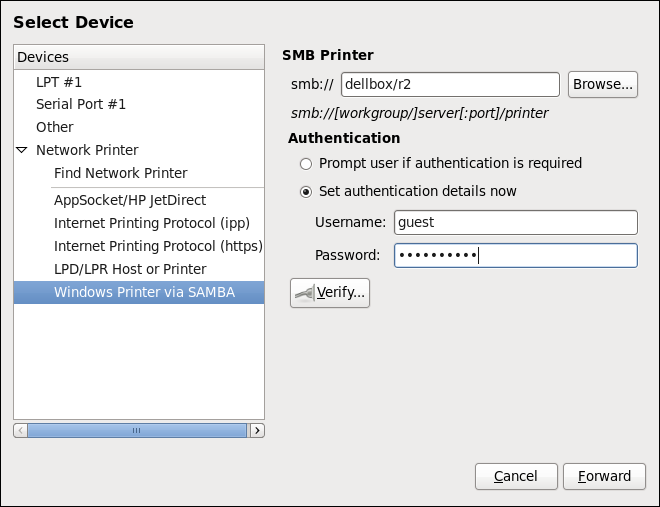
- Click to see the available workgroups/domains. To display only queues of a particular host, type in the host name (NetBios name) and click .
Select either of the options:
-
Prompt user if authentication is required: user name and password are collected from the user when printing a document. -
Set authentication details now: provide authentication information now so it is not required later. In theUsernamefield, enter the user name to access the printer. This user must exist on the SMB system, and the user must have permission to access the printer. The default user name is typicallyguestfor Windows servers, ornobodyfor Samba servers.
-
Enter the
Password(if required) for the user specified in theUsernamefield.WarningSamba printer user names and passwords are stored in the printer server as unencrypted files readable by
rootand the Linux Printing Daemon,lpd. Thus, other users that haverootaccess to the printer server can view the user name and password you use to access the Samba printer.Therefore, when you choose a user name and password to access a Samba printer, it is advisable that you choose a password that is different from what you use to access your local Red Hat Enterprise Linux system.
If there are files shared on the Samba print server, it is recommended that they also use a password different from what is used by the print queue.
- Click to test the connection. Upon successful verification, a dialog box appears confirming printer share accessibility.
- Click .
- Select the printer model. See Section 16.3.8, “Selecting the Printer Model and Finishing” for details.
16.3.8. Selecting the Printer Model and Finishing
Once you have properly selected a printer connection type, the system attempts to acquire a driver. If the process fails, you can locate or search for the driver resources manually.
Follow this procedure to provide the printer driver and finish the installation:
In the window displayed after the automatic driver detection has failed, select one of the following options:
-
Select a Printer from database— the system chooses a driver based on the selected make of your printer from the list ofMakes. If your printer model is not listed, chooseGeneric. -
Provide PPD file— the system uses the provided PostScript Printer Description (PPD) file for installation. A PPD file may also be delivered with your printer as being normally provided by the manufacturer. If the PPD file is available, you can choose this option and use the browser bar below the option description to select the PPD file. Search for a printer driver to download— enter the make and model of your printer into theMake and modelfield to search on OpenPrinting.org for the appropriate packages.Figure 16.7. Selecting a printer brand
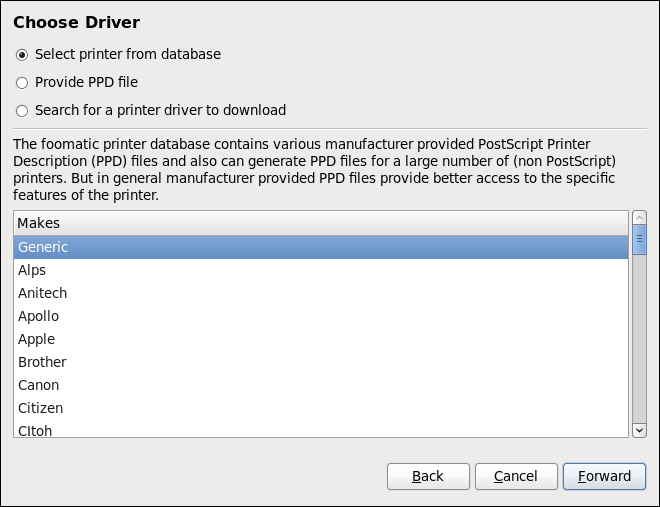
-
Depending on your previous choice provide details in the area displayed below:
-
Printer brand for the
Select printer from databaseoption. -
PPD file location for the
Provide PPD fileoption. -
Printer make and model for the
Search for a printer driver to downloadoption.
-
Printer brand for the
- Click to continue.
If applicable for your option, window shown in Figure 16.8, “Selecting a printer model” appears. Choose the corresponding model in the
Modelscolumn on the left.NoteOn the right, the recommended printer driver is automatically selected; however, you can select another available driver. The print driver processes the data that you want to print into a format the printer can understand. Since a local printer is attached directly to your computer, you need a printer driver to process the data that is sent to the printer.
Figure 16.8. Selecting a printer model
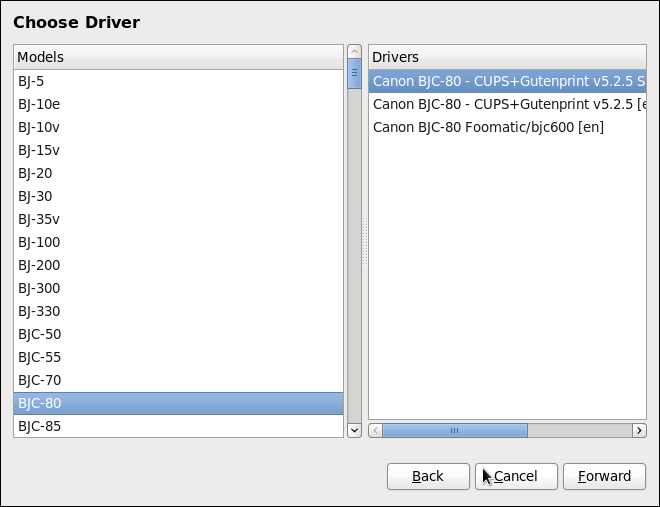
- Click .
Under the
Describe Printerenter a unique name for the printer in thePrinter Namefield. The printer name can contain letters, numbers, dashes (-), and underscores (); it _must not contain any spaces. You can also use theDescriptionandLocationfields to add further printer information. Both fields are optional, and may contain spaces.Figure 16.9. Printer setup

- Click to confirm your printer configuration and add the print queue if the settings are correct. Click to modify the printer configuration.
- After the changes are applied, a dialog box appears allowing you to print a test page. Click to print a test page now. Alternatively, you can print a test page later as described in Section 16.3.9, “Printing a Test Page”.
16.3.9. Printing a Test Page
After you have set up a printer or changed a printer configuration, print a test page to make sure the printer is functioning properly:
-
Right-click the printer in the
Printingwindow and clickProperties. -
In the Properties window, click
Settingson the left. -
On the displayed
Settingstab, click the button.
16.3.10. Modifying Existing Printers
To delete an existing printer, in the Print Settings window, select the printer and go to
To set the default printer, right-click the printer in the printer list and click the Set as Default button in the context menu.
16.3.10.1. The Settings Page
To change printer driver configuration, double-click the corresponding name in the Printer list and click the Settings label on the left to display the Settings page.
You can modify printer settings such as make and model, print a test page, change the device location (URI), and more.
Figure 16.10. Settings page

16.3.10.2. The Policies Page
Click the Policies button on the left to change settings in printer state and print output.
You can select the printer states, configure the Error Policy of the printer (you can decide to abort the print job, retry, or stop it if an error occurs).
You can also create a banner page (a page that describes aspects of the print job such as the originating printer, the user name from the which the job originated, and the security status of the document being printed): click the Starting Banner or Ending Banner drop-down menu and choose the option that best describes the nature of the print jobs (for example, confidential).
16.3.10.2.1. Sharing Printers
On the Policies page, you can mark a printer as shared: if a printer is shared, users published on the network can use it. To allow the sharing function for printers, go to Publish shared printers connected to this system.
Figure 16.11. Policies page
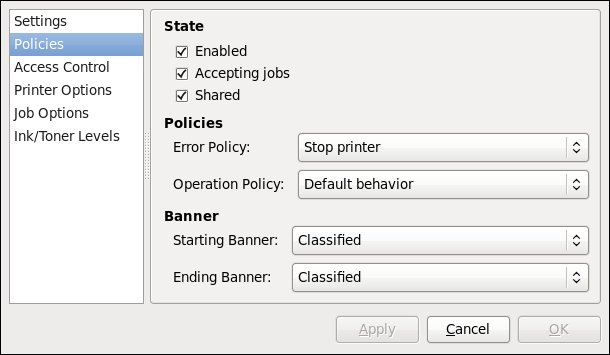
Make sure that the firewall allows incoming TCP connections to port 631, the port for the Network Printing Server (IPP) protocol. To allow IPP traffic through the firewall on Red Hat Enterprise Linux 7, make use of firewalld's IPP service. To do so, proceed as follows:
Enabling IPP Service in firewalld
To start the graphical firewall-config tool, press the Super key to enter the Activities Overview, type
firewalland then press Enter. TheFirewall Configurationwindow opens. You will be prompted for an administrator orrootpassword.Alternatively, to start the graphical firewall configuration tool using the command line, enter the following command as
rootuser:~]# firewall-configThe
Firewall Configurationwindow opens.Look for the word "Connected" in the lower left corner. This indicates that the firewall-config tool is connected to the user space daemon,
firewalld.To immediately change the current firewall settings, ensure the drop-down selection menu labeled
Configurationis set toRuntime. Alternatively, to edit the settings to be applied at the next system start, or firewall reload, selectPermanentfrom the drop-down list.-
Select the
Zonestab and then select the firewall zone to correspond with the network interface to be used. The default is thepubliczone. TheInterfacestab shows what interfaces have been assigned to a zone. -
Select the
Servicestab and then select theippservice to enable sharing. Theipp-clientservice is required for accessing network printers. - Close the firewall-config tool.
For more information on opening and closing ports in firewalld, see the Red Hat Enterprise Linux 7 Security Guide.
16.3.10.2.2. The Access Control Page
You can change user-level access to the configured printer on the Access Control page. Click the Access Control label on the left to display the page. Select either Allow printing for everyone except these users or Deny printing for everyone except these users and define the user set below: enter the user name in the text box and click the button to add the user to the user set.
Figure 16.12. Access Control page

16.3.10.2.3. The Printer Options Page
The Printer Options page contains various configuration options for the printer media and output, and its content may vary from printer to printer. It contains general printing, paper, quality, and printing size settings.
Figure 16.13. Printer Options page
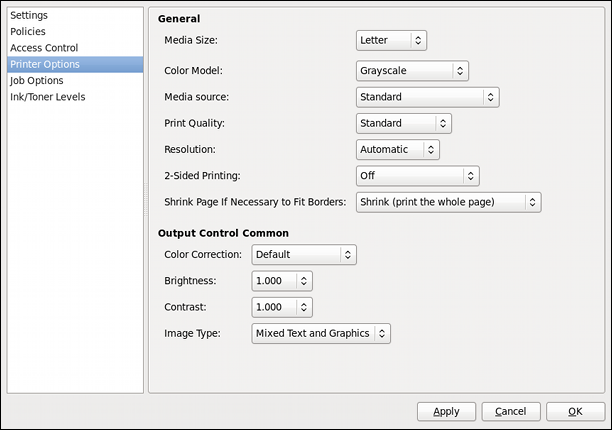
16.3.10.2.4. Job Options Page
On the Job Options page, you can detail the printer job options. Click the Job Options label on the left to display the page. Edit the default settings to apply custom job options, such as number of copies, orientation, pages per side, scaling (increase or decrease the size of the printable area, which can be used to fit an oversize print area onto a smaller physical sheet of print medium), detailed text options, and custom job options.
Figure 16.14. Job Options page
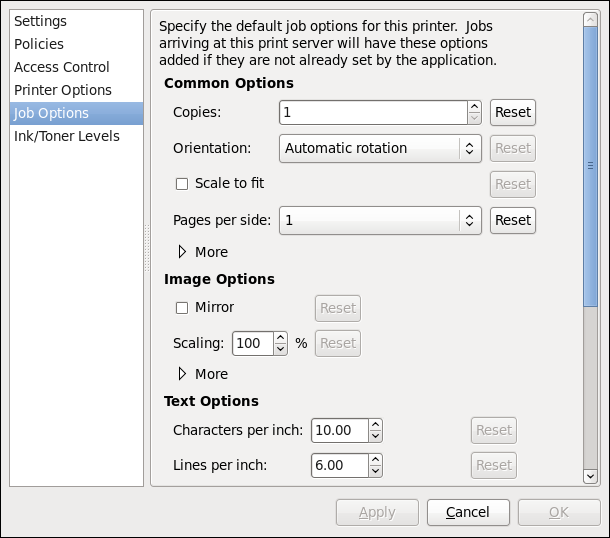
16.3.10.2.5. Ink/Toner Levels Page
The Ink/Toner Levels page contains details on toner status if available and printer status messages. Click the Ink/Toner Levels label on the left to display the page.
Figure 16.15. Ink/Toner Levels page
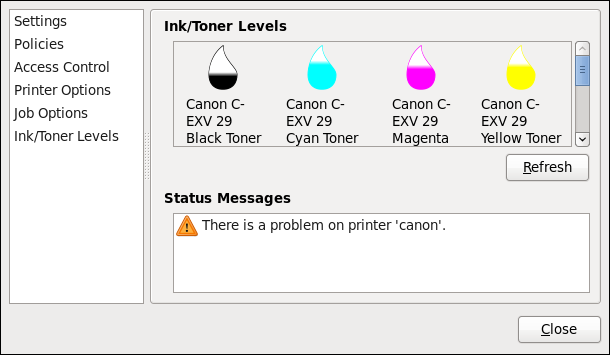
16.3.10.3. Managing Print Jobs
When you send a print job to the printer daemon, such as printing a text file from Emacs or printing an image from GIMP, the print job is added to the print spool queue. The print spool queue is a list of print jobs that have been sent to the printer and information about each print request, such as the status of the request, the job number, and more.
During the printing process, the Printer Status icon appears in the Notification Area on the panel. To check the status of a print job, click the Printer Status, which displays a window similar to Figure 16.16, “GNOME Print Status”.
Figure 16.16. GNOME Print Status
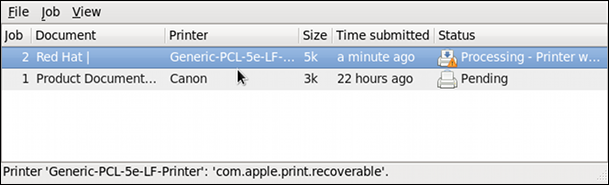
To cancel, hold, release, reprint or authenticate a print job, select the job in the GNOME Print Status and on the Job menu, click the respective command.
To view the list of print jobs in the print spool from a shell prompt, type the command lpstat -o. The last few lines look similar to the following:
Example 16.15. Example of lpstat -o output
$ lpstat -o
Charlie-60       twaugh      1024  Tue 08 Feb 2011 16:42:11 GMT
Aaron-61        twaugh      1024  Tue 08 Feb 2011 16:42:44 GMT
Ben-62         root       1024  Tue 08 Feb 2011 16:45:42 GMT
If you want to cancel a print job, find the job number of the request with the command lpstat -o and then use the command cancel job number. For example, cancel 60 would cancel the print job in Example 16.15, “Example of lpstat -o output”. You cannot cancel print jobs that were started by other users with the cancel command. However, you can enforce deletion of such job by issuing the cancel -U root job_number command. To prevent such canceling, change the printer operation policy to Authenticated to force root authentication.
You can also print a file directly from a shell prompt. For example, the command lp sample.txt prints the text file sample.txt. The print filter determines what type of file it is and converts it into a format the printer can understand.
16.3.11. Additional Resources
To learn more about printing on Red Hat Enterprise Linux, see the following resources.
Installed Documentation
-
lp(1)— The manual page for thelpcommand that allows you to print files from the command line. -
lpr(1)— The manual page for thelprcommand that allows you to print files from the command line. -
cancel(1)— The manual page for the command-line utility to remove print jobs from the print queue. -
mpage(1)— The manual page for the command-line utility to print multiple pages on one sheet of paper. -
cupsd(8)— The manual page for the CUPS printer daemon. -
cupsd.conf(5)— The manual page for the CUPS printer daemon configuration file. -
classes.conf(5)— The manual page for the class configuration file for CUPS. -
lpstat(1)— The manual page for thelpstatcommand, which displays status information about classes, jobs, and printers.
Online Documentation
- http://www.linuxprinting.org/ — The OpenPrinting group on the Linux Foundation website contains a large amount of information about printing in Linux.
- http://www.cups.org/ — The CUPS website provides documentation, FAQs, and newsgroups about CUPS.