Este contenido no está disponible en el idioma seleccionado.
Chapter 13. Setting Breakpoints
Overview
To set breakpoints, your project’s routing context .xml file must be open in the route editor’s Design tab.
The Camel debugger supports two types of breakpoints:
- Unconditional breakpoints — triggered whenever one is encountered during a debugging session
- Conditional breakpoints — triggered only when the breakpoint’s specified condition is met during a debugging session
You cannot set breakpoints on consumer endpoints or on when or otherwise nodes.
Setting unconditional breakpoints
With your routing context displayed on the canvas in the Design tab:
- Select a node whose state you want to examine during the debugging session.
-
Click its
 icon to set an unconditional breakpoint.
- Repeat these steps for each node on which you want to set an unconditional breakpoint.
Setting conditional breakpoints
With your routing context displayed on the canvas in the Design tab:
- Select a node whose state you want to examine during the debugging session.
Click its
 icon to set a conditional breakpoint and to open the Edit the condition and language of your breakpoint… dialog:
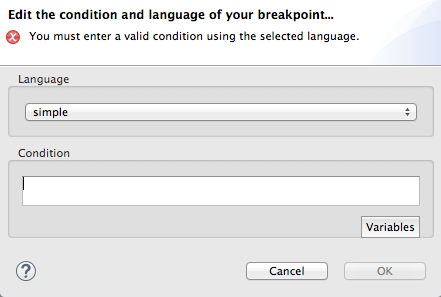
Click the Language drop-down menu and select the expression language to use to create the condition that will trigger the breakpoint.
Fuse Tooling supports twenty-four expression languages. Some of these languages provide variables for creating conditional expressions, while others do not.
Click Variables to display a list of the selected language’s supported variables.
If a list appears, select in sequence one or more of the variables to create the condition for triggering the breakpoint. The variables you select appear in the Condition text box.
If
 appears, enter the expression directly into the Condition text box.
- Repeat steps [condBpFirst] through [condBpLast] for each node on which you want to set a conditional breakpoint.
Disabling breakpoints
You can temporarily disable a breakpoint, leaving it in place, then enable it again later. The
 button skips over disabled breakpoints during debugging sessions.
To disable a breakpoint, select the node on the canvas and click its
 icon. The breakpoint turns gray, indicating that it has been disabled.
To enable a disabled breakpoint, select the node on the canvas and click its
 icon. Depending on whether the disabled breakpoint is conditional or unconditional, it turns yellow or red, respectively, to indicate that it has been re-enabled.
You can also disable and re-enable breakpoints during debugging sessions. For details, see Chapter 18, Disabling Breakpoints in a Running Context.
Deleting breakpoints
You can delete individual breakpoints or all breakpoints.
-
To delete individual breakpoints — in a route container, select the node whose breakpoint you want to delete, and click its
 icon.
icon.
-
To delete all breakpoints in a particular route — right-click the target route’s container, and select
-
To delete all breakpoints in all routes — right-click the canvas, and select