Ce contenu n'est pas disponible dans la langue sélectionnée.
10.2. Creating the RAID Devices and Mount Points
Once you have all of your partitions created as software RAID partitions, the following steps create the RAID device and mount point:
- Select the button on the Disk Druid main partitioning screen (refer to Figure 10.5, “RAID Options”).
- Figure 10.5, “RAID Options” appears. Select Create a RAID device.
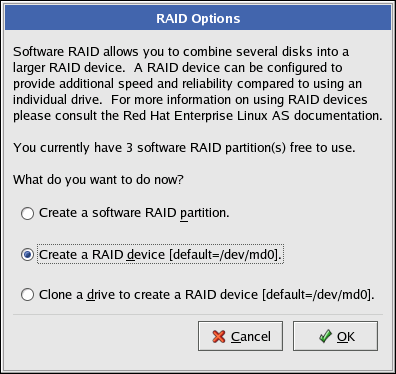
Figure 10.5. RAID Options
- Next, Figure 10.6, “Making a RAID Device and Assigning a Mount Point” appears, where you can make a RAID device and assign a mount point.
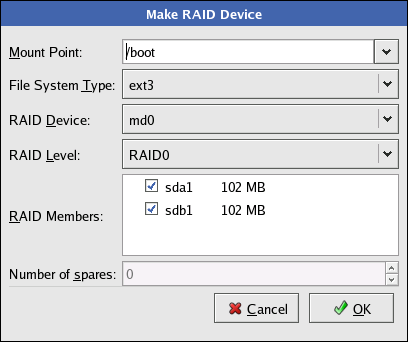
Figure 10.6. Making a RAID Device and Assigning a Mount Point
- Enter a mount point.
- Choose the file system type for the partition. At this point you can either configure a dynamic LVM file system or a traditional static ext2/ext3 file system. For more information on configuring LVM on a RAID device, select physical volume (LVM) and then refer to Chapter 8, LVM Configuration. If LVM is not required, continue on with the following instructions.
- Select a device name such as md0 for the RAID device.
- Choose your RAID level. You can choose from RAID 0, RAID 1, and RAID 5. If you need assistance in determining which RAID level to implement, refer to Chapter 9, Redundant Array of Independent Disks (RAID).
Note
If you are making a RAID partition of/boot/, you must choose RAID level 1, and it must use one of the first two drives (IDE first, SCSI second). If you are not creating a seperate RAID partition of/boot/, and you are making a RAID partition for the root file system (/), it must be RAID level 1 and must use one of the first two drives (IDE first, SCSI second).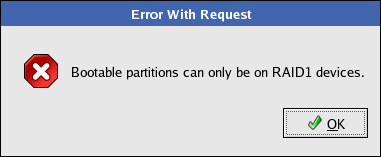
Figure 10.7. The
/boot/Mount Error - The RAID partitions created appear in the RAID Members list. Select which of these partitions should be used to create the RAID device.
- If configuring RAID 1 or RAID 5, specify the number of spare partitions. If a software RAID partition fails, the spare is automatically used as a replacement. For each spare you want to specify, you must create an additional software RAID partition (in addition to the partitions for the RAID device). Select the partitions for the RAID device and the partition(s) for the spare(s).
- After clicking , the RAID device appears in the Drive Summary list.
- Repeat this chapter's entire process for configuring additional partitions, devices, and mount points, such as the root partition (
/),/home/, or swap.
After completing the entire configuration, the figure as shown in Figure 10.8, “Final Sample RAID Configuration” resembles the default configuration, except for the use of RAID.

Figure 10.8. Final Sample RAID Configuration
The figure as shown in Figure 10.9, “Final Sample RAID With LVM Configuration” is an example of a RAID and LVM configuration.

Figure 10.9. Final Sample RAID With LVM Configuration
You can continue with your installation process. Refer to the Installation Guide for further instructions.