Ce contenu n'est pas disponible dans la langue sélectionnée.
13.2. Using Storage Pools
virsh commands and the Virtual Machine Manager.
13.2.1. Storage Pool Concepts
- Local storage pools
- Local storage pools are attached directly to the host server. They include local directories, directly attached disks, physical partitions, and Logical Volume Management (LVM) volume groups on local devices. Local storage pools are useful for development, testing, and small deployments that do not require migration or large numbers of virtual machines. Local storage pools may not be suitable for many production environments, because they cannot be used for live migration.
- Networked (shared) storage pools
- Networked storage pools include storage devices shared over a network using standard protocols. Networked storage is required when migrating virtual machines between hosts with virt-manager, but is optional when migrating with
virsh.For more information on migrating virtual machines, see Chapter 15, KVM Migration.
- Directory-based storage pools
- Disk-based storage pools
- Partition-based storage pools
- GlusterFS storage pools
- iSCSI-based storage pools
- LVM-based storage pools
- NFS-based storage pools
- vHBA-based storage pools with SCSI devices
libvirt storage pool types that are not supported by Red Hat Enterprise Linux:
- Multipath-based storage pool
- RBD-based storage pool
- Sheepdog-based storage pool
- Vstorage-based storage pool
- ZFS-based storage pool
Note
13.2.2. Creating Storage Pools
virsh and the Virtual Machine Manager. Using virsh enables you to specify all parameters, whereas using Virtual Machine Manager provides a graphic method for creating simpler storage pools.
13.2.2.1. Creating Storage Pools with virsh
Note
Procedure 13.2. Creating Storage Pools with virsh
Read recommendations and ensure that all prerequisites are met
For some storage pools, this guide recommends that you follow certain practices. In addition, there are prerequisites for some types of storage pools. To see the recommendations and prerequisites, if any, see Section 13.2.3, “Storage Pool Specifics”.Define the storage pool
Storage pools can be persistent or transient. A persistent storage pool survives a system restart of the host machine. A transient storage pool only exists until the host reboots.Do one of the following:- Define the storage pool using an XML file.a. Create a temporary XML file containing the storage pool information required for the new device.The XML file must contain specific fields, based on the storage pool type. For more information, see Section 13.2.3, “Storage Pool Specifics”.The following shows an example a storage pool definition XML file. In this example, the file is saved to
~/guest_images.xml<pool type='fs'> <name>guest_images_fs</name> <source> <device path='/dev/sdc1'/> </source> <target> <path>/guest_images</path> </target> </pool>b. Use thevirsh pool-definecommand to create a persistent storage pool or thevirsh pool-createcommand to create and start a transient storage pool.# virsh pool-define ~/guest_images.xml Pool defined from guest_images_fsor# virsh pool-create ~/guest_images.xml Pool created from guest_images_fsc. Delete the XML file created in step a. - Use the
virsh pool-define-ascommand to create a persistent storage pool or thevirsh pool-create-ascommand to create a transient storage pool.The following examples create a persistent and then a transient filesystem-based storage pool mapped to/dev/sdc1from the/guest_imagesdirectory.# virsh pool-define-as guest_images_fs fs - - /dev/sdc1 - "/guest_images" Pool guest_images_fs definedor# virsh pool-create-as guest_images_fs fs - - /dev/sdc1 - "/guest_images" Pool guest_images_fs createdNote
When using thevirshinterface, option names in the commands are optional. If option names are not used, use dashes for fields that do not need to be specified.
Verify that the pool was created
List all existing storage pools using thevirsh pool-list --all.# virsh pool-list --all Name State Autostart ----------------------------------------- default active yes guest_images_fs inactive noDefine the storage pool target path
Use thevirsh pool-buildcommand to create a storage pool target path for a pre-formatted file system storage pool, initialize the storage source device, and define the format of the data. Then use thevirsh pool-listcommand to ensure that the storage pool is listed.# virsh pool-build guest_images_fs Pool guest_images_fs built # ls -la /guest_images total 8 drwx------. 2 root root 4096 May 31 19:38 . dr-xr-xr-x. 25 root root 4096 May 31 19:38 .. # virsh pool-list --all Name State Autostart ----------------------------------------- default active yes guest_images_fs inactive noNote
Building the target path is only necessary for disk-based, file system-based, and logical storage pools. If libvirt detects that the source storage device's data format differs from the selected storage pool type, the build fails, unless theoverwriteoption is specified.Start the storage pool
Use thevirsh pool-startcommand to prepare the source device for usage.The action taken depends on the storage pool type. For example, for a file system-based storage pool, thevirsh pool-startcommand mounts the file system. For an LVM-based storage pool, thevirsh pool-startcommand activates the volume group usng thevgchangecommand.Then use thevirsh pool-list commandto ensure that the storage pool is active.# virsh pool-start guest_images_fs Pool guest_images_fs started # virsh pool-list --all Name State Autostart ----------------------------------------- default active yes guest_images_fs active noNote
Thevirsh pool-startcommand is only necessary for persistent storage pools. Transient storage pools are automatically started when they are created.Turn on autostart (optional)
By default, a storage pool defined withvirshis not set to automatically start each timelibvirtdstarts. You can configure the storage pool to start automatically using thevirsh pool-autostartcommand.# virsh pool-autostart guest_images_fs Pool guest_images_fs marked as autostarted # virsh pool-list --all Name State Autostart ----------------------------------------- default active yes guest_images_fs active yesThe storage pool is now automatically started each timelibvirtdstarts.Verify the storage pool
Verify that the storage pool was created correctly, the sizes reported are as expected, and the state is reported asrunning. Verify there is a "lost+found" directory in the target path on the file system, indicating that the device is mounted.# virsh pool-info guest_images_fs Name: guest_images_fs UUID: c7466869-e82a-a66c-2187-dc9d6f0877d0 State: running Persistent: yes Autostart: yes Capacity: 458.39 GB Allocation: 197.91 MB Available: 458.20 GB # mount | grep /guest_images /dev/sdc1 on /guest_images type ext4 (rw) # ls -la /guest_images total 24 drwxr-xr-x. 3 root root 4096 May 31 19:47 . dr-xr-xr-x. 25 root root 4096 May 31 19:38 .. drwx------. 2 root root 16384 May 31 14:18 lost+found
13.2.2.2. Creating storage pools with Virtual Machine Manager
Note
Procedure 13.3. Creating Storage Pools with Virtual Machine Manager
Prepare the medium on which the storage pool will be created
This will differ for different types of storage pools. For details, see Section 13.2.3, “Storage Pool Specifics”.In this example, you may need to relabel the disk with a GUID Partition Table.Open the storage settings
- In Virtual Machine Manager, select the host connection you want to configure.Open the Edit menu and select Connection Details.
- Click the Storage tab in the Connection Details window.
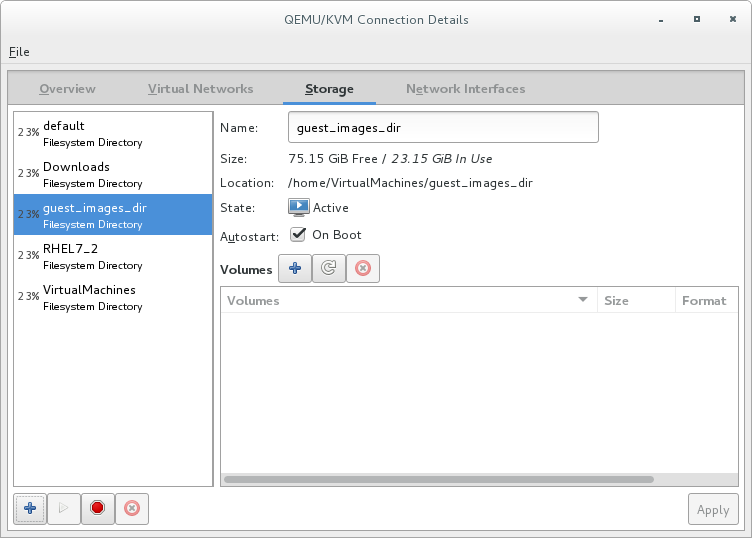
Figure 13.1. Storage tab
Create a new storage pool
Note
Using Virtual Machine Manager, you can only create persistent storage pools. Transient storage pools can only be created usingvirsh.Add a new storage pool (part 1)
Click the button at the bottom of the window. The Add a New Storage Pool wizard appears.
Enter a for the storage pool. This example uses the name guest_images_fs.Select a storage pool type to create from the drop-down list. This example uses
button at the bottom of the window. The Add a New Storage Pool wizard appears.
Enter a for the storage pool. This example uses the name guest_images_fs.Select a storage pool type to create from the drop-down list. This example usesfs: Pre-Formatted Block Device.
Figure 13.2. Storage pool name and type
Click the button to continue.Add a new pool (part 2)
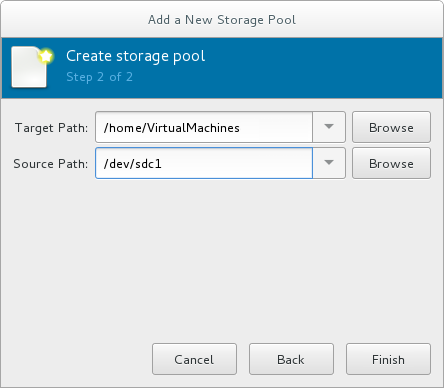
Figure 13.3. Storage pool path
Configure the storage pool with the relevant parameters. For information on the parameters for each type of storage pool, see Section 13.2.3, “Storage Pool Specifics”.For some types of storage pools, a Build Pool check box appears in the dialog. If you want to build the storage pool from the storage, check the Build Pool check box.Verify the details and click the button to create the storage pool.
13.2.3. Storage Pool Specifics
13.2.3.1. Directory-based storage pools
Parameters
virsh pool-define-as command, and the Virtual Machine Manager application, for creating a directory-based storage pool.
| Description | XML | pool-define-as | Virtual Machine Manager |
|---|---|---|---|
| The type of storage pool | <pool type='dir'> | [type] directory | dir: Filesystem Directory |
| The name of the storage pool | <name>name</name> | [name] name | Name |
| The path specifying the target. This will be the path used for the storage pool. |
<target> | target path_to_pool | Target Path |
virsh to create the storage pool, continue by verifying that the pool was created.
Examples
/guest_images directory:
<pool type='dir'>
  <name>dirpool</name>
  <target>
    <path>/guest_images</path>
  </target>
</pool> /guest_images directory:
# virsh pool-define-as dirpool dir --target "/guest_images"
Pool FS_directory defined/guest_images directory:

Figure 13.4. Add a new directory-based storage pool example
13.2.3.2. Disk-based storage pools
Recommendations
- Depending on the version of libvirt being used, dedicating a disk to a storage pool may reformat and erase all data currently stored on the disk device. It is strongly recommended that you back up the data on the storage device before creating a storage pool.
- Guests should not be given write access to whole disks or block devices (for example,
/dev/sdb). Use partitions (for example,/dev/sdb1) or LVM volumes.If you pass an entire block device to the guest, the guest will likely partition it or create its own LVM groups on it. This can cause the host physical machine to detect these partitions or LVM groups and cause errors.
Prerequisites
Note
virsh pool-build command.
# parted /dev/sdb
GNU Parted 2.1
Using /dev/sdb
Welcome to GNU Parted! Type 'help' to view a list of commands.
(parted) mklabel
New disk label type? gpt
(parted) quit
Information: You may need to update /etc/fstab.
#
Parameters
virsh pool-define-as command, and the Virtual Machine Manager application, for creating a disk-based storage pool.
| Description | XML | pool-define-as | Virtual Machine Manager |
|---|---|---|---|
| The type of storage pool | <pool type='disk'> | [type] disk | disk: Physical Disk Device |
| The name of the storage pool | <name>name</name> | [name] name | Name |
| The path specifying the storage device. For example, /dev/sdb |
<source> | source-dev path_to_disk | Source Path |
| The path specifying the target. This will be the path used for the storage pool. |
<target> | target path_to_pool | Target Path |
virsh to create the storage pool, continue with defining the storage pool.
Examples
<pool type='disk'>
  <name>phy_disk</name>
  <source>
    <device path='/dev/sdb'/>
    <format type='gpt'/>
  </source>
  <target>
    <path>/dev</path>
  </target>
</pool> # virsh pool-define-as phy_disk disk --source-format=gpt --source-dev=/dev/sdb --target /dev
Pool phy_disk defined
Figure 13.5. Add a new disk-based storage pool example
13.2.3.3. Filesystem-based storage pools
Recommendations
/dev/sdb). Guests should not be given write access to whole disks or block devices. This method should only be used to assign partitions (for example, /dev/sdb1) to storage pools.
Prerequisites
Note
virsh pool-build command.
# mkfs.ext4 /dev/sdc1Parameters
virsh pool-define-as command, and the Virtual Machine Manager application, for creating a filesystem-based storage pool from a partition.
| Description | XML | pool-define-as | Virtual Machine Manager |
|---|---|---|---|
| The type of storage pool | <pool type='fs'> | [type] fs | fs: Pre-Formatted Block Device |
| The name of the storage pool | <name>name</name> | [name] name | Name |
| The path specifying the partition. For example, /dev/sdc1 |
<source> | [source] path_to_partition | Source Path |
| The filesystem type, for example ext4 |
<format type='fs_type' /> | [source format] FS-format | N/A |
| The path specifying the target. This will be the path used for the storage pool. |
<target> | [target] path_to_pool | Target Path |
virsh to create the storage pool, continue with verifying that the storage pool was created.
Examples
<pool type='fs'>
  <name>guest_images_fs</name>
  <source>
    <device path='/dev/sdc1'/>
    <format type='auto'/>
  </source>
  <target>
    <path>/guest_images</path>
  </target>
</pool> # virsh pool-define-as guest_images_fs fs --source-dev /dev/sdc1 --target /guest_images
Pool guest_images_fs defined
Figure 13.6. Add a new filesystem-based storage pool example
13.2.3.4. GlusterFS-based storage pools
Recommendations
Prerequisites
Procedure 13.4. Preparing a Gluster server
- Obtain the IP address of the Gluster server by listing its status with the following command:
# gluster volume status Status of volume: gluster-vol1 Gluster process Port Online Pid ------------------------------------------------------------------------------ Brick 222.111.222.111:/gluster-vol1 49155 Y 18634 Task Status of Volume gluster-vol1 ------------------------------------------------------------------------------ There are no active volume tasks - If not installed, install the glusterfs-fuse package.
- If not enabled, enable the virt_use_fusefs boolean. Check that it is enabled.
# setsebool virt_use_fusefs on
# getsebool virt_use_fusefs
virt_use_fusefs --> on
Parameters
virsh pool-define-as command, and the Virtual Machine Manager application, for creating a GlusterFS-based storage pool.
| Description | XML | pool-define-as | Virtual Machine Manager |
|---|---|---|---|
| The type of storage pool | <pool type='gluster'> | [type] gluster | Gluster: Gluster Filesystem |
| The name of the storage pool | <name>name</name> | [name] name | Name |
| The hostname or IP address of the Gluster server |
<source> | source-host hostname | Host Name |
| The name of the Gluster server | <name='Gluster-name' /> | source-name Gluster-name | Source Name |
| The path on the Gluster server used for the storage pool |
<dir path='Gluster-path' /> | source-path Gluster-path | Source Path |
virsh to create the storage pool, continue with verifying that the storage pool was created.
Examples
<pool type='gluster'>
  <name>Gluster_pool</name>
  <source>
    <host name='111.222.111.222'/>
    <dir path='/'/>
    <name>gluster-vol1</name>
  </source>
</pool> # pool-define-as --name Gluster_pool --type gluster --source-host 111.222.111.222 --source-name gluster-vol1 --source-path /
Pool Gluster_pool defined
Figure 13.7. Add a new GlusterFS-based storage pool example
13.2.3.5. iSCSI-based storage pools
Recommendations
Prerequisites
Procedure 13.5. Creating an iSCSI target
Install the targetcli package
# yum install targetcliLaunch the
targetclicommand set# targetcliCreate storage objects
Create three storage objects, using a storage pool.- Create a block storage object
- Navigate to the
/backstores/blockdirectory. - Run the
createcommand.# create [block-name][filepath]For example:# create block1 dev=/dev/sdb1
- Create a fileio object
- Navigate to the
/fileiodirectory. - Run the
createcommand.# create [fileio-name][image-name] [image-size]For example:# create fileio1 /foo.img 50M
- Create a ramdisk object
- Navigate to the
/ramdiskdirectory. - Run the
createcommand.# create [ramdisk-name] [ramdisk-size]For example:# create ramdisk1 1M
- Make note of the names of the disks created in this step. They will be used later.
Create an iSCSI target
- Navigate to the
/iscsidirectory. - Create the target in one of two ways:
- Run the
createcommand with no parameters.The iSCSI qualified name (IQN) is generated automatically. - Run the
createcommand specifying the IQN and the server. For example:# create iqn.2010-05.com.example.server1:iscsirhel7guest
Define the portal IP address
To export the block storage over iSCSI, the portal, LUNs, and access control lists ACLs must first be configured.The portal includes the IP address and TCP that the target monitors, and the initiators to which it connects. iSCSI uses port 3260. This port is configured by default.To connect to port 3260:- Navigate to the
/tpgdirectory. - Run the following:
# portals/ createThis command makes all available IP addresses listening to port 3260.If you want only a single IP address to listen to port 3260, add the IP address to the end of the command. For example:# portals/ create 143.22.16.33
Configure the LUNs and assign storage objects to the fabric
This step uses the storage objects created in creating storage objects.- Navigate to the
lunsdirectory for the TPG created in defining the portal IP address. For example:# iscsi>iqn.iqn.2010-05.com.example.server1:iscsirhel7guest - Assign the first LUN to the ramdisk. For example:
# create /backstores/ramdisk/ramdisk1 - Assign the second LUN to the block disk. For example:
# create /backstores/block/block1 - Assign the third LUN to the fileio disk. For example:
# create /backstores/fileio/fileio1 - List the resulting LUNs.
/iscsi/iqn.20...csirhel7guest ls

o- tgp1 ............................................................[enabled, auth]
  o- acls...................................................................[0 ACL]
  o- luns..................................................................[3 LUNs]
  | o- lun0......................................................[ramdisk/ramdisk1]
  | o- lun1...............................................[block/block1 (dev/vdb1)]
  | o- lun2................................................[fileio/file1 (foo.img)]
  o- portals.............................................................[1 Portal]
    o- IP-ADDRESS:3260.........................................................[OK]
Create ACLs for each initiator
Enable authentication when the initiator connects. You can also resrict specified LUNs to specified intiators. Targets and initiators have unique names. iSCSI initiators use IQNs.- Find the IQN of the iSCSI initiator, using the initiator name. For example:
# cat /etc/iscsi/initiator2.iscsi
InitiatorName=create iqn.2010-05.com.example.server1:iscsirhel7guest
This IQN is used to create the ACLs. - Navigate to the
aclsdirectory. - Create ACLs by doing one of the following:
- Create ACLS for all LUNs and initiators by running the
createcommand with no parameters.# create - Create an ACL for a specific LUN and initiator, run the
createcommand specifying the IQN of the iSCSI intiator. For example:# create iqn.2010-05.com.example.server1:888 - Configure the kernel target to use a single user ID and password for all initiators.
# set auth userid=user_ID
# set auth password=password
# set attribute authentication=1
# set attribute generate_node_acls=1
After completing this procedure, continue by securing the storage pool.Save the configuration
Make the configuration persistent by overwriting the previous boot settings.# saveconfigEnable the service
To apply the saved settings on the next boot, enable the service.# systemctl enable target.service
Optional procedures
Procedure 13.6. Configuring a logical volume on a RAID array
Create a RAID5 array
For information on creating a RAID5 array, see the Red Hat Enterprise Linux 7 Storage Administration Guide.Create an LVM logical volume on the RAID5 array
For information on creating an LVM logical volume on a RAID5 array, see the Red Hat Enterprise Linux 7 Logical Volume Manager Administration Guide.
Procedure 13.7. Testing discoverability
Ensure that the new iSCSI device is discoverable.
# iscsiadm --mode discovery --type sendtargets --portal server1.example.com
143.22.16.33:3260,1 iqn.2010-05.com.example.server1:iscsirhel7guest
Procedure 13.8. Testing device attachment
Attach the new iSCSI device
Attach the new device (iqn.2010-05.com.example.server1:iscsirhel7guest) to determine whether the device can be attached.# iscsiadm -d2 -m node --login scsiadm: Max file limits 1024 1024 Logging in to [iface: default, target: iqn.2010-05.com.example.server1:iscsirhel7guest, portal: 143.22.16.33,3260] Login to [iface: default, target: iqn.2010-05.com.example.server1:iscsirhel7guest, portal: 143.22.16.33,3260] successful.Detach the device
# iscsiadm -d2 -m node --logout
scsiadm: Max file limits 1024 1024

Logging out of session [sid: 2, target: iqn.2010-05.com.example.server1:iscsirhel7guest, portal: 143.22.16.33,3260
Logout of [sid: 2, target: iqn.2010-05.com.example.server1:iscsirhel7guest, portal: 143.22.16.33,3260] successful.
Procedure 13.9. Using libvirt secrets for an iSCSI storage pool
Note
virsh to secure an iSCSI storage pool. This can be configured before or after the pool is defined, but the pool must be started for the authentication settings to take effect.
Create a libvirt secret file
Create a libvirt secret file with a challenge-handshake authentication protocol (CHAP) user name. For example:<secret ephemeral='no' private='yes'> <description>Passphrase for the iSCSI example.com server</description> <usage type='iscsi'> <target>iscsirhel7secret</target> </usage> </secret>Define the secret
# virsh secret-define secret.xmlVerify the UUID
# virsh secret-list
UUID                                  Usage
--------------------------------------------------------------------------------
2d7891af-20be-4e5e-af83-190e8a922360  iscsi iscsirhel7secret
Assign a secret to the UID
Use the following commands to assign a secret to the UUID in the output of the previous step. This ensures that the CHAP username and password are in a libvirt-controlled secret list.# MYSECRET=`printf %s "password123" | base64` # virsh secret-set-value 2d7891af-20be-4e5e-af83-190e8a922360 $MYSECRETAdd an authentication entry to the storage pool
Modify the<source>entry in the storage pool's XML file usingvirsh edit, and add an<auth>element, specifyingauthentication type,username, andsecret usage.For example:<pool type='iscsi'> <name>iscsirhel7pool</name> <source> <host name='192.168.122.1'/> <device path='iqn.2010-05.com.example.server1:iscsirhel7guest'/> <auth type='chap' username='redhat'> <secret usage='iscsirhel7secret'/> </auth> </source> <target> <path>/dev/disk/by-path</path> </target> </pool>Note
The<auth>sub-element exists in different locations within the guest XML's<pool>and<disk>elements. For a<pool>,<auth>is specified within the<source>element, as this describes where to find the pool sources, since authentication is a property of some pool sources (iSCSI and RBD). For a<disk>, which is a sub-element of a domain, the authentication to the iSCSI or RBD disk is a property of the disk.In addition, the<auth>sub-element for a disk differs from that of a storage pool.<auth username='redhat'> <secret type='iscsi' usage='iscsirhel7secret'/> </auth>Activate the changes
The storage pool must be started to activate these changes.- If the storage pool has not yet been started, follow the steps in Creating Storage Pools with virsh to define and start the storage pool.
- If the pool has already been started, enter the following commands to stop and restart the storage pool:
# virsh pool-destroy iscsirhel7pool
# virsh pool-start iscsirhel7pool
Parameters
virsh pool-define-as command, and the Virtual Machine Manager application, for creating an iSCSI-based storage pool.
| Description | XML | pool-define-as | Virtual Machine Manager |
|---|---|---|---|
| The type of storage pool | <pool type='iscsi'> | [type] iscsi | iscsi: iSCSI Target |
| The name of the storage pool | <name>name</name> | [name] name | Name |
| The name of the host. |
<source> | source-host hostname | Host Name |
| The iSCSI IQN. |
device path="iSCSI_IQN" /> | source-dev iSCSI_IQN | Source IQN |
| The path specifying the target. This will be the path used for the storage pool. |
<target> | target path_to_pool | Target Path |
| (Optional) The IQN of the iSCSI initiator. This is only needed when the ACL restricts the LUN to a particular initiator. |
<initiator> | See the note below. | Initiator IQN |
Note
virsh find-storage-pool-sources-as iscsi command.
virsh to create the storage pool, continue with verifying that the storage pool was created.
Examples
<pool type='iscsi'>
  <name>iSCSI_pool</name>
  <source>
    <host name='server1.example.com'/>
    <device path='iqn.2010-05.com.example.server1:iscsirhel7guest'/>
  </source>
  <target>
    <path>/dev/disk/by-path</path>
  </target>
</pool>
# virsh pool-define-as --name iSCSI_pool --type iscsi --source-host server1.example.com --source-dev iqn.2010-05.com.example.server1:iscsirhel7guest --target /dev/disk/by-path
Pool iSCSI_pool defined
Figure 13.8. Add a new iSCSI-based storage pool example
13.2.3.6. LVM-based storage pools
Recommendations
- LVM-based storage pools do not provide the full flexibility of LVM.
- libvirt supports thin logical volumes, but does not provide the features of thin storage pools.
- LVM-based storage pools are volume groups. You can create volume groups using Logical Volume Manager commands or
virshcommands. To manage volume groups using thevirshinterface, use thevirshcommands to create volume groups.For more information about volume groups, see the Red Hat Enterprise Linux Logical Volume Manager Administration Guide. - LVM-based storage pools require a full disk partition. If activating a new partition or device with these procedures, the partition will be formatted and all data will be erased. If using the host's existing Volume Group (VG) nothing will be erased. It is recommended to back up the storage device before commencing the following procedure.For information on creating LVM volume groups, see the Red Hat Enterprise Linux Logical Volume Manager Administration Guide.
- If you create an LVM-based storage pool on an existing VG, you should not run the
pool-buildcommand.
Parameters
virsh pool-define-as command, and the Virtual Machine Manager application, for creating an LVM-based storage pool.
| Description | XML | pool-define-as | Virtual Machine Manager |
|---|---|---|---|
| The type of storage pool | <pool type='logical'> | [type] logical | logical: LVM Volume Group |
| The name of the storage pool | <name>name</name> | [name] name | Name |
| The path to the device for the storage pool |
<source> | source-dev device_path | Source Path |
| The name of the volume group | <name='VG-name' /> | source-name VG-name | Source Path |
| The virtual group format |
<format type='lvm2' /> | source-format lvm2 | N/A |
| The target path |
<target> | target target-path | Target Path |
Note
<source>
  <device path='/dev/sda1'/>
  <device path='/dev/sdb3'/>
  <device path='/dev/sdc2'/>
  ...
</source> virsh to create the storage pool, continue with verifying that the storage pool was created.
Examples
<pool type='logical'>
  <name>guest_images_lvm</name>
  <source>
    <device path='/dev/sdc'/>
    <name>libvirt_lvm</name>
    <format type='lvm2'/>
  </source>
  <target>
    <path>/dev/libvirt_lvm</path>
  </target>
</pool> # virsh pool-define-as guest_images_lvm logical --source-dev=/dev/sdc --source-name libvirt_lvm --target /dev/libvirt_lvm
Pool guest_images_lvm defined
Figure 13.9. Add a new LVM-based storage pool example
13.2.3.7. NFS-based storage pools
Prerequisites
Parameters
virsh pool-define-as command, and the Virtual Machine Manager application, for creating an NFS-based storage pool.
| Description | XML | pool-define-as | Virtual Machine Manager |
|---|---|---|---|
| The type of storage pool | <pool type='netfs'> | [type] netfs | netfs: Network Exported Directory |
| The name of the storage pool | <name>name</name> | [name] name | Name |
| The hostname of the NFS server where the mount point is located. This can be a hostname or an IP address. |
<source> | source-host host_name | Host Name |
| The directory used on the NFS server |
<dir path='source_path' /> | source-path source_path | Source Path |
| The path specifying the target. This will be the path used for the storage pool. |
<target> | target target_path | Target Path |
virsh to create the storage pool, continue with verifying that the storage pool was created.
Examples
<pool type='netfs'>
  <name>nfspool</name>
  <source>
    <host name='localhost'/>
    <dir path='/home/net_mount'/>
  </source>
  <target>
    <path>/var/lib/libvirt/images/nfspool</path>
  </target>
</pool> # virsh pool-define-as nfspool netfs --source-host localhost --source-path /home/net_mount --target /var/lib/libvirt/images/nfspool
Pool nfspool defined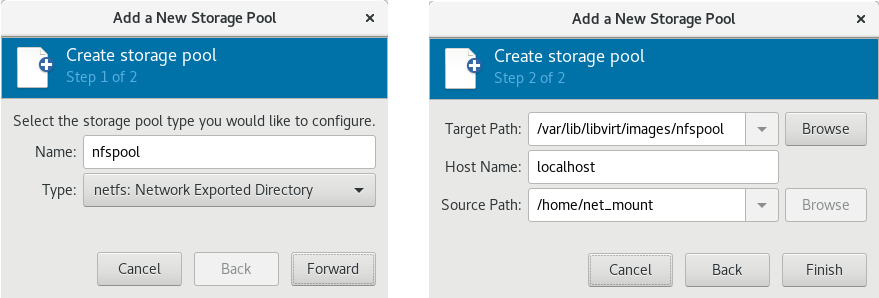
Figure 13.10. Add a new NFS-based storage pool example
13.2.3.8. vHBA-based storage pools using SCSI devices
Note
Recommendations
scsi_host# or as a WWNN/WWPN pair.
Note
scsi_host# and hardware is added to the host machine, the scsi_host# assignment may change. Therefore, it is recommended that you define a parent HBA using a WWNN/WWPN pair.
- The libvirt code can easily find the LUN's path using the virsh command output.
- Virtual machine migration requires only defining and starting a storage pool with the same vHBA name on the target machine. To do this, the vHBA LUN, libvirt storage pool and volume name must be specified in the virtual machine's XML configuration. Refer to Section 13.2.3.8, “vHBA-based storage pools using SCSI devices” for an example.
Note
'scsi' storage pool XML file using the format below. When creating a single vHBA that uses a storage pool on the same physical HBA, it is recommended to use a stable location for the <path> value, such as one of the /dev/disk/by-{path|id|uuid|label} locations on your system.
<path> field must be only /dev/, otherwise storage pool volumes are visible only to one of the vHBAs, and devices from the host cannot be exposed to multiple guests with the NPIV configuration.
Prerequisites
Procedure 13.10. Creating a vHBA
Locate HBAs on the host system
To locate the HBAs on your host system, use thevirsh nodedev-list --cap vportscommand.The following example shows a host that has two HBAs that support vHBA:# virsh nodedev-list --cap vports scsi_host3 scsi_host4Check the HBA's details
Use thevirsh nodedev-dumpxml HBA_devicecommand to see the HBA's details.# virsh nodedev-dumpxml scsi_host3The output from the command lists the<name>,<wwnn>, and<wwpn>fields, which are used to create a vHBA.<max_vports>shows the maximum number of supported vHBAs. For example:<device> <name>scsi_host3</name> <path>/sys/devices/pci0000:00/0000:00:04.0/0000:10:00.0/host3</path> <parent>pci_0000_10_00_0</parent> <capability type='scsi_host'> <host>3</host> <unique_id>0</unique_id> <capability type='fc_host'> <wwnn>20000000c9848140</wwnn> <wwpn>10000000c9848140</wwpn> <fabric_wwn>2002000573de9a81</fabric_wwn> </capability> <capability type='vport_ops'> <max_vports>127</max_vports> <vports>0</vports> </capability> </capability> </device>In this example, the<max_vports>value shows there are a total 127 virtual ports available for use in the HBA configuration. The<vports>value shows the number of virtual ports currently being used. These values update after creating a vHBA.Create a vHBA host device
Create an XML file similar to one of the following for the vHBA host. In this examples, the file is named vhba_host3.xml.This example usesscsi_host3to describe the parent vHBA.# cat vhba_host3.xml <device> <parent>scsi_host3</parent> <capability type='scsi_host'> <capability type='fc_host'> </capability> </capability> </device>This example uses a WWNN/WWPN pair to describe the parent vHBA.# cat vhba_host3.xml <device> <name>vhba</name> <parent wwnn='20000000c9848140' wwpn='10000000c9848140'/> <capability type='scsi_host'> <capability type='fc_host'> </capability> </capability> </device>Note
The WWNN and WWPN values must match those in the HBA details seen in Procedure 13.10, “Creating a vHBA”.The<parent>field specifies the HBA device to associate with this vHBA device. The details in the<device>tag are used in the next step to create a new vHBA device for the host. For more information on thenodedevXML format, see the libvirt upstream pages.Create a new vHBA on the vHBA host device
To create a vHBA on the basis of vhba_host3, use thevirsh nodedev-createcommand:# virsh nodedev-create vhba_host3.xml Node device scsi_host5 created from vhba_host3.xmlVerify the vHBA
Verify the new vHBA's details (scsi_host5) with thevirsh nodedev-dumpxmlcommand:# virsh nodedev-dumpxml scsi_host5 <device> <name>scsi_host5</name> <path>/sys/devices/pci0000:00/0000:00:04.0/0000:10:00.0/host3/vport-3:0-0/host5</path> <parent>scsi_host3</parent> <capability type='scsi_host'> <host>5</host> <unique_id>2</unique_id> <capability type='fc_host'> <wwnn>5001a4a93526d0a1</wwnn> <wwpn>5001a4ace3ee047d</wwpn> <fabric_wwn>2002000573de9a81</fabric_wwn> </capability> </capability> </device>
Parameters
virsh pool-define-as command, and the Virtual Machine Manager application, for creating a vHBA-based storage pool.
| Description | XML | pool-define-as |
|---|---|---|
| The type of storage pool | <pool type='scsi'> | scsi |
| The name of the storage pool | <name>name</name> | --adapter-name name |
The identifier of the vHBA. The parent attribute is optional. |
<source> |
[--adapter-parent parent] |
| The path specifying the target. This will be the path used for the storage pool. |
<target> | target path_to_pool |
Important
<path> field is /dev/, libvirt generates a unique short device path for the volume device path. For example, /dev/sdc. Otherwise, the physical host path is used. For example, /dev/disk/by-path/pci-0000:10:00.0-fc-0x5006016044602198-lun-0. The unique short device path allows the same volume to be listed in multiple guests by multiple storage pools. If the physical host path is used by multiple guests, duplicate device type warnings may occur.
Note
parent attribute can be used in the <adapter> field to identify the physical HBA parent from which the NPIV LUNs by varying paths can be used. This field, scsi_hostN, is combined with the vports and max_vports attributes to complete the parent identification. The parent, parent_wwnn, parent_wwpn, or parent_fabric_wwn attributes provide varying degrees of assurance that after the host reboots the same HBA is used.
- If no
parentis specified, libvirt uses the firstscsi_hostNadapter that supports NPIV. - If only the
parentis specified, problems can arise if additional SCSI host adapters are added to the configuration. - If
parent_wwnnorparent_wwpnis specified, after the host reboots the same HBA is used. - If
parent_fabric_wwnis used, after the host reboots an HBA on the same fabric is selected, regardless of thescsi_hostNused.
virsh to create the storage pool, continue with verifying that the storage pool was created.
Examples
parent attribute to identify the SCSI host device.
<pool type='scsi'>
  <name>vhbapool_host3</name>
  <source>
    <adapter type='fc_host' wwnn='5001a4a93526d0a1' wwpn='5001a4ace3ee047d'/>
  </source>
  <target>
    <path>/dev/disk/by-path</path>
  </target>
</pool>
<pool type='scsi'>
<name>vhbapool_host3</name>
<source>
<adapter type='fc_host' parent='scsi_host3' wwnn='5001a4a93526d0a1' wwpn='5001a4ace3ee047d'/>
</source>
<target>
<path>/dev/disk/by-path</path>
</target>
</pool> # virsh pool-define-as vhbapool_host3 scsi --adapter-parent scsi_host3 --adapter-wwnn 5001a4a93526d0a1 --adapter-wwpn 5001a4ace3ee047d --target /dev/disk/by-path
Pool vhbapool_host3 definedNote
virsh command does not provide a way to define the parent_wwnn, parent_wwpn, or parent_fabric_wwn attributes.
Configuring a virtual machine to use a vHBA LUN
- Create a disk volume on the virtual machine in the virtual machine's XML.
- Specify the
storage pooland thestorage volumein the<source>parameter.
<disk type='volume' device='disk'>
  <driver name='qemu' type='raw'/>
  <source pool='vhbapool_host3' volume='unit:0:4:0'/>
  <target dev='hda' bus='ide'/>
</disk>
13.2.4. Deleting Storage Pools
virsh or the Virtual Machine Manager.
13.2.4.1. Prerequisites for deleting a storage pool
13.2.4.2. Deleting storage pools using virsh
- List the defined storage pools:
# virsh pool-list --all Name State Autostart ----------------------------------------- default active yes guest_images_pool active yes - Stop the storage pool you want to delete.
# virsh pool-destroy guest_images_disk - (Optional) For some types of storage pools, you can optionally remove the directory where the storage pool resides:
# virsh pool-delete guest_images_disk - Remove the storage pool's definition.
# virsh pool-undefine guest_images_disk - Confirm the pool is undefined:
# virsh pool-list --all
Name                 State      Autostart
-----------------------------------------
default              active     yes
13.2.4.3. Deleting storage pools using Virtual Machine Manager
- Select the storage pool you want to delete in the storage pool list in the Storage tab of the Connection Details window.
- Click
 at the bottom of the Storage window. This stops the storage pool and releases any resources in use by it.
- Click
 .
.
Note
The
icon is only enabled if the storage pool is stopped.
The storage pool is deleted.