Ce contenu n'est pas disponible dans la langue sélectionnée.
10.3. Preparing to Deploy Geo-replication
This section provides an overview of geo-replication deployment scenarios, lists prerequisites, and describes how to setup the environment for geo-replication session.
10.3.1. Exploring Geo-replication Deployment Scenarios
Copier lienLien copié sur presse-papiers!
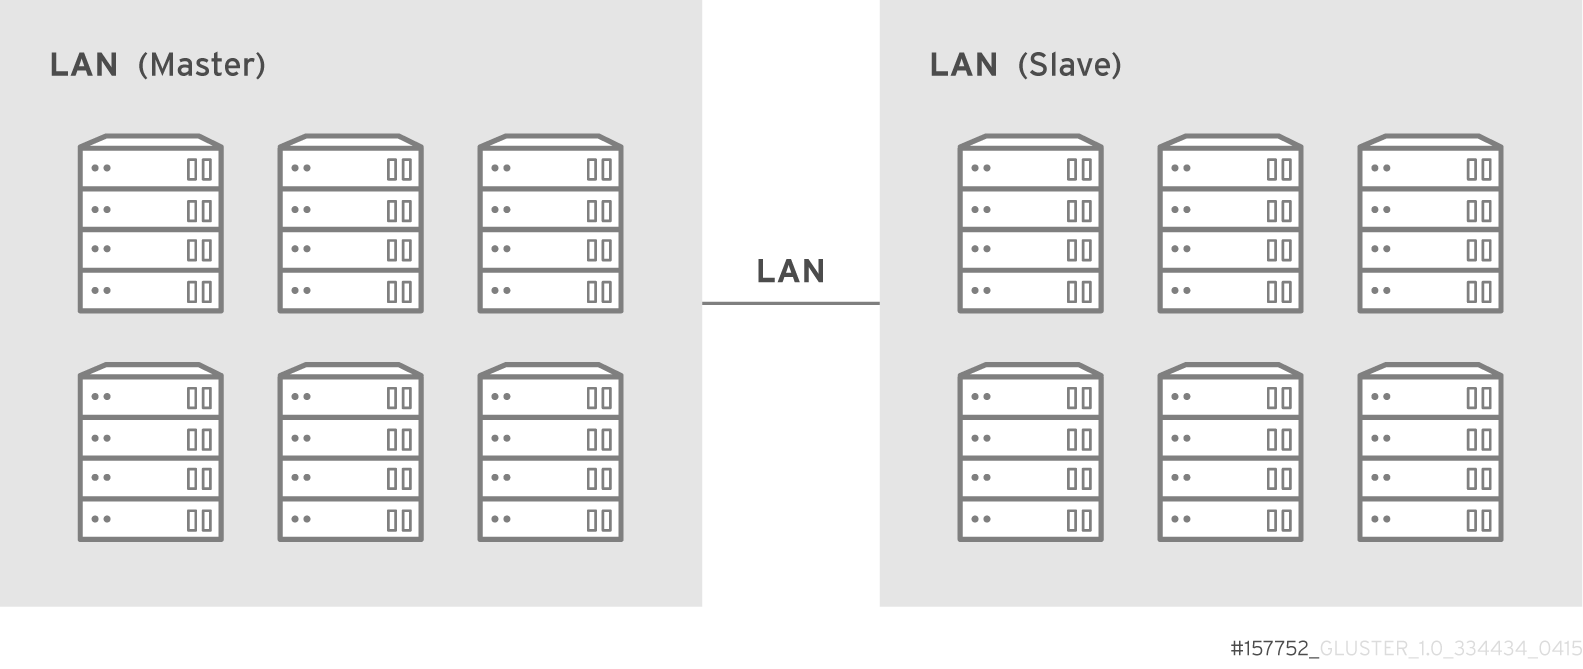
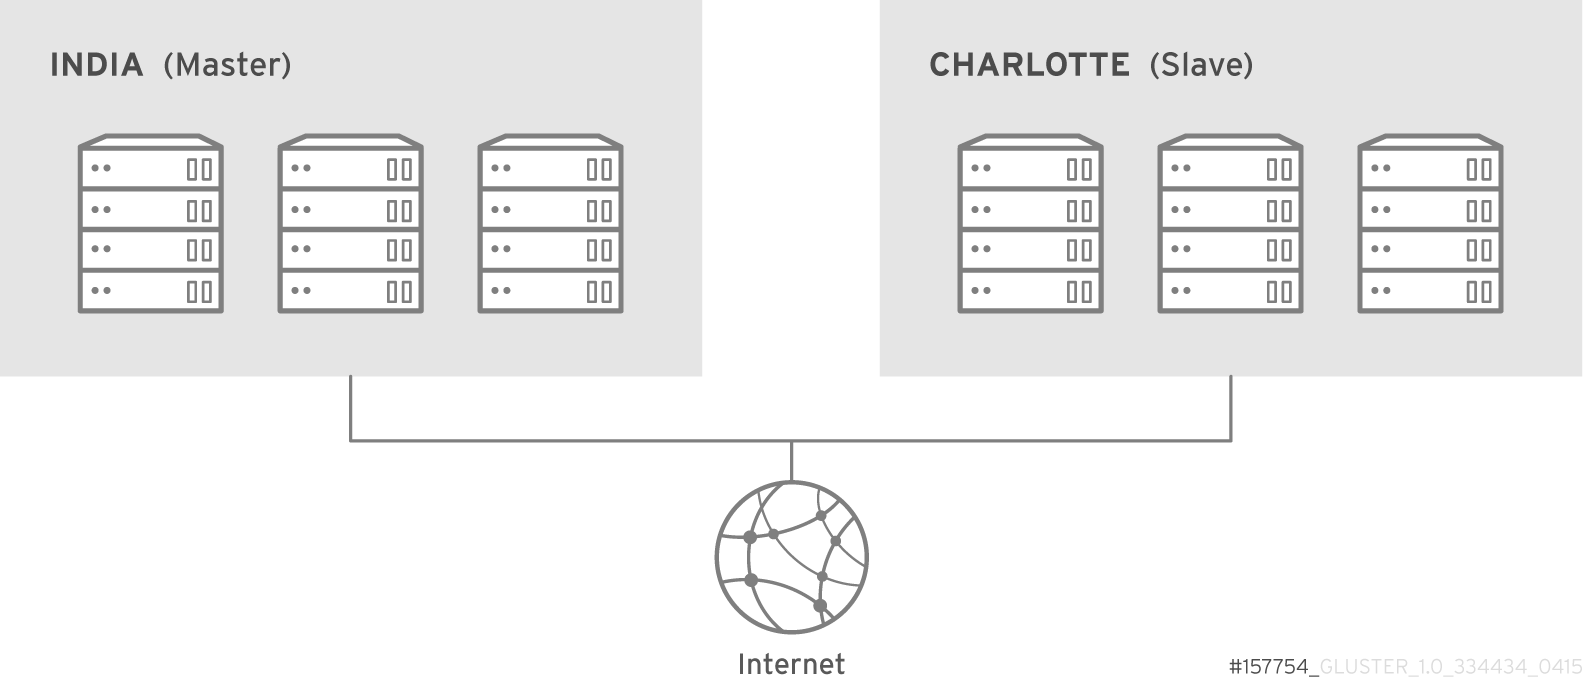
Geo-replication provides an incremental replication service over Local Area Networks (LANs), Wide Area Network (WANs), and the Internet. This section illustrates the most common deployment scenarios for geo-replication, including the following:
- Geo-replication over LAN
- Geo-replication over WAN
- Geo-replication over the Internet
- Multi-site cascading geo-replication
Geo-replication over LAN
Geo-replication over WAN

Geo-replication over Internet
Multi-site cascading Geo-replication

10.3.2. Geo-replication Deployment Overview
Copier lienLien copié sur presse-papiers!
Deploying geo-replication involves the following steps:
- Verify that your environment matches the minimum system requirements. See Section 10.3.3, “Prerequisites”.
- Determine the appropriate deployment scenario. See Section 10.3.1, “Exploring Geo-replication Deployment Scenarios”.
- Start geo-replication on the master and slave systems. See Section 10.4, “Starting Geo-replication”.
10.3.3. Prerequisites
Copier lienLien copié sur presse-papiers!
The following are prerequisites for deploying geo-replication:
Note that these prerequisites only need to be carried out once from one cluster to another cluster, so if you are syncing multiple volumes from the same master cluster to the same slave cluster, you need only perform these prerequisites once.
- The master and slave volumes must use the same version of Red Hat Gluster Storage.
- Nodes in the slave volume must not be part of the master volume. Two separate trusted storage pools are required.
- Disable the
performance.quick-readoption in the slave volume using the following command:[slave ~]# gluster volume set slavevol performance.quick-read off - Time must be synchronized between all master and slave nodes before geo-replication is configured. Red Hat recommends setting up a network time protocol service to keep time synchronized between bricks and servers, and avoid out-of-time synchronization errors.See Network Time Protocol Setup for more information.
- Add the required port for geo-replication from the ports listed in the Section 3.1.2, “Port Access Requirements”.
- Key-based SSH authentication without a password is required between one node of the master volume (the node from which the
geo-replication createcommand will be executed), and one node of the slave volume (the node whose IP/hostname will be mentioned in the slave name when running thegeo-replication createcommand).Create the public and private keys usingssh-keygen(without passphrase) on the master node:# ssh-keygenCopy the public key to the slave node using the following command:# ssh-copy-id -i identity_file root@slave_node_IPaddress/HostnameIf you are setting up a non-root geo-replicaton session, then copy the public key to the respectiveuserlocation.Note
- Key-based SSH authentication without a password is only required from the master node to the slave node; the slave node does not need this level of access. - ssh-copy-idcommand does not work ifssh authorized_keysfile is configured in the custom location. You must copy the contents of.ssh/id_rsa.pubfile from the Master and paste it to authorized_keys file in the custom location on the Slave node.Gsyncd also requires key-based SSH authentication without a password between every node in the master cluster to every node in the slave cluster. Thegluster system:: execute gsec_createcommand createssecret-pemfiles on all the nodes in the master, and is used to implement the SSH authentication connection. Thepush-pemoption in thegeo-replication createcommand pushes these keys to all slave nodes.For more information on thegluster system::execute gsec_createandpush-pemcommands, see Section 10.3.4.1, “Setting Up your Environment for Geo-replication Session”.
10.3.4. Setting Up your Environment
Copier lienLien copié sur presse-papiers!
You can set up your environment for a geo-replication session in the following ways:
- Section 10.3.4.1, “Setting Up your Environment for Geo-replication Session” - In this method, the slave mount is owned by the root user.
- Section 10.3.4.2, “Setting Up your Environment for a Secure Geo-replication Slave” - This method is more secure as the slave mount is owned by a normal user.
10.3.4.1. Setting Up your Environment for Geo-replication Session
Copier lienLien copié sur presse-papiers!
Creating Geo-replication Sessions
- To create a common
pem pubfile, run the following command on the master node where the key-based SSH authentication connection is configured:# gluster system:: execute gsec_create - Create the geo-replication session using the following command. The
push-pemoption is needed to perform the necessarypem-filesetup on the slave nodes.# gluster volume geo-replication MASTER_VOL SLAVE_HOST::SLAVE_VOL create push-pem [force]For example:# gluster volume geo-replication Volume1 storage.backup.com::slave-vol create push-pemNote
- There must be key-based SSH authentication access between the node from which this command is run, and the slave host specified in the above command. This command performs the slave verification, which includes checking for a valid slave URL, valid slave volume, and available space on the slave. If the verification fails, you can use the
forceoption which will ignore the failed verification and create a geo-replication session. - The slave volume is in read-only mode by default. However, in case of a failover-failback situation, the original master is made read-only by default as the session is from the original slave to the original master.
- Enable shared storage for master and slave volumes:
# gluster volume set all cluster.enable-shared-storage enableFor more information on shared storage, see Section 11.12, “Setting up Shared Storage Volume”. - Configure the meta-volume for geo-replication:
# gluster volume geo-replication MASTER_VOL SLAVE_HOST::SLAVE_VOL config use_meta_volume trueFor example:# gluster volume geo-replication Volume1 storage.backup.com::slave-vol config use_meta_volume trueFor more information on configuring meta-volume, see Section 10.3.5, “Configuring a Meta-Volume”. - Start the geo-replication by running the following command on the master node:For example,
# gluster volume geo-replication MASTER_VOL SLAVE_HOST::SLAVE_VOL start [force] - Verify the status of the created session by running the following command:
# gluster volume geo-replication MASTER_VOL SLAVE_HOST::SLAVE_VOL status
10.3.4.2. Setting Up your Environment for a Secure Geo-replication Slave
Copier lienLien copié sur presse-papiers!
Geo-replication supports access to Red Hat Gluster Storage slaves through SSH using an unprivileged account (user account with non-zero UID). This method is more secure and it reduces the master's capabilities over slave to the minimum. This feature relies on
mountbroker, an internal service of glusterd which manages the mounts for unprivileged slave accounts. You must perform additional steps to configure glusterd with the appropriate mountbroker's access control directives. The following example demonstrates this process:
Perform the following steps on all the Slave nodes to setup an auxiliary glusterFS mount for the unprivileged account:
- In all the slave nodes, create a new group. For example,
geogroup.Note
You must not use multiple groups for themountbrokersetup. You can create multiple user accounts but the group should be same for all the non-root users. - In all the slave nodes, create a unprivileged account. For example,
geoaccount. Addgeoaccountas a member ofgeogroupgroup. - On any one of the Slave nodes, run the following command to set up mountbroker root directory and group.
# gluster-mountbroker setup <MOUNT ROOT> <GROUP>For example,# gluster-mountbroker setup /var/mountbroker-root geogroup - On any one of the Slave nodes, run the following commands to add volume and user to the mountbroker service.
# gluster-mountbroker add <VOLUME> <USER>For example,# gluster-mountbroker add slavevol geoaccount - Check the status of the setup by running the following command:
# gluster-mountbroker status

     NODE    NODE STATUS                  MOUNT ROOT         GROUP              USERS
--------------------------------------------------------------------------------------- localhost             UP   /var/mountbroker-root(OK)  geogroup(OK)  geoaccount(slavevol)
    node2             UP   /var/mountbroker-root(OK)  geogroup(OK)  geoaccount(slavevol)
The output displays the mountbroker status for every peer node in the slave cluster. - Restart
glusterdservice on all the Slave nodes.# service glusterd restartAfter you setup an auxiliary glusterFS mount for the unprivileged account on all the Slave nodes, perform the following steps to setup a non-root geo-replication session.: - Setup key-based SSH authentication from one of the master nodes to the
useron one of the slave nodes.For example, to setup key-based SSH authentication to the user geoaccount.# ssh-keygen # ssh-copy-id -i identity_file geoaccount@slave_node_IPaddress/Hostname - Create a common pem pub file by running the following command on the master nodes, where the key-based SSH authentication connection is configured to the
useron the slave nodes:# gluster system:: execute gsec_create - Create a geo-replication relationship between the master and the slave to the
userby running the following command on the master node:For example,# gluster volume geo-replication MASTERVOL geoaccount@SLAVENODE::slavevol create push-pemIf you have multiple slave volumes and/or multiple accounts, create a geo-replication session with that particular user and volume.For example,# gluster volume geo-replication MASTERVOL geoaccount2@SLAVENODE::slavevol2 create push-pem - On the slave node, which is used to create relationship, run
/usr/libexec/glusterfs/set_geo_rep_pem_keys.shas a root with user name, master volume name, and slave volume names as the arguments.For example,# /usr/libexec/glusterfs/set_geo_rep_pem_keys.sh geoaccount MASTERVOL SLAVEVOL_NAME - Configure the meta-volume for geo-replication:
# gluster volume geo-replication MASTER_VOL SLAVE_HOST::SLAVE_VOL config use_meta_volume trueFor example:# gluster volume geo-replication Volume1 storage.backup.com::slave-vol config use_meta_volume trueFor more information on configuring meta-volume, see Section 10.3.5, “Configuring a Meta-Volume”. - Start the geo-replication with slave user by running the following command on the master node:For example,
# gluster volume geo-replication MASTERVOL geoaccount@SLAVENODE::slavevol start - Verify the status of geo-replication session by running the following command on the master node:
# gluster volume geo-replication MASTERVOL geoaccount@SLAVENODE::slavevol status
Deleting a mountbroker geo-replication options after deleting session
After mountbroker geo-replicaton session is deleted, use the following command to remove volumes per mountbroker user.
# gluster-mountbroker remove [--volume volume] [--user user]
For example,
# gluster-mountbroker remove --volume slavevol --user geoaccount
# gluster-mountbroker remove --user geoaccount
# gluster-mountbroker remove --volume slavevol
If the volume to be removed is the last one for the mountbroker user, the user is also removed.
Important
If you have a secured geo-replication setup, you must ensure to prefix the unprivileged user account to the slave volume in the command. For example, to execute a geo-replication status command, run the following:
# gluster volume geo-replication MASTERVOL geoaccount@SLAVENODE::slavevol status
In this command,
geoaccount is the name of the unprivileged user account.
10.3.5. Configuring a Meta-Volume
Copier lienLien copié sur presse-papiers!
For effective handling of node fail-overs in Master volume, geo-replication requires a shared storage to be available across all nodes of the cluster. Hence, you must ensure that a gluster volume named
gluster_shared_storage is created in the cluster, and is mounted at /var/run/gluster/shared_storage on all the nodes in the cluster. For more information on setting up shared storage volume, see Section 11.12, “Setting up Shared Storage Volume”.
- Configure the meta-volume for geo-replication:
# gluster volume geo-replication MASTER_VOL SLAVE_HOST::SLAVE_VOL config use_meta_volume trueFor example:# gluster volume geo-replication Volume1 storage.backup.com::slave-vol config use_meta_volume true