Ce contenu n'est pas disponible dans la langue sélectionnée.
Chapter 14. Using the v2 UI
Use the following procedures to configure, and use, the Red Hat Quay v2 UI.
14.1. v2 user interface configuration
With FEATURE_UI_V2 enabled, you can toggle between the current version of the user interface and the new version of the user interface.
- This UI is currently in beta and subject to change. In its current state, users can only create, view, and delete organizations, repositories, and image tags.
- When using the old UI, timed-out sessions would require that the user input their password again in the pop-up window. With the new UI, users are returned to the main page and required to input their username and password credentials. This is a known issue and will be fixed in a future version of the new UI.
- There is a discrepancy in how image manifest sizes are reported between the legacy UI and the new UI. In the legacy UI, image manifests were reported in mebibytes. The v2 UI uses the standard definition of megabyte (MB) to report image manifest sizes.
Procedure
In your deployment’s
config.yamlfile, add theFEATURE_UI_V2parameter and set it totrue, for example:--- FEATURE_TEAM_SYNCING: false FEATURE_UI_V2: true FEATURE_USER_CREATION: true ---
- Log in to your Red Hat Quay deployment.
In the navigation pane of your deployment, you are given the option to toggle between Current UI and New UI. Click the toggle button to set it to new UI, and then click Use Beta Environment, for example:

14.1.1. Creating a new organization using the v2 UI
Prerequisites
- You have toggled your deployment to use the v2 UI.
Use the following procedure to create an organization using the v2 UI.
Procedure
- Click Organization in the navigation pane.
- Click Create Organization.
-
Enter an Organization Name, for example,
testorg. - Click Create.
Now, your example organization should populate under the Organizations page.
14.1.2. Deleting an organization using the v2 UI
Use the following procedure to delete an organization using the v2 UI.
Procedure
-
On the Organizations page, select the name of the organization you want to delete, for example,
testorg. - Click the More Actions drop down menu.
Click Delete.
NoteOn the Delete page, there is a Search input box. With this box, users can search for specific organizations to ensure that they are properly scheduled for deletion. For example, if a user is deleting 10 organizations and they want to ensure that a specific organization was deleted, they can use the Search input box to confirm said organization is marked for deletion.
- Confirm that you want to permanently delete the organization by typing confirm in the box.
Click Delete.
After deletion, you are returned to the Organizations page.
NoteYou can delete more than one organization at a time by selecting multiple organizations, and then clicking More Actions
Delete.
14.1.3. Creating a new repository using the v2 UI
Use the following procedure to create a repository using the v2 UI.
Procedure
- Click Repositories on the navigation pane.
- Click Create Repository.
Select a namespace, for example, quayadmin, and then enter a Repository name, for example,
testrepo.ImportantDo not use the following words in your repository name: *
build*trigger*tagWhen these words are used for repository names, users are unable access the repository, and are unable to permanently delete the repository. Attempting to delete these repositories returns the following error:
Failed to delete repository <repository_name>, HTTP404 - Not Found.Click Create.
Now, your example repository should populate under the Repositories page.
14.1.4. Deleting a repository using the v2 UI
Prerequisites
- You have created a repository.
Procedure
-
On the Repositories page of the v2 UI, click the name of the image you want to delete, for example,
quay/admin/busybox. - Click the More Actions drop-down menu.
Click Delete.
NoteIf desired, you could click Make Public or Make Private.
- Type confirm in the box, and then click Delete.
- After deletion, you are returned to the Repositories page.
14.1.5. Pushing an image to the v2 UI
Use the following procedure to push an image to the v2 UI.
Procedure
Pull a sample image from an external registry:
$ podman pull busybox
Tag the image:
$ podman tag docker.io/library/busybox quay-server.example.com/quayadmin/busybox:test
Push the image to your registry:
$ podman push quay-server.example.com/quayadmin/busybox:test
- Navigate to the Repositories page on the v2 UI and ensure that your image has been properly pushed.
- You can check the security details by selecting your image tag, and then navigating to the Security Report page.
14.1.6. Deleting an image using the v2 UI
Use the following procedure to delete an image using the v2 UI.
Prerequisites
- You have pushed an image to your registry.
Procedure
-
On the Repositories page of the v2 UI, click the name of the image you want to delete, for example,
quay/admin/busybox. - Click the More Actions drop-down menu.
Click Delete.
NoteIf desired, you could click Make Public or Make Private.
- Type confirm in the box, and then click Delete.
- After deletion, you are returned to the Repositories page.
14.1.7. Creating a new team using the Red Hat Quay v2 UI
Use the following procedure to create a new team using the Red Hat Quay v2 UI.
Prerequisites
- You have created an organization with a repository.
Procedure
- On the Red Hat Quay v2 UI, click the name of an organization.
- On your organization’s page, click Teams and membership.
- Click the Create new team box.
- In the Create team popup window, provide a name for your new team.
- Optional. Provide a description for your new team.
- Click Proceed. A new popup window appears.
- Optional. Add this team to a repository, and set the permissions to one of Read, Write, Admin, or None.
- Optional. Add a team member or robot account. To add a team member, enter the name of their Red Hat Quay account.
Review and finish the information, then click Review and Finish. The new team appears under the Teams and membership page. From here, you can click the kebab menu, and select one of the following options:
- Manage Team Members. On this page, you can view all members, team members, robot accounts, or users who have been invited. You can also add a new team member by clicking Add new member.
- Set repository permissions. On this page, you can set the repository permissions to one of Read, Write, Admin, or None.
- Delete. This popup windows allows you to delete the team by clicking Delete.
Optional. You can click the one of the following options to reveal more information about teams, members, and collaborators:
- Team View. This menu shows all team names, the number of members, the number of repositories, and the role for each team.
- Members View. This menu shows all usernames of team members, the teams that they are part of, the repository permissions of the user.
- Collaborators View. This menu shows repository collaborators. Collaborators are users that do not belong to any team in the organization, but who have direct permissions on one or more repositories belonging to the organization.
14.1.8. Creating a robot account using the v2 UI
Use the following procedure to create a robot account using the v2 UI.
Procedure
- On the v2 UI, click Organizations.
-
Click the name of the organization that you will create the robot account for, for example,
test-org. -
Click the Robot accounts tab
Create robot account. -
In the Provide a name for your robot account box, enter a name, for example,
robot1. Optional. The following options are available if desired:
- Add the robot to a team.
- Add the robot to a repository.
- Adjust the robot’s permissions.
On the Review and finish page, review the information you have provided, then click Review and finish. The following alert appears: Successfully created robot account with robot name: <organization_name> + <robot_name>.
Alternatively, if you tried to create a robot account with the same name as another robot account, you might receive the following error message: Error creating robot account.
- Optional. You can click Expand or Collapse to reveal descriptive information about the robot account.
-
Optional. You can change permissions of the robot account by clicking the kebab menu
Set repository permissions. The following message appears: Successfully updated repository permission. -
Optional. To delete your robot account, check the box of the robot account and click the trash can icon. A popup box appears. Type confirm in the text box, then, click Delete. Alternatively, you can click the kebab menu
Delete. The following message appears: Successfully deleted robot account.
14.1.8.1. Bulk managing robot account repository access using the Red Hat Quay v2 UI
Use the following procedure to manage, in bulk, robot account repository access using the Red Hat Quay v2 UI.
Prerequisites
- You have created a robot account.
- You have created multiple repositories under a single organization.
Procedure
- On the Red Hat Quay v2 UI landing page, click Organizations in the navigation pane.
- On the Organizations page, select the name of the organization that has multiple repositories. The number of repositories under a single organization can be found under the Repo Count column.
- On your organization’s page, click Robot accounts.
-
For the robot account that will be added to multiple repositories, click the kebab icon
Set repository permissions. On the Set repository permissions page, check the boxes of the repositories that the robot account will be added to. For example:
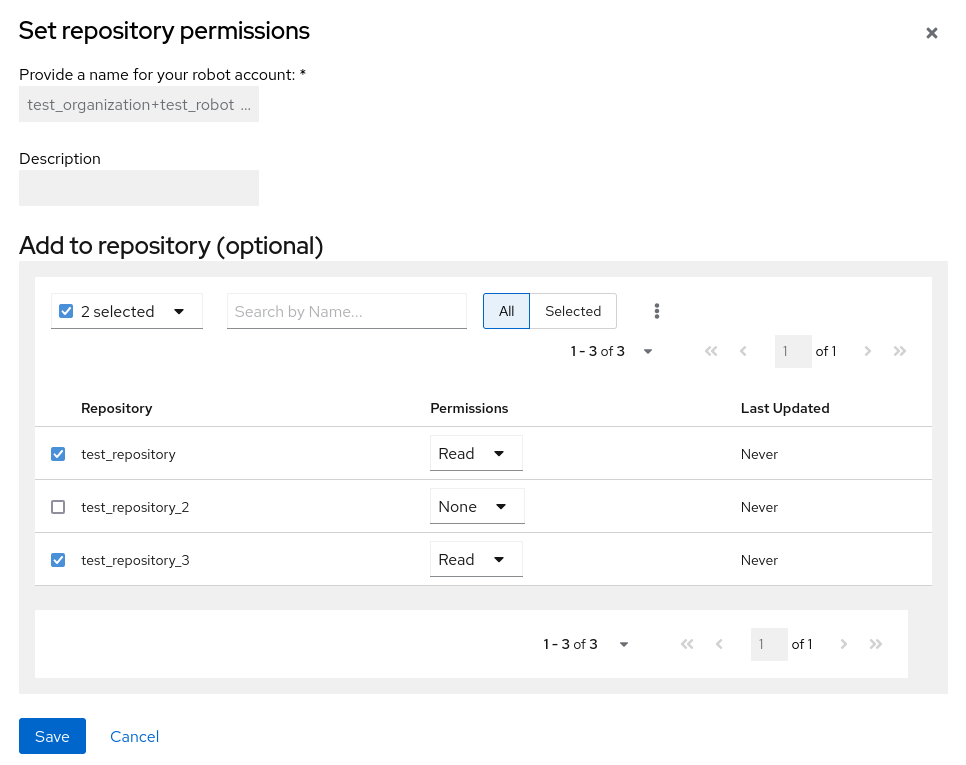
- Set the permissions for the robot account, for example, None, Read, Write, Admin.
- Click save. An alert that says Success alert: Successfully updated repository permission appears on the Set repository permissions page, confirming the changes.
-
Return to the Organizations
Robot accounts page. Now, the Repositories column of your robot account shows the number of repositories that the robot account has been added to.
14.1.9. Creating default permissions using the Red Hat Quay v2 UI
Default permissions defines permissions that should be granted automatically to a repository when it is created, in addition to the default of the repository’s creator. Permissions are assigned based on the user who created the repository.
Use the following procedure to create default permissions using the Red Hat Quay v2 UI.
Procedure
- Click the name of an organization.
- Click Default permissions.
- Click create default permissions. A toggle drawer appears.
Select either Anyone or Specific user to create a default permission when a repository is created.
If selecting Anyone, the following information must be provided:
- Applied to. Search, invite, or add a user/robot/team.
- Permission. Set the permission to one of Read, Write, or Admin.
If selecting Specific user, the following information must be provided:
- Repository creator. Provide either a user or robot account.
- Applied to. Provide a username, robot account, or team name.
- Permission. Set the permission to one of Read, Write, or Admin.
- Click Create default permission. A confirmation box appears, returning the following alert: Successfully created default permission for creator.
14.1.10. Organization settings for the v2 UI
Use the following procedure to alter your organization settings using the v2 UI.
Procedure
- On the v2 UI, click Organizations.
-
Click the name of the organization that you will create the robot account for, for example,
test-org. - Click the Settings tab.
- Optional. Enter the email address associated with the organization.
Optional. Set the allotted time for the Time Machine feature to one of the following:
- 1 week
- 1 month
- 1 year
- Never
- Click Save.
14.1.11. Viewing image tag information using the v2 UI
Use the following procedure to view image tag information using the v2 UI.
Procedure
- On the v2 UI, click Repositories.
-
Click the name of a repository, for example,
quayadmin/busybox. Click the name of the tag, for example,
test. You are taken to the Details page of the tag. The page reveals the following information:- Name
- Repository
- Digest
- Vulnerabilities
- Creation
- Modified
- Size
- Labels
- How to fetch the image tag
- Optional. Click Security Report to view the tag’s vulnerabilities. You can expand an advisory column to open up CVE data.
- Optional. Click Packages to view the tag’s packages.
-
Click the name of the repository, for example,
busybox, to return to the Tags page. - Optional. Hover over the Pull icon to reveal the ways to fetch the tag.
- Check the box of the tag, or multiple tags, click the Actions drop down menu, and then Delete to delete the tag. Confirm deletion by clicking Delete in the popup box.
14.1.12. Adjusting repository settings using the v2 UI
Use the following procedure to adjust various settings for a repository using the v2 UI.
Procedure
- On the v2 UI, click Repositories.
-
Click the name of a repository, for example,
quayadmin/busybox. - Click the Settings tab.
- Optional. Click User and robot permissions. You can adjust the settings for a user or robot account by clicking the dropdown menu option under Permissions. You can change the settings to Read, Write, or Admin.
Optional. Click Events and notifications. You can create an event and notification by clicking Create Notification. The following event options are available:
- Push to Repository
- Package Vulnerability Found
- Image build failed
- Image build queued
- Image build started
- Image build success
Image build cancelled
Then, issue a notification. The following options are available:
- Email Notification
- Flowdock Team Notification
- HipChat Room Notification
- Slack Notification
Webhook POST
After selecting an event option and the method of notification, include a Room ID #, a Room Notification Token, then, click Submit.
- Optional. Click Repository visibility. You can make the repository private, or public, by clicking Make Public.
- Optional. Click Delete repository. You can delete the repository by clicking Delete Repository.
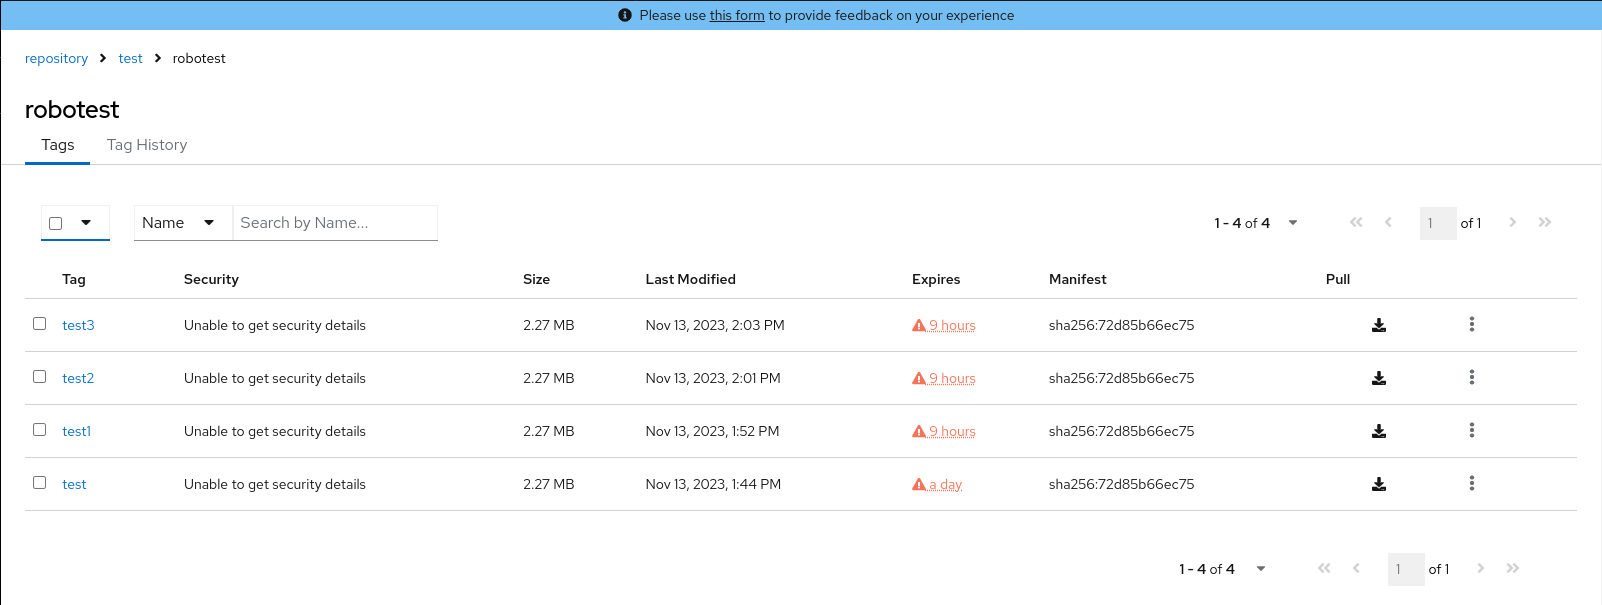
14.2. Viewing Red Hat Quay tag history
Use the following procedure to view tag history on the Red Hat Quay v2 UI.
Procedure
- On the Red Hat Quay v2 UI dashboard, click Repositories in the navigation pane.
- Click the name of a repository that has image tags.
Click Tag History. On this page, you can perform the following actions:
- Search by tag name
- Select a date range
- View tag changes
- View tag modification dates and the time at which they were changed
14.3. Adding and managing labels on the Red Hat Quay v2 UI
Red Hat Quay administrators can add and manage labels for tags by using the following procedure.
Procedure
- On the Red Hat Quay v2 UI dashboard, click Repositories in the navigation pane.
- Click the name of a repository that has image tags.
- Click the menu kebab for an image and select Edit labels.
- In the Edit labels window, click Add new label.
Enter a label for the image tag using the
key=valueformat, for example,com.example.release-date=2023-11-14.NoteThe following error is returned when failing to use the
key=valueformat:Invalid label format, must be key value separated by =.- Click the whitespace of the box to add the label.
- Optional. Add a second label.
-
Click Save labels to save the label to the image tag. The following notification is returned:
Created labels successfully. -
Optional. Click the same image tag’s menu kebab
Edit labels X on the label to remove it; alternatively, you can edit the text. Click Save labels. The label is now removed or edited.
14.4. Setting tag expirations on the Red Hat Quay v2 UI
Red Hat Quay administrators can set expiration dates for certain tags in a repository. This helps automate the cleanup of older or unused tags, helping to reduce storage space.
Procedure
- On the Red Hat Quay v2 UI dashboard, click Repositories in the navigation pane.
- Click the name of a repository that has image tags.
- Click the menu kebab for an image and select Change expiration.
-
Optional. Alternatively, you can bulk add expiration dates by clicking the box of multiple tags, and then select Actions
Set expiration. -
In the Change Tags Expiration window, set an expiration date, specifying the day of the week, month, day of the month, and year. For example,
Wednesday, November 15, 2023. Alternatively, you can click the calendar button and manually select the date. -
Set the time, for example,
2:30 PM. -
Click Change Expiration to confirm the date and time. The following notification is returned:
Successfully set expiration for tag test to Nov 15, 2023, 2:26 PM. On the Red Hat Quay v2 UI Tags page, you can see when the tag is set to expire. For example:
14.5. Selecting color theme preference on the Red Hat Quay v2 UI
Users can switch between light and dark modes when using the v2 UI. This feature also includes an automatic mode selection, which chooses between light or dark modes depending on the user’s browser preference.
Use the following procedure to switch between automatic, light, and dark modes.
Procedure
- Log in to your Red Hat Quay repository.
- In the navigation pane, click your username, for example, quayadmin.
- Under Appearance, select between Light theme, Dark theme, and Device-based theme. Device based theme sets the mode depending on your browser’s color preference.
14.6. Viewing usage logs on the Red Hat Quay v2 UI
Red Hat Quay logs can provide valuable information about the way that your Red Hat Quay registry is being used. Logs can be viewed by Organization, repository, or namespace on the v2 UI by using the following procedure.
Procedure
- Log in to your Red Hat Quay registry.
- Navigate to an Organization, repository, or namespace for which you are an administrator of.
Click Logs.

- Optional. Set the date range for viewing log entries by adding dates to the From and To boxes.
-
Optional. Export the logs by clicking Export. You must enter an email address or a valid callback URL that starts with
http://orhttps://. This process can take an hour depending on how many logs there are.
14.7. Enabling the legacy UI
In the navigation pane, you are given the option to toggle between Current UI and New UI. Click the toggle button to set it to Current UI.