Ce contenu n'est pas disponible dans la langue sélectionnée.
Chapter 3. Build an application with sample software templates
RHTAP transforms the development landscape with its ready-to-use software templates available in Red Hat Developer Hub (RHDH). These templates are meticulously designed for seamless integration with Red Hat’s comprehensive suite of tools (RHDH, RHTAS, RHTPA) and technologies. This integration furnishes a solid framework for a secure, effective, and developer-oriented SDLC within an on-premises environment.
Beyond these foundational elements, RHTAP’s ready-to-use software templates include default integrations with key technologies to further secure and optimize your development experience:
- ACS (Advanced Cluster Security): Bolsters your deployments by identifying and mitigating vulnerabilities early in the development process, ensuring your applications are fortified from inception to deployment.
- Quay: Acts as a secure harbor for your container images, providing a reliable repository that continuously scans for vulnerabilities, keeping your containerized applications safe.
- Tekton Pipelines: Automates your build and deployment processes with precision, enabling a CI/CD framework that integrates seamlessly into your SDLC, thus accelerating your path to production.
- GitOps: Implements a GitOps strategy by maintaining your infrastructure and application configurations in Git repositories, ensuring consistent and automated deployment across all environments.
Additionally, RHTAP supports the development and containerization of applications across a wide range of popular programming languages such as Java, Python, Node.js, and Go, expanding your application development capabilities.
Upon the installation of RHTAP, cluster administrators have the capability to tailor the Red Hat Developer Hub portal with specific templates and enhancements. This customization process is crucial for enabling developers to focus primarily on coding by simplifying development workflows and mitigating concerns related to pipelines, vulnerabilities, and policies.
Before proceeding with customization, it’s essential for cluster administrators to familiarize themselves with the available software and pipeline templates through this guide. Such exploration is key to grasping how RHTAP supports a secure supply chain, laying the groundwork for any subsequent customization.
3.1. Setting the stage
- Ensure you have successfully installed RHTAP.
- Log in to Red Hat Developer Hub (RHDH) using the link provided by RHTAP. RHDH operates as an inclusive developer platform, facilitating the creation of developer portals. It offers engineering teams a unified platform that enhances the development process, providing an assortment of tools and resources for crafting high-quality software efficiently.
3.2. Build an application
On the RHDH portal, select Create, and then select an appropriate template. For example, Quarkus Java - Trusted Application Pipeline.
Building an application or microservice for your developers in RHDH using the templates offered by RHTAP is essentially only a three step process:
- Provide application information
- Provide application repository information
- Provide deployment information
Provide application information
-
In the Name field, provide an application name. Your name may incorporate lowercase letters (a-z), numbers (0-9), and dashes (-), but it must start and end with a lowercase alphanumeric character. Examples of valid names are
my-nameorabc-123, and the length should range from 1 to 63 characters. -
From the Owner dropdown list, select an appropriate RHDH component owner for this application. The default value is
user:guest, which appears if no specific owner is registered in the system. If you have not registered an owner, retain the defaultuser:guestselection. If needed, you have the option to replaceguestwith your username, personalizing ownership of the application. - Select Next. The system displays the Application Repository Information form.
Provide application repository information
- From the Host Type dropdown list, select an appropriate repository host type.
- In the Repository Owner field, enter name of the organization that owns the Git App you are using. This could be a personal user account, an organization, or a project within your organization.
- In the Repository Name field, enter an appropriate repository name using characters restricted to A-Z, a-z, 0-9, underscore (_), and dashes (-). The system uses this information to name the repository that it creates on the host repository server.
-
In the Repository Default Branch field, enter the default branch for your repository. This field displays
mainby default you can choose to keep it the same. -
In the Repository Server field, enter your on-prem host URL without the
HTTPprotocol and without the.gitextension. For example, gitlab-gitlab.apps.cluster-ljg9z.sandbox219.opentlc.com - Select Next. The system displays the Deployment Information form.
Provide deployment information
-
In the Image Registry field, enter your on-prem image registry URL without the
HTTPprotocol. For example, quay-tv2pb.apps.cluster-tv2pb.sandbox1194.opentlc.com. - In the Image Organization field, enter the image organization for the image registry you provided in the Step 1.
In the Image Name field, enter an appropriate image name following these guidelines: use only lowercase letters, dights, and separators. Separators include a period (.), up to two underscores (_), or one or more hyphens (-). For example,
my-app_1.2.NoteYou must ensure that the name does not start or end with a separator.
In the Deployment Namespace field, enter the prefix for the namespaces or cluster where your intend to deploy your application. The system creates the actual namespaces as
rhtap-app-development,rhtap-app-stage, andrhtap-app-prod.Noterhtap-appis the default deployment namespace prefix. Cluster administrators have the option to customize this prefix. For instructions on how to customize the default deployment namespace prefix, refer to Customizing sample software templates.- Select Review to review all the information that you added.
Select Create. RHTAP initiates a sequence of automated tasks that are pivotal for setting up your application’s infrastructure and deployment pipeline. This process involves several key operations that unfold behind the scenes:
- Repository Creation and Configuration: A new repository is automatically created in your specified hosting service (GitLab or GitHub), tailored specifically for your application. This includes the setup of both the GitOps repository, which holds your deployment configurations, and the source repository, where your application code resides.
- Argo CD Integration: With the repositories in place, Argo CD resources are created and configured. Argo CD, a declarative, GitOps continuous delivery tool, springs into action, orchestrating the deployment of your application across the specified namespaces.
- Namespace Creation: As part of setting up your deployment environments, various namespaces are automatically generated based on your application’s requirements. This includes separate namespaces for development, staging, and production environments, ensuring isolation and security between stages.
- Pipeline Definition: Finally, a pipeline definition is added to your setup, providing you with a 'Pipeline as code' model. This defines the automated workflow for building, testing, and deploying your application, aligning with best practices and security measures.
3.3. Review your application
Once you’ve successfully created an application using RHTAP, reviewing its components, source code, GitOps configurations, and associated documentation is straightforward. Here’s how you can conduct a comprehensive analysis:
Access Your Application:
- To find your application, select Open Component in catalog. You can also navigate to the Catalog where the system lists your newly created application.
Examine the Source Code:
- Go to the Overview tab.
- Select View Source to open the repository where your application’s source code is housed. This step provides insight into the construction and logic of your application.
Review GitOps repository:
- On the Overview tab, use the Kind dropdown to select Resource and find the relevant GitOps repository.
- Choose View Source to examine the GitOps configurations directly. Alternatively, for a broader overview including technical documentation, select View TechDocs from the Catalog section and then choose the GitOps repository under the Home > Repository section.
Review the Documentation:
- From the Overview tab, click View Tech Docs.
- This opens the technical documentation for your application, providing detailed insights into its features, configuration steps, and how to utilize it effectively.
3.4. Unregister your application
This process removes the application’s source and GitOps repository from your catalog and resource view, essentially hiding it. The application itself remains functional within the cluster. Unregistered applications can be re-registered at any time.
- Navigate to the Catalog and select the component that you want to unregister.
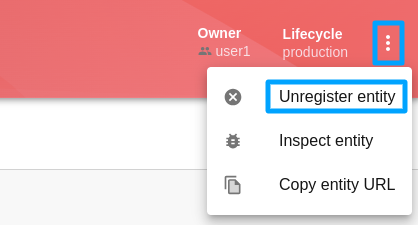
Select vertical three-dot menu associated with the component, and then select Unregister entity. A confirmation dialog appears.
- Select Unregister Location. This removes the application’s Git repository from your catalog view.
- Navigate to the Catalog, from the Kind drop down list, select Resource, and then unregister the corresponding GitOps resource.
Remove the application from the cluster, by running the following command:
oc delete application your-app-name-app-of-apps -n rhtap 1- 1
rhtapis the default namespace. Additionally,your-app-nameis the name of your application.
Next steps