Questo contenuto non è disponibile nella lingua selezionata.
Chapter 16. Image-based upgrade for single-node OpenShift clusters
16.1. Understanding the image-based upgrade for single-node OpenShift clusters
From OpenShift Container Platform 4.14.13, the Lifecycle Agent provides you with an alternative way to upgrade the platform version of a single-node OpenShift cluster. The image-based upgrade is faster than the standard upgrade method and allows you to directly upgrade from OpenShift Container Platform <4.y> to <4.y+2>, and <4.y.z> to <4.y.z+n>.
This upgrade method utilizes a generated OCI image from a dedicated seed cluster that is installed on the target single-node OpenShift cluster as a new ostree stateroot. A seed cluster is a single-node OpenShift cluster deployed with the target OpenShift Container Platform version, Day 2 Operators, and configurations that are common to all target clusters.
You can use the seed image, which is generated from the seed cluster, to upgrade the platform version on any single-node OpenShift cluster that has the same combination of hardware, Day 2 Operators, and cluster configuration as the seed cluster.
The image-based upgrade uses custom images that are specific to the hardware platform that the clusters are running on. Each different hardware platform requires a separate seed image.
The Lifecycle Agent uses two custom resources (CRs) on the participating clusters to orchestrate the upgrade:
-
On the seed cluster, the
SeedGeneratorCR allows for the seed image generation. This CR specifies the repository to push the seed image to. -
On the target cluster, the
ImageBasedUpgradeCR specifies the seed image for the upgrade of the target cluster and the backup configurations for your workloads.
Example SeedGenerator CR
apiVersion: lca.openshift.io/v1
kind: SeedGenerator
metadata:
  name: seedimage
spec:
  seedImage: <seed_image>
Example ImageBasedUpgrade CR
apiVersion: lca.openshift.io/v1
kind: ImageBasedUpgrade
metadata:
  name: upgrade
spec:
  stage: Idle
  seedImageRef:
    version: <target_version>
    image: <seed_container_image>
    pullSecretRef:
      name: <seed_pull_secret>
  autoRollbackOnFailure: {}
  extraManifests:
  - name: example-extra-manifests
    namespace: openshift-lifecycle-agent
  # List of ConfigMap resources that contain the OADP Backup and Restore CRs.
  oadpContent:
  - name: oadp-cm-example
    namespace: openshift-adp
where
spec.stage-
Defines the stage of the
ImageBasedUpgradeCR. The value can beIdle,Prep,Upgrade, orRollback. spec.seedImageRef- Defines the seed image to be used, the target platform version, and the secret required to access the image.
initMonitorTimeoutSeconds-
Optionally defines the time frame in seconds to roll back when the upgrade does not complete within that time frame after the first reboot. If not defined or set to
0, the default value of1800seconds (30 minutes) is used. spec.extraManifests-
Optionally defines the list of
ConfigMapresources that contain your custom catalog sources to retain after the upgrade, and your extra manifests to apply to the target cluster that are not part of the seed image. spec.oadpContent-
Defines the list of
ConfigMapresources that contain the OADPBackupandRestoreCRs.
16.1.1. Stages of the image-based upgrade
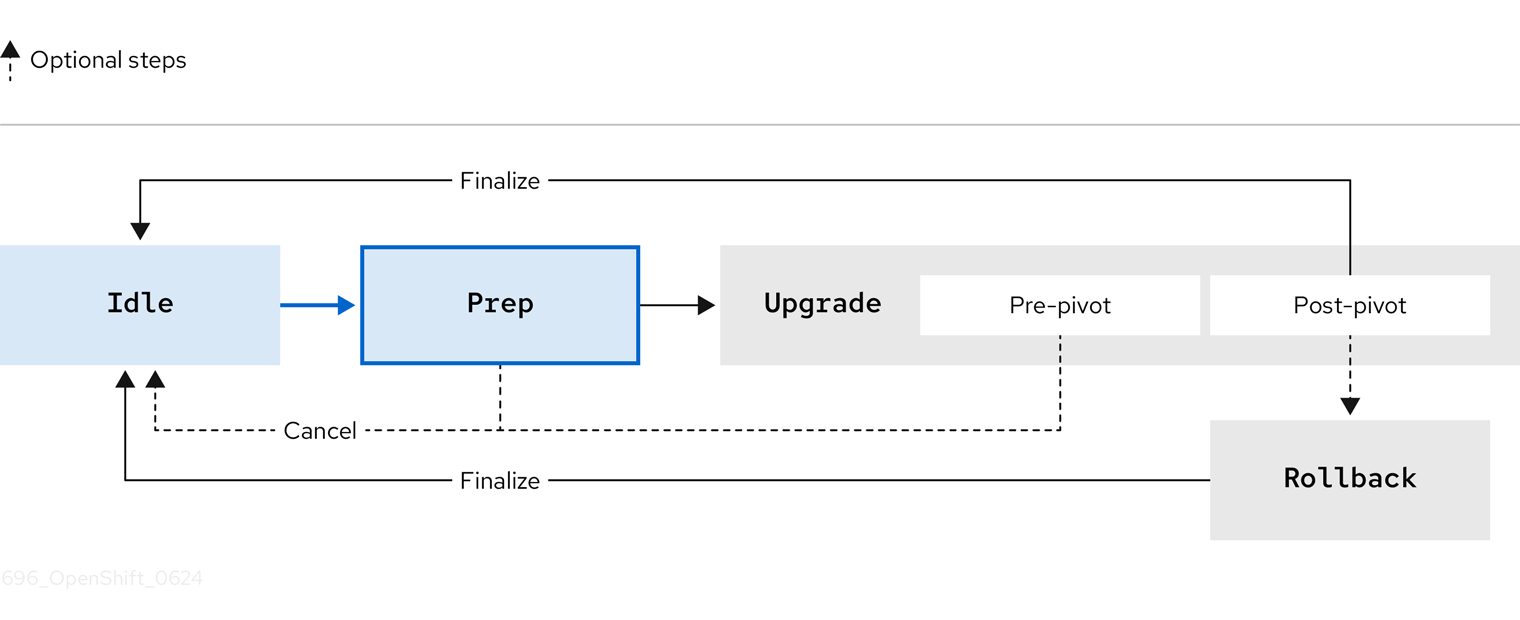
The image-based upgrade consists of four stages that you control by setting the spec.stage field in the ImageBasedUpgrade CR: Idle, Prep, Upgrade, and Rollback.
After generating the seed image on the seed cluster, you can move through the stages on the target cluster by setting the spec.stage field to one of the following values in the ImageBasedUpgrade CR:
-
Idle -
Prep -
Upgrade -
Rollback(Optional)
Figure 16.1. Stages of the image-based upgrade

16.1.1.1. Idle stage
The Lifecycle Agent creates an ImageBasedUpgrade CR set to stage: Idle when the Operator is first deployed. This is the default stage. There is no ongoing upgrade and the cluster is ready to move to the Prep stage.
Figure 16.2. Transition from Idle stage
You also move to the Idle stage to do one of the following steps:
- Finalize a successful upgrade
- Finalize a rollback
-
Cancel an ongoing upgrade until the pre-pivot phase in the
Upgradestage
Moving to the Idle stage ensures that the Lifecycle Agent cleans up resources, so that the cluster is ready for upgrades again.
Figure 16.3. Transitions to Idle stage

If using RHACM when you cancel an upgrade, you must remove the import.open-cluster-management.io/disable-auto-import annotation from the target managed cluster to re-enable the automatic import of the cluster.
16.1.1.2. Prep stage
You can complete this stage before a scheduled maintenance window.
For the Prep stage, you specify the following upgrade details in the ImageBasedUpgrade CR:
- seed image to use
- resources to back up
- extra manifests to apply and custom catalog sources to retain after the upgrade, if any
Then, based on what you specify, the Lifecycle Agent prepares for the upgrade without impacting the current running version. During this stage, the Lifecycle Agent ensures that the target cluster is ready to proceed to the Upgrade stage by checking if it meets certain conditions. The Operator pulls the seed image to the target cluster with additional container images specified in the seed image. The Lifecycle Agent checks if there is enough space on the container storage disk and if necessary, the Operator deletes unpinned images until the disk usage is below the specified threshold. For more information about how to configure or disable the cleaning up of the container storage disk, see "Configuring the automatic image cleanup of the container storage disk".
You also prepare backup resources with the OADP Operator’s Backup and Restore CRs. These CRs are used in the Upgrade stage to reconfigure the cluster, register the cluster with RHACM, and restore application artifacts.
In addition to the OADP Operator, the Lifecycle Agent uses the ostree versioning system to create a backup, which allows complete cluster reconfiguration after both upgrade and rollback.
After the Prep stage finishes, you can cancel the upgrade process by moving to the Idle stage or you can start the upgrade by moving to the Upgrade stage in the ImageBasedUpgrade CR. If you cancel the upgrade, the Operator performs cleanup operations.
Figure 16.4. Transition from Prep stage

16.1.1.3. Upgrade stage
The Upgrade stage consists of two phases:
- pre-pivot
-
Just before pivoting to the new stateroot, the Lifecycle Agent collects the required cluster specific artifacts and stores them in the new stateroot. The backup of your cluster resources specified in the
Prepstage are created on a compatible Object storage solution. The Lifecycle Agent exports CRs specified in theextraManifestsfield in theImageBasedUpgradeCR or the CRs described in the ZTP policies that are bound to the target cluster. After pre-pivot phase has completed, the Lifecycle Agent sets the new stateroot deployment as the default boot entry and reboots the node. - post-pivot
- After booting from the new stateroot, the Lifecycle Agent also regenerates the seed image’s cluster cryptography. This ensures that each single-node OpenShift cluster upgraded with the same seed image has unique and valid cryptographic objects. The Operator then reconfigures the cluster by applying cluster-specific artifacts that were collected in the pre-pivot phase. The Operator applies all saved CRs, and restores the backups.
After the upgrade has completed and you are satisfied with the changes, you can finalize the upgrade by moving to the Idle stage.
When you finalize the upgrade, you cannot roll back to the original release.
Figure 16.5. Transitions from Upgrade stage

If you want to cancel the upgrade, you can do so until the pre-pivot phase of the Upgrade stage. If you encounter issues after the upgrade, you can move to the Rollback stage for a manual rollback.
16.1.1.4. Rollback stage
The Rollback stage can be initiated manually or automatically upon failure. During the Rollback stage, the Lifecycle Agent sets the original ostree stateroot deployment as default. Then, the node reboots with the previous release of OpenShift Container Platform and application configurations.
If you move to the Idle stage after a rollback, the Lifecycle Agent cleans up resources that can be used to troubleshoot a failed upgrade.
The Lifecycle Agent initiates an automatic rollback if the upgrade does not complete within a specified time limit. For more information about the automatic rollback, see the "Moving to the Rollback stage with Lifecycle Agent" or "Moving to the Rollback stage with Lifecycle Agent and GitOps ZTP" sections.
Figure 16.6. Transition from Rollback stage
16.1.2. Guidelines for the image-based upgrade
Your deployments must meet specific requirements for a successful image-based upgrade, which can be performed using either GitOps ZTP or non-GitOps deployment methods.
For a successful image-based upgrade, your deployments must meet certain requirements.
There are different deployment methods in which you can perform the image-based upgrade:
- GitOps ZTP
- You use the GitOps Zero Touch Provisioning (ZTP) to deploy and configure your clusters.
- Non-GitOps
- You manually deploy and configure your clusters.
You can perform an image-based upgrade in disconnected environments. For more information about how to mirror images for a disconnected environment, see "Mirroring images for a disconnected installation".
16.1.2.1. Minimum software version of components
The image-based upgrade requires specific minimum software versions for various components depending on your deployment method.
Depending on your deployment method, the image-based upgrade requires the following minimum software versions.
| Component | Software version | Required |
|---|---|---|
| Lifecycle Agent | 4.16 | Yes |
| OADP Operator | 1.4.1 | Yes |
| Managed cluster version | 4.14.13 | Yes |
| Hub cluster version | 4.16 | No |
| RHACM | 2.10.2 | No |
| GitOps ZTP plugin | 4.16 | Only for GitOps ZTP deployment method |
| Red Hat OpenShift GitOps | 1.12 | Only for GitOps ZTP deployment method |
| Topology Aware Lifecycle Manager (TALM) | 4.16 | Only for GitOps ZTP deployment method |
| Local Storage Operator [1] | 4.14 | Yes |
| Logical Volume Manager (LVM) Storage [1] | 4.14.2 | Yes |
- The persistent storage must be provided by either the LVM Storage or the Local Storage Operator, not both.
16.1.2.2. Hub cluster guidelines
When using RHACM, the hub cluster must meet specific conditions including disabling optional add-ons and upgrading to at least the target version.
If you are using Red Hat Advanced Cluster Management (RHACM), your hub cluster needs to meet the following conditions:
- To avoid including any RHACM resources in your seed image, you need to disable all optional RHACM add-ons before generating the seed image.
- Your hub cluster must be upgraded to at least the target version before performing an image-based upgrade on a target single-node OpenShift cluster.
16.1.2.3. Seed image guidelines
The seed image targets single-node OpenShift clusters with matching hardware and configuration, requiring the seed cluster to match specific aspects of the target clusters.
The seed image targets a set of single-node OpenShift clusters with the same hardware and similar configuration. This means that the seed cluster must match the configuration of the target clusters for the following items:
CPU topology
- Number of CPU cores
- Tuned performance configuration, such as number of reserved CPUs
-
MachineConfigresources for the target cluster - IP version configuration, either IPv4, IPv6, or dual-stack networking
- Set of Day 2 Operators, including the Lifecycle Agent and the OADP Operator
- Disconnected registry
- FIPS configuration
The following configurations only have to partially match on the participating clusters:
- If the target cluster has a proxy configuration, the seed cluster must have a proxy configuration too but the configuration does not have to be the same.
-
A dedicated partition on the primary disk for container storage is required on all participating clusters. However, the size and start of the partition does not have to be the same. Only the
spec.config.storage.disks.partitions.label: varlibcontainerslabel in theMachineConfigCR must match on both the seed and target clusters. For more information about how to create the disk partition, see "Configuring a shared container partition between ostree stateroots" or "Configuring a shared container partition between ostree stateroots when using GitOps ZTP".
For more information about what to include in the seed image, see "Seed image configuration" and "Seed image configuration using the RAN DU profile".
16.1.2.4. OADP backup and restore guidelines
Use the OADP Operator to back up and restore applications during the image-based upgrade by creating Backup and Restore CRs wrapped in ConfigMap objects.
With the OADP Operator, you can back up and restore your applications on your target clusters by using Backup and Restore CRs wrapped in ConfigMap objects. The application must work on the current and the target OpenShift Container Platform versions so that they can be restored after the upgrade. The backups must include resources that were initially created.
The following resources must be excluded from the backup:
-
pods -
endpoints -
controllerrevision -
podmetrics -
packagemanifest -
replicaset -
localvolume, if using Local Storage Operator (LSO)
There are two local storage implementations for single-node OpenShift:
- Local Storage Operator (LSO)
-
The Lifecycle Agent automatically backs up and restores the required artifacts, including
localvolumeresources and their associatedStorageClassresources. You must exclude thepersistentvolumesresource in the applicationBackupCR. - LVM Storage
-
You must create the
BackupandRestoreCRs for LVM Storage artifacts. You must include thepersistentVolumesresource in the applicationBackupCR.
For the image-based upgrade, only one Operator is supported on a given target cluster.
For both Operators, you must not apply the Operator CRs as extra manifests through the ImageBasedUpgrade CR.
The persistent volume contents are preserved and used after the pivot. When you are configuring the DataProtectionApplication CR, you must ensure that the .spec.configuration.restic.enable is set to false for an image-based upgrade. This disables Container Storage Interface integration.
16.1.2.4.1. lca.openshift.io/apply-wave guidelines
The lca.openshift.io/apply-wave annotation determines the apply order of Backup or Restore CRs. The value of the annotation must be a string number. If you define the lca.openshift.io/apply-wave annotation in the Backup or Restore CRs, they are applied in increasing order based on the annotation value. If you do not define the annotation, they are applied together.
The lca.openshift.io/apply-wave annotation must be numerically lower in your platform Restore CRs, for example RHACM and LVM Storage artifacts, than that of the application. This way, the platform artifacts are restored before your applications.
If your application includes cluster-scoped resources, you must create separate Backup and Restore CRs to scope the backup to the specific cluster-scoped resources created by the application. The Restore CR for the cluster-scoped resources must be restored before the remaining application Restore CR(s).
16.1.2.4.2. lca.openshift.io/apply-label guidelines
You can back up specific resources exclusively with the lca.openshift.io/apply-label annotation. Based on which resources you define in the annotation, the Lifecycle Agent applies the lca.openshift.io/backup: <backup_name> label and adds the labelSelector.matchLabels.lca.openshift.io/backup: <backup_name> label selector to the specified resources when creating the Backup CRs.
To use the lca.openshift.io/apply-label annotation for backing up specific resources, the resources listed in the annotation must also be included in the spec section. If the lca.openshift.io/apply-label annotation is used in the Backup CR, only the resources listed in the annotation are backed up, even if other resource types are specified in the spec section or not.
Example CR
apiVersion: velero.io/v1
kind: Backup
metadata:
  name: acm-klusterlet
  namespace: openshift-adp
  annotations:
    lca.openshift.io/apply-label: rbac.authorization.k8s.io/v1/clusterroles/klusterlet,apps/v1/deployments/open-cluster-management-agent/klusterlet
  labels:
    velero.io/storage-location: default
spec:
  includedNamespaces:
   - open-cluster-management-agent
  includedClusterScopedResources:
   - clusterroles
  includedNamespaceScopedResources:
- deployments-
The
metadata.annotations.lca.openshift.io/apply-labelvalue must be a list of comma-separated objects ingroup/version/resource/nameformat for cluster-scoped resources orgroup/version/resource/namespace/nameformat for namespace-scoped resources, and it must be attached to the relatedBackupCR.
16.1.2.5. Extra manifest guidelines
Extra manifests enable the Lifecycle Agent to restore cluster-specific configurations after the upgrade pivot but before restoring application artifacts.
The Lifecycle Agent uses extra manifests to restore your target clusters after rebooting with the new stateroot deployment and before restoring application artifacts.
Different deployment methods require a different way to apply the extra manifests:
- GitOps ZTP
You use the
lca.openshift.io/target-ocp-version: <target_ocp_version>label to mark the extra manifests that the Lifecycle Agent must extract and apply after the pivot. You can specify the number of manifests labeled withlca.openshift.io/target-ocp-versionby using thelca.openshift.io/target-ocp-version-manifest-countannotation in theImageBasedUpgradeCR. If specified, the Lifecycle Agent verifies that the number of manifests extracted from policies matches the number provided in the annotation during the prep and upgrade stages.Example for the lca.openshift.io/target-ocp-version-manifest-count annotation
apiVersion: lca.openshift.io/v1 kind: ImageBasedUpgrade metadata: annotations: lca.openshift.io/target-ocp-version-manifest-count: "5" name: upgrade- Non-Gitops
-
You mark your extra manifests with the
lca.openshift.io/apply-waveannotation to determine the apply order. The labeled extra manifests are wrapped inConfigMapobjects and referenced in theImageBasedUpgradeCR that the Lifecycle Agent uses after the pivot.
If the target cluster uses custom catalog sources, you must include them as extra manifests that point to the correct release version.
You cannot apply the following items as extra manifests:
-
MachineConfigobjects - OLM Operator subscriptions
16.2. Preparing for an image-based upgrade for single-node OpenShift clusters
16.2.2. Installing Operators for the image-based upgrade
Prepare your clusters for the upgrade by installing the Lifecycle Agent and the OADP Operator.
To install the OADP Operator with the non-GitOps method, see "Installing the OADP Operator".
16.2.2.1. Installing the Lifecycle Agent by using the CLI
You can use the OpenShift CLI (oc) to install the Lifecycle Agent.
Prerequisites
-
You have installed the OpenShift CLI (
oc). -
You have logged in as a user with
cluster-adminprivileges.
Procedure
Create a
Namespaceobject YAML file for the Lifecycle Agent:apiVersion: v1 kind: Namespace metadata: name: openshift-lifecycle-agent annotations: workload.openshift.io/allowed: managementCreate the
NamespaceCR by running the following command:$ oc create -f <namespace_filename>.yaml
Create an
OperatorGroupobject YAML file for the Lifecycle Agent:apiVersion: operators.coreos.com/v1 kind: OperatorGroup metadata: name: openshift-lifecycle-agent namespace: openshift-lifecycle-agent spec: targetNamespaces: - openshift-lifecycle-agentCreate the
OperatorGroupCR by running the following command:$ oc create -f <operatorgroup_filename>.yaml
Create a
SubscriptionCR for the Lifecycle Agent:apiVersion: operators.coreos.com/v1alpha1 kind: Subscription metadata: name: openshift-lifecycle-agent-subscription namespace: openshift-lifecycle-agent spec: channel: "stable" name: lifecycle-agent source: redhat-operators sourceNamespace: openshift-marketplaceCreate the
SubscriptionCR by running the following command:$ oc create -f <subscription_filename>.yaml
Verification
To verify that the installation succeeded, inspect the CSV resource by running the following command:
$ oc get csv -n openshift-lifecycle-agentExample output
NAME                              DISPLAY                     VERSION               REPLACES                           PHASE
lifecycle-agent.v4.20.0           Openshift Lifecycle Agent   4.20.0                Succeeded
Verify that the Lifecycle Agent is up and running by running the following command:
$ oc get deploy -n openshift-lifecycle-agentExample output
NAME                                 READY   UP-TO-DATE   AVAILABLE   AGE
lifecycle-agent-controller-manager   1/1     1            1           14s
16.2.2.2. Installing the Lifecycle Agent by using the web console
You can use the OpenShift Container Platform web console to install the Lifecycle Agent.
Prerequisites
-
You have logged in as a user with
cluster-adminprivileges.
Procedure
-
In the OpenShift Container Platform web console, navigate to Ecosystem
Software Catalog. - Search for the Lifecycle Agent from the list of available Operators, and then click Install.
- On the Install Operator page, under A specific namespace on the cluster select openshift-lifecycle-agent.
- Click Install.
Verification
To confirm that the installation is successful:
-
Click Ecosystem
Installed Operators. Ensure that the Lifecycle Agent is listed in the openshift-lifecycle-agent project with a Status of InstallSucceeded.
NoteDuring installation an Operator might display a Failed status. If the installation later succeeds with an InstallSucceeded message, you can ignore the Failed message.
-
Click Ecosystem
If the Operator is not installed successfully:
-
Click Ecosystem
Installed Operators, and inspect the Operator Subscriptions and Install Plans tabs for any failure or errors under Status. -
Click Workloads
Pods, and check the logs for pods in the openshift-lifecycle-agent project.
16.2.2.3. Installing the Lifecycle Agent with GitOps ZTP
Install the Lifecycle Agent with GitOps Zero Touch Provisioning (ZTP) to do an image-based upgrade.
Procedure
Extract the following CRs from the
ztp-site-generatecontainer image and push them to thesource-crdirectory:Example
LcaSubscriptionNS.yamlfile:apiVersion: v1 kind: Namespace metadata: name: openshift-lifecycle-agent annotations: workload.openshift.io/allowed: management ran.openshift.io/ztp-deploy-wave: "2" labels: kubernetes.io/metadata.name: openshift-lifecycle-agentExample
LcaSubscriptionOperGroup.yamlfile:apiVersion: operators.coreos.com/v1 kind: OperatorGroup metadata: name: lifecycle-agent-operatorgroup namespace: openshift-lifecycle-agent annotations: ran.openshift.io/ztp-deploy-wave: "2" spec: targetNamespaces: - openshift-lifecycle-agentExample
LcaSubscription.yamlfile:apiVersion: operators.coreos.com/v1alpha1 kind: Subscription metadata: name: lifecycle-agent namespace: openshift-lifecycle-agent annotations: ran.openshift.io/ztp-deploy-wave: "2" spec: channel: "stable" name: lifecycle-agent source: redhat-operators sourceNamespace: openshift-marketplace installPlanApproval: Manual status: state: AtLatestKnownExample directory structure:
├── kustomization.yaml
├── sno
│   ├── example-cnf.yaml
│   ├── common-ranGen.yaml
│   ├── group-du-sno-ranGen.yaml
│   ├── group-du-sno-validator-ranGen.yaml
│   └── ns.yaml
├── source-crs
│   ├── LcaSubscriptionNS.yaml
│   ├── LcaSubscriptionOperGroup.yaml
│   ├── LcaSubscription.yaml
Add the CRs to your common PolicyGenerator:
apiVersion: policy.open-cluster-management.io/v1
kind: PolicyGenerator
metadata:
  name: common-latest
placementBindingDefaults:
  name: common-placement-binding
policyDefaults:
  namespace: ztp-common
  placement:
    labelSelector:
      common: "true"
      du-profile: "latest"
  remediationAction: inform
  severity: low
  namespaceSelector:
    exclude:
      - kube-*
    include:
      - '*'
  evaluationInterval:
    compliant: 10m
    noncompliant: 10s
policies:
- name: common-latest-subscriptions-policy
  policyAnnotations:
    ran.openshift.io/ztp-deploy-wave: "2"
  manifests:
    - path: source-crs/LcaSubscriptionNS.yaml
    - path: source-crs/LcaSubscriptionOperGroup.yaml
    - path: source-crs/LcaSubscription.yaml
[...]
16.2.2.4. Installing and configuring the OADP Operator with GitOps ZTP
Install and configure the OADP Operator with GitOps ZTP before starting the upgrade.
Procedure
Extract the following CRs from the
ztp-site-generatecontainer image and push them to thesource-crdirectory:Example
OadpSubscriptionNS.yamlfile:apiVersion: v1 kind: Namespace metadata: name: openshift-adp annotations: ran.openshift.io/ztp-deploy-wave: "2" labels: kubernetes.io/metadata.name: openshift-adpExample
OadpSubscriptionOperGroup.yamlfile:apiVersion: operators.coreos.com/v1 kind: OperatorGroup metadata: name: redhat-oadp-operator namespace: openshift-adp annotations: ran.openshift.io/ztp-deploy-wave: "2" spec: targetNamespaces: - openshift-adpExample
OadpSubscription.yamlfile:apiVersion: operators.coreos.com/v1alpha1 kind: Subscription metadata: name: redhat-oadp-operator namespace: openshift-adp annotations: ran.openshift.io/ztp-deploy-wave: "2" spec: channel: stable-1.4 name: redhat-oadp-operator source: redhat-operators sourceNamespace: openshift-marketplace installPlanApproval: Manual status: state: AtLatestKnownExample
OadpOperatorStatus.yamlfile:apiVersion: operators.coreos.com/v1 kind: Operator metadata: name: redhat-oadp-operator.openshift-adp annotations: ran.openshift.io/ztp-deploy-wave: "2" status: components: refs: - kind: Subscription namespace: openshift-adp conditions: - type: CatalogSourcesUnhealthy status: "False" - kind: InstallPlan namespace: openshift-adp conditions: - type: Installed status: "True" - kind: ClusterServiceVersion namespace: openshift-adp conditions: - type: Succeeded status: "True" reason: InstallSucceededExample directory structure:
├── kustomization.yaml
├── sno
│   ├── example-cnf.yaml
│   ├── common-ranGen.yaml
│   ├── group-du-sno-ranGen.yaml
│   ├── group-du-sno-validator-ranGen.yaml
│   └── ns.yaml
├── source-crs
│   ├── OadpSubscriptionNS.yaml
│   ├── OadpSubscriptionOperGroup.yaml
│   ├── OadpSubscription.yaml
│   ├── OadpOperatorStatus.yaml
Add the CRs to your common
PolicyGenTemplate:apiVersion: ran.openshift.io/v1 kind: PolicyGenTemplate metadata: name: "example-common-latest" namespace: "ztp-common" spec: bindingRules: common: "true" du-profile: "latest" sourceFiles: - fileName: OadpSubscriptionNS.yaml policyName: "subscriptions-policy" - fileName: OadpSubscriptionOperGroup.yaml policyName: "subscriptions-policy" - fileName: OadpSubscription.yaml policyName: "subscriptions-policy" - fileName: OadpOperatorStatus.yaml policyName: "subscriptions-policy" [...]Create the
DataProtectionApplicationCR and the S3 secret only for the target cluster:Extract the following CRs from the
ztp-site-generatecontainer image and push them to thesource-crdirectory:Example
OadpDataProtectionApplication.yamlfile:apiVersion: oadp.openshift.io/v1alpha1 kind: DataProtectionApplication metadata: name: dataprotectionapplication namespace: openshift-adp annotations: ran.openshift.io/ztp-deploy-wave: "100" spec: configuration: restic: enable: false velero: defaultPlugins: - aws - openshift resourceTimeout: 10m backupLocations: - velero: config: profile: "default" region: minio s3Url: $url insecureSkipTLSVerify: "true" s3ForcePathStyle: "true" provider: aws default: true credential: key: cloud name: cloud-credentials objectStorage: bucket: $bucketName prefix: $prefixName status: conditions: - reason: Complete status: "True" type: Reconciled-
spec.configuration.restic.enablemust be set tofalsefor an image-based upgrade because persistent volume contents are retained and reused after the upgrade. -
bucketdefines the bucket name created in S3 backend.prefixdefines the name of the subdirectory that will be automatically created in the bucket. The combination of bucket and prefix must be unique for each target cluster to avoid interference between them. To ensure a unique storage directory for each target cluster, you can use the Red Hat Advanced Cluster Management hub template function, for example,prefix: {{hub .ManagedClusterName hub}}.
Example
OadpSecret.yamlfile:apiVersion: v1 kind: Secret metadata: name: cloud-credentials namespace: openshift-adp annotations: ran.openshift.io/ztp-deploy-wave: "100" type: OpaqueExample
OadpBackupStorageLocationStatus.yamlfile:apiVersion: velero.io/v1 kind: BackupStorageLocation metadata: name: dataprotectionapplication-1 namespace: openshift-adp annotations: ran.openshift.io/ztp-deploy-wave: "100" status: phase: AvailableThe
namevalue in theBackupStorageLocationresource must follow a specific naming convention that aligns with the correspondingDataProtectionApplicationresource.-
The name must use the
<DataProtectionApplication.metadata.name>-<index>pattern. -
The
<index>represents the position of the corresponding entry in thespec.backupLocationsfield in theDataProtectionApplicationresource. The position starts at1. -
If you change the
metadata.namevalue of theDataProtectionApplicationresource in theOadpDataProtectionApplication.yamlfile, you must also update themetadata.namefield in theBackupStorageLocationresource to match the new value.
The
OadpBackupStorageLocationStatus.yamlCR verifies the availability of backup storage locations created by OADP.-
Add the CRs to your site
PolicyGenTemplatewith overrides:apiVersion: ran.openshift.io/v1 kind: PolicyGenTemplate metadata: name: "example-cnf" namespace: "ztp-site" spec: bindingRules: sites: "example-cnf" du-profile: "latest" mcp: "master" sourceFiles: ... - fileName: OadpSecret.yaml policyName: "config-policy" data: cloud: <your_credentials> - fileName: OadpDataProtectionApplication.yaml policyName: "config-policy" spec: backupLocations: - velero: config: region: minio s3Url: <your_S3_URL> profile: "default" insecureSkipTLSVerify: "true" s3ForcePathStyle: "true" provider: aws default: true credential: key: cloud name: cloud-credentials objectStorage: bucket: <your_bucket_name> prefix: <cluster_name> - fileName: OadpBackupStorageLocationStatus.yaml policyName: "config-policy"
where:
your_credentials- Specifies your credentials for your S3 storage backend.
OadpDataProtectionApplication.yaml-
If more than one
backupLocationsentries are defined in theOadpDataProtectionApplicationCR, ensure that each location has a correspondingOadpBackupStorageLocationCR added for status tracking. Ensure that the name of each additionalOadpBackupStorageLocationCR is overridden with the correct index as described in the exampleOadpBackupStorageLocationStatus.yamlfile. your_S3_URL- Specifies the URL for your S3-compatible bucket.
bucketandprefix-
The
bucketdefines the bucket name that is created in S3 backend. Theprefixdefines the name of the subdirectory that will be automatically created in thebucket. The combination ofbucketandprefixmust be unique for each target cluster to avoid interference between them. To ensure a unique storage directory for each target cluster, you can use the Red Hat Advanced Cluster Management hub template function, for example,prefix: {{hub .ManagedClusterName hub}}.
16.2.3. Generating a seed image for the image-based upgrade with the Lifecycle Agent
Use the Lifecycle Agent to generate the seed image with the SeedGenerator custom resource (CR).
16.2.3.1. Seed image configuration
The seed image targets a set of single-node OpenShift clusters with the same hardware and similar configuration. This means that the seed image must have all of the components and configuration that the seed cluster shares with the target clusters. Therefore, the seed image generated from the seed cluster cannot contain any cluster-specific configuration.
The following table lists the components, resources, and configurations that you must and must not include in your seed image:
| Cluster configuration | Include in seed image |
|---|---|
| Performance profile | Yes |
|
| Yes |
| IP version configuration, either IPv4, IPv6, or dual-stack networking | Yes |
| Set of Day 2 Operators, including the Lifecycle Agent and the OADP Operator | Yes |
| Disconnected registry configuration [2] | Yes |
| Valid proxy configuration [3] | Yes |
| FIPS configuration | Yes |
| Dedicated partition on the primary disk for container storage that matches the size of the target clusters | Yes |
| Local volumes
| No |
|
OADP | No |
- If the seed cluster is installed in a disconnected environment, the target clusters must also be installed in a disconnected environment.
- The proxy configuration must be either enabled or disabled in both the seed and target clusters. However, the proxy servers configured on the clusters does not have to match.
16.2.3.1.1. Seed image configuration using the RAN DU profile
The following table lists the components, resources, and configurations that you must and must not include in the seed image when using the RAN DU profile:
| Resource | Include in seed image |
|---|---|
| All extra manifests that are applied as part of Day 0 installation | Yes |
| All Day 2 Operator subscriptions | Yes |
|
| Yes |
|
| Yes |
|
| Yes |
|
| Yes |
|
| Yes |
|
|
No, if it is used in |
|
| No |
|
| No |
|
| Yes |
| Resource | Apply as extra manifest |
|---|---|
|
| Yes Note
The DU profile includes the Cluster Logging Operator, but the profile does not configure or apply any Cluster Logging Operator CRs. To enable log forwarding, include the |
|
| Yes |
|
| Yes |
|
| Yes |
|
| Yes |
|
| If the interfaces of the target cluster are common with the seed cluster, you can include them in the seed image. Otherwise, apply it as extra manifests. |
|
| If the configuration, including namespaces, is exactly the same on both the seed and target cluster, you can include them in the seed image. Otherwise, apply them as extra manifests. |
16.2.3.2. Generating a seed image with the Lifecycle Agent
Use the Lifecycle Agent to generate a seed image from a managed cluster. The Operator checks for required system configurations, performs any necessary system cleanup before generating the seed image, and launches the image generation. The seed image generation includes the following tasks:
- Stopping cluster Operators
- Preparing the seed image configuration
-
Generating and pushing the seed image to the image repository specified in the
SeedGeneratorCR - Restoring cluster Operators
- Expiring seed cluster certificates
- Generating new certificates for the seed cluster
-
Restoring and updating the
SeedGeneratorCR on the seed cluster
Prerequisites
- RHACM and multicluster engine for Kubernetes Operator are not installed on the seed cluster.
- You have configured a shared container directory on the seed cluster.
- You have installed the minimum version of the OADP Operator and the Lifecycle Agent on the seed cluster.
- Ensure that persistent volumes are not configured on the seed cluster.
-
Ensure that the
LocalVolumeCR does not exist on the seed cluster if the Local Storage Operator is used. -
Ensure that the
LVMClusterCR does not exist on the seed cluster if LVM Storage is used. -
Ensure that the
DataProtectionApplicationCR does not exist on the seed cluster if OADP is used.
Procedure
Detach the managed cluster from the hub to delete any RHACM-specific resources from the seed cluster that must not be in the seed image:
Manually detach the seed cluster by running the following command:
$ oc delete managedcluster sno-worker-example-
Wait until the managed cluster is removed. After the cluster is removed, create the proper
SeedGeneratorCR. The Lifecycle Agent cleans up the RHACM artifacts.
-
Wait until the managed cluster is removed. After the cluster is removed, create the proper
If you are using GitOps ZTP, detach your cluster by removing the seed cluster’s
SiteConfigCR from thekustomization.yaml.If you have a
kustomization.yamlfile that references multipleSiteConfigCRs, remove your seed cluster’sSiteConfigCR from thekustomization.yaml:apiVersion: kustomize.config.k8s.io/v1beta1 kind: Kustomization generators: #- example-seed-sno1.yaml - example-target-sno2.yaml - example-target-sno3.yamlIf you have a
kustomization.yamlthat references oneSiteConfigCR, remove your seed cluster’sSiteConfigCR from thekustomization.yamland add thegenerators: {}line:apiVersion: kustomize.config.k8s.io/v1beta1 kind: Kustomization generators: {}Commit the
kustomization.yamlchanges in your Git repository and push the changes to your repository.The ArgoCD pipeline detects the changes and removes the managed cluster.
Create the
Secretobject so that you can push the seed image to your registry.Create the authentication file by running the following commands:
$ MY_USER=myuserid$ AUTHFILE=/tmp/my-auth.json$ podman login --authfile ${AUTHFILE} -u ${MY_USER} quay.io/${MY_USER}$ base64 -w 0 ${AUTHFILE} ; echoCopy the output into the
seedAuthfield in theSecretYAML file namedseedgenin theopenshift-lifecycle-agentnamespace:apiVersion: v1 kind: Secret metadata: name: seedgen1 namespace: openshift-lifecycle-agent type: Opaque data: seedAuth: <encoded_AUTHFILE>2 Apply the
Secretby running the following command:$ oc apply -f secretseedgenerator.yaml
Create the
SeedGeneratorCR:apiVersion: lca.openshift.io/v1 kind: SeedGenerator metadata: name: seedimage1 spec: seedImage: <seed_container_image>2 Generate the seed image by running the following command:
$ oc apply -f seedgenerator.yamlImportantThe cluster reboots and loses API capabilities while the Lifecycle Agent generates the seed image. Applying the
SeedGeneratorCR stops thekubeletand the CRI-O operations, then it starts the image generation.
If you want to generate more seed images, you must provision a new seed cluster with the version that you want to generate a seed image from.
Verification
After the cluster recovers and it is available, you can check the status of the
SeedGeneratorCR by running the following command:$ oc get seedgenerator -o yaml
Example output
status:
  conditions:
  - lastTransitionTime: "2024-02-13T21:24:26Z"
    message: Seed Generation completed
    observedGeneration: 1
    reason: Completed
    status: "False"
    type: SeedGenInProgress
  - lastTransitionTime: "2024-02-13T21:24:26Z"
    message: Seed Generation completed
    observedGeneration: 1
    reason: Completed
    status: "True"
    type: SeedGenCompleted
observedGeneration: 1- 1
- The seed image generation is complete.
16.2.4. Creating ConfigMap objects for the image-based upgrade with the Lifecycle Agent
The Lifecycle Agent needs all your OADP resources, extra manifests, and custom catalog sources wrapped in a ConfigMap object to process them for the image-based upgrade.
16.2.4.1. Creating OADP ConfigMap objects for the image-based upgrade with Lifecycle Agent
Create your OADP resources that are used to back up and restore your resources during the upgrade.
Prerequisites
- You have generated a seed image from a compatible seed cluster.
- You have created OADP backup and restore resources.
- You have created a separate partition on the target cluster for the container images that is shared between stateroots. For more information, see "Configuring a shared container partition for the image-based upgrade".
- You have deployed a version of Lifecycle Agent that is compatible with the version used with the seed image.
-
You have installed the OADP Operator, the
DataProtectionApplicationCR, and its secret on the target cluster. - You have created an S3-compatible storage solution and a ready-to-use bucket with proper credentials configured. For more information, see "About installing OADP".
Procedure
Create the OADP
BackupandRestoreCRs for platform artifacts in the same namespace where the OADP Operator is installed, which isopenshift-adp.If the target cluster is managed by RHACM, add the following
PlatformBackupRestore.yamlfile for backing up and restoring RHACM artifacts:apiVersion: velero.io/v1 kind: Backup metadata: name: acm-klusterlet annotations: lca.openshift.io/apply-label: "apps/v1/deployments/open-cluster-management-agent/klusterlet,v1/secrets/open-cluster-management-agent/bootstrap-hub-kubeconfig,rbac.authorization.k8s.io/v1/clusterroles/klusterlet,v1/serviceaccounts/open-cluster-management-agent/klusterlet,scheduling.k8s.io/v1/priorityclasses/klusterlet-critical,rbac.authorization.k8s.io/v1/clusterroles/open-cluster-management:klusterlet-admin-aggregate-clusterrole,rbac.authorization.k8s.io/v1/clusterrolebindings/klusterlet,operator.open-cluster-management.io/v1/klusterlets/klusterlet,apiextensions.k8s.io/v1/customresourcedefinitions/klusterlets.operator.open-cluster-management.io,v1/secrets/open-cluster-management-agent/open-cluster-management-image-pull-credentials" labels: velero.io/storage-location: default namespace: openshift-adp spec: includedNamespaces: - open-cluster-management-agent includedClusterScopedResources: - klusterlets.operator.open-cluster-management.io - clusterroles.rbac.authorization.k8s.io - clusterrolebindings.rbac.authorization.k8s.io - priorityclasses.scheduling.k8s.io includedNamespaceScopedResources: - deployments - serviceaccounts - secrets excludedNamespaceScopedResources: [] --- apiVersion: velero.io/v1 kind: Restore metadata: name: acm-klusterlet namespace: openshift-adp labels: velero.io/storage-location: default annotations: lca.openshift.io/apply-wave: "1" spec: backupName: acm-klusterletNoteIf your
multiclusterHubCR does not have.spec.imagePullSecretdefined and the secret does not exist on theopen-cluster-management-agentnamespace in your hub cluster, removev1/secrets/open-cluster-management-agent/open-cluster-management-image-pull-credentialsfrom thelca.openshift.io/apply-labelannotation.If you created persistent volumes on your cluster through LVM Storage, add the following
PlatformBackupRestoreLvms.yamlfile for LVM Storage artifacts:apiVersion: velero.io/v1 kind: Backup metadata: labels: velero.io/storage-location: default name: lvmcluster namespace: openshift-adp spec: includedNamespaces: - openshift-storage includedNamespaceScopedResources: - lvmclusters - lvmvolumegroups - lvmvolumegroupnodestatuses --- apiVersion: velero.io/v1 kind: Restore metadata: name: lvmcluster namespace: openshift-adp labels: velero.io/storage-location: default annotations: lca.openshift.io/apply-wave: "2" spec: backupName: lvmcluster-
The
lca.openshift.io/apply-wavevalue must be lower than the values specified in the applicationRestoreCRs.
-
The
If you need to restore applications after the upgrade, create the OADP
BackupandRestoreCRs for your application in theopenshift-adpnamespace.Create the OADP CRs for cluster-scoped application artifacts in the
openshift-adpnamespace, for example:apiVersion: velero.io/v1 kind: Backup metadata: annotations: lca.openshift.io/apply-label: "apiextensions.k8s.io/v1/customresourcedefinitions/test.example.com,security.openshift.io/v1/securitycontextconstraints/test,rbac.authorization.k8s.io/v1/clusterroles/test-role,rbac.authorization.k8s.io/v1/clusterrolebindings/system:openshift:scc:test" name: backup-app-cluster-resources labels: velero.io/storage-location: default namespace: openshift-adp spec: includedClusterScopedResources: - customresourcedefinitions - securitycontextconstraints - clusterrolebindings - clusterroles excludedClusterScopedResources: - Namespace --- apiVersion: velero.io/v1 kind: Restore metadata: name: test-app-cluster-resources namespace: openshift-adp labels: velero.io/storage-location: default annotations: lca.openshift.io/apply-wave: "3" spec: backupName: backup-app-cluster-resources-
Replace the example resource names in the
lca.openshift.io/apply-labelfield with your actual resources. -
The value in the
lca.openshift.io/apply-wavefield must be higher than the value in the platformRestoreCRs and lower than the value in the application namespace-scopedRestoreCR.
-
Replace the example resource names in the
Create the OADP CRs for your namespace-scoped application artifacts.
When using LSO, see the following example OADP CRs:
apiVersion: velero.io/v1 kind: Backup metadata: labels: velero.io/storage-location: default name: backup-app namespace: openshift-adp spec: includedNamespaces: - test includedNamespaceScopedResources: - secrets - persistentvolumeclaims - deployments - statefulsets - configmaps - cronjobs - services - job - poddisruptionbudgets - <application_custom_resources> excludedClusterScopedResources: - persistentVolumes --- apiVersion: velero.io/v1 kind: Restore metadata: name: test-app namespace: openshift-adp labels: velero.io/storage-location: default annotations: lca.openshift.io/apply-wave: "4" spec: backupName: backup-app-
Define custom resources for your application in the
includedNamespaceScopedResourcesfield.
When using LVM Storage, see the following example OADP CRs:
apiVersion: velero.io/v1 kind: Backup metadata: labels: velero.io/storage-location: default name: backup-app namespace: openshift-adp spec: includedNamespaces: - test includedNamespaceScopedResources: - secrets - persistentvolumeclaims - deployments - statefulsets - configmaps - cronjobs - services - job - poddisruptionbudgets - <application_custom_resources> includedClusterScopedResources: - persistentVolumes - logicalvolumes.topolvm.io - volumesnapshotcontents --- apiVersion: velero.io/v1 kind: Restore metadata: name: test-app namespace: openshift-adp labels: velero.io/storage-location: default annotations: lca.openshift.io/apply-wave: "4" spec: backupName: backup-app restorePVs: true restoreStatus: includedResources: - logicalvolumeswhere:
-
<application_custom_resources>: Define custom resources for your application. -
persistentVolumes: Required field. -
logicalvolumes.topolvm.io: Required field. -
volumesnapshotcontents: Optional if you use LVM Storage volume snapshots. -
restoreStatus.includedResources: Required field for restoring logical volumes.
ImportantThe same version of the applications must function on both the current and the target release of OpenShift Container Platform.
-
Define custom resources for your application in the
Create the
ConfigMapobject for your OADP CRs by running the following command:$ oc create configmap oadp-cm-example --from-file=example-oadp-resources.yaml=<path_to_oadp_crs> -n openshift-adpPatch the
ImageBasedUpgradeCR by running the following command:$ oc patch imagebasedupgrades.lca.openshift.io upgrade \ -p='{"spec": {"oadpContent": [{"name": "oadp-cm-example", "namespace": "openshift-adp"}]}}' \ --type=merge -n openshift-lifecycle-agent
16.2.4.2. Creating ConfigMap objects of extra manifests for the image-based upgrade with Lifecycle Agent
Create additional manifests that you want to apply to the target cluster.
If you add more than one extra manifest, and the manifests must be applied in a specific order, you must prefix the filenames of the manifests with numbers that represent the required order. For example, 00-namespace.yaml, 01-sriov-extra-manifest.yaml, and so on.
Procedure
Create a YAML file that contains your extra manifests, such as SR-IOV.
Example SR-IOV resources
apiVersion: sriovnetwork.openshift.io/v1 kind: SriovNetworkNodePolicy metadata: name: "example-sriov-node-policy" namespace: openshift-sriov-network-operator spec: deviceType: vfio-pci isRdma: false nicSelector: pfNames: [ens1f0] nodeSelector: node-role.kubernetes.io/master: "" mtu: 1500 numVfs: 8 priority: 99 resourceName: example-sriov-node-policy --- apiVersion: sriovnetwork.openshift.io/v1 kind: SriovNetwork metadata: name: "example-sriov-network" namespace: openshift-sriov-network-operator spec: ipam: |- { } linkState: auto networkNamespace: sriov-namespace resourceName: example-sriov-node-policy spoofChk: "on" trust: "off"Create the
ConfigMapobject by running the following command:$ oc create configmap example-extra-manifests-cm --from-file=example-extra-manifests.yaml=<path_to_extramanifest> -n openshift-lifecycle-agentPatch the
ImageBasedUpgradeCR by running the following command:$ oc patch imagebasedupgrades.lca.openshift.io upgrade \ -p='{"spec": {"extraManifests": [{"name": "example-extra-manifests-cm", "namespace": "openshift-lifecycle-agent"}]}}' \ --type=merge -n openshift-lifecycle-agent
16.2.4.3. Creating ConfigMap objects of custom catalog sources for the image-based upgrade with Lifecycle Agent
You can keep your custom catalog sources after the upgrade by generating a ConfigMap object for your catalog sources and adding them to the spec.extraManifest field in the ImageBasedUpgrade CR. For more information about catalog sources, see "Catalog source".
Procedure
Create a YAML file that contains the
CatalogSourceCR:apiVersion: operators.coreos.com/v1 kind: CatalogSource metadata: name: example-catalogsources namespace: openshift-marketplace spec: sourceType: grpc displayName: disconnected-redhat-operators image: quay.io/example-org/example-catalog:v1Create the
ConfigMapobject by running the following command:$ oc create configmap example-catalogsources-cm --from-file=example-catalogsources.yaml=<path_to_catalogsource_cr> -n openshift-lifecycle-agentPatch the
ImageBasedUpgradeCR by running the following command:$ oc patch imagebasedupgrades.lca.openshift.io upgrade \ -p='{"spec": {"extraManifests": [{"name": "example-catalogsources-cm", "namespace": "openshift-lifecycle-agent"}]}}' \ --type=merge -n openshift-lifecycle-agent
16.2.5. Creating ConfigMap objects for the image-based upgrade with the Lifecycle Agent using GitOps ZTP
Create your OADP resources, extra manifests, and custom catalog sources wrapped in a ConfigMap object to prepare for the image-based upgrade.
16.2.5.1. Creating OADP resources for the image-based upgrade with GitOps ZTP
Prepare your OADP resources to restore your application after an upgrade.
Prerequisites
- You have provisioned one or more managed clusters with GitOps ZTP.
-
You have logged in as a user with
cluster-adminprivileges. - You have generated a seed image from a compatible seed cluster.
- You have created a separate partition on the target cluster for the container images that is shared between stateroots. For more information, see "Configuring a shared container partition between ostree stateroots when using GitOps ZTP".
- You have deployed a version of Lifecycle Agent that is compatible with the version used with the seed image.
-
You have installed the OADP Operator, the
DataProtectionApplicationCR, and its secret on the target cluster. - You have created an S3-compatible storage solution and a ready-to-use bucket with proper credentials configured. For more information, see "Installing and configuring the OADP Operator with GitOps ZTP".
-
The
openshift-adpnamespace for the OADPConfigMapobject must exist on all managed clusters and the hub for the OADPConfigMapto be generated and copied to the clusters.
Procedure
Ensure that your Git repository that you use with the ArgoCD policies application contains the following directory structure:
├── source-crs/ │ ├── ibu/ │ │ ├── ImageBasedUpgrade.yaml │ │ ├── PlatformBackupRestore.yaml │ │ ├── PlatformBackupRestoreLvms.yaml │ │ ├── PlatformBackupRestoreWithIBGU.yaml ├── ... ├── kustomization.yamlThe
source-crs/ibu/PlatformBackupRestoreWithIBGU.yamlfile is provided in the ZTP container image.PlatformBackupRestoreWithIBGU.yaml
apiVersion: velero.io/v1 kind: Backup metadata: name: acm-klusterlet annotations: lca.openshift.io/apply-label: "apps/v1/deployments/open-cluster-management-agent/klusterlet,v1/secrets/open-cluster-management-agent/bootstrap-hub-kubeconfig,rbac.authorization.k8s.io/v1/clusterroles/klusterlet,v1/serviceaccounts/open-cluster-management-agent/klusterlet,scheduling.k8s.io/v1/priorityclasses/klusterlet-critical,rbac.authorization.k8s.io/v1/clusterroles/open-cluster-management:klusterlet-work:ibu-role,rbac.authorization.k8s.io/v1/clusterroles/open-cluster-management:klusterlet-admin-aggregate-clusterrole,rbac.authorization.k8s.io/v1/clusterrolebindings/klusterlet,operator.open-cluster-management.io/v1/klusterlets/klusterlet,apiextensions.k8s.io/v1/customresourcedefinitions/klusterlets.operator.open-cluster-management.io,v1/secrets/open-cluster-management-agent/open-cluster-management-image-pull-credentials"1 labels: velero.io/storage-location: default namespace: openshift-adp spec: includedNamespaces: - open-cluster-management-agent includedClusterScopedResources: - klusterlets.operator.open-cluster-management.io - clusterroles.rbac.authorization.k8s.io - clusterrolebindings.rbac.authorization.k8s.io - priorityclasses.scheduling.k8s.io includedNamespaceScopedResources: - deployments - serviceaccounts - secrets excludedNamespaceScopedResources: [] --- apiVersion: velero.io/v1 kind: Restore metadata: name: acm-klusterlet namespace: openshift-adp labels: velero.io/storage-location: default annotations: lca.openshift.io/apply-wave: "1" spec: backupName: acm-klusterlet- 1
- If your
multiclusterHubCR does not have.spec.imagePullSecretdefined and the secret does not exist on theopen-cluster-management-agentnamespace in your hub cluster, removev1/secrets/open-cluster-management-agent/open-cluster-management-image-pull-credentials.
NoteIf you perform the image-based upgrade directly on managed clusters, use the
PlatformBackupRestore.yamlfile.If you use LVM Storage to create persistent volumes, you can use the
source-crs/ibu/PlatformBackupRestoreLvms.yamlprovided in the ZTP container image to back up your LVM Storage resources.PlatformBackupRestoreLvms.yaml
apiVersion: velero.io/v1 kind: Backup metadata: labels: velero.io/storage-location: default name: lvmcluster namespace: openshift-adp spec: includedNamespaces: - openshift-storage includedNamespaceScopedResources: - lvmclusters - lvmvolumegroups - lvmvolumegroupnodestatuses --- apiVersion: velero.io/v1 kind: Restore metadata: name: lvmcluster namespace: openshift-adp labels: velero.io/storage-location: default annotations: lca.openshift.io/apply-wave: "2" spec: backupName: lvmcluster-
The
lca.openshift.io/apply-wavevalue must be lower than the values specified in the applicationRestoreCRs.
If you need to restore applications after the upgrade, create the OADP
BackupandRestoreCRs for your application in theopenshift-adpnamespace:Create the OADP CRs for cluster-scoped application artifacts in the
openshift-adpnamespace:Example OADP CRs for cluster-scoped application artifacts for LSO and LVM Storage
apiVersion: velero.io/v1 kind: Backup metadata: annotations: lca.openshift.io/apply-label: "apiextensions.k8s.io/v1/customresourcedefinitions/test.example.com,security.openshift.io/v1/securitycontextconstraints/test,rbac.authorization.k8s.io/v1/clusterroles/test-role,rbac.authorization.k8s.io/v1/clusterrolebindings/system:openshift:scc:test" name: backup-app-cluster-resources labels: velero.io/storage-location: default namespace: openshift-adp spec: includedClusterScopedResources: - customresourcedefinitions - securitycontextconstraints - clusterrolebindings - clusterroles excludedClusterScopedResources: - Namespace --- apiVersion: velero.io/v1 kind: Restore metadata: name: test-app-cluster-resources namespace: openshift-adp labels: velero.io/storage-location: default annotations: lca.openshift.io/apply-wave: "3" spec: backupName: backup-app-cluster-resources-
Replace the example resource names in the
lca.openshift.io/apply-labelfield with your actual resources. -
The value in the
lca.openshift.io/apply-wavefield must be higher than the value in the platformRestoreCRs and lower than the value in the application namespace-scopedRestoreCR.
-
Replace the example resource names in the
Create the OADP CRs for your namespace-scoped application artifacts in the
source-crs/custom-crsdirectory:Example OADP CRs namespace-scoped application artifacts when LSO is used
apiVersion: velero.io/v1 kind: Backup metadata: labels: velero.io/storage-location: default name: backup-app namespace: openshift-adp spec: includedNamespaces: - test includedNamespaceScopedResources: - secrets - persistentvolumeclaims - deployments - statefulsets - configmaps - cronjobs - services - job - poddisruptionbudgets - <application_custom_resources> excludedClusterScopedResources: - persistentVolumes --- apiVersion: velero.io/v1 kind: Restore metadata: name: test-app namespace: openshift-adp labels: velero.io/storage-location: default annotations: lca.openshift.io/apply-wave: "4" spec: backupName: backup-app-
Define custom resources for your application in the
includedNamespaceScopedResourcesfield.
Example OADP CRs namespace-scoped application artifacts when LVM Storage is used
apiVersion: velero.io/v1
kind: Backup
metadata:
  labels:
    velero.io/storage-location: default
  name: backup-app
  namespace: openshift-adp
spec:
  includedNamespaces:
  - test
  includedNamespaceScopedResources:
  - secrets
  - persistentvolumeclaims
  - deployments
  - statefulsets
  - configmaps
  - cronjobs
  - services
  - job
  - poddisruptionbudgets
  - <application_custom_resources>
  includedClusterScopedResources:
  - persistentVolumes
  - logicalvolumes.topolvm.io
  - volumesnapshotcontents
---
apiVersion: velero.io/v1
kind: Restore
metadata:
  name: test-app
  namespace: openshift-adp
  labels:
    velero.io/storage-location: default
  annotations:
    lca.openshift.io/apply-wave: "4"
spec:
  backupName:
    backup-app
  restorePVs: true
  restoreStatus:
    includedResources:
    - logicalvolumes
where:
-
<application_custom_resources>: Define custom resources for your application. -
persistentVolumes: Required field. -
logicalvolumes.topolvm.io: Required field. -
volumesnapshotcontents: Optional if you use LVM Storage volume snapshots. -
restoreStatus.includedResources: Required field for restoring logical volumes.
ImportantThe same version of the applications must function on both the current and the target release of OpenShift Container Platform.
-
Define custom resources for your application in the
Create a
kustomization.yamlwith the following content:apiVersion: kustomize.config.k8s.io/v1beta1 kind: Kustomization configMapGenerator:1 - files: - source-crs/ibu/PlatformBackupRestoreWithIBGU.yaml #- source-crs/custom-crs/ApplicationClusterScopedBackupRestore.yaml #- source-crs/custom-crs/ApplicationApplicationBackupRestoreLso.yaml name: oadp-cm namespace: openshift-adp2 generatorOptions: disableNameSuffixHash: true- Push the changes to your Git repository.
16.2.5.2. Labeling extra manifests for the image-based upgrade with GitOps ZTP
Label your extra manifests so that the Lifecycle Agent can extract resources that are labeled with the lca.openshift.io/target-ocp-version: <target_version> label.
Prerequisites
- You have provisioned one or more managed clusters with GitOps ZTP.
-
You have logged in as a user with
cluster-adminprivileges. - You have generated a seed image from a compatible seed cluster.
- You have created a separate partition on the target cluster for the container images that is shared between stateroots. For more information, see "Configuring a shared container directory between ostree stateroots when using GitOps ZTP".
- You have deployed a version of Lifecycle Agent that is compatible with the version used with the seed image.
Procedure
Label your required extra manifests with the
lca.openshift.io/target-ocp-version: <target_version>label in your existing sitePolicyGenTemplateCR:apiVersion: ran.openshift.io/v1 kind: PolicyGenTemplate metadata: name: example-sno spec: bindingRules: sites: "example-sno" du-profile: "4.15" mcp: "master" sourceFiles: - fileName: SriovNetwork.yaml policyName: "config-policy" metadata: name: "sriov-nw-du-fh" labels: lca.openshift.io/target-ocp-version: "4.15"1 spec: resourceName: du_fh vlan: 140 - fileName: SriovNetworkNodePolicy.yaml policyName: "config-policy" metadata: name: "sriov-nnp-du-fh" labels: lca.openshift.io/target-ocp-version: "4.15" spec: deviceType: netdevice isRdma: false nicSelector: pfNames: ["ens5f0"] numVfs: 8 priority: 10 resourceName: du_fh - fileName: SriovNetwork.yaml policyName: "config-policy" metadata: name: "sriov-nw-du-mh" labels: lca.openshift.io/target-ocp-version: "4.15" spec: resourceName: du_mh vlan: 150 - fileName: SriovNetworkNodePolicy.yaml policyName: "config-policy" metadata: name: "sriov-nnp-du-mh" labels: lca.openshift.io/target-ocp-version: "4.15" spec: deviceType: vfio-pci isRdma: false nicSelector: pfNames: ["ens7f0"] numVfs: 8 priority: 10 resourceName: du_mh - fileName: DefaultCatsrc.yaml2 policyName: "config-policy" metadata: name: default-cat-source namespace: openshift-marketplace labels: lca.openshift.io/target-ocp-version: "4.15" spec: displayName: default-cat-source image: quay.io/example-org/example-catalog:v1- 1
- Ensure that the
lca.openshift.io/target-ocp-versionlabel matches either the y-stream or the z-stream of the target OpenShift Container Platform version that is specified in thespec.seedImageRef.versionfield of theImageBasedUpgradeCR. The Lifecycle Agent only applies the CRs that match the specified version. - 2
- If you do not want to use custom catalog sources, remove this entry.
- Push the changes to your Git repository.
16.2.6. Configuring the automatic image cleanup of the container storage disk
Configure when the Lifecycle Agent cleans up unpinned images in the Prep stage by setting a minimum threshold for available storage space through annotations. The default container storage disk usage threshold is 50%.
The Lifecycle Agent does not delete images that are pinned in CRI-O or are currently used. The Operator selects the images for deletion by starting with dangling images and then sorting the images from oldest to newest that is determined by the image Created timestamp.
16.2.6.1. Configuring the automatic image cleanup of the container storage disk
Configure the minimum threshold for available storage space through annotations.
Prerequisites
-
You have created an
ImageBasedUpgradeCR.
Procedure
Increase the threshold to 65% by running the following command:
$ oc -n openshift-lifecycle-agent annotate ibu upgrade image-cleanup.lca.openshift.io/disk-usage-threshold-percent='65'(Optional) Remove the threshold override by running the following command:
$ oc -n openshift-lifecycle-agent annotate ibu upgrade image-cleanup.lca.openshift.io/disk-usage-threshold-percent-
16.2.6.2. Disable the automatic image cleanup of the container storage disk
Disable the automatic image cleanup threshold.
Procedure
Disable the automatic image cleanup by running the following command:
$ oc -n openshift-lifecycle-agent annotate ibu upgrade image-cleanup.lca.openshift.io/on-prep='Disabled'(Optional) Enable automatic image cleanup again by running the following command:
$ oc -n openshift-lifecycle-agent annotate ibu upgrade image-cleanup.lca.openshift.io/on-prep-
16.3. Performing an image-based upgrade for single-node OpenShift clusters with the Lifecycle Agent
You can use the Lifecycle Agent to do a manual image-based upgrade of a single-node OpenShift cluster.
When you deploy the Lifecycle Agent on a cluster, an ImageBasedUpgrade CR is automatically created. You update this CR to specify the image repository of the seed image and to move through the different stages.
16.3.1. Moving to the Prep stage of the image-based upgrade with Lifecycle Agent
When you deploy the Lifecycle Agent on a cluster, the Lifecycle Agent automatically creates an ImageBasedUpgrade custom resource (CR).
After you create all the resources that you need during the upgrade, you can move on to the Prep stage. For more information, see the "Creating ConfigMap objects for the image-based upgrade with Lifecycle Agent" section.
In a disconnected environment, if the seed cluster’s release image registry is different from the target cluster’s release image registry, you must create an ImageDigestMirrorSet (IDMS) resource to configure alternative mirrored repository locations. For more information, see "Configuring image registry repository mirroring".
You can retrieve the release registry used in the seed image by running the following command:
$ skopeo inspect docker://<imagename> | jq -r '.Labels."com.openshift.lifecycle-agent.seed_cluster_info" | fromjson | .release_registry'Prerequisites
- You have created resources to back up and restore your clusters.
Procedure
Check that you have patched your
ImageBasedUpgradeCR:apiVersion: lca.openshift.io/v1 kind: ImageBasedUpgrade metadata: name: upgrade spec: stage: Idle seedImageRef: version: <target_version> image: <seed_container_image> pullSecretRef: <seed_pull_secret> autoRollbackOnFailure: {} initMonitorTimeoutSeconds: <initMonitorTimeoutSeconds> extraManifests: - name: example-extra-manifests-cm namespace: openshift-lifecycle-agent - name: example-catalogsources-cm namespace: openshift-lifecycle-agent oadpContent: - name: oadp-cm-example namespace: openshift-adpwhere:
<target_version>- Target platform version. The value must match the version of the seed image.
<seed_container_image>- Repository where the target cluster can pull the seed image from.
<seed_pull_secret>- Reference to a secret with credentials to pull container images if the images are in a private registry.
<initMonitorTimeoutSeconds>-
Optional: Time frame in seconds to roll back if the upgrade does not complete within that time frame after the first reboot. If not defined or set to
0, the Lifecycle Agent uses the default value of1800seconds (30 minutes). extraManifests-
Optional: List of
ConfigMapresources. These resources contain your custom catalog sources to retain after the upgrade and any extra manifests that the seed image does not include. oadpContent-
List of
ConfigMapresources that contain the OADPBackupandRestoreCRs.
To start the
Prepstage, change the value of thestagefield toPrepin theImageBasedUpgradeCR by running the following command:$ oc patch imagebasedupgrades.lca.openshift.io upgrade -p='{"spec": {"stage": "Prep"}}' --type=merge -n openshift-lifecycle-agentIf you include
ConfigMapobjects for OADP resources and extra manifests, Lifecycle Agent validates the specifiedConfigMapobjects during thePrepstage.The following issues might occur:
-
Validation warnings or errors if the Lifecycle Agent detects any issues with the
extraManifestsparameters. -
Validation errors if the Lifecycle Agent detects any issues with the
oadpContentparameters.
Validation warnings do not block the
Upgradestage but you must decide if it is safe to proceed with the upgrade. These warnings, for example missing custom resource definitions (CRDs), namespaces, or dry run failures, update thestatus.conditionsfor thePrepstage andannotationfields in theImageBasedUpgradeCR with details about the warning. The following example shows these details:# ... metadata: annotations: extra-manifest.lca.openshift.io/validation-warning: '...' # ...However, validation errors, such as adding
MachineConfigor Operator manifests to extra manifests, cause thePrepstage to fail and block theUpgradestage.When the validations pass, the cluster creates a new
ostreestateroot, which involves pulling and unpacking the seed image, and running host-level commands. Finally, the Lifecycle Agent precaches all the required images on the target cluster.-
Validation warnings or errors if the Lifecycle Agent detects any issues with the
Verification
Check the status of the
ImageBasedUpgradeCR by running the following command:$ oc get ibu -o yamlThe following example shows a successful
Prepstage:conditions: - lastTransitionTime: "2024-01-01T09:00:00Z" message: In progress observedGeneration: 13 reason: InProgress status: "False" type: Idle - lastTransitionTime: "2024-01-01T09:00:00Z" message: Prep completed observedGeneration: 13 reason: Completed status: "False" type: PrepInProgress - lastTransitionTime: "2024-01-01T09:00:00Z" message: Prep stage completed successfully observedGeneration: 13 reason: Completed status: "True" type: PrepCompleted observedGeneration: 13 validNextStages: - Idle - Upgrade
16.3.2. Moving to the Upgrade stage of the image-based upgrade with Lifecycle Agent
After you generate the seed image and complete the Prep stage, you can upgrade the target cluster. During the upgrade process, the OADP Operator creates a backup of the artifacts specified in the OADP custom resources (CRs), then the Lifecycle Agent upgrades the cluster.
If the upgrade fails or stops, the Lifecycle Agent initiates an automatic rollback. If you have an issue after the upgrade, you can perform a manual rollback. For more information about manual rollback, see "Moving to the Rollback stage of the image-based upgrade with Lifecycle Agent".
Prerequisites
-
You have completed the
Prepstage.
Procedure
To move to the
Upgradestage, change the value of thestagefield toUpgradein theImageBasedUpgradeCR by running the following command:$ oc patch imagebasedupgrades.lca.openshift.io upgrade -p='{"spec": {"stage": "Upgrade"}}' --type=mergeCheck the status of the
ImageBasedUpgradeCR by running the following command:$ oc get ibu -o yamlThe following example shows an upgrade in progress:
status:
  conditions:
  - lastTransitionTime: "2024-01-01T09:00:00Z"
    message: In progress
    observedGeneration: 5
    reason: InProgress
    status: "False"
    type: Idle
  - lastTransitionTime: "2024-01-01T09:00:00Z"
    message: Prep completed
    observedGeneration: 5
    reason: Completed
    status: "False"
    type: PrepInProgress
  - lastTransitionTime: "2024-01-01T09:00:00Z"
    message: Prep completed successfully
    observedGeneration: 5
    reason: Completed
    status: "True"
    type: PrepCompleted
  - lastTransitionTime: "2024-01-01T09:00:00Z"
    message: |-
      Waiting for system to stabilize: one or more health checks failed
        - one or more ClusterOperators not yet ready: authentication
        - one or more MachineConfigPools not yet ready: master
        - one or more ClusterServiceVersions not yet ready: sriov-fec.v2.8.0
    observedGeneration: 1
    reason: InProgress
    status: "True"
    type: UpgradeInProgress
  observedGeneration: 1
  rollbackAvailabilityExpiration: "2024-05-19T14:01:52Z"
  validNextStages:
  - Rollback
The OADP Operator creates a backup of the data specified in the OADP
BackupandRestoreCRs and the target cluster reboots.Monitor the status of the CR by running the following command:
$ oc get ibu -o yamlAfter the upgrade, complete the changes by patching the value of the
stagefield toIdlein theImageBasedUpgradeCR by running the following command:$ oc patch imagebasedupgrades.lca.openshift.io upgrade -p='{"spec": {"stage": "Idle"}}' --type=mergeImportantYou cannot roll back the changes once you move to the
Idlestage after an upgrade.The Lifecycle Agent deletes all resources created during the upgrade process.
- You can remove the OADP Operator and its configuration files after a successful upgrade. For more information, see "Deleting Operators from a cluster".
Verification
Check the status of the
ImageBasedUpgradeCR by running the following command:$ oc get ibu -o yamlThe following example shows a completed upgrade:
status:
  conditions:
  - lastTransitionTime: "2024-01-01T09:00:00Z"
    message: In progress
    observedGeneration: 5
    reason: InProgress
    status: "False"
    type: Idle
  - lastTransitionTime: "2024-01-01T09:00:00Z"
    message: Prep completed
    observedGeneration: 5
    reason: Completed
    status: "False"
    type: PrepInProgress
  - lastTransitionTime: "2024-01-01T09:00:00Z"
    message: Prep completed successfully
    observedGeneration: 5
    reason: Completed
    status: "True"
    type: PrepCompleted
  - lastTransitionTime: "2024-01-01T09:00:00Z"
    message: Upgrade completed
    observedGeneration: 1
    reason: Completed
    status: "False"
    type: UpgradeInProgress
  - lastTransitionTime: "2024-01-01T09:00:00Z"
    message: Upgrade completed
    observedGeneration: 1
    reason: Completed
    status: "True"
    type: UpgradeCompleted
  observedGeneration: 1
  rollbackAvailabilityExpiration: "2024-01-01T09:00:00Z"
  validNextStages:
  - Idle
  - Rollback
Check the status of the cluster restoration by running the following command:
$ oc get restores -n openshift-adp -o custom-columns=NAME:.metadata.name,Status:.status.phase,Reason:.status.failureReasonThe following example shows completed restores:
NAME Status Reason acm-klusterlet Completed <none> apache-app Completed <none> localvolume Completed <none>NoteThe
acm-klusterletis specific to RHACM environments only.
16.3.3. Moving to the Rollback stage of the image-based upgrade with Lifecycle Agent
The Lifecycle Agent initiates an automatic rollback if the upgrade does not complete within the time frame specified in the initMonitorTimeoutSeconds field after rebooting, as shown in the following example:
apiVersion: lca.openshift.io/v1
kind: ImageBasedUpgrade
metadata:
  name: upgrade
spec:
  stage: Idle
  seedImageRef:
    version: 4.15.2
    image: <seed_container_image>
  autoRollbackOnFailure: {}
#    initMonitorTimeoutSeconds: <initMonitorTimeoutSeconds>
# ...
where:
<initMonitorTimeoutSeconds>-
Optional: The time frame in seconds to roll back if the upgrade does not complete within that time frame after the first reboot. If not defined or set to
0, the Lifecycle Agent uses the default value of1800seconds (30 minutes).
You can manually roll back the changes if you see unresolvable issues after an upgrade.
Prerequisites
-
You have logged into the hub cluster as a user with
cluster-adminprivileges. - You ensured that the control plane certificates on the original stateroot are valid. If the certificates expired, see "Recovering from expired control plane certificates".
If you choose to upgrade a recently installed single-node OpenShift cluster for example, for testing purposes, you have a limited rollback time frame of 24 hours or less. You can verify the rollback time by checking the rollbackAvailabilityExpiration field of the ImageBasedUpgrade custom resource.
Procedure
To move to the rollback stage, patch the value of the
stagefield toRollbackin theImageBasedUpgradeCR by running the following command:$ oc patch imagebasedupgrades.lca.openshift.io upgrade -p='{"spec": {"stage": "Rollback"}}' --type=mergeThe Lifecycle Agent reboots the cluster with the previously installed version of OpenShift Container Platform and restores the applications.
After reviewing the changes, complete the rollback by patching the value of the
stagefield toIdlein theImageBasedUpgradeCR by running the following command:$ oc patch imagebasedupgrades.lca.openshift.io upgrade -p='{"spec": {"stage": "Idle"}}' --type=merge -n openshift-lifecycle-agentWarningIf you move to the
Idlestage after a rollback, the Lifecycle Agent cleans up resources that you can use to troubleshoot a failed upgrade.
16.3.4. Troubleshooting image-based upgrades with Lifecycle Agent
Perform troubleshooting steps on the managed clusters to resolve any issues.
If you are using the ImageBasedGroupUpgrade CR to upgrade your clusters, ensure that you update the lcm.openshift.io/ibgu-<stage>-completed or lcm.openshift.io/ibgu-<stage>-failed cluster labels properly after performing troubleshooting or recovery steps on the managed clusters. This ensures that the TALM continues to manage the image-based upgrade for the cluster.
16.3.4.1. Collecting logs
You can use the oc adm must-gather CLI to collect information for debugging and troubleshooting.
To collect data about the Operators, run the following command:
$  oc adm must-gather \
  --dest-dir=must-gather/tmp \
  --image=$(oc -n openshift-lifecycle-agent get deployment.apps/lifecycle-agent-controller-manager -o jsonpath='{.spec.template.spec.containers[?(@.name == "manager")].image}') \
  --image=<oadp_must_gather_image> \
  --image=<origin_must_gather_image>
where:
<oadp_must_gather_image>-
Optional: Add this option, for example
quay.io/konveyor/oadp-must-gather:latest, if you need to gather more information from the OADP Operator. <origin_must_gather_image>-
Optional: Add this option, for example
quay.io/openshift/origin-must-gather:latest, if you need to gather more information from the SR-IOV Operator.
16.3.4.2. AbortFailed or FinalizeFailed error
- Issue
During the finalization stage or when you stop the process at the
Prepstage, Lifecycle Agent cleans up the following resources:- Stateroot that is no longer required
- Precaching resources
- OADP CRs
-
ImageBasedUpgradeCR
If the Lifecycle Agent fails to clean up these resources, it transitions to the
AbortFailedorFinalizeFailedstates. The condition message and log show the steps that failed, as shown in the following example:message: failed to delete all the backup CRs. Perform cleanup manually then add 'lca.openshift.io/manual-cleanup-done' annotation to ibu CR to transition back to Idle observedGeneration: 5 reason: AbortFailed status: "False" type: Idle- Resolution
- Inspect the logs to find the reason for failure.
To prompt Lifecycle Agent to retry the cleanup, add the
lca.openshift.io/manual-cleanup-doneannotation to theImageBasedUpgradeCR.After observing this annotation, Lifecycle Agent retries the cleanup and, if it is successful, the
ImageBasedUpgradestage transitions toIdle.If the cleanup fails again, you can manually clean up the resources.
16.3.4.3. Cleaning up stateroot manually
- Issue
-
Stopping at the
Prepstage, Lifecycle Agent cleans up the new stateroot. When finalizing after a successful upgrade or a rollback, Lifecycle Agent cleans up the old stateroot. If this step fails, you must inspect the logs to decide why the failure occurred. - Resolution
Check if there are any existing deployments in the stateroot by running the following command:
$ ostree admin statusIf there are any, clean up the existing deployment by running the following command:
$ ostree admin undeploy <index_of_deployment>After cleaning up all the deployments of the stateroot, wipe the stateroot directory by running the following commands:
WarningEnsure that the booted deployment is not in this stateroot.
$ stateroot="<stateroot_to_delete>"$ unshare -m /bin/sh -c "mount -o remount,rw /sysroot && rm -rf /sysroot/ostree/deploy/${stateroot}"
16.3.4.4. Cleaning up OADP resources manually
- Issue
-
Automatic cleanup of OADP resources can fail due to connection issues between Lifecycle Agent and the S3 backend. By restoring the connection and adding the
lca.openshift.io/manual-cleanup-doneannotation, the Lifecycle Agent can successfully cleanup backup resources. - Resolution
Check the backend connectivity by running the following command:
$ oc get backupstoragelocations.velero.io -n openshift-adpThe following example shows successful backend connectivity:
NAME PHASE LAST VALIDATED AGE DEFAULT dataprotectionapplication-1 Available 33s 8d true-
Remove all backup resources and then add the
lca.openshift.io/manual-cleanup-doneannotation to theImageBasedUpgradeCR.
16.3.4.5. LVM Storage volume contents not restored
When you use LVM Storage to configure dynamic persistent volume storage, LVM Storage might not restore the persistent volume contents if you have configured it incorrectly.
16.3.4.6. Missing LVM Storage-related fields in Backup CR
- Issue
Your
BackupCRs might be missing fields that you need to restore your persistent volumes. You can check for events in your application pod to decide if you have this issue by running the following:$ oc describe pod <your_app_name>The following example output shows a pod failing due to missing LVM Storage-related fields in the
BackupCR:Events: Type Reason Age From Message ---- ------ ---- ---- ------- Warning FailedScheduling 58s (x2 over 66s) default-scheduler 0/1 nodes are available: pod has unbound immediate PersistentVolumeClaims. preemption: 0/1 nodes are available: 1 Preemption is not helpful for scheduling.. Normal Scheduled 56s default-scheduler Successfully assigned default/db-1234 to sno1.example.lab Warning FailedMount 24s (x7 over 55s) kubelet MountVolume.SetUp failed for volume "pvc-1234" : rpc error: code = Unknown desc = VolumeID is not found- Resolution
You must include
logicalvolumes.topolvm.ioin the applicationBackupCR. Without this resource, the application restores its persistent volume claims and persistent volume manifests correctly, however, thelogicalvolumeassociated with this persistent volume is not restored properly after pivot. The following example shows a correctly configuredBackupCR:apiVersion: velero.io/v1 kind: Backup metadata: labels: velero.io/storage-location: default name: small-app namespace: openshift-adp spec: includedNamespaces: - test includedNamespaceScopedResources: - secrets - persistentvolumeclaims - deployments - statefulsets includedClusterScopedResources: - persistentVolumes - volumesnapshotcontents - logicalvolumes.topolvm.ioTo restore the persistent volumes for your application, you must configure the
includedClusterScopedResourcessection as shown.
16.3.4.7. Missing LVM Storage-related fields in Restore CR
- Issue
LVM Storage restores the expected resources for the applications but it does not preserve the persistent volume contents after upgrading.
List the persistent volumes for you applications by running the following command before pivot:
$ oc get pv,pvc,logicalvolumes.topolvm.io -AThe following shows the output before pivot:
NAME                        CAPACITY   ACCESS MODES   RECLAIM POLICY   STATUS   CLAIM            STORAGECLASS   REASON   AGE
persistentvolume/pvc-1234   1Gi        RWO            Retain           Bound    default/pvc-db   lvms-vg1                4h45m

NAMESPACE   NAME                           STATUS   VOLUME     CAPACITY   ACCESS MODES   STORAGECLASS   AGE
default     persistentvolumeclaim/pvc-db   Bound    pvc-1234   1Gi        RWO            lvms-vg1       4h45m

NAMESPACE   NAME                                AGE
            logicalvolume.topolvm.io/pvc-1234   4h45m
List the persistent volumes for you applications by running the following command after pivot:
$ oc get pv,pvc,logicalvolumes.topolvm.io -AThe following shows the output after pivot:
NAME                        CAPACITY   ACCESS MODES   RECLAIM POLICY   STATUS   CLAIM            STORAGECLASS   REASON   AGE
persistentvolume/pvc-1234   1Gi        RWO            Delete           Bound    default/pvc-db   lvms-vg1                19s

NAMESPACE   NAME                           STATUS   VOLUME     CAPACITY   ACCESS MODES   STORAGECLASS   AGE
default     persistentvolumeclaim/pvc-db   Bound    pvc-1234   1Gi        RWO            lvms-vg1       19s

NAMESPACE   NAME                                AGE
            logicalvolume.topolvm.io/pvc-1234   18s
- Resolution
The reason for this issue is that the
logicalvolumestatus is not preserved in theRestoreCR. This status is important because Velero requires this status to reference the volumes that you must preserve after pivoting. You must include the following fields in the applicationRestoreCR, as shown in the following example:apiVersion: velero.io/v1 kind: Restore metadata: name: sample-vote-app namespace: openshift-adp labels: velero.io/storage-location: default annotations: lca.openshift.io/apply-wave: "3" spec: backupName: sample-vote-app restorePVs: <restore_pvs> restoreStatus: includedResources: - logicalvolumeswhere:
<restore_pvs>-
To preserve the persistent volumes for your application, you must set
restorePVstotrue. restoreStatus- To preserve the persistent volumes for your application, you must configure this field as shown.
16.3.4.8. Debugging failed Backup and Restore CRs
- Issue
- The backup or restoration of artifacts failed.
- Resolution
You can debug
BackupandRestoreCRs and retrieve logs with the Velero CLI tool. The Velero CLI tool offers more detailed information than the OpenShift CLI tool.Describe the
BackupCR that has errors by running the following command:$ oc exec -n openshift-adp velero-7c87d58c7b-sw6fc -c velero -- ./velero describe backup -n openshift-adp backup-acm-klusterlet --detailsDescribe the
RestoreCR that has errors by running the following command:$ oc exec -n openshift-adp velero-7c87d58c7b-sw6fc -c velero -- ./velero describe restore -n openshift-adp restore-acm-klusterlet --detailsDownload the backed up resources to a local directory by running the following command:
$ oc exec -n openshift-adp velero-7c87d58c7b-sw6fc -c velero -- ./velero backup download -n openshift-adp backup-acm-klusterlet -o ~/backup-acm-klusterlet.tar.gz
16.4. Performing an image-based upgrade for single-node OpenShift clusters using GitOps ZTP
You can use a single resource on the hub cluster, the ImageBasedGroupUpgrade custom resource (CR), to manage an imaged-based upgrade on a selected group of managed clusters through all stages. Topology Aware Lifecycle Manager (TALM) reconciles the ImageBasedGroupUpgrade CR and creates the underlying resources to complete the defined stage transitions, either in a manually controlled or a fully automated upgrade flow.
For more information about the image-based upgrade, see "Understanding the image-based upgrade for single-node OpenShift clusters".
16.4.1. Managing the image-based upgrade at scale using the ImageBasedGroupUpgrade CR on the hub
The ImageBasedGroupUpgrade CR combines the ImageBasedUpgrade and ClusterGroupUpgrade APIs. For example, you can define the cluster selection and rollout strategy with the ImageBasedGroupUpgrade API in the same way as the ClusterGroupUpgrade API. The stage transitions are different from the ImageBasedUpgrade API. The ImageBasedGroupUpgrade API allows you to combine several stage transitions, also called actions, into one step that share one rollout strategy.
Example ImageBasedGroupUpgrade.yaml
apiVersion: lcm.openshift.io/v1alpha1
kind: ImageBasedGroupUpgrade
metadata:
  name: <filename>
  namespace: default
spec:
  clusterLabelSelectors:
    - matchExpressions:
      - key: name
        operator: In
        values:
        - spoke1
        - spoke4
        - spoke6
  ibuSpec:
    seedImageRef:
      image: quay.io/seed/image:4.20.0-rc.1
      version: 4.20.0-rc.1
      pullSecretRef:
        name: "<seed_pull_secret>"
    extraManifests:
      - name: example-extra-manifests
        namespace: openshift-lifecycle-agent
    oadpContent:
      - name: oadp-cm
        namespace: openshift-adp
  plan:
    - actions: ["Prep", "Upgrade", "FinalizeUpgrade"]
      rolloutStrategy:
        maxConcurrency: 200
timeout: 2400 - 1
- Clusters to upgrade.
- 2
- Target platform version, the seed image to be used, and the secret required to access the image.Note
If you add the seed image pull secret in the hub cluster, in the same namespace as the
ImageBasedGroupUpgraderesource, the secret is added to the manifest list for thePrepstage. The secret is recreated in each spoke cluster in theopenshift-lifecycle-agentnamespace. - 3
- Optional: Applies additional manifests, which are not in the seed image, to the target cluster. Also applies
ConfigMapobjects for custom catalog sources. - 4
ConfigMapresources that contain the OADPBackupandRestoreCRs.- 5
- Upgrade plan details.
- 6
- Number of clusters to update in a batch.
- 7
- Timeout limit to complete the action in minutes.
16.4.1.1. Supported action combinations
Actions are the list of stage transitions that TALM completes in the steps of an upgrade plan for the selected group of clusters. Each action entry in the ImageBasedGroupUpgrade CR is a separate step and a step contains one or several actions that share the same rollout strategy. You can achieve more control over the rollout strategy for each action by separating actions into steps.
These actions can be combined differently in your upgrade plan and you can add subsequent steps later. Wait until the previous steps either complete or fail before adding a step to your plan. The first action of an added step for clusters that failed a previous steps must be either Abort or Rollback.
You cannot remove actions or steps from an ongoing plan.
The following table shows example plans for different levels of control over the rollout strategy:
| Example plan | Description |
|---|---|
| All actions share the same strategy |
| Some actions share the same strategy |
| All actions have different strategies |
Clusters that fail one of the actions will skip the remaining actions in the same step.
The ImageBasedGroupUpgrade API accepts the following actions:
Prep-
Start preparing the upgrade resources by moving to the
Prepstage. Upgrade-
Start the upgrade by moving to the
Upgradestage. FinalizeUpgrade-
Finalize the upgrade on selected clusters that completed the
Upgradeaction by moving to theIdlestage. Rollback-
Start a rollback only on successfully upgraded clusters by moving to the
Rollbackstage. FinalizeRollback-
Finalize the rollback by moving to the
Idlestage. AbortOnFailure-
Cancel the upgrade on selected clusters that failed the
PreporUpgradeactions by moving to theIdlestage. Abort-
Cancel an ongoing upgrade only on clusters that are not yet upgraded by moving to the
Idlestage.
The following action combinations are supported. A pair of brackets signifies one step in the plan section:
-
["Prep"],["Abort"] -
["Prep", "Upgrade", "FinalizeUpgrade"] -
["Prep"],["AbortOnFailure"],["Upgrade"],["AbortOnFailure"],["FinalizeUpgrade"] -
["Rollback", "FinalizeRollback"]
Use one of the following combinations when you need to resume or cancel an ongoing upgrade from a completely new ImageBasedGroupUpgrade CR:
-
["Upgrade","FinalizeUpgrade"] -
["FinalizeUpgrade"] -
["FinalizeRollback"] -
["Abort"] -
["AbortOnFailure"]
16.4.1.2. Labeling for cluster selection
Use the spec.clusterLabelSelectors field for initial cluster selection. In addition, TALM labels the managed clusters according to the results of their last stage transition.
When a stage completes or fails, TALM marks the relevant clusters with the following labels:
-
lcm.openshift.io/ibgu-<stage>-completed -
lcm.openshift.io/ibgu-<stage>-failed
Use these cluster labels to cancel or roll back an upgrade on a group of clusters after troubleshooting issues that you might encounter.
If you are using the ImageBasedGroupUpgrade CR to upgrade your clusters, ensure that the lcm.openshift.io/ibgu-<stage>-completed or lcm.openshift.io/ibgu-<stage>-failed cluster labels are updated properly after performing troubleshooting or recovery steps on the managed clusters. This ensures that the TALM continues to manage the image-based upgrade for the cluster.
For example, if you want to cancel the upgrade for all managed clusters except for clusters that successfully completed the upgrade, you can add an Abort action to your plan. The Abort action moves back the ImageBasedUpgrade CR to the Idle stage, which cancels the upgrade on clusters that are not yet upgraded. Adding a separate Abort action ensures that the TALM does not perform the Abort action on clusters that have the lcm.openshift.io/ibgu-upgrade-completed label.
The cluster labels are removed after successfully canceling or finalizing the upgrade.
16.4.1.3. Status monitoring
The ImageBasedGroupUpgrade CR ensures a better monitoring experience with a comprehensive status reporting for all clusters that is aggregated in one place. You can monitor the following actions:
status.clusters.completedActions-
Shows all completed actions defined in the
plansection. status.clusters.currentAction- Shows all actions that are currently in progress.
status.clusters.failedActions- Shows all failed actions along with a detailed error message.
16.4.2. Performing an image-based upgrade on managed clusters at scale in several steps
For use cases when you need better control of when the upgrade interrupts your service, you can upgrade a set of your managed clusters by using the ImageBasedGroupUpgrade CR with adding actions after the previous step is complete. After evaluating the results of the previous steps, you can move to the next upgrade stage or troubleshoot any failed steps throughout the procedure.
Only certain action combinations are supported and listed in Supported action combinations.
Prerequisites
-
You have logged in to the hub cluster as a user with
cluster-adminprivileges. -
You have created policies and
ConfigMapobjects for resources used in the image-based upgrade. - You have installed the Lifecycle Agent and OADP Operators on all managed clusters through the hub cluster.
Procedure
Create a YAML file on the hub cluster that contains the
ImageBasedGroupUpgradeCR:apiVersion: lcm.openshift.io/v1alpha1 kind: ImageBasedGroupUpgrade metadata: name: <filename> namespace: default spec: clusterLabelSelectors:1 - matchExpressions: - key: name operator: In values: - spoke1 - spoke4 - spoke6 ibuSpec: seedImageRef:2 image: quay.io/seed/image:4.16.0-rc.1 version: 4.16.0-rc.1 pullSecretRef: name: "<seed_pull_secret>" extraManifests:3 - name: example-extra-manifests namespace: openshift-lifecycle-agent oadpContent:4 - name: oadp-cm namespace: openshift-adp plan:5 - actions: ["Prep"] rolloutStrategy: maxConcurrency: 2 timeout: 2400- 1
- Clusters to upgrade.
- 2
- Target platform version, the seed image to be used, and the secret required to access the image.Note
If you add the seed image pull secret in the hub cluster, in the same namespace as the
ImageBasedGroupUpgraderesource, the secret is added to the manifest list for thePrepstage. The secret is recreated in each spoke cluster in theopenshift-lifecycle-agentnamespace. - 3
- Optional: Applies additional manifests, which are not in the seed image, to the target cluster. Also applies
ConfigMapobjects for custom catalog sources. - 4
- List of
ConfigMapresources that contain the OADPBackupandRestoreCRs. - 5
- Upgrade plan details.
Apply the created file by running the following command on the hub cluster:
$ oc apply -f <filename>.yamlMonitor the status updates by running the following command on the hub cluster:
$ oc get ibgu -o yamlExample output
# ...
status:
  clusters:
  - completedActions:
    - action: Prep
    name: spoke1
  - completedActions:
    - action: Prep
    name: spoke4
  - failedActions:
    - action: Prep
    name: spoke6
# ...
The previous output of an example plan starts with the
Prepstage only and you add actions to the plan based on the results of the previous step. TALM adds a label to the clusters to mark if the upgrade succeeded or failed. For example, thelcm.openshift.io/ibgu-prep-failedis applied to clusters that failed thePrepstage.After investigating the failure, you can add the
AbortOnFailurestep to your upgrade plan. It moves the clusters labeled withlcm.openshift.io/ibgu-<action>-failedback to theIdlestage. Any resources that are related to the upgrade on the selected clusters are deleted.Optional: Add the
AbortOnFailureaction to your existingImageBasedGroupUpgradeCR by running the following command:$ oc patch ibgu <filename> --type=json -p \ '[{"op": "add", "path": "/spec/plan/-", "value": {"actions": ["AbortOnFailure"], "rolloutStrategy": {"maxConcurrency": 5, "timeout": 10}}}]'Continue monitoring the status updates by running the following command:
$ oc get ibgu -o yaml
Add the action to your existing
ImageBasedGroupUpgradeCR by running the following command:$ oc patch ibgu <filename> --type=json -p \ '[{"op": "add", "path": "/spec/plan/-", "value": {"actions": ["Upgrade"], "rolloutStrategy": {"maxConcurrency": 2, "timeout": 30}}}]'Optional: Add the
AbortOnFailureaction to your existingImageBasedGroupUpgradeCR by running the following command:$ oc patch ibgu <filename> --type=json -p \ '[{"op": "add", "path": "/spec/plan/-", "value": {"actions": ["AbortOnFailure"], "rolloutStrategy": {"maxConcurrency": 5, "timeout": 10}}}]'Continue monitoring the status updates by running the following command:
$ oc get ibgu -o yaml
Add the action to your existing
ImageBasedGroupUpgradeCR by running the following command:$ oc patch ibgu <filename> --type=json -p \ '[{"op": "add", "path": "/spec/plan/-", "value": {"actions": ["FinalizeUpgrade"], "rolloutStrategy": {"maxConcurrency": 10, "timeout": 3}}}]'
Verification
Monitor the status updates by running the following command:
$ oc get ibgu -o yamlExample output
# ...
status:
  clusters:
  - completedActions:
    - action: Prep
    - action: AbortOnFailure
    failedActions:
    - action: Upgrade
    name: spoke1
  - completedActions:
    - action: Prep
    - action: Upgrade
    - action: FinalizeUpgrade
    name: spoke4
  - completedActions:
    - action: AbortOnFailure
    failedActions:
    - action: Prep
    name: spoke6
# ...
16.4.3. Performing an image-based upgrade on managed clusters at scale in one step
For use cases when service interruption is not a concern, you can upgrade a set of your managed clusters by using the ImageBasedGroupUpgrade CR with several actions combined in one step with one rollout strategy. With one rollout strategy, the upgrade time can be reduced but you can only troubleshoot failed clusters after the upgrade plan is complete.
Prerequisites
-
You have logged in to the hub cluster as a user with
cluster-adminprivileges. -
You have created policies and
ConfigMapobjects for resources used in the image-based upgrade. - You have installed the Lifecycle Agent and OADP Operators on all managed clusters through the hub cluster.
Procedure
Create a YAML file on the hub cluster that contains the
ImageBasedGroupUpgradeCR:apiVersion: lcm.openshift.io/v1alpha1 kind: ImageBasedGroupUpgrade metadata: name: <filename> namespace: default spec: clusterLabelSelectors:1 - matchExpressions: - key: name operator: In values: - spoke1 - spoke4 - spoke6 ibuSpec: seedImageRef:2 image: quay.io/seed/image:4.20.0-rc.1 version: 4.20.0-rc.1 pullSecretRef: name: "<seed_pull_secret>" extraManifests:3 - name: example-extra-manifests namespace: openshift-lifecycle-agent oadpContent:4 - name: oadp-cm namespace: openshift-adp plan:5 - actions: ["Prep", "Upgrade", "FinalizeUpgrade"] rolloutStrategy: maxConcurrency: 2006 timeout: 24007 - 1
- Clusters to upgrade.
- 2
- Target platform version, the seed image to be used, and the secret required to access the image.Note
If you add the seed image pull secret in the hub cluster, in the same namespace as the
ImageBasedGroupUpgraderesource, the secret is added to the manifest list for thePrepstage. The secret is recreated in each spoke cluster in theopenshift-lifecycle-agentnamespace. - 3
- Optional: Applies additional manifests, which are not in the seed image, to the target cluster. Also applies
ConfigMapobjects for custom catalog sources. - 4
ConfigMapresources that contain the OADPBackupandRestoreCRs.- 5
- Upgrade plan details.
- 6
- Number of clusters to update in a batch.
- 7
- Timeout limit to complete the action in minutes.
Apply the created file by running the following command on the hub cluster:
$ oc apply -f <filename>.yaml
Verification
Monitor the status updates by running the following command:
$ oc get ibgu -o yamlExample output
# ...
status:
  clusters:
  - completedActions:
    - action: Prep
    failedActions:
    - action: Upgrade
    name: spoke1
  - completedActions:
    - action: Prep
    - action: Upgrade
    - action: FinalizeUpgrade
    name: spoke4
  - failedActions:
    - action: Prep
    name: spoke6
# ...
16.4.4. Canceling an image-based upgrade on managed clusters at scale
You can cancel the upgrade on a set of managed clusters that completed the Prep stage.
Only certain action combinations are supported and listed in Supported action combinations.
Prerequisites
-
You have logged in to the hub cluster as a user with
cluster-adminprivileges.
Procedure
Create a separate YAML file on the hub cluster that contains the
ImageBasedGroupUpgradeCR:apiVersion: lcm.openshift.io/v1alpha1 kind: ImageBasedGroupUpgrade metadata: name: <filename> namespace: default spec: clusterLabelSelectors: - matchExpressions: - key: name operator: In values: - spoke4 ibuSpec: seedImageRef: image: quay.io/seed/image:4.16.0-rc.1 version: 4.16.0-rc.1 pullSecretRef: name: "<seed_pull_secret>" extraManifests: - name: example-extra-manifests namespace: openshift-lifecycle-agent oadpContent: - name: oadp-cm namespace: openshift-adp plan: - actions: ["Abort"] rolloutStrategy: maxConcurrency: 5 timeout: 10All managed clusters that completed the
Prepstage are moved back to theIdlestage.Apply the created file by running the following command on the hub cluster:
$ oc apply -f <filename>.yaml
Verification
Monitor the status updates by running the following command:
$ oc get ibgu -o yamlExample output
# ...
status:
  clusters:
  - completedActions:
    - action: Prep
    currentActions:
    - action: Abort
    name: spoke4
# ...
16.4.5. Rolling back an image-based upgrade on managed clusters at scale
Roll back the changes on a set of managed clusters if you encounter unresolvable issues after a successful upgrade. You need to create a separate ImageBasedGroupUpgrade CR and define the set of managed clusters that you want to roll back.
Only certain action combinations are supported and listed in Supported action combinations.
Prerequisites
-
You have logged in to the hub cluster as a user with
cluster-adminprivileges.
Procedure
Create a separate YAML file on the hub cluster that contains the
ImageBasedGroupUpgradeCR:apiVersion: lcm.openshift.io/v1alpha1 kind: ImageBasedGroupUpgrade metadata: name: <filename> namespace: default spec: clusterLabelSelectors: - matchExpressions: - key: name operator: In values: - spoke4 ibuSpec: seedImageRef: image: quay.io/seed/image:4.20.0-rc.1 version: 4.20.0-rc.1 pullSecretRef: name: "<seed_pull_secret>" extraManifests: - name: example-extra-manifests namespace: openshift-lifecycle-agent oadpContent: - name: oadp-cm namespace: openshift-adp plan: - actions: ["Rollback", "FinalizeRollback"] rolloutStrategy: maxConcurrency: 200 timeout: 2400Apply the created file by running the following command on the hub cluster:
$ oc apply -f <filename>.yamlAll managed clusters that match the defined labels are moved back to the
Rollbackand then theIdlestages to finalize the rollback.
Verification
Monitor the status updates by running the following command:
$ oc get ibgu -o yamlExample output
# ...
status:
  clusters:
  - completedActions:
    - action: Rollback
    - action: FinalizeRollback
    name: spoke4
# ...
16.4.6. Troubleshooting image-based upgrades with Lifecycle Agent
Perform troubleshooting steps on the managed clusters to resolve any issues.
If you are using the ImageBasedGroupUpgrade CR to upgrade your clusters, ensure that you update the lcm.openshift.io/ibgu-<stage>-completed or lcm.openshift.io/ibgu-<stage>-failed cluster labels properly after performing troubleshooting or recovery steps on the managed clusters. This ensures that the TALM continues to manage the image-based upgrade for the cluster.
16.4.6.1. Collecting logs
You can use the oc adm must-gather CLI to collect information for debugging and troubleshooting.
To collect data about the Operators, run the following command:
$  oc adm must-gather \
  --dest-dir=must-gather/tmp \
  --image=$(oc -n openshift-lifecycle-agent get deployment.apps/lifecycle-agent-controller-manager -o jsonpath='{.spec.template.spec.containers[?(@.name == "manager")].image}') \
  --image=<oadp_must_gather_image> \
  --image=<origin_must_gather_image>
where:
<oadp_must_gather_image>-
Optional: Add this option, for example
quay.io/konveyor/oadp-must-gather:latest, if you need to gather more information from the OADP Operator. <origin_must_gather_image>-
Optional: Add this option, for example
quay.io/openshift/origin-must-gather:latest, if you need to gather more information from the SR-IOV Operator.
16.4.6.2. AbortFailed or FinalizeFailed error
- Issue
During the finalization stage or when you stop the process at the
Prepstage, Lifecycle Agent cleans up the following resources:- Stateroot that is no longer required
- Precaching resources
- OADP CRs
-
ImageBasedUpgradeCR
If the Lifecycle Agent fails to clean up these resources, it transitions to the
AbortFailedorFinalizeFailedstates. The condition message and log show the steps that failed, as shown in the following example:message: failed to delete all the backup CRs. Perform cleanup manually then add 'lca.openshift.io/manual-cleanup-done' annotation to ibu CR to transition back to Idle observedGeneration: 5 reason: AbortFailed status: "False" type: Idle- Resolution
- Inspect the logs to find the reason for failure.
To prompt Lifecycle Agent to retry the cleanup, add the
lca.openshift.io/manual-cleanup-doneannotation to theImageBasedUpgradeCR.After observing this annotation, Lifecycle Agent retries the cleanup and, if it is successful, the
ImageBasedUpgradestage transitions toIdle.If the cleanup fails again, you can manually clean up the resources.
16.4.6.3. Cleaning up stateroot manually
- Issue
-
Stopping at the
Prepstage, Lifecycle Agent cleans up the new stateroot. When finalizing after a successful upgrade or a rollback, Lifecycle Agent cleans up the old stateroot. If this step fails, you must inspect the logs to decide why the failure occurred. - Resolution
Check if there are any existing deployments in the stateroot by running the following command:
$ ostree admin statusIf there are any, clean up the existing deployment by running the following command:
$ ostree admin undeploy <index_of_deployment>After cleaning up all the deployments of the stateroot, wipe the stateroot directory by running the following commands:
WarningEnsure that the booted deployment is not in this stateroot.
$ stateroot="<stateroot_to_delete>"$ unshare -m /bin/sh -c "mount -o remount,rw /sysroot && rm -rf /sysroot/ostree/deploy/${stateroot}"
16.4.6.4. Cleaning up OADP resources manually
- Issue
-
Automatic cleanup of OADP resources can fail due to connection issues between Lifecycle Agent and the S3 backend. By restoring the connection and adding the
lca.openshift.io/manual-cleanup-doneannotation, the Lifecycle Agent can successfully cleanup backup resources. - Resolution
Check the backend connectivity by running the following command:
$ oc get backupstoragelocations.velero.io -n openshift-adpThe following example shows successful backend connectivity:
NAME PHASE LAST VALIDATED AGE DEFAULT dataprotectionapplication-1 Available 33s 8d true-
Remove all backup resources and then add the
lca.openshift.io/manual-cleanup-doneannotation to theImageBasedUpgradeCR.
16.4.6.5. LVM Storage volume contents not restored
When you use LVM Storage to configure dynamic persistent volume storage, LVM Storage might not restore the persistent volume contents if you have configured it incorrectly.
16.4.6.6. Missing LVM Storage-related fields in Backup CR
- Issue
Your
BackupCRs might be missing fields that you need to restore your persistent volumes. You can check for events in your application pod to decide if you have this issue by running the following:$ oc describe pod <your_app_name>The following example output shows a pod failing due to missing LVM Storage-related fields in the
BackupCR:Events: Type Reason Age From Message ---- ------ ---- ---- ------- Warning FailedScheduling 58s (x2 over 66s) default-scheduler 0/1 nodes are available: pod has unbound immediate PersistentVolumeClaims. preemption: 0/1 nodes are available: 1 Preemption is not helpful for scheduling.. Normal Scheduled 56s default-scheduler Successfully assigned default/db-1234 to sno1.example.lab Warning FailedMount 24s (x7 over 55s) kubelet MountVolume.SetUp failed for volume "pvc-1234" : rpc error: code = Unknown desc = VolumeID is not found- Resolution
You must include
logicalvolumes.topolvm.ioin the applicationBackupCR. Without this resource, the application restores its persistent volume claims and persistent volume manifests correctly, however, thelogicalvolumeassociated with this persistent volume is not restored properly after pivot. The following example shows a correctly configuredBackupCR:apiVersion: velero.io/v1 kind: Backup metadata: labels: velero.io/storage-location: default name: small-app namespace: openshift-adp spec: includedNamespaces: - test includedNamespaceScopedResources: - secrets - persistentvolumeclaims - deployments - statefulsets includedClusterScopedResources: - persistentVolumes - volumesnapshotcontents - logicalvolumes.topolvm.ioTo restore the persistent volumes for your application, you must configure the
includedClusterScopedResourcessection as shown.
16.4.6.7. Missing LVM Storage-related fields in Restore CR
- Issue
LVM Storage restores the expected resources for the applications but it does not preserve the persistent volume contents after upgrading.
List the persistent volumes for you applications by running the following command before pivot:
$ oc get pv,pvc,logicalvolumes.topolvm.io -AThe following shows the output before pivot:
NAME                        CAPACITY   ACCESS MODES   RECLAIM POLICY   STATUS   CLAIM            STORAGECLASS   REASON   AGE
persistentvolume/pvc-1234   1Gi        RWO            Retain           Bound    default/pvc-db   lvms-vg1                4h45m

NAMESPACE   NAME                           STATUS   VOLUME     CAPACITY   ACCESS MODES   STORAGECLASS   AGE
default     persistentvolumeclaim/pvc-db   Bound    pvc-1234   1Gi        RWO            lvms-vg1       4h45m

NAMESPACE   NAME                                AGE
            logicalvolume.topolvm.io/pvc-1234   4h45m
List the persistent volumes for you applications by running the following command after pivot:
$ oc get pv,pvc,logicalvolumes.topolvm.io -AThe following shows the output after pivot:
NAME                        CAPACITY   ACCESS MODES   RECLAIM POLICY   STATUS   CLAIM            STORAGECLASS   REASON   AGE
persistentvolume/pvc-1234   1Gi        RWO            Delete           Bound    default/pvc-db   lvms-vg1                19s

NAMESPACE   NAME                           STATUS   VOLUME     CAPACITY   ACCESS MODES   STORAGECLASS   AGE
default     persistentvolumeclaim/pvc-db   Bound    pvc-1234   1Gi        RWO            lvms-vg1       19s

NAMESPACE   NAME                                AGE
            logicalvolume.topolvm.io/pvc-1234   18s
- Resolution
The reason for this issue is that the
logicalvolumestatus is not preserved in theRestoreCR. This status is important because Velero requires this status to reference the volumes that you must preserve after pivoting. You must include the following fields in the applicationRestoreCR, as shown in the following example:apiVersion: velero.io/v1 kind: Restore metadata: name: sample-vote-app namespace: openshift-adp labels: velero.io/storage-location: default annotations: lca.openshift.io/apply-wave: "3" spec: backupName: sample-vote-app restorePVs: <restore_pvs> restoreStatus: includedResources: - logicalvolumeswhere:
<restore_pvs>-
To preserve the persistent volumes for your application, you must set
restorePVstotrue. restoreStatus- To preserve the persistent volumes for your application, you must configure this field as shown.
16.4.6.8. Debugging failed Backup and Restore CRs
- Issue
- The backup or restoration of artifacts failed.
- Resolution
You can debug
BackupandRestoreCRs and retrieve logs with the Velero CLI tool. The Velero CLI tool offers more detailed information than the OpenShift CLI tool.Describe the
BackupCR that has errors by running the following command:$ oc exec -n openshift-adp velero-7c87d58c7b-sw6fc -c velero -- ./velero describe backup -n openshift-adp backup-acm-klusterlet --detailsDescribe the
RestoreCR that has errors by running the following command:$ oc exec -n openshift-adp velero-7c87d58c7b-sw6fc -c velero -- ./velero describe restore -n openshift-adp restore-acm-klusterlet --detailsDownload the backed up resources to a local directory by running the following command:
$ oc exec -n openshift-adp velero-7c87d58c7b-sw6fc -c velero -- ./velero backup download -n openshift-adp backup-acm-klusterlet -o ~/backup-acm-klusterlet.tar.gz