Questo contenuto non è disponibile nella lingua selezionata.
6.2. Managing Volumes using Heketi
Important
Heketi is a technology preview feature. Technology preview features are not fully supported under Red Hat subscription level agreements (SLAs), may not be functionally complete, and are not intended for production use. However, these features provide early access to upcoming product innovations, enabling customers to test functionality and provide feedback during the development process. As Red Hat considers making future iterations of technology preview features generally available, we will provide commercially reasonable support to resolve any reported issues that customers experience when using these features.
Heketi provides a RESTful management interface which can be used to manage the lifecycle of Red Hat Gluster Storage volumes. With Heketi, cloud services like OpenStack Manila, Kubernetes, and OpenShift can dynamically provision Red Hat Gluster Storage volumes with any of the supported durability types. Heketi will automatically determine the location for bricks across the cluster, making sure to place bricks and its replicas across different failure domains. Heketi also supports any number of Red Hat Gluster Storage clusters, allowing cloud services to provide network file storage without being limited to a single Red Hat Gluster Storage cluster.
With Heketi, the administrator no longer manages or configures bricks, disks, or trusted storage pools. Heketi service will manage all hardware for the administrator, enabling it to allocate storage on demand. Any disks registered with Heketi must be provided in raw format, which will then be managed by it using LVM on the disks provided.
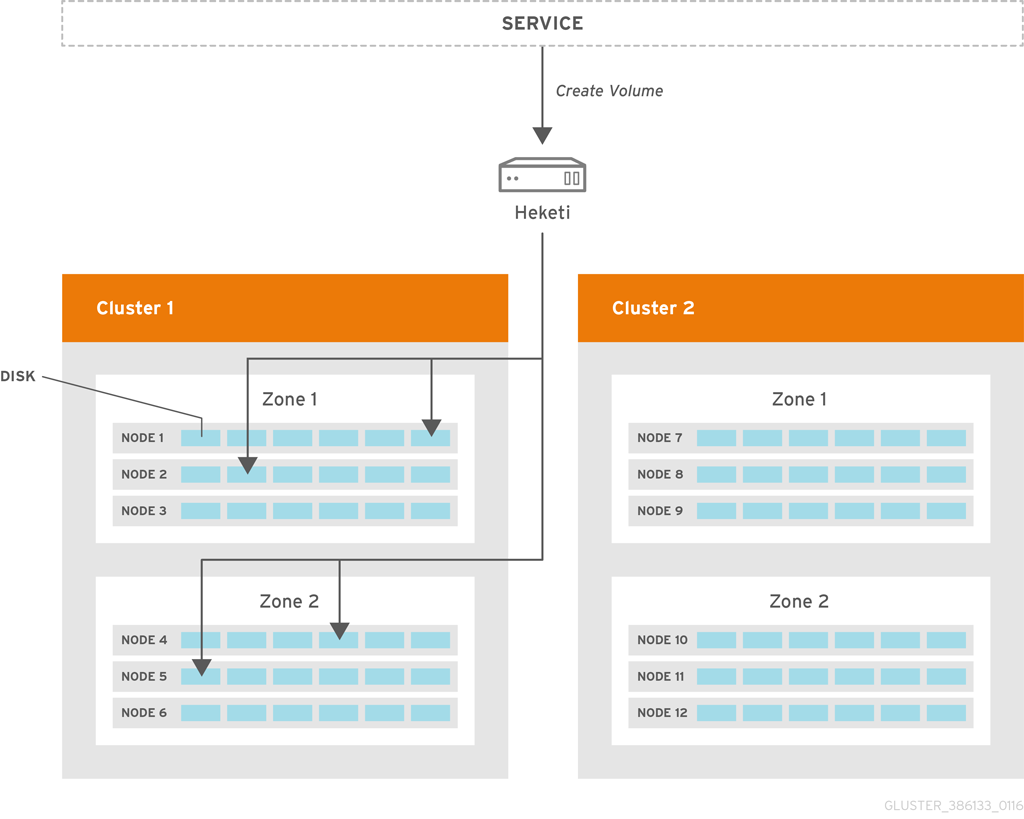
Figure 6.1. Heketi Architecture
Heketi can be configured and executed using the CLI or the API. The sections ahead describe configuring Heketi using the CLI. For more information regarding the Heketi API, see Heketi API.
6.2.1. Prerequisites
Copia collegamentoCollegamento copiato negli appunti!
Heketi requires SSH access to the nodes that it will manage. Hence, ensure that the following requirements are met:
- SSH Access
- SSH user and public key must be setup on the node.
- SSH user must have password-less sudo.
- Must be able to run sudo commands from SSH. This requires disabling
requirettyin the/etc/sudoersfile
- Start the glusterd service after Red Hat Gluster Storage is installed.
- Disks registered with Heketi must be in the raw format.
6.2.2. Installing Heketi
Copia collegamentoCollegamento copiato negli appunti!
After installing Red Hat Gluster Storage 3.1.2, execute the following command to install Heketi:
# yum install heketi
For more information about subscribing to the required channels and installing Red Hat Gluster Storage, see the Red Hat Gluster Storage Installation Guide.
6.2.3. Starting the Heketi Server
Copia collegamentoCollegamento copiato negli appunti!
Before starting the server, ensure that the following prerequisites are met:
- Generate the passphrase-less SSH keys for the nodes which are going to be part of the trusted storage pool by running the following command:
# ssh-keygen -f id_rsa -t rsa -N '' - Set up password-less SSH access between Heketi and the Red Hat Gluster Storage servers by running the following command:
# ssh-copy-id -i root@server - Setup the heketi.json configuration file. The file is located in /etc/heketi/heketi.json. The configuration file has the information required to run the Heketi server. The config file must be in JSON format with the following settings:
- port: string, Heketi REST service port number
- use_auth: bool, Enable JWT Authentication
- jwt: map, JWT Authentication settings
- admin: map, Settings for the Heketi administrator
- key: string,
- user: map, Settings for the Heketi volume requests access user
- key: string, t
- glusterfs: map, Red Hat Gluster Storage settings
- executor: string, Determines the type of command executor to use. Possible values are:
- mock: Does not send any commands out to servers. Can be used for development and tests
- ssh: Sends commands to real systems over ssh
- db: string, Location of Heketi database
- sshexec: map, SSH configuration
- keyfile: string, File with private ssh key
- user: string, SSH user
Following is an example of the JSON file:{ "_port_comment": "Heketi Server Port Number", "port": "8080", "_use_auth": "Enable JWT authorization. Please enable for deployment", "use_auth": false, "_jwt": "Private keys for access", "jwt": { "_admin": "Admin has access to all APIs", "admin": { "key": "My Secret" }, "_user": "User only has access to /volumes endpoint", "user": { "key": "My Secret" } }, .....Note
The location for the private SSH key that is created must be set in thekeyfilesetting of the configuration file, and the key should be readable by the heketi user.Advanced OptionsThe following configuration options should only be set on advanced configurations.
- brick_max_size_gb: int, Maximum brick size (Gb)
- brick_min_size_gb: int, Minimum brick size (Gb)
- max_bricks_per_volume: int, Maximum number of bricks per volume
6.2.3.1. Starting the Server
Copia collegamentoCollegamento copiato negli appunti!
For Red Hat Enterprise Linux 7
- Enable heketi by executing the following command:
# systemctl enable heketi - Start the Heketi server, by executing the following command:
# systemctl start heketi - To check the status of the Heketi server, execute the following command:
# systemctl status heketi - To check the logs, execute the following command:
# journalctl -u heketi
For Red Hat Enterprise Linux 6
- To start Heketi, execute the following command:
# chkconfig --add heketi # service heketi start - Check the logs by executing the following command:
# less /var/log/heketi
Note
The database will be installed in /var/lib/heketi.
6.2.3.2. Verifying the Configuration
Copia collegamentoCollegamento copiato negli appunti!
To verify if the server is running, execute the following step:
If Heketi is not setup with authentication, then use curl to verify the configuration:
# curl http://<server:port>/hello
You can also verify the configuration using the heketi-cli when authentication is enabled:
# heketi-cli -server http://<server:port> -user <user> -secret <secret> cluster list6.2.4. Setting up the Topology
Copia collegamentoCollegamento copiato negli appunti!
Setting up the topology allows Heketi to determine which nodes, disks, and clusters to use.
6.2.4.1. Prerequisites
Copia collegamentoCollegamento copiato negli appunti!
You have to determine the node failure domains and clusters of nodes. Failure domains is a value given to a set of nodes which share the same switch, power supply, or anything else that would cause them to fail at the same time. Heketi uses this information to make sure that replicas are created across failure domains, thus providing cloud services volumes which are resilient to both data unavailability and data loss.
You have to determine which nodes would constitute a cluster. Heketi supports multiple Red Hat Gluster Storage clusters, which gives cloud services the option of specifying a set of clusters where a volume must be created. This provides cloud services and administrators the option of creating SSD, SAS, SATA, or any other type of cluster which provide a specific quality of service to users.
6.2.4.2. Topology Setup
Copia collegamentoCollegamento copiato negli appunti!
The command line client loads the information about creating a cluster, adding nodes to that cluster, and then adding disks to each one of those nodes.This information is added into the topology file. To load a topology file with heketi-cli, execute the following command:
# export HEKETI_CLI_SERVER=http://<heketi_server:port>
# heketi-cli load -json=<topology_file>
Where
topology_file is a file in JSON format describing the clusters, nodes, and disks to add to Heketi. The format of the file is as follows:
clusters: array of clusters, Array of clusters
- Each element on the array is a map which describes the cluster as follows
- nodes: array of nodes, Array of nodes in a clusterEach element on the array is a map which describes the node as follows
- node: map, Same map as Node Add except there is no need to supply the cluster id.
- devices: array of strings, Name of each disk to be added
For example:
- Topology file:
{ "clusters": [ { "nodes": [ { "node": { "hostnames": { "manage": [ "10.0.0.1" ], "storage": [ "10.0.0.1" ] }, "zone": 1 }, "devices": [ "/dev/sdb", "/dev/sdc", "/dev/sdd", "/dev/sde", "/dev/sdf", "/dev/sdg", "/dev/sdh", "/dev/sdi" ] }, { "node": { "hostnames": { "manage": [ "10.0.0.2" ], "storage": [ "10.0.0.2" ] }, "zone": 2 }, "devices": [ "/dev/sdb", "/dev/sdc", "/dev/sdd", "/dev/sde", "/dev/sdf", "/dev/sdg", "/dev/sdh", "/dev/sdi" ] }, ...... ...... - Load the Heketi JSON file:
# heketi-cli load -json=topology_libvirt.json Creating cluster ... ID: a0d9021ad085b30124afbcf8df95ec06 Creating node 192.168.10.100 ... ID: b455e763001d7903419c8ddd2f58aea0 Adding device /dev/vdb ... OK Adding device /dev/vdc ... OK ……. Creating node 192.168.10.101 ... ID: 4635bc1fe7b1394f9d14827c7372ef54 Adding device /dev/vdb ... OK Adding device /dev/vdc ... OK …………. - Execute the following command to check the details of a particular node:
# heketi-cli node info b455e763001d7903419c8ddd2f58aea0 Node Id: b455e763001d7903419c8ddd2f58aea0 Cluster Id: a0d9021ad085b30124afbcf8df95ec06 Zone: 1 Management Hostname: 192.168.10.100 Storage Hostname: 192.168.10.100 Devices: Id:0ddba53c70537938f3f06a65a4a7e88b Name:/dev/vdi Size (GiB):499 Used (GiB):0 Free (GiB):499 Id:4fae3aabbaf79d779795824ca6dc433a Name:/dev/vdg Size (GiB):499 Used (GiB):0 Free (GiB):499 ……………. - Execute the following command to check the details of the cluster:
# heketi-cli cluster info a0d9021ad085b30124afbcf8df95ec06 Cluster id: a0d9021ad085b30124afbcf8df95ec06 Nodes: 4635bc1fe7b1394f9d14827c7372ef54 802a3bfab2d0295772ea4bd39a97cd5e b455e763001d7903419c8ddd2f58aea0 ff9eeb735da341f8772d9415166b3f9d Volumes: - To check the details of the device, execute the following command:
# heketi-cli device info 0ddba53c70537938f3f06a65a4a7e88b
Device Id: 0ddba53c70537938f3f06a65a4a7e88b
Name: /dev/vdi
Size (GiB): 499
Used (GiB): 0
Free (GiB): 499
Bricks:
6.2.5. Creating a Volume
Copia collegamentoCollegamento copiato negli appunti!
After Heketi is set up, you can use the CLI to create a volume.
- Execute the following command to check the various option for creating a volume:
# heketi-cli volume create [options] - For example: After setting up the topology file with two nodes on one failure domain, and two nodes in another failure domain, create a 100Gb volume using the following command:
# heketi-cli volume create -size=100 Name: vol_0729fe8ce9cee6eac9ccf01f84dc88cc Size: 100 Id: 0729fe8ce9cee6eac9ccf01f84dc88cc Cluster Id: a0d9021ad085b30124afbcf8df95ec06 Mount: 192.168.10.101:vol_0729fe8ce9cee6eac9ccf01f84dc88cc Mount Options: backupvolfile-servers=192.168.10.100,192.168.10.102 Durability Type: replicate Replica: 3 Snapshot: Disabled Bricks: Id: 8998961142c1b51ab82d14a4a7f4402d Path: /var/lib/heketi/mounts/vg_0ddba53c70537938f3f06a65a4a7e88b/brick_8998961142c1b51ab82d14a4a7f4402d/brick Size (GiB): 50 Node: b455e763001d7903419c8ddd2f58aea0 Device: 0ddba53c70537938f3f06a65a4a7e88b ……………. - If you want to increase the storage capacity of a particular volume by 1TB, then execute the following command:
# heketi-cli volume expand -volume=0729fe8ce9cee6eac9ccf01f84dc88cc -expand-size=1024 Name: vol_0729fe8ce9cee6eac9ccf01f84dc88cc Size: 1224 Id: 0729fe8ce9cee6eac9ccf01f84dc88cc Cluster Id: a0d9021ad085b30124afbcf8df95ec06 Mount: 192.168.10.101:vol_0729fe8ce9cee6eac9ccf01f84dc88cc Mount Options: backupvolfile-servers=192.168.10.100,192.168.10.102 Durability Type: replicate Replica: 3 Snapshot: Disabled Bricks: Id: 0b53e8c0d8e2b1a3fa5701e3c876d532 Path: /var/lib/heketi/mounts/vg_0ddba53c70537938f3f06a65a4a7e88b/brick_0b53e8c0d8e2b1a3fa5701e3c876d532/brick Size (GiB): 256 Node: b455e763001d7903419c8ddd2f58aea0 Device: 0ddba53c70537938f3f06a65a4a7e88b ......... ......... - To check the details of the device, execute the following command:
# heketi-cli device info 0ddba53c70537938f3f06a65a4a7e88b
Device Id: 0ddba53c70537938f3f06a65a4a7e88b
Name: /dev/vdi
Size (GiB): 499
Used (GiB): 201
Free (GiB): 298
Bricks:
Id:0f1766cc142f1828d13c01e6eed12c74   Size (GiB):50      Path: /var/lib/heketi/mounts/vg_0ddba53c70537938f3f06a65a4a7e88b/brick_0f1766cc142f1828d13c01e6eed12c74/brick
Id:5d944c47779864b428faa3edcaac6902   Size (GiB):50      Path: /var/lib/heketi/mounts/vg_0ddba53c70537938f3f06a65a4a7e88b/brick_5d944c47779864b428faa3edcaac6902/brick
Id:8998961142c1b51ab82d14a4a7f4402d   Size (GiB):50      Path: /var/lib/heketi/mounts/vg_0ddba53c70537938f3f06a65a4a7e88b/brick_8998961142c1b51ab82d14a4a7f4402d/brick
Id:a11e7246bb21b34a157e0e1fd598b3f9   Size (GiB):50      Path: /var/lib/heketi/mounts/vg_0ddba53c70537938f3f06a65a4a7e88b/brick_a11e7246bb21b34a157e0e1fd598b3f9/brick
6.2.6. Deleting a Volume
Copia collegamentoCollegamento copiato negli appunti!
To delete a volume, execute the following command:
# heketi-cli volume delete <volname>
For example:
$ heketi-cli volume delete 0729fe8ce9cee6eac9ccf01f84dc88cc
Volume 0729fe8ce9cee6eac9ccf01f84dc88cc deleted