OpenShift Container Storage is now OpenShift Data Foundation starting with version 4.9.
Questo contenuto non è disponibile nella lingua selezionata.
Chapter 1. Deploying OpenShift Container Storage on Red Hat Virtualization platform
Deploying OpenShift Container Storage on OpenShift Container Platform using shared storage devices provided by Red Hat Virtualization installer-provisioned infrastructure (IPI) enables you to create internal cluster resources.
Only internal Openshift Container Storage clusters are supported on Red Hat Virtualization platform. See Planning your deployment for more information about deployment requirements.
Use this section to deploy OpenShift Container Storage on Red Hat Virtualization infrastructure where OpenShift Container Platform is already installed.
To deploy Red Hat OpenShift Container Storage using local storage, follow these steps:
- Understand the requirements for installing OpenShift Container Storage using local storage devices.
- Install the Red Hat OpenShift Container Storage Operator.
- Install Local Storage Operator.
- Find the available storage devices.
- Creating OpenShift Container Storage cluster service on Red Hat Virtualization.
1.1. Requirements for installing OpenShift Container Storage using local storage devices
You must have at least three OpenShift Container Platform worker nodes in the cluster with locally attached storage devices on each of them.
- Each of the three selected nodes must have at least one raw block device available to be used by OpenShift Container Storage.
- For minimum starting node requirements, see Resource requirements section in Planning guide.
- The devices to be used must be empty, that is, there should be no PVs, VGs, or LVs remaining on the disks.
You must have a minimum of three labeled nodes.
Each node that has local storage devices to be used by OpenShift Container Storage must have a specific label to deploy OpenShift Container Storage pods. To label the nodes, use the following command:
oc label nodes <NodeNames> cluster.ocs.openshift.io/openshift-storage=''
$ oc label nodes <NodeNames> cluster.ocs.openshift.io/openshift-storage=''Copy to Clipboard Copied! Toggle word wrap Toggle overflow
- There should not be any storage providers managing locally mounted storage on the storage nodes that would conflict with the use of Local Storage Operator for Red Hat OpenShift Container Storage.
- The Local Storage Operator version must match the Red Hat OpenShift Container Platform version in order to have the Local Storage Operator fully supported with Red Hat OpenShift Container Storage. The Local Storage Operator does not get upgraded when Red Hat OpenShift Container Platform is upgraded.
1.2. Installing Red Hat OpenShift Container Storage Operator
You can install Red Hat OpenShift Container Storage Operator using the Red Hat OpenShift Container Platform Operator Hub. For information about the hardware and software requirements, see Planning your deployment.
Prerequisites
- You must be logged into the OpenShift Container Platform cluster.
- You must have at least three worker nodes in the OpenShift Container Platform cluster.
When you need to override the cluster-wide default node selector for OpenShift Container Storage, you can use the following command in command line interface to specify a blank node selector for the openshift-storage namespace:
oc annotate namespace openshift-storage openshift.io/node-selector=
$ oc annotate namespace openshift-storage openshift.io/node-selector=Procedure
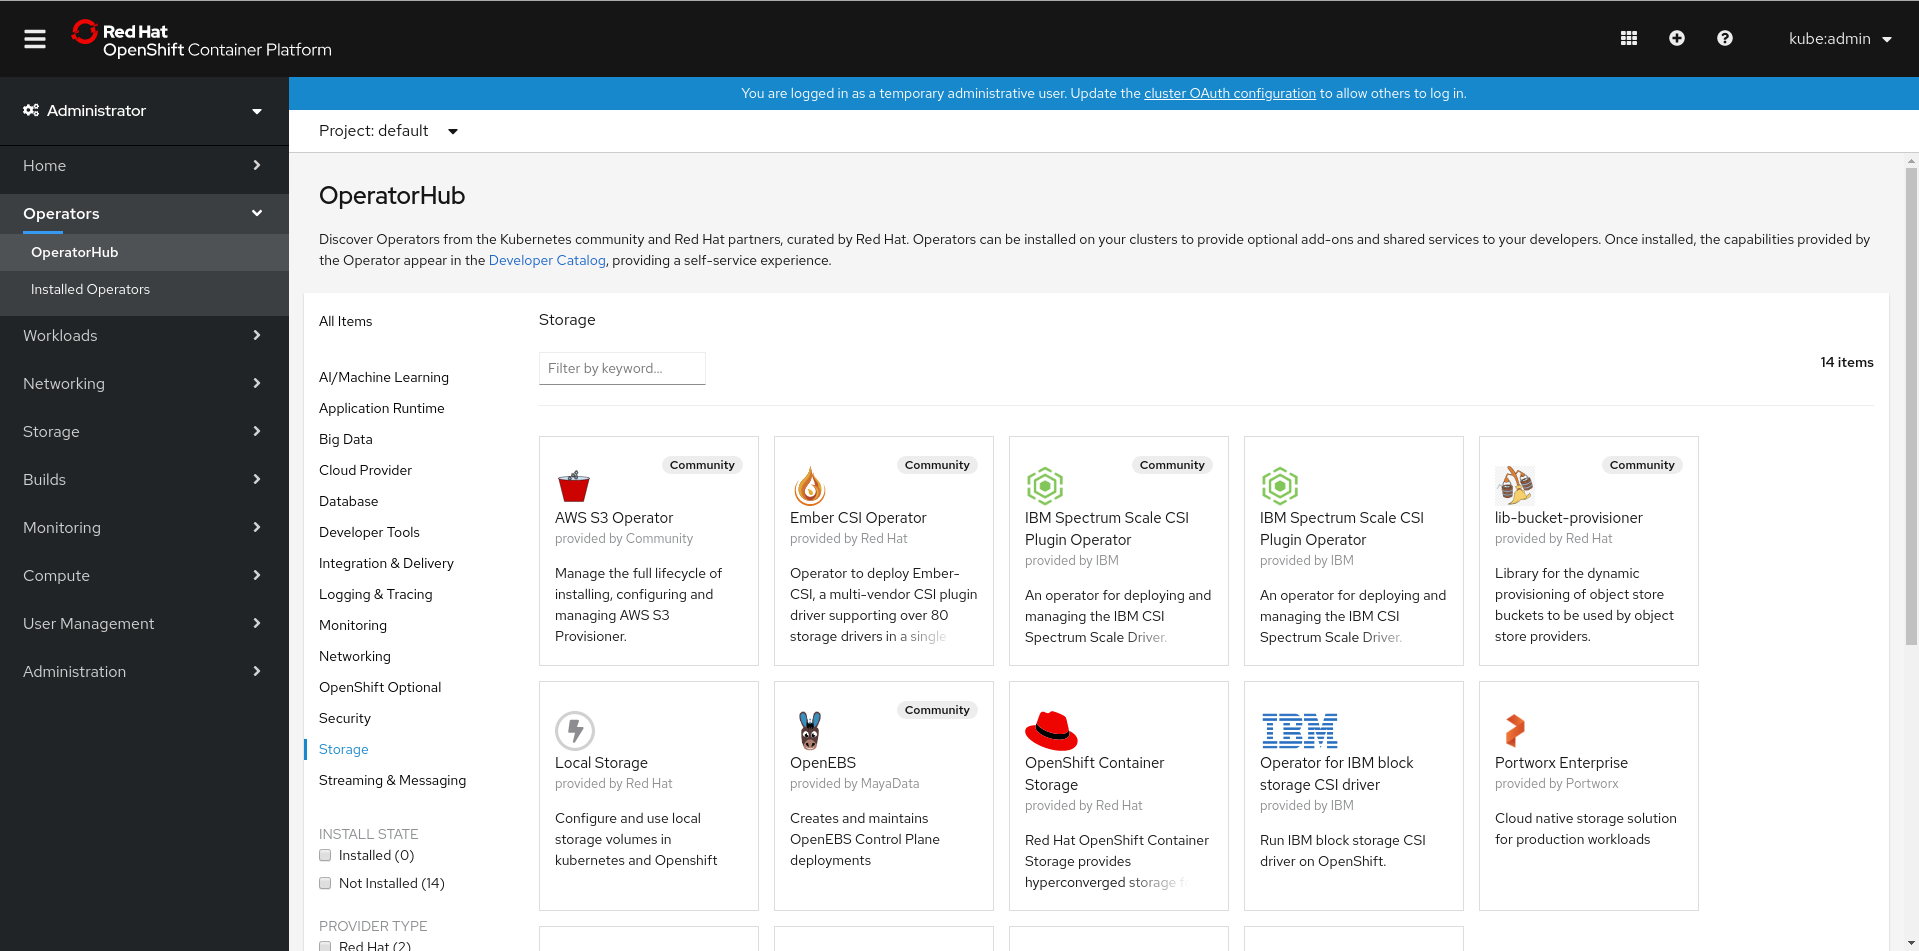
Click Operators
OperatorHub in the left pane of the OpenShift Web Console. Figure 1.1. List of operators in the Operator Hub
Click on OpenShift Container Storage.
You can use the Filter by keyword text box or the filter list to search for OpenShift Container Storage from the list of operators.
- On the OpenShift Container Storage operator page, click Install.
On the Install Operator page, ensure the following options are selected:
- Update Channel as stable-4.5
- Installation Mode as A specific namespace on the cluster
-
Installed Namespace as Operator recommended namespace PR openshift-storage. If Namespace
openshift-storagedoes not exist, it will be created during the operator installation. Select Approval Strategy as Automatic or Manual. Approval Strategy is set to Automatic by default.
Approval Strategy as Automatic.
NoteWhen you select the Approval Strategy as Automatic, approval is not required either during fresh installation or when updating to the latest version of OpenShift Container Storage.
- Click Install
- Wait for the install to initiate. This may take up to 20 minutes.
-
Click Operators
Installed Operators -
Ensure the Project is
openshift-storage. By default, the Project isopenshift-storage. - Wait for the Status of OpenShift Container Storage to change to Succeeded.
Approval Strategy as Manual.
NoteWhen you select the Approval Strategy as Manual, approval is required during fresh installation or when updating to the latest version of OpenShift Container Storage.
- Click Install.
- On the Installed Operators page, click ocs-operator.
- On the Subscription Details page, click the Install Plan link.
- On the InstallPlan Details page, click Preview Install Plan.
- Review the install plan and click Approve.
- Wait for the Status of the Components to change from Unknown to either Created or Present.
-
Click Operators
Installed Operators -
Ensure the Project is
openshift-storage. By default, the Project isopenshift-storage. - Wait for the Status of OpenShift Container Storage to change to Succeeded.
Verification steps
- Verify that OpenShift Container Storage Operator shows the Status as Succeeded on the Installed Operators dashboard.
1.3. Installing Local Storage Operator
Use this procedure to install the Local Storage Operator from the Operator Hub before creating OpenShift Container Storage clusters on local storage devices.
Prerequisites
Create a namespace called
local-storageas follows:-
Click Administration
Namespaces in the left pane of the OpenShift Web Console. - Click Create Namespace.
-
In the Create Namespace dialog box, enter
local-storagefor Name. - Select No restrictions option for Default Network Policy.
- Click Create.
-
Click Administration
Procedure
-
Click Operators
OperatorHub in the left pane of the OpenShift Web Console. - Search for Local Storage Operator from the list of operators and click on it.
Click Install.
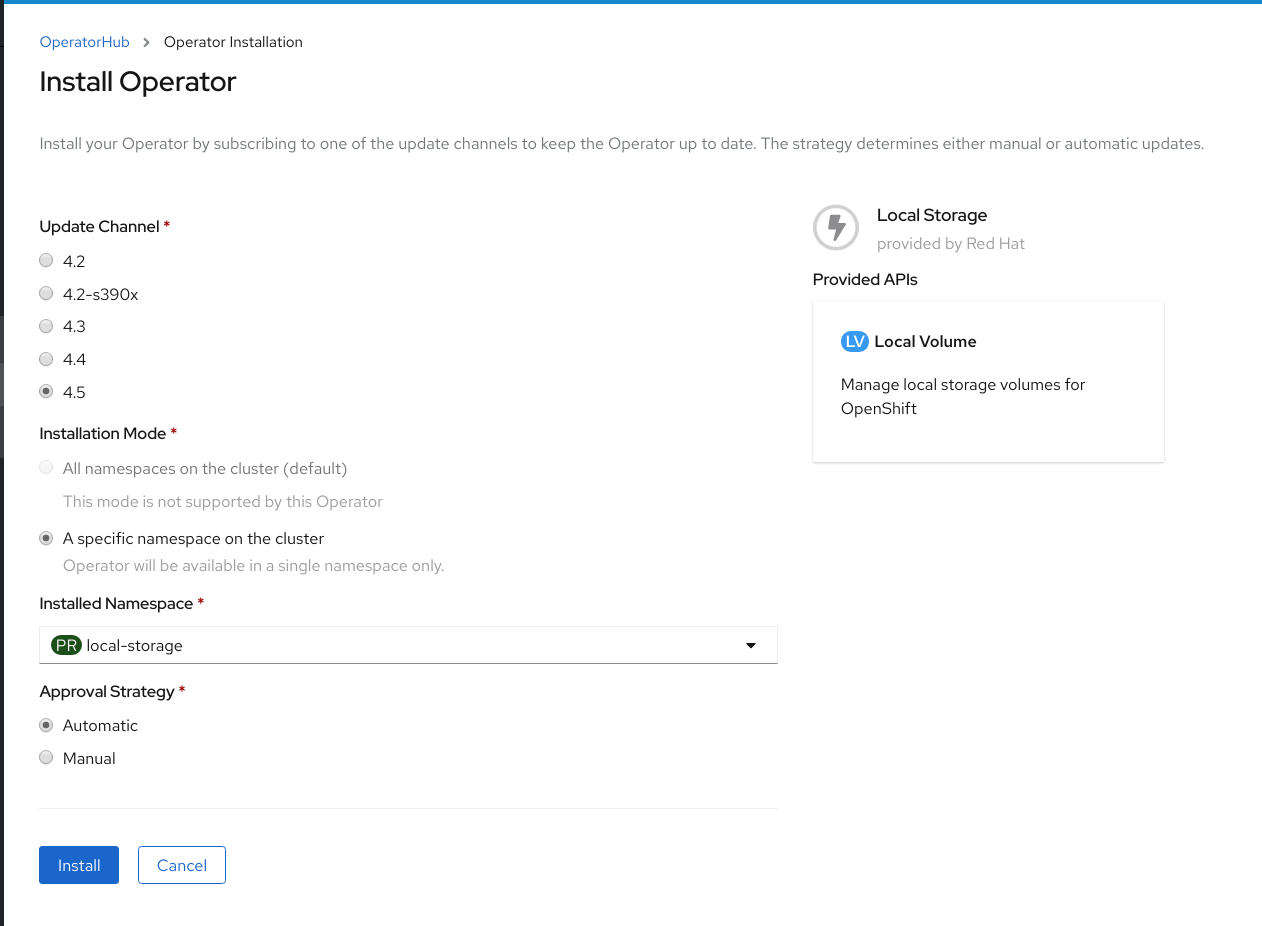
Figure 1.2. Install Operator page
On the Install Operator page, ensure the following options are selected
- Update Channel as stable-4.5
- Installation Mode as A specific namespace on the cluster
- Installed Namespace as local-storage.
- Approval Strategy as Automatic
- Click Install.
-
Verify that the Local Storage Operator shows the Status as
Succeeded.
1.4. Finding available storage devices
Use this procedure to identify the device names for each of the three or more worker nodes that you have labeled with the OpenShift Container Storage label cluster.ocs.openshift.io/openshift-storage='' before creating PVs for Red Hat Virtualization.
Procedure
List and verify the name of the worker nodes with the OpenShift Container Storage label.
oc get nodes -l cluster.ocs.openshift.io/openshift-storage=
$ oc get nodes -l cluster.ocs.openshift.io/openshift-storage=Copy to Clipboard Copied! Toggle word wrap Toggle overflow Example output:
NAME          STATUS   ROLES    AGE     VERSION
rhvworker01    Ready    worker   6h45m   v1.16.2
rhvworker02    Ready    worker   6h45m   v1.16.2
rhvworker03    Ready    worker   6h45m   v1.16.2
NAME          STATUS   ROLES    AGE     VERSION
rhvworker01    Ready    worker   6h45m   v1.16.2
rhvworker02    Ready    worker   6h45m   v1.16.2
rhvworker03    Ready    worker   6h45m   v1.16.2
Copy to Clipboard Copied! Toggle word wrap Toggle overflow Log in to each worker node that is used for OpenShift Container Storage resources and find the unique
by-iddevice name for each available raw block device.oc debug node/<Nodename>
$ oc debug node/<Nodename>Copy to Clipboard Copied! Toggle word wrap Toggle overflow Example output:
Copy to Clipboard Copied! Toggle word wrap Toggle overflow In this example, for
rhvworker01, the available local device isnvme0n1.Identify the unique ID for each of the devices selected in Step 2.
ls -l /dev/disk/by-id/ | grep nvme0n1
sh-4.4#  ls -l /dev/disk/by-id/ | grep nvme0n1
lrwxrwxrwx. 1 root root 13 Mar 17 16:24 nvme-INTEL_SSDPE2KX010T7_PHLF733402LM1P0GGN -> ../../nvme0n1
Copy to Clipboard Copied! Toggle word wrap Toggle overflow In the above example, the ID for the local device
nvme0n1nvme-INTEL_SSDPE2KX010T7_PHLF733402LM1P0GGN
nvme-INTEL_SSDPE2KX010T7_PHLF733402LM1P0GGNCopy to Clipboard Copied! Toggle word wrap Toggle overflow - Repeat the above step to identify the device ID for all the other nodes that have the storage devices to be used by OpenShift Container Storage. See this Knowledge Base article for more details.
1.5. Creating OpenShift Container Storage cluster on Red Hat Virtualization platform
Prerequisites
- Ensure that all the requirements in the Requirements for installing OpenShift Container Storage using local storage devices section are met.
Verify your OpenShift Container Platform worker nodes are labeled for OpenShift Container Storage:
oc get nodes -l cluster.ocs.openshift.io/openshift-storage -o jsonpath='{range .items[*]}{.metadata.name}{"\n"}'$ oc get nodes -l cluster.ocs.openshift.io/openshift-storage -o jsonpath='{range .items[*]}{.metadata.name}{"\n"}'Copy to Clipboard Copied! Toggle word wrap Toggle overflow
To identify storage devices on each node, refer to Finding available storage devices.
Procedure
Create the
LocalVolumeCR for block PVs.Example of
LocalVolumeCRlocal-storage-block.yamlusing OCS label as node selector.Copy to Clipboard Copied! Toggle word wrap Toggle overflow Create the
LocalVolumeCR for block PVs.oc create -f local-storage-block.yaml
$ oc create -f local-storage-block.yamlCopy to Clipboard Copied! Toggle word wrap Toggle overflow Check if the pods are created.
Example output:
Copy to Clipboard Copied! Toggle word wrap Toggle overflow Check if the PVs are created.
oc get pv
$ oc get pvCopy to Clipboard Copied! Toggle word wrap Toggle overflow Example output:
NAME                CAPACITY   ACCESS MODES   RECLAIM POLICY   STATUS      CLAIM   STORAGECLASS   REASON   AGE
local-pv-150fdc87   931Gi      RWO            Delete           Available           localblock              2m11s
local-pv-183bfc0a   931Gi      RWO            Delete           Available           localblock              2m15s
local-pv-b2f5cb25   931Gi      RWO            Delete           Available           localblock              2m21s
Copy to Clipboard Copied! Toggle word wrap Toggle overflow Check for the new
localblockStorageClass.oc get sc | grep localblock
$ oc get sc | grep localblockCopy to Clipboard Copied! Toggle word wrap Toggle overflow Example output:
NAME            PROVISIONER                    RECLAIMPOLICY
VOLUMEBINDINGMODE ALLOWVOLUMEEXPANSION     AGE
localblock      kubernetes.io/no-provisioner   Delete
WaitForFirstConsumer  false                2m10s
NAME            PROVISIONER                    RECLAIMPOLICY
VOLUMEBINDINGMODE ALLOWVOLUMEEXPANSION     AGE
localblock      kubernetes.io/no-provisioner   Delete
WaitForFirstConsumer  false                2m10s
Copy to Clipboard Copied! Toggle word wrap Toggle overflow Create the OpenShift Container Storage Cluster Service that uses the
localblockStorage Class.- Log into the OpenShift Web Console.
-
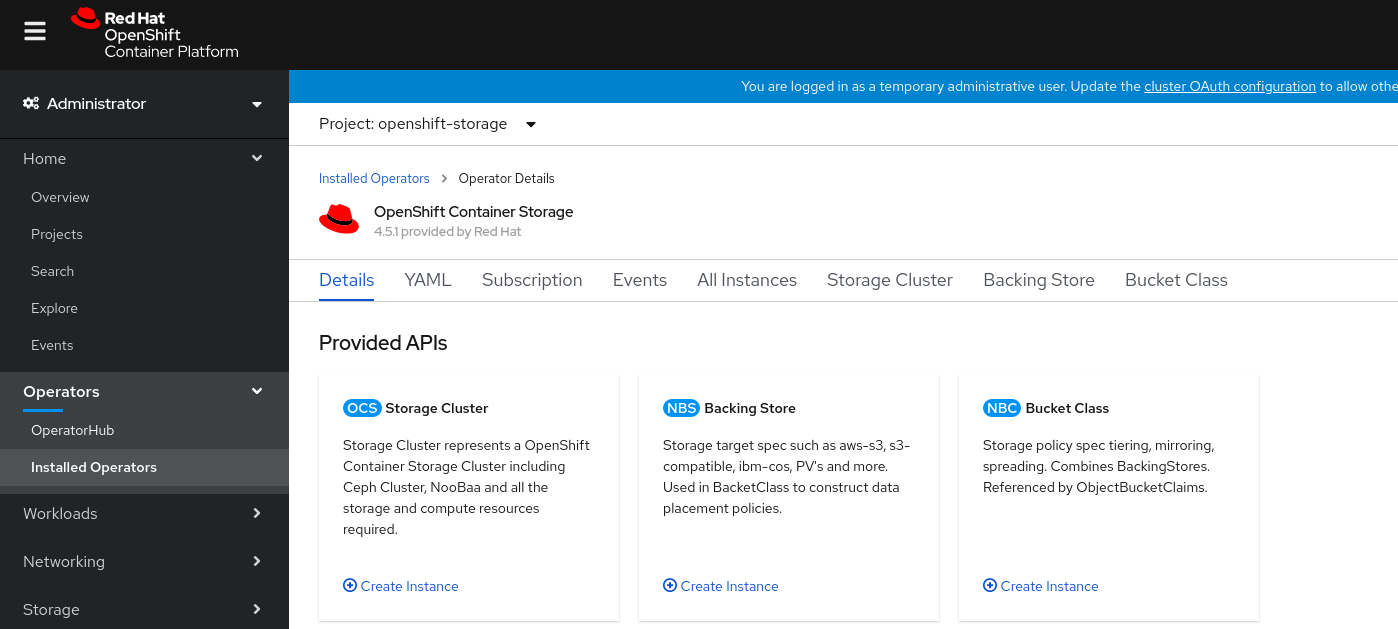
Click Operators
Installed Operators from the OpenShift Web Console to view the installed operators. Ensure that the Project selected is openshift-storage. On the Installed Operators page, click Openshift Container Storage.
Figure 1.3. OpenShift Container Storage Operator page
On the Installed Operators
Operator Details page, perform either of the following to create a Storage Cluster Service. On the Details tab
Provided APIs OCS Storage Cluster, click Create Instance. Figure 1.4. Operator Details Page
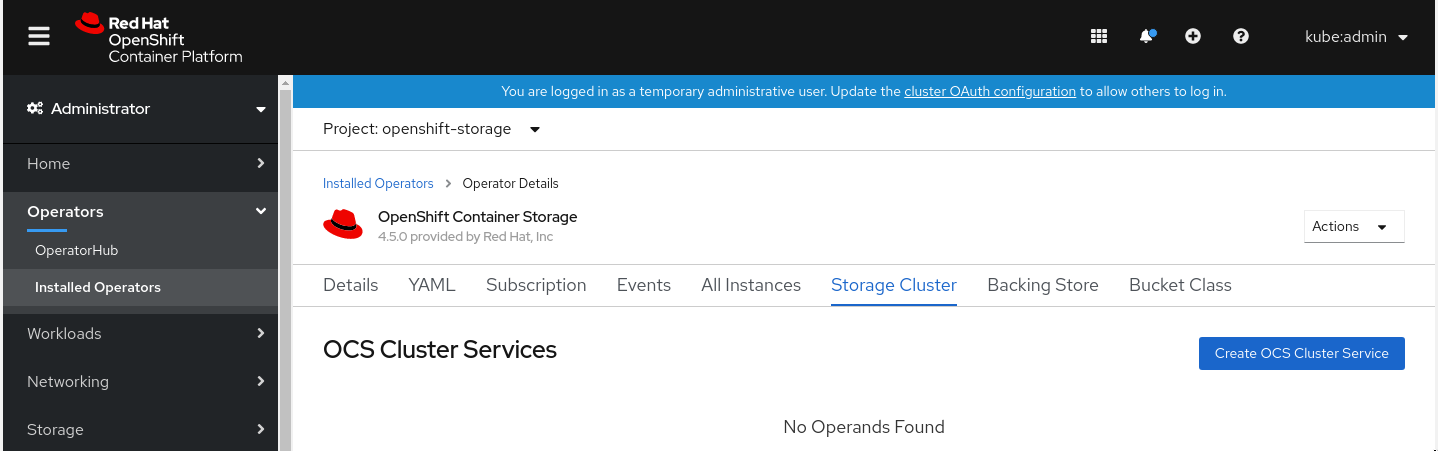
Alternatively, select the Storage cluster tab and click Create OCS Cluster Service.
Figure 1.5. Storage Cluster tab
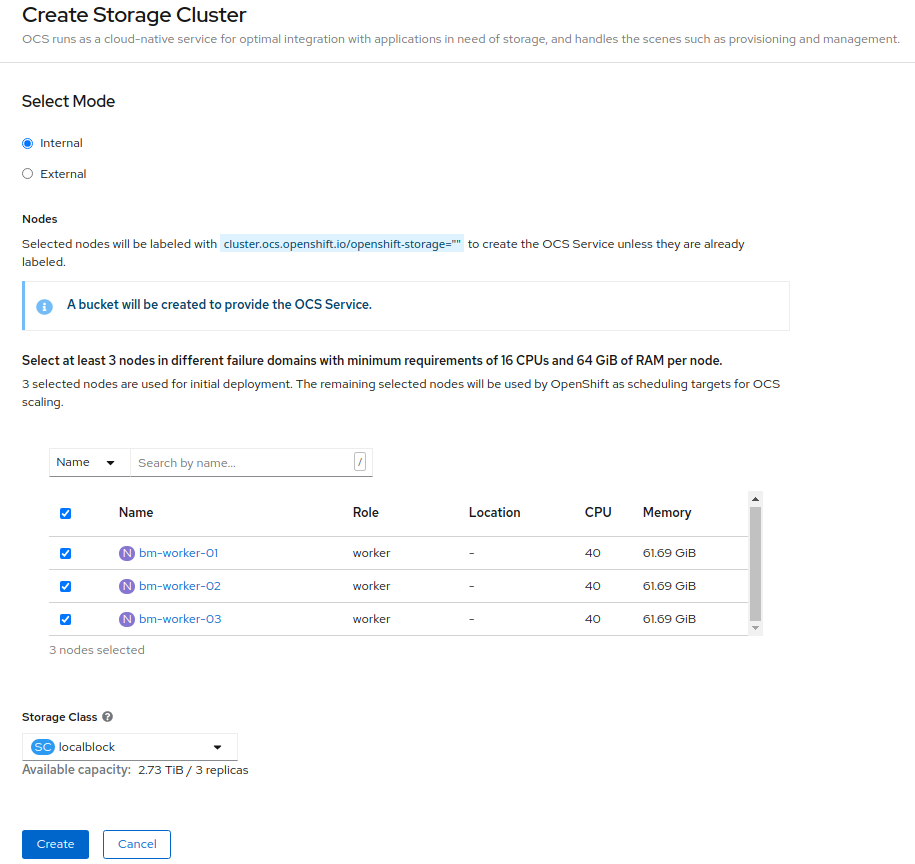
On the Create Storage Cluster page, ensure that the following options are selected:
- Leave Select Mode as Internal.
In the Nodes section, for the use of OpenShift Container Storage service, select a minimum of three or a multiple of three worker nodes from the available list.
It is recommended that the worker nodes are spread across three different physical nodes, racks or failure domains for high availability.
NoteTo find specific worker nodes in the cluster, you can filter nodes on the basis of Name or Label.
- Name allows you to search by name of the node
- Label allows you to search by selecting the predefined label
- Ensure OpenShift Container Storage rack labels are aligned with physical racks in the datacenter to prevent a double node failure at the failure domain level.
For minimum starting node requirements, see Resource requirements section in Planning guide.
- Select localblock from the Storage Class dropdown list.
Click Create.
NoteThe Create button is enabled only after selecting a minimum of three worker nodes.
Upon successful deployment, a storage cluster with three storage devices gets created. These devices get distributed across three of the selected nodes. The configuration uses a replication factor of 3. To scale the initial cluster, see Scaling storage nodes.

Verification steps
See Verifying your OpenShift Container Storage installation.