Questo contenuto non è disponibile nella lingua selezionata.
Install clusters
Installing, accessing, and deleting Red Hat OpenShift Service on AWS (ROSA) clusters.
Abstract
Chapter 1. Red Hat OpenShift Service on AWS quick start guide
Use this guide to create a Red Hat OpenShift Service on AWS cluster with the ROSA command-line interface (CLI) (rosa), grant user access, deploy an application, and manage your cluster.
1.1. Overview of the default cluster specifications
You can quickly create a Red Hat OpenShift Service on AWS cluster by using the default installation options.
| Component | Default specifications |
|---|---|
| Accounts and roles |
|
| Cluster settings |
|
| Compute node machine pool |
|
| Networking configuration |
|
| Classless Inter-Domain Routing (CIDR) ranges |
|
| Cluster roles and policies |
|
| Storage |
|
| Cluster update strategy |
|
1.2. Setting up the environment for cluster creation
Before you create a Red Hat OpenShift Service on AWS cluster, you must configure your environment.
You must complete the following tasks:
- Verify Red Hat OpenShift Service on AWS prerequisites against your AWS and Red Hat accounts.
- Install and configure the required command-line interface (CLI) tools.
- Verify the configuration of the CLI tools.
1.2.1. Verifying Red Hat OpenShift Service on AWS prerequisites
You can enable Red Hat OpenShift Service on AWS in your AWS account by verifying prerequisites in the AWS Management Console.
Prerequisites
- You have a Red Hat account.
You have an AWS account.
NoteConsider using a dedicated AWS account to run production clusters. If you are using AWS Organizations, you can use an AWS account within your organization or create a new one.
Procedure
- Sign in to the AWS Management Console.
- Navigate to the ROSA service.
Click Get started.
The Verify ROSA prerequisites page opens.
Under ROSA enablement, ensure that a green check mark and
You previously enabled ROSAare displayed.If not, follow these steps:
-
Select the checkbox beside
I agree to share my contact information with Red Hat. Click Enable ROSA.
After a short wait, a green check mark and
You enabled ROSAmessage are displayed.
-
Select the checkbox beside
Under Service Quotas, ensure that a green check and
Your quotas meet the requirements for ROSAare displayed.If you see
Your quotas don’t meet the minimum requirements, take note of the quota type and the minimum listed in the error message. See the Amazon documentation on requesting a quota increase for guidance. It may take several hours for Amazon to approve your quota request.-
Under ELB service-linked role, ensure that a green check mark and
AWSServiceRoleForElasticLoadBalancing already existsare displayed. Click Continue to Red Hat.
The Get started with Red Hat OpenShift Service on AWS (ROSA) page opens in a new tab. You have already completed Step 1 on this page, and can now continue with Step 2.
1.2.2. Installing and configuring the required CLI tools
Several command-line interface (CLI) tools are required to deploy and work with your cluster.
Prerequisites
- You have an AWS account.
- You have a Red Hat account.
Procedure
Log in to your Red Hat and AWS accounts to access the download page for each required tool.
- Log in to your Red Hat account at console.redhat.com.
- Log in to your AWS account at aws.amazon.com.
Install and configure the latest AWS CLI (
aws).- Install the AWS CLI by following the AWS Command Line Interface documentation appropriate for your workstation.
Configure the AWS CLI by specifying your
aws_access_key_id,aws_secret_access_key, andregionin the.aws/credentialsfile. For more information, see AWS Configuration basics in the AWS documentation.NoteYou can optionally use the
AWS_DEFAULT_REGIONenvironment variable to set the default AWS region.Query the AWS API to verify if the AWS CLI is installed and configured correctly:
$ aws sts get-caller-identity --output textFor example:
<aws_account_id> arn:aws:iam::<aws_account_id>:user/<username> <aws_user_id>
Install and configure the latest ROSA CLI.
- Navigate to Downloads.
Find Red Hat OpenShift Service on AWS command line interface (
rosa) in the list of tools and click Download.The
rosa-linux.tar.gzfile is downloaded to your default download location.Extract the
rosabinary file from the downloaded archive. The following example extracts the binary from a Linux tar archive:$ tar xvf rosa-linux.tar.gzMove the
rosabinary file to a directory in your execution path. In the following example, the/usr/local/bindirectory is included in the path of the user:$ sudo mv rosa /usr/local/bin/rosaVerify that the ROSA CLI is installed correctly by querying the
rosaversion:$ rosa versionFor example:
1.2.47
Your ROSA CLI is up to date.
Log in to the ROSA CLI using an offline access token.
Run the login command:
$ rosa loginFor example:
To login to your Red Hat account, get an offline access token at https://console.redhat.com/openshift/token/rosa ? Copy the token and paste it here:- Navigate to the URL listed in the command output to view your offline access token.
Enter the offline access token at the command-line prompt to log in.
? Copy the token and paste it here: ******************* [full token length omitted]NoteIn the future you can specify the offline access token by using the
--token="<offline_access_token>"argument when you run therosa logincommand.Verify that you are logged in and confirm that your credentials are correct before proceeding:
$ rosa whoamiFor example:
AWS Account ID:               <aws_account_number>
AWS Default Region:           us-east-1
AWS ARN:                      arn:aws:iam::<aws_account_number>:user/<aws_user_name>
OCM API:                      https://api.openshift.com
OCM Account ID:               <red_hat_account_id>
OCM Account Name:             Your Name
OCM Account Username:         you@domain.com
OCM Account Email:            you@domain.com
OCM Organization ID:          <org_id>
OCM Organization Name:        Your organization
OCM Organization External ID: <external_org_id>
Install and configure the latest OpenShift CLI (
oc).Use the ROSA CLI to download the
ocCLI.The following command downloads the latest version of the CLI to the current working directory:
$ rosa download openshift-clientExtract the
ocbinary file from the downloaded archive. The following example extracts the files from a Linux tar archive:$ tar xvf openshift-client-linux.tar.gzMove the
ocbinary to a directory in your execution path. In the following example, the/usr/local/bindirectory is included in the path of the user:$ sudo mv oc /usr/local/bin/ocVerify that the
ocCLI is installed correctly:$ rosa verify openshift-clientFor example:
I: Verifying whether OpenShift command-line tool is available...
I: Current OpenShift Client Version: 4.17.3
Next steps
Before using the Red Hat Hybrid Cloud Console to deploy Red Hat OpenShift Service on AWS clusters, associate your AWS account with your Red Hat organization and create the required account-wide IAM STS roles and policies.
1.3. Creating a Virtual Private Cloud for your Red Hat OpenShift Service on AWS clusters
You must have an AWS Virtual Private Cloud (VPC) to create a Red Hat OpenShift Service on AWS cluster. You can create a VPC by using the ROSA CLI, or you can manually create the VPC resources in the AWS console.
The Terraform instructions are for testing and demonstration purposes. Your own installation requires some modifications to the VPC for your own use. You should also ensure that when you use this linked Terraform configuration, it is in the same region that you intend to install your cluster. In these examples, us-east-2 is used.
1.3.1. Creating an AWS VPC using the ROSA CLI
The rosa create network command is available in v.1.2.48 or later of the ROSA CLI. The command uses AWS CloudFormation to create a VPC and associated networking components necessary to install a Red Hat OpenShift Service on AWS cluster. CloudFormation is a native AWS infrastructure-as-code tool and is compatible with the AWS CLI.
If you do not specify a template, CloudFormation uses a default template that creates resources with the following parameters:
| VPC parameter | Value |
|---|---|
| Availability zones | 1 |
| Region |
|
| VPC CIDR |
|
You can create and customize CloudFormation templates to use with the rosa create network command. See the additional resources of this section for information on the default VPC template.
Prerequisites
- You have configured your AWS account
- You have configured your Red Hat accounts
- You have installed the ROSA CLI and configured it to the latest version
Procedure
Create an AWS VPC using the default CloudFormations template by running the following command:
$ rosa create networkOptional: Customize your VPC by specifying additional parameters.
You can use the
--paramflag to specify changes to the default VPC template. The following example command specifies custom values forregion,Name,AvailabilityZoneCountandVpcCidr.$ rosa create network --param Region=us-east-2 --param Name=quickstart-stack --param AvailabilityZoneCount=3 --param VpcCidr=10.0.0.0/16The command takes about 5 minutes to run and provides regular status updates from AWS as resources are created. If there is an issue with CloudFormation, a rollback is attempted. For all other errors that are encountered, please follow the error message instructions or contact AWS support.
Verification
When completed, you receive a summary of the created resources:
INFO[0140] Resources created in stack: INFO[0140] Resource: AttachGateway, Type: AWS::EC2::VPCGatewayAttachment, ID: <gateway_id> INFO[0140] Resource: EC2VPCEndpoint, Type: AWS::EC2::VPCEndpoint, ID: <vpce_id> INFO[0140] Resource: EcrApiVPCEndpoint, Type: AWS::EC2::VPCEndpoint, ID: <vpce_id> INFO[0140] Resource: EcrDkrVPCEndpoint, Type: AWS::EC2::VPCEndpoint, ID: <vpce_id> INFO[0140] Resource: ElasticIP1, Type: AWS::EC2::EIP, ID: <IP> INFO[0140] Resource: ElasticIP2, Type: AWS::EC2::EIP, ID: <IP> INFO[0140] Resource: InternetGateway, Type: AWS::EC2::InternetGateway, ID: igw-016e1a71b9812464e INFO[0140] Resource: KMSVPCEndpoint, Type: AWS::EC2::VPCEndpoint, ID: <vpce_id> INFO[0140] Resource: NATGateway1, Type: AWS::EC2::NatGateway, ID: <nat-gateway_id> INFO[0140] Resource: PrivateRoute, Type: AWS::EC2::Route, ID: <route_id> INFO[0140] Resource: PrivateRouteTable, Type: AWS::EC2::RouteTable, ID: <route_id> INFO[0140] Resource: PrivateSubnetRouteTableAssociation1, Type: AWS::EC2::SubnetRouteTableAssociation, ID: <route_id> INFO[0140] Resource: PublicRoute, Type: AWS::EC2::Route, ID: <route_id> INFO[0140] Resource: PublicRouteTable, Type: AWS::EC2::RouteTable, ID: <route_id> INFO[0140] Resource: PublicSubnetRouteTableAssociation1, Type: AWS::EC2::SubnetRouteTableAssociation, ID: <route_id> INFO[0140] Resource: S3VPCEndpoint, Type: AWS::EC2::VPCEndpoint, ID: <vpce_id> INFO[0140] Resource: STSVPCEndpoint, Type: AWS::EC2::VPCEndpoint, ID: <vpce_id> INFO[0140] Resource: SecurityGroup, Type: AWS::EC2::SecurityGroup, ID: <security-group_id> INFO[0140] Resource: SubnetPrivate1, Type: AWS::EC2::Subnet, ID: <private_subnet_id-1> INFO[0140] Resource: SubnetPublic1, Type: AWS::EC2::Subnet, ID: <public_subnet_id-1> INFO[0140] Resource: VPC, Type: AWS::EC2::VPC, ID: <vpc_id> INFO[0140] Stack rosa-network-stack-5555 created-
The
<private_subnet_id-1>and<public_subnet_id-1>subnet IDs are used to create your cluster when using therosa create clustercommand. -
The network stack name (
rosa-network-stack-5555) is used to delete the resource later.
-
The
1.3.1.1. Creating a Virtual Private Cloud using Terraform
Terraform is a tool that allows you to create various resources using an established template. You can use Terraform with default options to create a Virtual Private Cloud for your Red Hat OpenShift Service on AWS cluster.
Prerequisites
- You have installed Terraform version 1.4.0 or newer on your machine.
- You have installed Git on your machine.
Procedure
Open a shell prompt and clone the Terraform VPC repository by running the following command:
$ git clone https://github.com/openshift-cs/terraform-vpc-exampleNavigate to the created directory by running the following command:
$ cd terraform-vpc-exampleInitiate the Terraform file by running the following command:
$ terraform initA message confirming the initialization appears when this process completes.
To build your VPC Terraform plan based on the existing Terraform template, run the
plancommand. You must include your AWS region. You can choose to specify a cluster name. Arosa.tfplanfile is added to thehypershift-tfdirectory after theterraform plancompletes. For more detailed options, see the Terraform VPC repository’s README file.$ terraform plan -out rosa.tfplan -var region=<region>Apply this plan file to build your VPC by running the following command:
$ terraform apply rosa.tfplanOptional: Capture the Terraform-provisioned private, public, and machinepool subnet IDs as environment variables to use when creating your Red Hat OpenShift Service on AWS cluster:
$ export SUBNET_IDS=$(terraform output -raw cluster-subnets-string)Verify that the variables were correctly set with the following command:
$ echo $SUBNET_IDSExample output
$ subnet-0a6a57e0f784171aa,subnet-078e84e5b10ecf5b0
1.3.2. Requirements for manually creating an AWS Virtual Private Cloud
If you do not use a managed infrastructure tool such as Terraform or AWS CloudFormation to create your Virtual Private Cloud (VPC), you can create it manually through the AWS console. A manually created VPC must meet specific requirements for use with Red Hat OpenShift Service on AWS.
Your VPC must meet the requirements shown in the following table.
| Requirement | Details |
|---|---|
| VPC name | You need to have the specific VPC name and ID when creating your cluster. |
| CIDR range | Your VPC CIDR range should match your machine CIDR. |
| Availability zone | You need one availability zone for a single zone, and you need three for availability zones for multi-zone. |
| Public subnet | You must have one public subnet with a NAT gateway for public clusters. Private clusters do not need a public subnet. |
| DNS hostname and resolution | You must ensure that the DNS hostname and resolution are enabled. |
1.4. Creating an OpenID Connect configuration
Red Hat OpenShift Service on AWS clusters use OIDC and the AWS Security Token Service (STS) to authenticate Operator access to AWS resources they require to perform their functions. Each production cluster requires its own OIDC configuration. When creating a Red Hat OpenShift Service on AWS cluster, you can create the OpenID Connect (OIDC) configuration before creating your cluster.
Prerequisites
- You have completed the AWS prerequisites for Red Hat OpenShift Service on AWS.
-
You have installed and configured the latest ROSA command-line interface (CLI) (
rosa) on your installation host.
Procedure
To create your OIDC configuration alongside the AWS resources, run the following command:
$ rosa create oidc-config --mode=auto --yesThis command returns the following information.
For example:
? Would you like to create a Managed (Red Hat hosted) OIDC Configuration Yes I: Setting up managed OIDC configuration I: To create Operator Roles for this OIDC Configuration, run the following command and remember to replace <user-defined> with a prefix of your choice: rosa create operator-roles --prefix <user-defined> --oidc-config-id 13cdr6b If you are going to create a Hosted Control Plane cluster please include '--hosted-cp' I: Creating OIDC provider using 'arn:aws:iam::4540112244:user/userName' ? Create the OIDC provider? Yes I: Created OIDC provider with ARN 'arn:aws:iam::4540112244:oidc-provider/dvbwgdztaeq9o.cloudfront.net/13cdr6b'When creating your cluster, you must supply the OIDC config ID. The CLI output provides this value for
--mode auto, otherwise you must determine these values based onawsCLI output for--mode manual.Optional: you can save the OIDC configuration ID as a variable to use later. Run the following command to save the variable:
$ export OIDC_ID=<oidc_config_id><oidc_config_id>-
In this example output, the OIDC configuration ID is
13cdr6b.
View the value of the variable by running the following command:
$ echo $OIDC_IDFor example:
13cdr6b
Verification
You can list the possible OIDC configurations available for your clusters that are associated with your user organization. Run the following command:
$ rosa list oidc-configFor example:
ID MANAGED ISSUER URL SECRET ARN 2330dbs0n8m3chkkr25gkkcd8pnj3lk2 true https://dvbwgdztaeq9o.cloudfront.net/2330dbs0n8m3chkkr25gkkcd8pnj3lk2 233hvnrjoqu14jltk6lhbhf2tj11f8un false https://oidc-r7u1.s3.us-east-1.amazonaws.com aws:secretsmanager:us-east-1:242819244:secret:rosa-private-key-oidc-r7u1-tM3MDN
1.5. Creating Operator roles and policies
When you deploy a Red Hat OpenShift Service on AWS cluster, you must create the Operator IAM roles. The cluster Operators use the Operator roles and policies to obtain temporary permissions to perform cluster operations, such as managing storage and external access.
Prerequisites
- You have completed the AWS prerequisites for Red Hat OpenShift Service on AWS.
-
You have installed and configured the latest ROSA command-line interface (CLI) (
rosa) on your installation host. - You created the account-wide AWS roles.
Procedure
To create your Operator roles, run the following command:
$ rosa create operator-roles --hosted-cp --prefix=$OPERATOR_ROLES_PREFIX --oidc-config-id=$OIDC_ID --installer-role-arn arn:aws:iam::$AWS_ACCOUNT_ID:role/${ACCOUNT_ROLES_PREFIX}-HCP-ROSA-Installer-RoleThe following breakdown provides options for the Operator role creation.
$ rosa create operator-roles --hosted-cp --prefix=$OPERATOR_ROLES_PREFIX --oidc-config-id=$OIDC_ID --installer-role-arn arn:aws:iam::$AWS_ACCOUNT_ID:role/$ACCOUNT_ROLES_PREFIX-HCP-ROSA-Installer-Rolewhere:
--prefix=- You must supply a prefix when creating these Operator roles. Failing to do so produces an error. See the Additional resources of this section for information on the Operator prefix.
--oidc-config-id=- This value is the OIDC configuration ID that you created for your Red Hat OpenShift Service on AWS cluster.
--installer-role-arn- This value is the installer role ARN that you created when you created the Red Hat OpenShift Service on AWS account roles.
You must include the
--hosted-cpparameter to create the correct roles for Red Hat OpenShift Service on AWS clusters. This command returns the following information.For example:
? Role creation mode: auto ? Operator roles prefix: <pre-filled_prefix> ? OIDC Configuration ID: 23soa2bgvpek9kmes9s7os0a39i13qm4 | https://dvbwgdztaeq9o.cloudfront.net/23soa2bgvpek9kmes9s7os0a39i13qm4 ? Create hosted control plane operator roles: Yes W: More than one Installer role found ? Installer role ARN: arn:aws:iam::4540112244:role/<prefix>-HCP-ROSA-Installer-Role ? Permissions boundary ARN (optional): I: Reusable OIDC Configuration detected. Validating trusted relationships to operator roles: I: Creating roles using 'arn:aws:iam::4540112244:user/<userName>' I: Created role '<prefix>-openshift-cluster-csi-drivers-ebs-cloud-credentials' with ARN 'arn:aws:iam::4540112244:role/<prefix>-openshift-cluster-csi-drivers-ebs-cloud-credentials' I: Created role '<prefix>-openshift-cloud-network-config-controller-cloud-credenti' with ARN 'arn:aws:iam::4540112244:role/<prefix>-openshift-cloud-network-config-controller-cloud-credenti' I: Created role '<prefix>-kube-system-kube-controller-manager' with ARN 'arn:aws:iam::4540112244:role/<prefix>-kube-system-kube-controller-manager' I: Created role '<prefix>-kube-system-capa-controller-manager' with ARN 'arn:aws:iam::4540112244:role/<prefix>-kube-system-capa-controller-manager' I: Created role '<prefix>-kube-system-control-plane-operator' with ARN 'arn:aws:iam::4540112244:role/<prefix>-kube-system-control-plane-operator' I: Created role '<prefix>-kube-system-kms-provider' with ARN 'arn:aws:iam::4540112244:role/<prefix>-kube-system-kms-provider' I: Created role '<prefix>-openshift-image-registry-installer-cloud-credentials' with ARN 'arn:aws:iam::4540112244:role/<prefix>-openshift-image-registry-installer-cloud-credentials' I: Created role '<prefix>-openshift-ingress-operator-cloud-credentials' with ARN 'arn:aws:iam::4540112244:role/<prefix>-openshift-ingress-operator-cloud-credentials' I: To create a cluster with these roles, run the following command: rosa create cluster --sts --oidc-config-id 23soa2bgvpek9kmes9s7os0a39i13qm4 --operator-roles-prefix <prefix> --hosted-cpwhere:
Operator roles prefix- This field is prepopulated with the prefix that you set in the initial creation command.
OIDC Configuration ID- This field requires you to select an OIDC configuration that you created for your Red Hat OpenShift Service on AWS cluster.
The Operator roles are now created and ready to use for creating your Red Hat OpenShift Service on AWS cluster.
Verification
You can list the Operator roles associated with your Red Hat OpenShift Service on AWS account. Run the following command:
$ rosa list operator-rolesFor example:
I: Fetching operator roles ROLE PREFIX AMOUNT IN BUNDLE <prefix> 8 ? Would you like to detail a specific prefix Yes ? Operator Role Prefix: <prefix> ROLE NAME ROLE ARN VERSION MANAGED <prefix>-kube-system-capa-controller-manager arn:aws:iam::4540112244:role/<prefix>-kube-system-capa-controller-manager 4.13 No <prefix>-kube-system-control-plane-operator arn:aws:iam::4540112244:role/<prefix>-kube-system-control-plane-operator 4.13 No <prefix>-kube-system-kms-provider arn:aws:iam::4540112244:role/<prefix>-kube-system-kms-provider 4.13 No <prefix>-kube-system-kube-controller-manager arn:aws:iam::4540112244:role/<prefix>-kube-system-kube-controller-manager 4.13 No <prefix>-openshift-cloud-network-config-controller-cloud-credenti arn:aws:iam::4540112244:role/<prefix>-openshift-cloud-network-config-controller-cloud-credenti 4.13 No <prefix>-openshift-cluster-csi-drivers-ebs-cloud-credentials arn:aws:iam::4540112244:role/<prefix>-openshift-cluster-csi-drivers-ebs-cloud-credentials 4.13 No <prefix>-openshift-image-registry-installer-cloud-credentials arn:aws:iam::4540112244:role/<prefix>-openshift-image-registry-installer-cloud-credentials 4.13 No <prefix>-openshift-ingress-operator-cloud-credentials arn:aws:iam::4540112244:role/<prefix>-openshift-ingress-operator-cloud-credentials 4.13 NoAfter the command runs, it displays all the prefixes associated with your AWS account and notes how many roles are associated with this prefix. If you need to see all of these roles and their details, enter "Yes" on the detail prompt to have these roles listed out with specifics.
1.6. Creating a Red Hat OpenShift Service on AWS cluster using the CLI
You can create a Red Hat OpenShift Service on AWS cluster quickly by using the ROSA command-line interface (CLI) (rosa) with default options.
Prerequisites
- You have completed the AWS prerequisites for Red Hat OpenShift Service on AWS.
- You have available AWS service quotas.
- You have enabled the Red Hat OpenShift Service on AWS in the AWS Console.
-
You have installed and configured the latest ROSA CLI (
rosa) on your installation host. Runrosa versionto see your currently installed version of the ROSA CLI. If a newer version is available, the CLI provides a link to download this upgrade. - You have logged in to your Red Hat account by using the ROSA CLI.
- You have created an OIDC configuration.
- You have verified that the AWS Elastic Load Balancing (ELB) service role exists in your AWS account.
Procedure
Use one of the following commands to create your Red Hat OpenShift Service on AWS cluster:
NoteWhen creating a Red Hat OpenShift Service on AWS cluster, the default machine Classless Inter-Domain Routing (CIDR) is
10.0.0.0/16. If this does not correspond to the CIDR range for your VPC subnets, add--machine-cidr <address_block>to the following commands. To learn more about the default CIDR ranges for Red Hat OpenShift Service on AWS, see CIDR range definitions.If you did not set environmental variables, run the following command:
$ rosa create cluster --cluster-name=<cluster_name> \ --mode=auto --hosted-cp [--private] \ --operator-roles-prefix <operator-role-prefix> \ --external-id <external-id> \ --oidc-config-id <id-of-oidc-configuration> \ --subnet-ids=<public-subnet-id>,<private-subnet-id>where:
<cluster_name>-
Specify the name of your cluster. If your cluster name is longer than 15 characters, it contains an autogenerated domain prefix as a subdomain for your provisioned cluster on openshiftapps.com. To customize the subdomain, use the
--domain-prefixflag. The domain prefix cannot be longer than 15 characters, must be unique, and cannot be changed after cluster creation. --private-
Optional. Use the
--privateargument to create private Red Hat OpenShift Service on AWS clusters. If you use this argument, ensure that you only use your private subnet ID for--subnet-ids. <operator-role-prefix>-
By default, the cluster-specific Operator role names are prefixed with the cluster name and a random 4-digit hash. You can optionally specify a custom prefix to replace
<cluster_name>-<hash>in the role names. The prefix is applied when you create the cluster-specific Operator IAM roles. For information about the prefix, see About custom Operator IAM role prefixes. <external-id>- Optional. A unique identifier that might be required when you assume a role in another account.
NoteIf you specified custom ARN paths when you created the associated account-wide roles, the custom path is automatically detected. The custom path is applied to the cluster-specific Operator roles when you create them in a later step.
If you set the environment variables, create a cluster with a private API and private Ingress by running the following command:
$ rosa create cluster --private --cluster-name=<cluster_name> \ --mode=auto --hosted-cp --operator-roles-prefix=$OPERATOR_ROLES_PREFIX \ --oidc-config-id=$OIDC_ID --subnet-ids=$SUBNET_IDSIf you set the environmental variables, create a cluster with a single, initial machine pool, a publicly available API, and a publicly available Ingress by running the following command:
$ rosa create cluster --cluster-name=<cluster_name> --mode=auto \ --hosted-cp --operator-roles-prefix=$OPERATOR_ROLES_PREFIX \ --oidc-config-id=$OIDC_ID --subnet-ids=$SUBNET_IDS
Check the status of your cluster by running the following command:
$ rosa describe cluster --cluster=<cluster_name>The following
Statefield changes are listed in the output as the cluster installation progresses:-
pending (Preparing account) -
installing (DNS setup in progress) -
installing readyNoteIf the installation fails or the
Statefield does not change toreadyafter more than 10 minutes, check the installation troubleshooting documentation for details. For more information, see Troubleshooting installations. For steps to contact Red Hat Support for assistance, see Getting support for Red Hat OpenShift Service on AWS.
-
Track the progress of the cluster creation by watching the Red Hat OpenShift Service on AWS installation program logs. To check the logs, run the following command:
$ rosa logs install --cluster=<cluster_name> --watchOptional: To watch for new log messages as the installation progresses, use the
--watchargument.
1.7. Granting user access to a cluster
You can grant a user access to your Red Hat OpenShift Service on AWS cluster by adding them to your configured identity provider.
You can configure different types of identity providers for your Red Hat OpenShift Service on AWS cluster. The following example procedure adds a user to a GitHub organization that is configured for identity provision to the cluster.
Procedure
- Navigate to github.com and log in to your GitHub account.
- Invite users that require access to the Red Hat OpenShift Service on AWS cluster to your GitHub organization. Follow the steps in Inviting users to join your organization in the GitHub documentation.
1.8. Granting administrator privileges to a user
After you have added a user to your configured identity provider, you can grant the user cluster-admin or dedicated-admin privileges for your Red Hat OpenShift Service on AWS cluster.
Procedure
To configure
cluster-adminprivileges for an identity provider user:Grant the user
cluster-adminprivileges:$ rosa grant user cluster-admin --user=<idp_user_name> --cluster=<cluster_name>Example output
I: Granted role 'cluster-admins' to user '<idp_user_name>' on cluster '<cluster_name>'Verify if the user is listed as a member of the
cluster-adminsgroup:$ rosa list users --cluster=<cluster_name>Example output
ID GROUPS <idp_user_name> cluster-admins
To configure
dedicated-adminprivileges for an identity provider user:Grant the user
dedicated-adminprivileges:$ rosa grant user dedicated-admin --user=<idp_user_name> --cluster=<cluster_name>Example output
I: Granted role 'dedicated-admins' to user '<idp_user_name>' on cluster '<cluster_name>'Verify if the user is listed as a member of the
dedicated-adminsgroup:$ rosa list users --cluster=<cluster_name>Example output
ID GROUPS <idp_user_name> dedicated-admins
1.9. Accessing a cluster through the web console
After creating a cluster administrator or adding a user to your identity provider, you can log in to your Red Hat OpenShift Service on AWS cluster through the web console.
Procedure
Obtain the console URL for your cluster:
$ rosa describe cluster -c <cluster_name> | grep ConsoleExample output
Console URL: https://console-openshift-console.apps.example-cluster.wxyz.p1.openshiftapps.comGo to the console URL in the output of the preceding step and log in.
-
If you created a
cluster-adminuser, log in by using the provided credentials. - If you configured an identity provider for your cluster, select the identity provider name in the Log in with… dialog and complete any authorization requests from your provider.
-
If you created a
1.10. Deploying an application from the Developer Catalog
From the Red Hat OpenShift Service on AWS web console, you can deploy a test application from the Developer Catalog and expose it with a route.
Prerequisites
- You logged in to the Red Hat Hybrid Cloud Console.
- You created a Red Hat OpenShift Service on AWS cluster.
- You configured an identity provider for your cluster.
- You added your user account to the configured identity provider.
Procedure
- Go to the Cluster List page in OpenShift Cluster Manager.
- Click the options icon (⋮) next to the cluster you want to view.
- Click Open console.
- Your cluster console opens in a new browser window. Log in to your Red Hat account with your configured identity provider credentials.
- In the Administrator perspective, select Home → Projects → Create Project.
- Enter a name for your project and optionally add a Display Name and Description.
- Click Create to create the project.
- Switch to the Developer perspective and select +Add. Verify that the selected Project is the one that you created.
- In the Developer Catalog dialog, select All services.
- In the Developer Catalog page, select Languages → JavaScript from the menu.
Click Node.js, and then click Create to open the Create Source-to-Image application page.
NoteYou might need to click Clear All Filters to display the Node.js option.
- In the Git section, click Try sample.
- Add a unique name in the Name field. The value is used to name the associated resources.
- Confirm that Deployment and Create a route are selected.
- Click Create to deploy the application. It takes a few minutes for the pods to deploy.
-
Optional: Check the status of the pods in the Topology pane by selecting your Node.js app and reviewing its sidebar. You must wait for the
nodejsbuild to complete and for thenodejspod to be in a Running state before continuing. When the deployment is complete, click the route URL for the application, which has a format similar to the following:
https://nodejs-<project>.<cluster_name>.<hash>.<region>.openshiftapps.com/A new tab in your browser opens with a message similar to the following:
Welcome to your Node.js application on OpenShiftOptional: Delete the application and clean up the resources that you created:
- In the Administrator perspective, navigate to Home → Projects.
- Click the action menu for your project and select Delete Project.
1.11. Revoking administrator privileges and user access
You can revoke cluster-admin or dedicated-admin privileges from a user by using the ROSA CLI, rosa.
To revoke cluster access from a user, you must remove the user from your configured identity provider.
Follow the procedures in this section to revoke administrator privileges or cluster access from a user.
1.11.1. Revoking administrator privileges from a user
You can revoke cluster-admin or dedicated-admin privileges from a user by using the ROSA command-line interface (CLI) (rosa).
Procedure
To revoke
cluster-adminprivileges from an identity provider user:Revoke the
cluster-adminprivilege:$ rosa revoke user cluster-admin --user=<idp_user_name> --cluster=<cluster_name>Example output
? Are you sure you want to revoke role cluster-admins from user <idp_user_name> in cluster <cluster_name>? Yes I: Revoked role 'cluster-admins' from user '<idp_user_name>' on cluster '<cluster_name>'Verify that the user is not listed as a member of the
cluster-adminsgroup:$ rosa list users --cluster=<cluster_name>Example output
W: There are no users configured for cluster '<cluster_name>'
To revoke
dedicated-adminprivileges from an identity provider user:Revoke the
dedicated-adminprivilege:$ rosa revoke user dedicated-admin --user=<idp_user_name> --cluster=<cluster_name>Example output
? Are you sure you want to revoke role dedicated-admins from user <idp_user_name> in cluster <cluster_name>? Yes I: Revoked role 'dedicated-admins' from user '<idp_user_name>' on cluster '<cluster_name>'Verify that the user is not listed as a member of the
dedicated-adminsgroup:$ rosa list users --cluster=<cluster_name>Example output
W: There are no users configured for cluster '<cluster_name>'
1.11.2. Revoking user access to a cluster
You can revoke cluster access for an identity provider user by removing them from your configured identity provider.
You can configure different types of identity providers for your Red Hat OpenShift Service on AWS cluster. The following example procedure revokes cluster access for a member of a GitHub organization that is configured for identity provision to the cluster.
Procedure
- Navigate to github.com and log in to your GitHub account.
- Remove the user from your GitHub organization. Follow the steps in Removing a member from your organization in the GitHub documentation.
1.12. Deleting a Red Hat OpenShift Service on AWS cluster and the AWS IAM STS resources
You can use the ROSA CLI to delete a Red Hat OpenShift Service on AWS cluster, the AWS Identity and Access Management (IAM) account-wide roles, the cluster-specific Operator roles, and the OpenID Connect (OIDC) provider. To delete the account-wide and Operator policies, use the AWS IAM Console or the AWS CLI.
Account-wide IAM roles and policies might be used by other Red Hat OpenShift Service on AWS clusters in the same AWS account. You must only remove the resources if they are not required by other clusters.
Procedure
Delete a cluster and watch the logs, replacing
<cluster_name>with the name or ID of your cluster:$ rosa delete cluster --cluster=<cluster_name> --watchImportantYou must wait for the cluster deletion to complete before you remove the IAM roles, policies, and OIDC provider. The account-wide roles are required to delete the resources created by the installer. The cluster-specific Operator roles are required to clean-up the resources created by the OpenShift Operators. The Operators use the OIDC provider to authenticate with AWS APIs.
After the cluster is deleted, delete the OIDC provider that the cluster Operators use to authenticate:
$ rosa delete oidc-provider -c <cluster_id> --mode autoNoteYou can use the
-yoption to automatically answer yes to the prompts.Delete the cluster-specific Operator IAM roles:
$ rosa delete operator-roles -c <cluster_id> --mode autoDelete the account-wide roles:
ImportantAccount-wide IAM roles and policies might be used by other Red Hat OpenShift Service on AWS clusters in the same AWS account. You must only remove the resources if they are not required by other clusters.
$ rosa delete account-roles --prefix <prefix> --mode autoReplace
<prefix>with the prefix of the account-wide roles to delete. If you did not specify a custom prefix when you created the account-wide roles, specify the default prefix, depending on how they were created,HCP-ROSAorManagedOpenShift.Delete the account-wide and Operator IAM policies that you created for Red Hat OpenShift Service on AWS deployments:
- Log in to the AWS IAM Console.
- Navigate to Access management → Policies and select the checkbox for one of the account-wide policies.
- With the policy selected, click on Actions → Delete to open the delete policy dialog.
- Enter the policy name to confirm the deletion and select Delete to delete the policy.
- Repeat this step to delete each of the account-wide and Operator policies for the cluster.
Chapter 2. Creating Red Hat OpenShift Service on AWS clusters using the default options
You can create a Red Hat OpenShift Service on AWS cluster quickly by using the default options and automatic AWS Identity and Access Management (IAM) resource creation. You can deploy your cluster by using the ROSA command-line interface (CLI) (rosa).
You cannot upgrade or convert existing Red Hat OpenShift Service on AWS (classic architecture) clusters to hosted control planes architecture. You must create a new Red Hat OpenShift Service on AWS cluster.
Red Hat OpenShift Service on AWS clusters only support AWS IAM Security Token Service (STS) authentication.
2.1. About automatic IAM resource creation
The auto mode in the ROSA command-line interface (CLI) (rosa) immediately creates the required IAM resources using the current AWS account. The required resources include the account-wide IAM roles and policies, cluster-specific Operator roles and policies, and OpenID Connect (OIDC) identity provider.
Alternatively, you can use manual mode, which outputs the aws commands needed to create the IAM resources instead of deploying them automatically.
2.2. Overview of the default cluster specifications
You can quickly create a Red Hat OpenShift Service on AWS cluster by using the default installation options.
| Component | Default specifications |
|---|---|
| Accounts and roles |
|
| Cluster settings |
|
| Compute node machine pool |
|
| Networking configuration |
|
| Classless Inter-Domain Routing (CIDR) ranges |
|
| Cluster roles and policies |
|
| Storage |
|
| Cluster update strategy |
|
2.3. Red Hat OpenShift Service on AWS prerequisites for cluster creation
Creating a Red Hat OpenShift Service on AWS cluster requires a configured virtual private cloud (VPC), account-wide roles, an OIDC configuration, and Operator roles.
2.3.1. Creating a Virtual Private Cloud for your Red Hat OpenShift Service on AWS clusters
You must have a Virtual Private Cloud (VPC) to create a Red Hat OpenShift Service on AWS cluster.
You can create a VPC by using one of these methods:
- Create a VPC using the ROSA CLI
- Create a VPC by using a Terraform template
- Manually create the VPC resources in the AWS console
The Terraform instructions are for testing and demonstration purposes. Your own installation requires some modifications to the VPC for your own use. You should also ensure that when you use this Terraform configuration, it is in the same region that you intend to install your cluster. In these examples, us-east-2 is used.
2.3.1.1. Creating an AWS VPC using the ROSA CLI
The rosa create network command is available in v.1.2.48 or later of the ROSA CLI. The command uses AWS CloudFormation to create a VPC and associated networking components necessary to install a Red Hat OpenShift Service on AWS cluster. CloudFormation is a native AWS infrastructure-as-code tool and is compatible with the AWS CLI.
If you do not specify a template, CloudFormation uses a default template that creates resources with the following parameters:
| VPC parameter | Value |
|---|---|
| Availability zones | 1 |
| Region |
|
| VPC CIDR |
|
You can create and customize CloudFormation templates to use with the rosa create network command. See the additional resources of this section for information on the default VPC template.
Prerequisites
- You have configured your AWS account
- You have configured your Red Hat accounts
- You have installed the ROSA CLI and configured it to the latest version
Procedure
Create an AWS VPC using the default CloudFormations template by running the following command:
$ rosa create networkOptional: Customize your VPC by specifying additional parameters.
You can use the
--paramflag to specify changes to the default VPC template. The following example command specifies custom values forregion,Name,AvailabilityZoneCountandVpcCidr.$ rosa create network --param Region=us-east-2 --param Name=quickstart-stack --param AvailabilityZoneCount=3 --param VpcCidr=10.0.0.0/16The command takes about 5 minutes to run and provides regular status updates from AWS as resources are created. If there is an issue with CloudFormation, a rollback is attempted. For all other errors that are encountered, please follow the error message instructions or contact AWS support.
Verification
When completed, you receive a summary of the created resources:
INFO[0140] Resources created in stack: INFO[0140] Resource: AttachGateway, Type: AWS::EC2::VPCGatewayAttachment, ID: <gateway_id> INFO[0140] Resource: EC2VPCEndpoint, Type: AWS::EC2::VPCEndpoint, ID: <vpce_id> INFO[0140] Resource: EcrApiVPCEndpoint, Type: AWS::EC2::VPCEndpoint, ID: <vpce_id> INFO[0140] Resource: EcrDkrVPCEndpoint, Type: AWS::EC2::VPCEndpoint, ID: <vpce_id> INFO[0140] Resource: ElasticIP1, Type: AWS::EC2::EIP, ID: <IP> INFO[0140] Resource: ElasticIP2, Type: AWS::EC2::EIP, ID: <IP> INFO[0140] Resource: InternetGateway, Type: AWS::EC2::InternetGateway, ID: igw-016e1a71b9812464e INFO[0140] Resource: KMSVPCEndpoint, Type: AWS::EC2::VPCEndpoint, ID: <vpce_id> INFO[0140] Resource: NATGateway1, Type: AWS::EC2::NatGateway, ID: <nat-gateway_id> INFO[0140] Resource: PrivateRoute, Type: AWS::EC2::Route, ID: <route_id> INFO[0140] Resource: PrivateRouteTable, Type: AWS::EC2::RouteTable, ID: <route_id> INFO[0140] Resource: PrivateSubnetRouteTableAssociation1, Type: AWS::EC2::SubnetRouteTableAssociation, ID: <route_id> INFO[0140] Resource: PublicRoute, Type: AWS::EC2::Route, ID: <route_id> INFO[0140] Resource: PublicRouteTable, Type: AWS::EC2::RouteTable, ID: <route_id> INFO[0140] Resource: PublicSubnetRouteTableAssociation1, Type: AWS::EC2::SubnetRouteTableAssociation, ID: <route_id> INFO[0140] Resource: S3VPCEndpoint, Type: AWS::EC2::VPCEndpoint, ID: <vpce_id> INFO[0140] Resource: STSVPCEndpoint, Type: AWS::EC2::VPCEndpoint, ID: <vpce_id> INFO[0140] Resource: SecurityGroup, Type: AWS::EC2::SecurityGroup, ID: <security-group_id> INFO[0140] Resource: SubnetPrivate1, Type: AWS::EC2::Subnet, ID: <private_subnet_id-1> INFO[0140] Resource: SubnetPublic1, Type: AWS::EC2::Subnet, ID: <public_subnet_id-1> INFO[0140] Resource: VPC, Type: AWS::EC2::VPC, ID: <vpc_id> INFO[0140] Stack rosa-network-stack-5555 created-
The
<private_subnet_id-1>and<public_subnet_id-1>subnet IDs are used to create your cluster when using therosa create clustercommand. -
The network stack name (
rosa-network-stack-5555) is used to delete the resource later.
-
The
2.3.1.2. Creating a Virtual Private Cloud using Terraform
Terraform is a tool that allows you to create various resources using an established template. You can use Terraform with default options to create a Virtual Private Cloud for your Red Hat OpenShift Service on AWS cluster.
Prerequisites
- You have installed Terraform version 1.4.0 or newer on your machine.
- You have installed Git on your machine.
Procedure
Open a shell prompt and clone the Terraform VPC repository by running the following command:
$ git clone https://github.com/openshift-cs/terraform-vpc-exampleNavigate to the created directory by running the following command:
$ cd terraform-vpc-exampleInitiate the Terraform file by running the following command:
$ terraform initA message confirming the initialization appears when this process completes.
To build your VPC Terraform plan based on the existing Terraform template, run the
plancommand. You must include your AWS region. You can choose to specify a cluster name. Arosa.tfplanfile is added to thehypershift-tfdirectory after theterraform plancompletes. For more detailed options, see the Terraform VPC repository’s README file.$ terraform plan -out rosa.tfplan -var region=<region>Apply this plan file to build your VPC by running the following command:
$ terraform apply rosa.tfplanOptional: Capture the Terraform-provisioned private, public, and machinepool subnet IDs as environment variables to use when creating your Red Hat OpenShift Service on AWS cluster:
$ export SUBNET_IDS=$(terraform output -raw cluster-subnets-string)Verify that the variables were correctly set with the following command:
$ echo $SUBNET_IDSExample output
$ subnet-0a6a57e0f784171aa,subnet-078e84e5b10ecf5b0
2.3.2. Requirements for manually creating an AWS Virtual Private Cloud
If you do not use a managed infrastructure tool such as Terraform or AWS CloudFormation to create your Virtual Private Cloud (VPC), you can create it manually through the AWS console. A manually created VPC must meet specific requirements for use with Red Hat OpenShift Service on AWS.
Your VPC must meet the requirements shown in the following table.
| Requirement | Details |
|---|---|
| VPC name | You need to have the specific VPC name and ID when creating your cluster. |
| CIDR range | Your VPC CIDR range should match your machine CIDR. |
| Availability zone | You need one availability zone for a single zone, and you need three for availability zones for multi-zone. |
| Public subnet | You must have one public subnet with a NAT gateway for public clusters. Private clusters do not need a public subnet. |
| DNS hostname and resolution | You must ensure that the DNS hostname and resolution are enabled. |
2.3.4. Creating the account-wide STS roles and policies
Before you create a Red Hat OpenShift Service on AWS cluster, you must create the required account-wide IAM roles and policies by using the ROSA command-line interface (CLI) (rosa).
Specific AWS-managed policies for Red Hat OpenShift Service on AWS must be attached to each role. Customer-managed policies must not be used with these required account roles. For more information regarding AWS-managed policies for Red Hat OpenShift Service on AWS clusters, see AWS managed policies for Red Hat OpenShift Service on AWS.
Prerequisites
- You have completed the AWS prerequisites for Red Hat OpenShift Service on AWS.
- You have available AWS service quotas.
- You have enabled the Red Hat OpenShift Service on AWS in the AWS Console.
-
You have installed and configured the latest ROSA command-line interface (CLI) (
rosa) on your installation host. - You have logged in to your Red Hat account by using the ROSA CLI.
Procedure
If they do not exist in your AWS account, create the required account-wide STS roles and attach the policies by running the following command:
$ rosa create account-roles --hosted-cpOptional: Set your prefix as an environmental variable by running the following command:
$ export ACCOUNT_ROLES_PREFIX=<account_role_prefix>View the value of the variable by running the following command:
$ echo $ACCOUNT_ROLES_PREFIXFor example:
ManagedOpenShift
2.3.5. Creating an OpenID Connect configuration
Red Hat OpenShift Service on AWS clusters use OIDC and the AWS Security Token Service (STS) to authenticate Operator access to AWS resources they require to perform their functions. Each production cluster requires its own OIDC configuration. When creating a Red Hat OpenShift Service on AWS cluster, you can create the OpenID Connect (OIDC) configuration before creating your cluster.
Prerequisites
- You have completed the AWS prerequisites for Red Hat OpenShift Service on AWS.
-
You have installed and configured the latest ROSA command-line interface (CLI) (
rosa) on your installation host.
Procedure
To create your OIDC configuration alongside the AWS resources, run the following command:
$ rosa create oidc-config --mode=auto --yesThis command returns the following information.
For example:
? Would you like to create a Managed (Red Hat hosted) OIDC Configuration Yes I: Setting up managed OIDC configuration I: To create Operator Roles for this OIDC Configuration, run the following command and remember to replace <user-defined> with a prefix of your choice: rosa create operator-roles --prefix <user-defined> --oidc-config-id 13cdr6b If you are going to create a Hosted Control Plane cluster please include '--hosted-cp' I: Creating OIDC provider using 'arn:aws:iam::4540112244:user/userName' ? Create the OIDC provider? Yes I: Created OIDC provider with ARN 'arn:aws:iam::4540112244:oidc-provider/dvbwgdztaeq9o.cloudfront.net/13cdr6b'When creating your cluster, you must supply the OIDC config ID. The CLI output provides this value for
--mode auto, otherwise you must determine these values based onawsCLI output for--mode manual.Optional: you can save the OIDC configuration ID as a variable to use later. Run the following command to save the variable:
$ export OIDC_ID=<oidc_config_id><oidc_config_id>-
In this example output, the OIDC configuration ID is
13cdr6b.
View the value of the variable by running the following command:
$ echo $OIDC_IDFor example:
13cdr6b
Verification
You can list the possible OIDC configurations available for your clusters that are associated with your user organization. Run the following command:
$ rosa list oidc-configFor example:
ID MANAGED ISSUER URL SECRET ARN 2330dbs0n8m3chkkr25gkkcd8pnj3lk2 true https://dvbwgdztaeq9o.cloudfront.net/2330dbs0n8m3chkkr25gkkcd8pnj3lk2 233hvnrjoqu14jltk6lhbhf2tj11f8un false https://oidc-r7u1.s3.us-east-1.amazonaws.com aws:secretsmanager:us-east-1:242819244:secret:rosa-private-key-oidc-r7u1-tM3MDN
2.3.6. Creating Operator roles and policies
When you deploy a Red Hat OpenShift Service on AWS cluster, you must create the Operator IAM roles. The cluster Operators use the Operator roles and policies to obtain temporary permissions to perform cluster operations, such as managing storage and external access.
Prerequisites
- You have completed the AWS prerequisites for Red Hat OpenShift Service on AWS.
-
You have installed and configured the latest ROSA command-line interface (CLI) (
rosa) on your installation host. - You created the account-wide AWS roles.
Procedure
To create your Operator roles, run the following command:
$ rosa create operator-roles --hosted-cp --prefix=$OPERATOR_ROLES_PREFIX --oidc-config-id=$OIDC_ID --installer-role-arn arn:aws:iam::$AWS_ACCOUNT_ID:role/${ACCOUNT_ROLES_PREFIX}-HCP-ROSA-Installer-RoleThe following breakdown provides options for the Operator role creation.
$ rosa create operator-roles --hosted-cp --prefix=$OPERATOR_ROLES_PREFIX --oidc-config-id=$OIDC_ID --installer-role-arn arn:aws:iam::$AWS_ACCOUNT_ID:role/$ACCOUNT_ROLES_PREFIX-HCP-ROSA-Installer-Rolewhere:
--prefix=- You must supply a prefix when creating these Operator roles. Failing to do so produces an error. See the Additional resources of this section for information on the Operator prefix.
--oidc-config-id=- This value is the OIDC configuration ID that you created for your Red Hat OpenShift Service on AWS cluster.
--installer-role-arn- This value is the installer role ARN that you created when you created the Red Hat OpenShift Service on AWS account roles.
You must include the
--hosted-cpparameter to create the correct roles for Red Hat OpenShift Service on AWS clusters. This command returns the following information.For example:
? Role creation mode: auto ? Operator roles prefix: <pre-filled_prefix> ? OIDC Configuration ID: 23soa2bgvpek9kmes9s7os0a39i13qm4 | https://dvbwgdztaeq9o.cloudfront.net/23soa2bgvpek9kmes9s7os0a39i13qm4 ? Create hosted control plane operator roles: Yes W: More than one Installer role found ? Installer role ARN: arn:aws:iam::4540112244:role/<prefix>-HCP-ROSA-Installer-Role ? Permissions boundary ARN (optional): I: Reusable OIDC Configuration detected. Validating trusted relationships to operator roles: I: Creating roles using 'arn:aws:iam::4540112244:user/<userName>' I: Created role '<prefix>-openshift-cluster-csi-drivers-ebs-cloud-credentials' with ARN 'arn:aws:iam::4540112244:role/<prefix>-openshift-cluster-csi-drivers-ebs-cloud-credentials' I: Created role '<prefix>-openshift-cloud-network-config-controller-cloud-credenti' with ARN 'arn:aws:iam::4540112244:role/<prefix>-openshift-cloud-network-config-controller-cloud-credenti' I: Created role '<prefix>-kube-system-kube-controller-manager' with ARN 'arn:aws:iam::4540112244:role/<prefix>-kube-system-kube-controller-manager' I: Created role '<prefix>-kube-system-capa-controller-manager' with ARN 'arn:aws:iam::4540112244:role/<prefix>-kube-system-capa-controller-manager' I: Created role '<prefix>-kube-system-control-plane-operator' with ARN 'arn:aws:iam::4540112244:role/<prefix>-kube-system-control-plane-operator' I: Created role '<prefix>-kube-system-kms-provider' with ARN 'arn:aws:iam::4540112244:role/<prefix>-kube-system-kms-provider' I: Created role '<prefix>-openshift-image-registry-installer-cloud-credentials' with ARN 'arn:aws:iam::4540112244:role/<prefix>-openshift-image-registry-installer-cloud-credentials' I: Created role '<prefix>-openshift-ingress-operator-cloud-credentials' with ARN 'arn:aws:iam::4540112244:role/<prefix>-openshift-ingress-operator-cloud-credentials' I: To create a cluster with these roles, run the following command: rosa create cluster --sts --oidc-config-id 23soa2bgvpek9kmes9s7os0a39i13qm4 --operator-roles-prefix <prefix> --hosted-cpwhere:
Operator roles prefix- This field is prepopulated with the prefix that you set in the initial creation command.
OIDC Configuration ID- This field requires you to select an OIDC configuration that you created for your Red Hat OpenShift Service on AWS cluster.
The Operator roles are now created and ready to use for creating your Red Hat OpenShift Service on AWS cluster.
Verification
You can list the Operator roles associated with your Red Hat OpenShift Service on AWS account. Run the following command:
$ rosa list operator-rolesFor example:
I: Fetching operator roles ROLE PREFIX AMOUNT IN BUNDLE <prefix> 8 ? Would you like to detail a specific prefix Yes ? Operator Role Prefix: <prefix> ROLE NAME ROLE ARN VERSION MANAGED <prefix>-kube-system-capa-controller-manager arn:aws:iam::4540112244:role/<prefix>-kube-system-capa-controller-manager 4.13 No <prefix>-kube-system-control-plane-operator arn:aws:iam::4540112244:role/<prefix>-kube-system-control-plane-operator 4.13 No <prefix>-kube-system-kms-provider arn:aws:iam::4540112244:role/<prefix>-kube-system-kms-provider 4.13 No <prefix>-kube-system-kube-controller-manager arn:aws:iam::4540112244:role/<prefix>-kube-system-kube-controller-manager 4.13 No <prefix>-openshift-cloud-network-config-controller-cloud-credenti arn:aws:iam::4540112244:role/<prefix>-openshift-cloud-network-config-controller-cloud-credenti 4.13 No <prefix>-openshift-cluster-csi-drivers-ebs-cloud-credentials arn:aws:iam::4540112244:role/<prefix>-openshift-cluster-csi-drivers-ebs-cloud-credentials 4.13 No <prefix>-openshift-image-registry-installer-cloud-credentials arn:aws:iam::4540112244:role/<prefix>-openshift-image-registry-installer-cloud-credentials 4.13 No <prefix>-openshift-ingress-operator-cloud-credentials arn:aws:iam::4540112244:role/<prefix>-openshift-ingress-operator-cloud-credentials 4.13 NoAfter the command runs, it displays all the prefixes associated with your AWS account and notes how many roles are associated with this prefix. If you need to see all of these roles and their details, enter "Yes" on the detail prompt to have these roles listed out with specifics.
2.4. Creating a Red Hat OpenShift Service on AWS cluster using the CLI
You can create a Red Hat OpenShift Service on AWS cluster quickly by using the ROSA command-line interface (CLI) (rosa) with default options.
Prerequisites
- You have completed the AWS prerequisites for Red Hat OpenShift Service on AWS.
- You have available AWS service quotas.
- You have enabled the Red Hat OpenShift Service on AWS in the AWS Console.
-
You have installed and configured the latest ROSA CLI (
rosa) on your installation host. Runrosa versionto see your currently installed version of the ROSA CLI. If a newer version is available, the CLI provides a link to download this upgrade. - You have logged in to your Red Hat account by using the ROSA CLI.
- You have created an OIDC configuration.
- You have verified that the AWS Elastic Load Balancing (ELB) service role exists in your AWS account.
Procedure
Use one of the following commands to create your Red Hat OpenShift Service on AWS cluster:
NoteWhen creating a Red Hat OpenShift Service on AWS cluster, the default machine Classless Inter-Domain Routing (CIDR) is
10.0.0.0/16. If this does not correspond to the CIDR range for your VPC subnets, add--machine-cidr <address_block>to the following commands. To learn more about the default CIDR ranges for Red Hat OpenShift Service on AWS, see CIDR range definitions.If you did not set environmental variables, run the following command:
$ rosa create cluster --cluster-name=<cluster_name> \ --mode=auto --hosted-cp [--private] \ --operator-roles-prefix <operator-role-prefix> \ --external-id <external-id> \ --oidc-config-id <id-of-oidc-configuration> \ --subnet-ids=<public-subnet-id>,<private-subnet-id>where:
<cluster_name>-
Specify the name of your cluster. If your cluster name is longer than 15 characters, it contains an autogenerated domain prefix as a subdomain for your provisioned cluster on openshiftapps.com. To customize the subdomain, use the
--domain-prefixflag. The domain prefix cannot be longer than 15 characters, must be unique, and cannot be changed after cluster creation. --private-
Optional. Use the
--privateargument to create private Red Hat OpenShift Service on AWS clusters. If you use this argument, ensure that you only use your private subnet ID for--subnet-ids. <operator-role-prefix>-
By default, the cluster-specific Operator role names are prefixed with the cluster name and a random 4-digit hash. You can optionally specify a custom prefix to replace
<cluster_name>-<hash>in the role names. The prefix is applied when you create the cluster-specific Operator IAM roles. For information about the prefix, see About custom Operator IAM role prefixes. <external-id>- Optional. A unique identifier that might be required when you assume a role in another account.
NoteIf you specified custom ARN paths when you created the associated account-wide roles, the custom path is automatically detected. The custom path is applied to the cluster-specific Operator roles when you create them in a later step.
If you set the environment variables, create a cluster with a private API and private Ingress by running the following command:
$ rosa create cluster --private --cluster-name=<cluster_name> \ --mode=auto --hosted-cp --operator-roles-prefix=$OPERATOR_ROLES_PREFIX \ --oidc-config-id=$OIDC_ID --subnet-ids=$SUBNET_IDSIf you set the environmental variables, create a cluster with a single, initial machine pool, a publicly available API, and a publicly available Ingress by running the following command:
$ rosa create cluster --cluster-name=<cluster_name> --mode=auto \ --hosted-cp --operator-roles-prefix=$OPERATOR_ROLES_PREFIX \ --oidc-config-id=$OIDC_ID --subnet-ids=$SUBNET_IDS
Check the status of your cluster by running the following command:
$ rosa describe cluster --cluster=<cluster_name>The following
Statefield changes are listed in the output as the cluster installation progresses:-
pending (Preparing account) -
installing (DNS setup in progress) -
installing readyNoteIf the installation fails or the
Statefield does not change toreadyafter more than 10 minutes, check the installation troubleshooting documentation for details. For more information, see Troubleshooting installations. For steps to contact Red Hat Support for assistance, see Getting support for Red Hat OpenShift Service on AWS.
-
Track the progress of the cluster creation by watching the Red Hat OpenShift Service on AWS installation program logs. To check the logs, run the following command:
$ rosa logs install --cluster=<cluster_name> --watchOptional: To watch for new log messages as the installation progresses, use the
--watchargument.
Chapter 3. Creating a Red Hat OpenShift Service on AWS cluster with Terraform
3.1. Creating a default Red Hat OpenShift Service on AWS cluster with Terraform
Create a Red Hat OpenShift Service on AWS cluster with a Terraform cluster template that is configured with the default cluster options.
The following process for creating a cluster uses a Terraform configuration that prepares a Red Hat OpenShift Service on AWS cluster with these resources:
-
An OpenID Connect (OIDC) provider with a managed
oidc-configconfiguration - Prerequisite IAM Operator roles with associated AWS Managed Red Hat OpenShift Service on AWS Policies
- IAM account roles with associated AWS Managed Red Hat OpenShift Service on AWS Policies
- All other AWS resources required to create a Red Hat OpenShift Service on AWS cluster
3.1.1. Overview of Terraform
Terraform is an infrastructure-as-code tool that provides a way to configure your resources once and replicate those resources as desired. Terraform accomplishes the creation tasks by using declarative language. You declare what you want the final state of the infrastructure resource to be, and Terraform creates these resources to your specifications.
3.1.2. Prerequisites
To use the Red Hat Cloud Services provider inside your Terraform configuration, you must meet the following prerequisites:
- You have installed the ROSA CLI tool.
- You have your offline Red Hat OpenShift Cluster Manager token.
- You have installed Terraform version 1.4.6 or newer.
You have created your AWS account-wide IAM roles.
The specific account-wide IAM roles and policies provide the STS permissions required for Red Hat OpenShift Service on AWS support, installation, control plane, and compute functionality. This includes account-wide Operator policies. See the Additional resources for more information on the AWS account roles.
- You have an AWS account and associated credentials that allow you to create resources. The credentials are configured for the AWS provider. See the Authentication and Configuration section in AWS Terraform provider documentation.
You have, at minimum, the following permissions in your AWS IAM role policy that is operating Terraform. Check for these permissions in the AWS console.
{ "Version": "2012-10-17", "Statement": [ { "Sid": "VisualEditor0", "Effect": "Allow", "Action": [ "iam:GetPolicyVersion", "iam:DeletePolicyVersion", "iam:CreatePolicyVersion", "iam:UpdateAssumeRolePolicy", "secretsmanager:DescribeSecret", "iam:ListRoleTags", "secretsmanager:PutSecretValue", "secretsmanager:CreateSecret", "iam:TagRole", "secretsmanager:DeleteSecret", "iam:UpdateOpenIDConnectProviderThumbprint", "iam:DeletePolicy", "iam:CreateRole", "iam:AttachRolePolicy", "iam:ListInstanceProfilesForRole", "secretsmanager:GetSecretValue", "iam:DetachRolePolicy", "iam:ListAttachedRolePolicies", "iam:ListPolicyTags", "iam:ListRolePolicies", "iam:DeleteOpenIDConnectProvider", "iam:DeleteInstanceProfile", "iam:GetRole", "iam:GetPolicy", "iam:ListEntitiesForPolicy", "iam:DeleteRole", "iam:TagPolicy", "iam:CreateOpenIDConnectProvider", "iam:CreatePolicy", "secretsmanager:GetResourcePolicy", "iam:ListPolicyVersions", "iam:UpdateRole", "iam:GetOpenIDConnectProvider", "iam:TagOpenIDConnectProvider", "secretsmanager:TagResource", "sts:AssumeRoleWithWebIdentity", "iam:ListRoles" ], "Resource": [ "arn:aws:secretsmanager:*:<ACCOUNT_ID>:secret:*", "arn:aws:iam::<ACCOUNT_ID>:instance-profile/*", "arn:aws:iam::<ACCOUNT_ID>:role/*", "arn:aws:iam::<ACCOUNT_ID>:oidc-provider/*", "arn:aws:iam::<ACCOUNT_ID>:policy/*" ] }, { "Sid": "VisualEditor1", "Effect": "Allow", "Action": [ "s3:*" ], "Resource": "*" } ] }
3.1.3. Considerations when using Terraform
In general, using Terraform to manage cloud resources should be done with the expectation that any changes should be done using the Terraform methodology. Use caution when using tools outside of Terraform, such as the AWS console or Red Hat console, to modify cloud resources created by Terraform. Using tools outside Terraform to manage cloud resources that are already managed by Terraform introduces configuration drift from your declared Terraform configuration.
For example, if you upgrade your Terraform-created cluster by using the Red Hat Hybrid Cloud Console, you need to reconcile your Terraform state before applying any forthcoming configuration changes.
3.1.4. Overview of the default cluster specifications
You can quickly create a Red Hat OpenShift Service on AWS cluster by using the default installation options.
| Component | Default specifications |
|---|---|
| Accounts and roles |
|
| Cluster settings |
|
| Compute node machine pool |
|
| Networking configuration |
|
| Classless Inter-Domain Routing (CIDR) ranges |
|
| Cluster roles and policies |
|
| Storage |
|
| Cluster update strategy |
|
3.1.5. Creating a default Red Hat OpenShift Service on AWS cluster using Terraform
The cluster creation process outlined below shows how to use Terraform to create your account-wide IAM roles and a Red Hat OpenShift Service on AWS cluster with a managed OIDC configuration.
3.1.5.1. Preparing your environment for Terraform
Before you can create your Red Hat OpenShift Service on AWS cluster by using Terraform, you need to export your offline Red Hat OpenShift Cluster Manager token.
Procedure
Optional: Because the Terraform files get created in your current directory during this procedure, you can create a new directory to store these files and navigate into it by running the following command:
$ mkdir terraform-cluster && cd terraform-cluster- Grant permissions to your account by using an offline Red Hat OpenShift Cluster Manager token.
Copy your offline token, and set the token as an environmental variable by running the following command:
$ export RHCS_TOKEN=<your_offline_token>NoteThis environmental variable resets at the end of each session, such as restarting your machine or closing the terminal.
Verification
After you export your token, verify the value by running the following command:
$ echo $RHCS_TOKEN
3.1.5.2. Creating your Terraform files locally
After you configure your offline Red Hat OpenShift Cluster Manager token, you need to create the Terraform files locally to build your cluster. You can create these files by using the following code templates.
Procedure
Create the
main.tffile by running the following command:$ cat<<-EOF>main.tf # # Copyright (c) 2023 Red Hat, Inc. # # Licensed under the Apache License, Version 2.0 (the "License"); # you may not use this file except in compliance with the License. # You may obtain a copy of the License at # # http://www.apache.org/licenses/LICENSE-2.0 # # Unless required by applicable law or agreed to in writing, software # distributed under the License is distributed on an "AS IS" BASIS, # WITHOUT WARRANTIES OR CONDITIONS OF ANY KIND, either express or implied. # See the License for the specific language governing permissions and # limitations under the License. # terraform { required_providers { aws = { source = "hashicorp/aws" version = ">= 4.21.0" } rhcs = { version = ">= 1.6.3" source = "terraform-redhat/rhcs" } } } # Export token using the RHCS_TOKEN environment variable provider "rhcs" {} provider "aws" { region = var.aws_region ignore_tags { key_prefixes = ["kubernetes.io/"] } default_tags { tags = var.default_aws_tags } } data "aws_availability_zones" "available" {} locals { # Extract availability zone names for the specified region, limit it to 3 if multi az or 1 if single region_azs = var.multi_az ? slice([for zone in data.aws_availability_zones.available.names : format("%s", zone)], 0, 3) : slice([for zone in data.aws_availability_zones.available.names : format("%s", zone)], 0, 1) } resource "random_string" "random_name" { length = 6 special = false upper = false } locals { worker_node_replicas = var.multi_az ? 3 : 2 # If cluster_name is not null, use that, otherwise generate a random cluster name cluster_name = coalesce(var.cluster_name, "rosa-\${random_string.random_name.result}") } # The network validator requires an additional 60 seconds to validate Terraform clusters. resource "time_sleep" "wait_60_seconds" { count = var.create_vpc ? 1 : 0 depends_on = [module.vpc] create_duration = "60s" } module "rosa-hcp" { source = "terraform-redhat/rosa-hcp/rhcs" version = "1.6.3" cluster_name = local.cluster_name openshift_version = var.openshift_version account_role_prefix = local.cluster_name operator_role_prefix = local.cluster_name replicas = local.worker_node_replicas aws_availability_zones = local.region_azs create_oidc = true private = var.private_cluster aws_subnet_ids = var.create_vpc ? var.private_cluster ? module.vpc[0].private_subnets : concat(module.vpc[0].public_subnets, module.vpc[0].private_subnets) : var.aws_subnet_ids create_account_roles = true create_operator_roles = true # Optional: Configure a cluster administrator user # # Option 1: Default cluster-admin user # Create an administrator user (cluster-admin) and automatically # generate a password by uncommenting the following parameter: # create_admin_user = true # Generated administrator credentials are displayed in terminal output. # # Option 2: Specify administrator username and password # Create an administrator user and define your own password # by uncommenting and editing the values of the following parameters: # admin_credentials_username = <username> # admin_credentials_password = <password> depends_on = [time_sleep.wait_60_seconds] } EOFIf you want to create an administrator user during cluster creation, uncomment the appropriate parameters in the
Optional: Configure a cluster administrator usersection and edit their values.Create the
variables.tffile by running the following command:NoteCopy and edit this file before running the command to build your cluster.
$ cat<<-EOF>variables.tf # # Copyright (c) 2023 Red Hat, Inc. # # Licensed under the Apache License, Version 2.0 (the "License"); # you may not use this file except in compliance with the License. # You may obtain a copy of the License at # # http://www.apache.org/licenses/LICENSE-2.0 # # Unless required by applicable law or agreed to in writing, software # distributed under the License is distributed on an "AS IS" BASIS, # WITHOUT WARRANTIES OR CONDITIONS OF ANY KIND, either express or implied. # See the License for the specific language governing permissions and # limitations under the License. # variable "openshift_version" { type = string default = "4.14.20" description = "Desired version of OpenShift for the cluster, for example '4.14.20'. If version is greater than the currently running version, an upgrade will be scheduled." } variable "create_vpc" { type = bool description = "If you would like to create a new VPC, set this value to 'true'. If you do not want to create a new VPC, set this value to 'false'." } # ROSA Cluster info variable "cluster_name" { default = null type = string description = "The name of the ROSA cluster to create" } variable "additional_tags" { default = { Terraform = "true" Environment = "dev" } description = "Additional AWS resource tags" type = map(string) } variable "multi_az" { type = bool description = "Multi AZ Cluster for High Availability" default = true } variable "worker_node_replicas" { default = 3 description = "Number of worker nodes to provision. Single zone clusters need at least 2 nodes, multizone clusters need at least 3 nodes" type = number } variable "aws_subnet_ids" { type = list(any) description = "A list of either the public or public + private subnet IDs to use for the cluster blocks to use for the cluster" default = ["subnet-01234567890abcdef", "subnet-01234567890abcdef", "subnet-01234567890abcdef"] } variable "private_cluster" { type = bool description = "If you want to create a private cluster, set this value to 'true'. If you want a publicly available cluster, set this value to 'false'." } #VPC Info variable "vpc_name" { type = string description = "VPC Name" default = "tf-qs-vpc" } variable "vpc_cidr_block" { type = string description = "value of the CIDR block to use for the VPC" default = "10.0.0.0/16" } variable "private_subnet_cidrs" { type = list(any) description = "The CIDR blocks to use for the private subnets" default = ["10.0.1.0/24", "10.0.2.0/24", "10.0.3.0/24"] } variable "public_subnet_cidrs" { type = list(any) description = "The CIDR blocks to use for the public subnets" default = ["10.0.101.0/24", "10.0.102.0/24", "10.0.103.0/24"] } variable "single_nat_gateway" { type = bool description = "Single NAT or per NAT for subnet" default = false } #AWS Info variable "aws_region" { type = string default = "us-east-2" } variable "default_aws_tags" { type = map(string) description = "Default tags for AWS" default = {} } EOFCreate the
vpc.tffile by running the following command:$ cat<<-EOF>vpc.tf # # Copyright (c) 2023 Red Hat, Inc. # # Licensed under the Apache License, Version 2.0 (the "License"); # you may not use this file except in compliance with the License. # You may obtain a copy of the License at # # http://www.apache.org/licenses/LICENSE-2.0 # # Unless required by applicable law or agreed to in writing, software # distributed under the License is distributed on an "AS IS" BASIS, # WITHOUT WARRANTIES OR CONDITIONS OF ANY KIND, either express or implied. # See the License for the specific language governing permissions and # limitations under the License. # module "vpc" { source = "terraform-aws-modules/vpc/aws" version = "5.1.2" count = var.create_vpc ? 1 : 0 name = var.vpc_name cidr = var.vpc_cidr_block azs = local.region_azs private_subnets = var.multi_az ? var.private_subnet_cidrs : [var.private_subnet_cidrs[0]] public_subnets = var.multi_az ? var.public_subnet_cidrs : [var.public_subnet_cidrs[0]] enable_nat_gateway = true single_nat_gateway = var.single_nat_gateway enable_dns_hostnames = true enable_dns_support = true tags = var.additional_tags } EOFYou are ready to initiate Terraform.
3.1.5.3. Using Terraform to create your Red Hat OpenShift Service on AWS cluster
After you create the Terraform files, you must initiate Terraform to provide all of the required dependencies. Then apply the Terraform plan.
Do not modify Terraform state files. For more information, see Considerations when using Terraform
Procedure
Configure Terraform to create your resources based on your Terraform files, run the following command:
$ terraform initOptional: Verify that the Terraform you copied is correct by running the following command:
$ terraform validateExample output
Success! The configuration is valid.Create your cluster with Terraform by running the following command:
$ terraform applyThe Terraform interface asks two questions to create your cluster, similar to the following:
var.create_vpc If you would like to create a new VPC, set this value to 'true'. If you do not want to create a new VPC, set this value to 'false'. Enter a value: var.private_cluster If you want to create a private cluster, set this value to 'true'. If you want a publicly available cluster, set this value to 'false'. Enter a value:Enter
yesto proceed ornoto cancel when the Terraform interface lists the resources to be created or changed and prompts for confirmation:Plan: 63 to add, 0 to change, 0 to destroy. Do you want to perform these actions? Terraform will perform the actions described above. Only 'yes' will be accepted to approve.If you enter
yes, your Terraform plan starts, creating your AWS account roles, Operator roles, and your Red Hat OpenShift Service on AWS cluster.
Verification
Verify that your cluster was created by running the following command:
$ rosa list clustersThis example shows a cluster in the
readystate:ID NAME STATE TOPOLOGY 27c3snjsupa9obua74ba8se5kcj11269 rosa-tf-demo ready Hosted CPVerify that your account roles were created by running the following command:
$ rosa list account-rolesThis example shows the account roles that were created:
I: Fetching account roles ROLE NAME ROLE TYPE ROLE ARN OPENSHIFT VERSION AWS Managed ROSA-demo-Installer-Role Installer arn:aws:iam::<ID>:role/ROSA-demo-Installer-Role 4.14 No ROSA-demo-Support-Role Support arn:aws:iam::<ID>:role/ROSA-demo-Support-Role 4.14 No ROSA-demo-Worker-Role Worker arn:aws:iam::<ID>:role/ROSA-demo-Worker-Role 4.14 NoVerify that your Operator roles were created by running the following command:
$ rosa list operator-rolesThis example shows the Terraform-created Operator roles:
I: Fetching operator roles ROLE PREFIX AMOUNT IN BUNDLE rosa-demo 8
3.1.5.4. Configuring an htpasswd identity provider with Terraform
After creating your cluster with Terraform, you can permit users access to your cluster by using an htpasswd identity provider (IDP) with the Terraform tool.
Prerequisites
- You have installed and configured the latest version of the ROSA CLI.
- You have installed and configured the latest version of Terraform.
Procedure
Create the
htpasswd_idp.tffile by running one of the following commands:Option 1: To create a user with a generated, randomized password, run:
$ cat<<-EOF>htpasswd_idp.tf module "htpasswd_idp" { source = "terraform-redhat/rosa-hcp/rhcs//modules/idp" version = "1.6.2" cluster_id = "2odpb9p344hnkfvpkluo00qmgkika78l" name = "htpasswd-idp-tf-1" idp_type = "htpasswd" htpasswd_idp_users = [{ username = "pej-user-d1", password = random_password.password.result }] } resource "aws_secretsmanager_secret" "idp_password" { name = "idp-password-secret" description = "Any description here" } resource "random_password" "password" { length = 16 lower = true special = true override_special = "!#$%&*()-_=+[]{}<>:?" } # If you need to output the password, mark it as sensitive to hide from CLI logs output "password_output" { value = random_password.password.result sensitive = true } # This section sends your credentials to your AWS Secrets Manager to enable you to log in to your cluster. resource "aws_secretsmanager_secret_version" "idp_password_val" { secret_id = aws_secretsmanager_secret.idp_password.id secret_string = random_password.password.result } EOFYou must replace the
<cluster_id>placeholder with the 32-digit ID for your cluster. To find that value, runrosa list clusters | awk '{print $1}'. You also must replace the<user_name>placeholder with the username you want to create. The randomized password is then stored in your AWS Secrets manager to be used when logging in to the cluster.Run the following command to view your password after setting it:
$ terraform output password_outputThe CLI returns your generated password in plain text.
Option 2: To specify your passwords when creating a user, run:
$ cat<<-EOF>htpasswd_idp.tf module "htpasswd_idp" { source = "terraform-redhat/rosa-hcp/rhcs//modules/idp" version = "1.6.2" cluster_id = "<cluster_id>" name = "htpasswd-idp" idp_type = "htpasswd" htpasswd_idp_users = [{ username="<user_name>",password="<password>"}] } EOFYou must replace the
<cluster_id>placeholder with the 32-digit ID for your cluster. To find that value, runrosa list clusters | awk '{print $1}'. You also must replace the<user_name>placeholder with the username you want to create as well as a password for the<password>placeholder.
Run the following command to configure Terraform to create your resources based on your Terraform files:
$ terraform initVerify that the Terraform you copied is correct by running the following command:
$ terraform validateExample output
Success! The configuration is valid.Create your cluster with Terraform by running the following command:
$ terraform applyEnter
yesto proceed ornoto cancel when the Terraform interface lists the resources to be created or changed and prompts for confirmation:Do you want to perform these actions? Terraform will perform the actions described above. Only 'yes' will be accepted to approve. Enter a value: yesYou see a confirmation that your IDP has been created.
Apply complete! Resources: 1 added, 0 changed, 0 destroyed.NoteIf you used the randomized password template, then the generated password is stored in your AWS Secrets manager.
3.1.5.5. Deleting your Red Hat OpenShift Service on AWS cluster with Terraform
Use the terraform destroy command to remove all resources you create with the terraform apply command.
Keep your Terraform .tf files unchanged before destroying your resources. These variables are matched to resources to delete.
Procedure
In the directory where you ran the
terraform applycommand to create your cluster, run the following command to delete the cluster:$ terraform destroyThe Terraform interface prompts you for two variables. These should match the answers you provided when creating a cluster:
var.create_vpc If you would like to create a new VPC, set this value to 'true.' If you do not want to create a new VPC, set this value to 'false.' Enter a value: var.private_cluster If you want to create a private cluster, set this value to 'true.' If you want a publicly available cluster, set this value to 'false.' Enter a value:Enter
yesto start the role and cluster deletion:Example output
Plan: 0 to add, 0 to change, 63 to destroy. Do you really want to destroy all resources? Terraform will destroy all your managed infrastructure, as shown above. There is no undo. Only 'yes' will be accepted to confirm. Enter a value: yes
Verification
Verify that your cluster was destroyed by running the following command:
$ rosa list clustersExample output showing no cluster
I: No clusters availableVerify that the account roles were destroyed by running the following command:
$ rosa list account-rolesExample output showing no Terraform-created account roles
I: Fetching account roles I: No account roles availableVerify that the Operator roles were destroyed by running the following command:
$ rosa list operator-rolesExample output showing no Terraform-created Operator roles
I: Fetching operator roles I: No operator roles available
Chapter 4. Creating Red Hat OpenShift Service on AWS clusters using a custom AWS KMS encryption key
By default, Red Hat OpenShift Service on AWS encrypts Amazon EBS volumes with an AWS managed KMS key. Use a custom KMS key to control key rotation, access policies, or meet specific compliance requirements.
4.1. Red Hat OpenShift Service on AWS prerequisites
To create a Red Hat OpenShift Service on AWS cluster, you must have the following items:
- A configured virtual private cloud (VPC)
- Account-wide roles
- An OIDC configuration
- Operator roles
4.2. Creating a Virtual Private Cloud for your Red Hat OpenShift Service on AWS clusters
You must have an AWS Virtual Private Cloud (VPC) to create a Red Hat OpenShift Service on AWS cluster. You can create a VPC by using the ROSA CLI, or you can manually create the VPC resources in the AWS console.
The Terraform instructions are for testing and demonstration purposes. Your own installation requires some modifications to the VPC for your own use. You should also ensure that when you use this linked Terraform configuration, it is in the same region that you intend to install your cluster. In these examples, us-east-2 is used.
4.2.1. Creating an AWS VPC using the ROSA CLI
The rosa create network command is available in v.1.2.48 or later of the ROSA CLI. The command uses AWS CloudFormation to create a VPC and associated networking components necessary to install a Red Hat OpenShift Service on AWS cluster. CloudFormation is a native AWS infrastructure-as-code tool and is compatible with the AWS CLI.
If you do not specify a template, CloudFormation uses a default template that creates resources with the following parameters:
| VPC parameter | Value |
|---|---|
| Availability zones | 1 |
| Region |
|
| VPC CIDR |
|
You can create and customize CloudFormation templates to use with the rosa create network command. See the additional resources of this section for information on the default VPC template.
Prerequisites
- You have configured your AWS account
- You have configured your Red Hat accounts
- You have installed the ROSA CLI and configured it to the latest version
Procedure
Create an AWS VPC using the default CloudFormations template by running the following command:
$ rosa create networkOptional: Customize your VPC by specifying additional parameters.
You can use the
--paramflag to specify changes to the default VPC template. The following example command specifies custom values forregion,Name,AvailabilityZoneCountandVpcCidr.$ rosa create network --param Region=us-east-2 --param Name=quickstart-stack --param AvailabilityZoneCount=3 --param VpcCidr=10.0.0.0/16The command takes about 5 minutes to run and provides regular status updates from AWS as resources are created. If there is an issue with CloudFormation, a rollback is attempted. For all other errors that are encountered, please follow the error message instructions or contact AWS support.
Verification
When completed, you receive a summary of the created resources:
INFO[0140] Resources created in stack: INFO[0140] Resource: AttachGateway, Type: AWS::EC2::VPCGatewayAttachment, ID: <gateway_id> INFO[0140] Resource: EC2VPCEndpoint, Type: AWS::EC2::VPCEndpoint, ID: <vpce_id> INFO[0140] Resource: EcrApiVPCEndpoint, Type: AWS::EC2::VPCEndpoint, ID: <vpce_id> INFO[0140] Resource: EcrDkrVPCEndpoint, Type: AWS::EC2::VPCEndpoint, ID: <vpce_id> INFO[0140] Resource: ElasticIP1, Type: AWS::EC2::EIP, ID: <IP> INFO[0140] Resource: ElasticIP2, Type: AWS::EC2::EIP, ID: <IP> INFO[0140] Resource: InternetGateway, Type: AWS::EC2::InternetGateway, ID: igw-016e1a71b9812464e INFO[0140] Resource: KMSVPCEndpoint, Type: AWS::EC2::VPCEndpoint, ID: <vpce_id> INFO[0140] Resource: NATGateway1, Type: AWS::EC2::NatGateway, ID: <nat-gateway_id> INFO[0140] Resource: PrivateRoute, Type: AWS::EC2::Route, ID: <route_id> INFO[0140] Resource: PrivateRouteTable, Type: AWS::EC2::RouteTable, ID: <route_id> INFO[0140] Resource: PrivateSubnetRouteTableAssociation1, Type: AWS::EC2::SubnetRouteTableAssociation, ID: <route_id> INFO[0140] Resource: PublicRoute, Type: AWS::EC2::Route, ID: <route_id> INFO[0140] Resource: PublicRouteTable, Type: AWS::EC2::RouteTable, ID: <route_id> INFO[0140] Resource: PublicSubnetRouteTableAssociation1, Type: AWS::EC2::SubnetRouteTableAssociation, ID: <route_id> INFO[0140] Resource: S3VPCEndpoint, Type: AWS::EC2::VPCEndpoint, ID: <vpce_id> INFO[0140] Resource: STSVPCEndpoint, Type: AWS::EC2::VPCEndpoint, ID: <vpce_id> INFO[0140] Resource: SecurityGroup, Type: AWS::EC2::SecurityGroup, ID: <security-group_id> INFO[0140] Resource: SubnetPrivate1, Type: AWS::EC2::Subnet, ID: <private_subnet_id-1> INFO[0140] Resource: SubnetPublic1, Type: AWS::EC2::Subnet, ID: <public_subnet_id-1> INFO[0140] Resource: VPC, Type: AWS::EC2::VPC, ID: <vpc_id> INFO[0140] Stack rosa-network-stack-5555 created-
The
<private_subnet_id-1>and<public_subnet_id-1>subnet IDs are used to create your cluster when using therosa create clustercommand. -
The network stack name (
rosa-network-stack-5555) is used to delete the resource later.
-
The
4.2.2. Requirements for manually creating an AWS Virtual Private Cloud
If you do not use a managed infrastructure tool such as Terraform or AWS CloudFormation to create your Virtual Private Cloud (VPC), you can create it manually through the AWS console. A manually created VPC must meet specific requirements for use with Red Hat OpenShift Service on AWS.
Your VPC must meet the requirements shown in the following table.
| Requirement | Details |
|---|---|
| VPC name | You need to have the specific VPC name and ID when creating your cluster. |
| CIDR range | Your VPC CIDR range should match your machine CIDR. |
| Availability zone | You need one availability zone for a single zone, and you need three for availability zones for multi-zone. |
| Public subnet | You must have one public subnet with a NAT gateway for public clusters. Private clusters do not need a public subnet. |
| DNS hostname and resolution | You must ensure that the DNS hostname and resolution are enabled. |
4.2.4. Creating the account-wide STS roles and policies
Before you create a Red Hat OpenShift Service on AWS cluster, you must create the required account-wide IAM roles and policies by using the ROSA command-line interface (CLI) (rosa).
Specific AWS-managed policies for Red Hat OpenShift Service on AWS must be attached to each role. Customer-managed policies must not be used with these required account roles. For more information regarding AWS-managed policies for Red Hat OpenShift Service on AWS clusters, see AWS managed policies for Red Hat OpenShift Service on AWS.
Prerequisites
- You have completed the AWS prerequisites for Red Hat OpenShift Service on AWS.
- You have available AWS service quotas.
- You have enabled the Red Hat OpenShift Service on AWS in the AWS Console.
-
You have installed and configured the latest ROSA command-line interface (CLI) (
rosa) on your installation host. - You have logged in to your Red Hat account by using the ROSA CLI.
Procedure
If they do not exist in your AWS account, create the required account-wide STS roles and attach the policies by running the following command:
$ rosa create account-roles --hosted-cpOptional: Set your prefix as an environmental variable by running the following command:
$ export ACCOUNT_ROLES_PREFIX=<account_role_prefix>View the value of the variable by running the following command:
$ echo $ACCOUNT_ROLES_PREFIXFor example:
ManagedOpenShift
4.2.5. Creating an OpenID Connect configuration
Red Hat OpenShift Service on AWS clusters use OIDC and the AWS Security Token Service (STS) to authenticate Operator access to AWS resources they require to perform their functions. Each production cluster requires its own OIDC configuration. When creating a Red Hat OpenShift Service on AWS cluster, you can create the OpenID Connect (OIDC) configuration before creating your cluster.
Prerequisites
- You have completed the AWS prerequisites for Red Hat OpenShift Service on AWS.
-
You have installed and configured the latest ROSA command-line interface (CLI) (
rosa) on your installation host.
Procedure
To create your OIDC configuration alongside the AWS resources, run the following command:
$ rosa create oidc-config --mode=auto --yesThis command returns the following information.
For example:
? Would you like to create a Managed (Red Hat hosted) OIDC Configuration Yes I: Setting up managed OIDC configuration I: To create Operator Roles for this OIDC Configuration, run the following command and remember to replace <user-defined> with a prefix of your choice: rosa create operator-roles --prefix <user-defined> --oidc-config-id 13cdr6b If you are going to create a Hosted Control Plane cluster please include '--hosted-cp' I: Creating OIDC provider using 'arn:aws:iam::4540112244:user/userName' ? Create the OIDC provider? Yes I: Created OIDC provider with ARN 'arn:aws:iam::4540112244:oidc-provider/dvbwgdztaeq9o.cloudfront.net/13cdr6b'When creating your cluster, you must supply the OIDC config ID. The CLI output provides this value for
--mode auto, otherwise you must determine these values based onawsCLI output for--mode manual.Optional: you can save the OIDC configuration ID as a variable to use later. Run the following command to save the variable:
$ export OIDC_ID=<oidc_config_id><oidc_config_id>-
In this example output, the OIDC configuration ID is
13cdr6b.
View the value of the variable by running the following command:
$ echo $OIDC_IDFor example:
13cdr6b
Verification
You can list the possible OIDC configurations available for your clusters that are associated with your user organization. Run the following command:
$ rosa list oidc-configFor example:
ID MANAGED ISSUER URL SECRET ARN 2330dbs0n8m3chkkr25gkkcd8pnj3lk2 true https://dvbwgdztaeq9o.cloudfront.net/2330dbs0n8m3chkkr25gkkcd8pnj3lk2 233hvnrjoqu14jltk6lhbhf2tj11f8un false https://oidc-r7u1.s3.us-east-1.amazonaws.com aws:secretsmanager:us-east-1:242819244:secret:rosa-private-key-oidc-r7u1-tM3MDN
4.2.6. Creating Operator roles and policies
When you deploy a Red Hat OpenShift Service on AWS cluster, you must create the Operator IAM roles. The cluster Operators use the Operator roles and policies to obtain temporary permissions to perform cluster operations, such as managing storage and external access.
Prerequisites
- You have completed the AWS prerequisites for Red Hat OpenShift Service on AWS.
-
You have installed and configured the latest ROSA command-line interface (CLI) (
rosa) on your installation host. - You created the account-wide AWS roles.
Procedure
To create your Operator roles, run the following command:
$ rosa create operator-roles --hosted-cp --prefix=$OPERATOR_ROLES_PREFIX --oidc-config-id=$OIDC_ID --installer-role-arn arn:aws:iam::$AWS_ACCOUNT_ID:role/${ACCOUNT_ROLES_PREFIX}-HCP-ROSA-Installer-RoleThe following breakdown provides options for the Operator role creation.
$ rosa create operator-roles --hosted-cp --prefix=$OPERATOR_ROLES_PREFIX --oidc-config-id=$OIDC_ID --installer-role-arn arn:aws:iam::$AWS_ACCOUNT_ID:role/$ACCOUNT_ROLES_PREFIX-HCP-ROSA-Installer-Rolewhere:
--prefix=- You must supply a prefix when creating these Operator roles. Failing to do so produces an error. See the Additional resources of this section for information on the Operator prefix.
--oidc-config-id=- This value is the OIDC configuration ID that you created for your Red Hat OpenShift Service on AWS cluster.
--installer-role-arn- This value is the installer role ARN that you created when you created the Red Hat OpenShift Service on AWS account roles.
You must include the
--hosted-cpparameter to create the correct roles for Red Hat OpenShift Service on AWS clusters. This command returns the following information.For example:
? Role creation mode: auto ? Operator roles prefix: <pre-filled_prefix> ? OIDC Configuration ID: 23soa2bgvpek9kmes9s7os0a39i13qm4 | https://dvbwgdztaeq9o.cloudfront.net/23soa2bgvpek9kmes9s7os0a39i13qm4 ? Create hosted control plane operator roles: Yes W: More than one Installer role found ? Installer role ARN: arn:aws:iam::4540112244:role/<prefix>-HCP-ROSA-Installer-Role ? Permissions boundary ARN (optional): I: Reusable OIDC Configuration detected. Validating trusted relationships to operator roles: I: Creating roles using 'arn:aws:iam::4540112244:user/<userName>' I: Created role '<prefix>-openshift-cluster-csi-drivers-ebs-cloud-credentials' with ARN 'arn:aws:iam::4540112244:role/<prefix>-openshift-cluster-csi-drivers-ebs-cloud-credentials' I: Created role '<prefix>-openshift-cloud-network-config-controller-cloud-credenti' with ARN 'arn:aws:iam::4540112244:role/<prefix>-openshift-cloud-network-config-controller-cloud-credenti' I: Created role '<prefix>-kube-system-kube-controller-manager' with ARN 'arn:aws:iam::4540112244:role/<prefix>-kube-system-kube-controller-manager' I: Created role '<prefix>-kube-system-capa-controller-manager' with ARN 'arn:aws:iam::4540112244:role/<prefix>-kube-system-capa-controller-manager' I: Created role '<prefix>-kube-system-control-plane-operator' with ARN 'arn:aws:iam::4540112244:role/<prefix>-kube-system-control-plane-operator' I: Created role '<prefix>-kube-system-kms-provider' with ARN 'arn:aws:iam::4540112244:role/<prefix>-kube-system-kms-provider' I: Created role '<prefix>-openshift-image-registry-installer-cloud-credentials' with ARN 'arn:aws:iam::4540112244:role/<prefix>-openshift-image-registry-installer-cloud-credentials' I: Created role '<prefix>-openshift-ingress-operator-cloud-credentials' with ARN 'arn:aws:iam::4540112244:role/<prefix>-openshift-ingress-operator-cloud-credentials' I: To create a cluster with these roles, run the following command: rosa create cluster --sts --oidc-config-id 23soa2bgvpek9kmes9s7os0a39i13qm4 --operator-roles-prefix <prefix> --hosted-cpwhere:
Operator roles prefix- This field is prepopulated with the prefix that you set in the initial creation command.
OIDC Configuration ID- This field requires you to select an OIDC configuration that you created for your Red Hat OpenShift Service on AWS cluster.
The Operator roles are now created and ready to use for creating your Red Hat OpenShift Service on AWS cluster.
Verification
You can list the Operator roles associated with your Red Hat OpenShift Service on AWS account. Run the following command:
$ rosa list operator-rolesFor example:
I: Fetching operator roles ROLE PREFIX AMOUNT IN BUNDLE <prefix> 8 ? Would you like to detail a specific prefix Yes ? Operator Role Prefix: <prefix> ROLE NAME ROLE ARN VERSION MANAGED <prefix>-kube-system-capa-controller-manager arn:aws:iam::4540112244:role/<prefix>-kube-system-capa-controller-manager 4.13 No <prefix>-kube-system-control-plane-operator arn:aws:iam::4540112244:role/<prefix>-kube-system-control-plane-operator 4.13 No <prefix>-kube-system-kms-provider arn:aws:iam::4540112244:role/<prefix>-kube-system-kms-provider 4.13 No <prefix>-kube-system-kube-controller-manager arn:aws:iam::4540112244:role/<prefix>-kube-system-kube-controller-manager 4.13 No <prefix>-openshift-cloud-network-config-controller-cloud-credenti arn:aws:iam::4540112244:role/<prefix>-openshift-cloud-network-config-controller-cloud-credenti 4.13 No <prefix>-openshift-cluster-csi-drivers-ebs-cloud-credentials arn:aws:iam::4540112244:role/<prefix>-openshift-cluster-csi-drivers-ebs-cloud-credentials 4.13 No <prefix>-openshift-image-registry-installer-cloud-credentials arn:aws:iam::4540112244:role/<prefix>-openshift-image-registry-installer-cloud-credentials 4.13 No <prefix>-openshift-ingress-operator-cloud-credentials arn:aws:iam::4540112244:role/<prefix>-openshift-ingress-operator-cloud-credentials 4.13 NoAfter the command runs, it displays all the prefixes associated with your AWS account and notes how many roles are associated with this prefix. If you need to see all of these roles and their details, enter "Yes" on the detail prompt to have these roles listed out with specifics.
4.2.7. Creating a Red Hat OpenShift Service on AWS cluster using a custom AWS KMS key
You can create a Red Hat OpenShift Service on AWS cluster with a customer-provided KMS key that is used to encrypt either node root volumes, the etcd database, or both. A different KMS key ARN can be provided for each option.
Red Hat OpenShift Service on AWS does not automatically configure the default storage class to encrypt persistent volumes with the customer-provided KMS key. You can configure this in-cluster after installation.
Procedure
Create a custom AWS customer-managed KMS key by running the following command:
$ KMS_ARN=$(aws kms create-key --region $AWS_REGION --description 'Custom ROSA Encryption Key' --tags TagKey=red-hat,TagValue=true --query KeyMetadata.Arn --output text)This command saves the Amazon Resource Name (ARN) output of this custom key for further steps.
NoteCustomers must provide the
--tags TagKey=red-hat,TagValue=trueargument that is required for a customer KMS key.Verify the KMS key has been created by running the following command:
$ echo $KMS_ARNSet your AWS account ID to an environment variable.
$ AWS_ACCOUNT_ID=<aws_account_id>Add the ARN for the account-wide installer role and operator roles that you created in the preceding step to the
Statement.Principal.AWSsection in the file. In the following example, the ARN for the defaultManagedOpenShift-HCP-ROSA-Installer-Rolerole is added:{ "Version": "2012-10-17", "Id": "key-rosa-policy-1", "Statement": [ { "Sid": "Enable IAM User Permissions", "Effect": "Allow", "Principal": { "AWS": "arn:aws:iam::${AWS_ACCOUNT_ID}:root" }, "Action": "kms:*", "Resource": "*" }, { "Sid": "Installer Permissions", "Effect": "Allow", "Principal": { "AWS": "arn:aws:iam::${AWS_ACCOUNT_ID}:role/ManagedOpenShift-HCP-ROSA-Installer-Role" }, "Action": [ "kms:CreateGrant", "kms:DescribeKey", "kms:GenerateDataKeyWithoutPlaintext" ], "Resource": "*" }, { "Sid": "ROSA KubeControllerManager Permissions", "Effect": "Allow", "Principal": { "AWS": "arn:aws:iam::${AWS_ACCOUNT_ID}:role/<operator_role_prefix>-kube-system-kube-controller-manager" }, "Action": "kms:DescribeKey", "Resource": "*" }, { "Sid": "ROSA KMS Provider Permissions", "Effect": "Allow", "Principal": { "AWS": "arn:aws:iam::${AWS_ACCOUNT_ID}:role/<operator_role_prefix>-kube-system-kms-provider" }, "Action": [ "kms:Encrypt", "kms:Decrypt", "kms:DescribeKey" ], "Resource": "*" }, { "Sid": "ROSA NodeManager Permissions", "Effect": "Allow", "Principal": { "AWS": "arn:aws:iam::${AWS_ACCOUNT_ID}:role/<operator_role_prefix>-kube-system-capa-controller-manager" }, "Action": [ "kms:DescribeKey", "kms:GenerateDataKeyWithoutPlaintext", "kms:CreateGrant" ], "Resource": "*" } ] }Confirm the details of the policy file created by running the following command:
$ cat rosa-key-policy.jsonApply the newly generated key policy to the custom KMS key by running the following command:
$ aws kms put-key-policy --key-id $KMS_ARN \ --policy file://rosa-key-policy.json \ --policy-name defaultCreate the cluster by running the following command:
NoteIf your cluster name is longer than 15 characters, it will contain an autogenerated domain prefix as a sub-domain for your provisioned cluster on
*.openshiftapps.com.To customize the subdomain, use the
--domain-prefixflag. The domain prefix cannot be longer than 15 characters, must be unique, and cannot be changed after cluster creation.$ rosa create cluster --cluster-name <cluster_name> \ --subnet-ids <private_subnet_id>,<public_subnet_id> \ --sts \ --mode auto \ --machine-cidr 10.0.0.0/16 \ --compute-machine-type m5.xlarge \ --hosted-cp \ --region <aws_region> \ --oidc-config-id $OIDC_ID \ --kms-key-arn $KMS_ARN \ --etcd-encryption-kms-arn $KMS_ARN \ --operator-roles-prefix $OPERATOR_ROLES_PREFIXwhere:
--kms-key-arn- This KMS key ARN is used to encrypt all worker node root volumes. It is not required if only etcd database encryption is needed.
--etcd-encryption-kms-arn- This KMS key ARN is used to encrypt the etcd database. The etcd database is always encrypted by default with an AES cipher block, but can be encrypted instead with a KMS key. It is not required if only node root volume encryption is needed.
Verification
You can verify that your KMS key works by using OpenShift Cluster Manager.
- Navigate to OpenShift Cluster Manager and select Instances.
- Select your instance.
- Click the Storage tab.
- Copy the KMS key ID.
- Search and select Key Management Service.
- Enter your copied KMS key ID in the Filter field.
Chapter 5. Deploying Red Hat OpenShift Service on AWS clusters using FIPS encryption
Deploying a Red Hat OpenShift Service on AWS cluster using Federal Information Processing Standards (FIPS) encryption ensures that sensitive data is protected using validated cryptographic modules.
5.1. Creating the account-wide STS roles and policies
Before you create a Red Hat OpenShift Service on AWS cluster, you must create the required account-wide IAM roles and policies by using the ROSA command-line interface (CLI) (rosa).
Specific AWS-managed policies for Red Hat OpenShift Service on AWS must be attached to each role. Customer-managed policies must not be used with these required account roles. For more information regarding AWS-managed policies for Red Hat OpenShift Service on AWS clusters, see AWS managed policies for Red Hat OpenShift Service on AWS.
Prerequisites
- You have completed the AWS prerequisites for Red Hat OpenShift Service on AWS.
- You have available AWS service quotas.
- You have enabled the Red Hat OpenShift Service on AWS in the AWS Console.
-
You have installed and configured the latest ROSA command-line interface (CLI) (
rosa) on your installation host. - You have logged in to your Red Hat account by using the ROSA CLI.
Procedure
If they do not exist in your AWS account, create the required account-wide STS roles and attach the policies by running the following command:
$ export PREFIX=<custom_prefix>; rosa create account-roles --hosted-cp --prefix $PREFIXWhen using FIPS encryption, you need to set a custom prefix instead of using the default
ManagedOpenShiftprefix.
5.2. Creating an AWS VPC using the ROSA CLI
The rosa create network command is available in v.1.2.48 or later of the ROSA CLI. The command uses AWS CloudFormation to create a VPC and associated networking components necessary to install a Red Hat OpenShift Service on AWS cluster. CloudFormation is a native AWS infrastructure-as-code tool and is compatible with the AWS CLI.
If you do not specify a template, CloudFormation uses a default template that creates resources with the following parameters:
| VPC parameter | Value |
|---|---|
| Availability zones | 1 |
| Region |
|
| VPC CIDR |
|
You can create and customize CloudFormation templates to use with the rosa create network command. See the additional resources of this section for information on the default VPC template.
Prerequisites
- You have configured your AWS account
- You have configured your Red Hat accounts
- You have installed the ROSA CLI and configured it to the latest version
Procedure
Create an AWS VPC using the default CloudFormations template by running the following command:
$ rosa create networkOptional: Customize your VPC by specifying additional parameters.
You can use the
--paramflag to specify changes to the default VPC template. The following example command specifies custom values forregion,Name,AvailabilityZoneCountandVpcCidr.$ rosa create network --param Region=us-east-2 --param Name=quickstart-stack --param AvailabilityZoneCount=3 --param VpcCidr=10.0.0.0/16The command takes about 5 minutes to run and provides regular status updates from AWS as resources are created. If there is an issue with CloudFormation, a rollback is attempted. For all other errors that are encountered, please follow the error message instructions or contact AWS support.
Verification
When completed, you receive a summary of the created resources:
INFO[0140] Resources created in stack: INFO[0140] Resource: AttachGateway, Type: AWS::EC2::VPCGatewayAttachment, ID: <gateway_id> INFO[0140] Resource: EC2VPCEndpoint, Type: AWS::EC2::VPCEndpoint, ID: <vpce_id> INFO[0140] Resource: EcrApiVPCEndpoint, Type: AWS::EC2::VPCEndpoint, ID: <vpce_id> INFO[0140] Resource: EcrDkrVPCEndpoint, Type: AWS::EC2::VPCEndpoint, ID: <vpce_id> INFO[0140] Resource: ElasticIP1, Type: AWS::EC2::EIP, ID: <IP> INFO[0140] Resource: ElasticIP2, Type: AWS::EC2::EIP, ID: <IP> INFO[0140] Resource: InternetGateway, Type: AWS::EC2::InternetGateway, ID: igw-016e1a71b9812464e INFO[0140] Resource: KMSVPCEndpoint, Type: AWS::EC2::VPCEndpoint, ID: <vpce_id> INFO[0140] Resource: NATGateway1, Type: AWS::EC2::NatGateway, ID: <nat-gateway_id> INFO[0140] Resource: PrivateRoute, Type: AWS::EC2::Route, ID: <route_id> INFO[0140] Resource: PrivateRouteTable, Type: AWS::EC2::RouteTable, ID: <route_id> INFO[0140] Resource: PrivateSubnetRouteTableAssociation1, Type: AWS::EC2::SubnetRouteTableAssociation, ID: <route_id> INFO[0140] Resource: PublicRoute, Type: AWS::EC2::Route, ID: <route_id> INFO[0140] Resource: PublicRouteTable, Type: AWS::EC2::RouteTable, ID: <route_id> INFO[0140] Resource: PublicSubnetRouteTableAssociation1, Type: AWS::EC2::SubnetRouteTableAssociation, ID: <route_id> INFO[0140] Resource: S3VPCEndpoint, Type: AWS::EC2::VPCEndpoint, ID: <vpce_id> INFO[0140] Resource: STSVPCEndpoint, Type: AWS::EC2::VPCEndpoint, ID: <vpce_id> INFO[0140] Resource: SecurityGroup, Type: AWS::EC2::SecurityGroup, ID: <security-group_id> INFO[0140] Resource: SubnetPrivate1, Type: AWS::EC2::Subnet, ID: <private_subnet_id-1> INFO[0140] Resource: SubnetPublic1, Type: AWS::EC2::Subnet, ID: <public_subnet_id-1> INFO[0140] Resource: VPC, Type: AWS::EC2::VPC, ID: <vpc_id> INFO[0140] Stack rosa-network-stack-5555 created-
The
<private_subnet_id-1>and<public_subnet_id-1>subnet IDs are used to create your cluster when using therosa create clustercommand. -
The network stack name (
rosa-network-stack-5555) is used to delete the resource later.
-
The
5.3. Creating an OpenID Connect configuration
Red Hat OpenShift Service on AWS clusters use OIDC and the AWS Security Token Service (STS) to authenticate Operator access to AWS resources they require to perform their functions. Each production cluster requires its own OIDC configuration. When creating a Red Hat OpenShift Service on AWS cluster, you can create the OpenID Connect (OIDC) configuration before creating your cluster.
Prerequisites
- You have completed the AWS prerequisites for Red Hat OpenShift Service on AWS.
-
You have installed and configured the latest ROSA command-line interface (CLI) (
rosa) on your installation host.
Procedure
To create your OIDC configuration alongside the AWS resources, run the following command:
$ rosa create oidc-config --mode=auto --yesThis command returns the following information.
For example:
? Would you like to create a Managed (Red Hat hosted) OIDC Configuration Yes I: Setting up managed OIDC configuration I: To create Operator Roles for this OIDC Configuration, run the following command and remember to replace <user-defined> with a prefix of your choice: rosa create operator-roles --prefix <user-defined> --oidc-config-id 13cdr6b If you are going to create a Hosted Control Plane cluster please include '--hosted-cp' I: Creating OIDC provider using 'arn:aws:iam::4540112244:user/userName' ? Create the OIDC provider? Yes I: Created OIDC provider with ARN 'arn:aws:iam::4540112244:oidc-provider/dvbwgdztaeq9o.cloudfront.net/13cdr6b'When creating your cluster, you must supply the OIDC config ID. The CLI output provides this value for
--mode auto, otherwise you must determine these values based onawsCLI output for--mode manual.Optional: you can save the OIDC configuration ID as a variable to use later. Run the following command to save the variable:
$ export OIDC_ID=<oidc_config_id><oidc_config_id>-
In this example output, the OIDC configuration ID is
13cdr6b.
View the value of the variable by running the following command:
$ echo $OIDC_IDFor example:
13cdr6b
Verification
You can list the possible OIDC configurations available for your clusters that are associated with your user organization. Run the following command:
$ rosa list oidc-configFor example:
ID MANAGED ISSUER URL SECRET ARN 2330dbs0n8m3chkkr25gkkcd8pnj3lk2 true https://dvbwgdztaeq9o.cloudfront.net/2330dbs0n8m3chkkr25gkkcd8pnj3lk2 233hvnrjoqu14jltk6lhbhf2tj11f8un false https://oidc-r7u1.s3.us-east-1.amazonaws.com aws:secretsmanager:us-east-1:242819244:secret:rosa-private-key-oidc-r7u1-tM3MDN
5.4. Creating Operator roles and policies
When you deploy a Red Hat OpenShift Service on AWS cluster, you must create the Operator IAM roles. The cluster Operators use the Operator roles and policies to obtain temporary permissions to perform cluster operations, such as managing storage and external access.
Prerequisites
- You have completed the AWS prerequisites for Red Hat OpenShift Service on AWS.
-
You have installed and configured the latest ROSA command-line interface (CLI) (
rosa) on your installation host. - You created the account-wide AWS roles.
Procedure
To create your Operator roles, run the following command:
$ rosa create operator-roles --hosted-cp --prefix=$PREFIX --oidc-config-id=$OIDC_IDThe Operator roles are now created and ready to use for creating your Red Hat OpenShift Service on AWS cluster.
Verification
You can list the Operator roles associated with your Red Hat OpenShift Service on AWS account. Run the following command:
$ rosa list operator-rolesFor example:
I: Fetching operator roles ROLE PREFIX AMOUNT IN BUNDLE <prefix> 8 ? Would you like to detail a specific prefix Yes ? Operator Role Prefix: <prefix> ROLE NAME ROLE ARN VERSION MANAGED <prefix>-kube-system-capa-controller-manager arn:aws:iam::4540112244:role/<prefix>-kube-system-capa-controller-manager 4.13 No <prefix>-kube-system-control-plane-operator arn:aws:iam::4540112244:role/<prefix>-kube-system-control-plane-operator 4.13 No <prefix>-kube-system-kms-provider arn:aws:iam::4540112244:role/<prefix>-kube-system-kms-provider 4.13 No <prefix>-kube-system-kube-controller-manager arn:aws:iam::4540112244:role/<prefix>-kube-system-kube-controller-manager 4.13 No <prefix>-openshift-cloud-network-config-controller-cloud-credenti arn:aws:iam::4540112244:role/<prefix>-openshift-cloud-network-config-controller-cloud-credenti 4.13 No <prefix>-openshift-cluster-csi-drivers-ebs-cloud-credentials arn:aws:iam::4540112244:role/<prefix>-openshift-cluster-csi-drivers-ebs-cloud-credentials 4.13 No <prefix>-openshift-image-registry-installer-cloud-credentials arn:aws:iam::4540112244:role/<prefix>-openshift-image-registry-installer-cloud-credentials 4.13 No <prefix>-openshift-ingress-operator-cloud-credentials arn:aws:iam::4540112244:role/<prefix>-openshift-ingress-operator-cloud-credentials 4.13 NoAfter the command runs, it displays all the prefixes associated with your AWS account and notes how many roles are associated with this prefix. If you need to see all of these roles and their details, enter "Yes" on the detail prompt to have these roles listed out with specifics.
5.5. Create an AWS KMS encryption key
Using your AWS account and the aws CLI tool, you can create an AWS KMS encryption key to encrypt your resources.
Procedure
Set the AWS region where you installed your VPC by running the following command:
NoteYou should use the same region where you installed your VPC.
$ AWS_REGION=<aws_region>Create a custom AWS customer-managed KMS key by running the following command:
$ KMS_ARN=$(aws kms create-key --region $AWS_REGION --description 'Custom ROSA Encryption Key' --tags TagKey=red-hat,TagValue=true --query KeyMetadata.Arn --output text)This command saves the Amazon Resource Name (ARN) output of this custom key for further steps.
NoteCustomers must provide the
--tags TagKey=red-hat,TagValue=trueargument that is required for a customer KMS key.Verify the KMS key has been created by running the following command:
$ echo $KMS_ARNSet your AWS account ID to an environment variable by running the following command:
$ AWS_ACCOUNT=$(aws sts get-caller-identity --query Account --output text)Create your AWS key policy by running the following command.
NoteIf you use the default prefix, you need to modify the following code sample where you see
{PREFIX}-toManagedOpenShift-.cat << EOF > rosa-key-policy.json { "Version": "2012-10-17", "Id": "key-rosa-policy-1", "Statement": [ { "Sid": "Enable IAM User Permissions", "Effect": "Allow", "Principal": { "AWS": "arn:aws:iam::${AWS_ACCOUNT}:root" }, "Action": "kms:*", "Resource": "*" }, { "Sid": "Allow ROSA use of the key", "Effect": "Allow", "Principal": { "AWS": [ "arn:aws:iam::${AWS_ACCOUNT}:role/${PREFIX}-HCP-ROSA-Support-Role", "arn:aws:iam::${AWS_ACCOUNT}:role/${PREFIX}-HCP-ROSA-Installer-Role", "arn:aws:iam::${AWS_ACCOUNT}:role/${PREFIX}-HCP-ROSA-Worker-Role", "arn:aws:iam::${AWS_ACCOUNT}:role/${PREFIX}-openshift-cluster-csi-drivers-ebs-cloud-credentials", "arn:aws:iam::${AWS_ACCOUNT}:role/${PREFIX}-kube-system-kms-provider" ] }, "Action": [ "kms:Encrypt", "kms:Decrypt", "kms:ReEncrypt*", "kms:GenerateDataKey*", "kms:DescribeKey" ], "Resource": "*" }, { "Sid": "Allow attachment of persistent resources", "Effect": "Allow", "Principal": { "AWS": [ "arn:aws:iam::${AWS_ACCOUNT}:role/${PREFIX}-HCP-ROSA-Support-Role", "arn:aws:iam::${AWS_ACCOUNT}:role/${PREFIX}-HCP-ROSA-Installer-Role", "arn:aws:iam::${AWS_ACCOUNT}:role/${PREFIX}-HCP-ROSA-Worker-Role", "arn:aws:iam::${AWS_ACCOUNT}:role/${PREFIX}-openshift-cluster-csi-drivers-ebs-cloud-credentials" ] }, "Action": [ "kms:CreateGrant", "kms:ListGrants", "kms:RevokeGrant" ], "Resource": "*", "Condition": { "Bool": { "kms:GrantIsForAWSResource": "true" } } } ] } EOFConfirm the details of the policy file created by running the following command:
$ cat rosa-key-policy.jsonApply the newly generated key policy to the custom KMS key by running the following command:
aws kms put-key-policy --key-id $KMS_ARN --policy file://rosa-key-policy.json --policy-name defaultYou can now create your cluster using this AWS KMS encryption key.
5.6. Creating a Red Hat OpenShift Service on AWS cluster using FIPS encryption
You can create a Red Hat OpenShift Service on AWS cluster with Federal Information Processing Standards (FIPS) encryption and a customer-provided KMS key for node root volumes, the etcd database, or both. A different KMS key ARN can be provided for each option.
Red Hat OpenShift Service on AWS does not automatically configure the default storage class to encrypt persistent volumes with the customer-provided KMS key. You can configure this in-cluster after installation.
Procedure
Verify the KMS key has been created by running the following command:
$ echo $KMS_ARNConfirm the details of the policy file created by running the following command:
$ cat rosa-key-policy.jsonCreate the cluster by running the following command:
NoteIf your cluster name is longer than 15 characters, it will contain an autogenerated domain prefix as a sub-domain for your provisioned cluster on
*.openshiftapps.com.To customize the subdomain, use the
--domain-prefixflag. The domain prefix cannot be longer than 15 characters, must be unique, and cannot be changed after cluster creation.$ rosa create cluster \ --cluster-name ${PREFIX}-test \ --hosted-cp \ --machine-cidr 10.0.0.0/16 \ --oidc-config-id $OIDC_CONFIG \ --mode auto \ --region $AWS_REGION \ --replicas 2 \ --operator-roles-prefix $PREFIX \ --installer-role-arn "arn:aws:iam::${AWS_ACCOUNT}:role/${PREFIX}-HCP-ROSA-Installer-Role" \ --support-role-arn "arn:aws:iam::${AWS_ACCOUNT}:role/${PREFIX}-HCP-ROSA-Support-Role" \ --worker-iam-role-arn "arn:aws:iam::${AWS_ACCOUNT}:role/${PREFIX}-HCP-ROSA-Worker-Role" \ --subnet-ids <subnet-ids> \ --etcd-encryption \ --etcd-encryption-kms-arn $KMS_ARN \ --fipswhere:
--subnet-ids- These subnet IDs should be at least one private subnet ID and public subnet ID.
--kms-key-arn- This KMS key ARN is used to encrypt all worker node root volumes. It is not required if only etcd database encryption is needed.
--etcd-encryption-kms-arn- This KMS key ARN is used to encrypt the etcd database. The etcd database is always encrypted by default with an AES cipher block, but can be encrypted instead with a KMS key. It is not required if only node root volume encryption is needed.
Verification
- Log in to your cluster as an admin user.
Set the node name as a variable by running the following command:
$ NODE=$(oc get nodes --no-headers | awk '$2=="Ready"{print $1; exit}')Check your cluster’s FIPS status by running the following command:
$ oc debug node/${NODE} --to-namespace=default -- chroot /host bash -c 'set -x; \ fips-mode-setup --check; \ update-crypto-policies --show; \ cat /etc/system-fips; \ cat /proc/sys/crypto/fips_enabled; \ sysctl crypto.fips_enabled'Example output
Starting pod/ip-10-0-1-162us-east-2computeinternal-debug-86cnb ... To use host binaries, run `chroot /host` + fips-mode-setup --check FIPS mode is enabled. + update-crypto-policies --show FIPS + cat /etc/system-fips # FIPS module installation complete + cat /proc/sys/crypto/fips_enabled 1 + sysctl crypto.fips_enabled crypto.fips_enabled = 1 Removing debug pod ...
Chapter 6. Configuring a shared VPC for Red Hat OpenShift Service on AWS clusters
You can use a shared virtual private cloud (VPC) to centralize network management in a single AWS account while allowing separate AWS accounts to create Red Hat OpenShift Service on AWS clusters in that VPC.
Installing a new Red Hat OpenShift Service on AWS cluster into a VPC that was automatically created by the installer for a different cluster is not supported.
- This process requires two separate AWS accounts that belong to the same AWS organization. One account functions as the VPC-owning AWS account (VPC Owner), while the other account creates the cluster in the cluster-creating AWS account (Cluster Creator).
- Installing a cluster in a shared VPC is supported only for OpenShift 4.17.9 and later.
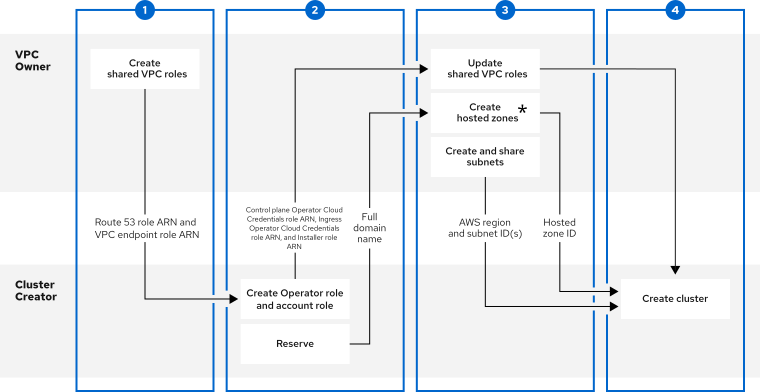
* The hosted zones can be created in either the centrally-managed VPC account or in the workload account in which the cluster is deployed.
Only certain cluster-to-VPC relationships are supported. Multiple Red Hat OpenShift Service on AWS clusters in a single VPC are not supported.
6.1. Prerequisites for the VPC Owner
- You have an AWS account with the proper permissions to create roles and share resources.
- You enabled resource sharing from the management account for your organization.
- You have access to an AWS entrypoint such as the AWS console or the AWS command-line interface (CLI).
6.2. Prerequisites for the Cluster Creator
-
You installed the ROSA command-line interface (CLI) (
rosa) 1.2.49 or later. - You created all of the required account roles for creating a cluster.
- The Cluster Creator’s AWS account is separate from the VPC Owner’s AWS account.
6.3. Step One - VPC Owner: Configuring a VPC to share within your AWS organization
You can share subnets within a VPC with another AWS account in your AWS organization.

Procedure
- Create or modify a VPC to your specifications in the VPC section of the AWS console. Ensure you have selected the correct region.
Create the
Route 53 role.NoteYou must create the
Route 53 rolein the same account where you plan to create the Amazon Route 53 hosted zones (which are created in Step 3). For example, if you want to create the hosted zones in the centrally-managed VPC account, you must create theRoute 53 rolein the VPC Owner account. If you want to create the hosted zones in the workload account, you must create theRoute 53 rolein the Cluster Creator account.Create a custom trust policy file that grants permission to assume roles:
$ cat <<EOF > /tmp/route53-role.json { "Version": "2012-10-17", "Statement": [ { "Effect": "Allow", "Principal": { "AWS": "arn:aws:iam::<Account-ID>:root" }, "Action": "sts:AssumeRole" } ] } EOFThe trust policy principals (
Principal.AWS) may be scoped down to the ingress Operator role and installer account role rather thanroot.Create the IAM role for the AWS managed policy
ROSASharedVPCRoute53Policy.$ aws iam create-role --role-name <role_name> \ --assume-role-policy-document file:///tmp/route53-role.jsonAttach the AWS managed policy
ROSASharedVPCRoute53Policyto allow for necessary shared VPC permissions.$ aws iam attach-role-policy --role-name <role_name> \ --policy-arn arn:aws:iam::aws:policy/ROSASharedVPCRoute53Policy
Create the
VPC endpoint role.Create a custom trust policy file that grants permission to assume roles:
$ cat <<EOF > /tmp/shared-vpc-role.json { "Version": "2012-10-17", "Statement": [ { "Effect": "Allow", "Principal": { "AWS": "arn:aws:iam::<Account-ID>:root" }, "Action": "sts:AssumeRole" } ] } EOFThe trust policy principals (
Principal.AWS) may be scoped down to the ingress Operator role and installer account role rather thanroot.Create the IAM role for the AWS managed policy
ROSASharedVPCEndpointPolicy:$ aws iam create-role --role-name <role_name> \ --assume-role-policy-document file:///tmp/vpce-role.jsonAttach the AWS managed policy
ROSASharedVPCEndpointPolicyto allow for necessary shared VPC permissions.$ aws iam attach-role-policy --role-name <role_name> \ --policy-arn arn:aws:iam::aws:policy/ROSASharedVPCEndpointPolicy
-
Provide the
Route 53 roleARN and theVPC endpoint roleARN to the Cluster Creator to continue configuration.
6.4. Step Two - Cluster Creator: Reserving your DNS entries and creating cluster Operator roles
After the VPC Owner creates a VPC, subnets, and an IAM role, reserve an openshiftapps.com DNS domain and create Operator roles.
For shared VPC clusters, you can choose to create the Operator roles after the cluster creation steps. The cluster is in a waiting state until the Ingress Operator role ARN is added to the shared VPC role trusted relationships.
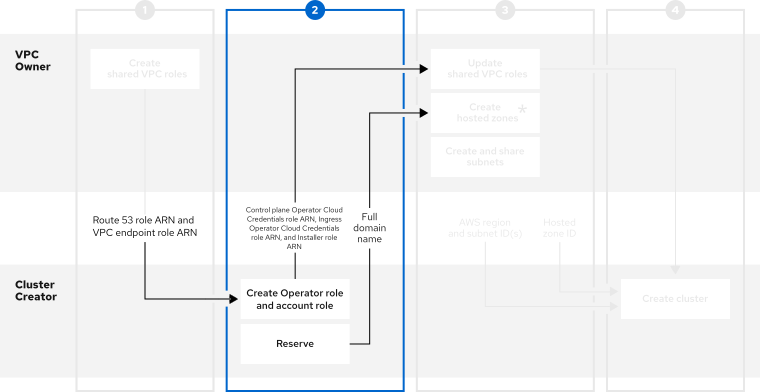
Prerequisites
-
You have the
Route 53 roleARN for the IAM role from the VPC Owner. -
You have the
VPC endpoint roleARN for the IAM role from the VPC Owner.
Procedure
Reserve an
openshiftapps.comDNS domain with the following command:$ rosa create dns-domain --hosted-cpThe command creates a reserved
openshiftapps.comDNS domain.I: DNS domain '14eo.p3.openshiftapps.com' has been created. I: To view all DNS domains, run 'rosa list dns-domains'Create an OIDC configuration.
Review this article for more information on the OIDC configuration process. The following command produces the OIDC configuration ID that you need:
$ rosa create oidc-configYou receive confirmation that the command created an OIDC configuration:
I: To create Operator Roles for this OIDC Configuration, run the following command and remember to replace <user-defined> with a prefix of your choice: rosa create operator-roles --prefix <user-defined> --oidc-config-id 25tu67hq45rto1am3slpf5lq6jarggCreate the account roles by entering the following command:
$ rosa create account-roles \ --route53-role-arn <Created_Route_53_Role_Arn> \ --vpc-endpoint-role-arn <Created_VPC_Endpoint_Role_Arn> \ --prefix <user_defined_account_role_prefix> \ --hosted-cpwhere:
<Created_Route_53_Role_Arn>- Provide the ARN for the Route 53 role that the VPC Owner created.
<Created_VPC_Endpoint_Role_Arn>- Provide the ARN for the VPC endpoint role that the VPC Owner created.
<user_defined_account_role_prefix>- Provide a prefix for the Operator roles.
Create the Operator roles by entering the following command:
$ rosa create operator-roles --oidc-config-id <oidc-config-ID> \ --installer-role-arn <Installer_Role> \ --route53-role-arn <Created_Route_53_Role_Arn> \ --vpc-endpoint-role-arn <Created_VPC_Endpoint_Role_Arn> \ --prefix <operator-prefix> \ --hosted-cpwhere:
<oidc-config-ID>- Provide the OIDC configuration ID that you created in the previous step.
<Installer_Role>-
Provide your installer ARN that was created as part of the
rosa create account-rolesprocess. <Created_Route_53_Role_Arn>- Provide the ARN for the Route 53 role that the VPC Owner created.
<Created_VPC_Endpoint_Role_Arn>- Provide the ARN for the VPC endpoint role that the VPC Owner created.
<operator-prefix>- Provide a prefix for the Operator roles.
NoteThe Installer account role and the shared VPC roles must have a one-to-one relationship. If you want to create multiple shared VPC roles, you should create one set of account roles per shared VPC role.
After creating the Operator roles, share the Ingress Operator Cloud Credentials, Installer, and Control plane Operator Cloud Credentials role ARNs with the VPC Owner.
The shared information resembles these examples:
-
my-rosa-cluster.14eo.p1.openshiftapps.com -
arn:aws:iam::111122223333:role/ManagedOpenShift-Installer-Role -
arn:aws:iam::111122223333:role/my-rosa-cluster-openshift-ingress-operator-cloud-credentials -
arn:aws:iam::111122223333:role/my-rosa-cluster-control-plane-operator
-
6.5. Step Three - VPC Owner: Updating the shared VPC role and creating hosted zones
After the Cluster Creator provides the DNS domain and IAM roles, create two hosted zones and update the trust policy on the shared VPC IAM roles.
The hosted zones can be created in either the centrally-managed VPC account or in the workload account.
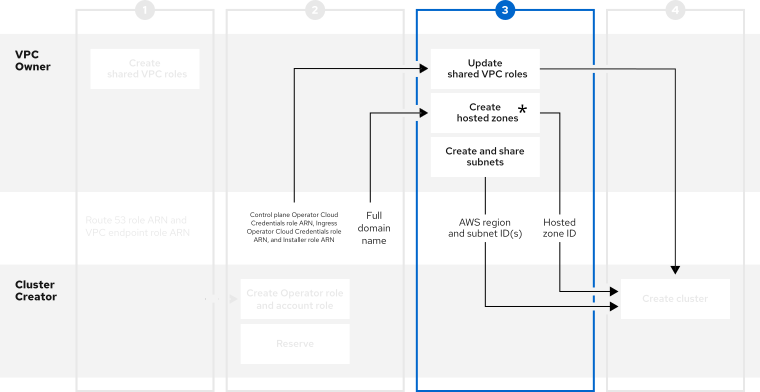
* The hosted zones can be created in either the centrally-managed VPC account or in the workload account in which the cluster is deployed.
Prerequisites
- You have the full domain name from the Cluster Creator.
- You have the Ingress Operator Cloud Credentials role’s ARN from the Cluster Creator.
- You have the Installer role’s ARN from the Cluster Creator.
- You have the Control plane Operator Cloud Credentials role’s ARN from the Cluster Creator.
If your cluster name is longer than 15 characters, it will contain an autogenerated domain prefix as a sub-domain for your provisioned cluster on *.openshiftapps.com.
To customize the subdomain, use the --domain-prefix flag. The domain prefix cannot be longer than 15 characters, must be unique, and cannot be changed after cluster creation.
Procedure
- In the Resource Access Manager of the AWS console, create a resource share that shares the previously created VPC’s public and private subnets with the Cluster Creator’s AWS account ID.
Update the
Route 53 roleand add the Installer and Ingress Operator Cloud Credentials roles to the principal section of the trust policy.{ "Version": "2012-10-17", "Statement": [ { "Sid": "Statement1", "Effect": "Allow", "Principal": { "AWS": [ "arn:aws:iam::<Cluster-Creator's-AWS-Account-ID>:role/<prefix>-ingress-operator-cloud-credentials", "arn:aws:iam::<Cluster-Creator's-AWS-Account-ID>:role/<prefix>-hcp-Installer-Role", "arn:aws:iam::<Cluster-Creator's-AWS-Account-ID>:role/<prefix>-control-plane-operator" ] }, "Action": "sts:AssumeRole" } ] }Update the
VPC endpoint roleand add the Installer and Ingress Operator Cloud Credentials roles to the principal section of the trust policy.{ "Version": "2012-10-17", "Statement": [ { "Sid": "Statement1", "Effect": "Allow", "Principal": { "AWS": [ "arn:aws:iam::<Cluster-Creator's-AWS-Account-ID>:role/<prefix>-hcp-Installer-Role", "arn:aws:iam::<Cluster-Creator's-AWS-Account-ID>:role/<prefix>-control-plane-operator" ] }, "Action": "sts:AssumeRole" } ] }-
Create a private hosted zone in the Route 53 section of the AWS console. In the hosted zone configuration, the domain name is
rosa.<cluster-name>.<base-domain>. The private hosted zone must be associated with the network owner’s VPC. -
Create a local hosted zone in the Route 53 section of the AWS console. In the hosted zone configuration, the domain name is
<cluster-name>.hypershift.local. The local hosted zone must be associated with the network owner’s VPC. After the hosted zones are created and associated with the network owner’s VPC, provide the following to the Cluster Creator to continue configuration:
- Hosted zone IDs
- AWS region
- Subnet IDs
6.6. Step Four - Cluster Creator: Creating your cluster in a shared VPC
You can create a Red Hat OpenShift Service on AWS cluster in a shared VPC by using the ROSA command-line interface (CLI) (rosa).
Installing a cluster in a shared VPC is supported only for OpenShift 4.17.9 and later.

Prerequisites
- You have the hosted zone IDs from the VPC Owner.
- You have the AWS region from the VPC Owner.
- You have the subnet IDs from the VPC Owner.
-
You have the
Route 53 roleARN from the VPC Owner. -
You have the
VPC endpoint roleARN from the VPC Owner.
Procedure
In a terminal, enter the following command to create the shared VPC:
$ rosa create cluster --cluster-name <cluster_name> --sts --operator-roles-prefix <prefix> --oidc-config-id <oidc_config_id> --region us-east-1 --subnet-ids <subnet_ids> --hcp-internal-communication-hosted-zone-id <local_hosted_zone_ID> --ingress-private-hosted-zone-id <private_hosted_zone_ID> --route53-role-arn <route_53_role_arn> vpc-endpoint-role-arn <vpc_endpoint_role_arn> --base-domain <dns-domain> --additional-allowed-principals <route53-role-arn>,<vpc-endpoint-role-arn> --hosted-cp
Chapter 7. Creating a private cluster on Red Hat OpenShift Service on AWS
For Red Hat OpenShift Service on AWS workloads that do not require public internet access, you can create a private cluster.
7.1. Creating a private Red Hat OpenShift Service on AWS cluster using the ROSA CLI
You can create a private cluster with multiple availability zones (Multi-AZ) on Red Hat OpenShift Service on AWS using the ROSA command-line interface (CLI), rosa.
Creating a cluster with hosted control planes can take around 10 minutes.
Prerequisites
- You have available AWS service quotas.
- You have enabled the Red Hat OpenShift Service on AWS in the AWS Console.
- You have installed and configured the latest version of the ROSA CLI on your installation host.
Procedure
Create a VPC with at least one private subnet. Ensure that your machine’s classless inter-domain routing (CIDR) matches your virtual private cloud’s CIDR. For more information, see Requirements for using your VPC and VPC validation.
ImportantIf you use a firewall, you must configure it so that ROSA can access the sites that required to function.
For more information, see the "AWS PrivateLink firewall prerequisites" section.
Create the account-wide IAM roles by running the following command:
$ rosa create account-roles --hosted-cpCreate the OIDC configuration by running the following command:
$ rosa create oidc-config --mode=auto --yesSave the OIDC configuration ID because you need it to create the Operator roles.
Example output
I: Setting up managed OIDC configuration I: To create Operator Roles for this OIDC Configuration, run the following command and remember to replace <user-defined> with a prefix of your choice: rosa create operator-roles --prefix <user-defined> --oidc-config-id 28s4avcdt2l318r1jbk3ifmimkurk384 If you are going to create a Hosted Control Plane cluster please include '--hosted-cp' I: Creating OIDC provider using 'arn:aws:iam::46545644412:user/user' I: Created OIDC provider with ARN 'arn:aws:iam::46545644412:oidc-provider/oidc.op1.openshiftapps.com/28s4avcdt2l318r1jbk3ifmimkurk384'Create the Operator roles by running the following command:
$ rosa create operator-roles --hosted-cp --prefix <operator_roles_prefix> --oidc-config-id <oidc_config_id> --installer-role-arn arn:aws:iam::$<account_roles_prefix>:role/$<account_roles_prefix>-HCP-ROSA-Installer-RoleCreate a private Red Hat OpenShift Service on AWS cluster by running the following command:
$ rosa create cluster --private --cluster-name=<cluster-name> --sts --mode=auto --hosted-cp --operator-roles-prefix <operator_role_prefix> --oidc-config-id <oidc_config_id> [--machine-cidr=<VPC CIDR>/16] --subnet-ids=<private-subnet-id1>[,<private-subnet-id2>,<private-subnet-id3>]Enter the following command to check the status of your cluster. During cluster creation, the
Statefield transitions frompendingtoinstalling, and finally, toready.$ rosa describe cluster --cluster=<cluster_name>NoteIf installation fails or the
Statefield does not change toreadyafter 10 minutes, see the "Troubleshooting Red Hat OpenShift Service on AWS installations" documentation in the Additional resources section.Enter the following command to follow the OpenShift installer logs to track the progress of your cluster:
$ rosa logs install --cluster=<cluster_name> --watch
7.2. Adding additional AWS security groups to the AWS PrivateLink endpoint
The AWS PrivateLink endpoint in the host VPC has a default security group that restricts access to the cluster’s Machine CIDR range. To grant API access from outside the VPC, you must create and attach an additional security group to the PrivateLink endpoint.
Adding additional AWS security groups to the AWS PrivateLink endpoint is only supported on Red Hat OpenShift Service on AWS version 4.17.2 and later.
Prerequisites
- Your corporate network or other VPC has connectivity.
- You have permission to create and attach security groups within the VPC.
Procedure
Set your cluster name as an environmental variable by running the following command:
$ export CLUSTER_NAME=<cluster_name>Verify that the variable exists by running the following command:
$ echo $CLUSTER_NAMEExample output
hcp-privateFind the VPC endpoint (VPCE) ID and VPC ID by running the following command:
$ read -r VPCE_ID VPC_ID <<< $(aws ec2 describe-vpc-endpoints --filters "Name=tag:api.openshift.com/id,Values=$(rosa describe cluster -c ${CLUSTER_NAME} -o yaml | grep '^id: ' | cut -d' ' -f2)" --query 'VpcEndpoints[].[VpcEndpointId,VpcId]' --output text)WarningModifying or removing the default AWS PrivateLink endpoint security group is not supported and might result in unexpected behavior.
Create an additional security group by running the following command:
$ export SG_ID=$(aws ec2 create-security-group --description "Granting API access to ${CLUSTER_NAME} from outside of VPC" --group-name "${CLUSTER_NAME}-api-sg" --vpc-id $VPC_ID --output text)Add an inbound (ingress) rule to the security group by running the following command:
$ aws ec2 authorize-security-group-ingress --group-id $SG_ID --ip-permissions FromPort=443,ToPort=443,IpProtocol=tcp,IpRanges=[{CidrIp=<cidr-to-allow>}]Add the new security group to the VPCE by running the following command:
$ aws ec2 modify-vpc-endpoint --vpc-endpoint-id $VPCE_ID --add-security-group-ids $SG_IDYou can now access the API of your Red Hat OpenShift Service on AWS private cluster from the specified CIDR block.
7.3. Additional principals on your Red Hat OpenShift Service on AWS cluster
You can allow AWS Identity and Access Management (IAM) roles as additional principals to connect to your cluster’s private API server endpoint.
You can access your Red Hat OpenShift Service on AWS cluster’s API server endpoint from the public internet or the VPC private subnet interface endpoint. By default, you can privately access your Red Hat OpenShift Service on AWS API Server by using the -kube-system-kube-controller-manager Operator role. To access the Red Hat OpenShift Service on AWS API server from another account without using the primary account, include cross-account IAM roles as additional principals. This feature simplifies your network architecture and reduces data transfer costs. You can avoid peering or attaching cross-account VPCs to the cluster’s VPC.
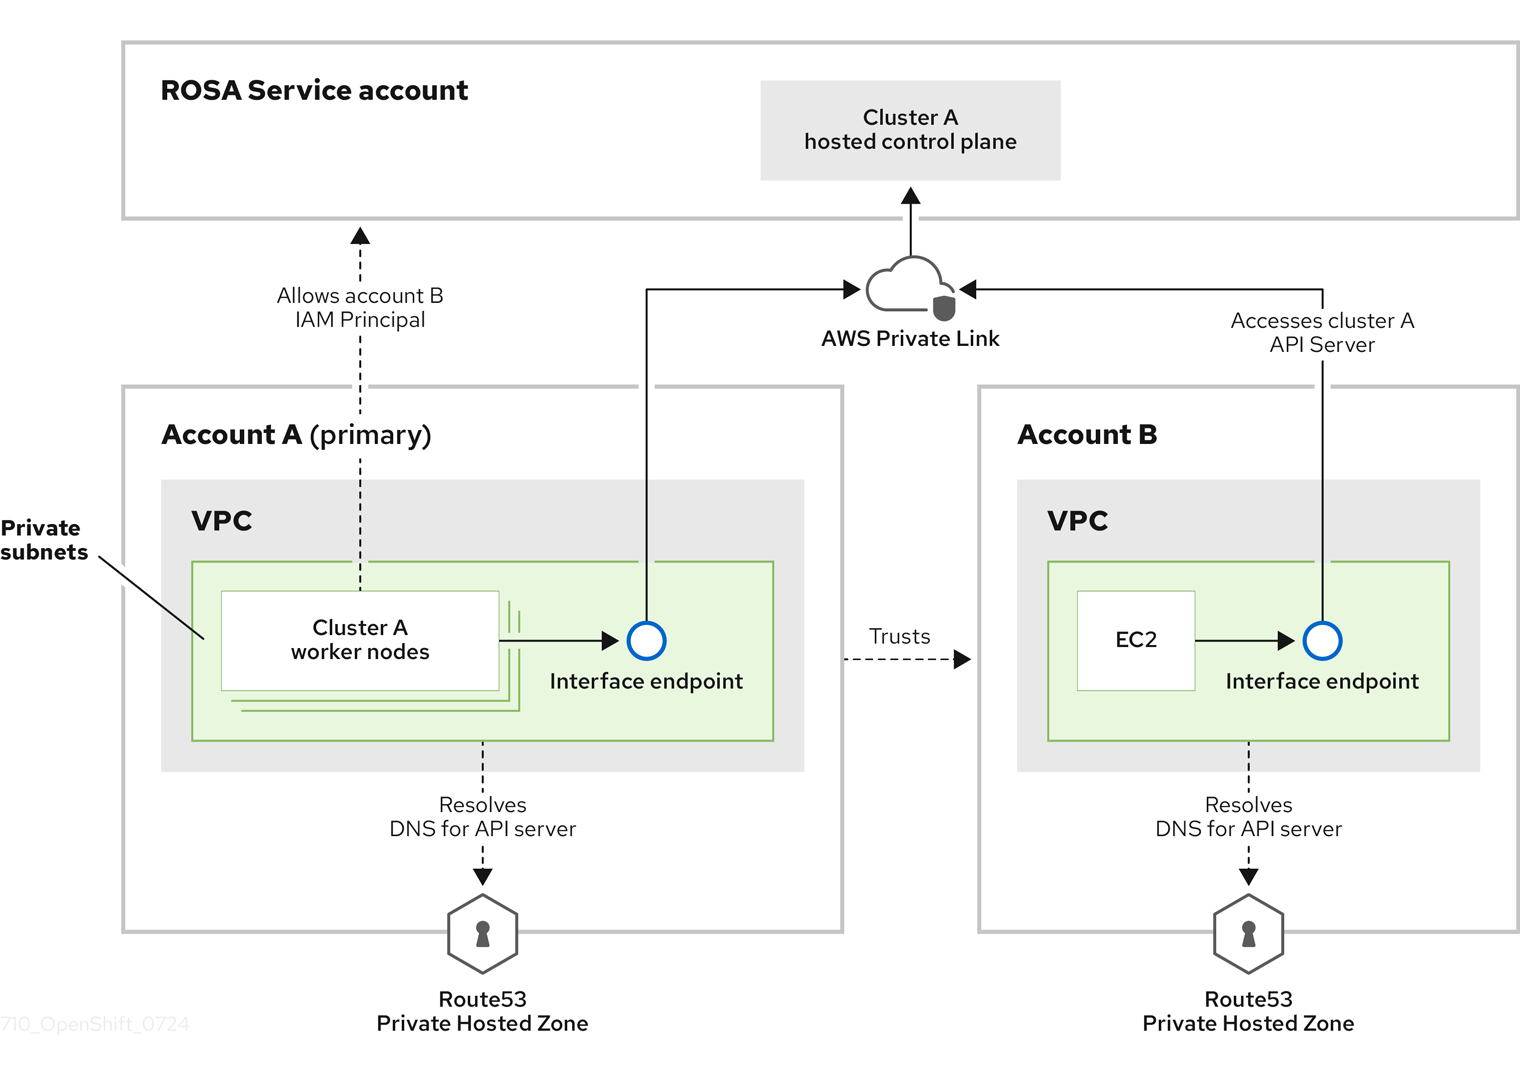
In this diagram, the cluster creating account is designated as Account A. This account designates that another account, Account B, should have access to the API server.
After configuring additional allowed principals, create an interface VPC endpoint in the VPC that accesses the cross-account Red Hat OpenShift Service on AWS API server. Then, create a private hosted zone in Route53. Configure the hosted zone to route calls to the cross-account Red Hat OpenShift Service on AWS API server through the VPC endpoint.
7.3.1. Adding additional principals while creating your Red Hat OpenShift Service on AWS cluster
By default, only the IAM role that created the cluster can access the cluster’s API. If other IAM roles in your AWS account need access to the cluster API, you can grant them access by specifying additional allowed principals during cluster creation.
Procedure
Add the
--additional-allowed-principalsargument to therosa create clustercommand, similar to the following:$ rosa create cluster [...] --additional-allowed-principals <arn_string>You can use
arn:aws:iam::account_id:role/role_nameto approve a specific role.When the cluster creation command runs, you receive a summary of your cluster with the
--additional-allowed-principalsspecified:Example output
Name: mycluster Domain Prefix: mycluster Display Name: mycluster ID: <cluster-id> External ID: <cluster-id> Control Plane: ROSA Service Hosted OpenShift Version: 4.15.17 Channel Group: stable DNS: Not ready AWS Account: <aws_id> AWS Billing Account: <aws_id> API URL: Console URL: Region: us-east-2 Availability: - Control Plane: MultiAZ - Data Plane: SingleAZ Nodes: - Compute (desired): 2 - Compute (current): 0 Network: - Type: OVNKubernetes - Service CIDR: 172.30.0.0/16 - Machine CIDR: 10.0.0.0/16 - Pod CIDR: 10.128.0.0/14 - Host Prefix: /23 - Subnets: subnet-453e99d40, subnet-666847ce827 EC2 Metadata Http Tokens: optional Role (STS) ARN: arn:aws:iam::<aws_id>:role/mycluster-HCP-ROSA-Installer-Role Support Role ARN: arn:aws:iam::<aws_id>:role/mycluster-HCP-ROSA-Support-Role Instance IAM Roles: - Worker: arn:aws:iam::<aws_id>:role/mycluster-HCP-ROSA-Worker-Role Operator IAM Roles: - arn:aws:iam::<aws_id>:role/mycluster-kube-system-control-plane-operator - arn:aws:iam::<aws_id>:role/mycluster-openshift-cloud-network-config-controller-cloud-creden - arn:aws:iam::<aws_id>:role/mycluster-openshift-image-registry-installer-cloud-credentials - arn:aws:iam::<aws_id>:role/mycluster-openshift-ingress-operator-cloud-credentials - arn:aws:iam::<aws_id>:role/mycluster-openshift-cluster-csi-drivers-ebs-cloud-credentials - arn:aws:iam::<aws_id>:role/mycluster-kube-system-kms-provider - arn:aws:iam::<aws_id>:role/mycluster-kube-system-kube-controller-manager - arn:aws:iam::<aws_id>:role/mycluster-kube-system-capa-controller-manager Managed Policies: Yes State: waiting (Waiting for user action) Private: No Delete Protection: Disabled Created: Jun 25 2024 13:36:37 UTC User Workload Monitoring: Enabled Details Page: https://console.redhat.com/openshift/details/s/Bvbok4O79q1Vg8 OIDC Endpoint URL: https://oidc.op1.openshiftapps.com/vhufi5lap6vbl3jlq20e (Managed) Audit Log Forwarding: Disabled External Authentication: Disabled Additional Principals: arn:aws:iam::<aws_id>:role/additional-user-role
7.3.2. Adding additional principals to your existing Red Hat OpenShift Service on AWS cluster
If you did not specify additional allowed principals when you created your cluster, or if your access requirements have changed, you can add additional principals to an existing cluster by using the ROSA command-line interface (CLI) (rosa).
Procedure
Run the following command to edit your cluster and add an additional principal who can access this cluster’s endpoint:
$ rosa edit cluster -c <cluster_name> --additional-allowed-principals <arn_string>You can use
arn:aws:iam::account_id:role/role_nameto approve a specific role.
Next steps
- Configure an identity provider.
Chapter 8. Creating Red Hat OpenShift Service on AWS clusters with egress zero
You can create a Red Hat OpenShift Service on AWS cluster with egress zero to pull Red Hat container images from a regional Amazon Elastic Container Registry (ECR) instead of from the public internet. This enhances cluster stability and security.
Your cluster first tries to pull the images from Quay, and when they are not reached, it instead pulls the images from the image registry in the local region.
Clusters with egress zero pull Red Hat container images from an ECR in the cluster’s local region instead of from registries on the public internet. ECR provides storage for OpenShift release images as well as Red Hat Operators. All requests for ECR are kept within your AWS network by serving them over a VPC endpoint within your cluster.
Red Hat OpenShift Service on AWS clusters with egress zero use AWS ECR to provision your clusters without the need for public internet. Because necessary cluster lifecycle processes occur over AWS private networking, AWS ECR serves as a critical service for core cluster platform images.
You can create a fully operational cluster that does not require a public egress by configuring a virtual private cloud (VPC) and using the --properties zero_egress:true flag when creating your cluster.
Clusters created in restricted network environments cannot use certain Red Hat OpenShift Service on AWS features, such as Red Hat Lightspeed and Telemetry, and might experience failures for workloads that require public access to registries such as quay.io. With egress zero, you can install Red Hat-owned Operators from the software catalog, but only the default Operator channel is mirrored. For a complete list of Red Hat-owned Operators, see the Red Hat Ecosystem Catalog.
8.1. Prerequisites
- You have an AWS account with sufficient permissions to create VPCs, subnets, and other required infrastructure.
- You have installed the Terraform v1.4.0+ CLI.
-
You have installed the ROSA command-line interface (CLI) (
rosa) v1.2.45+. - You have installed and configured the AWS CLI with the necessary credentials.
- You have installed the git CLI.
- You have enabled the necessary ROSA CLI and Red Hat Hybrid Cloud Console firewall rules.
- You can use egress zero on all supported Red Hat OpenShift Service on AWS versions. Red Hat recommends using the latest available z-stream release for each OpenShift Container Platform version.
- Due to an upstream issue with the internal image registry in disconnected environments, clusters with egress zero cannot fully use all platform components. You can restore these features by upgrading or installing your cluster with the latest OpenShift Container Platform version.
8.2. Glossary of network environment terms
The Red Hat OpenShift Service on AWS documentation uses several terms to describe network environments with limited or no internet connectivity. These environments differ from a standard network and might require additional configuration.
The following table describes the different terms used to refer to environments without a full internet connection:
| Term | Description |
|---|---|
| Air-gapped network | An environment or network that is completely isolated from an external network. This isolation depends on a physical separation, or an "air gap", between machines on the internal network and any part of an external network. Air-gapped environments are often used in industries with strict security or regulatory requirements. |
| Disconnected environment | An environment or network that has some level of isolation from an external network. This isolation could be enabled by physical or logical separation between machines on the internal network and an external network. A cluster in a disconnected environment does not have access to Red Hat public services and requires additional setup to maintain full cluster functionality. |
| Restricted network | An environment or network with limited connection to an external network. A physical connection might exist between machines on the internal network and an external network, but network traffic is limited by additional configurations, such as firewalls and proxies. |
8.3. Setting environment variables for cluster creation
You can set environment variables to streamline resource creation for your Red Hat OpenShift Service on AWS cluster.
Procedure
Set your environment variable by running the following command:
$ export <variable_name>=<variable_value>You can confirm that your variable has been set by running the following command:
$ echo <variable_name>Expand Table 8.2. Suggested variables for disconnected Red Hat OpenShift Service on AWS clusters Variable name Variable value Notes AWS_ACCOUNT_ID$(aws sts get-caller-identity --query Account --output text)You must be logged in to your AWS account with
rosa login.CLUSTER_NAMEThe name you want for your cluster.
Your cluster name cannot exceed 26 characters.
OIDC_IDThe 32-digit ID for your OpenID Connect (OIDC) configuration.
You generate this ID by running
rosa create oidc-config.OPERATOR_ROLES_PREFIXThe Operator role prefix.
If you want to make your AWS account roles use the same prefix as your Operator roles, you can run
ACCOUNT_ROLES_PREFIX=$OPERATOR_ROLES_PREFIXafter setting your Operator role prefix variable.PRIVATE_SUBNETThe ID of your private subnets.
You must enclose this value in quotation marks (") and separate the subnet IDs with commas.
REGIONYour AWS region.
-
SUBNET_IDSThe IDs of all your subnets.
You must enclose this value in quotation marks (") and separate the subnet IDs with commas.
8.3.1. Creating a Virtual Private Cloud for your Red Hat OpenShift Service on AWS clusters
You must have a Virtual Private Cloud (VPC) to create a Red Hat OpenShift Service on AWS cluster. To pull images from the local ECR mirror over your VPC endpoint, you must configure a privatelink service connection and modify the default security groups with specific tags.
You can create a VPC by using one of these methods:
- Create a VPC by using the ROSA command-line interface (CLI)
- Create a VPC by using a Terraform template
- Create a VPC by using the AWS CLI
- Create the VPC resources manually in the AWS console
8.3.2. Creating an AWS VPC using the ROSA CLI
The rosa create network command is available in v.1.2.48 or later of the ROSA CLI. The command uses AWS CloudFormation to create a VPC and associated networking components necessary to install a Red Hat OpenShift Service on AWS cluster. CloudFormation is a native AWS infrastructure-as-code tool and is compatible with the AWS CLI.
If you do not specify a template, CloudFormation uses a default template that creates resources with the following parameters:
| VPC parameter | Value |
|---|---|
| Availability zones | 1 |
| Region |
|
| VPC CIDR |
|
You can create and customize CloudFormation templates to use with the rosa create network command. See the additional resources of this section for information on the default VPC template.
Prerequisites
- You have configured your AWS account
- You have configured your Red Hat accounts
- You have installed the ROSA CLI and configured it to the latest version
Procedure
Create an AWS VPC using the default CloudFormations template by running the following command:
$ rosa create networkOptional: Customize your VPC by specifying additional parameters.
You can use the
--paramflag to specify changes to the default VPC template. The following example command specifies custom values forregion,Name,AvailabilityZoneCountandVpcCidr.$ rosa create network --param Region=us-east-2 --param Name=quickstart-stack --param AvailabilityZoneCount=3 --param VpcCidr=10.0.0.0/16The command takes about 5 minutes to run and provides regular status updates from AWS as resources are created. If there is an issue with CloudFormation, a rollback is attempted. For all other errors that are encountered, please follow the error message instructions or contact AWS support.
Verification
When completed, you receive a summary of the created resources:
INFO[0140] Resources created in stack: INFO[0140] Resource: AttachGateway, Type: AWS::EC2::VPCGatewayAttachment, ID: <gateway_id> INFO[0140] Resource: EC2VPCEndpoint, Type: AWS::EC2::VPCEndpoint, ID: <vpce_id> INFO[0140] Resource: EcrApiVPCEndpoint, Type: AWS::EC2::VPCEndpoint, ID: <vpce_id> INFO[0140] Resource: EcrDkrVPCEndpoint, Type: AWS::EC2::VPCEndpoint, ID: <vpce_id> INFO[0140] Resource: ElasticIP1, Type: AWS::EC2::EIP, ID: <IP> INFO[0140] Resource: ElasticIP2, Type: AWS::EC2::EIP, ID: <IP> INFO[0140] Resource: InternetGateway, Type: AWS::EC2::InternetGateway, ID: igw-016e1a71b9812464e INFO[0140] Resource: KMSVPCEndpoint, Type: AWS::EC2::VPCEndpoint, ID: <vpce_id> INFO[0140] Resource: NATGateway1, Type: AWS::EC2::NatGateway, ID: <nat-gateway_id> INFO[0140] Resource: PrivateRoute, Type: AWS::EC2::Route, ID: <route_id> INFO[0140] Resource: PrivateRouteTable, Type: AWS::EC2::RouteTable, ID: <route_id> INFO[0140] Resource: PrivateSubnetRouteTableAssociation1, Type: AWS::EC2::SubnetRouteTableAssociation, ID: <route_id> INFO[0140] Resource: PublicRoute, Type: AWS::EC2::Route, ID: <route_id> INFO[0140] Resource: PublicRouteTable, Type: AWS::EC2::RouteTable, ID: <route_id> INFO[0140] Resource: PublicSubnetRouteTableAssociation1, Type: AWS::EC2::SubnetRouteTableAssociation, ID: <route_id> INFO[0140] Resource: S3VPCEndpoint, Type: AWS::EC2::VPCEndpoint, ID: <vpce_id> INFO[0140] Resource: STSVPCEndpoint, Type: AWS::EC2::VPCEndpoint, ID: <vpce_id> INFO[0140] Resource: SecurityGroup, Type: AWS::EC2::SecurityGroup, ID: <security-group_id> INFO[0140] Resource: SubnetPrivate1, Type: AWS::EC2::Subnet, ID: <private_subnet_id-1> INFO[0140] Resource: SubnetPublic1, Type: AWS::EC2::Subnet, ID: <public_subnet_id-1> INFO[0140] Resource: VPC, Type: AWS::EC2::VPC, ID: <vpc_id> INFO[0140] Stack rosa-network-stack-5555 created-
The
<private_subnet_id-1>and<public_subnet_id-1>subnet IDs are used to create your cluster when using therosa create clustercommand. -
The network stack name (
rosa-network-stack-5555) is used to delete the resource later.
-
The
8.3.2.1. Tagging your subnets
Before you can use your VPC to create a Red Hat OpenShift Service on AWS cluster, you must tag your VPC subnets. Automated service preflight checks verify that these resources are tagged correctly.
The following table shows how to tag your resources:
| Resource | Key | Value |
|---|---|---|
| Public subnet |
|
|
| Private subnet |
|
|
You must tag at least one private subnet and one public subnet, if applicable.
Procedure
Tag your resources in your terminal:
For public subnets, run the following command:
$ aws ec2 create-tags --resources <public_subnet_id> --region <aws_region> --tags Key=kubernetes.io/role/elb,Value=1For private subnets, run the following command:
$ aws ec2 create-tags --resources <private_subnet_id> --region <aws_region> --tags Key=kubernetes.io/role/internal-elb,Value=1
Verification
Verify that the tag is correct by running the following command:
$ aws ec2 describe-tags --filters "Name=resource-id,Values=<subnet_id>"Example output
TAGS Name <subnet_id> subnet <prefix>-subnet-public1-us-east-1a TAGS kubernetes.io/role/elb <subnet_id> subnet 1
8.3.3. Creating a Virtual Private Cloud using Terraform
Terraform is a tool that allows you to create various resources using an established template. You can use Terraform with default options to create a Virtual Private Cloud for your Red Hat OpenShift Service on AWS cluster.
The Terraform instructions are for testing and demonstration purposes. Your own installation requires some modifications to the VPC for your own use. Use this Terraform script in the same region where you intend to install your cluster. These examples use us-east-2.
Prerequisites
- You have installed Terraform version 1.4.0 or newer on your machine.
- You have installed Git on your machine.
Procedure
Open a shell prompt and clone the Terraform VPC repository by running the following command:
$ git clone https://github.com/openshift-cs/terraform-vpc-exampleNavigate to the created directory by running the following command:
$ cd terraform-vpc-example/zero-egressInitiate the Terraform file by running the following command:
$ terraform initA message confirming the initialization appears when this process completes.
To build your VPC Terraform plan based on the existing Terraform template, run the
plancommand. You must include your AWS region, availability zones, CIDR blocks, and private subnets. You can choose to specify a cluster name. Arosa-zero-egress.tfplanfile is added to thehypershift-tfdirectory after theterraform plancompletes. For more detailed options, see the Terraform VPC repository’s README file.$ terraform plan -out rosa-zero-egress.tfplan -var region=<aws_region> \ -var 'availability_zones=<availability_zones>' \ -var vpc_cidr_block=<vpc_cidr_block> \ -var 'private_subnets=<private_subnets>'where:
<aws_region>- Enter your AWS region.
<availability_zones>-
Enter the availability zones for the VPC. For example, for a VPC that uses
ap-southeast-1, you would use the following as availability zones:["ap-southeast-1a", "ap-southeast-1b", "ap-southeast-1c"]. <vpc_cidr_block>-
Enter the CIDR block for your VPC. For example,
10.0.0.0/16. <private_subnets>-
Enter each of the subnets that are created for the VPC. For example,
["10.0.0.0/24", "10.0.1.0/24", "10.0.2.0/24"].
Apply this plan file to build your VPC by running the following command:
$ terraform apply rosa-zero-egress.tfplan
8.3.3.1. Tagging your subnets
Before you can use your VPC to create a Red Hat OpenShift Service on AWS cluster, you must tag your VPC subnets. Automated service preflight checks verify that these resources are tagged correctly.
The following table shows how to tag your resources:
| Resource | Key | Value |
|---|---|---|
| Public subnet |
|
|
| Private subnet |
|
|
You must tag at least one private subnet and one public subnet, if applicable.
Procedure
Tag your resources in your terminal:
For public subnets, run the following command:
$ aws ec2 create-tags --resources <public_subnet_id> --region <aws_region> --tags Key=kubernetes.io/role/elb,Value=1For private subnets, run the following command:
$ aws ec2 create-tags --resources <private_subnet_id> --region <aws_region> --tags Key=kubernetes.io/role/internal-elb,Value=1
Verification
Verify that the tag is correct by running the following command:
$ aws ec2 describe-tags --filters "Name=resource-id,Values=<subnet_id>"Example output
TAGS Name <subnet_id> subnet <prefix>-subnet-public1-us-east-1a TAGS kubernetes.io/role/elb <subnet_id> subnet 1
8.3.4. Creating a VPC using the AWS CLI
You can create a VPC by using the AWS CLI.
8.3.5. Requirements for manually creating an AWS Virtual Private Cloud
If you do not use a managed infrastructure tool such as Terraform or AWS CloudFormation to create your Virtual Private Cloud (VPC), you can create it manually through the AWS console. A manually created VPC must meet specific requirements for use with Red Hat OpenShift Service on AWS.
Your VPC must meet the requirements shown in the following table.
| Requirement | Details |
|---|---|
| VPC name | You need to have the specific VPC name and ID when creating your cluster. |
| CIDR range | Your VPC CIDR range should match your machine CIDR. |
| Availability zone | You need one availability zone for a single zone, and you need three for availability zones for multi-zone. |
| Public subnet | You must have one public subnet with a NAT gateway for public clusters. Private clusters do not need a public subnet. |
| DNS hostname and resolution | You must ensure that the DNS hostname and resolution are enabled. |
8.3.5.1. Tagging your subnets
Before you can use your VPC to create a Red Hat OpenShift Service on AWS cluster, you must tag your VPC subnets. Automated service preflight checks verify that these resources are tagged correctly before you can use these resources for a cluster.
| Resource | Key | Value |
|---|---|---|
| Public subnet |
|
|
| Private subnet |
|
|
You must tag at least one private subnet and, if applicable, one public subnet.
Prerequisites
- You have created a VPC.
-
You have installed the
awsCLI.
Procedure
Tag your resources in your terminal by running the following commands:
For public subnets, run:
$ aws ec2 create-tags --resources <public-subnet-id> --region <aws_region> --tags Key=kubernetes.io/role/elb,Value=1For private subnets, run:
$ aws ec2 create-tags --resources <private-subnet-id> --region <aws_region> --tags Key=kubernetes.io/role/internal-elb,Value=1
Verification
Verify that the tag is correctly applied by running the following command:
$ aws ec2 describe-tags --filters "Name=resource-id,Values=<subnet_id>"For example:
TAGS    Name                    <subnet-id>        subnet  <prefix>-subnet-public1-us-east-1a
TAGS    kubernetes.io/role/elb  <subnet-id>        subnet  1
8.4. Creating the account-wide STS roles and policies
Before you create a Red Hat OpenShift Service on AWS cluster, you must create the required account-wide IAM roles and policies by using the ROSA command-line interface (CLI) (rosa).
Specific AWS-managed policies for Red Hat OpenShift Service on AWS must be attached to each role. Customer-managed policies must not be used with these required account roles. For more information regarding AWS-managed policies for Red Hat OpenShift Service on AWS clusters, see AWS managed policies for Red Hat OpenShift Service on AWS.
Prerequisites
- You have completed the AWS prerequisites for Red Hat OpenShift Service on AWS.
- You have available AWS service quotas.
- You have enabled the Red Hat OpenShift Service on AWS in the AWS Console.
-
You have installed and configured the latest ROSA command-line interface (CLI) (
rosa) on your installation host. - You have logged in to your Red Hat account by using the ROSA CLI.
Procedure
If they do not exist in your AWS account, create the required account-wide STS roles and attach the policies by running the following command:
$ rosa create account-roles --hosted-cpVerify that your worker role has the correct AWS policy by running the following command:
$ aws iam attach-role-policy \ --role-name ManagedOpenShift-HCP-ROSA-Worker-Role \ --policy-arn "arn:aws:iam::aws:policy/AmazonEC2ContainerRegistryReadOnly"--role-name ManagedOpenShift-HCP-ROSA-Worker-Role::This role needs to include the prefix that was created in the previous step.Optional: Set your prefix as an environmental variable by running the following command:
$ export ACCOUNT_ROLES_PREFIX=<account_role_prefix>View the value of the variable by running the following command:
$ echo $ACCOUNT_ROLES_PREFIXFor example:
ManagedOpenShift
8.5. Creating an OpenID Connect configuration
Red Hat OpenShift Service on AWS clusters use OIDC and the AWS Security Token Service (STS) to authenticate Operator access to AWS resources they require to perform their functions. Each production cluster requires its own OIDC configuration. When creating a Red Hat OpenShift Service on AWS cluster, you can create the OpenID Connect (OIDC) configuration before creating your cluster.
Prerequisites
- You have completed the AWS prerequisites for Red Hat OpenShift Service on AWS.
-
You have installed and configured the latest ROSA command-line interface (CLI) (
rosa) on your installation host.
Procedure
To create your OIDC configuration alongside the AWS resources, run the following command:
$ rosa create oidc-config --mode=auto --yesThis command returns the following information.
For example:
? Would you like to create a Managed (Red Hat hosted) OIDC Configuration Yes
I: Setting up managed OIDC configuration
I: To create Operator Roles for this OIDC Configuration, run the following command and remember to replace <user-defined> with a prefix of your choice:
	rosa create operator-roles --prefix <user-defined> --oidc-config-id 13cdr6b
If you are going to create a Hosted Control Plane cluster please include '--hosted-cp'
I: Creating OIDC provider using 'arn:aws:iam::4540112244:user/userName'
? Create the OIDC provider? Yes
I: Created OIDC provider with ARN 'arn:aws:iam::4540112244:oidc-provider/dvbwgdztaeq9o.cloudfront.net/13cdr6b'
When creating your cluster, you must supply the OIDC config ID. The CLI output provides this value for
--mode auto, otherwise you must determine these values based onawsCLI output for--mode manual.Optional: you can save the OIDC configuration ID as a variable to use later. Run the following command to save the variable:
$ export OIDC_ID=<oidc_config_id><oidc_config_id>-
In this example output, the OIDC configuration ID is
13cdr6b.
View the value of the variable by running the following command:
$ echo $OIDC_IDFor example:
13cdr6b
Verification
You can list the possible OIDC configurations available for your clusters that are associated with your user organization. Run the following command:
$ rosa list oidc-configFor example:
ID                                MANAGED  ISSUER URL                                                             SECRET ARN
2330dbs0n8m3chkkr25gkkcd8pnj3lk2  true     https://dvbwgdztaeq9o.cloudfront.net/2330dbs0n8m3chkkr25gkkcd8pnj3lk2
233hvnrjoqu14jltk6lhbhf2tj11f8un  false    https://oidc-r7u1.s3.us-east-1.amazonaws.com                           aws:secretsmanager:us-east-1:242819244:secret:rosa-private-key-oidc-r7u1-tM3MDN
8.6. Creating Operator roles and policies
When you deploy a Red Hat OpenShift Service on AWS cluster, you must create the Operator IAM roles. The cluster Operators use the Operator roles and policies to obtain temporary permissions to perform cluster operations, such as managing storage and external access.
Prerequisites
- You have completed the AWS prerequisites for Red Hat OpenShift Service on AWS.
-
You have installed and configured the latest ROSA command-line interface (CLI) (
rosa) on your installation host. - You created the account-wide AWS roles.
Procedure
To create your Operator roles, run the following command:
$ rosa create operator-roles --hosted-cp --prefix=$OPERATOR_ROLES_PREFIX --oidc-config-id=$OIDC_ID --installer-role-arn arn:aws:iam::$AWS_ACCOUNT_ID:role/${ACCOUNT_ROLES_PREFIX}-HCP-ROSA-Installer-RoleThe following breakdown provides options for the Operator role creation.
$ rosa create operator-roles --hosted-cp
	--prefix=$OPERATOR_ROLES_PREFIX
	--oidc-config-id=$OIDC_ID
	--installer-role-arn arn:aws:iam::$AWS_ACCOUNT_ID:role/$ACCOUNT_ROLES_PREFIX-HCP-ROSA-Installer-Role
where:
--prefix=- You must supply a prefix when creating these Operator roles. Failing to do so produces an error. See the Additional resources of this section for information on the Operator prefix.
--oidc-config-id=- This value is the OIDC configuration ID that you created for your Red Hat OpenShift Service on AWS cluster.
--installer-role-arn- This value is the installer role ARN that you created when you created the Red Hat OpenShift Service on AWS account roles.
You must include the
--hosted-cpparameter to create the correct roles for Red Hat OpenShift Service on AWS clusters. This command returns the following information.For example:
? Role creation mode: auto
? Operator roles prefix: <pre-filled_prefix>
? OIDC Configuration ID: 23soa2bgvpek9kmes9s7os0a39i13qm4 | https://dvbwgdztaeq9o.cloudfront.net/23soa2bgvpek9kmes9s7os0a39i13qm4
? Create hosted control plane operator roles: Yes
W: More than one Installer role found
? Installer role ARN: arn:aws:iam::4540112244:role/<prefix>-HCP-ROSA-Installer-Role
? Permissions boundary ARN (optional):
I: Reusable OIDC Configuration detected. Validating trusted relationships to operator roles:
I: Creating roles using 'arn:aws:iam::4540112244:user/<userName>'
I: Created role '<prefix>-openshift-cluster-csi-drivers-ebs-cloud-credentials' with ARN 'arn:aws:iam::4540112244:role/<prefix>-openshift-cluster-csi-drivers-ebs-cloud-credentials'
I: Created role '<prefix>-openshift-cloud-network-config-controller-cloud-credenti' with ARN 'arn:aws:iam::4540112244:role/<prefix>-openshift-cloud-network-config-controller-cloud-credenti'
I: Created role '<prefix>-kube-system-kube-controller-manager' with ARN 'arn:aws:iam::4540112244:role/<prefix>-kube-system-kube-controller-manager'
I: Created role '<prefix>-kube-system-capa-controller-manager' with ARN 'arn:aws:iam::4540112244:role/<prefix>-kube-system-capa-controller-manager'
I: Created role '<prefix>-kube-system-control-plane-operator' with ARN 'arn:aws:iam::4540112244:role/<prefix>-kube-system-control-plane-operator'
I: Created role '<prefix>-kube-system-kms-provider' with ARN 'arn:aws:iam::4540112244:role/<prefix>-kube-system-kms-provider'
I: Created role '<prefix>-openshift-image-registry-installer-cloud-credentials' with ARN 'arn:aws:iam::4540112244:role/<prefix>-openshift-image-registry-installer-cloud-credentials'
I: Created role '<prefix>-openshift-ingress-operator-cloud-credentials' with ARN 'arn:aws:iam::4540112244:role/<prefix>-openshift-ingress-operator-cloud-credentials'
I: To create a cluster with these roles, run the following command:
	rosa create cluster --sts --oidc-config-id 23soa2bgvpek9kmes9s7os0a39i13qm4 --operator-roles-prefix <prefix> --hosted-cp
where:
Operator roles prefix- This field is prepopulated with the prefix that you set in the initial creation command.
OIDC Configuration ID- This field requires you to select an OIDC configuration that you created for your Red Hat OpenShift Service on AWS cluster.
The Operator roles are now created and ready to use for creating your Red Hat OpenShift Service on AWS cluster.
Verification
You can list the Operator roles associated with your Red Hat OpenShift Service on AWS account. Run the following command:
$ rosa list operator-rolesFor example:
I: Fetching operator roles
ROLE PREFIX  AMOUNT IN BUNDLE
<prefix>      8
? Would you like to detail a specific prefix Yes
? Operator Role Prefix: <prefix>
ROLE NAME                                                         ROLE ARN                                                                                         VERSION  MANAGED
<prefix>-kube-system-capa-controller-manager                       arn:aws:iam::4540112244:role/<prefix>-kube-system-capa-controller-manager                       4.13     No
<prefix>-kube-system-control-plane-operator                        arn:aws:iam::4540112244:role/<prefix>-kube-system-control-plane-operator                        4.13     No
<prefix>-kube-system-kms-provider                                  arn:aws:iam::4540112244:role/<prefix>-kube-system-kms-provider                                  4.13     No
<prefix>-kube-system-kube-controller-manager                       arn:aws:iam::4540112244:role/<prefix>-kube-system-kube-controller-manager                       4.13     No
<prefix>-openshift-cloud-network-config-controller-cloud-credenti  arn:aws:iam::4540112244:role/<prefix>-openshift-cloud-network-config-controller-cloud-credenti  4.13     No
<prefix>-openshift-cluster-csi-drivers-ebs-cloud-credentials       arn:aws:iam::4540112244:role/<prefix>-openshift-cluster-csi-drivers-ebs-cloud-credentials       4.13     No
<prefix>-openshift-image-registry-installer-cloud-credentials      arn:aws:iam::4540112244:role/<prefix>-openshift-image-registry-installer-cloud-credentials      4.13     No
<prefix>-openshift-ingress-operator-cloud-credentials              arn:aws:iam::4540112244:role/<prefix>-openshift-ingress-operator-cloud-credentials              4.13     No
After the command runs, it displays all the prefixes associated with your AWS account and notes how many roles are associated with this prefix. If you need to see all of these roles and their details, enter "Yes" on the detail prompt to have these roles listed out with specifics.
8.7. Creating Red Hat OpenShift Service on AWS clusters with egress zero using the CLI
You can create a Red Hat OpenShift Service on AWS cluster with egress zero by using the ROSA command-line interface (CLI) (rosa).
Prerequisites
- You have completed the AWS prerequisites for Red Hat OpenShift Service on AWS.
- You have available AWS service quotas.
- You have enabled the Red Hat OpenShift Service on AWS in the AWS Console.
-
You have installed and configured the latest ROSA CLI (
rosa) on your installation host. Runrosa versionto see your currently installed version of the ROSA CLI. If a newer version is available, the CLI provides a link to download this upgrade. - You have logged in to your Red Hat account by using the ROSA CLI.
- You have created an OIDC configuration.
- You have verified that the AWS Elastic Load Balancing (ELB) service role exists in your AWS account.
Procedure
Use one of the following commands to create your Red Hat OpenShift Service on AWS cluster:
NoteWhen creating a Red Hat OpenShift Service on AWS cluster, the default machine Classless Inter-Domain Routing (CIDR) is
10.0.0.0/16. If this does not correspond to the CIDR range for your VPC subnets, add--machine-cidr <address_block>to the following commands. To learn more about the default CIDR ranges for Red Hat OpenShift Service on AWS, see the CIDR range definitions.If you did not set environment variables, run the following command:
$ rosa create cluster --cluster-name=<cluster_name> \ --mode=auto --hosted-cp [--private] \ --operator-roles-prefix <operator-role-prefix> \ --oidc-config-id <id-of-oidc-configuration> \ --subnet-ids=<private-subnet-id> --region <region> \ --machine-cidr 10.0.0.0/16 --service-cidr 172.30.0.0/16 \ --pod-cidr 10.128.0.0/14 --host-prefix 23 \ --billing-account <root-acct-id> \ --properties zero_egress:truewhere:
<cluster_name>-
Specify the name of your cluster. If your cluster name is longer than 15 characters, it contains an autogenerated domain prefix as a subdomain for your provisioned cluster on openshiftapps.com. To customize the subdomain, use the
--domain-prefixflag. The domain prefix cannot be longer than 15 characters, must be unique, and cannot be changed after cluster creation. <operator-role-prefix>By default, the cluster-specific Operator role names are prefixed with the cluster name and a random 4-digit hash. You can optionally specify a custom prefix to replace
<cluster_name>-<hash>in the role names. The prefix is applied when you create the cluster-specific Operator IAM roles. For information about the prefix, see About custom Operator IAM role prefixes.NoteIf you specified custom ARN paths when you created the associated account-wide roles, the custom path is automatically detected. The custom path is applied to the cluster-specific Operator roles when you create them in a later step.
<root-acct-id>- If your billing account is different from your user account, add this argument and specify the AWS account that is responsible for all billing.
If you set the environment variables, create a cluster with egress zero, a private API, and a private Ingress by running the following command:
$ rosa create cluster --private --cluster-name=$CLUSTER_NAME \ --mode=auto --hosted-cp --operator-roles-prefix=$OPERATOR_ROLES_PREFIX \ --oidc-config-id=$OIDC_ID --subnet-ids=$SUBNET_IDS \ --region $REGION --machine-cidr 10.0.0.0/16 --service-cidr 172.30.0.0/16 \ --pod-cidr 10.128.0.0/14 --host-prefix 23 \ --private --properties zero_egress:true
Check the status of your cluster by running the following command:
$ rosa describe cluster --cluster=<cluster_name>The following
Statefield changes are listed in the output as cluster installation progresses:-
pending (Preparing account) -
installing (DNS setup in progress) -
installing readyNoteIf the installation fails or the
Statefield does not change toreadyafter more than 10 minutes, check the installation troubleshooting documentation for details. For more information, see Troubleshooting installations. For steps to contact Red Hat Support for assistance, see Getting support for Red Hat OpenShift Service on AWS.
-
Track the cluster creation progress by watching the Red Hat OpenShift Service on AWS installation program logs. To check the logs, run the following command:
$ rosa logs install --cluster=<cluster_name> [--watch]Optional: To watch for new log messages as the installation progresses, use the
--watchargument.
Chapter 9. Creating a Red Hat OpenShift Service on AWS cluster that uses external authentication
You can create Red Hat OpenShift Service on AWS clusters that use an external OpenID Connect (OIDC) identity provider to issue tokens for authentication, replacing the built-in OpenShift OAuth server.
While the built-in OpenShift OAuth server supports integration with a variety of identity providers, including external OIDC identity providers, it is limited to the capabilities of the OAuth server itself. You can directly integrate external OIDC identity providers with Red Hat OpenShift Service on AWS clusters to enable machine-to-machine workflows and capabilities beyond the built-in OpenShift OAuth server.
You cannot upgrade or convert existing Red Hat OpenShift Service on AWS (classic architecture) clusters to hosted control planes architecture. You must create a new Red Hat OpenShift Service on AWS cluster. You also cannot convert a cluster that was created to use external authentication providers to use the internal OAuth2 server. You must also create a new cluster.
Red Hat OpenShift Service on AWS clusters only support Security Token Service (STS) authentication.
9.1. Red Hat OpenShift Service on AWS prerequisites
To create a Red Hat OpenShift Service on AWS cluster, you must have completed the following steps:
- Configured virtual private cloud (VPC)
- Created Account-wide roles
- Created OIDC configuration
- Created Operator roles
9.2. Creating a Red Hat OpenShift Service on AWS cluster that uses external authentication
Use the --external-auth-providers-enabled flag in the ROSA CLI to create a cluster that uses an external authentication service.
When creating a Red Hat OpenShift Service on AWS cluster, the default machine Classless Inter-Domain Routing (CIDR) is 10.0.0.0/16. If this does not correspond to the CIDR range for your VPC subnets, add --machine-cidr <address_block> to the following commands.
Procedure
If you used the
OIDC_ID,SUBNET_IDS, andOPERATOR_ROLES_PREFIXvariables to prepare your environment, you can continue to use those variables when creating your cluster. For example, run the following command:$ rosa create cluster --hosted-cp --subnet-ids=$SUBNET_IDS \ --oidc-config-id=$OIDC_ID --cluster-name=<cluster_name> \ --operator-roles-prefix=$OPERATOR_ROLES_PREFIX \ --external-auth-providers-enabledIf you did not set environmental variables, run the following command:
$ rosa create cluster --cluster-name=<cluster_name> --sts --mode=auto \ --hosted-cp --operator-roles-prefix <operator-role-prefix> \ --oidc-config-id <ID-of-OIDC-configuration> \ --external-auth-providers-enabled \ --subnet-ids=<public-subnet-id>,<private-subnet-id>
Verification
Verify that your external authentication is enabled in the cluster details by running the following command:
$ rosa describe cluster --cluster=<cluster_name>In the following example output, the
External Authenticationfield shows that the external authentication is enabled:Name: rosa-ext-test Display Name: rosa-ext-test ID: <cluster_id> External ID: <cluster_ext_id> Control Plane: ROSA Service Hosted OpenShift Version: 4.21.0 Channel Group: stable DNS: <dns> AWS Account: <AWS_id> AWS Billing Account: <AWS_id> API URL: <ocm_api> Console URL: Region: us-east-1 Availability: - Control Plane: MultiAZ - Data Plane: SingleAZ Nodes: - Compute (desired): 2 - Compute (current): 0 Network: - Type: OVNKubernetes - Service CIDR: <service_cidr> - Machine CIDR: <machine_cidr> - Pod CIDR: <pod_cidr> - Host Prefix: /23 - Subnets: <subnet_ids> EC2 Metadata Http Tokens: optional Role (STS) ARN: arn:aws:iam::<AWS_id>:role/<account_roles_prefix>-HCP-ROSA-Installer-Role Support Role ARN: arn:aws:iam::<AWS_id>:role/<account_roles_prefix>-HCP-ROSA-Support-Role Instance IAM Roles: - Worker: arn:aws:iam::<AWS_id>:role/<account_roles_prefix>-HCP-ROSA-Worker-Role Operator IAM Roles: - arn:aws:iam::<AWS_id>:role/<operator_roles_prefix>-openshift-cloud-network-config-controller-clo - arn:aws:iam::<AWS_id>:role/<operator_roles_prefix>-kube-system-capa-controller-manager - arn:aws:iam::<AWS_id>:role/<operator_roles_prefix>-kube-system-control-plane-operator - arn:aws:iam::<AWS_id>:role/<operator_roles_prefix>-kube-system-kms-provider - arn:aws:iam::<AWS_id>:role/<operator_roles_prefix>-kube-system-kube-controller-manager - arn:aws:iam::<AWS_id>:role/<operator_roles_prefix>-openshift-image-registry-installer-cloud-cred - arn:aws:iam::<AWS_id>:role/<operator_roles_prefix>-openshift-ingress-operator-cloud-credentials - arn:aws:iam::<AWS_id>:role/<operator_roles_prefix>-openshift-cluster-csi-drivers-ebs-cloud-crede Managed Policies: Yes State: ready Private: No Created: Mar 29 2024 14:25:52 UTC User Workload Monitoring: Enabled Details Page: https://<url> OIDC Endpoint URL: https://<endpoint> (Managed) Audit Log Forwarding: Disabled External Authentication: Enabled
9.3. Creating an external authentication provider
After you have created a Red Hat OpenShift Service on AWS cluster with the enabled option for external authentication providers, you must create a provider using the ROSA CLI.
Similar to the rosa create|delete|list idp[s] command in the ROSA CLI, you cannot edit an existing identity provider that you created using rosa create external-auth-provider. Instead, you must delete the external authentication provider and create a new one.
Procedure
Do one of the following:
To create your external authentication provider using interactive mode, run the following command:
$ rosa create external-auth-provider -c <cluster_name>To create your external authentication provider by entering each argument, run the following command:
$ rosa create external-auth-provider --cluster=<cluster_name> \ --name=<provider_name> \ --issuer-url=<issuing_url> \ --issuer-audiences=<audience_id> \ --issuer-ca-file=<ca_file_path> \ --claim-mapping-username-claim=<claim_username> \ --claim-mapping-groups-claim=<method> \ --console-client-id=<client_id_for_app_registration> \ --console-client-secret=<client_secret> \ --claim-validation-rule=<claim_validation_rule>where:
<cluster_id>- The name or the ID of your cluster.
<provider_name>- The name of your external authentication provider. This name should be a lower-case with numbers and dashes.
<issuing_url>- The URL of the token issuer.
<audience_id>- The audience IDs that this authentication provider issues tokens for. This is a comma-separated list of token audiences.
<ca_file_path>- Optional. The certificate file to use when making requests.
<claim_username>-
The name of the claim that is used to construct the user names for cluster identity, such as using
email. <method>-
The method with which to transform the ID token into a cluster identity, such as using
groups. <client_id_for_app_registration>- Optional. The application or client ID that your app registration uses for the console.
<client_secret>- The client secret that is used to associate your account with the application. If you do not include the client secret, this command uses a public OIDC OAuthClient.
<claim_validation_rule>-
Optional. The rules that help validate token claims which authenticate your users. This field should be formatted as
:<required_value>.
Example output
I: Successfully created an external authentication provider for cluster 'ext-auth-test'
9.3.1. Configuring Microsoft Entra ID as an external provider
You can configure Microsoft Entra ID as an external authentication provider for your Red Hat OpenShift Service on AWS cluster by using the ROSA command-line interface (CLI) (rosa). Before you configure this provider, you must have a Microsoft Entra ID server already set up.
For more information about setting up Microsoft Entra ID, see the Microsoft Entra ID documentation.
Procedure
Create an external authentication provider that uses Microsoft Entra ID by running the following command:
NoteYou must set your own environment variables with values specific to your Microsoft Entra ID server.
$ rosa create external-auth-provider -c $CLUSTER_NAME \ --claim-mapping-groups-claim groups \ --claim-mapping-username-claim <authorized_user_name> \ --console-client-id $CONSOLE_CLIENT_ID \ --console-client-secret $CONSOLE_CLIENT_SECRET_VALUE \ --issuer-audiences "$AUDIENCE_1" \ --issuer-ca-file ca-bundle.crt --issuer-url $ISSUER_URL \ --name m-entra-idThe output should indicate that the external authentication provider was successfully created.
I: Successfully created an external authentication provider for cluster 'ext-auth-test'. It can take a few minutes for the creation of an external authentication provider to become fully effective.List the external authentication provider for your cluster to see the issuer URL, or use
rosa describeto see all details, by running one of the following commands:List the external authentication configuration on a specified cluster by running the following command:
$ rosa list external-auth-provider -c <cluster_name>The output should show the issuer URL for the external authentication provider.
NAME ISSUER URL m-entra-id https://login.microsoftonline.com/<group_id>/v2.0Display the external authentication configuration on a specified cluster by running the following command:
$ rosa describe external-auth-provider \ -c <cluster_name> --name <name_of_external_authentication>The output displays the details of the external authentication provider.
ID: ms-entra-id Cluster ID: <cluster_id> Issuer audiences: - <audience_id> Issuer Url: https://login.microsoftonline.com/<group_id>/v2.0 Claim mappings group: groups Claim mappings username: email
9.3.2. Configuring Keycloak as an external provider
You can configure Keycloak as an external authentication provider for your Red Hat OpenShift Service on AWS cluster by using the ROSA command-line interface (CLI) (rosa). Before you configure this provider, you must have a Keycloak server already set up.
For more information about setting up Keycloak, see the Keycloak documentation.
Procedure
Create an external authentication provider that uses Keycloak by running the following command:
NoteYou must set your own environment variables with values specific to your Keycloak server.
$ rosa create external-auth-provider -c $CLUSTER_NAME \ --claim-mapping-groups-claim groups \ --claim-mapping-username-claim <authorized_user_name> \ --console-client-id $CONSOLE_CLIENT_ID \ --console-client-secret $CONSOLE_CLIENT_SECRET_VALUE \ --issuer-audiences "$AUDIENCE_1,$AUDIENCE_2" \ --issuer-ca-file ca-bundle.crt --issuer-url $ISSUER_URL --name keycloakThe output should indicate that the external authentication provider was successfully created.
I: Successfully created an external authentication provider for cluster 'ext-auth-test'. It can take a few minutes for the creation of an external authentication provider to become fully effective.List the external authentication provider for your cluster to see the issuer URL, or use
rosa describeto see all details, by running one of the following commands:List the external authentication configuration on a specified cluster by running the following command:
$ rosa list external-auth-provider -c <cluster_name>The output should display the issuer URL for the external authentication provider.
NAME ISSUER URL keycloak https://keycloak-keycloak.apps.<keycloak_id>.openshift.org/realms/masterDisplay the external authentication configuration on a specified cluster by running the following command:
$ rosa describe external-auth-provider \ -c <cluster_name> --name <name_of_external_authentication>The output displays the details of the external authentication provider.
ID: keycloak Cluster ID: <cluster_id> Issuer audiences: - <audience_id_1> - <audience_id_2> Issuer Url: https://keycloak-keycloak.apps.<keycloak_id>.openshift.org/realms/master Claim mappings group: groups Claim mappings username: <authorized_user_name> Console client id: console-test
9.4. Creating a break glass credential for a Red Hat OpenShift Service on AWS cluster
You can create a break glass credential to generate temporary cluster-admin credentials for Red Hat OpenShift Service on AWS clusters that use custom OIDC token issuers. The break glass credential provides a kubeconfig file that you can use to access the cluster.
Prerequisites
- You have created a Red Hat OpenShift Service on AWS cluster with external authentication enabled. For more information, see Creating a Red Hat OpenShift Service on AWS with HCP cluster that uses external authentication providers.
- You have created an external authentication provider. For more information, see Creating an external authentication provider.
-
You have an account with
cluster adminpermissions.
Procedure
Create a break glass credential by using one of the following commands:
To create a break glass credential by using the interactive command interface to interactively specify custom settings, run the following command:
$ rosa create break-glass-credential -c <cluster_name> -iThis command starts an interactive CLI process:
I: Enabling interactive mode ? Username (optional): ? Expiration duration (optional): I: Successfully created a break glass credential for cluster 'ac-hcp-test'.where:
Username-
If left blank, the
usernamefield is set to a randomly generated value. Expiration duration- The minimum validity of the break glass credential is 10 minutes, and the maximum validity is 24 hours. If left blank, the expiration duration value defaults to 24 hours.
To create a break glass credential for cluster called
myclusterwith specified values:$ rosa create break-glass-credential -c mycluster --username test-username --expiration 1h
List the break glass credential IDs, status, and associated users that are available for a cluster called
myclusterby running the following command:$ rosa list break-glass-credential -c myclusterExample output
ID USERNAME STATUS 2a7jli9n4phe6c02ul7ti91djtv2o51d test-user issuedNoteYou can also view the credentials in a JSON output by adding the
-o jsonargument to the command.To view the status of a break glass credential, run the following command, replacing
<break_glass_credential_id>with the break glass credential ID:$ rosa describe break-glass-credential <break_glass_credential_id> -c <cluster_name>Example output
ID: 2a7jli9n4phe6c02ul7ti91djtv2o51d Username: test-user Expire at: Dec 28 2026 10:23:05 EDT Status: issuedThe following is a list of possible
Statusfield values:issued- The break glass credential has been issued and is ready to use.
expired- The break glass credential has expired and can no longer be used.
failed- The break glass credential has failed to create. In this case, you receive a service log detailing the failure. For more information about service logs, see Accessing the service logs for Red Hat OpenShift Service on AWS clusters. For steps to contact Red Hat Support for assistance, see Getting support.
awaiting_revocation- The break glass credential is currently being revoked, meaning it cannot be used.
revoked- The break glass credential has been revoked and can no longer be used.
To retrieve the
kubeconfig, run the following commands:Create a
kubeconfigsdirectory:$ mkdir ~/kubeconfigsExport the newly generated
kubeconfigfile, replacing <cluster_name> with the name of your cluster:$ export CLUSTER_NAME=<cluster_name> && export KUBECONFIG=~/kubeconfigs/break-glass-${CLUSTER_NAME}.kubeconfigView the
kubeconfig:$ rosa describe break-glass-credential <break_glass_credential_id> -c mycluster --kubeconfigExample output
apiVersion: v1 clusters: - cluster: server: <server_url> name: cluster contexts: - context: cluster: cluster namespace: default user: test-username name: admin current-context: admin kind: Config preferences: {} users: - name: test-user user: client-certificate-data: <client-certificate-data> client-key-data: <client-key-data>where:
users.user.client-certificate-data- The client-certificate contains a certificate for the user signed by the Kubernetes certificate authorities (CA).
users.user.client-key-data- The client-key contains the key that signed the client certificate.
Optional: To save the
kubeconfig, run the following command :$ rosa describe break-glass-credential <break_glass_credential_id> -c mycluster --kubeconfig > $KUBECONFIG
9.5. Accessing a Red Hat OpenShift Service on AWS cluster by using a break glass credential
Use the new kubeconfig from the break glass credential to gain temporary admin access to a Red Hat OpenShift Service on AWS cluster.
Prerequisites
- You have access to a Red Hat OpenShift Service on AWS cluster with external authentication enabled. For more information, see Creating a Red Hat OpenShift Service on AWS cluster that uses direct authentication with an external OIDC identity provider.
-
You have installed the
ocand thekubectlCLIs. -
You have configured the new
kubeconfig. For more information, see Creating a break glass credential for a Red Hat OpenShift Service on AWS cluster.
Procedure
Access the details for the cluster:
$ rosa describe break-glass-credential <break_glass_credential_id> -c <cluster_name> --kubeconfig > $KUBECONFIGList the nodes from the cluster:
$ oc get nodesExample output
NAME STATUS ROLES AGE VERSION ip-10-0-0-27.ec2.internal Ready worker 8m v1.28.7+f1b5f6c ip-10-0-0-67.ec2.internal Ready worker 9m v1.28.7+f1b5f6cVerify you have the correct credentials:
$ kubectl auth whoamiExample output
ATTRIBUTE VALUE Username system:customer-break-glass:test-user Groups [system:masters system:authenticated]Apply the
ClusterRoleBindingfor the groups defined in the external OIDC provider. TheClusterRoleBindingmaps therosa-hcp-adminsgroup that is created in Microsoft Entra ID to a group in the Red Hat OpenShift Service on AWS cluster.$ oc apply -f - <<EOF apiVersion: rbac.authorization.k8s.io/v1 kind: ClusterRoleBinding metadata: name: rosa-hcp-admins roleRef: apiGroup: rbac.authorization.k8s.io kind: ClusterRole name: cluster-admin subjects: - apiGroup: rbac.authorization.k8s.io kind: Group name: f715c264-ab90-45d5-8a29-2e91a609a895 EOFThe output of this command is:
clusterrolebinding.rbac.authorization.k8s.io/rosa-hcp-admins createdNoteAfter applying the
ClusterRoleBinding, the Red Hat OpenShift Service on AWS cluster is configured and therosaCLI and Red Hat Hybrid Cloud Console authenticate through the external OIDC provider. You can now start assigning roles and deploying applications on the cluster.
9.6. Revoking a break glass credential for a Red Hat OpenShift Service on AWS cluster
You can revoke access to any break glass credentials that you have provisioned at any time by using the revoke break-glass-credentials command.
Prerequisites
- You have created a break glass credential.
- You are the cluster owner.
Procedure
Revoke the break glass credentials for a Red Hat OpenShift Service on AWS cluster by running the following command.
ImportantRunning this command revokes access for all break glass credentials related to the cluster.
$ rosa revoke break-glass-credentials -c <cluster_name>Example output
? Are you sure you want to revoke all the break glass credentials on cluster 'my-cluster'?: Yes I: Successfully requested revocation for all break glass credentials from cluster 'my-cluster'
Verification
The revocation process can take several minutes. You can verify that the break glass credentials for your clusters have been revoked by running one of the following commands:
List all break glass credentials and check the status of each:
$ rosa list break-glass-credential -c <cluster_name>Example output
ID USERNAME STATUS 2330dbs0n8m3chkkr25gkkcd8pnj3lk2 test-user awaiting_revocationYou can also verify the status by checking the individual credential:
$ rosa describe break-glass-credential <break_glass_credential_id> -c <cluster_name>Example output
ID: 2330dbs0n8m3chkkr25gkkcd8pnj3lk2 Username: test-user Expire at: Dec 28 2026 10:23:05 EDT Status: issued Revoked at: Dec 27 2026 15:30:33 EDT
9.7. Deleting an external authentication provider
You can delete external authentication providers from a cluster by using the ROSA command-line interface (CLI) (rosa).
Procedure
Display your external authentication provider on your cluster by running the following command:
$ rosa list external-auth-provider -c <cluster_name>Example output
NAME ISSUER URL entra-test https://login.microsoftonline.com/<group_id>/v2.0Delete the external authentication provider by running the following command:
$ rosa delete external-auth-provider <name_of_provider> -c <cluster_name>Example output
? Are you sure you want to delete external authentication provider entra-test on cluster rosa-ext-test? Yes I: Successfully deleted external authentication provider 'entra-test' from cluster 'rosa-ext-test'
Verification
Query for any external authentication providers on your cluster by running the following command:
$ rosa list external-auth-provider -c <cluster_name>Example output
E: there are no external authentication providers for this cluster
Chapter 10. Red Hat OpenShift Service on AWS clusters without a CNI plugin
You can create a Red Hat OpenShift Service on AWS cluster without a Container Network Interface (CNI) plugin so that you can install a third-party CNI plugin that meets your specific networking requirements. After cluster creation, you install your chosen CNI plugin to provide pod networking.
For customers who choose to use their own CNI, the responsibility of CNI plugin support belongs to the customer in coordination with their chosen CNI vendor.
The default plugin for Red Hat OpenShift Service on AWS is the OVN-Kubernetes network plugin. This plugin is the only Red Hat supported CNI plugin for Red Hat OpenShift Service on AWS.
If you use your own CNI for Red Hat OpenShift Service on AWS clusters, you must obtain commercial support from the plugin vendor before creating your clusters. Red Hat cannot assist with CNI-related issues, such as pod-to-pod traffic, but continues to provide support for all non-CNI issues. To receive CNI-related support from Red Hat, install the cluster with the default OVN-Kubernetes network plugin. For more information, see the responsibility matrix.
10.1. Prerequisites
- You have completed the AWS prerequisites.
- You have configured a virtual private cloud (VPC).
10.2. Creating the account-wide STS roles and policies
Before you create a Red Hat OpenShift Service on AWS cluster, you must create the required account-wide IAM roles and policies by using the ROSA command-line interface (CLI) (rosa).
Specific AWS-managed policies for Red Hat OpenShift Service on AWS must be attached to each role. Customer-managed policies must not be used with these required account roles. For more information regarding AWS-managed policies for Red Hat OpenShift Service on AWS clusters, see AWS managed policies for Red Hat OpenShift Service on AWS.
Prerequisites
- You have completed the AWS prerequisites for Red Hat OpenShift Service on AWS.
- You have available AWS service quotas.
- You have enabled the Red Hat OpenShift Service on AWS in the AWS Console.
-
You have installed and configured the latest ROSA command-line interface (CLI) (
rosa) on your installation host. - You have logged in to your Red Hat account by using the ROSA CLI.
Procedure
If they do not exist in your AWS account, create the required account-wide STS roles and attach the policies by running the following command:
$ rosa create account-roles --hosted-cpOptional: Set your prefix as an environmental variable by running the following command:
$ export ACCOUNT_ROLES_PREFIX=<account_role_prefix>View the value of the variable by running the following command:
$ echo $ACCOUNT_ROLES_PREFIXFor example:
ManagedOpenShift
10.3. Creating an OpenID Connect configuration
Red Hat OpenShift Service on AWS clusters use OIDC and the AWS Security Token Service (STS) to authenticate Operator access to AWS resources they require to perform their functions. Each production cluster requires its own OIDC configuration. When creating a Red Hat OpenShift Service on AWS cluster, you can create the OpenID Connect (OIDC) configuration before creating your cluster.
Prerequisites
- You have completed the AWS prerequisites for Red Hat OpenShift Service on AWS.
-
You have installed and configured the latest ROSA command-line interface (CLI) (
rosa) on your installation host.
Procedure
To create your OIDC configuration alongside the AWS resources, run the following command:
$ rosa create oidc-config --mode=auto --yesThis command returns the following information.
For example:
? Would you like to create a Managed (Red Hat hosted) OIDC Configuration Yes
I: Setting up managed OIDC configuration
I: To create Operator Roles for this OIDC Configuration, run the following command and remember to replace <user-defined> with a prefix of your choice:
	rosa create operator-roles --prefix <user-defined> --oidc-config-id 13cdr6b
If you are going to create a Hosted Control Plane cluster please include '--hosted-cp'
I: Creating OIDC provider using 'arn:aws:iam::4540112244:user/userName'
? Create the OIDC provider? Yes
I: Created OIDC provider with ARN 'arn:aws:iam::4540112244:oidc-provider/dvbwgdztaeq9o.cloudfront.net/13cdr6b'
When creating your cluster, you must supply the OIDC config ID. The CLI output provides this value for
--mode auto, otherwise you must determine these values based onawsCLI output for--mode manual.Optional: you can save the OIDC configuration ID as a variable to use later. Run the following command to save the variable:
$ export OIDC_ID=<oidc_config_id><oidc_config_id>-
In this example output, the OIDC configuration ID is
13cdr6b.
View the value of the variable by running the following command:
$ echo $OIDC_IDFor example:
13cdr6b
Verification
You can list the possible OIDC configurations available for your clusters that are associated with your user organization. Run the following command:
$ rosa list oidc-configFor example:
ID                                MANAGED  ISSUER URL                                                             SECRET ARN
2330dbs0n8m3chkkr25gkkcd8pnj3lk2  true     https://dvbwgdztaeq9o.cloudfront.net/2330dbs0n8m3chkkr25gkkcd8pnj3lk2
233hvnrjoqu14jltk6lhbhf2tj11f8un  false    https://oidc-r7u1.s3.us-east-1.amazonaws.com                           aws:secretsmanager:us-east-1:242819244:secret:rosa-private-key-oidc-r7u1-tM3MDN
10.4. Creating Operator roles and policies
When you deploy a Red Hat OpenShift Service on AWS cluster, you must create the Operator IAM roles. The cluster Operators use the Operator roles and policies to obtain temporary permissions to perform cluster operations, such as managing storage and external access.
Prerequisites
- You have completed the AWS prerequisites for Red Hat OpenShift Service on AWS.
-
You have installed and configured the latest ROSA command-line interface (CLI) (
rosa) on your installation host. - You created the account-wide AWS roles.
Procedure
To create your Operator roles, run the following command:
$ rosa create operator-roles --hosted-cp --prefix=$OPERATOR_ROLES_PREFIX --oidc-config-id=$OIDC_ID --installer-role-arn arn:aws:iam::$AWS_ACCOUNT_ID:role/${ACCOUNT_ROLES_PREFIX}-HCP-ROSA-Installer-RoleThe following breakdown provides options for the Operator role creation.
$ rosa create operator-roles --hosted-cp
	--prefix=$OPERATOR_ROLES_PREFIX
	--oidc-config-id=$OIDC_ID
	--installer-role-arn arn:aws:iam::$AWS_ACCOUNT_ID:role/$ACCOUNT_ROLES_PREFIX-HCP-ROSA-Installer-Role
where:
--prefix=- You must supply a prefix when creating these Operator roles. Failing to do so produces an error. See the Additional resources of this section for information on the Operator prefix.
--oidc-config-id=- This value is the OIDC configuration ID that you created for your Red Hat OpenShift Service on AWS cluster.
--installer-role-arn- This value is the installer role ARN that you created when you created the Red Hat OpenShift Service on AWS account roles.
You must include the
--hosted-cpparameter to create the correct roles for Red Hat OpenShift Service on AWS clusters. This command returns the following information.For example:
? Role creation mode: auto
? Operator roles prefix: <pre-filled_prefix>
? OIDC Configuration ID: 23soa2bgvpek9kmes9s7os0a39i13qm4 | https://dvbwgdztaeq9o.cloudfront.net/23soa2bgvpek9kmes9s7os0a39i13qm4
? Create hosted control plane operator roles: Yes
W: More than one Installer role found
? Installer role ARN: arn:aws:iam::4540112244:role/<prefix>-HCP-ROSA-Installer-Role
? Permissions boundary ARN (optional):
I: Reusable OIDC Configuration detected. Validating trusted relationships to operator roles:
I: Creating roles using 'arn:aws:iam::4540112244:user/<userName>'
I: Created role '<prefix>-openshift-cluster-csi-drivers-ebs-cloud-credentials' with ARN 'arn:aws:iam::4540112244:role/<prefix>-openshift-cluster-csi-drivers-ebs-cloud-credentials'
I: Created role '<prefix>-openshift-cloud-network-config-controller-cloud-credenti' with ARN 'arn:aws:iam::4540112244:role/<prefix>-openshift-cloud-network-config-controller-cloud-credenti'
I: Created role '<prefix>-kube-system-kube-controller-manager' with ARN 'arn:aws:iam::4540112244:role/<prefix>-kube-system-kube-controller-manager'
I: Created role '<prefix>-kube-system-capa-controller-manager' with ARN 'arn:aws:iam::4540112244:role/<prefix>-kube-system-capa-controller-manager'
I: Created role '<prefix>-kube-system-control-plane-operator' with ARN 'arn:aws:iam::4540112244:role/<prefix>-kube-system-control-plane-operator'
I: Created role '<prefix>-kube-system-kms-provider' with ARN 'arn:aws:iam::4540112244:role/<prefix>-kube-system-kms-provider'
I: Created role '<prefix>-openshift-image-registry-installer-cloud-credentials' with ARN 'arn:aws:iam::4540112244:role/<prefix>-openshift-image-registry-installer-cloud-credentials'
I: Created role '<prefix>-openshift-ingress-operator-cloud-credentials' with ARN 'arn:aws:iam::4540112244:role/<prefix>-openshift-ingress-operator-cloud-credentials'
I: To create a cluster with these roles, run the following command:
	rosa create cluster --sts --oidc-config-id 23soa2bgvpek9kmes9s7os0a39i13qm4 --operator-roles-prefix <prefix> --hosted-cp
where:
Operator roles prefix- This field is prepopulated with the prefix that you set in the initial creation command.
OIDC Configuration ID- This field requires you to select an OIDC configuration that you created for your Red Hat OpenShift Service on AWS cluster.
The Operator roles are now created and ready to use for creating your Red Hat OpenShift Service on AWS cluster.
Verification
You can list the Operator roles associated with your Red Hat OpenShift Service on AWS account. Run the following command:
$ rosa list operator-rolesFor example:
I: Fetching operator roles
ROLE PREFIX  AMOUNT IN BUNDLE
<prefix>      8
? Would you like to detail a specific prefix Yes
? Operator Role Prefix: <prefix>
ROLE NAME                                                         ROLE ARN                                                                                         VERSION  MANAGED
<prefix>-kube-system-capa-controller-manager                       arn:aws:iam::4540112244:role/<prefix>-kube-system-capa-controller-manager                       4.13     No
<prefix>-kube-system-control-plane-operator                        arn:aws:iam::4540112244:role/<prefix>-kube-system-control-plane-operator                        4.13     No
<prefix>-kube-system-kms-provider                                  arn:aws:iam::4540112244:role/<prefix>-kube-system-kms-provider                                  4.13     No
<prefix>-kube-system-kube-controller-manager                       arn:aws:iam::4540112244:role/<prefix>-kube-system-kube-controller-manager                       4.13     No
<prefix>-openshift-cloud-network-config-controller-cloud-credenti  arn:aws:iam::4540112244:role/<prefix>-openshift-cloud-network-config-controller-cloud-credenti  4.13     No
<prefix>-openshift-cluster-csi-drivers-ebs-cloud-credentials       arn:aws:iam::4540112244:role/<prefix>-openshift-cluster-csi-drivers-ebs-cloud-credentials       4.13     No
<prefix>-openshift-image-registry-installer-cloud-credentials      arn:aws:iam::4540112244:role/<prefix>-openshift-image-registry-installer-cloud-credentials      4.13     No
<prefix>-openshift-ingress-operator-cloud-credentials              arn:aws:iam::4540112244:role/<prefix>-openshift-ingress-operator-cloud-credentials              4.13     No
After the command runs, it displays all the prefixes associated with your AWS account and notes how many roles are associated with this prefix. If you need to see all of these roles and their details, enter "Yes" on the detail prompt to have these roles listed out with specifics.
10.5. Creating the cluster without a CNI plugin
You can create a Red Hat OpenShift Service on AWS cluster without a CNI plugin by using the --no-cni flag with the ROSA command-line interface (CLI) (rosa).
Prerequisites
- You have completed the AWS prerequisites for Red Hat OpenShift Service on AWS.
- You have available AWS service quotas.
- You have enabled the Red Hat OpenShift Service on AWS in the AWS Console.
-
You have installed and configured the latest ROSA CLI (
rosa) on your installation host. Runrosa versionto see your currently installed version of the ROSA CLI. If a newer version is available, the CLI provides a link to download this upgrade. - You have logged in to your Red Hat account by using the ROSA CLI.
- You have created an OIDC configuration.
- You have verified that the AWS Elastic Load Balancing (ELB) service role exists in your AWS account.
Procedure
You can create your Red Hat OpenShift Service on AWS cluster with one of the following commands.
NoteWhen creating a Red Hat OpenShift Service on AWS cluster, the default machine Classless Inter-Domain Routing (CIDR) is
10.0.0.0/16. If this does not correspond to the CIDR range for your VPC subnets, add--machine-cidr <address_block>to the following commands.Create a cluster with a single, initial machine pool, publicly available API, publicly available Ingress, and no CNI plugin by running the following command:
$ rosa create cluster --cluster-name=<cluster_name> \
    --sts --mode=auto --hosted-cp --operator-roles-prefix <operator-role-prefix> \
    --oidc-config-id <ID-of-OIDC-configuration> --subnet-ids=<public-subnet-id>,<private-subnet-id> --no-cni
Create a cluster with a single, initial machine pool, privately available API, privately available Ingress, and no CNI plugin by running the following command:
$ rosa create cluster --private --cluster-name=<cluster_name> \
    --sts --mode=auto --hosted-cp --subnet-ids=<private-subnet-id> --no-cni
If you used the
OIDC_ID,SUBNET_IDS, andOPERATOR_ROLES_PREFIXvariables to prepare your environment, you can continue to use those variables when creating your cluster without a CNI plugin. For example, run the following command:$ rosa create cluster --hosted-cp --subnet-ids=$SUBNET_IDS --oidc-config-id=$OIDC_ID --cluster-name=<cluster_name> --operator-roles-prefix=$OPERATOR_ROLES_PREFIX --no-cni
Check the status of your cluster by running the following command:
$ rosa describe cluster --cluster=<cluster_name>ImportantWhen you first log in to the cluster after it reaches
readystatus, the nodes are still in thenot readystate until you install your own CNI plugin. After CNI installation, the nodes change toready.The following
Statefield changes are listed in the output as the cluster installation progresses:-
pending (Preparing account) -
installing (DNS setup in progress) -
installing readyNoteIf the installation fails or the
Statefield does not change toreadyafter more than 10 minutes, check the installation troubleshooting documentation for details. For more information, see Troubleshooting installations. For steps to contact Red Hat Support for assistance, see Getting support for Red Hat OpenShift Service on AWS.
-
Track the progress of the cluster creation by watching the Red Hat OpenShift Service on AWS installation program logs. To check the logs, run the following command:
$ rosa logs install --cluster=<cluster_name> --watchOptional: To watch for new log messages as the installation progresses, use the
--watchargument.
10.6. Installing a CNI plugin
After creating a Red Hat OpenShift Service on AWS cluster without a CNI plugin, you must install the CNI plugin before the cluster nodes are ready and workloads can deploy. Until you install a CNI provider, components such as the web console, Ingress Controller, image registry, and monitoring stack are not available.
Procedure
Install your CNI plugin.
The nodes change from the
not readytoreadystate.
Chapter 11. Deleting a Red Hat OpenShift Service on AWS cluster
You can delete a Red Hat OpenShift Service on AWS cluster by using either the Red Hat OpenShift Cluster Manager or the ROSA command-line interface (CLI) (rosa). After deleting the cluster, you can clean up the AWS Identity and Access Management (IAM) resources that were used by the cluster.
11.1. Deleting a Red Hat OpenShift Service on AWS cluster and the cluster-specific IAM resources
If you no longer need a Red Hat OpenShift Service on AWS cluster, you can delete it to stop incurring costs. After deleting the cluster, you must also remove the cluster-specific Operator roles and OpenID Connect (OIDC) provider to avoid leaving unused IAM resources in your AWS account.
The cluster deletion must complete before you remove the IAM resources, because the resources are used in the cluster deletion and clean up processes.
If add-ons are installed, the cluster deletion takes longer because add-ons are uninstalled before the cluster is deleted. The amount of time depends on the number and size of the add-ons.
Prerequisites
- You have installed a Red Hat OpenShift Service on AWS cluster.
- You have installed and configured the latest ROSA CLI on your installation host.
Procedure
Get the cluster ID, the Amazon Resource Names (ARNs) for the cluster-specific Operator roles, and the endpoint URL for the OIDC provider by running the following command:
$ rosa describe cluster --cluster=<cluster_name>Example output
Name:                       test_cluster
Domain Prefix:              test_cluster
Display Name:               test_cluster
ID:                         <cluster_id>
External ID:                <external_id>
Control Plane:              ROSA Service Hosted
OpenShift Version:          4.21.0
Channel Group:              stable
DNS:                        test_cluster.l3cn.p3.openshiftapps.com
AWS Account:                <AWS_id>
AWS Billing Account:        <AWS_id>
API URL:                    https://api.test_cluster.l3cn.p3.openshiftapps.com:443
Console URL:
Region:                     us-east-1
Availability:
 - Control Plane:           MultiAZ
 - Data Plane:              SingleAZ

Nodes:
 - Compute (desired):       2
 - Compute (current):       0
Network:
 - Type:                    OVNKubernetes
 - Service CIDR:            172.30.0.0/16
 - Machine CIDR:            10.0.0.0/16
 - Pod CIDR:                10.128.0.0/14
 - Host Prefix:             /23
 - Subnets:                 <subnet_ids>
EC2 Metadata Http Tokens:   optional
Role (STS) ARN:             arn:aws:iam::<AWS_id>:role/test_cluster-HCP-ROSA-Installer-Role
Support Role ARN:           arn:aws:iam::<AWS_id>:role/test_cluster-HCP-ROSA-Support-Role
Instance IAM Roles:
 - Worker:                  arn:aws:iam::<AWS_id>:role/test_cluster-HCP-ROSA-Worker-Role
Operator IAM Roles:
 - arn:aws:iam::<AWS_id>:role/test_cluster-openshift-cloud-network-config-controller-cloud-crede
 - arn:aws:iam::<AWS_id>:role/test_cluster-openshift-image-registry-installer-cloud-credentials
 - arn:aws:iam::<AWS_id>:role/test_cluster-openshift-ingress-operator-cloud-credentials
 - arn:aws:iam::<AWS_id>:role/test_cluster-kube-system-kube-controller-manager
 - arn:aws:iam::<AWS_id>:role/test_cluster-kube-system-capa-controller-manager
 - arn:aws:iam::<AWS_id>:role/test_cluster-kube-system-control-plane-operator
 - arn:aws:iam::<AWS_id>:role/hcpcluster-kube-system-kms-provider
 - arn:aws:iam::<AWS_id>:role/test_cluster-openshift-cluster-csi-drivers-ebs-cloud-credentials
Managed Policies:           Yes
State:                      ready
Private:                    No
Created:                    Apr 16 2024 20:32:06 UTC
User Workload Monitoring:   Enabled
Details Page:               https://console.redhat.com/openshift/details/s/<cluster_id>
OIDC Endpoint URL:          https://oidc.op1.openshiftapps.com/<cluster_id> (Managed)
Audit Log Forwarding:       Disabled
External Authentication:    Disabled
where:
-
The
IDfield lists the cluster ID. -
The
Operator IAM Rolesfield specifies the ARNs for the cluster-specific Operator roles. For example, in the sample output the ARN for the role required by the Machine Config Operator isarn:aws:iam::<aws_account_id>:role/mycluster-x4q9-openshift-machine-api-aws-cloud-credentials. The
OIDC Endpoint URLfield displays the endpoint URL for the cluster-specific OIDC provider.ImportantAfter the cluster is deleted, you need the cluster ID to delete the cluster-specific STS resources using the ROSA CLI.
-
The
Delete the cluster by using either the OpenShift Cluster Manager or the ROSA CLI:
To delete the cluster by using the OpenShift Cluster Manager:
- Navigate to the OpenShift Cluster Manager.
-
Click the Options menu
 next to your cluster and select Delete cluster.
- Type the name of your cluster into the prompt and click Delete.
To delete the cluster using the ROSA CLI:
Run the following command, replacing
<cluster_name>with the name or ID of your cluster:$ rosa delete cluster --cluster=<cluster_name> --watchImportantYou must wait for cluster deletion to complete before you remove the Operator roles and the OIDC provider.
Delete the cluster-specific Operator IAM roles by running one of the following commands:
For clusters without a shared Virtual Private Cloud (VPC):
$ rosa delete operator-roles --prefix <operator_role_prefix>For clusters with a shared VPC:
$ rosa delete operator-roles --prefix <operator_role_prefix> --delete-hosted-shared-vpc-policies
Delete the OIDC provider by running the following command:
$ rosa delete oidc-provider --oidc-config-id <oidc_config_id>
Troubleshooting
- Verify that there are no add-ons for your cluster pending in the Hybrid Cloud Console.
- Verify that all AWS resources and dependencies have been deleted in the Amazon Web Console.
11.2. Deleting the account-wide IAM resources
You can delete the account-wide AWS Identity and Access Management (IAM) resources. First, delete all Red Hat OpenShift Service on AWS clusters that depend on these resources.
If you no longer need Red Hat OpenShift Cluster Manager to install Red Hat OpenShift Service on AWS clusters, you can delete the OpenShift Cluster Manager and user IAM roles.
The account-wide IAM roles and policies might be used by other Red Hat OpenShift Service on AWS clusters in the same AWS account. Only remove the resources if they are not required by other clusters.
The OpenShift Cluster Manager and user IAM roles are required for other Red Hat OpenShift Service on AWS clusters in the same AWS account. These roles enable you to install, manage, and delete clusters by using OpenShift Cluster Manager. Only remove them if you no longer need to manage Red Hat OpenShift Service on AWS clusters in your account. If these roles are removed before cluster deletion, see "Repairing a cluster that cannot be deleted" in Troubleshooting cluster deployments.
11.2.1. Deleting the account-wide IAM roles and policies
You can delete the account-wide IAM roles and policies that you created for Red Hat OpenShift Service on AWS deployments, along with the account-wide Operator policies. You can delete the account-wide IAM roles and policies only after deleting all Red Hat OpenShift Service on AWS clusters that depend on them.
The account-wide IAM roles and policies might be used by other Red Hat OpenShift Service on AWS clusters in the same AWS account. Only remove the roles if they are not required by other clusters.
Prerequisites
- You have account-wide IAM roles that you want to delete.
-
You have installed and configured the latest ROSA CLI (
rosa) on your installation host.
Procedure
Delete the account-wide roles:
List the account-wide roles in your AWS account by using the ROSA CLI (
rosa):$ rosa list account-rolesExample output
I: Fetching account roles
ROLE NAME                                 ROLE TYPE      ROLE ARN                                                                 OPENSHIFT VERSION  AWS Managed
ManagedOpenShift-HCP-ROSA-Installer-Role  Installer      arn:aws:iam::<aws_account_id>:role/ManagedOpenShift-HCP-ROSA-Installer-Role  4.21               Yes
ManagedOpenShift-HCP-ROSA-Support-Role    Support        arn:aws:iam::<aws_account_id>:role/ManagedOpenShift-HCP-ROSA-Support-Role    4.21               Yes
ManagedOpenShift-HCP-ROSA-Worker-Role     Worker         arn:aws:iam::<aws_account_id>:role/ManagedOpenShift-HCP-ROSA-Worker-Role     4.21               Yes
Delete the account-wide roles by running one of the following commands:
For clusters without a shared Virtual Private Cloud (VPC):
$ rosa delete account-roles --prefix <prefix> --mode autoYou must include the
--<prefix>argument. Replace<prefix>with the prefix of the account-wide roles to delete. If you did not specify a custom prefix when you created the account-wide roles, specify the default prefix,ManagedOpenShift.For clusters with a shared VPC:
$ rosa delete account-roles --prefix <prefix> --delete-hosted-shared-vpc-policies --mode autoYou must include the
--<prefix>argument. Replace<prefix>with the prefix of the account-wide roles to delete. If you did not specify a custom prefix when you created the account-wide roles, specify the default prefix,ManagedOpenShift.ImportantThe account-wide IAM roles might be used by other Red Hat OpenShift Service on AWS clusters in the same AWS account. Only remove the roles if they are not required by other clusters.
Example output
W: There are no classic account roles to be deleted
I: Deleting hosted CP account roles
? Delete the account role 'delete-rosa-HCP-ROSA-Installer-Role'? Yes
I: Deleting account role 'delete-rosa-HCP-ROSA-Installer-Role'
? Delete the account role 'delete-rosa-HCP-ROSA-Support-Role'? Yes
I: Deleting account role 'delete-rosa-HCP-ROSA-Support-Role'
? Delete the account role 'delete-rosa-HCP-ROSA-Worker-Role'? Yes
I: Deleting account role 'delete-rosa-HCP-ROSA-Worker-Role'
I: Successfully deleted the hosted CP account roles
Delete the account-wide in-line and Operator policies:
Under the Policies page in the AWS IAM Console, filter the list of policies by the prefix that you specified when you created the account-wide roles and policies.
NoteIf you did not specify a custom prefix when you created the account-wide roles, search for the default prefix,
ManagedOpenShift.Delete the account-wide policies and Operator policies by using the AWS IAM Console. For more information about deleting IAM policies by using the AWS IAM Console, see Deleting IAM policies in the AWS documentation.
ImportantThe account-wide and Operator IAM policies might be used by other Red Hat OpenShift Service on AWS clusters in the same AWS account. Only remove the roles if they are not required by other clusters.
11.2.2. Unlinking and deleting the OpenShift Cluster Manager and user IAM roles
When you install a Red Hat OpenShift Service on AWS cluster by using Red Hat OpenShift Cluster Manager, you also create OpenShift Cluster Manager and user Identity and Access Management (IAM) roles linked to your Red Hat organization. After deleting your cluster, you can unlink and delete the roles by using the ROSA command-line interface (CLI) (rosa).
The OpenShift Cluster Manager and user IAM roles are required to install and manage other Red Hat OpenShift Service on AWS clusters in the same AWS account using OpenShift Cluster Manager. Only remove the roles if you no longer need to use the OpenShift Cluster Manager to install Red Hat OpenShift Service on AWS clusters.
Prerequisites
- You created OpenShift Cluster Manager and user IAM roles and linked them to your Red Hat organization.
-
You have installed and configured the latest ROSA CLI (
rosa) on your installation host. - You have organization administrator privileges in your Red Hat organization.
Procedure
Unlink the OpenShift Cluster Manager IAM role from your Red Hat organization and delete the role:
List the OpenShift Cluster Manager IAM roles in your AWS account:
$ rosa list ocm-rolesExample output
I: Fetching ocm roles
ROLE NAME                                                     ROLE ARN                                                                                         LINKED  ADMIN  AWS Managed
ManagedOpenShift-OCM-Role-<red_hat_organization_external_id>  arn:aws:iam::<aws_account_id>:role/ManagedOpenShift-OCM-Role-<red_hat_organization_external_id>  Yes      Yes     Yes
If your OpenShift Cluster Manager IAM role is listed as linked, unlink it from your Red Hat organization by running the following command:
$ rosa unlink ocm-role --role-arn <arn>Replace
<arn>with the Amazon Resource Name (ARN) for your OpenShift Cluster Manager IAM role. The ARN is specified in the output of the preceding command. In the preceding example, the ARN is in the formatarn:aws:iam::<aws_account_id>:role/ManagedOpenShift-OCM-Role-<red_hat_organization_external_id>.Example output
I: Unlinking OCM role
? Unlink the 'arn:aws:iam::<aws_account_id>:role/ManagedOpenShift-OCM-Role-<red_hat_organization_external_id>' role from organization '<red_hat_organization_id>'? Yes
I: Successfully unlinked role-arn 'arn:aws:iam::<aws_account_id>:role/ManagedOpenShift-OCM-Role-<red_hat_organization_external_id>' from organization account '<red_hat_organization_id>'
Delete the OpenShift Cluster Manager IAM role and policies:
$ rosa delete ocm-role --role-arn <arn>Example output
I: Deleting OCM role
? OCM Role ARN: arn:aws:iam::<aws_account_id>:role/ManagedOpenShift-OCM-Role-<red_hat_organization_external_id>
? Delete 'arn:aws:iam::<aws_account_id>:role/ManagedOpenShift-OCM-Role-<red_hat_organization_external_id>' ocm role? Yes
? OCM role deletion mode: auto
I: Successfully deleted the OCM role
The
OCM role deletion modefield specifies the deletion mode. You can useautomode to automatically delete the OpenShift Cluster Manager IAM role and policies. Inmanualmode, the ROSA CLI generates theawscommands needed to delete the role and policies.manualmode enables you to review the details before running theawscommands manually.
Unlink the user IAM role from your Red Hat organization and delete the role:
List the user IAM roles in your AWS account:
$ rosa list user-rolesExample output
I: Fetching user roles
ROLE NAME                                  ROLE ARN                                                                  LINKED
ManagedOpenShift-User-<ocm_user_name>-Role  arn:aws:iam::<aws_account_id>:role/ManagedOpenShift-User-<ocm_user_name>-Role  Yes
If your user IAM role is listed as linked in the output of the preceding command, unlink the role from your Red Hat organization:
$ rosa unlink user-role --role-arn <arn>Replace
<arn>with the Amazon Resource Name (ARN) for your user IAM role. The ARN is specified in the output of the preceding command. In the preceding example, the ARN is in the formatarn:aws:iam::<aws_account_id>:role/ManagedOpenShift-User-<ocm_user_name>-Role.Example output
I: Unlinking user role
? Unlink the 'arn:aws:iam::<aws_account_id>:role/ManagedOpenShift-User-<ocm_user_name>-Role' role from the current account '<ocm_user_account_id>'? Yes
I: Successfully unlinked role ARN 'arn:aws:iam::<aws_account_id>:role/ManagedOpenShift-User-<ocm_user_name>-Role' from account '<ocm_user_account_id>'
Delete the user IAM role:
$ rosa delete user-role --role-arn <arn>Example output
I: Deleting user role
? User Role ARN: arn:aws:iam::<aws_account_id>:role/ManagedOpenShift-User-<ocm_user_name>-Role
? Delete the 'arn:aws:iam::<aws_account_id>:role/ManagedOpenShift-User-<ocm_user_name>-Role' role from the AWS account? Yes
? User role deletion mode: auto
I: Successfully deleted the user role
The
User role deletion modefield specifies the deletion mode. You can useautomode to automatically delete the user IAM role. Inmanualmode, the ROSA CLI generates theawscommand needed to delete the role.manualmode enables you to review the details before running theawscommand manually.
Legal Notice
Copyright © Red Hat
OpenShift documentation is licensed under the Apache License 2.0 (https://www.apache.org/licenses/LICENSE-2.0).
Modified versions must remove all Red Hat trademarks.
Portions adapted from https://github.com/kubernetes-incubator/service-catalog/ with modifications by Red Hat.
Red Hat, Red Hat Enterprise Linux, the Red Hat logo, the Shadowman logo, JBoss, OpenShift, Fedora, the Infinity logo, and RHCE are trademarks of Red Hat, Inc., registered in the United States and other countries.
Linux® is the registered trademark of Linus Torvalds in the United States and other countries.
Java® is a registered trademark of Oracle and/or its affiliates.
XFS® is a trademark of Silicon Graphics International Corp. or its subsidiaries in the United States and/or other countries.
MySQL® is a registered trademark of MySQL AB in the United States, the European Union and other countries.
Node.js® is an official trademark of the OpenJS Foundation.
The OpenStack® Word Mark and OpenStack logo are either registered trademarks/service marks or trademarks/service marks of the OpenStack Foundation, in the United States and other countries and are used with the OpenStack Foundation’s permission. We are not affiliated with, endorsed or sponsored by the OpenStack Foundation, or the OpenStack community.
All other trademarks are the property of their respective owners.