このコンテンツは選択した言語では利用できません。
3.5. Configuring Fence Devices
Configuring fence devices consists of creating, modifying, and deleting fence devices. Creating a fence device consists of selecting a fence device type and entering parameters for that fence device (for example, name, IP address, login, and password). Modifying a fence device consists of selecting an existing fence device and changing parameters for that fence device. Deleting a fence device consists of selecting an existing fence device and deleting it.
Note
If you are creating a new cluster, you can create fence devices when you configure cluster nodes. Refer to Section 3.6, “Configuring Cluster Members”.
With Conga you can create shared and non-shared fence devices.
The following shared fence devices are available:
- APC Power Switch
- Brocade Fabric Switch
- Bull PAP
- Egenera SAN Controller
- GNBD
- IBM Blade Center
- McData SAN Switch
- QLogic SANbox2
- SCSI Fencing
- Virtual Machine Fencing
- Vixel SAN Switch
- WTI Power Switch
The following non-shared fence devices are available:
- Dell DRAC
- HP iLO
- IBM RSA II
- IPMI LAN
- RPS10 Serial Switch
This section provides procedures for the following tasks:
- Creating shared fence devices — Refer to Section 3.5.1, “Creating a Shared Fence Device”. The procedures apply only to creating shared fence devices. You can create non-shared (and shared) fence devices while configuring nodes (refer to Section 3.6, “Configuring Cluster Members”).
- Modifying or deleting fence devices — Refer to Section 3.5.2, “Modifying or Deleting a Fence Device”. The procedures apply to both shared and non-shared fence devices.
The starting point of each procedure is at the cluster-specific page that you navigate to from Choose a cluster to administer displayed on the tab.
3.5.1. Creating a Shared Fence Device
リンクのコピーリンクがクリップボードにコピーされました!
To create a shared fence device, follow these steps:
- At the detailed menu for the cluster (below the menu), click . Clicking causes the display of the fence devices for a cluster and causes the display of menu items for fence device configuration: and .
Note
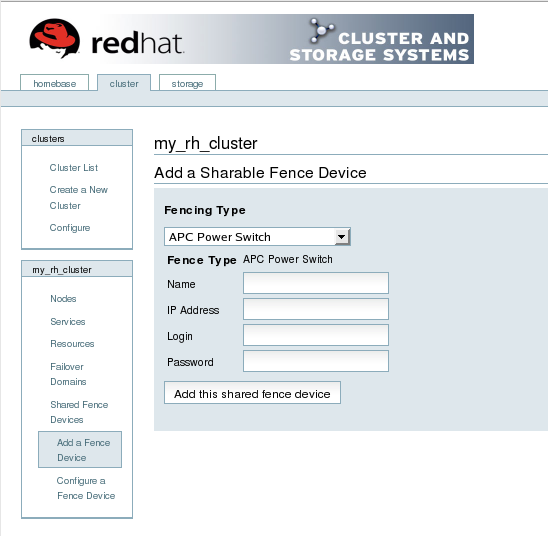
If this is an initial cluster configuration, no fence devices have been created, and therefore none are displayed. - Click . Clicking causes the Add a Sharable Fence Device page to be displayed (refer to Figure 3.1, “Fence Device Configuration”).
Figure 3.1. Fence Device Configuration
- At the Add a Sharable Fence Device page, click the drop-down box under and select the type of fence device to configure.
- Specify the information in the Fencing Type dialog box according to the type of fence device. Refer to Appendix B, Fence Device Parameters for more information about fence device parameters.
- Click .
- Clicking causes a progress page to be displayed temporarily. After the fence device has been added, the detailed cluster properties menu is updated with the fence device under .
