9장. JUnit을 사용하여 경로 테스트
이 튜토리얼에서는 새 Camel 테스트 케이스 마법사를 사용하여 경로에 대한 테스트 케이스를 생성한 다음 경로를 테스트하는 방법을 보여줍니다.
9.1. 개요
새 Camel 테스트 케이스 마법사는 상용구 JUnit 테스트 케이스를 생성합니다. 경로를 만들거나 수정할 때(예: 더 많은 프로세서 추가) 생성 또는 업데이트된 경로와 관련된 기대치 및 어설션을 추가하도록 생성된 테스트 케이스를 생성하거나 수정해야 합니다. 이렇게 하면 테스트가 경로에 유효한지 확인할 수 있습니다.
9.2. 목표
이 튜토리얼에서는 다음 작업을 완료합니다.
-
JUnit 테스트 케이스를 저장할
/src/test/폴더를 생성합니다. -
ZooOrderApp프로젝트에 대한 JUnit 테스트 케이스 생성 - 새로 생성된 JUnit 테스트 케이스 수정
-
ZooOrderApp프로젝트의pom.xml파일 수정 -
새 JUnit 테스트 케이스를 사용하여
ZooOrderApp실행 - 출력 보기
9.3. 사전 요구 사항
이 튜토리얼을 시작하려면 다음 중 하나에서 생성된 ZooOrderApp 프로젝트가 필요합니다.
8장. 경로를 통해 메시지 추적 튜토리얼을 완료합니다.
또는
-
2장. 환경 설정 튜토리얼을 완료하고 “리소스 파일 정보” 에 설명된 대로 프로젝트의
블루프린트Contexts/blueprint3.xml파일을 제공된블루프린트Contexts/blueprint3.xml파일로 교체합니다.
Project Explorer 의
ZooOrderApp프로젝트의/src/data/디렉터리 및/target/messages/하위 디렉터리에서 추적 생성 메시지를 삭제합니다. 추적 생성 메시지는ID-접두사로 시작합니다. 예를 들어 그림 9.1. “추적 생성 메시지” 에는 8개의 추적 생성 메시지가 표시됩니다.그림 9.1. 추적 생성 메시지
일괄 처리로 모든 추적 생성 메시지를 선택하고 마우스 오른쪽 버튼으로 클릭한 다음 삭제 를 선택합니다.
9.4. src/test 폴더 생성
ZooOrderApp 프로젝트에 대한 JUnit 테스트 케이스를 생성하기 전에 빌드 경로에 포함된 폴더를 생성해야 합니다.
-
Project Explorer 에서
ZooOrderApp프로젝트를 마우스 오른쪽 버튼으로 클릭한 다음 새폴더 를 선택합니다. 새 폴더 대화 상자의 프로젝트 트리 창에서
ZooOrderApp노드를 확장하고src폴더를 선택합니다.Enter에
ZooOrderApp/src가 표시되는지 확인하거나 상위 폴더 필드를 선택합니다.폴더 이름 에서
/test/java:을 입력합니다.완료를 클릭합니다.
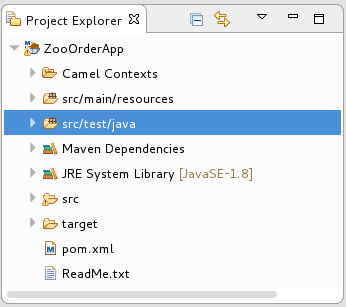
Project Explorer 에서 새
src/test/java폴더가src/main/resources폴더 아래에 나타납니다.새
/src/test/java폴더가 빌드 경로에 포함되어 있는지 확인합니다.-
Project Explorer 에서
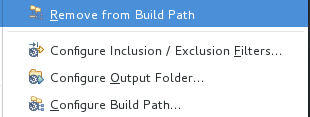
/src/test/java폴더를 마우스 오른쪽 버튼으로 클릭하여 컨텍스트 메뉴를 엽니다. 빌드 경로를 선택하여 메뉴 옵션을 확인합니다.
Remove from Build Path 메뉴 옵션은
/src/test/java폴더가 현재 빌드 경로에 포함되어 있는지 확인합니다.
-
Project Explorer 에서
9.5. JUnit 테스트 케이스 생성
ZooOrderApp 프로젝트에 대한 JUnit 테스트 케이스를 생성하려면 다음을 수행합니다.
-
Project Explorer 에서
src/test/java를 선택합니다. 마우스 오른쪽 버튼으로 클릭한 다음 새
Camel 테스트 케이스 를 선택합니다. -
Camel JUnit 테스트 케이스 마법사에서
소스 폴더필드에ZooOrderApp/src/test/java가 포함되어 있는지 확인합니다. 적절한 폴더를 찾으려면 을 클릭합니다.
-
Package 필드에
tutorial.zooapp.route를 입력합니다. 이 패키지에는 새 테스트 케이스가 포함됩니다. 테스트 중인 Camel XML 파일에서
 를 클릭하여 XML 파일을 필터링하도록 구성된 파일 탐색기를 연 다음
 ZooOrderApp프로젝트의블루프린트.xml파일을 선택합니다.OK를 클릭합니다. Name 필드의 기본값은 블루프린트Test 입니다.
다음을 클릭하여 Test Endpoints 페이지를 엽니다.
기본적으로 모든 끝점이 선택되며 테스트 사례에 포함됩니다.
완료를 클릭합니다.
참고메시지가 표시되면 빌드 경로에 JUnit을 추가합니다.
테스트 아티팩트가 프로젝트에 추가되고 src/test/java 아래의 Project Explorer 에 표시됩니다. 테스트 케이스를 구현하는 클래스는 툴링의 Java 편집기에서 열립니다.
생성된 이 JUnit 테스트 케이스는 ZooOrderApp 프로젝트에 충분하지 않으며 성공적으로 실행되지 않습니다. “블루프린트Test 파일 수정” 및 “pom.xml 파일 수정” 에 설명된 대로 이 파일과 프로젝트의 pom.xml 을 수정해야 합니다.
9.6. 블루프린트Test 파일 수정
블루프린트 CryostatTest.java 파일을 다음과 같이 수정해야 합니다.
- 필요한 파일 함수를 지원하는 여러 클래스 가져오기
-
다양한 소스
.xml파일의 내용을 보관하기 위한 변수 생성 -
소스
.xml파일의 내용 읽기 - 적절한 기대치 정의
블루프린트Test.java 파일을 수정하려면 다음 단계를 따르십시오.
Project Explorer 에서
ZooOrderApp프로젝트를 확장하여블루프린트 CryostatTest.java파일을 노출합니다.-
블루프린트Test.java파일을 엽니다. -
Java 편집기에서
org.apache.camel.EndpointInject; 가져오기옆에 있는 확장 버튼을 클릭하여 목록을 확장합니다. 굵은 텍스트로 표시된 두 행을 추가합니다. 첫 번째 행을 추가하면 다음 섹션의 지시에 따라
pom.xml파일을 업데이트할 때 해결되는 오류가 발생합니다.Copy to Clipboard Copied! Toggle word wrap Toggle overflow -
// Expected message body 뒤에 바로 이어지는 줄까지 아래로 스크롤합니다. 해당 줄의
protected Object[] expectedBodies={ … expectedBody2</something>"};Cryostat- Cryostat를 이러한보호된 문자열 본문#으로 바꿉니다.protected String body1; protected String body2; protected String body3; protected String body4; protected String body5; protected String body6;
protected String body1; protected String body2; protected String body3; protected String body4; protected String body5; protected String body6;Copy to Clipboard Copied! Toggle word wrap Toggle overflow 공용 void testCamelRoute() 줄로 아래로 스크롤하면 Exception {)을 throw하고 그 줄body# = FileUtils.readFileToString(new File("src/data/message#.xml"), "UTF-8")을 바로 삽입합니다. 이러한 줄은 다음 섹션에 설명된 대로pom.xml파일을 업데이트할 때까지 오류를 나타냅니다.// Valid orders body2 = FileUtils.readFileToString(new File("src/data/message2.xml"), "UTF-8"); body4 = FileUtils.readFileToString(new File("src/data/message4.xml"), "UTF-8"); body5 = FileUtils.readFileToString(new File("src/data/message5.xml"), "UTF-8"); body6 = FileUtils.readFileToString(new File("src/data/message6.xml"), "UTF-8"); // Invalid orders body1 = FileUtils.readFileToString(new File("src/data/message1.xml"), "UTF-8"); body3 = FileUtils.readFileToString(new File("src/data/message3.xml"), "UTF-8");// Valid orders body2 = FileUtils.readFileToString(new File("src/data/message2.xml"), "UTF-8"); body4 = FileUtils.readFileToString(new File("src/data/message4.xml"), "UTF-8"); body5 = FileUtils.readFileToString(new File("src/data/message5.xml"), "UTF-8"); body6 = FileUtils.readFileToString(new File("src/data/message6.xml"), "UTF-8"); // Invalid orders body1 = FileUtils.readFileToString(new File("src/data/message1.xml"), "UTF-8"); body3 = FileUtils.readFileToString(new File("src/data/message3.xml"), "UTF-8");Copy to Clipboard Copied! Toggle word wrap Toggle overflow -
// TODO 후 직접 따르는 행까지 아래로 스크롤하면 테스트 중인 경로에 대한 기대치가 의미가있습니다. outputEndpoint.expectedBodiesReceivedInAnyOrder(expectedBodies);…inputEndpoint.sendBody(expectedBody)로 시작하는 코드 블록을 여기에 표시된 행으로 교체합니다.// Invalid orders outputEndpoint.expectedBodiesReceived(body1, body3); // Valid orders for USA output3Endpoint.expectedBodiesReceived(body2, body5, body6); // Valid order for Germany output4Endpoint.expectedBodiesReceived(body4);
// Invalid orders outputEndpoint.expectedBodiesReceived(body1, body3); // Valid orders for USA output3Endpoint.expectedBodiesReceived(body2, body5, body6); // Valid order for Germany output4Endpoint.expectedBodiesReceived(body4);Copy to Clipboard Copied! Toggle word wrap Toggle overflow 나머지 코드는 그대로 둡니다.
- 파일을 저장합니다.
업데이트된
블루프린트 CryostatTest.java파일에 필요한 수정 사항이 있는지 확인합니다. 다음과 같이 표시됩니다.Copy to Clipboard Copied! Toggle word wrap Toggle overflow
9.7. pom.xml 파일 수정
commons-io 프로젝트에 대한 종속성을 ZooOrderApp 프로젝트의 pom.xml 파일에 추가해야 합니다.
-
Project Explorer 에서
target폴더 아래에 있는pom.xml을 선택하고 툴의 XML 편집기에서 엽니다. -
페이지 하단에서
pom.xml탭을 클릭하여 편집을 위해 파일을 엽니다. 다음 행을 <
dependencies> 섹션 끝에추가합니다.Copy to Clipboard Copied! Toggle word wrap Toggle overflow - 파일을 저장합니다.
9.8. JUnit 테스트 실행
테스트를 실행하려면 다음을 수행합니다.
- JBoss 관점으로 전환하여 더 많은 작업 공간을 확보합니다.
-
Project Explorer 에서
ZooOrderApp프로젝트를 마우스 오른쪽 버튼으로 클릭합니다. Run as
JUnit Test 를 선택합니다. 기본적으로 JUnit 뷰가 사이드바에 열립니다. (더 나은 보기를 제공하려면 콘솔 , 서버 및 속성 탭을 표시하는 오른쪽 패널로 드래그하십시오.)
참고프로젝트에서 JUnit을 처음 실행할 때 테스트가 실패하는 경우가 있습니다. 테스트를 다시 실행하면 성공적인 결과가 발생합니다.
테스트가 성공적으로 실행되면 다음과 같은 내용이 표시됩니다.
그림 9.2. 성공적인 JUnit 실행
테스트가 실패하면 다음과 같은 내용이 표시됩니다.
그림 9.3. 실패한 JUnit 실행
참고실행 환경이 Java SE 8로 설정되지 않은 경우 JUnit이 실패합니다. JUnit 탭 상단에 있는 메시지 표시줄에는 올바른 SDK를 찾을 수 없음을 나타내는 오류 메시지가 표시됩니다.
이 문제를 해결하려면 프로젝트의 컨텍스트 메뉴를 열고 Run As
Run Configurations JRE 를 선택합니다. *실행 환경 필드 옆에 있는 환경] 버튼을 클릭하여 Java SE 8 환경을 찾아서 선택합니다. 출력을 검사하고 모든 테스트 오류를 해결하기 위해 조치를 취합니다.
JUnit 패널에 표시되는 오류를 더 보려면 패널의 메뉴 모음에서
 를 클릭하여 뷰를 극대화합니다.
JUnit 테스트 케이스를 다시 실행하기 전에 Project Explorer 의 ZooOrderApp 프로젝트의
/src/data폴더에서 JUnit 생성 테스트 메시지를 삭제합니다( 그림 9.1. “추적 생성 메시지”참조).
9.9. 추가 읽기
JUnit 테스트에 대한 자세한 내용은 JUnit 을 참조하십시오.
9.10. 다음 단계
10장. Red Hat Fuse에 프로젝트 게시 튜토리얼에서는 Apache Camel 프로젝트를 Red Hat Fuse에 게시하는 방법을 알아봅니다.


