이 콘텐츠는 선택한 언어로 제공되지 않습니다.
Chapter 7. Using Clair V4 Security Scanning
Clair v4 is the next generation of Clair image scanning available with Red Hat Quay. Clair v4 is currently released as Technology Preview, which means that it is not supported for production use. However, you are encouraged to test Clair v4 as it represents the direction of Clair image scanning development.
To align with the Red Hat Quay release, the current Clair v4 release image is clair:v3.3.4.
7.1. What is Clair v4?
Technically, Clair v4 is a set of micro services that can be used with Red Hat Quay to perform vulnerability scanning of container images associated with a set of Linux operating systems. The micro services design of Clair v4 makes it appropriate to run in a highly scalable configuration, where components can be scaled separately as appropriate for enterprise environments.
For the purposes of trying out Clair v4, we recommend running it in combo mode (see clair-combo.yaml) This mode, described here, brings all the microservices together as one process.
All supported security databases for Clair v4 are turned on. These databases include:
- Alpine SecDB database
- AWS UpdateInfo
- Debian Oval database
- Oracle Oval database
- RHEL Oval database
- SUSE Oval database
- Ubuntu Oval database
For information on how Clair does security mapping with the different databases, see ClairCore Severity Mapping.
Because Clair v4 is Technology Preview, don’t expect 100% accurate reporting. Expect that the presentation of vulnerability results will look different going forward than they did with v2. Over time, Clair v4 will produce more results.
The steps for using Clair v4 alongside an existing Red Hat Quay + Clair v2 environment are described next.
7.2. Configuring Clair v4
To try out Clair v4, stand up a Red Hat Quay cluster with a running Clair v2 instance. Then use the following procedure to run Clair v4 along side it. Here is how to do that on an OpenShift v4.2 or later cluster on an AWS cloud.
Set your current project to the name of the project in which Red Hat Quay is running. For example:
oc project quay-enterprise
$ oc project quay-enterpriseCopy to Clipboard Copied! Toggle word wrap Toggle overflow Create a Postgres deployment file for Clair v4 (for example,
clairv4-postgres.yaml) as follows.clairv4-postgres.yaml
Copy to Clipboard Copied! Toggle word wrap Toggle overflow Deploy the postgres database as follows:
oc create -f ./clairv4-postgres.yaml
$ oc create -f ./clairv4-postgres.yamlCopy to Clipboard Copied! Toggle word wrap Toggle overflow Create a Clair config.yaml file to use for Clair v4. For example:
config.yaml
Copy to Clipboard Copied! Toggle word wrap Toggle overflow Create a secret from the Clair config.yaml:
oc create secret generic clairv4-config-secret --from-file=./config.yaml
$ oc create secret generic clairv4-config-secret --from-file=./config.yamlCopy to Clipboard Copied! Toggle word wrap Toggle overflow Create the Clair v4 deployment file (for example,
clair-combo.yaml) and modify it as necessary:clair-combo.yaml
Copy to Clipboard Copied! Toggle word wrap Toggle overflow - 1
- Change image to latest clair image name and version.
- 2
- With the Service set to clairv4, the scanner endpoint for Clair v4 is entered later into the Red Hat Quay config.yaml in the SECURITY_SCANNER_V4_ENDPOINT as http://clairv4.
Create the Clair v4 deployment as follows:
oc create -f ./clair-combo.yaml
$ oc create -f ./clair-combo.yamlCopy to Clipboard Copied! Toggle word wrap Toggle overflow Modify the
config.yamlfile for your Red Hat Quay deployment to add the following entries at the end:Copy to Clipboard Copied! Toggle word wrap Toggle overflow Redeploy the modified
config.yamlto the secret containing that file (for example,quay-enterprise-config-secret:oc delete secret quay-enterprise-config-secret oc create secret generic quay-enterprise-config-secret --from-file=./config.yaml
$ oc delete secret quay-enterprise-config-secret
$ oc create secret generic quay-enterprise-config-secret --from-file=./config.yaml
Copy to Clipboard Copied! Toggle word wrap Toggle overflow -
For the new
config.yamlto take effect, you need to restart the Red Hat Quay pods. Simply deleting thequay-apppods causes pods with the updated configuration to be deployed.
At this point, images in any of the organizations identified in the namespace whitelist will be scanned by Clair v4.
7.3. Using Clair v4
The user interface for viewing vulnerability information gathered by Clair v4 is essentially the same as it was for Clair v2.
- Log in to your Red Hat Quay cluster and select an organization for which you have configured Clair v4 scanning.
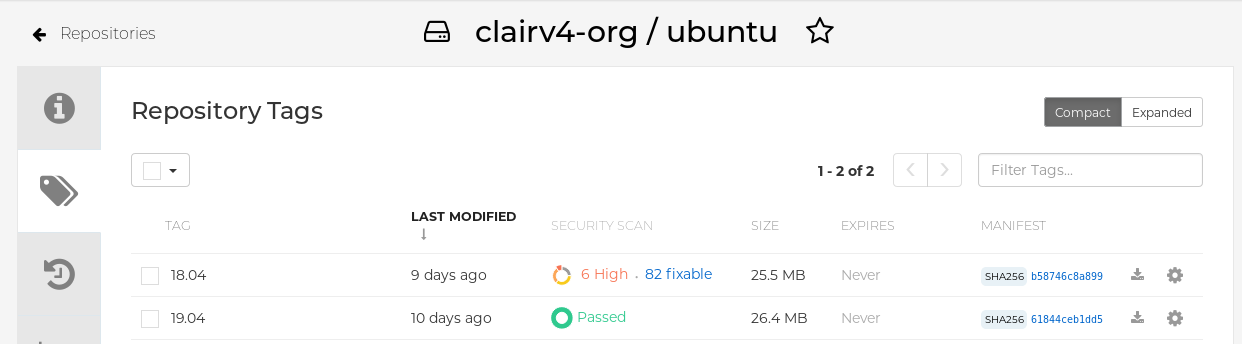
Select a repository from that organization that holds some images and select Tags from the left navigation. The following figure shows an example of a repository with two images that have been scanned:
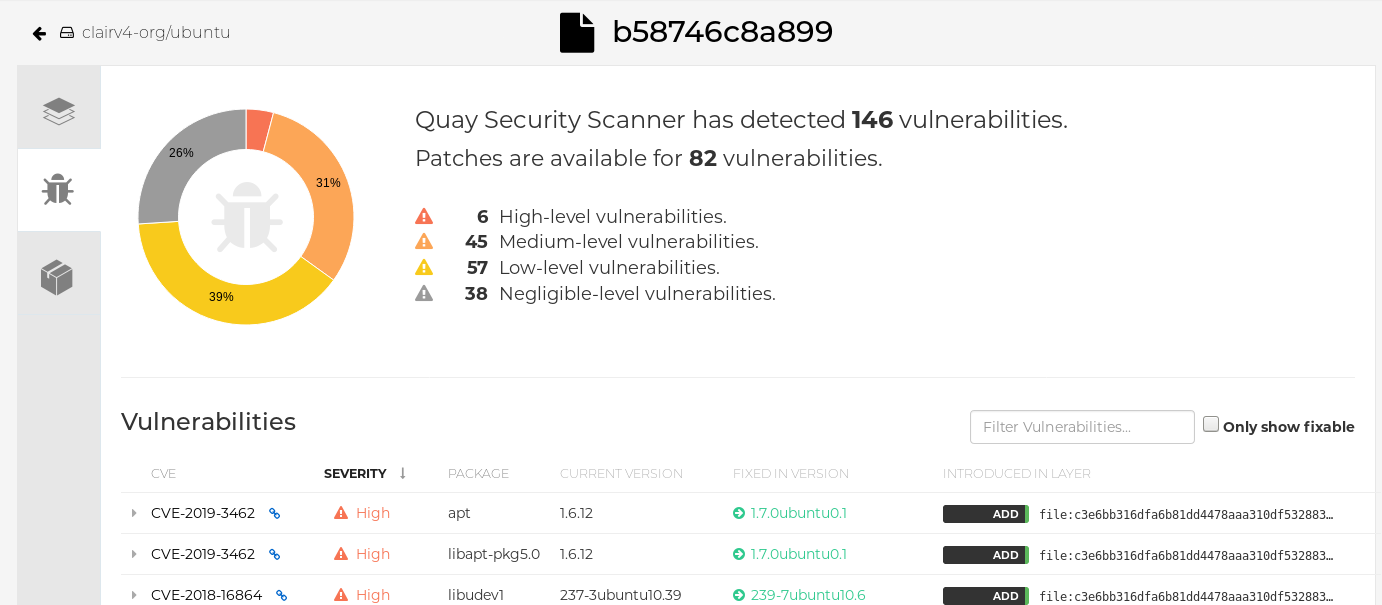
If vulnerabilities are found, select to under the Security Scan column for the image to see either all vulnerabilities or those that are fixable. The following figure shows information on all vulnerabilities found: