이 콘텐츠는 선택한 언어로 제공되지 않습니다.
Chapter 5. Red Hat Quay Security Scanning with Clair
Red Hat Quay supports scanning container images for known vulnerabilities with a scanning engine such as Clair. This document explains how to configure Clair with Red Hat Quay.
5.1. Set up Clair in the Red Hat Quay config tool
Enabling Clair in Red Hat Quay consists of:
- Starting the Red Hat Quay config tool. See the Red Hat Quay deployment guide for the type of deployment you are doing (OpenShift, Basic, or HA) for how to start the config tool for that environment.
- Enabling security scanning, then generating a private key and PEM file in the config tool
- Including the key and PEM file in the Clair config file
- Start the Clair container
The procedure varies, based on whether you are running Red Hat Quay on OpenShift or directly on a host.
5.1.1. Enabling Clair on a Red Hat Quay OpenShift deployment
To set up Clair on Red Hat Quay in OpenShift, see Add Clair image scanning to Red Hat Quay.
5.1.2. Enabling Clair on a Red Hat Quay Basic or HA deployment
To set up Clair on a Red Hat Quay deployment where the container is running directly on the host system, do the following:
-
Restart the Red Hat Quay config tool: Run the quay container again in config mode, open the configuration UI in a browser, then select
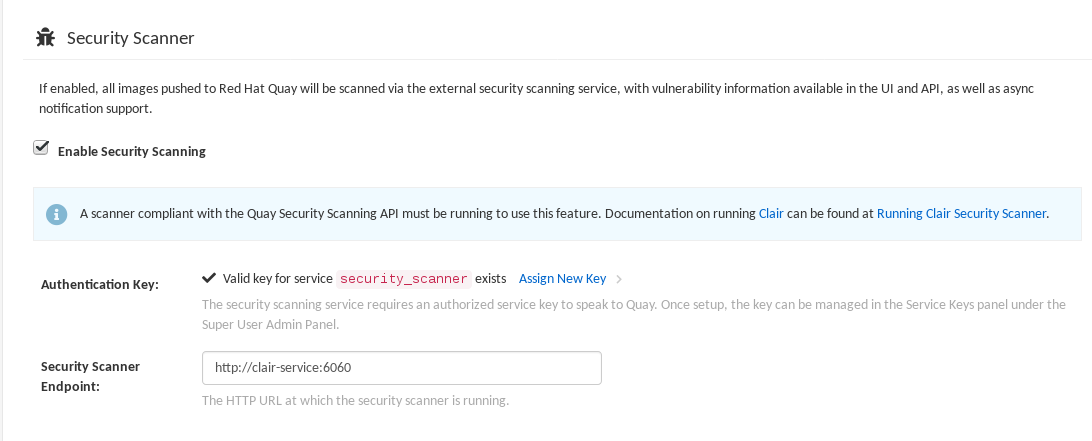
Modify an existing configuration. When prompted, upload thequay-config.tar.gzfile that was originally created for the deployment. Enable Security Scanning: Scroll to the Security Scanner section and select the "Enable Security Scanning" checkbox. From the fields that appear you need to create an authentication key and enter the security scanner endpoint. Here’s how:
-
Generate key: Click
Create Key, then from the pop-up window type a name for the Clair private key and an optional expiration date (if blank, the key never expires). Then select Generate Key. Copy the Clair key and PEM file: Save the Key ID (to a notepad or similar) and download a copy of the Private Key PEM file (
named security_scanner.pem) by selecting "Download Private Key" (if you lose the key, you need to generate a new one). You will need the key and PEM file when you start the Clair container later.Close the pop-up when you are done. Here is an example of a completed Security Scanner config:
-
Generate key: Click
-
Save the configuration: Click
Save Configuration Changesand then selectDownload Configurationto save it to your local system. Deploy the configuration: To pick up the changes enabling scanning, as well as other changes you may have made to the configuration, unpack the
quay-config.tar.gzand copy the resulting files to the config directory. For example:tar xvf quay-config.tar.gz config.yaml ssl.cert ssl.key cp config.yaml ssl* /mnt/quay/config
$ tar xvf quay-config.tar.gz
config.yaml  ssl.cert  ssl.key
$ cp config.yaml ssl* /mnt/quay/config
Copy to Clipboard Copied! Toggle word wrap Toggle overflow
Next, start the Clair container and associated database, as described in the following sections.