此内容没有您所选择的语言版本。
7.5. Managing Assets
To activate and use the feature described below, login to Business Central with a user that has the kiemgmt role assigned.
To make management of projects easier, Red Hat JBoss BPM Suite now provides a way to manage multiple projects based on standards. This allows you to create repository structures using industry standard best practices for maintenance, versioning and distribution of your projects.
To start with, repositories can now be managed or unmanaged.
Managed and Unmanaged Repositories
Unmanaged Repositories are the repository structures that you are used to. They can contain multiple unrelated projects.
Managed Repositories, on the other hand, provide version control at the project level and project branches for managing the release cycle. Further, Managed Repositories can be restricted to just a single project or encompass multiple projects. When you create a Managed Repository, the asset management configuration process is automatically launched in order to create the repository branches. Corresponding project structure is created as well.
Procedure: Creating an Unmanaged Repository
-
In Business Central, go to Authoring
Administration. Click Repositories
New Repository. The New Repository window is displayed.
- Enter the repository name and select an organizational unit the repository belongs to.
- Click Finish.
Procedure: Creating a Managed Repository
-
In Business Central, go to Authoring
Administration. Click Repositories
New Repository. The New Repository window is displayed.
- Enter the repository name and select an organizational unit the repository belongs to.
Select the Managed Repository check box and click Next to enter additional details of the Managed Repository.

Choose either the Single-project Repository or the Multi-project Repository radio button.
If the project you are creating is simple and self-contained, select the Single-project Repository radio button. Note that you will not be able to add more projects to this repository later.
For more complex projects, where there is likely to be a parent project that encompasses smaller ones, select the Multi-project Repository radio button.

Enter the details of the managed project along with the GAV (Group, Artifact, Version) details.
Note that all projects created in a Multi-project Repository will be managed together, with their version numbers being incremented together as well. Details of the parent project will be inherited by all future projects that you create in this Managed Repository.
- Click Finish .
Managed Branches
With Managed Repositories comes the added advantage of Managed Branches. As in Git, you can choose to work on different branches of your project (for example: master, dev and release). This process of branching can also be automated for you, by selecting the checkbox while creating a new Managed Repository (for both single and multi-projects).
You can switch between branches by selecting the desired branch while working in the Project Explorer.
Repository Structure
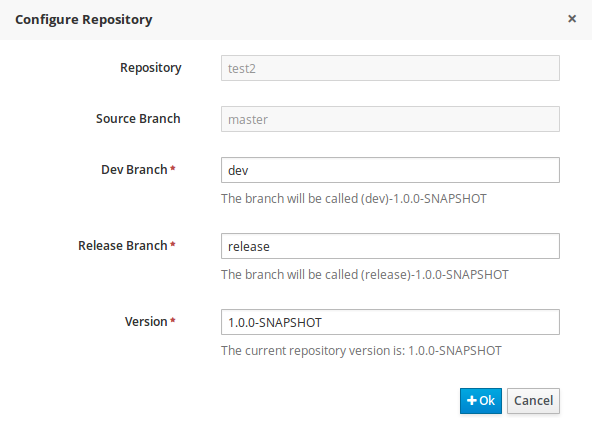
If you do not select automatic branch management while creating a repository, you can create branches manually afterwards. For Managed Repositories, you can do so by using the Configure button. This button, along with Promote and Release buttons, is provided in the Repository Structure view. You can access this view, by clicking on Repository
Clicking on the Configure button allows you to create branches or edit automatically created ones.
You can promote assets from the master branch to other branches using the Promote button. Similarly, you can Release branches and deploy them on the server using the Release button.
Both these functions are controlled internally by the use of pre-defined processes that are deployed on your instance. For example, when you click on Promote button after having done work on your development branch, a Promote Changes process is started in the background. A user, with the role of kiemgmt will have a user task appear in this task list to review the assets being promoted. This user can claim this task, and decide to promote all, some or none of the assets. The underlying process will cherry-pick the commits selected by the user to a release branch. This user can also request another review of these assets and this process can be repeated multiple times till all the assets are ready for release. The flow for this process is shown below:

Similarly, when you click on the Release button, a release process flow is initiated. This process flow builds the project and updates all the Maven artifacts to the next version, and deploys the project to the runtime, if runtime deployment details are supplied.
Project branches to be released must start with the keyword release.
