Dieser Inhalt ist in der von Ihnen ausgewählten Sprache nicht verfügbar.
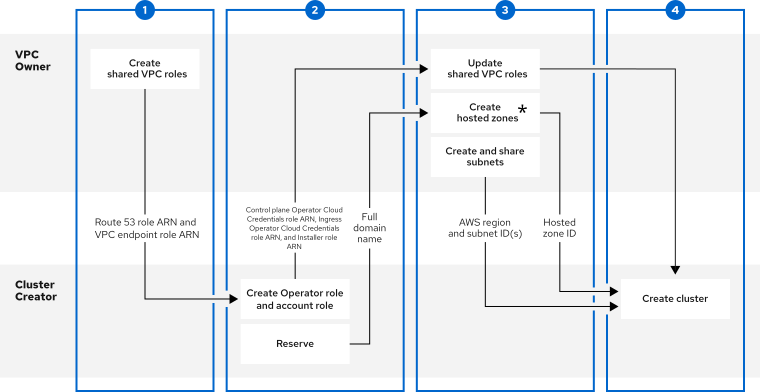
Chapter 6. Configuring a shared VPC for Red Hat OpenShift Service on AWS clusters
You can use a shared virtual private cloud (VPC) to centralize network management in a single AWS account while allowing separate AWS accounts to create Red Hat OpenShift Service on AWS clusters in that VPC.
Installing a new Red Hat OpenShift Service on AWS cluster into a VPC that was automatically created by the installer for a different cluster is not supported.
- This process requires two separate AWS accounts that belong to the same AWS organization. One account functions as the VPC-owning AWS account (VPC Owner), while the other account creates the cluster in the cluster-creating AWS account (Cluster Creator).
- Installing a cluster in a shared VPC is supported only for OpenShift 4.17.9 and later.
* The hosted zones can be created in either the centrally-managed VPC account or in the workload account in which the cluster is deployed.
Only certain cluster-to-VPC relationships are supported. Multiple Red Hat OpenShift Service on AWS clusters in a single VPC are not supported.
6.1. Prerequisites for the VPC Owner
- You have an AWS account with the proper permissions to create roles and share resources.
- You enabled resource sharing from the management account for your organization.
- You have access to an AWS entrypoint such as the AWS console or the AWS command-line interface (CLI).
6.2. Prerequisites for the Cluster Creator
-
You installed the ROSA command-line interface (CLI) (
rosa) 1.2.49 or later. - You created all of the required account roles for creating a cluster.
- The Cluster Creator’s AWS account is separate from the VPC Owner’s AWS account.
6.3. Step One - VPC Owner: Configuring a VPC to share within your AWS organization
You can share subnets within a VPC with another AWS account in your AWS organization.

Procedure
- Create or modify a VPC to your specifications in the VPC section of the AWS console. Ensure you have selected the correct region.
Create the
Route 53 role.NoteYou must create the
Route 53 rolein the same account where you plan to create the Amazon Route 53 hosted zones (which are created in Step 3). For example, if you want to create the hosted zones in the centrally-managed VPC account, you must create theRoute 53 rolein the VPC Owner account. If you want to create the hosted zones in the workload account, you must create theRoute 53 rolein the Cluster Creator account.Create a custom trust policy file that grants permission to assume roles:
$ cat <<EOF > /tmp/route53-role.json
{
    "Version": "2012-10-17",
    "Statement": [
        {
            "Effect": "Allow",
            "Principal": {
                "AWS": "arn:aws:iam::<Account-ID>:root"
            },
            "Action": "sts:AssumeRole"
        }
    ]
}
EOF
The trust policy principals (
Principal.AWS) may be scoped down to the ingress Operator role and installer account role rather thanroot.Create the IAM role for the AWS managed policy
ROSASharedVPCRoute53Policy.$ aws iam create-role --role-name <role_name> \ --assume-role-policy-document file:///tmp/route53-role.jsonAttach the AWS managed policy
ROSASharedVPCRoute53Policyto allow for necessary shared VPC permissions.$ aws iam attach-role-policy --role-name <role_name> \ --policy-arn arn:aws:iam::aws:policy/ROSASharedVPCRoute53Policy
Create the
VPC endpoint role.Create a custom trust policy file that grants permission to assume roles:
$ cat <<EOF > /tmp/shared-vpc-role.json
{
    "Version": "2012-10-17",
    "Statement": [
        {
            "Effect": "Allow",
            "Principal": {
                "AWS": "arn:aws:iam::<Account-ID>:root"
            },
            "Action": "sts:AssumeRole"
        }
    ]
}
EOF
The trust policy principals (
Principal.AWS) may be scoped down to the ingress Operator role and installer account role rather thanroot.Create the IAM role for the AWS managed policy
ROSASharedVPCEndpointPolicy:$ aws iam create-role --role-name <role_name> \ --assume-role-policy-document file:///tmp/vpce-role.jsonAttach the AWS managed policy
ROSASharedVPCEndpointPolicyto allow for necessary shared VPC permissions.$ aws iam attach-role-policy --role-name <role_name> \ --policy-arn arn:aws:iam::aws:policy/ROSASharedVPCEndpointPolicy
-
Provide the
Route 53 roleARN and theVPC endpoint roleARN to the Cluster Creator to continue configuration.
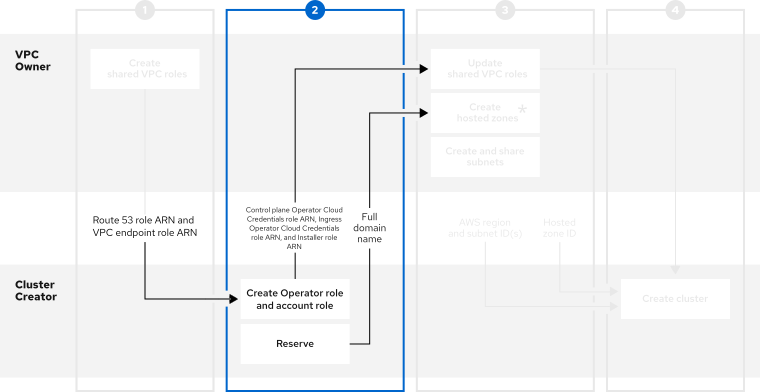
6.4. Step Two - Cluster Creator: Reserving your DNS entries and creating cluster Operator roles
After the VPC Owner creates a VPC, subnets, and an IAM role, reserve an openshiftapps.com DNS domain and create Operator roles.
For shared VPC clusters, you can choose to create the Operator roles after the cluster creation steps. The cluster is in a waiting state until the Ingress Operator role ARN is added to the shared VPC role trusted relationships.
Prerequisites
-
You have the
Route 53 roleARN for the IAM role from the VPC Owner. -
You have the
VPC endpoint roleARN for the IAM role from the VPC Owner.
Procedure
Reserve an
openshiftapps.comDNS domain with the following command:$ rosa create dns-domain --hosted-cpThe command creates a reserved
openshiftapps.comDNS domain.I: DNS domain '14eo.p3.openshiftapps.com' has been created. I: To view all DNS domains, run 'rosa list dns-domains'Create an OIDC configuration.
Review this article for more information on the OIDC configuration process. The following command produces the OIDC configuration ID that you need:
$ rosa create oidc-configYou receive confirmation that the command created an OIDC configuration:
I: To create Operator Roles for this OIDC Configuration, run the following command and remember to replace <user-defined> with a prefix of your choice:
	rosa create operator-roles --prefix <user-defined> --oidc-config-id 25tu67hq45rto1am3slpf5lq6jargg
Create the account roles by entering the following command:
$ rosa create account-roles \
    --route53-role-arn <Created_Route_53_Role_Arn> \
    --vpc-endpoint-role-arn <Created_VPC_Endpoint_Role_Arn> \
    --prefix <user_defined_account_role_prefix> \
    --hosted-cp
where:
<Created_Route_53_Role_Arn>- Provide the ARN for the Route 53 role that the VPC Owner created.
<Created_VPC_Endpoint_Role_Arn>- Provide the ARN for the VPC endpoint role that the VPC Owner created.
<user_defined_account_role_prefix>- Provide a prefix for the Operator roles.
Create the Operator roles by entering the following command:
$ rosa create operator-roles --oidc-config-id <oidc-config-ID> \
    --installer-role-arn <Installer_Role> \
    --route53-role-arn <Created_Route_53_Role_Arn> \
    --vpc-endpoint-role-arn <Created_VPC_Endpoint_Role_Arn> \
    --prefix <operator-prefix> \
    --hosted-cp
where:
<oidc-config-ID>- Provide the OIDC configuration ID that you created in the previous step.
<Installer_Role>-
Provide your installer ARN that was created as part of the
rosa create account-rolesprocess. <Created_Route_53_Role_Arn>- Provide the ARN for the Route 53 role that the VPC Owner created.
<Created_VPC_Endpoint_Role_Arn>- Provide the ARN for the VPC endpoint role that the VPC Owner created.
<operator-prefix>- Provide a prefix for the Operator roles.
NoteThe Installer account role and the shared VPC roles must have a one-to-one relationship. If you want to create multiple shared VPC roles, you should create one set of account roles per shared VPC role.
After creating the Operator roles, share the Ingress Operator Cloud Credentials, Installer, and Control plane Operator Cloud Credentials role ARNs with the VPC Owner.
The shared information resembles these examples:
-
my-rosa-cluster.14eo.p1.openshiftapps.com -
arn:aws:iam::111122223333:role/ManagedOpenShift-Installer-Role -
arn:aws:iam::111122223333:role/my-rosa-cluster-openshift-ingress-operator-cloud-credentials -
arn:aws:iam::111122223333:role/my-rosa-cluster-control-plane-operator
-
6.5. Step Three - VPC Owner: Updating the shared VPC role and creating hosted zones
After the Cluster Creator provides the DNS domain and IAM roles, create two hosted zones and update the trust policy on the shared VPC IAM roles.
The hosted zones can be created in either the centrally-managed VPC account or in the workload account.
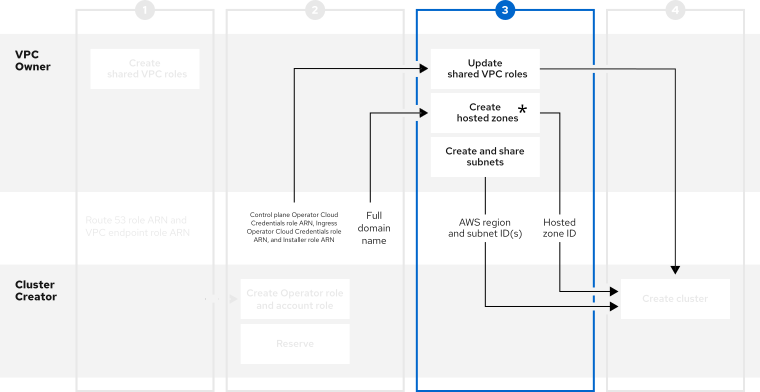
* The hosted zones can be created in either the centrally-managed VPC account or in the workload account in which the cluster is deployed.
Prerequisites
- You have the full domain name from the Cluster Creator.
- You have the Ingress Operator Cloud Credentials role’s ARN from the Cluster Creator.
- You have the Installer role’s ARN from the Cluster Creator.
- You have the Control plane Operator Cloud Credentials role’s ARN from the Cluster Creator.
If your cluster name is longer than 15 characters, it will contain an autogenerated domain prefix as a sub-domain for your provisioned cluster on *.openshiftapps.com.
To customize the subdomain, use the --domain-prefix flag. The domain prefix cannot be longer than 15 characters, must be unique, and cannot be changed after cluster creation.
Procedure
- In the Resource Access Manager of the AWS console, create a resource share that shares the previously created VPC’s public and private subnets with the Cluster Creator’s AWS account ID.
Update the
Route 53 roleand add the Installer and Ingress Operator Cloud Credentials roles to the principal section of the trust policy.{ "Version": "2012-10-17", "Statement": [ { "Sid": "Statement1", "Effect": "Allow", "Principal": { "AWS": [ "arn:aws:iam::<Cluster-Creator's-AWS-Account-ID>:role/<prefix>-ingress-operator-cloud-credentials", "arn:aws:iam::<Cluster-Creator's-AWS-Account-ID>:role/<prefix>-hcp-Installer-Role", "arn:aws:iam::<Cluster-Creator's-AWS-Account-ID>:role/<prefix>-control-plane-operator" ] }, "Action": "sts:AssumeRole" } ] }Update the
VPC endpoint roleand add the Installer and Ingress Operator Cloud Credentials roles to the principal section of the trust policy.{ "Version": "2012-10-17", "Statement": [ { "Sid": "Statement1", "Effect": "Allow", "Principal": { "AWS": [ "arn:aws:iam::<Cluster-Creator's-AWS-Account-ID>:role/<prefix>-hcp-Installer-Role", "arn:aws:iam::<Cluster-Creator's-AWS-Account-ID>:role/<prefix>-control-plane-operator" ] }, "Action": "sts:AssumeRole" } ] }-
Create a private hosted zone in the Route 53 section of the AWS console. In the hosted zone configuration, the domain name is
rosa.<cluster-name>.<base-domain>. The private hosted zone must be associated with the network owner’s VPC. -
Create a local hosted zone in the Route 53 section of the AWS console. In the hosted zone configuration, the domain name is
<cluster-name>.hypershift.local. The local hosted zone must be associated with the network owner’s VPC. After the hosted zones are created and associated with the network owner’s VPC, provide the following to the Cluster Creator to continue configuration:
- Hosted zone IDs
- AWS region
- Subnet IDs
6.6. Step Four - Cluster Creator: Creating your cluster in a shared VPC
You can create a Red Hat OpenShift Service on AWS cluster in a shared VPC by using the ROSA command-line interface (CLI) (rosa).
Installing a cluster in a shared VPC is supported only for OpenShift 4.17.9 and later.

Prerequisites
- You have the hosted zone IDs from the VPC Owner.
- You have the AWS region from the VPC Owner.
- You have the subnet IDs from the VPC Owner.
-
You have the
Route 53 roleARN from the VPC Owner. -
You have the
VPC endpoint roleARN from the VPC Owner.
Procedure
In a terminal, enter the following command to create the shared VPC:
$ rosa create cluster --cluster-name <cluster_name> --sts --operator-roles-prefix <prefix> --oidc-config-id <oidc_config_id> --region us-east-1 --subnet-ids <subnet_ids> --hcp-internal-communication-hosted-zone-id <local_hosted_zone_ID> --ingress-private-hosted-zone-id <private_hosted_zone_ID> --route53-role-arn <route_53_role_arn> vpc-endpoint-role-arn <vpc_endpoint_role_arn> --base-domain <dns-domain> --additional-allowed-principals <route53-role-arn>,<vpc-endpoint-role-arn> --hosted-cp