Dieser Inhalt ist in der von Ihnen ausgewählten Sprache nicht verfügbar.
Chapter 6. Working with nodes
6.1. Viewing and listing the nodes in your Red Hat OpenShift Service on AWS cluster
You can list all the nodes in your cluster to obtain information such as status, age, memory usage, and details about the nodes.
When you perform node management operations, the CLI interacts with node objects that are representations of actual node hosts. The master uses the information from node objects to validate nodes with health checks.
Worker nodes are not guaranteed longevity, and may be replaced at any time as part of the normal operation and management of OpenShift. For more details about the node lifecycle, refer to additional resources.
6.1.1. About listing all the nodes in a cluster
You can get detailed information about the nodes in the cluster, which can help you understand the state of the nodes in your cluster.
The following command lists all nodes:
$ oc get nodesThe following example is a cluster with healthy nodes:
$ oc get nodesExample output
NAME                   STATUS    ROLES     AGE       VERSION
master.example.com     Ready     master    7h        v1.34.2
node1.example.com      Ready     worker    7h        v1.34.2
node2.example.com      Ready     worker    7h        v1.34.2
The following example is a cluster with one unhealthy node:
$ oc get nodesExample output
NAME                   STATUS                      ROLES     AGE       VERSION
master.example.com     Ready                       master    7h        v1.34.2
node1.example.com      NotReady,SchedulingDisabled worker    7h        v1.34.2
node2.example.com      Ready                       worker    7h        v1.34.2
The conditions that trigger a
NotReadystatus are shown later in this section.The
-o wideoption provides additional information on nodes.$ oc get nodes -o wideExample output
NAME                STATUS   ROLES    AGE    VERSION   INTERNAL-IP    EXTERNAL-IP   OS-IMAGE                                                       KERNEL-VERSION                 CONTAINER-RUNTIME
master.example.com  Ready    master   171m   v1.34.2   10.0.129.108   <none>        Red Hat Enterprise Linux CoreOS 48.83.202103210901-0 (Ootpa)   4.21.0-240.15.1.el8_3.x86_64   cri-o://1.34.2-30.rhaos4.10.gitf2f339d.el8-dev
node1.example.com   Ready    worker   72m    v1.34.2   10.0.129.222   <none>        Red Hat Enterprise Linux CoreOS 48.83.202103210901-0 (Ootpa)   4.21.0-240.15.1.el8_3.x86_64   cri-o://1.34.2-30.rhaos4.10.gitf2f339d.el8-dev
node2.example.com   Ready    worker   164m   v1.34.2   10.0.142.150   <none>        Red Hat Enterprise Linux CoreOS 48.83.202103210901-0 (Ootpa)   4.21.0-240.15.1.el8_3.x86_64   cri-o://1.34.2-30.rhaos4.10.gitf2f339d.el8-dev
The following command lists information about a single node:
$ oc get node <node>For example:
$ oc get node node1.example.comExample output
NAME                   STATUS    ROLES     AGE       VERSION
node1.example.com      Ready     worker    7h        v1.34.2
The following command provides more detailed information about a specific node, including the reason for the current condition:
$ oc describe node <node>For example:
$ oc describe node node1.example.comNoteThe following example contains some values that are specific to Red Hat OpenShift Service on AWS on AWS.
Example output
Name:               node1.example.com
Roles:              worker
Labels:             kubernetes.io/os=linux
                    kubernetes.io/hostname=ip-10-0-131-14
                    kubernetes.io/arch=amd64
                    node-role.kubernetes.io/worker=
                    node.kubernetes.io/instance-type=m4.large
                    node.openshift.io/os_id=rhcos
                    node.openshift.io/os_version=4.5
                    region=east
                    topology.kubernetes.io/region=us-east-1
                    topology.kubernetes.io/zone=us-east-1a
Annotations:        cluster.k8s.io/machine: openshift-machine-api/ahardin-worker-us-east-2a-q5dzc
                    machineconfiguration.openshift.io/currentConfig: worker-309c228e8b3a92e2235edd544c62fea8
                    machineconfiguration.openshift.io/desiredConfig: worker-309c228e8b3a92e2235edd544c62fea8
                    machineconfiguration.openshift.io/state: Done
                    volumes.kubernetes.io/controller-managed-attach-detach: true
CreationTimestamp:  Wed, 13 Feb 2019 11:05:57 -0500
Taints:             <none>
Unschedulable:      false
Conditions:
  Type             Status  LastHeartbeatTime                 LastTransitionTime                Reason                       Message
  ----             ------  -----------------                 ------------------                ------                       -------
  OutOfDisk        False   Wed, 13 Feb 2019 15:09:42 -0500   Wed, 13 Feb 2019 11:05:57 -0500   KubeletHasSufficientDisk     kubelet has sufficient disk space available
  MemoryPressure   False   Wed, 13 Feb 2019 15:09:42 -0500   Wed, 13 Feb 2019 11:05:57 -0500   KubeletHasSufficientMemory   kubelet has sufficient memory available
  DiskPressure     False   Wed, 13 Feb 2019 15:09:42 -0500   Wed, 13 Feb 2019 11:05:57 -0500   KubeletHasNoDiskPressure     kubelet has no disk pressure
  PIDPressure      False   Wed, 13 Feb 2019 15:09:42 -0500   Wed, 13 Feb 2019 11:05:57 -0500   KubeletHasSufficientPID      kubelet has sufficient PID available
  Ready            True    Wed, 13 Feb 2019 15:09:42 -0500   Wed, 13 Feb 2019 11:07:09 -0500   KubeletReady                 kubelet is posting ready status
Addresses:
  InternalIP:   10.0.140.16
  InternalDNS:  ip-10-0-140-16.us-east-2.compute.internal
  Hostname:     ip-10-0-140-16.us-east-2.compute.internal
Capacity:
 attachable-volumes-aws-ebs:  39
 cpu:                         2
 hugepages-1Gi:               0
 hugepages-2Mi:               0
 memory:                      8172516Ki
 pods:                        250
Allocatable:
 attachable-volumes-aws-ebs:  39
 cpu:                         1500m
 hugepages-1Gi:               0
 hugepages-2Mi:               0
 memory:                      7558116Ki
 pods:                        250
System Info:
 Machine ID:                              63787c9534c24fde9a0cde35c13f1f66
 System UUID:                             EC22BF97-A006-4A58-6AF8-0A38DEEA122A
 Boot ID:                                 f24ad37d-2594-46b4-8830-7f7555918325
 Kernel Version:                          3.10.0-957.5.1.el7.x86_64
 OS Image:                                Red Hat Enterprise Linux CoreOS 410.8.20190520.0 (Ootpa)
 Operating System:                        linux
 Architecture:                            amd64
 Container Runtime Version:               cri-o://1.34.2-0.6.dev.rhaos4.3.git9ad059b.el8-rc2
 Kubelet Version:                         v1.34.2
 Kube-Proxy Version:                      v1.34.2
PodCIDR:                                  10.128.4.0/24
ProviderID:                               aws:///us-east-2a/i-04e87b31dc6b3e171
Non-terminated Pods:                      (12 in total)
  Namespace                               Name                                   CPU Requests  CPU Limits  Memory Requests  Memory Limits
  ---------                               ----                                   ------------  ----------  ---------------  -------------
  openshift-cluster-node-tuning-operator  tuned-hdl5q                            0 (0%)        0 (0%)      0 (0%)           0 (0%)
  openshift-dns                           dns-default-l69zr                      0 (0%)        0 (0%)      0 (0%)           0 (0%)
  openshift-image-registry                node-ca-9hmcg                          0 (0%)        0 (0%)      0 (0%)           0 (0%)
  openshift-ingress                       router-default-76455c45c-c5ptv         0 (0%)        0 (0%)      0 (0%)           0 (0%)
  openshift-machine-config-operator       machine-config-daemon-cvqw9            20m (1%)      0 (0%)      50Mi (0%)        0 (0%)
  openshift-marketplace                   community-operators-f67fh              0 (0%)        0 (0%)      0 (0%)           0 (0%)
  openshift-monitoring                    alertmanager-main-0                    50m (3%)      50m (3%)    210Mi (2%)       10Mi (0%)
  openshift-monitoring                    node-exporter-l7q8d                    10m (0%)      20m (1%)    20Mi (0%)        40Mi (0%)
  openshift-monitoring                    prometheus-adapter-75d769c874-hvb85    0 (0%)        0 (0%)      0 (0%)           0 (0%)
  openshift-multus                        multus-kw8w5                           0 (0%)        0 (0%)      0 (0%)           0 (0%)
  openshift-ovn-kubernetes                          ovnkube-node-t4dsn                              80m (0%)     0 (0%)      1630Mi (0%)       0 (0%)
Allocated resources:
  (Total limits may be over 100 percent, i.e., overcommitted.)
  Resource                    Requests     Limits
  --------                    --------     ------
  cpu                         380m (25%)   270m (18%)
  memory                      880Mi (11%)  250Mi (3%)
  attachable-volumes-aws-ebs  0            0
Events:
  Type     Reason                   Age                From                      Message
  ----     ------                   ----               ----                      -------
  Normal   NodeHasSufficientPID     6d (x5 over 6d)    kubelet, m01.example.com  Node m01.example.com status is now: NodeHasSufficientPID
  Normal   NodeAllocatableEnforced  6d                 kubelet, m01.example.com  Updated Node Allocatable limit across pods
  Normal   NodeHasSufficientMemory  6d (x6 over 6d)    kubelet, m01.example.com  Node m01.example.com status is now: NodeHasSufficientMemory
  Normal   NodeHasNoDiskPressure    6d (x6 over 6d)    kubelet, m01.example.com  Node m01.example.com status is now: NodeHasNoDiskPressure
  Normal   NodeHasSufficientDisk    6d (x6 over 6d)    kubelet, m01.example.com  Node m01.example.com status is now: NodeHasSufficientDisk
  Normal   NodeHasSufficientPID     6d                 kubelet, m01.example.com  Node m01.example.com status is now: NodeHasSufficientPID
  Normal   Starting                 6d                 kubelet, m01.example.com  Starting kubelet.
#...
where:
Names- Specifies the name of the node.
Roles-
Specifies the role of the node, either
masterorworker. Labels- Specifies the labels applied to the node.
Annotations- Specifies the annotations applied to the node.
Taints- Specifies the taints applied to the node.
Conditions-
Specifies the node conditions and status. The
conditionsstanza lists theReady,PIDPressure,MemoryPressure,DiskPressureandOutOfDiskstatus. These condition are described later in this section. Addresses- Specifies the IP address and hostname of the node.
Capacity- Specifies the pod resources and allocatable resources.
Information- Specifies information about the node host.
Non-terminated Pods- Specifies the pods on the node.
Events- Specifies the events reported by the node.
Among the information shown for nodes, the following node conditions appear in the output of the commands shown in this section:
| Condition | Description |
|---|---|
|
|
If |
|
|
If |
|
|
If |
|
|
If |
|
|
If |
|
|
If |
|
|
If |
|
| Pods cannot be scheduled for placement on the node. |
6.1.2. Listing pods on a node in your cluster
You can list all of the pods on a node by using the oc get pods command along with specific flags. This command shows the number of pods on that node, the state of the pods, number of pod restarts, and the age of the pods.
Procedure
To list all or selected pods on selected nodes:
$ oc get pod --selector=<nodeSelector>$ oc get pod --selector=kubernetes.io/osOr:
$ oc get pod -l=<nodeSelector>$ oc get pod -l kubernetes.io/os=linuxTo list all pods on a specific node, including terminated pods:
$ oc get pod --all-namespaces --field-selector=spec.nodeName=<nodename>
6.1.3. Viewing memory and CPU usage statistics on your nodes
You can display usage statistics about nodes, including CPU, memory, and storage consumption. These statistics can help you ensure your cluster is running efficiently.
Prerequisites
-
You must have
cluster-readerpermission to view the usage statistics. - Metrics must be installed to view the usage statistics.
Procedure
To view the usage statistics:
$ oc adm top nodesExample output
NAME                                   CPU(cores)   CPU%      MEMORY(bytes)   MEMORY%
ip-10-0-12-143.ec2.compute.internal    1503m        100%      4533Mi          61%
ip-10-0-132-16.ec2.compute.internal    76m          5%        1391Mi          18%
ip-10-0-140-137.ec2.compute.internal   398m         26%       2473Mi          33%
ip-10-0-142-44.ec2.compute.internal    656m         43%       6119Mi          82%
ip-10-0-146-165.ec2.compute.internal   188m         12%       3367Mi          45%
ip-10-0-19-62.ec2.compute.internal     896m         59%       5754Mi          77%
ip-10-0-44-193.ec2.compute.internal    632m         42%       5349Mi          72%
To view the usage statistics for nodes with labels:
$ oc adm top node --selector=''You must choose the selector (label query) to filter on. Supports
=,==, and!=.
6.2. Working with nodes
As an administrator, you can perform several tasks to make your clusters more efficient. You can use the oc adm command to cordon, uncordon, and drain a specific node.
Cordoning and draining are only allowed on worker nodes that are part of Red Hat OpenShift Cluster Manager machine pools.
6.2.1. Evacuating pods on nodes
You can remove, or evacuate, pods from a given node or nodes. Evacuating pods allows you to migrate all or selected pods to other nodes.
You can evacuate only pods that are backed by a replication controller. The replication controller creates new pods on other nodes and removes the existing pods from the specified node(s).
Bare pods, meaning those not backed by a replication controller, are unaffected by default. You can evacuate a subset of pods by specifying a pod selector. Because pod selectors are based on labels, all of the pods with the specified label are evacuated.
Procedure
Mark the nodes as unschedulable before performing the pod evacuation.
Mark the node as unschedulable by running the following command:
$ oc adm cordon <node1>Example output
node/<node1> cordonedCheck that the node status is
Ready,SchedulingDisabledby running the following command:$ oc get node <node1>Example output
NAME        STATUS                     ROLES     AGE       VERSION
<node1>     Ready,SchedulingDisabled   worker    1d        v1.34.2
Evacuate the pods by using one of the following methods:
Evacuate all or selected pods on one or more nodes by running the
oc adm draincommand:$ oc adm drain <node1> <node2> [--pod-selector=<pod_selector>]Force the deletion of bare pods by using the
--forceoption with theoc adm draincommand. When set totrue, deletion continues even if there are pods not managed by a replication controller, replica set, job, daemon set, or stateful set.$ oc adm drain <node1> <node2> --force=trueSet a period of time in seconds for each pod to terminate gracefully by using the
--grace-periodoption with theoc adm draincommand. If negative, the default value specified in the pod will be used:$ oc adm drain <node1> <node2> --grace-period=-1Ignore pods managed by daemon sets by using the
--ignore-daemonsets=trueoption with theoc adm draincommand:$ oc adm drain <node1> <node2> --ignore-daemonsets=trueSet the length of time to wait before giving up using the
--timeoutoption with theoc adm draincommand. A value of0sets an infinite length of time.$ oc adm drain <node1> <node2> --timeout=5sDelete pods even if there are pods using
emptyDirvolumes by setting the--delete-emptydir-data=trueoption with theoc adm draincommand. Local data is deleted when the node is drained.$ oc adm drain <node1> <node2> --delete-emptydir-data=trueList objects that would be migrated without actually performing the evacuation, by using the
--dry-run=trueoption with theoc adm draincommand:$ oc adm drain <node1> <node2> --dry-run=trueInstead of specifying specific node names (for example,
<node1> <node2>), you can use the--selector=<node_selector>option with theoc adm draincommand to evacuate pods on selected nodes.
Mark the node as schedulable when done by using the following command.
$ oc adm uncordon <node1>
6.3. Using the Node Tuning Operator
Red Hat OpenShift Service on AWS supports the Node Tuning Operator to improve performance of your nodes on your clusters. The Node Tuning Operator in Red Hat OpenShift Service on AWS helps you manage node-level tuning by orchestrating the TuneD daemon. You can use this unified interface to apply custom tuning specifications and achieve low latency performance for high-performance applications.
Before creating a node tuning configuration, you must create a custom tuning specification.
The Node Tuning Operator helps you manage node-level tuning by orchestrating the TuneD daemon and achieves low latency performance by using the Performance Profile controller. The majority of high-performance applications require some level of kernel tuning. The Node Tuning Operator provides a unified management interface to users of node-level sysctls and more flexibility to add custom tuning specified by user needs.
The Operator manages the containerized TuneD daemon for Red Hat OpenShift Service on AWS as a Kubernetes daemon set. It ensures the custom tuning specification is passed to all containerized TuneD daemons running in the cluster in the format that the daemons understand. The daemons run on all nodes in the cluster, one per node.
Node-level settings applied by the containerized TuneD daemon are rolled back on an event that triggers a profile change or when the containerized TuneD daemon is terminated gracefully by receiving and handling a termination signal.
The Node Tuning Operator uses the Performance Profile controller to implement automatic tuning to achieve low latency performance for Red Hat OpenShift Service on AWS applications.
The cluster administrator configures a performance profile to define node-level settings such as the following:
- Updating the kernel to kernel-rt.
- Choosing CPUs for housekeeping.
- Choosing CPUs for running workloads.
The Node Tuning Operator is part of a standard Red Hat OpenShift Service on AWS installation in version 4.1 and later.
In earlier versions of Red Hat OpenShift Service on AWS, the Performance Addon Operator was used to implement automatic tuning to achieve low latency performance for OpenShift applications. In Red Hat OpenShift Service on AWS 4.11 and later, this functionality is part of the Node Tuning Operator.
6.3.1. Custom tuning specification
The custom resource (CR) for the Operator has two major sections. The first section, profile:, is a list of TuneD profiles and their names. The second, recommend:, defines the profile selection logic.
Multiple custom tuning specifications can co-exist as multiple CRs in the Operator’s namespace. The existence of new CRs or the deletion of old CRs is detected by the Operator. All existing custom tuning specifications are merged and appropriate objects for the containerized TuneD daemons are updated.
Management state
The Operator Management state is set by adjusting the default Tuned CR. By default, the Operator is in the Managed state and the spec.managementState field is not present in the default Tuned CR. Valid values for the Operator Management state are as follows:
- Managed: the Operator will update its operands as configuration resources are updated
- Unmanaged: the Operator will ignore changes to the configuration resources
- Removed: the Operator will remove its operands and resources the Operator provisioned
Profile data
The profile: section lists TuneD profiles and their names.
profile:
- name: tuned_profile_1
  data: |
    # TuneD profile specification
    [main]
    summary=Description of tuned_profile_1 profile

    [sysctl]
    net.ipv4.ip_forward=1
    # ... other sysctl's or other TuneD daemon plugins supported by the containerized TuneD

# ...

- name: tuned_profile_n
  data: |
    # TuneD profile specification
    [main]
    summary=Description of tuned_profile_n profile

    # tuned_profile_n profile settings
Recommended profiles
The profile: selection logic is defined by the recommend: section of the CR. The recommend: section is a list of items to recommend the profiles based on a selection criteria.
recommend:
<recommend-item-1>
# ...
<recommend-item-n>
The individual items of the list:
- machineConfigLabels:
    <mcLabels>
  match:
    <match>
  priority: <priority>
  profile: <tuned_profile_name>
  operand:
    debug: <bool>
    tunedConfig:
      reapply_sysctl: <bool>
where:
-
machineConfigLabels: Optional. -
<mcLabels>: A dictionary of key/valueMachineConfiglabels. The keys must be unique. -
match: If omitted, profile match is assumed unless a profile with a higher priority matches first ormachineConfigLabelsis set. -
<match>: An optional list. -
<priority>: Profile ordering priority. Lower numbers mean higher priority (0is the highest priority). -
<tuned_profile_name>: A TuneD profile to apply on a match. For exampletuned_profile_1. -
operand: Optional operand configuration. -
debug: Turn debugging on or off for the TuneD daemon. Options aretruefor on orfalsefor off. The default isfalse. -
reapply_sysctl: Turnreapply_sysctlfunctionality on or off for the TuneD daemon. Options aretruefor on andfalsefor off.
<match> is an optional list recursively defined as follows:
- label: <label_name>
  value: <label_value>
  type: <label_type>
    <match>
where:
-
<label_name>: Node or pod label name. -
<label_value>: Optional node or pod label value. If omitted, the presence of<label_name>is enough to match. -
<label_type>: Optional object type (nodeorpod). If omitted,nodeis assumed. -
<match>: An optional<match>list.
If <match> is not omitted, all nested <match> sections must also evaluate to true. Otherwise, false is assumed and the profile with the respective <match> section will not be applied or recommended. Therefore, the nesting (child <match> sections) works as logical AND operator. Conversely, if any item of the <match> list matches, the entire <match> list evaluates to true. Therefore, the list acts as logical OR operator.
If machineConfigLabels is defined, machine config pool based matching is turned on for the given recommend: list item. <mcLabels> specifies the labels for a machine config. The machine config is created automatically to apply host settings, such as kernel boot parameters, for the profile <tuned_profile_name>. This involves finding all machine config pools with machine config selector matching <mcLabels> and setting the profile <tuned_profile_name> on all nodes that are assigned the found machine config pools. To target nodes that have both master and worker roles, you must use the master role.
The list items match and machineConfigLabels are connected by the logical OR operator. The match item is evaluated first in a short-circuit manner. Therefore, if it evaluates to true, the machineConfigLabels item is not considered.
When using machine config pool based matching, it is advised to group nodes with the same hardware configuration into the same machine config pool. Not following this practice might result in TuneD operands calculating conflicting kernel parameters for two or more nodes sharing the same machine config pool.
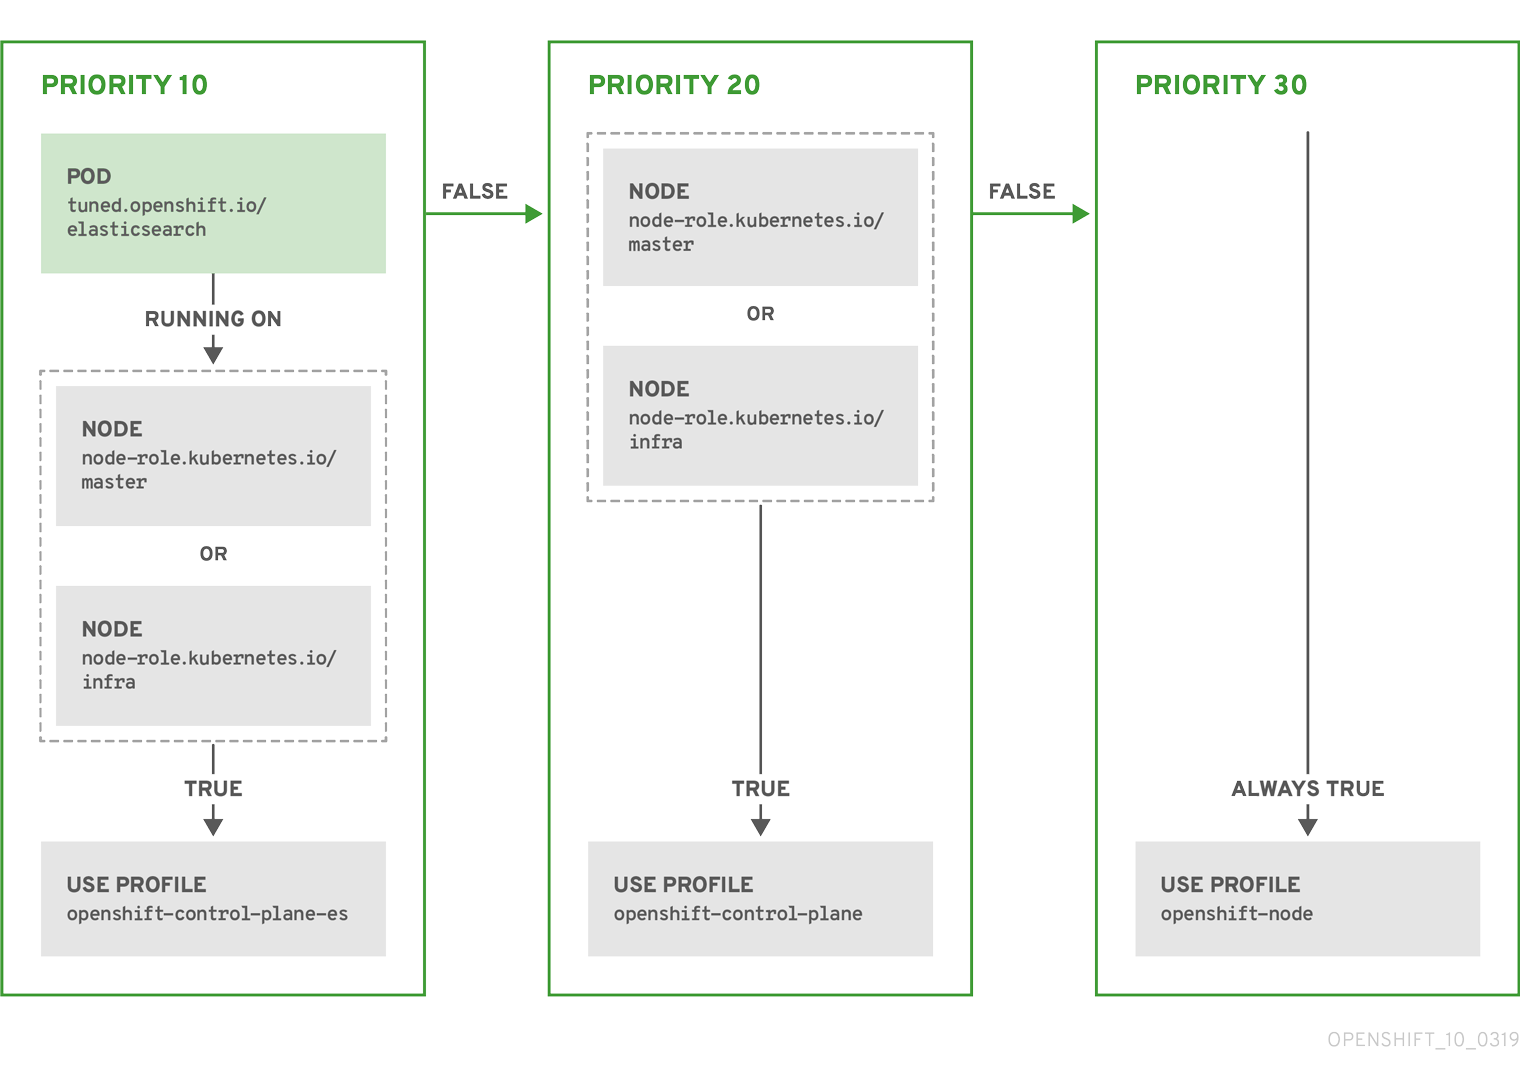
Example: Node or pod label based matching
- match:
  - label: tuned.openshift.io/elasticsearch
    match:
    - label: node-role.kubernetes.io/master
    - label: node-role.kubernetes.io/infra
    type: pod
  priority: 10
  profile: openshift-control-plane-es
- match:
  - label: node-role.kubernetes.io/master
  - label: node-role.kubernetes.io/infra
  priority: 20
  profile: openshift-control-plane
- priority: 30
  profile: openshift-node
The CR above is translated for the containerized TuneD daemon into its recommend.conf file based on the profile priorities. The profile with the highest priority (10) is openshift-control-plane-es and, therefore, it is considered first. The containerized TuneD daemon running on a given node looks to see if there is a pod running on the same node with the tuned.openshift.io/elasticsearch label set. If not, the entire <match> section evaluates as false. If there is such a pod with the label, in order for the <match> section to evaluate to true, the node label also needs to be node-role.kubernetes.io/master or node-role.kubernetes.io/infra.
If the labels for the profile with priority 10 matched, openshift-control-plane-es profile is applied and no other profile is considered. If the node/pod label combination did not match, the second highest priority profile (openshift-control-plane) is considered. This profile is applied if the containerized TuneD pod runs on a node with labels node-role.kubernetes.io/master or node-role.kubernetes.io/infra.
Finally, the profile openshift-node has the lowest priority of 30. It lacks the <match> section and, therefore, will always match. It acts as a profile catch-all to set openshift-node profile, if no other profile with higher priority matches on a given node.
Example: Machine config pool based matching
apiVersion: tuned.openshift.io/v1
kind: Tuned
metadata:
  name: openshift-node-custom
  namespace: openshift-cluster-node-tuning-operator
spec:
  profile:
  - data: |
      [main]
      summary=Custom OpenShift node profile with an additional kernel parameter
      include=openshift-node
      [bootloader]
      cmdline_openshift_node_custom=+skew_tick=1
    name: openshift-node-custom

  recommend:
  - machineConfigLabels:
      machineconfiguration.openshift.io/role: "worker-custom"
    priority: 20
    profile: openshift-node-custom
To minimize node reboots, label the target nodes with a label the machine config pool’s node selector will match, then create the Tuned CR above and finally create the custom machine config pool itself.
Cloud provider-specific TuneD profiles
With this functionality, all Cloud provider-specific nodes can conveniently be assigned a TuneD profile specifically tailored to a given Cloud provider on a Red Hat OpenShift Service on AWS cluster. This can be accomplished without adding additional node labels or grouping nodes into machine config pools.
This functionality takes advantage of spec.providerID node object values in the form of <cloud-provider>://<cloud-provider-specific-id> and writes the file /var/lib/ocp-tuned/provider with the value <cloud-provider> in NTO operand containers. The content of this file is then used by TuneD to load provider-<cloud-provider> profile if such profile exists.
The openshift profile that both openshift-control-plane and openshift-node profiles inherit settings from is now updated to use this functionality through the use of conditional profile loading. Neither NTO nor TuneD currently include any Cloud provider-specific profiles. However, it is possible to create a custom profile provider-<cloud-provider> that will be applied to all Cloud provider-specific cluster nodes.
Example GCE Cloud provider profile
apiVersion: tuned.openshift.io/v1
kind: Tuned
metadata:
  name: provider-gce
  namespace: openshift-cluster-node-tuning-operator
spec:
  profile:
  - data: |
      [main]
      summary=GCE Cloud provider-specific profile
      # Your tuning for GCE Cloud provider goes here.
    name: provider-gce
Due to profile inheritance, any setting specified in the provider-<cloud-provider> profile will be overwritten by the openshift profile and its child profiles.
6.3.2. Creating node tuning configurations
You can create tuning configurations by using the Red Hat OpenShift Service on AWS (ROSA) CLI, rosa.
Prerequisites
- You have downloaded the latest version of the ROSA CLI.
- You have a cluster on the latest version.
- You have a specification file configured for node tuning.
Procedure
Run the following command to create your tuning configuration:
$ rosa create tuning-config -c <cluster_id> --name <name_of_tuning> --spec-path <path_to_spec_file>You must supply the path to the
spec.jsonfile or the command returns an error.$ I: Tuning config 'sample-tuning' has been created on cluster 'cluster-example'.$ I: To view all tuning configs, run 'rosa list tuning-configs -c cluster-example'
Verification
You can verify the existing tuning configurations that are applied by your account with the following command:
$ rosa list tuning-configs -c <cluster_name> [-o json]You can specify the type of output you want for the configuration list.
Without specifying the output type, you see the ID and name of the tuning configuration:
Example output without specifying output type
ID                                    NAME
20468b8e-edc7-11ed-b0e4-0a580a800298  sample-tuning
If you specify an output type, such as
json, you receive the tuning configuration as JSON text:NoteThe following JSON output has hard line-returns for the sake of reading clarity. This JSON output is invalid unless you remove the newlines in the JSON strings.
Example output specifying JSON output
[
  {
    "kind": "TuningConfig",
    "id": "20468b8e-edc7-11ed-b0e4-0a580a800298",
    "href": "/api/clusters_mgmt/v1/clusters/23jbsevqb22l0m58ps39ua4trff9179e/tuning_configs/20468b8e-edc7-11ed-b0e4-0a580a800298",
    "name": "sample-tuning",
    "spec": {
      "profile": [
        {
          "data": "[main]\nsummary=Custom OpenShift profile\ninclude=openshift-node\n\n[sysctl]\nvm.dirty_ratio=\"55\"\n",
          "name": "tuned-1-profile"
        }
      ],
      "recommend": [
        {
          "priority": 20,
          "profile": "tuned-1-profile"
        }
      ]
    }
  }
]
6.3.3. Modifying your node tuning configurations
You can view and update the node tuning configurations by using the Red Hat OpenShift Service on AWS (ROSA) CLI, rosa.
Prerequisites
- You have downloaded the latest version of the ROSA CLI.
- You have a cluster on the latest version
- Your cluster has a node tuning configuration added to it
Procedure
You view the tuning configurations with the
rosa describecommand:$ rosa describe tuning-config -c <cluster_id> \ --name <name_of_tuning> \ [-o json]where:
<cluster_id>- Specifies the cluster ID for the cluster that you own that you want to apply a node tuning configuration.
<name_of_tuning>- Specifies the name of your tuning configuration.
-o json- Specifies the output type. This parameter is optional. If you do not specify any outputs, you see only the ID and name of the tuning configuration.
Example output without specifying output type
Name:    sample-tuning
ID:      20468b8e-edc7-11ed-b0e4-0a580a800298
Spec:    {
            "profile": [
              {
                "data": "[main]\nsummary=Custom OpenShift profile\ninclude=openshift-node\n\n[sysctl]\nvm.dirty_ratio=\"55\"\n",
                "name": "tuned-1-profile"
              }
            ],
            "recommend": [
              {
                 "priority": 20,
                 "profile": "tuned-1-profile"
              }
            ]
         }
Example output specifying JSON output
{
  "kind": "TuningConfig",
  "id": "20468b8e-edc7-11ed-b0e4-0a580a800298",
  "href": "/api/clusters_mgmt/v1/clusters/23jbsevqb22l0m58ps39ua4trff9179e/tuning_configs/20468b8e-edc7-11ed-b0e4-0a580a800298",
  "name": "sample-tuning",
  "spec": {
    "profile": [
      {
        "data": "[main]\nsummary=Custom OpenShift profile\ninclude=openshift-node\n\n[sysctl]\nvm.dirty_ratio=\"55\"\n",
        "name": "tuned-1-profile"
      }
    ],
    "recommend": [
      {
        "priority": 20,
        "profile": "tuned-1-profile"
      }
    ]
  }
}
After verifying the tuning configuration, you edit the existing configurations with the
rosa editcommand:$ rosa edit tuning-config -c <cluster_id> --name <name_of_tuning> --spec-path <path_to_spec_file>In this command, you use the
spec.jsonfile to edit your configurations.
Verification
Run the
rosa describecommand again, to see that the changes you made to thespec.jsonfile are updated in the tuning configurations:$ rosa describe tuning-config -c <cluster_id> --name <name_of_tuning>Example output
Name:  sample-tuning
ID:    20468b8e-edc7-11ed-b0e4-0a580a800298
Spec:  {
           "profile": [
             {
              "data": "[main]\nsummary=Custom OpenShift profile\ninclude=openshift-node\n\n[sysctl]\nvm.dirty_ratio=\"55\"\n",
              "name": "tuned-2-profile"
             }
           ],
           "recommend": [
             {
              "priority": 10,
              "profile": "tuned-2-profile"
             }
           ]
       }
6.3.4. Deleting node tuning configurations
You can delete tuning configurations if you no longer need them by using the Red Hat OpenShift Service on AWS (ROSA) CLI, rosa.
You cannot delete a tuning configuration referenced in a machine pool. You must first remove the tuning configuration from all machine pools before you can delete it.
Prerequisites
- You have downloaded the latest version of the ROSA CLI.
- You have a cluster on the latest version .
- Your cluster has a node tuning configuration that you want delete.
Procedure
To delete the tuning configurations, run the following command:
$ rosa delete tuning-config -c <cluster_id> <name_of_tuning>The tuning configuration on the cluster is deleted
Example output
? Are you sure you want to delete tuning config sample-tuning on cluster sample-cluster? Yes
I: Successfully deleted tuning config 'sample-tuning' from cluster 'sample-cluster'