This documentation is for a release that is no longer maintained
See documentation for the latest supported version 3 or the latest supported version 4.Chapter 26. Configuring Routing
26.1. Overview
After installing OpenShift Container Platform and deploying a router, you can modify the router to suit your needs using the examples in this topic.
26.2. Configuring Route Timeouts
You can configure the default timeouts for an existing route when you have services in need of a low timeout, as required for Service Level Availability (SLA) purposes, or a high timeout, for cases with a slow back end.
Using the oc annotate command, add the timeout to the route:
oc annotate route <route_name> \
    --overwrite haproxy.router.openshift.io/timeout=<timeout><time_unit>
# oc annotate route <route_name> \
    --overwrite haproxy.router.openshift.io/timeout=<timeout><time_unit>
For example, to set a route named myroute to a timeout of two seconds:
oc annotate route myroute --overwrite haproxy.router.openshift.io/timeout=2s
# oc annotate route myroute --overwrite haproxy.router.openshift.io/timeout=2sSupported time units are microseconds (us), milliseconds (ms), seconds (s), minutes (m), hours (h), or days (d).
26.3. Configuring Native Container Routing
This section describes how to set up container networking using existing switches and routers and the kernel networking stack in Linux. The setup requires that the network administrator or a script modifies the router or routers when new nodes are added to the cluster.
The procedure outlined in this topic can be adapted to any type of router.
26.3.1. Network Overview
The following describes a general network setup:
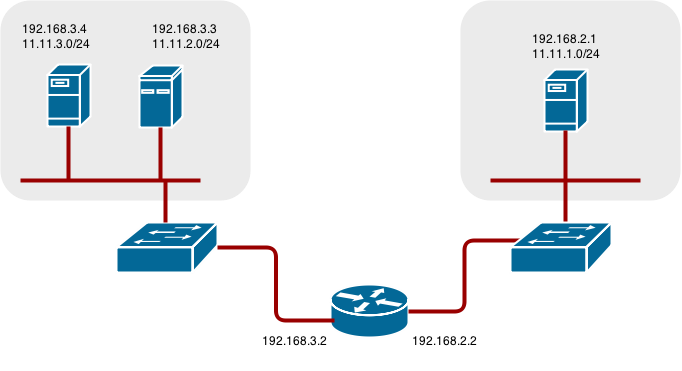
- 11.11.0.0/16 is the container network.
- The 11.11.x.0/24 subnet is reserved for each node and assigned to the Docker Linux bridge.
- Each node has a route to the router for reaching anything in the 11.11.0.0/16 range, except the local subnet.
- The router has routes for each node, so it can be directed to the right node.
- Existing nodes do not need any changes when new nodes are added, unless the network topology is modified.
- IP forwarding is enabled on each node.
The following diagram shows the container networking setup described in this topic. It uses one Linux node with two network interface cards serving as a router, two switches, and three nodes connected to these switches.
- Node setup
- Assign an unused 11.11.x.0/24 subnet IP address to the Linux bridge on the node:
brctl addbr lbr0
ip addr add 11.11.1.1/24 dev lbr0
ip link set dev lbr0 up
# brctl addbr lbr0
# ip addr add 11.11.1.1/24 dev lbr0
# ip link set dev lbr0 up
Copy to Clipboard Copied! Toggle word wrap Toggle overflow Modify the Docker startup script to use the new bridge. By default, the startup script is the
/etc/sysconfig/dockerfile:docker -d -b lbr0 --other-options
# docker -d -b lbr0 --other-optionsCopy to Clipboard Copied! Toggle word wrap Toggle overflow Add a route to the router for the 11.11.0.0/16 network:
ip route add 11.11.0.0/16 via 192.168.2.2 dev p3p1
# ip route add 11.11.0.0/16 via 192.168.2.2 dev p3p1Copy to Clipboard Copied! Toggle word wrap Toggle overflow Enable IP forwarding on the node:
sysctl -w net.ipv4.ip_forward=1
# sysctl -w net.ipv4.ip_forward=1Copy to Clipboard Copied! Toggle word wrap Toggle overflow
- Router setup
The following procedure assumes a Linux box with multiple NICs is used as a router. Modify the steps as required to use the syntax for a particular router:
Enable IP forwarding on the router:
sysctl -w net.ipv4.ip_forward=1
# sysctl -w net.ipv4.ip_forward=1Copy to Clipboard Copied! Toggle word wrap Toggle overflow Add a route for each node added to the cluster:
ip route add <node_subnet> via <node_ip_address> dev <interface through which node is L2 accessible>
ip route add 11.11.1.0/24 via 192.168.2.1 dev p3p1
ip route add 11.11.2.0/24 via 192.168.3.3 dev p3p2
ip route add 11.11.3.0/24 via 192.168.3.4 dev p3p2
# ip route add <node_subnet> via <node_ip_address> dev <interface through which node is L2 accessible>
# ip route add 11.11.1.0/24 via 192.168.2.1 dev p3p1
# ip route add 11.11.2.0/24 via 192.168.3.3 dev p3p2
# ip route add 11.11.3.0/24 via 192.168.3.4 dev p3p2
Copy to Clipboard Copied! Toggle word wrap Toggle overflow
